-
猿创征文 | Spring框架【管理对象(IOC详解)】
目录
1,管理对象(IOC详解)
-
Spring框架是企业使用最多的框架,没有之一。
-
Spring是一站式框架,也就是Spring可以整合其他框架。

1.1 :什么是IOC
-
IoC 是 Inversion of Control 的缩写,即“控制反转”。
-
控制反转:将创建对象的权利,由自己(new)反转给spring。
-
图解1:未使用IoC
-

图解2:使用IoC
-

IoC作用:
-
统一管理对象
-
解决对象之间的耦合
-
之前使用,类之间存在耦合
-
-

解决程序耦合
-
servlet类中,只用了service接口,表示web层和service层解耦。
-
service实现类中,只用了dao的接口,表示service层和dao层解耦。
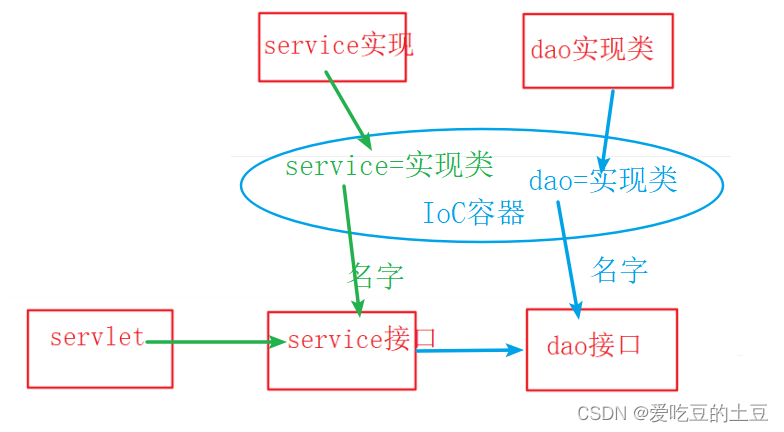
好处: 可以实现解耦, 让类和类之间的耦合度降低, 将对象的创建权交给Spring管理
1.2:Bean创建
-
在spring 容器中管理的对象,统称为
bean。例如:UserDao、UserService 等
1.2.1:Bean相关注解
注解 描述 @Component 将修饰的资源交予spring管理。 value属性:为资源命名(唯一标识) @Controller 衍生注解,与@Component作用和属性相同。特用于修饰==表示层==的资源。 @Service 衍生注解,与@Component作用和属性相同。特用于修饰==业务逻辑层==的资源。 @Repository 衍生注解,与@Component作用和属性相同。特用于修饰==数据访问层==的资源。 1.3:依赖注入(DI)
1.3.1:什么是DI
依赖注入(Dependency Injection,DI)Spring 容器在创建被调用者的实例时,会自动将调用者需要的对象实例注入给调用者。

注解 描述 修饰位置 @Resource(name=”…”) 按照指定名称注入对象 字段、setter方法 @ Resource 按照类型注入对象 字段、setter方法 @Value 注入简单值 字段、setter方法、参数 @PropertySource 加载properties配置文件 类 1.3.2:按照名称注入
- public class 类名{
- @Resource(name="名称")
- private 类型 变量;
- }
字段注入
- @Resource(name = "studentService4")
- private StudentService studentService;
setter方法注入
- private StudentService studentService;
- @Resource(name = "studentService4")
- public void setStudentService(StudentService studentService) {
- this.studentService = studentService;
- }
1.3.3:按照类型注入
- public class 类名{
- @Resource
- private 类型 变量;
- }
1.3.4:注入简单数据:@Value
-
简单数据:基本数据类型、字符串等。
-
需要:定义User对象,给User对象注入数据
@Value 可以给成员变量注入、也可以给属性注入(getter/setter)
-
步骤
-
步骤1:目标类,User,进行普通数据注入
-
步骤2:配置类
-
步骤3:测试类
-
步骤1:目标类,User,进行普通数据注入
- @Component
- public class User {
- @Value("jack")
- private String username;
- @Value("18")
- private Integer age;
- //....
- }
步骤2:配置类
- @Configuration
- @ComponentScan(basePackages = "com.czxy.demo05_di_value.domain")
- public class Demo05Configuration {
- }
步骤3:测试类
- @RunWith(SpringRunner.class)
- @ContextConfiguration(classes = Demo05Configuration.class)
- public class TestDemo05 {
- @Resource
- private User user;
- @Test
- public void testDemo5() {
- System.out.println(user);
- }
- }
1.3.5:properies数据注入
-
需求:读取数据库配置信息
-
步骤:
-
步骤1:编写demo07.properties文件
-
步骤2:编写配置类,读取properties内容。@Value修饰setter
-
步骤3:测试类
-
编写properties文件,key=value

#key=value
jdbc.driver=com.mysql.cj.jdbc.Driver
jdbc.url=jdbc:mysql://localhost:3306/db2
jdbc.username=root
jdbc.password=1234使用@PropertySource("classpath:properties文件")加载properties文件,使用@Value("${key}")进行注入
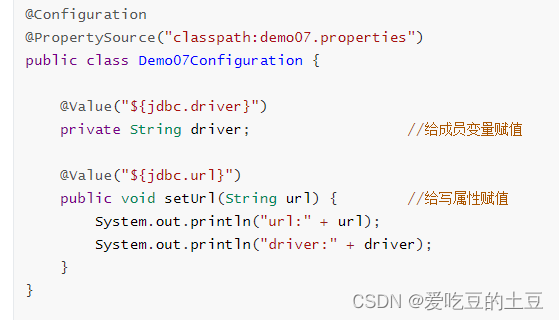
测试类

1.4:@Bean注入第三方类
-
在实际开发中,有很多第三方提供类(jar包里),需要在spring中使用。
-
Spring提供@Bean注解,整合第三方类。
注解 描述 @Bean 将第三方对象,添加到spring容器中,方法名为默认名。 @Bean(name = "") 按照指定名称,将第三方对象,添加到spring容器中。 1.4.1:按照类型
-
需要:假设UserDao是第三方(不能添加注解),需要使用UserDao
-
步骤:
-
步骤1:模拟类
-
步骤2:配置类
-
步骤3:测试类
-
-
模拟类
-

-
配置类

配置类
-
- @RunWith(SpringRunner.class)
- @ContextConfiguration(classes = Demo08Configuration.class)
- public class TestDemo08 {
- @Resource
- private UserDao userDao;
- @Test
- public void testDemo07() {
- // UserDao userDao = new UserDao();
- userDao.selectAll();
- }
- }
1.4.2:按照名称
-
需求:定义一个UserDao接口,编写2个实现类A、B,分别按照名称进行注入
-
步骤:
-
模拟数据类
-
接口
-
实现类A
-
实现类B
-
-
配置类,创建2个实现类,并进行不同的命名
-
测试类,依次注入不同命名的实现类
-
-
实现
-
配置类
-
- @Configuration
- public class Demo09Configuration {
- @Bean(name="userDaoA")
- public UserDao createUserDaoA() {
- return new UserDaoImplA();
- }
- @Bean(name="userDaoB")
- public UserDao createUserDaoB() {
- return new UserDaoImplB();
- }
- }
测试类
-
- @RunWith(SpringRunner.class)
- @ContextConfiguration(classes = Demo09Configuration.class)
- public class TestDemo09 {
- @Resource(name="userDaoA")
- private UserDao userDaoA;
- @Resource(name="userDaoB")
- private UserDao userDaoB;
- @Test
- public void testDemo07() {
- userDaoA.selectAll();
- userDaoB.selectAll();
- }
- }
-
1.4.3:参数类型:引入数据
-
需求:service、dao 都是第三方
-
@Bean 修饰的方法,如果有参数,将自动注入。
- @Bean
- public 返回值 方法名(参数类型 参数名) { //主动注入参数对象
- }
-
步骤:
-
模拟类
-
UserDao
-
UserService
-
-
配置类
-
编写方法,createUserDao
-
编写方法,createUserService( UserDao userDao )
-
-
测试类
-
-
实现
-
模拟类:dao实现类没有注解
-
- public interface StudentDao {
- public void selectAll();
- }
- public class StudentDaoImpl implements StudentDao {
- @Override
- public void selectAll() {
- System.out.println("demo10 student dao ");
- }
- }
模拟类:service,没有注解
- public interface StudentService {
- public void selectAll();
- }
- public class StudentServiceImpl implements StudentService {
- private StudentDao studentDao;
- public void setStudentDao(StudentDao studentDao) {
- this.studentDao = studentDao;
- }
- @Override
- public void selectAll() {
- System.out.println("demo10 student service");
- studentDao.selectAll();
- }
- }
配置类

- @Configuration
- @ComponentScan(basePackages = {"com.czxy.demo10_bean_param"})
- public class Demo10Configuration {
- @Bean
- public StudentDao studentDao() {
- return new StudentDaoImpl();
- }
- @Bean
- public StudentService studentService10(StudentDao studentDao) {
- StudentServiceImpl studentService = new StudentServiceImpl();
- studentService.setStudentDao(studentDao);
- return studentService;
- }
- }
测试类
- @RunWith(SpringRunner.class)
- @ContextConfiguration(classes = Demo10Configuration.class)
- public class TestDemo10 {
- @Resource(name = "studentService10")
- private StudentService studentService;
- @Test
- public void testDemo() {
- studentService.selectAll();
- }
- }
1.4.4:参数类型:简单数据
properties配置文件

配置类

测试类

1.5:Bean作用域
1.5.1:概述
-
bean作用域:一个对象的使用范围。
-
通过@Scope可以设置Bean的作用域
注解 取值 @Scope singleton 默认值,单例的。整个spring容器只有一个 prototype 多例的。每获得一次创建一份 -
需求:编写UserDao,获得对象,注入2次。
1.5.2:单例
dao,确定作用域方式
- @Repository
- @Scope("singleton")
- public class UserDao {
- }
配置类

测试类,注入2次,打印结果一样的。

1.5.3:多例
修改单例代码

1.5.4:常量

1.6:生命周期
1.6.1:什么是生命周期
-
生命周期:指Spring创建Bean到销毁Bean的整个过程。
-
spring bean 完整生命周期参数
-
在实际开发中,最常用的是bean
初始化和销毁。
1.6.2:生命周期详解
-
完整示意图

实例:(⑧、⑬为XML配置内容)
-

步骤1:创建后处理bean
-
- @Component
- public class MyBeanPostProcessor implements BeanPostProcessor {
- @Override
- public Object postProcessBeforeInitialization(Object bean, String beanName) throws BeansException {
- if("dog".equalsIgnoreCase(beanName)) {
- System.out.println("5. BeanPostProcessor#before --> " + beanName);
- }
- return bean;
- }
- @Override
- public Object postProcessAfterInitialization(Object bean, String beanName) throws BeansException {
- if("dog".equalsIgnoreCase(beanName)) {
- System.out.println("9. BeanPostProcessor#after --> " + beanName);
- }
- return bean;
- }
- }
步骤2:编写目标类Dog
-
- @Component
- //@Scope("prototype")
- public class Dog implements BeanNameAware, BeanFactoryAware, InitializingBean, DisposableBean {
- public Dog() {
- System.out.println("1. 初始化");
- }
- @Value("旺财")
- public void setName(String name) {
- System.out.println("2. properties --> " + name);
- }
- @Override
- public void setBeanName(String s) {
- System.out.println("3. BeanNameAware#setBeanName --> " + s);
- }
- @Override
- public void setBeanFactory(BeanFactory beanFactory) throws BeansException {
- System.out.println("4. BeanFactoryAware#beanFactory ");
- }
- @PostConstruct //初始化
- public void init() {
- System.out.println("6. 小狗 出生了");
- }
- @Override
- public void afterPropertiesSet() throws Exception {
- System.out.println("7. InitializingBean#afterPropertiesSet");
- }
- public void eat() {
- System.out.println("10. 正在吃...");
- }
- @PreDestroy //销毁
- public void DogDestroy() {
- System.out.println("11. 小狗 挂了");
- }
- @Override
- public void destroy() throws Exception {
- System.out.println("12. DisposableBean#destroy");
- }
- }
步骤3:配置类
-
- @Configuration
- @ComponentScan(basePackages = {"com.czxy.demo13_lifecycle.domain","com.czxy.demo13_lifecycle.processor"})
- public class Demo13Configuration {
- }
步骤4:测试类
-
- @RunWith(SpringRunner.class)
- @ContextConfiguration(classes = Demo13Configuration.class)
- public class TestDemo13 {
- @Resource
- private Dog dog;
- @Test
- public void testDemo13() {
- dog.eat();
- }
- }
1.6.3:方式一:详解-初始化&销毁
-
需求:
-
编写目标类Dog,并执行eat方法打印
正在吃... -
在eat()前后分别执行初始化
小狗 出生了、销毁小狗 挂了
-
-
目标类:需要完成初始化、销毁功能的类
-
@PostConstruct 用于修饰==初始化==方法。
-
@PreDestroy 用于修饰==销毁==方法。
-

配置类:

测试类:

1.6.4:方式二:第三方@Bean
-
需求:
-
使用@Bean配置目标类Dog的初始化和销毁
-
-
目录类(假设Dog由第三方jar提供,没有源码,不允许使用注解
@Component)

配置类,使用@Bean注册第三方对象,通过 initMethod 和 destroyMethod 两个属性设置初始化和销毁

测试类

1.6.5:生命周期函数有什么用吗?
释放资源:
- public class 类名 {
- @Bean(destroyMethod="close")
- public DataSource datasource() {
- return new DruidDataSource();
- }
- }
-
-
相关阅读:
Himall商城LinqHelper帮助类(2)
SpringBoot-AOP-Logback用切面拦截操作日志
【第48篇】MaxViT:多轴视觉转换器
基于 ceph-deploy 部署 Ceph 集群 超详细
Windows 基础(一):深入理解Windows,掌握命令行与Shell
Docker+Jenkins+Harbor+Rancher持续集成部署分布式项目
企业如何利用APS排程软件建立起精益供应链与生产体系
在linux服务器中使用rz上传文件乱码问题解决办法
5年软件测试工程师感悟——写给还在迷茫的朋友
Java学习Day018(第四章数组笔记)
- 原文地址:https://blog.csdn.net/m0_64550837/article/details/126726547
