-
Spring Boot实战演练Demo
需求:使用SSM+SpringBoot 实现 账户 的CRUD功能
数据库准备:
CREATE TABLE `account` ( `id` int(11) NOT NULL AUTO_INCREMENT, `name` varchar(32) DEFAULT NULL, `money` double DEFAULT NULL, PRIMARY KEY (`id`) ) ENGINE=InnoDB AUTO_INCREMENT=3 DEFAULT CHARSET=utf8; insert into `account`(`id`,`name`,`money`) values (1,'tom',1000), (2,'jerry',1000);- 1
- 2
- 3
- 4
- 5
- 6
- 7
- 8
(1)创建springboot工程


next —> finish
删除以下多余目录

删除后目录

(2)导入pom.xml
<dependency> <groupId>com.alibabagroupId> <artifactId>druidartifactId> <version>1.1.3version> dependency>- 1
- 2
- 3
- 4
- 5
- 6
为了扫描mapper可做下面两个操作


SpringboottestApplication.java
(3) 配置数据库信息
application.yml## 数据库连接信息 spring: datasource: name: druid type: com.alibaba.druid.pool.DruidDataSource url: jdbc:mysql://localhost:3306/test?characterEncoding=utf-8&serverTimezone=UTC username: root password: zhangwt- 1
- 2
- 3
- 4
- 5
- 6
- 7
- 8
IDEA连接数据库


(4) Free Mybatis plugin插件安装(新MyBatisX)
安装目的:自动生成Mybatis相关代码
https://plugins.jetbrains.com/plugin/8321-free-mybatis-plugin/versions/stable/74577这个插件已经闭源了,版本更新截止到2019.12.18,可以用上面链接下载旧版本。也可以使用插件MyBatisX代替,二者选其一
MyBatisX插件在线安装


Free Mybatis plugin插件本地安装
将 Free Mybatis plugin 下载在本地磁盘,然后导入安装


注:为节省时间,后面两个步骤代码可使用Mybatis-X 或 Free Mybatis plugin插件生成
Mybatis-X生成步骤


next

生成后结构如下

AccountMapper.java/** * @Entity com.zwt.domain.Account */ public interface AccountMapper extends BaseMapper<Account> { }- 1
- 2
- 3
- 4
- 5
- 6
- 7
但是,Mapper文件中并没有自动生成单表操作的方法,为了方便,还是使用Free Mybatis plugin插件生成好一点
Free Mybatis plugin生成步骤


生成后结构如下:

(5)Account 实体类编写
/** * account * @author */ @Data public class Account implements Serializable { private Integer id; private String name; private Double money; private static final long serialVersionUID = 1L; }- 1
- 2
- 3
- 4
- 5
- 6
- 7
- 8
- 9
- 10
- 11
- 12
- 13
- 14
(6)AccountMapper 编写及Mapper文件
AccountMapper.java
public interface AccountMapper { int deleteByPrimaryKey(Integer id); int insert(Account record); int insertSelective(Account record); Account selectByPrimaryKey(Integer id); int updateByPrimaryKeySelective(Account record); int updateByPrimaryKey(Account record); List<Account> queryAll(); }- 1
- 2
- 3
- 4
- 5
- 6
- 7
- 8
- 9
- 10
- 11
- 12
- 13
- 14
- 15
AccountMapper.xml
DOCTYPE mapper PUBLIC "-//mybatis.org//DTD Mapper 3.0//EN" "http://mybatis.org/dtd/mybatis-3-mapper.dtd"> <mapper namespace="com.zwt.mapper.AccountMapper"> <resultMap id="BaseResultMap" type="com.zwt.pojo.Account"> <id column="id" jdbcType="INTEGER" property="id" /> <result column="name" jdbcType="VARCHAR" property="name" /> <result column="money" jdbcType="DOUBLE" property="money" /> resultMap> <sql id="Base_Column_List"> id, `name`, money sql> <select id="selectByPrimaryKey" parameterType="java.lang.Integer" resultMap="BaseResultMap"> select <include refid="Base_Column_List" /> from account where id = #{id,jdbcType=INTEGER} select> <select id="queryAll" resultMap="BaseResultMap"> select <include refid="Base_Column_List" /> from account select> <delete id="deleteByPrimaryKey" parameterType="java.lang.Integer"> delete from account where id = #{id,jdbcType=INTEGER} delete> <insert id="insert" keyColumn="id" keyProperty="id" parameterType="com.zwt.pojo.Account" useGeneratedKeys="true"> insert into account (`name`, money) values (#{name,jdbcType=VARCHAR}, #{money,jdbcType=DOUBLE}) insert> <insert id="insertSelective" keyColumn="id" keyProperty="id" parameterType="com.zwt.pojo.Account" useGeneratedKeys="true"> insert into account <trim prefix="(" suffix=")" suffixOverrides=","> <if test="name != null"> `name`, if> <if test="money != null"> money, if> trim> <trim prefix="values (" suffix=")" suffixOverrides=","> <if test="name != null"> #{name,jdbcType=VARCHAR}, if> <if test="money != null"> #{money,jdbcType=DOUBLE}, if> trim> insert> <update id="updateByPrimaryKeySelective" parameterType="com.zwt.pojo.Account"> update account <set> <if test="name != null"> `name` = #{name,jdbcType=VARCHAR}, if> <if test="money != null"> money = #{money,jdbcType=DOUBLE}, if> set> where id = #{id,jdbcType=INTEGER} update> <update id="updateByPrimaryKey" parameterType="com.zwt.pojo.Account"> update account set `name` = #{name,jdbcType=VARCHAR}, money = #{money,jdbcType=DOUBLE} where id = #{id,jdbcType=INTEGER} update> mapper>- 1
- 2
- 3
- 4
- 5
- 6
- 7
- 8
- 9
- 10
- 11
- 12
- 13
- 14
- 15
- 16
- 17
- 18
- 19
- 20
- 21
- 22
- 23
- 24
- 25
- 26
- 27
- 28
- 29
- 30
- 31
- 32
- 33
- 34
- 35
- 36
- 37
- 38
- 39
- 40
- 41
- 42
- 43
- 44
- 45
- 46
- 47
- 48
- 49
- 50
- 51
- 52
- 53
- 54
- 55
- 56
- 57
- 58
- 59
- 60
- 61
- 62
- 63
- 64
- 65
- 66
- 67
- 68
(7)配置XML映射文件路径
在项目中编写的XML映射文件,Spring Boot并无从知晓,所以无法扫描到该自定义编写的XML配置文件,还必须在全局配置文件application.properties中添加MyBatis映射文件路径的配置,同时需要添加实体类别名映射路径,示例代码如下
application.yml
mybatis: #配置MyBatis的xml配置文件路径 mapper-locations: classpath:mapper/*.xml #配置XML映射文件中指定的实体类别名路径 type-aliases-package: com.zwt.pojo- 1
- 2
- 3
- 4
- 5
(8)AccountService接口及实现类编写

AccountService.java
public interface AccountService { /** * 查询所有 * @return */ List<Account> queryAll(); /** * 通过ID查询 * @param id * @return */ Account findById(Integer id); /** * 新增 * @param Account */ void insert(Account Account); /** * 通过ID删除 * @param id */ void deleteById(Integer id); /** * 修改 * @param Account */ void update(Account Account); }- 1
- 2
- 3
- 4
- 5
- 6
- 7
- 8
- 9
- 10
- 11
- 12
- 13
- 14
- 15
- 16
- 17
- 18
- 19
- 20
- 21
- 22
- 23
- 24
- 25
- 26
- 27
- 28
- 29
- 30
- 31
- 32
AccountServiceImpl.java
@Service public class AccountServiceImpl implements AccountService { @Autowired private com.zwt.mapper.AccountMapper AccountMapper; @Override public List<Account> queryAll() { return AccountMapper.queryAll(); } @Override public Account findById(Integer id) { return AccountMapper.selectByPrimaryKey(id); } @Override public void insert(Account Account) { //AccountMapper.insert(Account); //将除id所有的列都拼SQL AccountMapper.insertSelective(Account); //只是将不为空的列才拼SQL } @Override public void deleteById(Integer id) { AccountMapper.deleteByPrimaryKey(id); } @Override public void update(Account Account) { AccountMapper.updateByPrimaryKeySelective(Account); } }- 1
- 2
- 3
- 4
- 5
- 6
- 7
- 8
- 9
- 10
- 11
- 12
- 13
- 14
- 15
- 16
- 17
- 18
- 19
- 20
- 21
- 22
- 23
- 24
- 25
- 26
- 27
- 28
- 29
- 30
- 31
- 32
(9)AccountController编写
AccountController.java
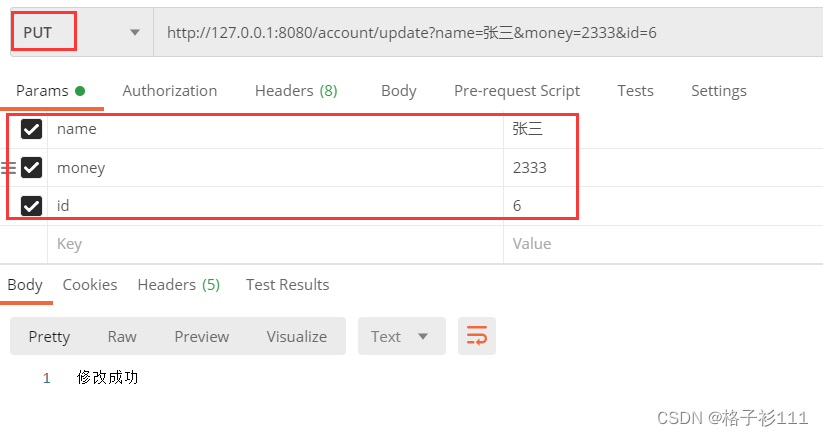
@RestController @RequestMapping("/account") public class AccountController { @Autowired private AccountService accountService; /** * restful格式进行访问 * 查询:GET * 新增: POST * 更新:PUT * 删除: DELETE */ /** * 查询所有 * @return */ @GetMapping("/query") public List<Account> queryAll(){ return accountService.queryAll(); } /** * 通过ID查询 */ @GetMapping("/query/{id}") public Account queryById(@PathVariable Integer id){ return accountService.findById(id); } /** * 删除 * @param id * @return */ @DeleteMapping("/delete/{id}") public String delete(@PathVariable Integer id){ accountService.deleteById(id); return "删除成功"; } /** * 新增 * @param Account * @return */ @PostMapping("/insert") public String insert(Account Account){ accountService.insert(Account); return "新增成功"; } /** * 修改 * @param Account * @return */ @PutMapping("/update") public String update(Account Account){ accountService.update(Account); return "修改成功"; } }- 1
- 2
- 3
- 4
- 5
- 6
- 7
- 8
- 9
- 10
- 11
- 12
- 13
- 14
- 15
- 16
- 17
- 18
- 19
- 20
- 21
- 22
- 23
- 24
- 25
- 26
- 27
- 28
- 29
- 30
- 31
- 32
- 33
- 34
- 35
- 36
- 37
- 38
- 39
- 40
- 41
- 42
- 43
- 44
- 45
- 46
- 47
- 48
- 49
- 50
- 51
- 52
- 53
- 54
- 55
- 56
- 57
- 58
- 59
- 60
- 61
- 62
- 63
- 64
使用postman测试
查询


删除

新增
修改
(10)Spring Boot项目部署
需求:将Spring Boot项目使用maven指令打成jar包并运行测试
1、修改端口号
端口号一般不使用默认的
application.yml##服务器配置 server: port: 8090- 1
- 2
- 3
2、添加打包组件
<build> <plugins> <plugin> <groupId>org.springframework.bootgroupId> <artifactId>spring-boot-maven-pluginartifactId> plugin> plugins> build>- 1
- 2
- 3
- 4
- 5
- 6
- 7
- 8
- 9
- 10
需要添加打包组件将项目中的资源、配置、依赖包打到一个jar包中;可以使用maven的 package ;

双击package

jar包一般在项目根目录的 target文件下

3、部署运行
打开powershell 窗口(Windows10系统)1、在当前文件夹,然后点击左上角的“文件”菜单。

2、接下来在打开的文件下拉菜单中找到“打开Windows Powershell”菜单项,点击“以管理员身份打开Windows Powershell”菜单项即可。
在windows下模拟Linux运行以下命令java -jar 包名- 1
java -jar .\springboottest-0.0.1-SNAPSHOT.jar

这个和在IDEA中启动项目类似
注意,此处有可能运行报错,原因为部署的环境和pom.xml中指定的JDK版本不一致

pom.xml
<properties> <java.version>11java.version> properties>- 1
- 2
- 3
解决办法:
- 方法1:将pom.xml中的版本号修改为Linux中对应的版本。Clean后重新Package打包。
- 方法2:将Linux中的jdk卸载,然后重新安装pom.xml中定义对应的jdk版本即可。
4、验证

至此,整个SpringBoot Demo演练完毕,我已将源码上传,可以在资源链接中下载
https://download.csdn.net/download/u012660464/86510033 -
相关阅读:
docker访问外部https数字证书问题
阿里云国际版两个ECS云服务器之间的迁移教程
10. 回归损失最小化
AOP 面向切面编程
数据库 SQL高级查询语句:聚合查询,多表查询,连接查询
WorkTool企微机器人接入微信智能问答
【C++右值引用】左右值的交叉引用的具体情景,右值详讲
Git实战技巧-查看不同版本之间的差异和代码的改动
【NodeJs-5天学习】第一天篇① —— 第一次认识NodeJs
牛客多校9 B(概率dp+差分)G(回文自动机+双哈希)
- 原文地址:https://blog.csdn.net/u012660464/article/details/126711652
