-
Netty学习(一)-- Netty 底层 Java NIO
视频地址,建议观看,老师由浅入深,循序渐进: https://www.bilibili.com/video/BV1py4y1E7oA
前面的学习:https://blog.csdn.net/weixin_43989102/article/details/126078132
1、NIO
1.1、Selector
1)多线程版本

缺点: 内存占用高、线程上下文切换成本高、只适合连接数少的场景
2)线程池版本

缺点: 阻塞模式下,线程仅能处理一个 socket 连接、仅适合短连接场景。
3)Selector 版本
Selector 的作用就是配合一个线程来管理多个 Channel 上发生的事件,获取这些 Channel 上发生的事件,这些 Channel 工作在非阻塞模式下,不会让线程吊死在一个 Channel 上。适合连接数特别多,但流量低的场景。

调用 selector 的
select()会阻塞直到 Channel 发生了读写事件,这些事件发生,select() 会返回这些事件交给 thread 来处理。1.2、Buffer
/** * @desc * @auth llp * @date 2022/8/1 10:37 */ public class Test { public static void main(String[] args) { System.out.println(ByteBuffer.allocate(8).getClass()); System.out.println(ByteBuffer.allocateDirect(8).getClass()); /** * class java.nio.HeapByteBuffer - java 堆内存,读写效率较低,受 GC 的影响 * class java.nio.DirectByteBuffer - 直接内存,读写效率高(少拷贝一次),不受 GC 的影响。分配的效率低。 */ // 自动切换为 读模式 ByteBuffer byteBuffer = StandardCharsets.UTF_8.encode("hello"); System.out.println("position==>" + byteBuffer.position()); System.out.println("limit==>" + byteBuffer.limit()); System.out.println("capacity==>" + byteBuffer.capacity()); System.out.println(StandardCharsets.UTF_8.decode(byteBuffer)); // warp 自动切换为 读模式 ByteBuffer byteBuffer1 = ByteBuffer.wrap("hello".getBytes()); System.out.println("position==>" + byteBuffer1.position()); System.out.println("limit==>" + byteBuffer1.limit()); System.out.println("capacity==>" + byteBuffer1.capacity()); System.out.println(StandardCharsets.UTF_8.decode(byteBuffer1)); } }- 1
- 2
- 3
- 4
- 5
- 6
- 7
- 8
- 9
- 10
- 11
- 12
- 13
- 14
- 15
- 16
- 17
- 18
- 19
- 20
- 21
- 22
- 23
- 24
- 25
- 26
- 27
- 28
- 29
黏包半包
compact() 方法:是把未读完的部分向前压缩,然后切换至写模式

代码案例:
/** * @desc * @auth llp * @date 2022/8/1 11:36 */ public class TestByteBuffer { public static void main(String[] args) { /** * 网络上有多条数据发送给服务端,数据之间使用 \n 进行分隔 * 由于某种原因进行了重新组合,如原始数据: * 1、Hello,World. \n * 2、I'm mmianbao \n * 3、How are you? \n * 变成了下面的两个 buffer: * Hello,World. \nI'm mmianbao \nHo (黏包) * w are you? \n (半包) */ ByteBuffer source = ByteBuffer.allocate(64); source.put("Hello,World. \nI'm mianbao \nHo".getBytes()); split(source); source.put("w are you? \n".getBytes()); split(source); } private static void split(ByteBuffer source) { source.flip(); for (int i = 0; i < source.limit(); i++) { if (source.get(i) == '\n'){ int length = i + 1 - source.position(); ByteBuffer target = ByteBuffer.allocate(length); // 从 source 读,写入 target for (int j = 0; j < length; j++) { target.put(source.get()); } System.out.println(new String(target.array())); } } source.compact(); } }- 1
- 2
- 3
- 4
- 5
- 6
- 7
- 8
- 9
- 10
- 11
- 12
- 13
- 14
- 15
- 16
- 17
- 18
- 19
- 20
- 21
- 22
- 23
- 24
- 25
- 26
- 27
- 28
- 29
- 30
- 31
- 32
- 33
- 34
- 35
- 36
- 37
- 38
- 39
- 40
1.3、文件编程
1)FileChannel
FileChannel 只能工作在阻塞模式下
获取方式:
FileChannel.open()方法获取。或者可以通过 FileInputStream、FileOutputStream、RandomAccessFile类来获取 FIleChannel,它们都有 getChannel() 方法。
- 通过 FileInputStream 获取的 Channel 只能读
- 通过 FileOutputStream 获取的 Channel 只能写
- 通过 RandomAccessFile 获取的是否能读写根据构造时的读写模式确认
transferTo()和transferFrom()只能传输大于 2G 的文件/** * @desc * @auth llp * @date 2022/8/1 14:40 */ public class ChannelTest { public static void main(String[] args) { try( FileChannel fromChannel = FileChannel.open(Paths.get("G:\\Typora\\Netty\\test\\input.txt"), StandardOpenOption.READ); FileChannel toChannel = FileChannel.open(Paths.get("G:\\Typora\\Netty\\test\\output.txt"), StandardOpenOption.READ, StandardOpenOption.WRITE, StandardOpenOption.CREATE); ){ // 效率高, long size = fromChannel.size(); // left 代表还剩多少字节 for (long left=size; left>0; ){ System.out.println("position: " + (size-left) + " left: " + left); left -= fromChannel.transferTo((size - left), left, toChannel); } } catch (IOException e) { e.printStackTrace(); } } }- 1
- 2
- 3
- 4
- 5
- 6
- 7
- 8
- 9
- 10
- 11
- 12
- 13
- 14
- 15
- 16
- 17
- 18
- 19
- 20
- 21
- 22
- 23
- 24
2)Path 和 Paths
- Path 用来表示文件路径。
- Paths 是工具类,用来获取 Path 实例。
3)Files
检测文件是否存在
Path path = Paths.get("G:\\Typora\\Netty\\test\\input.txt"); System.out.println(Files.exists(path));- 1
- 2
创建一级目录
Path path = Paths.get("helloworld/dir"); Files.createDirectory(path);- 1
- 2
- 如果文件已经存在,会抛出 FileAlreadyExistsException 异常
- 不能一次性创建多级目录,否则会抛出 NoSuchFileException 异常
创建多级目录使用
Path path = Paths.get("helloworld/dir/d"); Files.createDirectorys(path);- 1
- 2
拷贝文件
Path source = Paths.get("G:\\source.txt"); Path target = Paths.get("G:\\target.txt"); Files.copy(source, target); Files.copy(source, target, StandardCopyOption.REPLACE_EXISTING); // 覆盖- 1
- 2
- 3
- 4
- 5
移动文件
Files.move(source, target)- 1
删除文件和目录
Files.delete(source); // 只能删除空目录- 1
遍历删除文件和目录
private static void w1() throws IOException { AtomicInteger dirCount = new AtomicInteger(); AtomicInteger fileCount = new AtomicInteger(); AtomicInteger txtCount = new AtomicInteger(); Files.walkFileTree(Paths.get("G:\\Typora\\Netty\\test"), new SimpleFileVisitor<Path>(){ // 进入文件夹之前 @Override public FileVisitResult preVisitDirectory(Path dir, BasicFileAttributes attrs) throws IOException { System.out.println("dir ====> " + dir); dirCount.incrementAndGet(); return super.preVisitDirectory(dir, attrs); } // 遍历到文件时 @Override public FileVisitResult visitFile(Path file, BasicFileAttributes attrs) throws IOException { System.out.println("file ====> " + file); fileCount.incrementAndGet(); if (file.toString().endsWith(".txt")){ txtCount.incrementAndGet(); } // 删除文件 Files.delete(file); return super.visitFile(file, attrs); } // 退出文件夹 @Override public FileVisitResult postVisitDirectory(Path dir, IOException exc) throws IOException { System.out.println("<=== 退出"); // 删除目录 Files.delete(dir); return super.postVisitDirectory(dir, exc); } }); System.out.println("dir count: " + dirCount); System.out.println("file count: " + fileCount); System.out.println("txt file count: " + txtCount); }- 1
- 2
- 3
- 4
- 5
- 6
- 7
- 8
- 9
- 10
- 11
- 12
- 13
- 14
- 15
- 16
- 17
- 18
- 19
- 20
- 21
- 22
- 23
- 24
- 25
- 26
- 27
- 28
- 29
- 30
- 31
- 32
- 33
- 34
- 35
- 36
- 37
拷贝多级目录
public static void main(String[] args) throws IOException { String source = "G:\\Typora\\Netty\\test"; String target = "G:\\Typora\\Netty\\testcopy"; Files.walk(Paths.get(source)).forEach(path -> { try { String targetName = path.toString().replace(source, target); // 是目录 if (Files.isDirectory(path)){ Files.createDirectory(Paths.get(targetName)); } // 是普通文件 else if (Files.isRegularFile(path)){ Files.copy(path, Paths.get(targetName)); } } catch (IOException e) { e.printStackTrace(); } }); }- 1
- 2
- 3
- 4
- 5
- 6
- 7
- 8
- 9
- 10
- 11
- 12
- 13
- 14
- 15
- 16
- 17
- 18
- 19
- 20
1.4、网络编程
1)阻塞模式
ssc.accept();和channel.read(byteBuffer);都会导致线程暂停。阻塞的表现就是线程暂停了,暂停期间不会占用 CPU,但线程相当于闲置。public class Server { public static void main(String[] args) throws IOException { // 使用 NIO 来理解阻塞模式 // 缓冲区 ByteBuffer byteBuffer = ByteBuffer.allocate(1024); // 1、创建服务器 ServerSocketChannel ssc = ServerSocketChannel.open(); // 2、绑定监听端口 ssc.bind(new InetSocketAddress(8888)); // 3、建立连接集合 List<SocketChannel> channels = new ArrayList<>(); while (true){ // 4、accept 建立与客户端的连接, SocketChannel用来与客户端通信 System.out.println("connecting..."); SocketChannel sc = ssc.accept(); // 阻塞方法,线程停止运行了(直到有客户端连接) System.out.println("connectted..." + sc); channels.add(sc); for (SocketChannel channel : channels) { // 5、接收客户端发送的数据 System.out.println("before read..." + channel); channel.read(byteBuffer); // 阻塞方法,线程停止运行了(直到客户端发送数据) byteBuffer.flip(); System.out.println(new String(byteBuffer.array(), 0, byteBuffer.limit())); byteBuffer.clear(); System.out.println("after read..." + channel); } } } }- 1
- 2
- 3
- 4
- 5
- 6
- 7
- 8
- 9
- 10
- 11
- 12
- 13
- 14
- 15
- 16
- 17
- 18
- 19
- 20
- 21
- 22
- 23
- 24
- 25
- 26
- 27
- 28
- 29
public class Client { public static void main(String[] args) throws IOException { SocketChannel sc = SocketChannel.open(); sc.connect(new InetSocketAddress("127.0.0.1", 8888)); System.out.println("waiting..."); // sc.write(Charset.defaultCharset().encode("he")); while (true){} } }- 1
- 2
- 3
- 4
- 5
- 6
- 7
- 8

2)非阻塞模式
ssc.accept();会返回 null 继续运行channel.read(byteBuffer);会返回 0 。但线程不必阻塞,可以去执行其他 SocketChannel的 read 或者 ServerSocketChannel 的 accept。- 非阻塞模式下,即时没有建立连接和可读数据,线程仍然在不断的运行,白白浪费了CPU。
- 数据复制的过程中,线程实际还是阻塞的(AIO 实现改进)
/** * @desc * @auth llp * @date 2022/8/1 15:54 */ public class Server { public static void main(String[] args) throws IOException { // 缓冲区 ByteBuffer byteBuffer = ByteBuffer.allocate(1024); // 1、创建服务器 ServerSocketChannel ssc = ServerSocketChannel.open(); // 非阻塞模式 ssc.configureBlocking(false); // 2、绑定监听端口 ssc.bind(new InetSocketAddress(8888)); // 3、建立连接集合 List<SocketChannel> channels = new ArrayList<>(); while (true){ // 4、accept 建立与客户端的连接, SocketChannel用来与客户端通信 // 非阻塞,线程还会继续运行,没有建立连接方法返回 null SocketChannel sc = ssc.accept(); if(sc != null){ System.out.println("connectted..." + sc); channels.add(sc); } for (SocketChannel channel : channels) { // 5、接收客户端发送的数据 // 非阻塞,线程还会继续运行,如果没有读到数据,read 返回 0 int read = channel.read(byteBuffer); if (read > 0){ byteBuffer.flip(); System.out.println(new String(byteBuffer.array(), 0, byteBuffer.limit())); byteBuffer.clear(); System.out.println("after read..." + channel); } } } } }- 1
- 2
- 3
- 4
- 5
- 6
- 7
- 8
- 9
- 10
- 11
- 12
- 13
- 14
- 15
- 16
- 17
- 18
- 19
- 20
- 21
- 22
- 23
- 24
- 25
- 26
- 27
- 28
- 29
- 30
- 31
- 32
- 33
- 34
- 35
- 36
- 37
- 38
- 39
这种方式一直运行,一直占用内存资源,我们想当有 accept 请求事件发生时才去运行代码。
3)多路复用
单线程可以配合 Selector 完成对多个 Channel 可读写事件的监控,这称为多路复用。
- 多路复用仅针对网络 IO ,普通文件 IO 没办法利用多路复用。
- 如果不用 selector 的非阻塞模式,线程大部分时间都在做无用功,而 selector 能够保证
- 有可连接事件时才去连接
- 有可读事件时才去读取
- 有可写事件时才去写入
- 限于网络传输能力,Channel 未必时时可写,一旦 Channel 可写,会触发 selector 的可写事件
绑定的事件 描述 OP_ACCEPT 会在有连接请求时触发 OP_CONNECT 是客户端,连接建立后触发 OP_READ 可读事件 OP_WRITE 可写事件 selector 让非阻塞变成 ==> 无事件阻塞(
select()方法),有事件非阻塞。监听 Channel 事件:
// 阻塞直到绑定时间发生 int count = selector.select(); // 阻塞直到绑定时间发生,或者超时(单位 ms) int count = selector.select(long timeout); // 不会阻塞,也就是不管事件有没有发生,立刻返回,自己再根据返回值检查是否有事件发生 int count = selector.selectNow();- 1
- 2
- 3
- 4
- 5
- 6
select() 何时不阻塞:
- 事件发生时
- 客户端发起连接请求,会触发 accept 事件
- 客户端发送数据过来,客户端正常、异常关闭时,都会触发 read 事件(如果发送的数据大于 buffer 缓冲区,会触发多次读取事件)
- Channel 可写,会触发 write 事件
- 在 Linux 下 NIO bug 发生时
- 调用 selector.wakeup()
- 调用 selector.close()
- selector 所在的线程 interrupt(打断)
代码案例:
/** * @auth llp * @date 2022/8/1 15:54 */ public class Server { public static void main(String[] args) throws IOException { // 1、创建 selector,管理多个 Channel Selector selector = Selector.open(); ServerSocketChannel ssc = ServerSocketChannel.open(); ssc.configureBlocking(false); ssc.bind(new InetSocketAddress(8888)); // 2、创立 selector 和 Channel 的联系(注册) // SelectionKey 将来发生事件后,通过它可以知道事件和哪个Channel的事件 SelectionKey sscKey = ssc.register(selector, 0, null); // key 只关注 accept 事件 sscKey.interestOps(SelectionKey.OP_ACCEPT); System.out.println("register Key: " + sscKey); while (true){ // 3、select() 方法。 没有事件发生 select()是阻塞的。 // 在事件未处理时,它不会阻塞。 在事件发生后要么处理要么取消key.cancel(); selector.select(); // 4、处理事件, 所有发生事件集合 Iterator<SelectionKey> it = selector.selectedKeys().iterator(); while (it.hasNext()){ // 只有 ServerSocketChannel 一个 SelectionKey key = it.next(); System.out.println("Key: " + key); // 5、区分事件类型 if (key.isAcceptable()){ ServerSocketChannel channel = (ServerSocketChannel) key.channel(); // sc 是新的 Channel SocketChannel sc = channel.accept(); sc.configureBlocking(false); SelectionKey scKey = sc.register(selector, 0, null); scKey.interestOps(SelectionKey.OP_READ); System.out.println("sc: " + sc); }else if (key.isReadable()){ try { // 拿到触发事件的 Channel SocketChannel channel = (SocketChannel) key.channel(); ByteBuffer byteBuffer = ByteBuffer.allocate(1024); // 如果是正常断开(客户端调用 sc.close() 方法)。 read 返回值是 -1。 int read = channel.read(byteBuffer); if (read == -1){ key.cancel(); }else { byteBuffer.flip(); System.out.println(new String(byteBuffer.array(), 0, byteBuffer.limit())); byteBuffer.clear(); } } catch (IOException e) { e.printStackTrace(); // 事件要么处理要么取消 // 因为客户端断开的(异常断开,客户端点击停止程序),因此需要 key 取消(从 selector 的 Keys 集合中真正删除 key) key.cancel(); } } it.remove(); } } } }- 1
- 2
- 3
- 4
- 5
- 6
- 7
- 8
- 9
- 10
- 11
- 12
- 13
- 14
- 15
- 16
- 17
- 18
- 19
- 20
- 21
- 22
- 23
- 24
- 25
- 26
- 27
- 28
- 29
- 30
- 31
- 32
- 33
- 34
- 35
- 36
- 37
- 38
- 39
- 40
- 41
- 42
- 43
- 44
- 45
- 46
- 47
- 48
- 49
- 50
- 51
- 52
- 53
- 54
- 55
- 56
- 57
- 58
- 59
- 60
- 61
- 62
- 63
- 64
- 65
4)处理 accept 事件

5)处理 read 事件
1、处理消息边界

- 一种思路是固定消息长度,数据包的大小一样,服务器按预定长度读取,缺点是浪费带宽。
- 另一种思路是按分隔符拆分,缺点是效率低。
- TLV 格式,即 Type 类型、Length长度、Value数据,类型和长度已知的情况下,就可以方便获取消息大小,分配合适的 Buffer,缺点是 Buffer 需要提前分配,如果内容过大,则影响 Server 的吞吐量。
- HTTP 1.1 是 TLV 格式
- HTTP 2.0 是 LTV 格式

按分隔符拆分:
测试
服务端
....... // 容量超出。当消息超过缓冲区大小时,触发两次读事件,导致消息不全。 ByteBuffer byteBuffer = ByteBuffer.allocate(16); // 如果是正常断开(客户端调用 sc.close() 方法)。 read 返回值是 -1。 int read = channel.read(byteBuffer); if (read == -1){ key.cancel(); }else { split(byteBuffer); } ....... private static void split(ByteBuffer source) { source.flip(); for (int i = 0; i < source.limit(); i++) { if (source.get(i) == '\n'){ int length = i + 1 - source.position(); ByteBuffer target = ByteBuffer.allocate(length); // 从 source 读,写入 target for (int j = 0; j < length; j++) { target.put(source.get()); } System.out.println(new String(target.array())); } } source.compact(); }- 1
- 2
- 3
- 4
- 5
- 6
- 7
- 8
- 9
- 10
- 11
- 12
- 13
- 14
- 15
- 16
- 17
- 18
- 19
- 20
- 21
- 22
- 23
- 24
- 25
- 26
- 27
客户端:
public class Client { public static void main(String[] args) throws IOException { SocketChannel sc = SocketChannel.open(); sc.connect(new InetSocketAddress("127.0.0.1", 8888)); // 发送比缓存区小的 // sc.write(Charset.defaultCharset().encode("Hello\nWorld\n")); // 发送比缓冲区大的 sc.write(Charset.defaultCharset().encode("0123456789abcdef3333\n")); System.out.println("waiting..."); while (true){} } }- 1
- 2
- 3
- 4
- 5
- 6
- 7
- 8
- 9
- 10
- 11
- 12
容量超出问题:
附件与扩容:
....... // 使用 attachment ByteBuffer byteBuffer = ByteBuffer.allocate(16); // 将 bytebuffer 作为附件关联到 SelectionKey SelectionKey scKey = sc.register(selector, 0, byteBuffer); ....... ..... // 获取 SelectionKey 上关联的附件 attachment key.attach():关联新的附件 ByteBuffer buffer = (ByteBuffer) key.attachment(); // 如果是正常断开(客户端调用 sc.close() 方法)。 read 返回值是 -1。 int read = channel.read(buffer); if (read == -1){ key.cancel(); }else { split(buffer); // 扩容 if (buffer.position() == buffer.limit()){ ByteBuffer newBuffer = ByteBuffer.allocate(buffer.capacity() * 2); buffer.flip(); newBuffer.put(buffer); // 01234567890abcde // 替换关联的附件 key.attach(newBuffer); } } ..... // compact() 源码 public ByteBuffer compact() { System.arraycopy(hb, ix(position()), hb, ix(0), remaining()); position(remaining()); // limit - position 第一次循环 limit=16 position=0 limit(capacity()); discardMark(); return this; }- 1
- 2
- 3
- 4
- 5
- 6
- 7
- 8
- 9
- 10
- 11
- 12
- 13
- 14
- 15
- 16
- 17
- 18
- 19
- 20
- 21
- 22
- 23
- 24
- 25
- 26
- 27
- 28
- 29
- 30
- 31
- 32
- 33
- 34
- 35
2、ByteBuffer 大小分配
- 每个 Channel 都需要记录可能被切分的消息,因为 ByteBuffer 不是线程安全的;ByteBuffer 不能被多个 Channel 共享,否则数据混乱,因此需要为每个 Channel 维护一个独立的 ByteBuffer。
- ByteBuffer 不能太大,比如一个 ByteBuffer 1Mb 的话,需要支持百万连接就需要 1Tb 内存,因此需要设计大小可变的 ByteBuffer。
- 一种思路是首先分配一个比较小的 buffer,例如 4k,如果数据不够,再分配 8k 的 buffer,将 4k buffer 的内容拷贝至 8k 的 buffer。优点是消息连续容易处理,缺点是拷贝数据耗费性能。
- 一种思路是用多个数组组成 buffer,一个数组不够,把多出来的内容写入新的数组,与前面的区别就是消息存储不连续解析复杂,有点是避免了拷贝引起的性能消耗。
6)处理 write 事件
写入内容过多的问题
测试
服务端:
public class WriteServer { public static void main(String[] args) throws IOException { ServerSocketChannel ssc = ServerSocketChannel.open(); ssc.configureBlocking(false); ssc.bind(new InetSocketAddress(8888)); Selector selector = Selector.open(); ssc.register(selector, SelectionKey.OP_ACCEPT); while (true){ selector.select(); Iterator<SelectionKey> it = selector.selectedKeys().iterator(); while (it.hasNext()){ SelectionKey key = it.next(); it.remove(); if (key.isAcceptable()){ ServerSocketChannel channel = (ServerSocketChannel) key.channel(); SocketChannel sc = channel.accept(); sc.configureBlocking(false); // 1、向客户端发送大量数据 StringBuilder sb = new StringBuilder(); for (int i = 0; i < 30_000_000; i++) { sb.append("a"); } ByteBuffer byteBuffer = Charset.defaultCharset().encode(sb.toString()); while (byteBuffer.hasRemaining()){ // 2、返回值 代表实际写入的字节数 int write = sc.write(byteBuffer); System.out.println("write ==> " + write); } } } } } }- 1
- 2
- 3
- 4
- 5
- 6
- 7
- 8
- 9
- 10
- 11
- 12
- 13
- 14
- 15
- 16
- 17
- 18
- 19
- 20
- 21
- 22
- 23
- 24
- 25
- 26
- 27
- 28
- 29
- 30
- 31
- 32
- 33
- 34
- 35
客户端:
public class WriteClient { public static void main(String[] args) throws IOException { SocketChannel sc = SocketChannel.open(); sc.connect(new InetSocketAddress("localhost", 8888)); // 3、接收数据 int count = 0; while (true){ ByteBuffer byteBuffer = ByteBuffer.allocate(1024 * 1024); count += sc.read(byteBuffer); System.out.println("count ==> " + count); byteBuffer.clear(); } } }- 1
- 2
- 3
- 4
- 5
- 6
- 7
- 8
- 9
- 10
- 11
- 12
- 13
- 14
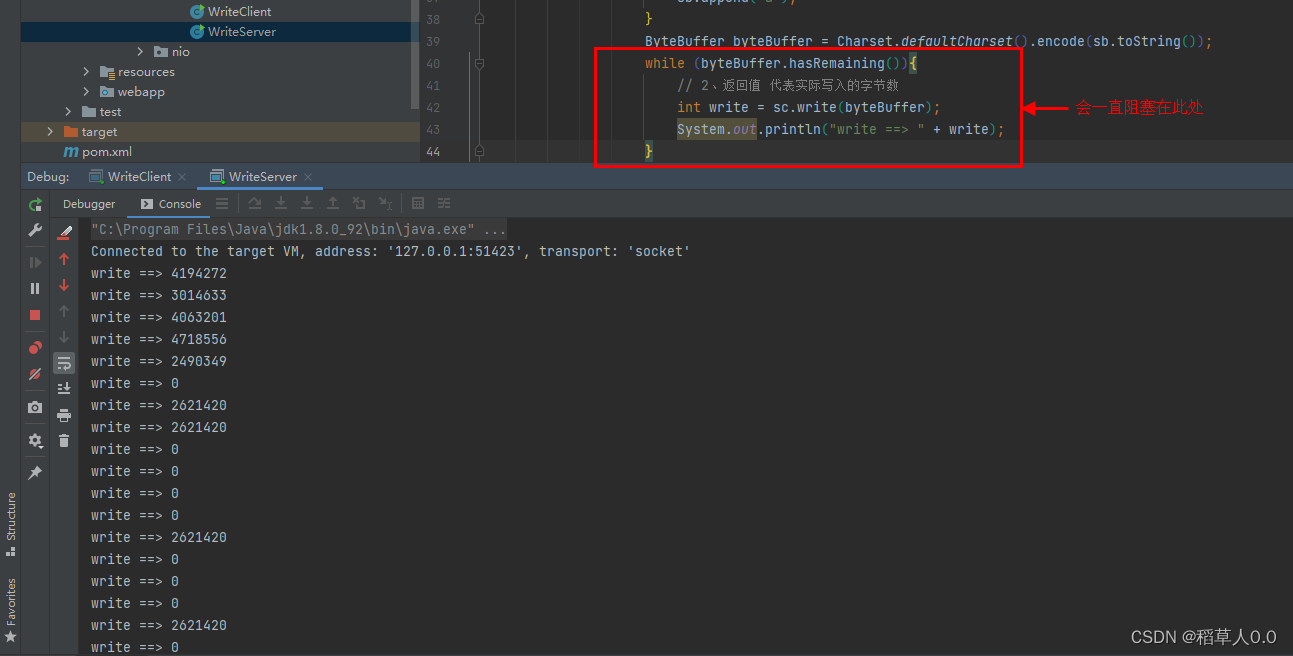
改进
先写一次,看 buffer 是否有剩余的,再关注可写事件。等 Channel 可写时,此时程序会再次进入
select()部分。服务端:
public class WriteServer { public static void main(String[] args) throws IOException { ServerSocketChannel ssc = ServerSocketChannel.open(); ssc.configureBlocking(false); ssc.bind(new InetSocketAddress(8888)); Selector selector = Selector.open(); ssc.register(selector, SelectionKey.OP_ACCEPT); while (true){ selector.select(); Iterator<SelectionKey> it = selector.selectedKeys().iterator(); while (it.hasNext()){ SelectionKey key = it.next(); it.remove(); if (key.isAcceptable()){ ServerSocketChannel channel = (ServerSocketChannel) key.channel(); SocketChannel sc = channel.accept(); sc.configureBlocking(false); SelectionKey scKey = sc.register(selector, 0, null); // 原来可能关注了读事件 scKey.interestOps(SelectionKey.OP_READ); // 1、向客户端发送大量数据 StringBuilder sb = new StringBuilder(); for (int i = 0; i < 5_000_000; i++) { sb.append("a"); } ByteBuffer byteBuffer = Charset.defaultCharset().encode(sb.toString()); // 2、返回值 代表实际写入的字节数 int write = sc.write(byteBuffer); System.out.println("write ==> " + write); // 3、判断是否有剩余内容 if (byteBuffer.hasRemaining()){ // 4、关注可写事件 channel 可以写入就会触发 // scKey.interestOps(SelectionKey.OP_WRITE); 会将原来关注的事件覆盖掉 scKey.interestOps(scKey.interestOps() + SelectionKey.OP_WRITE); // scKey.interestOps(scKey.interestOps() | SelectionKey.OP_WRITE); // 5、把未写完的数据挂到 scKey 上 scKey.attach(byteBuffer); } } // 可写事件 else if (key.isWritable()){ // 如果还是写不完下次还是会进到此处,因为我们已经关注了可写事件 ByteBuffer buffer = (ByteBuffer) key.attachment(); SocketChannel sc = (SocketChannel) key.channel(); int write = sc.write(buffer); System.out.println("Writable ==> " + write); // 6、清理操作 if (!buffer.hasRemaining()){ // 清理 buffer key.attach(null); // 写完了,不需要关注可写事件了 key.interestOps(key.interestOps() - SelectionKey.OP_WRITE); } } } } } }- 1
- 2
- 3
- 4
- 5
- 6
- 7
- 8
- 9
- 10
- 11
- 12
- 13
- 14
- 15
- 16
- 17
- 18
- 19
- 20
- 21
- 22
- 23
- 24
- 25
- 26
- 27
- 28
- 29
- 30
- 31
- 32
- 33
- 34
- 35
- 36
- 37
- 38
- 39
- 40
- 41
- 42
- 43
- 44
- 45
- 46
- 47
- 48
- 49
- 50
- 51
- 52
- 53
- 54
- 55
- 56
- 57
- 58
- 59
- 60
- 61
- 62
客户端不变。
运行结果:

7)更进一步
1、利用多线程优化
现在都是多核CPU,设计时要考虑不让 CPU 浪费
前面的部分只有一个选择器,没有充分利用 CPU,如何改进?
分两组选择器:
- 单线程配一个选择器,专门处理 accept 事件
- 创建 CPU 核心数的线程,每个线程配一个选择器,轮流处理 read 事件

服务端代码:
/** * @desc * @auth llp * @date 2022/8/2 16:04 */ public class MultiThreadServer { public static void main(String[] args) throws IOException { Thread.currentThread().setName("Boss"); ServerSocketChannel ssc = ServerSocketChannel.open(); ssc.configureBlocking(false); Selector boss = Selector.open(); SelectionKey bossKey = ssc.register(boss, 0, null); bossKey.interestOps(SelectionKey.OP_ACCEPT); ssc.bind(new InetSocketAddress(8888)); // 1、创建固定数量的 worker Worker worker01 = new Worker("Worker01"); // 初始化 selector 和 启动 worker01 线程 // (1)顺序必须满足 1.selector.open() 2.sc.register() 3.thread.start() // worker01.register(); 挪到 sc.register(worker01.selector, SelectionKey.OP_READ, null); 前 while (true){ boss.select(); Iterator<SelectionKey> it = boss.selectedKeys().iterator(); while (it.hasNext()){ SelectionKey key = it.next(); it.remove(); if (key.isAcceptable()){ SocketChannel sc = ssc.accept(); sc.configureBlocking(false); System.out.println("connected...." + sc.getRemoteAddress()); // 2、关联 selector System.out.println("before register...." + sc.getRemoteAddress()); // (2)在此处只是碰巧 selector.open() 后注册的,但再连接一个 worker 就还是卡在 before register 这 // worker01.register(); // (3) 思考,能不能让 register() 在 Worker 线程上跑 worker01.register(sc); // 在 boss 线程执行 // sc.register(worker01.selector, SelectionKey.OP_READ, null); System.out.println("after register...." + sc.getRemoteAddress()); } } } } // 监测读写事件 static class Worker implements Runnable{ private Thread thread; private Selector selector; private String name; private volatile boolean start = false; // 还未初始化 // (3) private ConcurrentLinkedQueue<Runnable> queue = new ConcurrentLinkedQueue<>(); public Worker(String name) { this.name = name; } // 初始化线程 和 selector public void register(SocketChannel sc) throws IOException { if (!start){ selector = Selector.open(); thread = new Thread(this, name); thread.start(); start = true; } // (3) 在此处,还是被调用的,还是在 BOSS 线程执行。 // sc.register(selector, SelectionKey.OP_READ, null); // 向对列添加了任务,但并没有执行 queue.add(()->{ try { sc.register(selector, SelectionKey.OP_READ, null); } catch (ClosedChannelException e) { e.printStackTrace(); } }); // (4)唤醒 select() 方法 是在 boss 线程执行 selector.wakeup(); } @Override public void run(){ while (true){ try { // 在 worker01 线程执行 selector.select(); // 阻塞 // (3) 取出任务执行 Runnable task = queue.poll(); if (task != null){ // 执行了 sc.register(selector, SelectionKey.OP_READ, null); 此时是在 worker01 线程执行 task.run(); } Iterator<SelectionKey> it = selector.selectedKeys().iterator(); while (it.hasNext()){ SelectionKey key = it.next(); it.remove(); if (key.isReadable()){ ByteBuffer buffer = ByteBuffer.allocate(1024); SocketChannel channel = (SocketChannel) key.channel(); channel.read(buffer); buffer.flip(); System.out.println(name + " read..." + channel.getRemoteAddress()); System.out.println(new String(buffer.array(), 0, buffer.limit())); }else if (key.isWritable()){ } } } catch (IOException e) { e.printStackTrace(); } } } } }- 1
- 2
- 3
- 4
- 5
- 6
- 7
- 8
- 9
- 10
- 11
- 12
- 13
- 14
- 15
- 16
- 17
- 18
- 19
- 20
- 21
- 22
- 23
- 24
- 25
- 26
- 27
- 28
- 29
- 30
- 31
- 32
- 33
- 34
- 35
- 36
- 37
- 38
- 39
- 40
- 41
- 42
- 43
- 44
- 45
- 46
- 47
- 48
- 49
- 50
- 51
- 52
- 53
- 54
- 55
- 56
- 57
- 58
- 59
- 60
- 61
- 62
- 63
- 64
- 65
- 66
- 67
- 68
- 69
- 70
- 71
- 72
- 73
- 74
- 75
- 76
- 77
- 78
- 79
- 80
- 81
- 82
- 83
- 84
- 85
- 86
- 87
- 88
- 89
- 90
- 91
- 92
- 93
- 94
- 95
- 96
- 97
- 98
- 99
- 100
- 101
- 102
- 103
- 104
- 105
- 106
- 107
- 108
- 109
- 110
- 111
- 112
客户端代码:
public class MultiThreadClient { public static void main(String[] args) throws IOException { SocketChannel sc = SocketChannel.open(); sc.connect(new InetSocketAddress("127.0.0.1", 8888)); sc.write(Charset.defaultCharset().encode("0123456789abcdef3333\n")); Scanner scanner = new Scanner(System.in); while (scanner.hasNextLine()){ String msg = scanner.nextLine(); sc.write(ByteBuffer.wrap(msg.getBytes(StandardCharsets.UTF_8))); } } }- 1
- 2
- 3
- 4
- 5
- 6
- 7
- 8
- 9
- 10
- 11
- 12
其他解决办法:
// 初始化线程 和 selector public void register(SocketChannel sc) throws IOException { if (!start){ selector = Selector.open(); thread = new Thread(this, name); thread.start(); start = true; } // Worker 线程启动执行 selector.select() 往下 boss 线程唤醒 select()方法 再执行注册 selector.wakeup(); sc.register(selector, SelectionKey.OP_READ, null); // selector.select() selector.wakeup() 执行先后顺序都不影响 唤醒 select() }- 1
- 2
- 3
- 4
- 5
- 6
- 7
- 8
- 9
- 10
- 11
- 12
- 13
多 Worker:
如何拿到 CPU 个数
Runtime.getRuntime().availableProcessors()如果工作在 Docker 容器下,因为容器不是物理隔离的,会拿到物理 CPU 个数,而不是容器申请的个数- 这个问题直到 JDK10 才修复,使用 JVM 参数 UseContainerSupport 配置,默认开启
..... // 多worker Worker[] workers = new Worker[Runtime.getRuntime().availableProcessors()]; for (int i = 0; i < workers.length; i++) { workers[i] = new Worker("worker0" + (i+1)); } .... // 轮询 workers[index.getAndIncrement() % workers.length].register(sc); ....- 1
- 2
- 3
- 4
- 5
- 6
- 7
- 8
- 9
- 10
- 11
2、NIO vs BIO
2.1、Stream vs Channel
- Stream 不会自动缓冲数据。Channel 会利用系统提供的发送数据缓冲区,接收数据缓冲区(更为底层)。
- Stream 仅支持阻塞 API。Channel 同时支持阻塞、非阻塞 API ,网络 Channel 可配合 selector 实现多路复用。
- 两者均为全双工,即读写可以同时进行。
2.2、IO 模型
同步阻塞、同步非阻塞、多路复用、异步阻塞、异步非阻塞。
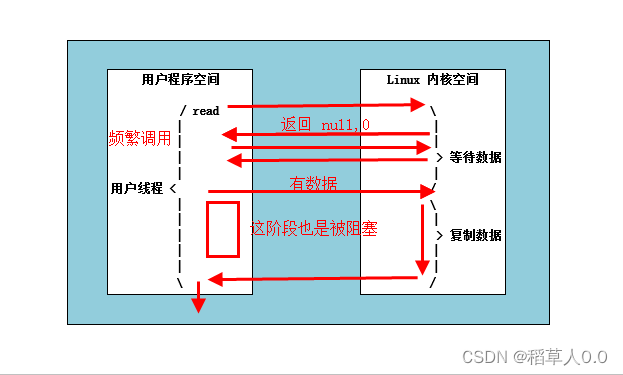
当调用一次 channel.read 或 stream.read 后,会切换至操作系统内核态来完成真正数据读取,而读取又分为两个阶段:等待数据阶段、复制数据阶段


五种 IO 模型
参考书籍 《UNIX 网络编程 - 卷1》
1)阻塞 IO

2)非阻塞 IO
3)多路复用
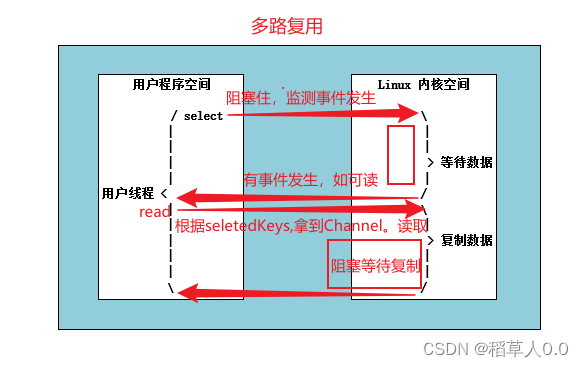
阻塞 IO 和 多路复用:

4)信号驱动
不常用。
5)异步 IO
异步阻塞(没有此情况)、异步非阻塞。
- 同步:线程自己去获取结果(一个线程)
- 异步:线程自己不去获取结果,而是由其它线程送结果(至少两个线程)
2.3、零拷贝
传统 IO 问题
传统 IO 将一个文件通过 Socket 写出
File f = new File("helloworld/data.txt"); RandomAccessFile file = new RandomAccessFile(f, "r"); byte[] buf = new byte[(int) f.length()]; file.read(buf); Socket socket = ...; socket.getOutputStream().write(buf);- 1
- 2
- 3
- 4
- 5
- 6
- 7
- 8
内部的工作情况:
1、Java 本身并不具备 IO 读写能力,因此 read 方法调用后,要从 java 程序的用户态切换至内核态,去调用操作系统(Kernel)的读能力,将数据写入内核缓冲区。这期间用户线程阻塞,操作系统使用 DMA(Direct Memory Access)来实现文件读,其间也不会使用 CPU。
DMA 也可以理解为硬件单元,用来解放 CPU 完成文件 IO
2、从内核态切换回用户态,将数据从内核缓冲区读入用户缓冲区(即 byte[] buf),这期间 CPU 会参与拷贝,无法利用 DMA。
3、调用 write 方法,这时数据从用户缓冲区(即 byte[] buf)写入 socket 缓冲区,CPU 会参与拷贝。
4、接下来要想网卡写数据,这项能力 java 又不具备,因此又得从用户态切换至内核态,调用操作系统的写能力,使用 DMA 将 socket 缓冲区的数据写入网卡,不会使用 CPU。
NIO 优化
通过 DirectByteBuffer
-
ByteBuffer.allocate(10) HeapByteBuffer 使用的 Java的内存- 1
-
ByteBuffer.allocateDirect(10) DirectByteBuffer 使用的 操作系统的内存- 1

Java 使用 DirectByteBuffer 将堆外内存映射到 JVM 内存中来直接访问使用。
- 这块内存不受 JVM 垃圾回收的影响,因此内存地址固定,有助于 IO 读写。
- Java 中的 DirectByteBuffer 对象仅维护了此内存的虚引用,内存回收分为两步
- DirectByteBuffer 对象被垃圾回收,将虚引用加入引用队列
- 通过专门的线程访问引用队列,根据虚引用释放堆外内存
- 减少了一次数据拷贝,用户态与内核态的切换次数没有减少
进一步优化
Linux 2.1 后提供的 sendFile 方法
java 中对应两个 Channel 调用
transferTo/transferFrom方法拷贝数据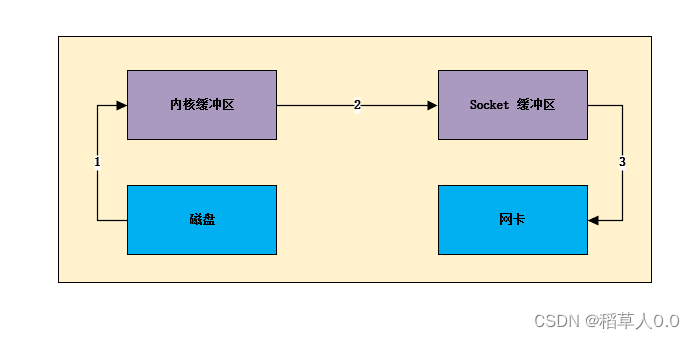
1、Java 调用 transferTo 方法后,要从 Java 程序的用户态切换至内核态,使用 DMA 将数据读入内核缓冲区,不会使用 CPU。
2、数据从内核缓冲区传输到 socket 缓冲区,CPU 会参与拷贝
3、最后使用 DMA 将 socket缓冲区的数据写入网卡,不会使用 CPU
只发生了一次用户态和内核态的切换,数据拷贝3次
Linux 2.4

1、Java 调用 transferTo 方法后,要从 Java 程序的用户态切换至内核态,使用 DMA 将数据读入内核缓冲区,不会使用 CPU。
2、只会将一些 offset 和 length 信息拷入 socket 缓冲区,几乎无消耗。
3、使用 DMA 将 内核缓冲区的数据写入网卡,不会使用 CPU
只发生了一次用户态和内核态的切换,数据拷贝2次
零拷贝:不会拷贝重复的数据到 JVM 内存中(适合小文件传输)
2.4、AIO
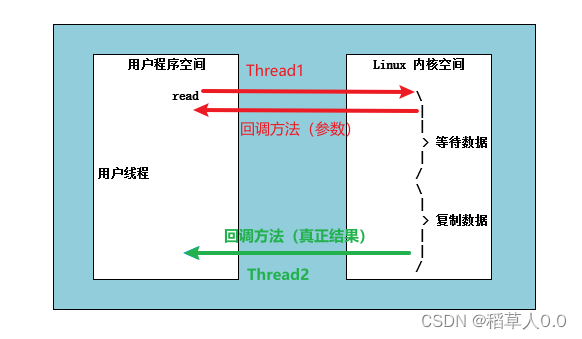
AIO 用来解决数据复制阶段的阻塞问题
- 同步意味着:在进行读写操作时,线程需要等待结果,还是相当于闲置
- 异步意味着:在进行读写操作时,线程不必等待结果,而是将来由操作系统来通过回调方式由另外的线程来获得结果
异步模型需要底层操作系统(Kernel)提供支持
- Windows 系统通过 IOCP 实现了真正的异步 IO
- Linux 系统异步 IO 在 2.6 版本引入,但底层实现还是用多路复用模拟了异步 IO,性能没有优势
Linux 支持异步 IO 的新 API
io_uring文件 AIO
public class AioTest { public static void main(String[] args) throws InterruptedException { try { AsynchronousFileChannel channel = AsynchronousFileChannel.open(Paths.get("G:\\IDEAWorkHome\\test\\data.txt"), StandardOpenOption.READ); // 参数1: byteBuffer 参数2: 读取的起始位置 参数3: 附件 参数4: 回调函数 ByteBuffer byteBuffer = ByteBuffer.allocate(1024); System.out.println("read beginning..." + Thread.currentThread().getName()); // 守护线程。如果主线程结束了,这个读取的线程也结束了 channel.read(byteBuffer, 0, byteBuffer, new CompletionHandler<Integer, ByteBuffer>() { @Override // read 成功 result:读到的实际字节数 attachment:参数3,读取是存在参数1,但传进来是同一个对象,两者一样 public void completed(Integer result, ByteBuffer attachment) { System.out.println("read completed..." + Thread.currentThread().getName()); attachment.flip(); System.out.println(new String(attachment.array(), 0, attachment.limit())); } @Override // read 成功 public void failed(Throwable exc, ByteBuffer attachment) { exc.printStackTrace(); } }); } catch (IOException e) { e.printStackTrace(); } System.out.println("read end..." + Thread.currentThread().getName()); // 等读取的守护线程结束再结束主线程 TimeUnit.SECONDS.sleep(2); } }- 1
- 2
- 3
- 4
- 5
- 6
- 7
- 8
- 9
- 10
- 11
- 12
- 13
- 14
- 15
- 16
- 17
- 18
- 19
- 20
- 21
- 22
- 23
- 24
- 25
- 26
- 27
- 28
- 29
网络 AIO
-
相关阅读:
QT入门知识回顾
抢先看!中移创马大赛通信能力开放专题赛初赛评选结果新鲜出炉
【一起学Rust】Rust的Hello Rust详细解析
智能运维应用之道,告别企业数字化转型危机
leetcode 890. Find and Replace Pattern(查找和替换pattern)
Webpack打包
MySQL主从复制和读写分离的原理与实战
浅谈非线性回归(non-linear regression)
webpack源码分析——loader-runner库之runLoaders函数
新生儿早产:原因、科普和注意事项
- 原文地址:https://blog.csdn.net/weixin_43989102/article/details/126715902
