-
C++笔记-auto_ptr&unique_ptr&shared_ptr&shared_ptr基本用法
前一篇博文的笔记是:C++文档阅读笔记-Smart Pointers in C++ and How to Use Them
这里Geek大体介绍了智能指针的基本,但感觉不是很具体,在此补充下例子,方便以后查阅。
本次例子主要是使用这4种类型的智能指针。
代码如下:
- #include
- #include
- #include
- #include
- using namespace::std;
- class Rectangle{
- public:
- Rectangle(int l, int b){
- length = l;
- breadth = b;
- }
- ~Rectangle(){
- qDebug() << "~Rectangle() called";
- }
- int area(){
- return length * breadth;
- }
- private:
- int breadth;
- int length;
- };
- void autoPtr(){
- qDebug() << "void autoPtr()";
- auto_ptr
ptr1(new Rectangle(10, 5)) ; - qDebug() << "ptr1->area() : " << ptr1->area();
- auto_ptr
ptr2(ptr1) ; - qDebug() << "ptr2->area() : " << ptr2->area();
- }
- void uniquePtr(){
- qDebug() << "void uniquePtr()";
- unique_ptr
ptr1(new Rectangle(10, 2)) ; - qDebug() << "ptr1->area() : " << ptr1->area();
- unique_ptr
ptr2 = move(ptr1); - qDebug() << "ptr2->area() : " << ptr2->area();
- }
- void sharedPtr(){
- qDebug() << "void sharedPtr()";
- shared_ptr
ptr1(new Rectangle(1, 2)) ; - qDebug() << "ptr1->area() : " << ptr1->area();
- qDebug() << "ptr1.use_count() : " << ptr1.use_count();
- shared_ptr
ptr2(ptr1) ; - qDebug() << "ptr2->area() : " << ptr2->area();
- qDebug() << "ptr2.use_count() : " << ptr2.use_count();
- qDebug() << "ptr1.use_count() : " << ptr1.use_count();
- }
- void weakPtr(){
- qDebug() << "void weakPtr()";
- shared_ptr
ptr1(new Rectangle(100, 1)) ; - qDebug() << "ptr1->area() : " << ptr1->area();
- qDebug() << "ptr1.use_count() : " << ptr1.use_count();
- weak_ptr
ptr2 = ptr1; - qDebug() << "ptr1.use_count() : " << ptr1.use_count();
- qDebug() << "ptr2.lock()->area() : " << ptr2.lock()->area();
- }
- int main(int argc, char *argv[])
- {
- QCoreApplication a(argc, argv);
- autoPtr();
- qDebug() << "";
- uniquePtr();
- qDebug() << "";
- sharedPtr();
- qDebug() << "";
- weakPtr();
- return a.exec();
- }
运行截图如下:
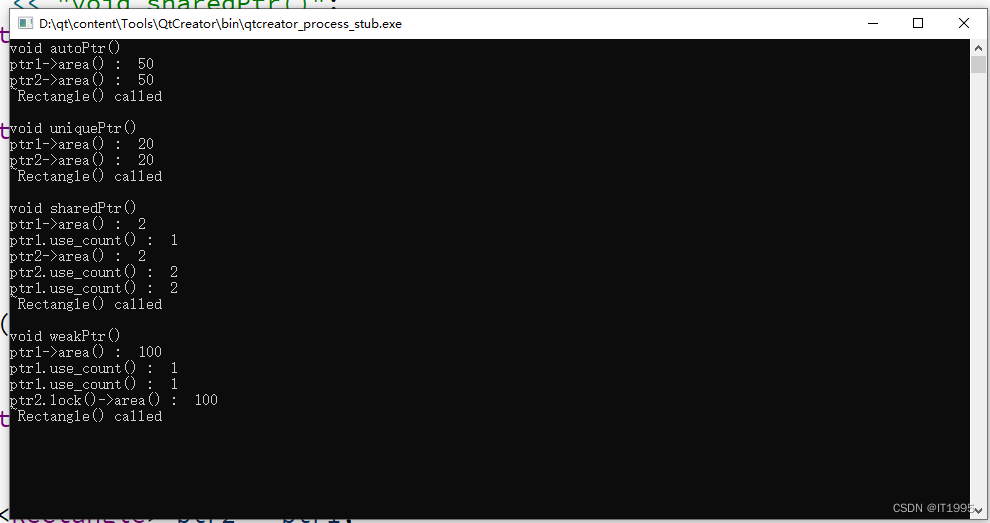
这里就简单来看下auto_ptr,我这里是windows平台:
- #if _HAS_AUTO_PTR_ETC
- // TEMPLATE CLASS auto_ptr
- template<class _Ty>
- class auto_ptr;
- template<class _Ty>
- struct auto_ptr_ref
- { // proxy reference for auto_ptr copying
- explicit auto_ptr_ref(_Ty *_Right)
- : _Ref(_Right)
- { // construct from generic pointer to auto_ptr ptr
- }
- _Ty *_Ref; // generic pointer to auto_ptr ptr
- };
- template<class _Ty>
- class auto_ptr
- { // wrap an object pointer to ensure destruction
- public:
- typedef auto_ptr<_Ty> _Myt;
- typedef _Ty element_type;
- explicit auto_ptr(_Ty *_Ptr = 0) _THROW0()
- : _Myptr(_Ptr)
- { // construct from object pointer
- }
- auto_ptr(_Myt& _Right) _THROW0()
- : _Myptr(_Right.release())
- { // construct by assuming pointer from _Right auto_ptr
- }
- auto_ptr(auto_ptr_ref<_Ty> _Right) _THROW0()
- { // construct by assuming pointer from _Right auto_ptr_ref
- _Ty *_Ptr = _Right._Ref;
- _Right._Ref = 0; // release old
- _Myptr = _Ptr; // reset this
- }
- template<class _Other>
- operator auto_ptr<_Other>() _THROW0()
- { // convert to compatible auto_ptr
- return (auto_ptr<_Other>(*this));
- }
- template<class _Other>
- operator auto_ptr_ref<_Other>() _THROW0()
- { // convert to compatible auto_ptr_ref
- _Other *_Cvtptr = _Myptr; // test implicit conversion
- auto_ptr_ref<_Other> _Ans(_Cvtptr);
- _Myptr = 0; // pass ownership to auto_ptr_ref
- return (_Ans);
- }
- template<class _Other>
- _Myt& operator=(auto_ptr<_Other>& _Right) _THROW0()
- { // assign compatible _Right (assume pointer)
- reset(_Right.release());
- return (*this);
- }
- template<class _Other>
- auto_ptr(auto_ptr<_Other>& _Right) _THROW0()
- : _Myptr(_Right.release())
- { // construct by assuming pointer from _Right
- }
- _Myt& operator=(_Myt& _Right) _THROW0()
- { // assign compatible _Right (assume pointer)
- reset(_Right.release());
- return (*this);
- }
- _Myt& operator=(auto_ptr_ref<_Ty> _Right) _THROW0()
- { // assign compatible _Right._Ref (assume pointer)
- _Ty *_Ptr = _Right._Ref;
- _Right._Ref = 0; // release old
- reset(_Ptr); // set new
- return (*this);
- }
- ~auto_ptr() _NOEXCEPT
- { // destroy the object
- delete _Myptr;
- }
- _Ty& operator*() const _THROW0()
- { // return designated value
- #if _ITERATOR_DEBUG_LEVEL == 2
- if (_Myptr == 0)
- _DEBUG_ERROR("auto_ptr not dereferencable");
- #endif /* _ITERATOR_DEBUG_LEVEL == 2 */
- return (*get());
- }
- _Ty *operator->() const _THROW0()
- { // return pointer to class object
- #if _ITERATOR_DEBUG_LEVEL == 2
- if (_Myptr == 0)
- _DEBUG_ERROR("auto_ptr not dereferencable");
- #endif /* _ITERATOR_DEBUG_LEVEL == 2 */
- return (get());
- }
- _Ty *get() const _THROW0()
- { // return wrapped pointer
- return (_Myptr);
- }
- _Ty *release() _THROW0()
- { // return wrapped pointer and give up ownership
- _Ty *_Tmp = _Myptr;
- _Myptr = 0;
- return (_Tmp);
- }
- void reset(_Ty *_Ptr = 0)
- { // destroy designated object and store new pointer
- if (_Ptr != _Myptr)
- delete _Myptr;
- _Myptr = _Ptr;
- }
- private:
- _Ty *_Myptr; // the wrapped object pointer
- };
- #endif /* _HAS_AUTO_PTR_ETC */
- _STD_END
这里以auto_ptr为例,研究2个问题:
①auto_ptr是如何调用传给他的原始指针;
②auto_ptr是如何实现原始指针的析构。
从中可以看到:


其实auto_ptr就是一封装类,他将传入的指针放到了_Ty中,命名为_Myptr。
构造函数要将需要变智能的指针传进来,给_Myptr赋值。

这里可以看到,但调用->这个符号后,他先看_Myptr有无值,如果有就调用get()方法。
如果是要使用*这个负荷:

就会传*get()过来,这里差不多就可以猜到,这个get()方法,返回的就是_Myptr
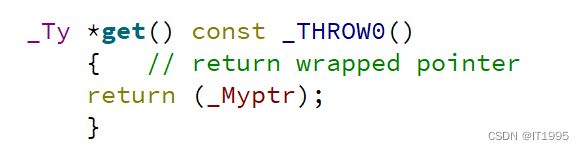
从中可以看到,的确,get方法返回被包裹的指针。第一个问题就研究完了,
下面来看第二个问题,他是如何实现资源的释放的。

看到这里想必都已经明白了,auto_ptr一般是在栈区进行创建,当栈区生命周期结束后,调用其自己的析构函数,而他自己的析构函数里面对_Myptr进行了delete。
-
相关阅读:
LeetCode解法汇总2591. 将钱分给最多的儿童
深度学习入门之线性代数(PyTorch)
[C#]使用C#部署yolov8的目标检测tensorrt模型
进程状态和优先级【Linux】
广告制作如何高效完成视频视频审片?
ubuntu 源码编译安装make过程很慢问题解决
word实用小技巧
22.2 正则表达式-数据验证、数据变换
2022 年最新【Java 经典面试 800 题】面试必备,查漏补缺;多线程 +spring+JVM 调优 + 分布式 +redis+ 算法
二十四节气之处暑
- 原文地址:https://blog.csdn.net/qq78442761/article/details/126711969