-
大前端学习笔记
前言:大前端包括哪些内容(NodeJS、NPM、ES6、Babel、Webpack、模块化)NodeJS安装与配置
安装node.js、npm与cnpm、webpack、vue-cli
1. NodeJS与Java类比。

2. NodeJS入门
2.1 hello world
- 创建node文件夹
- 创建hello.js,并编写代码
// 类似Java:System.out.println(""); console.log("hello world");- 1
- 2
- 运行
node hello.js
2.2 node实现请求响应
// 导入模块,require const http = require('http'); // 1. 创建httpserver服务 // 2. 监听一个端口8888 http.createServer((req,resp)=>{ // 告诉浏览器用html的方式来解析数据 resp.writeHead(200,{'Content-type':'text/html'}); // 输出给浏览器 resp.end("hello server!!!
"); }).listen(8888); // 3. 运行服务node httpserver.js // 4. 在浏览器访问http://localhost:8888 console.log("server is start on 8888")- 1
- 2
- 3
- 4
- 5
- 6
- 7
- 8
- 9
- 10
- 11
- 12
- 13
- 14
- 15
2.3 nodejs操作mysql
// 1.安装mysql依赖 npm install mysql // 2. 导入mysql依赖,类比java.sql var mysql = require('mysql'); // 3.1 创建MySQL连接对象 // 3.2 配置数据库连接信息 var conn = mysql.createConnection({ host:'localhost', user:'root', port:13306, password:'123456', database:'test' }); // 3.3 打开连接 conn.connect(); // 3.4 执行CURD conn.query("select * from user",(err, res, cols)=>{ if(err) throw err; console.log("res ==> ", res); }); // 3.5 关闭连接 conn.end(); // 4. 运行查看结果 node db.js res ==> [ RowDataPacket { id: 1, name: '小花' }, RowDataPacket { id: 2, name: '小董' }- 1
- 2
- 3
- 4
- 5
- 6
- 7
- 8
- 9
- 10
- 11
- 12
- 13
- 14
- 15
- 16
- 17
- 18
- 19
- 20
- 21
- 22
- 23
- 24
- 25
- 26
- 27
- 28
ES6(ECMAScript6)
面向对象、封装、继承、多态
let 和 const
var name = "huathy"; var PI = Math.PI; console.log(name); console.log(PI); let name2 = "huathy"; const PI2 = Math.PI; console.log(name2) console.log(PI2) PI = 100; try{ PI2 = 100; }catch(e){ console.error(e); } // let 解决了var变量穿透的问题,let 作用域在代码块,var在全局 // const解决常量修改的问题 for(let i=0;i<2;i++){ console.log(i) } //报错i is undefied console.log(i); // 实际开发中,小程序、uniapp、脚手架开发中,可以使用let、const // 但web开发中,低版本浏览器或许不兼容- 1
- 2
- 3
- 4
- 5
- 6
- 7
- 8
- 9
- 10
- 11
- 12
- 13
- 14
- 15
- 16
- 17
- 18
- 19
- 20
- 21
- 22
- 23
- 24
- 25
- 26
- 27
模板字符串
var man = { name: 'huathy', addr: '浙江' } // 字符串会牵扯到动态部分 let ipaddr = `[${man.name}]用户的IP属地是[${man.addr}]`; console.log(ipaddr)- 1
- 2
- 3
- 4
- 5
- 6
- 7
函数默认参数 和 箭头函数
// 参数不写默认值的时候是undefined function sum(a,b=0){ return a+b; } var res = sum(1,2); console.log("res = ",res) /***** 箭头函数 *****/ // 去掉function var del = (a,b)=>{ return a-b; } // 逻辑代码只有return可以去掉{}和return var del2 = (a,b) => a-b; // 给数组所有元素都*2 let arr = [1,2,3,4]; let newArr = arr.map(obj=>obj*2) console.log(newArr)- 1
- 2
- 3
- 4
- 5
- 6
- 7
- 8
- 9
- 10
- 11
- 12
- 13
- 14
- 15
- 16
- 17
- 18
- 19
对象初始化简写
// 旧写法 let info = { name:'huathy', say:function(){ console.log('hello') } } // 新写法 let name = '小花'; let info2 = { name, say(){ console.log('hi') } } console.log(info2.name) info2.say();- 1
- 2
- 3
- 4
- 5
- 6
- 7
- 8
- 9
- 10
- 11
- 12
- 13
- 14
- 15
- 16
- 17
对象解构
let info = { name:'huathy', say(){ console.log('hello') } } // 获取对象属性的方式 . 和 [] console.log(info.name) console.log(info['name']) info['say'](); var info2 = {}; var {name,say} = info; console.log(name) say();- 1
- 2
- 3
- 4
- 5
- 6
- 7
- 8
- 9
- 10
- 11
- 12
- 13
- 14
对象传播操作符
let info = { name:'huathy', age: 22, addr: '浙江', say(){ console.log('hello') } } var {...info2} = info; console.log(info2) // 如果已经取走的,不会被付给对象。 var {name,age,...info3} = info2; console.log(name) console.log(age) console.log(info3)- 1
- 2
- 3
- 4
- 5
- 6
- 7
- 8
- 9
- 10
- 11
- 12
- 13
- 14
- 15
数组map和reduce方法的使用
/***** map *****/ // 对arr每个元素×2 let arr = [1,2,3,4]; let newArr = []; arr.forEach(a => { newArr.push(a*2); }); console.log(arr) console.log(newArr) //map写法 let newArr2 = arr.map(a=>a*2) console.log(newArr2); /***** reduce *****/ var res = arr.reduce((a,b)=>a+b); console.log(res) // [1,2,3,4] a=1 ,b=2 // [1,2,3,4] a=3 ,b=3 // [1,2,3,4] a=6 ,b=4- 1
- 2
- 3
- 4
- 5
- 6
- 7
- 8
- 9
- 10
- 11
- 12
- 13
- 14
- 15
- 16
- 17
- 18
- 19
总结
es6可以使用在nodejs、uniapp、vue、react中
NPM包管理器
npm: node package manager node包管理器。类比maven。
作用:- 快速构建nodejs工程。
npm init会得到一个package.json文件(类似于pom.xml)
也可以使用npm init -y
{ "name": "test", //工程名称 "version": "1.0.0", //版本号 "description": "npm study", // 描述 "main": "index.js", //入口js "scripts": { "test": "npm run test" //运行脚本 }, "author": "huathy", //作者 "license": "ISC" //授权 }- 1
- 2
- 3
- 4
- 5
- 6
- 7
- 8
- 9
- 10
- 11
- 快速安装依赖第三方模块。如
npm install mysql redis。
通过npm install安装的模块,会记录在package.json文件的dependencies{}模块中。 - 使用
const mysql = require('mysql'); - 卸载模块
npm uninstall xxx - 下载缓慢可以使用cnpm、yarn
babel
ES6语法可能不能兼容低版本浏览器。babel可以将es6的语法转成es5的语法。
安装:npm install -g babel-cliyarn global add babel-cli
检查是否成功安装:babel -version
编写.babelrc文件{ "presets": ["es2015"], "plugins": []// npm install --save-dev babel-preset-es2015 }- 1
- 2
- 3
- 4
安装依赖:
npm install --save-dev babel-preset-es2015
执行命令:babel common -d dist模块化
math.js
const sum = (a,b)=>{return a+b}; const sub = (a,b)=>{return a-b}; const mul = (a,b)=>{return a*b}; const di = (a,b)=>{return a/b}; // module.exports = { // sum:sum, // sub:sub, // mul:mul, // di:di, // } module.exports = { sum,sub,mul,di, }- 1
- 2
- 3
- 4
- 5
- 6
- 7
- 8
- 9
- 10
- 11
- 12
- 13
- 14
import_test.js
const math = require('./common/math.js'); console.log(math.sub(2,1));- 1
- 2
- 3
es6模块化规范
api.js
export default{ getList(){ console.log('GET LIST METHOD RUN'); }, save(){ console.log('SAVE METHOD RUN'); } } // export function getList(){ // console.log('GET LIST METHOD RUN'); // } // export function save(){ // console.log('SAVE METHOD RUN'); // }- 1
- 2
- 3
- 4
- 5
- 6
- 7
- 8
- 9
- 10
- 11
- 12
- 13
- 14
- 15
api_test.js
import { getList,save } from "./common/api"; getList(); save(); // 默认不支持ES6语法,需要babel降级。- 1
- 2
- 3
- 4
- 5
- 6
WebPack
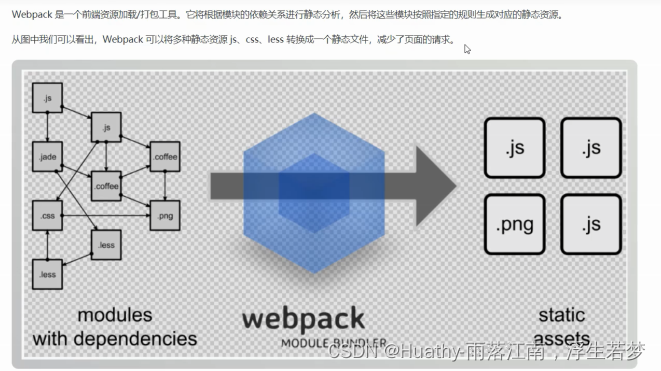
安装和使用
- 安装:
yarn add global webpack webpack-cli - 使用
- 创建一个nodejs项目 npm init -y
- 创建一个src项目,并放入两个需要合并的util.js和common.js
- 准备一个入口文件main.js,就是集中引入模块
- 在根目录下定义webpack.config.js文件配置打包规则
- 执行webpack查看效果
util.js
exports.add = (a,b) => a+b;- 1
common.js
exports.info = function(str){ console.log(str); document.write(str); }- 1
- 2
- 3
- 4
main.js
const util = require("./util.js") const common = require("./common.js") console.info("HELLO,"+ util.add(100,200))- 1
- 2
- 3
webpack.config.js
// 导入path模块 const path = require("path") //定义JS打包规则 module.exports = { // 入口文件 entry:"./src/main.js", // 输出当前系统文件下的dist目录 output:path.resolve(__dirname,"./dist"), // 合并的js文件 filename:"bundle.js" }- 1
- 2
- 3
- 4
- 5
- 6
- 7
- 8
- 9
- 10
- 11
-
相关阅读:
机器学习基础之《分类算法(6)—决策树》
6 Ajax & JSON
怎样使用Pyglet库给推箱子游戏画关卡地图
【MQTT】基于阿里云物联网平台实现两设备间相互订阅及发布消息
JVM面试题
【四】将vue部署到k8s中
获取vue当前页面url问号后面的参数
Pygame入门
API接口获取商品评论
口碑营销:品牌如何维护良好口碑?
- 原文地址:https://blog.csdn.net/qq_40366738/article/details/126646021
