-
nfs相关练习
使用redhat8.5 linux 主机
服务端[root@server ~]#ip192.168.171.140
客户端[root@client ~]# ip192.168.171.139
目录
1.使用yum工具安装rpcbind、nfs-utils (在此之前保证写好yum源、挂载)
实验要求
架设一台NFS服务器,并按照以下要求配置
1、开放/nfs/shared目录,供所有用户查询资料;
2、开放/nfs/upload目录,该目录为192.168.171.0/24网段的主机的数据上传目录,并将所有该网段主机上传文件的所属者和所属组映射为nfs-upload,其UID和GID为2001;
3、将/home/tom(该目录为uid=1111,gid=1111的tom用户的家目录)目录仅共享给192.168.171.139这台主机上的jerry用户,jerry对该目录具有访问、新建和删除文件的权限。具体过程
一.前期准备
1.使用yum工具安装rpcbind、nfs-utils (在此之前保证写好yum源、挂载)
- [root@server ~]# yum install rpcbind -y
- [root@server ~]# yum install nfs-utils -y
2.关闭防火墙,设置selinux、确保rpc、nfs运行
- [root@client ~]# systemctl stop firewalld
- [root@client ~]# setenforce 0
- [root@client ~]# systemctl start rpcbind
- [root@client ~]# systemctl start nfs-server 重启命令
- 也可使用如下
- [root@server ~]# systemctl is-active rpcbind 判断是否启动
- active
二.完成要求
1、服务器配置操作
(1)服务端编写配置文件服务端 /etc/exports
- [root@server ~]# vim /etc/exports 配置文件
- 分别依据实验要求添加如下内容
- # 定义共享的目录和权限
- /nfs/shared *(ro)
- /nfs/upload 192.168.171.0/24(rw,all_squash,anonuid=2001,anongid=2001)
- /home/tom 192.168.171.139(rw)
- 目录 用户 (权限)
(2)据要求完成目录、用户创建,权限管理
- 要求1
- [root@server /]# mkdir /nfs/{shared,upload} -p
- [root@server /] cd /nfs/shared/
- [root@server shared]touch {1..5]
- 要求2
- [root@server server ~]# useradd -u 2001 nfs-upload
- [root@server server ~]# chmod o=rwx /nfs/upload/ #修改其他人的权限
- [root@server nfs]# cd /nfs/upload/
- [root@server upload]# touch 1 创建一个文件方便对比
- 要求3
- [root@server nfs]# useradd -u 1111 tom
- [root@server nfs]# id tom
- uid=1111(tom) gid=1111(tom) groups=1111(tom)
- [root@server nfs]# cd /home/tom
- [root@server tom]# touch {1..5}
- [root@server ~]# systemctl restart nfs-server 重启nfs 更新所做配置
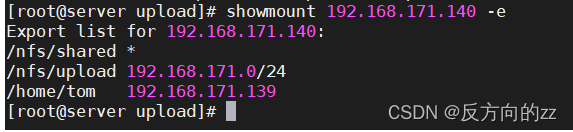
(3)服务器自检
[root@server shared]# showmount -e 192.168.171.140结果显示成功
2、客户端具体步骤
(1)客户端showmount

(2)创建挂载目录,创建用户Jerry完成第三要求
- [root@client ~]# mkdir /client/{shared,upload,tom}
- [root@client upload]# useradd jerry -u 1111
(3)客户端挂载
- [root@client ~]# mount 192.168.171.140:/nfs/shared /client/shared/
- [root@client ~]# mount 192.168.171.140:/nfs/upload /client/upload/
- [root@client ~]# mount 192.168.171.140:/home/tom /client/tom/
3、测试
第一要求
查看/client/shared内容完成检测,(其他人的权限为: r-- )

第二要求
- [root@client ~]# useradd -u 2001 nfs-upload 创建一个2001 的nfs-load 用户
- [root@client ~]# touch /client/upload/file0 客户端创建一个文件上传测试
- [root@client ~]# ll /client/upload/
客户端

服务端

通过客户端上传的文件所属组和所属用户都为nfs-upload
第三要求

通过其他用户权限不能访问/client/tom 目录;只有jerry可以访问。
做完辣!!
-
相关阅读:
一种退避序列实现
【Java SE】抽象类和接口
从大龄程序员现状聊聊出路
FPGA解析B码----连载8(完结篇)
NX二次开发-使用libxl读写EXCEL
HMS Core热门Kit Top问题合集,你要问的,这里全都有!
5+非肿瘤生信思路经典思路,没有机器学习,WGCNA也能撑起大局,还有多个实验验证的强势助攻
vue3 解决警告: Promise returned from xxx is ignored 和 $router未定义
《算法导论》16.2 贪心算法原理
Element UI怎么安装呢?
- 原文地址:https://blog.csdn.net/Shakespeare_i/article/details/126680715
