Nvidia Real-time Denoisers(NRD) v3.x
版本:NRD v3.4.0
NRD 是工业界内比较先进的降噪器,被实际应用于 Watch Dogs: Legion 和 Cyberpunk 2077 等游戏,然而网上关于 NRD 里降噪技术的具体介绍太少了,于是啃一啃源码,并且总结出了这篇剖析博客。

图左:输入 1 spp 的 Diffuse 信号和 0.5 spp 的 specular 信号
图右:ReBLUR 降噪后的输出

图左:输入 1 spp 的 Shadows 信号
图右:SIGMA 降噪后的输出
ReBLUR 前置知识
空间滤波(Spatial Filtering):Diffuse & Specular
泊松分布样本(poisson samples)
采用泊松分布样本,可以使用更少的样本数:

自适应半径(adaptive radius)
取决于:
-
accumulated frames 的数量:accumulated frames 越多意味着当前 pixel 的噪声干扰越小(结果更准确),就可以把模糊半径调小
-
hit dist:如果 hit dist 比较长,那么周围的 shading point 大概率也会 hit 到该地方,因此把模糊半径调大
-
不需要参考时序上或者空间上的 variance
这样就可以让丢失历史信息的 pixel(即 accumulated frames 不多)更多呈现出模糊而不是噪声。
代码:
float GetBlurRadius(
    float radius, float radiusBias, float radiusScale,
    float hitDistFactor, float nonLinearAccumSpeed,
    float roughness = 1.0
)
{
    // Scale down if accumulation goes well, keeping some non-zero scale to avoid under-blurring
    float r = lerp( gMinConvergedStateBaseRadiusScale, 1.0, nonLinearAccumSpeed );
    // Avoid over-blurring on contact ( tests 76, 95, 120 )
    hitDistFactor = lerp( hitDistFactor, 1.0, nonLinearAccumSpeed );
    r *= hitDistFactor; // TODO: reduce influence if reprojection confidence is low?

    // IMPORTANT: do not apply "hitDistFactor" to radiusBias because it is responsible for error compensation
    // Main composition
    r = radius * r + max( radiusBias, 2.0 * roughness ); // TODO: it would be good to get rid of "max"
    r *= radiusScale;
    // Modify by lobe spread
    r *= GetSpecMagicCurve2( roughness ); // TODO: roughness at hit needed
    // Disable spatial filtering if radius is 0
    r *= float( radius != 0 );
    return r; // TODO: if luminance stoppers are used, blur radius should depend less on hitDistFactor
}
效果:

模糊权重(blur weight)
权重考虑的因素(有些是需要联合考虑的):
- geometry :沿平面方向的距离相差太大,权重调低
- normal :法线相差太大,以至于夹角大过 specular lobe 的半角就拒绝该样本
- hit distance :hit distance 相差太大,权重调低
- roughness(仅 specular):roughness 相差太大,或者 roughness 太小(期望 specular 不那么多模糊),权重调低
- direction and pdf(可选) :direction = L,而 NoL 越大,说明这个方向接受的光照越强,越应该参考它,权重调高。但为了能量守恒,必须还得除于一个 pdf。
sampling space & anisotropic sampling
不同的 brdf lobe,应该在不同的 采样空间(sampling space) 进行采样:
- 对于 specular 物体来说,更应该在 view 为法线的平面中(其实就是传统 screen-space)进行模糊:符合直觉
- 对于 diffuse 来说,则更需要对以 n 为法线的平面上来进行模糊:在 tangent 平面可以保留更多 glancing angle 下的细节

为此,可以统一 specular 和 diffuse 的采样平面计算方法:
- 根据 roughness 来决定采样平面的朝向和半径
- 在实现中,就是通过算出平面的切线 T 和副切线 B 来表示这个平面的朝向和半径
采样平面改进效果:

此外,只要让采样平面拉伸或斜偏(skew)成类椭圆状,就能实现 各向异性采样(anisotropic sampling):
切线 T 和副切线 B 不是 normalized 的,它们的 length 分别代表了这个椭圆平面的短轴长度和长轴长度。
- 越接近 glancing angle ,T 的 length 就会越大
- roughness 决定了斜偏的程度

代码(包含采样平面 & anisotropic sampling):
float2x3 GetKernelBasis( float3 D, float3 N, float NoD, float worldRadius, float roughness = 1.0, float anisoFade = 1.0 )
{
    float3x3 basis = STL::Geometry::GetBasis( N );
    float3 T = basis[ 0 ];
    float3 B = basis[ 1 ];
    if( roughness < 0.95 && NoD < 0.999 )
    {
        float3 R = reflect( -D, N );
        T = normalize( cross( N, R ) );
        B = cross( R, T );
        float skewFactor = lerp( roughness, 1.0, NoD );
        T *= lerp( skewFactor, 1.0, anisoFade );
    }
    T *= worldRadius;
    B *= worldRadius;
    return float2x3( T, B );
}
anisotropic sampling 效果:

时间滤波(Temporal Filtering):Diffuse
surface motion
当前帧 pixel x 进行 back projection 后的位置 xprev,在大部分情况下都不会刚好处于像素的中心(也就是有一定子像素偏移),这时候就需要通过访问其相邻 4 个 pixels 的属性进行加权混合就能得到 xprev 对应的属性。
surface motion:这 4 个历史帧的 pixels 相当于组成了一个历史帧 surface,而这些组成 surface 的 pixels 也被称为 footprints。
当前帧没有 surface,因此默认这里出现的 surface 术语都是指历史帧的。
surface 至少需要包含以下信息:
- previous 4x4 viewZ:实际只会用到 2x2 个
- previous 2x2 normal
- previous 2x2 materialID
- previous 2x2 diffuse accum speed
- previous 2x2 specular accum speed

下一步就是需要 计算各 footprint 的权重:
-
对每个 footprint 都做了以下一种或两种测试,然后输出自定义权重
smbOcclusion0:-
遮挡测试(occlusion test):检查当前的 plane 是否与 previous plane 的距离相差不远
-
ID测试(material ID test):检查当前的 material id 是否和 previous material ID 一样
自定义权重的 x,y,z,w 分别代表第 1,2,3,4 个 footprint 是否通过 occlusion test + material id test。
-
-
通过 uv 坐标得到各个 footprint 的双线性插值(bilinear)权重。
bilinear 权重和自定义权重直接相乘后就能得到各 footprint 的最终权重:
float4 GetBilinearCustomWeights(Bilinear f, float4 customWeights)
{
    float2 oneMinusWeights = 1.0 - f.weights;
    float4 weights = customWeights;
    weights.x *= oneMinusWeights.x * oneMinusWeights.y;
    weights.y *= f.weights.x * oneMinusWeights.y;
    weights.z *= oneMinusWeights.x * f.weights.y;
    weights.w *= f.weights.x * f.weights.y;
    return weights;
}
顺便地,再另外计算一下 xprev 的 quality(也就是用于衡量这个 surface 有多少参考价值,它决定了 temporal 的历史混合系数):
quality = 0 为不具有参考性(意味着 4 个 footprints 都没通过 test),quality = 1 为极度具有参考性。
- 直接对
smbOcclusion0应用双线性插值,就能得到 xprev 的 quality - 顺便用 sqrt01 函数把 quality 往上提一下
float footprintQualityWithMaterialID = STL::Filtering::ApplyBilinearFilter( smbOcclusion0.z, smbOcclusion1.y, smbOcclusion2.y, smbOcclusion3.x, smbBilinearFilter );
footprintQualityWithMaterialID = STL::Math::Sqrt01( footprintQualityWithMaterialID );
历史权重(history weight)
控制 diffuse temporal 混合系数的主要因素:
- diffAccumSpeed(即 accumulated frames 的数量)
- footprintQualityWithMaterialID(x_prev 的质量)
接着通过 bilinear custom weights 算出四个 footprint 的权值,就可以加权混合它们的 accum speed 得到 xprev 的 accum speed:
// 计算出各个 footprint 的最终权值
float4 smbOcclusionWeightsWithMaterialID = STL::Filtering::GetBilinearCustomWeights( smbBilinearFilter, float4( smbOcclusion0.z, smbOcclusion1.y, smbOcclusion2.y, smbOcclusion3.x ) );
....
// AdvanceAccumSpped:加权混合 prevDiffAccumSpeeds 得到 diffAccumSpeed
float diffAccumSpeed = AdvanceAccumSpeed( prevDiffAccumSpeeds, gDiffMaterialMask ? smbOcclusionWeightsWithMaterialID : smbOcclusionWeights );
// 根据 quality 和 diffAccumSpeed,调整 diffAccumSpeed
diffAccumSpeed *= lerp( gDiffMaterialMask ? footprintQualityWithMaterialID : footprintQuality, 1.0, 1.0 / ( 1.0 + diffAccumSpeed ) );
最终,temporal 就是根据 xprev 的 accum speed(并限制在最多 32 帧)混合,输出结果:
A 为 accum speed(accumulated frames)的数量
float diffAccumSpeedNonLinear = 1.0 / ( min( diffAccumSpeed, gMaxAccumulatedFrameNum ) + 1.0 );
ReBLUR_TYPE diffResult = MixHistoryAndCurrent( smbDiffHistory, diff, diffAccumSpeedNonLinear );
此外,源码中还有个 fast history 选项:实际上就是将 accum speed 限制在更少的帧数(fast accum speed),从而历史混合权重更小,滞后效应更小,但可能闪烁严重。
时间滤波(Temporal Filtering):Specular
surface motion
计算 surface motion 的流程,对于 specular 和 diffuse 来说基本是一样的。
surface motion confidence
但是 surface 对 diffuse 和 sepcular 的参考价值各不同:
- 对于 diffuse 来说, surface motion 往往就是最具有参考价值的,其具体质量由 footprintQualityWithMaterialID 决定。
- 对于 specular 来说, surface motion 往往具有更低的参考价值,因为 specular 与很多因素相关,我们还需要除了 footprintQualityWithMaterialID 以外的其它衡量因素,如: parallax, nov, roughness(这些因素的可以合称为 surface motion confidence)
parallax :定义为新观察方向 V 与旧观察方向 Vprev 的偏差。
在观察的物体不移动旋转的情况下,如果 camera 不移动而只是旋转,那么 parallax = 0,此时直接的 back projection 是不会产生任何 artifacts 的。

// Parallax
float smbParallax = ComputeParallax(
    Xprev - gCameraDelta.xyz, 					// 相当于 V_prev
    gOrthoMode == 0.0 ? pixelUv : smbPixelUv,	// X 在当前裁剪空间的位置,实际上也代表了 V
    gWorldToClip,
    gRectSize,
    gUnproject,
    gOrthoMode
);
float ComputeParallax( float3 X, float2 uvForZeroParallax, float4x4 mWorldToClip, float2 rectSize, float unproject, float orthoMode )
{
    // 将 V_prev 变换到裁剪空间中
    float3 clip = STL::Geometry::ProjectiveTransform( mWorldToClip, X ).xyw;
    clip.xy /= clip.z;
    clip.y = -clip.y;
    float2 uv = clip.xy * 0.5 + 0.5;

    float invDist = orthoMode == 0.0 ? rsqrt( STL::Math::LengthSquared( X ) ) : rcp( clip.z );

    // 计算 V_prev 与 V 之间的偏差
    float2 parallaxInUv = uv - uvForZeroParallax;
    float parallaxInPixels = length( parallaxInUv * rectSize );
    float parallaxInUnits = PixelRadiusToWorld( unproject, orthoMode, parallaxInPixels, clip.z );
    float parallax = parallaxInUnits * invDist;

    return parallax * NRD_PARALLAX_NORMALIZATION;
}
diffuse 与 view 无关,但 specular 与 view 相关;相邻两帧间的 view 可能发生偏差,导致 xprev 的 specular 对当前帧 pixel x 的 specular 参考价值变低。
也就是说,parallax 越大就说明 surface motion 这个历史信息越不可靠:
- 历史混合权重应该更低
- 应用更宽的 variance clamping(源码未实现)
作者认为对于干净的 hit-dist 输入信号,variance 会比较小,从而 clamping 会十分有用。可惜在 ReBLUR pipeline 中,Pre-blur 还不足以保证输出信号的充分降噪,因此不太适合使用 clamping,强行使用只会浪费性能。
在最后计算 smbSpecAccumSpeed(即 accumulated frames 的数量)的时候会用到形如下的函数 f,即 GetSpecAccumSpeed:
A=f(A,n⋅v,parallex)
- roughness:对于 roughness 很小的情况下,f 的输出会更小
- parallax:对于 parallax 很大(即两帧之间视角差别很大时)的情况下,f 的输出会更小
- nov:f 的输出应当比 n⋅v 的绝对值更小(surface motion 本身没有考虑菲涅尔效应)
ps:f 输出越小,那么历史混合权重就越小
float GetSpecAccumSpeed( float maxAccumSpeed, float roughness, float NoV, float parallax, float curvature, float viewZ )
{
    // Artificially increase roughness if parallax is low to get a few frames of accumulation // TODO: is there a better way?
    float smbParallaxNorm = SaturateParallax( parallax * REBLUR_PARALLAX_SCALE );
    roughness = roughness + saturate( 0.05 - roughness ) * ( 1.0 - smbParallaxNorm );

    // Recalculate virtual roughness from curvature
    float pixelSize = PixelRadiusToWorld( gUnproject, gOrthoMode, 1.0, viewZ );
    float curvatureAngleTan = abs( curvature ) * pixelSize * gFramerateScale;

    float percentOfVolume = 0.75;
    float roughnessFromCurvatureAngle = STL::Math::Sqrt01( curvatureAngleTan * ( 1.0 - percentOfVolume ) / percentOfVolume );

    roughness = lerp( roughness, 1.0, roughnessFromCurvatureAngle );

    float acos01sq = saturate( 1.0 - NoV * 0.99999 ); // see AcosApprox()
    float a = STL::Math::Pow01( acos01sq, REBLUR_SPEC_ACCUM_CURVE );
    float b = 1.1 + roughness * roughness;
    float parallaxSensitivity = ( b + a ) / ( b - a );

    float powerScale = 1.0 + parallaxSensitivity * parallax * REBLUR_PARALLAX_SCALE; // TODO: previously was REBLUR_PARALLAX_SCALE => gFramerateScale
    float accumSpeed = GetSpecAccumulatedFrameNum( roughness, powerScale );
    accumSpeed = min( accumSpeed, maxAccumSpeed );
    return accumSpeed * float( gResetHistory == 0 );
}
virtual motion
这个方法和 2021 reliable motion vector 的 glossy motion vector 是相似的思路。
上面说到 surface motion 有时候可能对 specular 的参考价值不大,因为它的思路是跟踪着色点,而我们更应该跟踪反射点(specular 贡献最大的地方),于是就需要另一种方式计算出的参考位置,也就是 virtual motion。
virtual motion,核心是通过 hit dist 和 view 算出虚像的位置 xvirtual,然后 previous camera 和虚像的位置连线后相交于以 x 为准的平面,就能得到前一帧反射点 virtualPrev ,这个点便是我们更应该参考的点,因为它往往是反射最强烈的点(在镜面反射情形下它就是最佳参考点)。
虚像是指物体沿反射平面翻转后形成的虚假形象,它与反射点相连恰恰就是 view 的方向。这是使用虚像是为了方便计算,不然对着实像去做 motion,又得引入各种额外的 reflect 等计算。
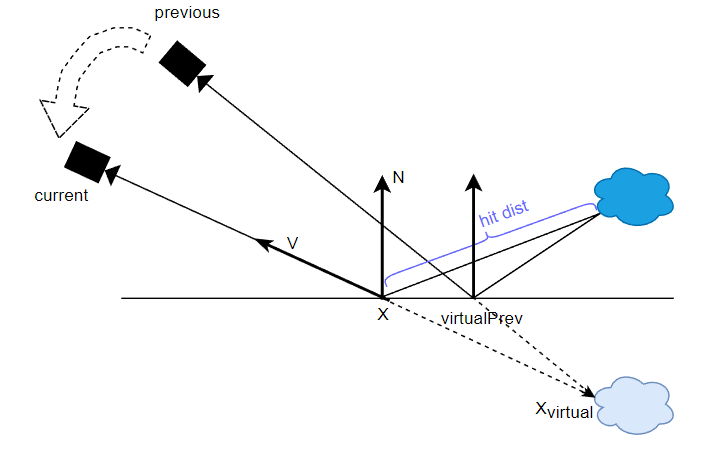
// 用于说明,非源码
float3 Xvirtual = X - V * hitDist;
float2 pixelUvVirtualPrev = GetScreenUv( gWorldToClipPrev , Xvirtual );
然而实际上的 specular 不可能全部都是 mirror reflection(roughness = 0),也就是说它的 lobe 可能是胖一些的(roughness>0):

对于非 mirror reflection 的 lobe,我们希望应该参考反射稍弱一些的地方,因此可以根据 roughness 来调整 xvirtual 的位置:roughness 越大,那么就让它越靠近表面的 x,从而得到更加偏离反射点的 virtualPrev。

// 用于说明,非源码
float f = GetSpecularDominantFactor(NoV, roughness);
float3 Xvirtual = X - V * hitDist * f;
float2 pixelUvVirtualPrev = GetScreenUv( gWorldToClipPrev , Xvirtual );
这个根据 roughness 来决定的距离比例函数 GetSpecularDominantFactor 如下:
float GetSpecularDominantFactor(float NoV, float linearRoughness, compiletime const uint mode = STL_SPECULAR_DOMINANT_DIRECTION_DEFAULT)
{
    float dominantFactor;
    if (mode == STL_SPECULAR_DOMINANT_DIRECTION_G2)
    {
        float a = 0.298475 * log(39.4115 - 39.0029 * linearRoughness);
        dominantFactor = Math::Pow01(1.0 - NoV, 10.8649) * (1.0 - a) + a;
    }
    else if (mode == STL_SPECULAR_DOMINANT_DIRECTION_G1)
        dominantFactor = 0.298475 * NoV * log(39.4115 - 39.0029 * linearRoughness) + (0.385503 - 0.385503 * NoV) * log(13.1567 - 12.2848 * linearRoughness);
    else
    {
        float s = 1.0 - linearRoughness;
        dominantFactor = s * (Math::Sqrt01(s) + linearRoughness);
    }
    return saturate(dominantFactor);
}
virtual motion confidence
对于 specular 来说,surface motion 可以通过 parallax, nov, roughness 等来衡量它的可参考性,而 virtual motion 的参考价值也不是完美的,因此也需要有 virtual motion confidence 来衡量它的可参考性:
- hit dist:如果 hit dist 变化不大,那么增强一些 confidence
// Virtual motion confidence
float smbHitDist = ExtractHitDist( lerp( spec, smbSpecHistory, STL::Math::SmoothStep( 0.04, 0.11, roughnessModified ) ) ); // see tests 114 and 138
smbHitDist *= hitDistScale;

float vmbHitDist = ExtractHitDist( vmbSpecHistory );
vmbHitDist *= _ReBLUR_GetHitDistanceNormalization( dot( vmbViewZs, 0.25 ), gHitDistParams, vmbRoughness );

float3 smbXvirtual = GetXvirtual( NoV, smbHitDist, curvature, X, Xprev, V, dominantFactor );
float2 uv1 = STL::Geometry::GetScreenUv( gWorldToClipPrev, smbXvirtual, false );
float3 vmbXvirtual = GetXvirtual( NoV, vmbHitDist, curvature, X, Xprev, V, dominantFactor );
float2 uv2 = STL::Geometry::GetScreenUv( gWorldToClipPrev, vmbXvirtual, false );

float hitDistDeltaScale = min( specAccumSpeed, 10.0 ) * lerp( 1.0, 0.5, saturate( gSpecPrepassBlurRadius / 5.0 ) ); // TODO: is it possible to tune better?
float deltaParallaxInPixels = length( ( uv1 - uv2 ) * gRectSize );
float virtualMotionHitDistWeight = saturate( 1.0 - hitDistDeltaScale * deltaParallaxInPixels );
- prev prev:计算出 xprev 位置与 xvirtual 位置的单位位移方向(delta),然后从 xvirtual 往 delta 方向移动若干次(源码迭代次数为2次),每次停留下来的点拿去检测:如果 normal 变化不大,那么增强一些 confidence
这个操作主要是为了解决在光滑平面接受粗糙表面 radiance 的 failure case,里面实际上还综合考虑了 viewz,roughness,具体可看源码。

// Virtual motion confidence - fixing trails if radiance on a flat surface is taken from a sloppy surface
float2 virtualMotionDelta = vmbPixelUv - smbPixelUv;
virtualMotionDelta *= STL::Math::Rsqrt( STL::Math::LengthSquared( virtualMotionDelta ) );
virtualMotionDelta /= gRectSizePrev;
virtualMotionDelta *= saturate( smbParallaxInPixels / 0.1 ) + smbParallaxInPixels;

float virtualMotionPrevPrevWeight = 1.0;
[unroll]
for( uint i = 1; i <= ReBLUR_VIRTUAL_MOTION_NORMAL_WEIGHT_ITERATION_NUM; i++ )
{
	float2 vmbPixelUvPrev = vmbPixelUv + virtualMotionDelta * i;

	float4 vmbNormalAndRoughnessPrev = UnpackNormalAndRoughness( gIn_Prev_Normal_Roughness.SampleLevel( gLinearClamp, vmbPixelUvPrev * gRectSizePrev * gInvScreenSize, 0 ) );
	float3 vmbNprev = STL::Geometry::RotateVector( gWorldPrevToWorld, vmbNormalAndRoughnessPrev.xyz );

	float w = GetEncodingAwareNormalWeight( N, vmbNprev, angle + curvatureAngle * i );

	float wr = GetEncodingAwareRoughnessWeights( roughness, vmbNormalAndRoughnessPrev.w, roughnessFraction );
	w *= lerp( 0.25 * i, 1.0, wr );

	// Ignore pixels from distant surfaces
	// TODO: with this addition test 3e shows a leak from the bright wall
	float vmbZprev = UnpackViewZ( gIn_Prev_ViewZ.SampleLevel( gLinearClamp, vmbPixelUvPrev * gRectSizePrev * gInvScreenSize, 0 ) );
	float wz = GetBilateralWeight( vmbZprev, Xvprev.z );
	w = lerp( 1.0, w, wz );

	virtualMotionPrevPrevWeight *= IsInScreen( vmbPixelUvPrev ) ? w : 1.0;
	virtualMotionRoughnessWeight *= wr;
}
根据 virtual motion confidence,计算出 virtual motion 的 accum speed:
// Virtual motion - accumulation acceleration
float responsiveAccumulationAmount = GetResponsiveAccumulationAmount( roughness );
float vmbSpecAccumSpeed = GetSpecAccumSpeed( specAccumSpeed, lerp( 1.0, roughnessModified, responsiveAccumulationAmount ), 0.99999, 0.0, 0.0, 1.0 );

float smc = GetSpecMagicCurve2( roughnessModified, 0.97 );
vmbSpecAccumSpeed *= lerp( smc, 1.0, virtualMotionHitDistWeight );
vmbSpecAccumSpeed *= virtualMotionPrevPrevWeight;
如果 virtual motion confidence 比较低,那么还可以再给 surface motion 的 accum speed 额外调高些:
// Surface motion - allow more accumulation in regions with low virtual motion confidence ( test 9 )
float roughnessBoost = ( 0.1 + 0.3 * roughnessModified ) * ( 1.0 - roughnessModified );
float roughnessBoostAmount = virtualHistoryAmount * ( 1.0 - virtualMotionRoughnessWeight );
float roughnessBoosted = roughnessModified + roughnessBoost * roughnessBoostAmount;
float smbSpecAccumSpeed = GetSpecAccumSpeed( specAccumSpeed, roughnessBoosted, NoV, smbParallax, curvature, viewZ );
历史权重(history weight)
有了基于 surface motion 计算出来的 smbSpecAccumSpeed 和基于 virtual motion 计算出来的 vmbSpecAccumSpeed,用于计算出两种 motion 方式的混合比例:
// Fallback to surface motion if virtual motion doesn't go well
virtualHistoryAmount *= saturate( ( vmbSpecAccumSpeed + 0.1 ) / ( smbSpecAccumSpeed + 0.1 ) );
根据混合比例,混合出 specular 历史 color 和 accum speed:
REBLUR_TYPE specHistory = lerp( smbSpecHistory, vmbSpecHistory, virtualHistoryAmount );
// Accumulation with checkerboard resolve // TODO: materialID support?
specAccumSpeed = InterpolateAccumSpeeds( smbSpecAccumSpeed, vmbSpecAccumSpeed, virtualHistoryAmount );
最终,和 diffuse temporal filtering 相似,根据 xprev 的 accum speed(并限制在最多 32 帧)混合,输出结果:
实际上,这里的混合还是和 diffuse temporal filtering 有所不同,因为这里还额外用 roughness 去稍微限制一下混合权重,具体可看源码。个人猜测理由是:specular 信号相比 diffuse 信号在时间域上的变化更加高频,因此不易太多 accumulation(低频化)。
float specAccumSpeedNonLinear = 1.0 / ( min( specAccumSpeed, gMaxAccumulatedFrameNum ) + 1.0 );
REBLUR_TYPE specResult = MixHistoryAndCurrent( specHistory, spec, specAccumSpeedNonLinear, roughnessModified );
ReBLUR Diffuse-Specular Pipeline

ps:反向的箭头是指上一帧的输出信息被 temporal 所利用
其它功能:
- performance mode(性能模式):主要就是关闭了 History fix 的相当部分代码,增速至约 1.25 倍
- 支持 Checkerboard Resolve(棋盘式渲染),即 0.5 SPP 信号
- 支持输入 Occlusion 信号,可以做额外实现 AO 降噪这个附加功能
Pass 1: Pre-blur
其实就是 spatial filtering:
- 使用固定的半径(实际上取决于 hit dist):对原始输入图像去做一个初步的降噪,从而粗略的完成 outliers removal
Pass 2: Accumulation
其实就是 temporal filtering,其所需的历史帧信息:
- accum speed:成功累积的帧数,可以理解成对应的 fragment 已经在屏幕中存活了多久
- viewz:深度
- normal & roughness
- material ID
- diffuse color
- specular color
可以看到 Accumulation 所需要的存储和带宽都比较大。
Pass 3: History Fix
有些 pixel 的 accumulated frames 数量很少(一般都是刚出现在屏幕0~3帧的 pixels),它只剩下初始的 1 spp 信号(缺少历史信息,往往充满噪声),这时候就需要对其重建历史:
- 取 3x3 周围 pixels 的 accum speed 并进行混合得到该 pixel 的 accum speed
- 如果 accum speed 低于某个阈值,说明缺少历史信息,然后进行 5x5 的简化版 spatial filtering 得到重建后(其实就希望用 blur 替代噪声)的 diffuse/specular 信号和 viewz
源代码中并没有看到对 diffuse/specular 信号或 viewz 生成了 mip,可能是原方法太过耗时,效果提升不大,不如干脆就做一遍 blur。
此外,performance mode 相关的代码基本都在 History fix Pass,开启 performance mode 可以加速 ReBLUR 性能到约 1.25 倍。
Pass 4: Blur & Pass 5: Post-blur
两个 pass 也都是 spatial filtering:
- 都是自适应半径(取决于 accumulated frames 和 hit dist)
- 但 Blur 使用较小的 radius scale,而 Post-blur 使用更大的 radius scale
为什么 Blur 和 Post-Blur 两个 Pass 几乎没区别,却不合并成一个 Blur Pass,个人理解是跟 a-trous 思想类似,只不过这种方式只有两层 Blur:

Pass 6: Temporal Stabilization
temporal stabilization != temporal accumulation,而是类似 TAA 的 filter:
- 基于 variance 的 clamping:相比 TAA 使用更宽的半径范围,clamp 掉的 history 以一定权重混合 current
- 不引入额外的延迟
虽然看代码,大部分还是 temporal filtering 的内容,但是就是通过 anti-lag 的处理和 clamping 才实现了类似 TAA 的效果。
SIGMA 前置知识
Tile-based Denoising
可以将屏幕分成一块块 tile,如果 tile 内部有至少一个需要降噪的 pixel,则将该 tile 加入需要降噪的 tile 队列。
对于 shadows 信号,图像内其实含有大量无需降噪的 pixels(例如整块 tile 都是被照亮的或者被遮挡的):

我们只需要对标记了的 tiles 进行降噪操作。
空间滤波(Spatial Filtering):Shadows
估测 occluder 平均距离
hit dist 意味着 shading point 到 occluder 的距离,而由于每个 pixel 的 hit dist 往往是 noisy 的,而后面的模糊步骤需要依赖干净一些的 hit dist 信息来指导,因此先做了一次屏幕空间上固定半径的基于深度权重的 spatial filtering:
其实也顺便 blur 了一下 visibility。
float sum = 0;
float hitDist = 0;
SIGMA_TYPE result = 0;
[unroll]
for( j = 0; j <= BORDER * 2; j++ )
{
	[unroll]
	for( i = 0; i <= BORDER * 2; i++ )
	{
		int2 pos = threadPos + int2( i, j );
		float2 data = s_Data[ pos.y ][ pos.x ];
		SIGMA_TYPE s = s_Shadow_Translucency[ pos.y ][ pos.x ];
		float h = data.x;
		float signNoL = float( data.x != 0.0 );
		float z = data.y;
		float w = 1.0;
		if( !( i == BORDER && j == BORDER ) )
		{
			w = GetBilateralWeight( z, viewZ );
			w *= saturate( 1.0 - abs( centerSignNoL - signNoL ) );
		}
		result += s * w;
		hitDist += h * float( s.x != 1.0 ) * w;
		sum += w;
	}
}
float invSum = 1.0 / sum;
result *= invSum;
hitDist *= invSum;
sampling space
与 diffuse 相似,对阴影模糊更应该在以 n 为法线的平面进行空间滤波(而非以 view 为法线的屏幕空间上):

在以 n 为法线的平面上分布的 poisson samples 还需要转换回屏幕空间 uv 坐标以便访问对应 pixel 的 visibility:
float2 GetKernelSampleCoordinates( float4x4 mToClip, float3 offset, float3 X, float3 T, float3 B, float4 rotator = float4( 1, 0, 0, 1 ) )
{
    #if( NRD_USE_QUADRATIC_DISTRIBUTION == 1 )
        offset.xy *= offset.z;
    #endif

    // We can't rotate T and B instead, because T is skewed
    offset.xy = STL::Geometry::RotateVector( rotator, offset.xy );

    float3 p = X + T * offset.x + B * offset.y;
    float3 clip = STL::Geometry::ProjectiveTransform( mToClip, p ).xyw;
    clip.xy /= clip.z;
    clip.y = -clip.y;

    float2 uv = clip.xy * 0.5 + 0.5;

    return uv;
}
SIGMA Shadow Pipeline
核心在于,输入 shadows 信号(是屏幕图像,而不是 shadowmap),每个 pixel 值代表了它的 visibility(可见性),对被标记的 tile 里的所有 pixels 做 2 次空间滤波 + 1 次时域滤波。
一般来讲,要使用 SIGMA,就要一个光源对场景生成一张屏幕图像,多个光源就得多张屏幕图像,因此应当只用在比较重要的主光源上。
SIGMA 可以结合较低采样数(如 2 SPP)的 PCF 或者 PCSS 来减少性能开销,然后通过空间滤波和时域滤波的方式直接模糊掉 noise,但 SIGMA 本身并不会特别耗性能,因为借它助 tile-based 特性大量剔除了无关计算。
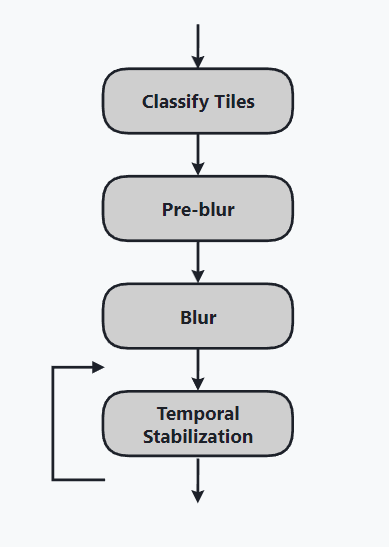
Pass 1: Classify Tiles
将屏幕分成若干个 tiles,对每个 tile :
- 检测内部共 256 个 pixels 是否同时全被照亮或者同时全被遮挡:若不满足,则将该 tile 标记成应当 denosing
- tile 内部每个 pixel 根据 hit dist 计算出 world radius(hit dist 越长往往更容易处于半影处),同时计算它投影在屏幕上的大小 pixel radius,并且比较并记录本 tile 中最大的 pixel radius 为 max radius。
Pass 2: Pre-blur & Pass 3: Blur
类似于 ReBLUR 的 Blur & Post-blur(两层空间滤波),不过每个 Pass 开头,先对 hit dist 和 visibility 做了一个固定半径的基于深度权重的粗糙模糊,接着才开始更正式的模糊:
- 根据 hit dist 和 Pass 1 计算出的 max radius 决定模糊半径
- 模糊权重基本上只考虑了 geometry 因素
Pass 4: Temporal Stabilization
类似于 ReBLUR 的 temporal stabilization,都是 TAA 效果:
- 基于 variance 的 clamping
- 不引入额外的延迟
ReLAX
主要是基于 SVGF + a-trous 的思路来做,然后对 diffuse 和 specular 两种信号分别进行了优化(在 ReBLUR 也能找到这些优化的踪影),核心是对 clamping 进行优化从而实现 fast history,对 RTXDI 的信号更加适用。
在 GI 中,实际性能与没开性能模式的 ReBLUR 差不多,且大部分场景下质量也不如性能模式下的 ReBLUR,因此此处就不深入剖析其源码了,推荐还是使用 ReBLUR+SIGMA。
总结
性能表现:
- RTX 3090,2K 分辨率:
- ReBLUR = 2.72 ms

- 个人实测:RTX2060,2K 分辨率,纯跑光追 20+ ms:
- ReBLUR = ReLAX = 10 ms
- ReBLUR: performance mode = 7~8 ms = 1.25倍的提升
- SIGMA = 2~3 ms
总的来说,NRD 通过利用了非常多的历史信息(导致高带宽高存储)和多层 spatial/temporal pass 去做出非常高质量的降噪效果。也就是说它太过重量级了,如果我们要实际应用于自己的光追信号,可以适当参考 NRD 的一些技术点,设计出一个更轻量级的 denoising pipeline。
当然,它的各种工业界的 trick 也很厉害,各种小参数用不同的函数形式(甚至还用一些 magic curves)倒来倒去,最后来影响最主要的参数(半径、权重之类)。