-
【Linux系统管理】12 服务管理
2 服务管理
2.1 服务的简介与分类
Windows 查看服务的管理,使用"services.msc"的指令操作

启动类型分为:自动,手动,禁用。自动代表下次开机之后,服务会随着系统的启动自动启动该服务,不需要人为参与。禁用代表开机之后不运行该服务。Windows 有一个特有的状态:手动 代表开机之后服务不运行,但是如果有其他服务需要调用该服务,该服务可以不经过管理员的同意就启动运行该服务。
该特有的状态Windows:手动 启动类型服务,在Linux系统是不可能实现的。
不管是Windows 还是 Linux 系统下,尽量将不需要的服务进行关闭,降低机器的性能消耗。开的服务越少,报错的概率就越少。被攻击的机率也越少。是相关机器的优化策略。
Linxu 服务分类:
-
RPM包安装的服务:
-
- 独立的服务:
-
-
- 1)启动:/etc/init.d/httpd start [推荐使用] && service httpd start
- 2)自启动:chkconfig --level 2345 httpd on|off && 修改 vi /etc/rc.local(或者 /etc/rc.d/rc.local)[推荐使用]
-
-
-
-
- /etc/init.d/httpd start
- chkconfig 和 vi /etc/rc.local 只能使用一个服务自启动,如果同时设置则会启动会有提示信息。
-
-
-
-
- 3)使用 ntsysv 命令:
-
-
- 基于xinetd的服务:
-
-
- 1)启动:vi /etc/xinetd.d/telnet 中的 disable = yes 改为 disable = no;然后重启xinetd服务,service xinetd restart
- 2)自启动:chkconfig xinetd on
- 3)使用 ntsysv 命令
-
-
源码包安装的服务:
-
- 1)启动:/usr/local/apache2/bin/apachectl start
- 2)自启动:修改 vi /etc/rc.local 添加 /usr/local/apache2/bin/apachectl start
xinetd 服务的查看需要手动安装 xinetd 的软件包
> yum install -y xinetd
> chkconfig --list
xinetd 的服务大部分是不太常用的服务,rsync 就是 xinetd 服务管理。
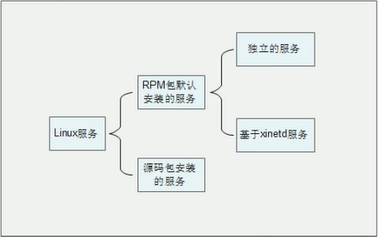
- RPM 包默认安装的服务
这些服务是通过 RPM 包安装的,可以被服务管理命令识别。又分为两种子分类:
-
独立的服务:就是独立启动的意思,这类型的服务可以自行启动,而不用依赖其他的管理服务。不依赖其他管理服务,那么当客户端请求访问时,独立的服务响应请求更快速。
-
- Linux 中目前大多数服务都是独立的服务,比如 apache 服务,FTP 服务,Samba 服务等。
-
基于 xinetd 的服务(基本不用了):这种服务就不能独立启动了,而是要依靠管理服务来调用这种服务。这个负责管理的服务就是 xinetd 服务,xinetd 服务是系统的超级守护进程。xinetd服务的作用就是管理不能独立启动的服务,当有客户端请求时,先请求 xinetd 服务,由 xinetd 服务去唤醒相对应的服务。当客户端请求结束后,被唤醒的服务会关闭并释放资源。这样做的好处是只需要持续启动 xinetd 服务,而其他基于 xinetd 的服务只有在需要时才启动,不会占用过的的服务器资源。但是这种服务由于在有客户端请求时才会被唤醒,所以相应时间相对较慢。
-
源码包安装的服务
查询已经安装的服务和区分服务
[root@localhost ~]# chkconfig --list [服务名] 选项: --list:列出所有 RPM 默认安装服务的自启动状态- 1
- 2
- 3
2.2 RPM 包默认安装的服务管理
2.2.1 独立的服务管理
1)、独立服务的启动管理
- 使用 /etc/init.d/ 目录中的启动脚本启动服务
/etc/init.d/httpd start- 1
- 使用 service 命令来启动独立的服务
service 服务名 start|stop|restart|......- 1
2)、独立服务的自启动管理
- 使用 chkconfig 服务自启动管理命令(通过命令将服务设置成开机自动运行)
[root@localhost ~]# chkconfig [--level运行级别] [独立服务名] [on|off] #选项: --level:设定在哪个运行级别中开机自启动(on),或是关闭自启动(off) [root@localhost ~]# chkconfig --level 2345 httpd on- 1
- 2
- 3
- 4
- 修改/etc/rc.d/rc.local 文件,设置服务自启动(通过修改开机自动运行的配置文件启动)
~ vim /etc/rc.local #!/bin/sh # # This script will be executed *after* all the other init scripts. # You can put your own initialization stuff in here if you don't # want to do the full Sys V style init stuff. touch /var/lock/subsys/local /etc/init.d/httpd start- 1
- 2
- 3
- 4
- 5
- 6
- 7
- 8
- 9
3)、使用 ntsysv 命令管理自启动
[root@localhost ~]# ntsysv [--level运行级别] 选项: --level运行级别:可以指定设定自启动的运行级别- 1
- 2
- 3
这个命令的操作是这样的:
- 上下键:在不同服务之间移动
- 空格键:选定或取消服务的自启动。就是在服务之前是否打入“*”
- tab键:在不同项目间切换
- F1键:显示服务的说明

ntsysv 只开启了纯字符界面的 init 3 的进程服务开机自启动。
2.2.2 基于 xinetd 服务的管理
1)、基于 xinetd 服务的启动
我们使用telnet服务来举例,telnet服务是用来进程系统远程管理的,端口时23。不过需要注意的是 telnet 的远程管理数据在网络当中是明文传输,非常不安全。所以我们在生产服务器上是不建议启动telnet服务的,我们这里只是举例而已。在生成服务器上,远程管理使用的是ssh 协议,ssh是加密的更加安全。
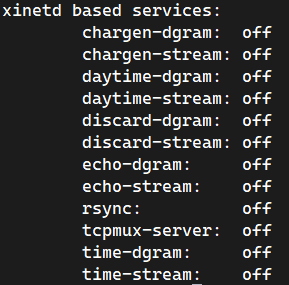
~ yum install -y telnet-server #查看 xinetd 服务列表 ~ chkconfig --list | tail -n 14 xinetd based services: chargen-dgram: off chargen-stream: off daytime-dgram: off daytime-stream: off discard-dgram: off discard-stream: off echo-dgram: off echo-stream: off rsync: off tcpmux-server: off telnet: off time-dgram: off time-stream: off #需要修改xinetd配置文件设置自启动 ~ vim /etc/xinetd.d/telnet # default: on # description: The telnet server serves telnet sessions; it uses \ # unencrypted username/password pairs for authentication. service telnet #服务的名称为 telnet { flags = REUSE #标志为 REUSE,设定TCP/IP socket可重用 socket_type = stream #使用TCP协议数据包 wait = no #允许多个连接同时连接 user = root #启动服务的用户为 root server = /usr/sbin/in.telnetd #服务的启动顺序 log_on_failure += USERID #登录天数后,记录用户的ID disable = yes #服务不启动 } #修改 /etc/xinetd.d/telnet 配置文件 ~ vim /etc/xinetd.d/telnet # default: on # description: The telnet server serves telnet sessions; it uses \ # unencrypted username/password pairs for authentication. service telnet #服务的名称为 telnet { ...省略部分输出... disable = no } #重新启动 xinetd 服务 ~ service xinetd restart Stopping xinetd: [FAILED] Starting xinetd: [ OK ] ~ netstat -auntlp | grep xinetd tcp 0 0 :::23 :::* LISTEN 2640/xinetd- 1
- 2
- 3
- 4
- 5
- 6
- 7
- 8
- 9
- 10
- 11
- 12
- 13
- 14
- 15
- 16
- 17
- 18
- 19
- 20
- 21
- 22
- 23
- 24
- 25
- 26
- 27
- 28
- 29
- 30
- 31
- 32
- 33
- 34
- 35
- 36
- 37
- 38
- 39
- 40
- 41
- 42
- 43
- 44
- 45
- 46
- 47
- 48
- 49
- 50
- 51
2)、基于xientd服务的自启动
- 使用chkconfig命令管理自启动
- 使用ntsysv命令管理自启动
[root@localhost]# chkconfig 服务名 on|off #基于xinetd 的服务,没有自己的运行级别,是依靠xinetd服务的运行级别。所以不用指定--level选项 ~ chkconfig --list | tail -n 14 xinetd based services: chargen-dgram: off chargen-stream: off daytime-dgram: off daytime-stream: off discard-dgram: off discard-stream: off echo-dgram: off echo-stream: off rsync: off tcpmux-server: off telnet: on time-dgram: off time-stream: off- 1
- 2
- 3
- 4
- 5
- 6
- 7
- 8
- 9
- 10
- 11
- 12
- 13
- 14
- 15
- 16
- 17
2.2.3 独立服务的启动脚本分析
既然独立的服务启动是依靠/etc/init.d/httpd这个脚本来进行启动管理的,那么这个脚本中到底是什么样子的?既然我们已经学习了shell脚本,那么我们就来学习一下这个脚本到底是怎么实现apache服务的管理的。
~ vim /etc/init.d/httpd #!/bin/bash # # httpd Startup script for the Apache HTTP Server # # chkconfig: - 85 15 #自启动设置,- 代表自启动级别,85(S85)代表开机启动序号,15(K15)代表关机关闭序号 # description: The Apache HTTP Server is an efficient and extensible \ # server implementing the current HTTP standards. #服务描述,以上两行用于 apache 自启动 # processname: httpd # config: /etc/httpd/conf/httpd.conf # config: /etc/sysconfig/httpd # pidfile: /var/run/httpd/httpd.pid # ### BEGIN INIT INFO # Provides: httpd # Required-Start: $local_fs $remote_fs $network $named # Required-Stop: $local_fs $remote_fs $network # Should-Start: distcache # Short-Description: start and stop Apache HTTP Server # Description: The Apache HTTP Server is an extensible server # implementing the current HTTP standards. ### END INIT INFO #以上都是注释 # Source function library. . /etc/rc.d/init.d/functions #"." 其实就是source,就是调用 functions 文件 if [ -f /etc/sysconfig/httpd ]; then . /etc/sysconfig/httpd fi #判断httpd如果是文件,则调用httpd文件 # Start httpd in the C locale by default. HTTPD_LANG=${HTTPD_LANG-"C"} #定义变量HTTPD_LANG的值,并追加变量的值为C,即英文 # This will prevent initlog from swallowing up a pass-phrase prompt if # mod_ssl needs a pass-phrase from the user. INITLOG_ARGS="" # Set HTTPD=/usr/sbin/httpd.worker in /etc/sysconfig/httpd to use a server # with the thread-based "worker" MPM; BE WARNED that some modules may not # work correctly with a thread-based MPM; notably PHP will refuse to start. # Path to the apachectl script, server binary, and short-form for messages. apachectl=/usr/sbin/apachectl httpd=${HTTPD-/usr/sbin/httpd} prog=httpd pidfile=${PIDFILE-/var/run/httpd/httpd.pid} lockfile=${LOCKFILE-/var/lock/subsys/httpd} #定义一系列变量,用于后面的执行 RETVAL=0 #定义全局命令返回变量 STOP_TIMEOUT=${STOP_TIMEOUT-10} # The semantics of these two functions differ from the way apachectl does # things -- attempting to start while running is a failure, and shutdown # when not running is also a failure. So we just do it the way init scripts # are expected to behave here. start() { echo -n $"Starting $prog: " LANG=$HTTPD_LANG daemon --pidfile=${pidfile} $httpd $OPTIONS RETVAL=$? echo [ $RETVAL = 0 ] && touch ${lockfile} return $RETVAL } #定义start函数,用于apache的启动 #如果守护进程/usr/sbin/httpd启动成功($RETVAL = 0),就建立/var/lock/subsys/httpd文件 #(touch ${lockfile})。通过$httpd变量执行/usr/sbin/httpd命令启动 apache。通过$pidfile变量调用apache #的PID。通过变量$OPTIONS定义命令执行时的初始化环境配置,依赖/etc/sysconfig/httpd文件 # When stopping httpd, a delay (of default 10 second) is required # before SIGKILLing the httpd parent; this gives enough time for the # httpd parent to SIGKILL any errant children. stop() { status -p ${pidfile} $httpd > /dev/null if [[ $? = 0 ]]; then echo -n $"Stopping $prog: " killproc -p ${pidfile} -d ${STOP_TIMEOUT} $httpd else echo -n $"Stopping $prog: " success fi RETVAL=$? echo [ $RETVAL = 0 ] && rm -f ${lockfile} ${pidfile} } #定义stop函数,用来关闭apache服务,关闭服务之后会删除pid文件 reload() { echo -n $"Reloading $prog: " if ! LANG=$HTTPD_LANG $httpd $OPTIONS -t >&/dev/null; then RETVAL=6 echo $"not reloading due to configuration syntax error" failure $"not reloading $httpd due to configuration syntax error" else # Force LSB behaviour from killproc LSB=1 killproc -p ${pidfile} $httpd -HUP RETVAL=$? if [ $RETVAL -eq 7 ]; then failure $"httpd shutdown" fi fi echo } #定义reload函数,用于apache的重新加载 #通过/usr/sbin/httpd -t 命令判断apache的配置文件,如果配置文件报错,则输出错误提示,如果 #配置文件正确,则重新加载apache # See how we were called. case "$1" in #判断执行脚本后的第一个参数的值,$1 表示执行脚本时的第一个参数 start) start ;; #如果参数值为start,则调用 start 函数 stop) stop ;; #如果参数值为stop,则调用 stop 函数 status) status -p ${pidfile} $httpd RETVAL=$? ;; #如果参数值为status,则执行 status -p $httpd 命令测试 apache 状态 restart) stop start ;; #如果参数值为restart,则先调用 stop 函数,再调用 start 函数 condrestart|try-restart) if status -p ${pidfile} $httpd >&/dev/null; then stop start fi ;; #如果参数值为condrestart或 try-restart,则只有apache 服务是已经运行时才先调用stop函数,再调 #用start函数,重启apache。如果apache服务没有运行,则不重启 apache。 force-reload|reload) reload ;; #如果参数值为force-reload或 reload,则调用reload函数。 graceful|help|configtest|fullstatus) $apachectl $@ RETVAL=$? ;; #如果参数是graceful或help或configtest或fullstatus,则执行/usr/sbin/apachectl命令,并把参 #数作为命令的参数传入 apachectl命令。 *) echo $"Usage: $prog {start|stop|restart|condrestart|try-restart|force-reload|reload|status|fullstatus|graceful|help|configtest}" RETVAL=2 #如果输出的参数不是以上任何参数,,则输出错误信息 esac exit $RETVAL- 1
- 2
- 3
- 4
- 5
- 6
- 7
- 8
- 9
- 10
- 11
- 12
- 13
- 14
- 15
- 16
- 17
- 18
- 19
- 20
- 21
- 22
- 23
- 24
- 25
- 26
- 27
- 28
- 29
- 30
- 31
- 32
- 33
- 34
- 35
- 36
- 37
- 38
- 39
- 40
- 41
- 42
- 43
- 44
- 45
- 46
- 47
- 48
- 49
- 50
- 51
- 52
- 53
- 54
- 55
- 56
- 57
- 58
- 59
- 60
- 61
- 62
- 63
- 64
- 65
- 66
- 67
- 68
- 69
- 70
- 71
- 72
- 73
- 74
- 75
- 76
- 77
- 78
- 79
- 80
- 81
- 82
- 83
- 84
- 85
- 86
- 87
- 88
- 89
- 90
- 91
- 92
- 93
- 94
- 95
- 96
- 97
- 98
- 99
- 100
- 101
- 102
- 103
- 104
- 105
- 106
- 107
- 108
- 109
- 110
- 111
- 112
- 113
- 114
- 115
- 116
- 117
- 118
- 119
- 120
- 121
- 122
- 123
- 124
- 125
- 126
- 127
- 128
- 129
- 130
- 131
- 132
- 133
- 134
- 135
- 136
- 137
- 138
- 139
- 140
- 141
- 142
- 143
- 144
- 145
- 146
- 147
- 148
- 149
- 150
- 151
- 152
- 153
- 154
- 155
- 156
- 157
- 158
- 159
通过这个脚本,我们可以对apache服务的启动有更深的了解了。
2.3 源码包安装的服务管理
2.3.1 源码包服务的启动管理
/usr/local/apache2/bin/apachectl start|stop|restart|...... #源码包服务启动管理- 1
- 2
范例:源码包服务启动
~ /usr/local/apache2/bin/apachectl start ~ ps aux | grep httpd root 54982 0.0 0.0 31300 1820 ? Ss 16:40 0:00 /usr/local/apache2/bin/httpd --help daemon 54983 0.0 0.0 31300 1220 ? S 16:40 0:00 /usr/local/apache2/bin/httpd --help daemon 54984 0.0 0.0 31300 1220 ? S 16:40 0:00 /usr/local/apache2/bin/httpd --help daemon 54985 0.0 0.0 31300 1220 ? S 16:40 0:00 /usr/local/apache2/bin/httpd --help daemon 54986 0.0 0.0 31300 1220 ? S 16:40 0:00 /usr/local/apache2/bin/httpd --help daemon 54987 0.0 0.0 31300 1220 ? S 16:40 0:00 /usr/local/apache2/bin/httpd --help root 55118 0.0 0.0 103320 892 pts/0 S+ 16:40 0:00 grep httpd ~ netstat -auntlp | grep 80 tcp 0 0 :::80 :::* LISTEN 54982/httpd- 1
- 2
- 3
- 4
- 5
- 6
- 7
- 8
- 9
- 10
- 11
- 12
- 13
2.3.2 源码包服务的自启动管理
~ vim /etc/rc.local #!/bin/sh # # This script will be executed *after* all the other init scripts. # You can put your own initialization stuff in here if you don't # want to do the full Sys V style init stuff. touch /var/lock/subsys/local /usr/local/apache2/bin/apachectl start- 1
- 2
- 3
- 4
- 5
- 6
- 7
- 8
- 9
2.3.3 让源码包服务被服务管理命令识别
那么我们就做个试验,看看如何把源码包安装的 apache 变为和RPM包安装的 apache一样,可以被service、 chkconfig、 ntsysv命令识别吧。试验如下:
1)、卸载RPM包的 apache 服务
~ yum remove -y httpd #卸载RPM包的apache,避免对试验产生影响(生产服务器上慎用yum卸载,有可能造成服务器崩溃)。 ~ serivce httpd start -bash: serivce: command not found #因为服务被卸载,所以 service命令不能识别httpd命令- 1
- 2
- 3
- 4
- 5
- 6
2)、安装源码包的 apache 服务,并启动
#安装源码包的 apache 服务,具体安装方法参考软件安装章节 ~ /usr/local/apache2/bin/apachectl start ~ netstat -auntlp | grep 80 tcp 0 0 :::80 :::* LISTEN 56212/httpd #启动源码包的 apache ,查看端口是否已经启动- 1
- 2
- 3
- 4
- 5
- 6
3)、让源码包的 apache 服务能被 service 命令管理启动
ln -s /usr/local/apache2/bin/apachectl /etc/init.d/apache #service命令其实只是在/etc /init.d/目录中查找是否有服务的启动脚本,所以我们 #只需要做个软链接把源码包的启动脚本链接到/etc/init.d/目录中,就能被service #命令管理了。为了大家的习惯,我把软链接文件起名为apache,不过注意这不是RPM包的apache哦! service apache start #虽然 RPM包的apache被卸载,但是service命令也能够生效。 ~ netstat -auntlp | grep 80 tcp 0 0 :::80 :::* LISTEN 75084/httpd- 1
- 2
- 3
- 4
- 5
- 6
- 7
- 8
- 9
4)、让源码包的 apache 服务能被 chkconfig 命令管理自启动
~ cat /etc/init.d/apache #修改源码包apache 的启动脚本(注意此文件是软链接,所以修改的还是源码包启动脚本) #!/bin/sh # # chkconfig: 35 86 76 #指定httpd脚本可以被chkconfig命令管理 #格式是:chkconfig:运行级别启动顺序关闭顺序 #这里我们让 apache在3和5级别能被chkeonfig 命令管理,启却顺序是S86,关闭顺序是K76 #(自定顺序,不要和系统中已有的启动程序顺序冲突) # description: source package apache #说明:内容随意 #以上两句话必须加入,才能被 chkconfig 命令识别 ...省略部分输出... ~ chkconfig --add apache # chkconfig命令能够管理源码包安装的apache ~ chkconfig --list | grep apache apache 0:off 1:off 2:off 3:on 4:off 5:on 6:off #很神奇吧,虽然RPM包的apche 被删除了,但是 chkconfig 命令可以管理源码包apache了- 1
- 2
- 3
- 4
- 5
- 6
- 7
- 8
- 9
- 10
- 11
- 12
- 13
- 14
- 15
- 16
- 17
- 18
- 19
- 20

5)、让 ntsysv 命令可以管理源码包 apache
#ntsysv命令其实是和 chkconfig命令使用同样的管理机制,也就是说ntsysv已经可以
#进行源码包apache的自启动管理了。如图所示:

总结下,如果想让源码包服务被service命令识别并管理,只要做个软链接把启动脚本链接到/etc/init.d/目录中即可。要想让源码包服务被chkconfig命令识别,除了需要把服务的启动脚本链接到/etc/init.d/目录中,还要修改这个启动脚本,在启动脚本的开头加入:
# chkconfig: 运行级别 启动顺序 关闭 # description: 说明- 1
- 2
然后需要使用“chkconfig --add 服务名”的方式把服务加入chkconfig命令管理中。命令格式如下:
[root@localhost ~]# chkconfig [选项] [服务名] 选项: --add :把服务加入chkconfig命令的管理 --del :把服务从chkconfig命令的管理中删除- 1
- 2
- 3
- 4
2.4 总结

2.5 Linux中的常见服务的作用
服务名称 功能简介 建议 acpid 电源管理接口。如果是笔记本用户建议开启,可以监听内核层的相关电源事件。 开启 anacron 系统的定时任务程序。cron的一个子系统,如果定时任务错过了执行时间,可以通过anacron继续唤醒执行。 开启 alsasound Alsa声卡驱动。如果使用alsa声卡,开启 关闭 apmd 电源管理模块。如果支持acpid,就不需要apmd,可以关闭 关闭 atd 指定系统在特定时间执行某个任务,只能执行一次。如果需要则开启,但我们一般使用crond来进行循环定时任务。 关闭 auditd 审核子系统。如果开启了此服务,SELinux的审核信息会写入/var/log/audit/audit.log文件,如果不开启,审核信息会记录在syslog中 开启 autofs 让服务器可以自动挂载网络中的其他服务器的共享数据,一般关闭用来自动挂载NFS服务。如果没有NFS服务建议关闭 关闭 avahi-daemon Avahi是zeroconf协议的实现。它可以在没有DNS服务的局域网里发现基于zeroconf协议的设备和服务。除非有兼容设备或使用zeroconf协议,否则关闭。 关闭 bluetooth 蓝牙设备支持。一般不会在服务器上启用蓝牙设备,关闭它 关闭 capi 仅对使用ISND设备的用户有用。 关闭 chargen-dgram 使用UDP协议的chargen server。主要功能是提供类似远程关闭打字的功能。 关闭 chargen-stream 同上。 关闭 cpuspeed 可以用来调整CPU的频率。当闲置时可以自动降低CPU频率来节省电量。 开启 crond 系统的定时任务,一般的Linux服务器都需要定时任务帮助系统维护。建议开启 开启 cvs 一个版本控制系统 关闭 daytime-dgram daytime 使用TCP协议的Daytime守护进程,该协议为客户机实现从远程服务器获取日期和时间的功能。 关闭 daytime-stream 同上。 关闭 dovecot 邮件服务中POP3/IMAP服务的守护进程。主要用来接收信件,如果启动了邮件服务则开启,否则关闭 关闭 echo-dgram 服务器回显客户服务的进程。 关闭 echo-stream 同上 关闭 firstboot 系统安装完成之后,有个欢迎界面,需要对系统进程初始设定。就是这个进程的作用。既然不是第一次启动了,关闭吧 关闭 gpm 在字符终端(tty1-tty6)中可以使用鼠标复制和粘贴。就是这个服务的功能 开启 haldaemon 检测盒支持USB设备。如果是服务器可以关闭,个人机建议开启。 关闭 hidd 蓝牙鼠标、键盘等蓝牙设备检测。必须启动bluetooth服务。 关闭 hplip HP打印机支持,如果没有HP打印机关闭吧 关闭 httpd apache服务的守护进程。如果需要启动apache,就开启。 开启 ip6tables IPv6的防火墙,目前IPv6协议并没有使用,可以关闭 关闭 iptables 防火墙功能,Linux中防火墙是内核支持功能。这是服务器的主要防护手段,必须开启。 开启 irda IrDA提供红外线设备(笔记本,PDA’s,手机,计算器等等间)的通讯支持。关闭吧 关闭 irqbalance 支持多核处理器,让CPU可以自动分配系统中断(IRQ),提高系统性能。目前服务器多是多核CPU,请开启。 开启 isdn 使用ISDN设备连接网络。目前主流的联网方式是光纤接入和ADSL,ISDN已经非常少见,请关闭 关闭 kudzu 该服务可以在开机时进行硬件检测,并会调用相关的设置软件。建议关闭,仅在需要时开启 关闭 lvm2-monitor 该服务可以让系统支持LVM逻辑卷组,如果分区采用的是LVM开启方式,那么应该开启。建议开启 开启 mcstrans SELinux的支持服务。建议启动 开启 mdmonitor 该服务用来监测Software RAID或LVM的信息。不是必须服务,建议关闭 关闭 mdmpd 该服务用来监测Multi-Path设备。不是必须服务 关闭 messagebus 这是 Linux 的IPC ( Interprocess Communication,进程间通讯)服务,用来在各个软件中交换信息。个人建议关闭 关闭 microcode_ctl Intel系列的CPU可以通过这个服务支持额外的微指令集。 关闭 mysqld mysql数据库服务器。如果需要就开启,否则关闭 开启 named DNS服务的守护进程,用来进行域名解析。如果是 DNS服务器关闭则开启,否则关闭 关闭 netfs 该服务用于在系统启动时自动挂载网络中的共享文件空间,比如:NFS,Samba等等。需要就开启,否则关闭 开启 network 提供网络设置功能。通过这个服务来管理网络,所以开启 开启 nfs NFS(Network File System)服务,Linux 与Linux之间的文件共享服务。需要就开启,否则关闭 关闭 nfslock 在Linux 中如果使用了NFS 服务,为了避免同一个文件被不同的用户同时编辑,所有有这个锁服务。有NFS是开启,否则关闭 关闭 ntpd 该服务可以通过互联网自动更新系统时间,使系统时间永远都准确。需要则开启,但不是必须服务 关闭 pcscd 智能卡检测服务,可以关闭 关闭 portmap 用在远程过程调用(RPC)的服务,如果没有任何RPC服务时,可以关闭。主要是NFS和 NIS服务需要。 关闭 psacct 该守护进程支持几个监控进程活动的工具。 关闭 rdisc 客户端ICMP路由协议 关闭 readahead_early 在系统开机的时候,先将某些进程加载如内存整理,可以加快一点启动速度。 关闭 readahead_later 同上 关闭 restorecond 用于给SELinux监测和重新加载正确的文件上下文。如果开启SELinux则需要开启。 关闭 rpcgssd 与NFS有关的客户端功能。如果没有NFS就关闭吧。 关闭 rpcidmapd 同上 关闭 rsync 远程数据备份守护进程。 关闭 sendmail sendmail邮件服务的守护进程。如果有邮件服务就开启,否则关闭关闭 关闭 setroubleshoot 该服务用于将SELinux相关信息记录在日志开启/var/log/messages中。建议开启 开启 smartd 该服务用于自动检测硬盘状态。建议开启 开启 smb 网络服务samba的守护进程。可以让Linux和 Windows之间共关闭享数据。如果需要则开启 开启 squid 代理服务的守护进程。如果需要则开启,否则关闭 关闭 sshd ssh加密远程登陆管理的服务。服务器的远程管理必须使用此服务,不要关闭 开启 syslog 日志的守护进程。 开启 vsftpd vsftp服务的守护进程。如果需要FTP服务则开启,否则关闭 关闭 xfs 这个是X Window的字体守护进程。为图形界面提供字体服务,关闭如果不启动图形界面,就不用开启。 关闭 xinetd 超级守护进程。如果有依赖xinetd的服务就必须开启。 开启 ypbind 为NIS(网络信息系统)客户机激活ypbind服务进程。 关闭 yum-updatesd yum的在线升级服务。 开启 -
-
相关阅读:
2023年CSP-J1入门级第一轮题解
如何写好一份PPT
Linux中替换配置文件中的某个变量值或参数值--sed
van-cascader 异步加载
咕咕驴2022新版AI短视频一键换脸小程序源码/带流量主
解析Flutter应用在iOS环境中的性能优化技巧
掌握时间复杂度, 编写高效代码
P2P 技术:点对点网络的兴起
metersphere 接口自动化
软考网络工程师综合题考点总结
- 原文地址:https://blog.csdn.net/weixin_40274679/article/details/126643124
