-
Nginx:优化和防盗链
目录
前言:在企业信息化应用环境中。服务器的安全性和响应速度需要根据实际的情况进行相应的参数配置,达到最优的用户体验。
默认的nginx安装参数只能提供最基本的服务,还需要调整如网页时间、连接超时、网页压缩等相应参数,才能发挥服务器的最大作用。
一、隐藏版本号
在生产环境下,需要隐藏Nginx的版本号,以免安全漏洞的泄露。
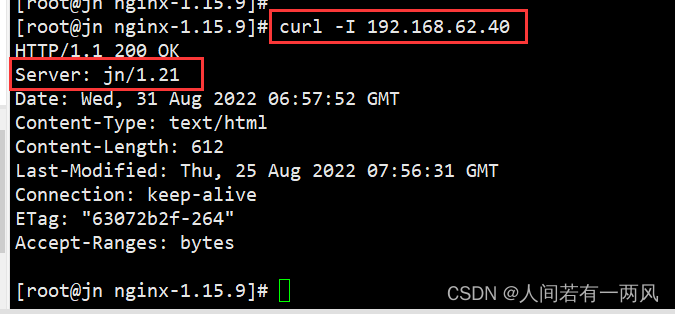
查看方法:
① 本地查看(查看头部信息)
curl -I http://192.168.184.20② 浏览器:可以直接在浏览器(例如谷歌)——》开发者工具——》选择network——》刷新页面——》选择请求——》选择headlers ——》查看版本

Nginx隐藏版本号的方式:① 修改配置文件 ② 修改源码
1、修改配置文件
- vim /usr/local/nginx/conf/nginx.conf
- http {
- include mime.types;
- default_type application/octet-stream;
- server_tokens off;
- ......
- }
- systemctl restart nginx
- curl -I http://192.168.226.128


2、修改源码
- vim /opt/nginx-1.12.0/src/core/nginx.h
- #define NGINX_VERSION "1.1.1" #修改版本号
- #define NGINX_VER "NGINX" NGINX_VERSION #修改服务器类型
- cd /opt/nginx-1.12.0/
- ./configure --prefix=/usr/local/nginx --user=nginx --group=nginx --add-module=/usr/local/nginx-module-vts-master/
- make && make install(生产环境最好不好make install 会清空所有nginx配置)
- vim /usr/local/nginx/conf/nginx.conf
- http {
- include mime.types;
- default_type application/octet-stream;
- server_tokens on; #版本号打开
- ......
- }
- systemctl restart nginx #重启服务


二、修改用户和组(控制权限)
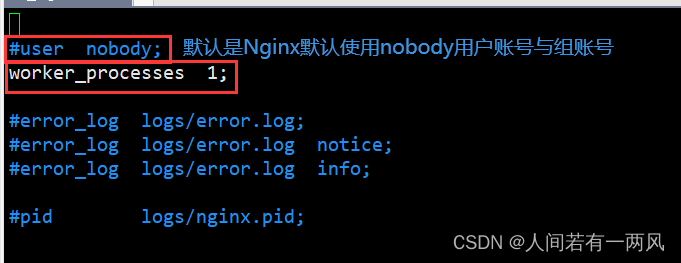
- 若没有安装前创建用户,则在此服务中默认使用的是nobody
- vim /usr/local/nginx/conf/nginx.conf
- #user nobody;
- worker_processe 1;
- #默认是Nginx默认使用nobody用户账号与组账号
- #修改成如下内容
- user nginx nginx;
- worker_processe 1;
- #修改属组属主,重启服务,查看服务状态
- systemctl restart nginx
- ps aux | grep nginx
- root 109662 0.0 0.0 20560 624 ? Ss 12:10 0:00 nginx: master process /usr/local/nginx/sbin/nginx
- nginx 109663 0.0 0.0 23096 1392 ? S 12:10 0:00 nginx: worker process
- root 109667 0.0 0.0 112724 988 pts/4 S+ 12:10 0:00 grep --color=auto nginx


三、设置缓存时间(图片)
- vim /usr/local/nginx/conf/nginx.conf
- http {
- ......
- server {
- ......
- location / {
- root html;
- index index.html index.htm;
- }
- location ~ \.(gif|jpg|jepg|png|bmp|ico)$ { #加入新的 location,以图片作为缓存对象
- root html;
- expires 1d; #指定缓存时间,1天
- }
- ......
- }
- }
- nginx -t
- systemctl restart nginx
- #上传rabbit.jpg图片、修改站点文件
- cd /usr/local/nginx/html
- vim index.html
- 14 <h1>Welcome to nginx</h1>
- 15 <img src="rabbit.jpg"/> #插入识别图片


四、日志分割
- vim /opt/fenge.sh
- #!/bin/bash
- d=$(date -d "-1 day" "+%Y%m%d") #显示前一天的时间
- logs_path="/var/log/nginx"
- pid_path=`cat /usr/local/nginx/logs/nginx.pid`
- [ -d $logs_path ] || mkdir -p $logs_path #创建日志文件目录
- #移动并重命名日志文件
- mv /usr/local/nginx/logs/access.log ${logs_path}/wu.com-access.log-{$d}
- #重建日志文件
- kill -USR1 $pid_path
- #删除30天前的日志文件
- find $logs_path -mtime +30 -exec rm -rf {} \;
- #find $logs_path -mtime +30 |xargs rm -rf


五、连接超时(偏于客户端)
- vim /usr/local/nginx/conf/nginx.conf
- 32 #keepalive_timeout 0;
- 33 keepalive_timeout 100; #控制连接总的超时时间(整体、下面是具体)
- 34 client_header_timeout 80; #等待客户端发送请求头的超时时间,超时会发送408错误
- 35 client_body_timeout 80; #等待客户端发送请求体的超时时间
- nginx -t
- nginx: the configuration file /usr/local/nginx/conf/nginx.conf syntax is ok
- nginx: configuration file /usr/local/nginx/conf/nginx.conf test is successful


六、更改进程数(场景)
- cpu的 nice 值 优先级
- cd /sys/fs/cgroup/cpu
- cat cpu.cfs_quota_us
- -1 #负一代表不做限制
- cat /proc/cpuinfo | grep -c "physical" #核心数
- 8
- ps aux | grep nginx #一个主进程包含一个子进程
- root 111019 0.0 0.0 20600 1496 ? Ss 6月24 0:00 nginx: master process /usr/local/nginx/sbin/nginx
- nginx 113972 0.0 0.0 23112 1428 ? S 01:00 0:00 nginx: worker process
- root 114265 0.0 0.0 112724 988 pts/1 S+ 01:24 0:00 grep --color=auto nginx
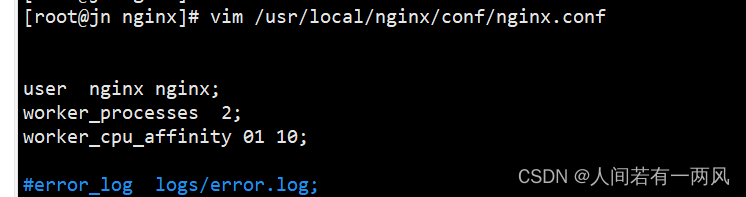
- vim /usr/local/nginx/conf/nginx.conf
- #user nobody;
- worker_processes 2; #修改与CPU核数相同或2倍(cgroup)
- worker_cpu_affinity 01 10; #设置每个进程由不同的cpu处理、进程数配为4时,为0001 0010 0100 1000
PS:
01表示启用第一个CPU内核,10表示启用第二个CPU内核
worker cpu affinity 0110;表示开启两个进程,第一个进程对应着第一个CP U内核,第二个进程对应着第二个CPU内核。
###2核cpu,开启4个进程
worker processes 4;
worker cpu affinity 01 10 01 10;
PS:开启了四个进程,它们分别对应着开启2个CPU内核
###4个cpu,开启4个进程
worker processes 4;
worker cpu affinity 0001 0010 0100 1000;
Ps:0001表示启用第一个CPU内核,0010表示启用第二个CPU内核,依此类推


七、网页压缩
- vim /usr/local/nginx/conf/nginx.conf
- http {
- ......
- gzip on; #取消注释,开启gzip压缩功能
- gzip_min_length 1k; #最小压缩文件大小(放在http中 只要文件超过1k就会进行压缩)
- gzip_buffers 4 64k; #压缩缓冲区,大小为4个64k缓冲区
- gzip_http_version 1.1; #压缩版本(默认1.1,前端如果是squid2.5请使用1.0)
- gzip_comp_level 6; #压缩比率
- gzip_vary on; #支持前端缓存服务器存储压缩页面
- gzip_types text/plain text/javascript application/x-javascript text/css text/xml application/xml application/xml+rss image/jpg image/jpeg image/png image/gif application/x-httpd-php application/javascript application/json; #压缩类型,表示哪些网页文档启用压缩功能
- ......
- }
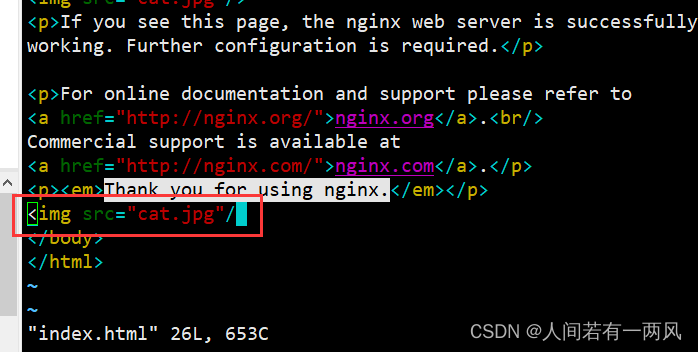
- cd /usr/local/nginx/html
- 先将game.jpg文件传到/usr/local/nginx/html目录下
- vim index.html
- ......
- <img src="game.jpg"/> #网页中插入图片
- </body>
- </html>
- systemctl restart nginx
- 在Linux系统中,打开火狐浏览器,右击点查看元素
- 选择 网络 ---> 选择 HTML、WS、其他
- 访问 http://192.168.184.20 ,双击200响应消息查看响应头中包含 Content-Encoding: gzip


八、盗链与防盗链
- 盗链端: 192.168.226.128 nginx
- 服务端: 192.168.226.130 nginx
- win10 : 192.168.226.160 #配置/HOST
- PS: win10的hosts配置路径:C:\WINDOWS\System32\drivers\etc
- 首次修改需要修改权限
- 属性——》安全——》高级——》更改为所有权限
- ####具体实操
- 网页准备:
- 服务端(192.168.226.130)
- cd /usr/local/nginx/html
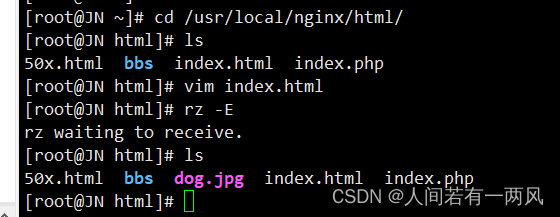
- 将dog.jpg、error.png文件传到/usr/local/nginx/html目录下
- vim index.html
- ......
- <img src="dog.jpg"/>
- </body>
- </html>
- #盗链端
- vim /etc/hosts
- echo "192.168.226.128 www.dog.com" >> /etc/hosts
- cd /usr/local/nginx/html
- vim index.html
- ......
- <img src="http://www.dog.com/dog.jpg"/>
- </body>
- </html>
- vim /etc/hosts
- echo "192.168.226.130 www.kgc.com" >> /etc/hosts
- echo "192.168.226.128 www.dog.com" >> /etc/hosts
- 在盗图网站主机上进行浏览器验证
- http://www.dog.com
- 防盗链核心操作:
- vim /usr/local/nginx/conf/nginx.conf
- http {
- ......
- server {
- ......
- location ~*\.(jpg|gif|swf)$ {
- valid_referers *.dog.com dog.com;
- if ( $invalid_referer ) {
- rewrite ^/ http://www.dog.com/error.png;
- return 403;
- }
- }
- ......
- }
- }
- 表示匹配不区分大小写,以.jpg 或.gif 或.swf 结尾的文件
- ~* .(jpg|gif|jepg|bmp|ico)$
- 防盗链设置参数详细说明:
- valid referers:设置信任的网站,即能引用相应图片的网站
- none:浏览器中Referer为空的情况,就是直接在浏览器访问图片
- blocked:referer不为空的情况,但是值被代理或防火墙删除了,这些值不以以http://或者https://开头
- 后面的网址或者域名:referer中包含相关字符串的网址
- if语句:如果链接的来源域名不在valid referers所列出的列表中,Sinvalid referer为1,则执行后面的操作,即进行重写或返回403页面
- ##上传error.png文件至/usr/local/nginx/html

盗
-
相关阅读:
统计 boy girl 复制出来多少次。 浴谷 P1321题
orale创建视图sql
LeetCode每日一题——698. 划分为k个相等的子集
vue3前端开发-flex布局篇
python采集美女内容,快来学会把你喜欢的内容全部下载吧~
【vue-baidu-map】自定义地图
HTML中, 在同一行上出现高低不一样的文字,处理对齐效果
基于JavaWeb+SSM+购物系统微信小程序的设计和实现
Echarts社区开源地址
【 OpenGauss源码学习 —— 列存储(CStore)(四)】
- 原文地址:https://blog.csdn.net/qq_69278945/article/details/126623823
