-
通过CTY、VTY、TTY访问网络设备[计网实践Cisco Packet Tracer]
实验一:接入网络设备
学习目标
- CTY访问网络设备
- VTY访问网络设备
- TTY访问网络设备
- WEB访问网络设备
实验环境
- Cisco Packet Tracer 6.0
原创文章,转载请注明出处:©️Sylvan Ding ❤️
实验内容
CTY访问设备
CTY是指通过
Console接口访问设备,进而实现设备控制和管理的设备访问方式。选用
Connections>Console线,一端连接PC的RS 232接口,另一端连接路由设备的Console接口,接着通过PC对Console接口进行配置。# Cisco IOS Router> enable # 进入路由器特权模式 Router# configure terminal # 进入路由器全局配置模式 Router(config)# line console 0 # 配置Console线路 Router(config-line)# password cisco # 配置Console口令 Router(config-line)# login # 开启登陆密码保护- 1
- 2
- 3
- 4
- 5
- 6
- 配置模式:Cisco IOS将EXEC会话分为用户(USER)模式和特权(privileged)模式。用户模式仅允许基本的监测命令,在这种模式下不能改变路由器配置模式。特权模式可以使用所有的配置命令。在特权模式下,还可以进入到全局模式和其他特殊的配置模式,这些特殊模式都是全局配置模式的一个子集。在配置过程中,可以通过使用
?来获得命令帮助。
VTY访问设备
VTY是指通过
Virtual Terminal虚拟终端远程登录设备,进而实现设备控制和管理的设备访问方式。在Cisco的不同系列产品中,都有一定数量的VTY线路可用,具体数目不尽相同。
支持远程登录的协议有
SSH和Telnet。SSH和Telnet都是用来管理远程连接的,SSH使用TCP的22号端口,Telnet使用TCP的23号端口。远程登录要求网络设备启用网络服务且至少有一个活动接口配置IP地址。出于安全考虑,IOS要求远程会话使用口令,并作为一种最低的身份验证手段。
配置Telnet
# 一、路由器配置以太网接口IP地址 Router> enable Router# configure terminal Router(config)# hostname Router1 # 配置路由器的主机名 Router1(config)# interface gigabitEthernet 0/0 # 进入路由器的千兆以太网口 Router1(config-if)# ip address 192.168.0.1 255.255.255.0 # 配置接口IP地址 Router1(config-if)# no shutdown # 激活接口(路由器接口默认关闭) # 二、配置路由器vty Router1(config-if)# line vty 0 4 # 进入vty线路模式,启用0-4线路(最大并行连接数) Router1(config-line)# password ciscotelnet # 配置口令 Router1(config-line)# login # 三、配置路由器特权口令 Router1(config)# enable password ciscotelnet # 四、配置PC的IP地址:192.168.0.2/24 # 五、PC通过Telnet访问路由器 C:\> telnet 192.168.0.1- 1
- 2
- 3
- 4
- 5
- 6
- 7
- 8
- 9
- 10
- 11
- 12
- 13
- 14
- 15
- 16
- 以CTY方式配置路由器,配置完毕后路由器和PC通过交换机相连,PC使用
telnet访问路由器。 - Telnet远程登录之前,需要先测试PC与路由器的连通性。在PC中使用ping命令
C:\> ping 192.168.0.1,PC能正常连通路由器的以太网口后,再用Telnet登陆路由器。 - 配置PC(
End Devices>Laptop-PT)的FastEthernet0网卡和路由器网卡于同一网段,即192.168.0,以确保二者能连通。
配置SSH
# 一、路由器配置以太网接口IP地址 Router> enable Router# configure terminal Router(config)# hostname Router1 Router1(config)# interface gigabitEthernet 0/0 Router1(config-if)# ip address 10.12.16.1 255.255.255.0 Router1(config-if)# no shutdown # 二、路由器生成RSA非对称密钥 Router1(config-if)# exit Router1(config)# ip domain-name demo.com # rsa的秘钥是用`hostname`和`domain-name`产生的 Router1(config)# crypto key generate rsa # 生成RSA秘钥后SSH服务会自动开启 The name for the keys will be: Router1.demo.com How many bits in the modulus [512]: % Generating 512 bit RSA keys, keys will be non-exportable...[OK] *3? 1 0:29:0.594: %SSH-5-ENABLED: SSH 1.5 has been enabled # 三、配置用户名和密码 Router1(config)# username sylvan privilege 0 password ciscossh # `privilege 0`阻止ssh登陆时自动进入特权模式 Router1(config)# enable password ciscossh # 配置特权模式密码 # 四、配置vty Router1(config)# line vty 0 4 # 启用0-4线路(最大并行连接数) Router1(config-line)# transport input ssh # 设置只允许通过ssh协议登陆 Router1(config-line)# exec-timeout 0 0 # 设置连接超时时间:永远与路由器保持连接,除非手动logout Router1(config-line)# logging synchronous # 同步日志信息输出和调试输出(避免输入过程被日志输出打断) Router1(config-line)# login local # 配置本地身份验证(登录时需要输入用户名) # 五、配置PC的IP地址:10.12.16.2/24 # 六、测试ssh登陆Router1 PC>ssh -l sylvan 10.12.16.1 Open Password: Router1> # 七、退出登陆 Router1>exit [Connection to 10.12.16.1 closed by foreign host]- 1
- 2
- 3
- 4
- 5
- 6
- 7
- 8
- 9
- 10
- 11
- 12
- 13
- 14
- 15
- 16
- 17
- 18
- 19
- 20
- 21
- 22
- 23
- 24
- 25
- 26
- 27
- 28
- 29
- 30
- 31
- 32
- 33
- _测试ssh登陆Router1_之前,先ping测试连通性.
PC>ping 10.12.16.1 Pinging 10.12.16.1 with 32 bytes of data: Reply from 10.12.16.1: bytes=32 time=1ms TTL=255 Reply from 10.12.16.1: bytes=32 time=0ms TTL=255 Reply from 10.12.16.1: bytes=32 time=0ms TTL=255 Reply from 10.12.16.1: bytes=32 time=0ms TTL=255 Ping statistics for 10.12.16.1: Packets: Sent = 4, Received = 4, Lost = 0 (0% loss), Approximate round trip times in milli-seconds: Minimum = 0ms, Maximum = 1ms, Average = 0ms- 1
- 2
- 3
- 4
- 5
- 6
- 7
- 8
- 9
- 10
- 11
- 12
- 13
TTY访问设备
TTY是一种通过异步端口
async拨号连接实现设备访问的方式。TTY一词起源于TeleTYpe,最初的TTY通过物理线路实现设备连接,但Cisco通过虚拟链路的方式实现了这一功能。早期的终端是电传字打印机(Teletype / Teletypewriter),英文缩写就是tty。虽然终端设备已经不再限制于电传打字机了,但是tty这个名称还是就这么保留了下来。
配置TTY
选择
Routers>1841,向槽slot0中插入HWIC-8A,其提供8个用来连接console接口的异步标准端口EIA-232. 以该路由器作为设备终端服务器Terminal Server(使用终端服务器可以减少配置多台路由和交换机设备时对console接口的损耗),使用Octal八爪线连接其Async接口和其他设备的console接口。创建一个Laptop-PT,通过console方式连接终端,进行如下配置以实现TTY访问设备:# 一、配置终端服务器`Terminal Server` Router> en Router# conf t Router(config)# host Terminal-Server # 配置终端服务器名称 Terminal-Server(config)# enable p ciscotty # 配置特权模式密码 Terminal-Server(config)# no ip domain-lookup # 阻止DNS解析 # 二、配置终端的回环接口 1.1.1.1/32 Terminal-Server(config)# interface loopback 0 Terminal-Server(config-if)# ip add 1.1.1.1 255.255.255.255 # 三、配置tty异步线路 Terminal-Server(config-if)# end Terminal-Server# show line Tty Line Typ Tx/Rx A Roty AccO AccI Uses Noise Overruns Int * 0 0 CTY - - - - 0 0 0/0 - 1 1 AUX 9600/9600 - - - - 0 0 0/0 - 0/0/0 2 TTY 9600/9600 - - - - 0 0 0/0 - 0/0/1 3 TTY 9600/9600 - - - - 0 0 0/0 - 0/0/2 4 TTY 9600/9600 - - - - 0 0 0/0 - 0/0/3 5 TTY 9600/9600 - - - - 0 0 0/0 - 0/0/4 6 TTY 9600/9600 - - - - 0 0 0/0 - 0/0/5 7 TTY 9600/9600 - - - - 0 0 0/0 - 0/0/6 8 TTY 9600/9600 - - - - 0 0 0/0 - 0/0/7 9 TTY 9600/9600 - - - - 0 0 0/0 - 194 194 VTY - - - - 0 0 0/0 - 195 195 VTY - - - - 0 0 0/0 - 196 196 VTY - - - - 0 0 0/0 - 197 197 VTY - - - - 0 0 0/0 - 198 198 VTY - - - - 0 0 0/0 - Line(s) not in async mode -or- with no hardware support: 10-193 Terminal-Server# conf t Terminal-Server(config)# line ? <2-499> First Line number aux Auxiliary line console Primary terminal line tty Terminal controller vty Virtual terminal x/y/z Slot/Subslot/Port for Modems Terminal-Server(config)# line tty ? <2-90> First Line number Terminal-Server(config)# line tty 2 9 # 配置8个异步线路 Terminal-Server(config-line)# transport input all # 允许所有协议都可以连接tty线路 Terminal-Server(config-line)# pas ciscotty # 配置tty连接密码 Terminal-Server(config-line)# login # 设置登陆检查 Terminal-Server(config-line)# exec-timeout 0 0 Terminal-Server(config-line)# logging synchronous # 四、配置vty虚拟终端线路,用以telnet连接 Terminal-Server(config-line)# exit Terminal-Server(config)#line vty ? <0-15> First Line number Terminal-Server(config-line)# no login # 取消登陆检查 Terminal-Server(config-line)# logging s Terminal-Server(config-line)# exec-timeout 0 0 # 五、在Terminal中测试telnet访问Router设备 # 按[Ctrl+Shift+6]组合键,放手后再按[X]键回到终端服务器上 # 该方法不会释放Telnet会话,Telnet会话被保留 # 为了显示所有的打开连接,可以使用`show sessions`命令 # 使用`disconnect x`命令可以中止一个激活的反向Telnet会话,其中`x`是需要中断的异步线路号 # `show line x`命令用以显示任何线路的状态,用来查找终端服务器的连接故障 # `clear line tty x`命令用以清除任意tty线路到空闲状态 Terminal-Server#telnet 1.1.1.1 2002 Trying 1.1.1.1 ...Open User Access Verification Password: System Bootstrap, Version 12.3(8r)T8, RELEASE SOFTWARE (fc1) Cisco 1841 (revision 5.0) with 114688K/16384K bytes of memory. --- System Configuration Dialog --- Continue with configuration dialog? [yes/no]: no Press RETURN to get started! Router> # 六、配置PC和路由器终端的网卡 # 在PC上的Command Line里通过telnet访问路由器终端,再通过八爪线访问其他设备 # 其具体实现可参照`配置Telnet`- 1
- 2
- 3
- 4
- 5
- 6
- 7
- 8
- 9
- 10
- 11
- 12
- 13
- 14
- 15
- 16
- 17
- 18
- 19
- 20
- 21
- 22
- 23
- 24
- 25
- 26
- 27
- 28
- 29
- 30
- 31
- 32
- 33
- 34
- 35
- 36
- 37
- 38
- 39
- 40
- 41
- 42
- 43
- 44
- 45
- 46
- 47
- 48
- 49
- 50
- 51
- 52
- 53
- 54
- 55
- 56
- 57
- 58
- 59
- 60
- 61
- 62
- 63
- 64
- 65
- 66
- 67
- 68
- 69
- 70
- 71
- 72
- 73
- 74
- 75
- 76
- 77
- 78
- 79
- 80
- Loopback:
终端路由器的回环接口,使用interface loopback0进行创建。Loopback接口是逻辑接口,比任何其它的物理接口都更稳定,一旦被创建,其物理状态和链路协议状态永远是Up,即使该接口上没有配置IP地址。由于环回接口的上述特性,更多使用环回接口的IP地址作为反向telnet的连接地址。
发往Loopback端口的数据包将会在路由器本地处理,包括路由信息。Loopback端口的IP地址可以用来作为OSPF路由协议的路由器标识、实施发向 Telnet或者作为远程Telnet访问的网络端口等。配置一个Loopback端口类似于配置一个以太网端口,可以把它看作一个虚拟的以太网端口。
通常每台路由器上存在众多接口和地址,由于telnet命令使用TCP报文,当路由器的某一个接口由于故障down掉了,但是其他的接口却仍旧可以telnet,到达这台路由器的TCP连接依旧存在。所以选择的telnet 地址必须是永远也不会down掉的,而虚接口恰好满足此类要求。由于此类接口没有与对端互联互通的需求,所以为了节约地址资源,loopback接口的地址通常指定为32位掩码。 - CAB-OCTAL-ASYNC:
CAB-OCTAL-ASYNC电缆(俗称八爪线)使用一个68管脚连接器和分支电缆,并且在每个68管脚连接器上提供八个RJ-45反转电缆异步端口。您能将每个RJ-45反转电缆设备的异步端口连接到设备的控制台或AUX端口上。
反向Telnet
PC软终端作为哑终端通过Console通信电缆与Router的Console口相连,Router与服务器相连,终端不能直接与服务器通信。配置通过反向Telnet登录设备,可以将Router作为客户端,把终端的数据传送到远端的服务器上,从而实现哑终端与服务器的通信。
具体来说,路由器异步线路与Modem连接后,就可以建立与Modem的直接Telnet对话通信,这个过程也称为反向远程登录Telnet(reverse Telnet).
Modem要建立直接的Telnet对话连接,需要确定以太局域网的IP地址接口,然后输入
telnet ip-add port命令到路由器的2000+n端口,n是连接Modem的路由器上的线路标号,特权模式下可通过show line命令查看。使用ip host配置命令可以简化Modem直接建立Telnet对话,该命令将端口的IP地址映射为设备名。实验任务
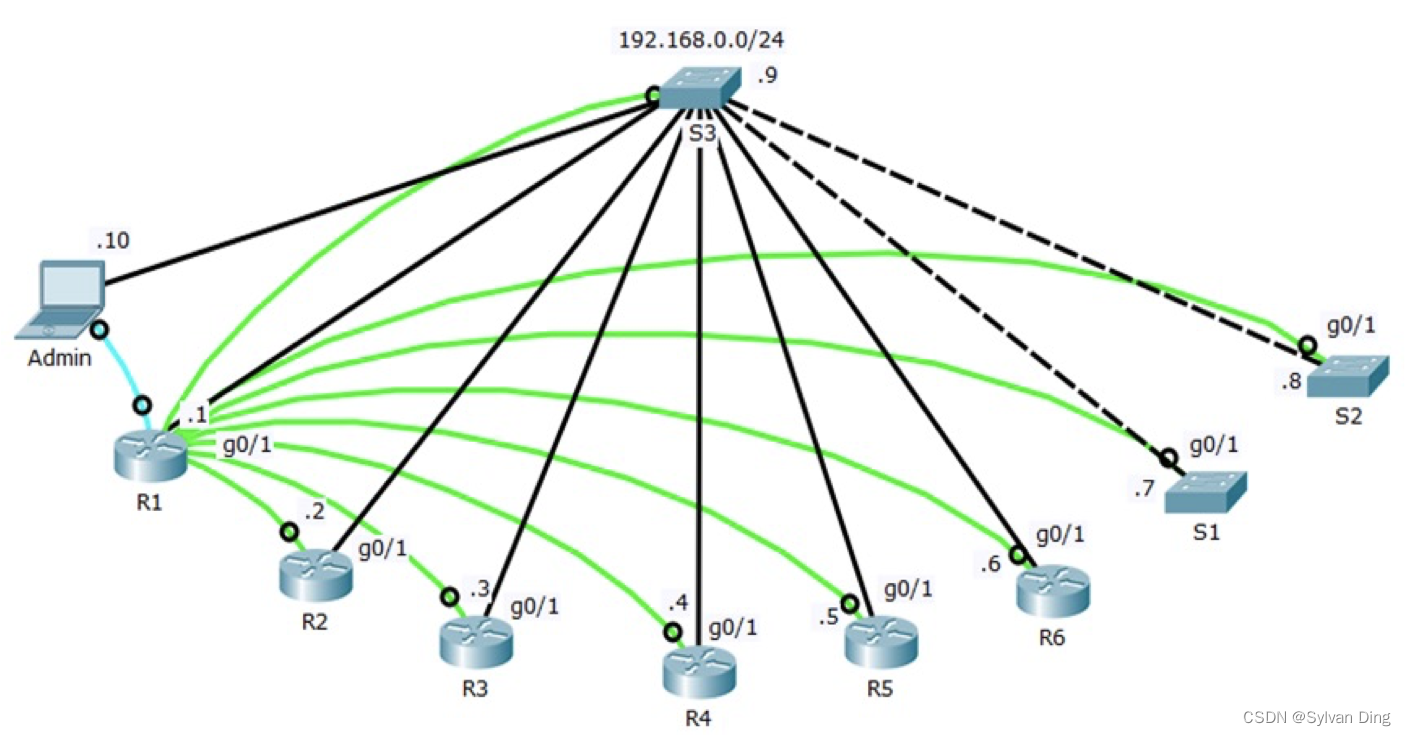
某实验室新购了一批网络设备,搭建的网络拓扑如下图所示。其中包含一台 Cisco 2911 路由器(R1),5台 Cisco 1941 路由器(R2~R5),两台 Cisco Catalyst 2960 交换(S1、S2)以及一台 Cisco 千兆交换机(S3)。为了保护设备,图中所示设备全部安置在机柜中。新购买的 Cisco HWIC-8A 模块安装在 2911 路由器 R1 上,使其成为终端服务器,通过购买八爪线缆连接到其余设备,以免反复插拔 Console 线损坏设备的 Console 端口。所有网络设备的千兆端口都连接到千兆交换机 S3 上,交换机 S3 所连接设备的逻辑网络地址为 192.168.0.0/24,各设备分配的接口地址如拓扑图所示。请按照如下要求配置相应网络设备:
配置TTY
- 配置 R1 使其可以访问与其相连的 8 台网络设备;
- 创建环回接口 10.10.10.10/32 用于 TTY 管理;
- 配置主机名到线路的映射(主机名大、小写均要映射);
- 设置 TTY 的登录口令为 ytvc2017;
- 开启日志输出同步;
- 关闭域名解析功能。
R1>en R1#conf t R1(config)#no ip domain-lookup R1(config)#int lo0 R1(config-if)#ip add 10.10.10.10 255.255.255.255 R1(config-if)#end R1#show line Tty Line Typ Tx/Rx A Roty AccO AccI Uses Noise Overruns Int * 0 0 CTY - - - - 0 0 0/0 - 1 1 AUX 9600/9600 - - - - 0 0 0/0 - 0/0/0 3 TTY 9600/9600 - - - - 0 0 0/0 - 0/0/1 4 TTY 9600/9600 - - - - 0 0 0/0 - 0/0/2 5 TTY 9600/9600 - - - - 0 0 0/0 - 0/0/3 6 TTY 9600/9600 - - - - 0 0 0/0 - 0/0/4 7 TTY 9600/9600 - - - - 0 0 0/0 - 0/0/5 8 TTY 9600/9600 - - - - 0 0 0/0 - 0/0/6 9 TTY 9600/9600 - - - - 0 0 0/0 - 0/0/7 10 TTY 9600/9600 - - - - 0 0 0/0 - 388 388 VTY - - - - 0 0 0/0 - 389 389 VTY - - - - 0 0 0/0 - 390 390 VTY - - - - 0 0 0/0 - 391 391 VTY - - - - 0 0 0/0 - 392 392 VTY - - - - 0 0 0/0 - Line(s) not in async mode -or- with no hardware support: 11-387 R1#conf t R1(config)#line tty 3 10 R1(config-line)#transport input all R1(config-line)#pas ytvc2017 R1(config-line)#login R1(config-line)#exe 0 0 R1(config-line)#logging s R1(config-line)#exit # --- 主机名小写映射 --- R1(config)#ip h r2 2003 10.10.10.10 R1(config)#ip h r3 2004 10.10.10.10 R1(config)#ip h r4 2005 10.10.10.10 R1(config)#ip h r5 2006 10.10.10.10 R1(config)#ip h r6 2007 10.10.10.10 R1(config)#ip h s1 2008 10.10.10.10 R1(config)#ip h s2 2009 10.10.10.10 R1(config)#ip h s3 2010 10.10.10.10 # --- 主机名大写映射 --- R1(config)#ip h R2 2003 10.10.10.10 R1(config)#ip h R3 2004 10.10.10.10 R1(config)#ip h R4 2005 10.10.10.10 R1(config)#ip h R5 2006 10.10.10.10 R1(config)#ip h R6 2007 10.10.10.10 R1(config)#ip h S1 2008 10.10.10.10 R1(config)#ip h S2 2009 10.10.10.10 R1(config)#ip h S3 2010 10.10.10.10 R1(config)#exi R1#show hosts Default Domain is not set Name/address lookup uses domain service Name servers are 255.255.255.255 Codes: UN - unknown, EX - expired, OK - OK, ?? - revalidate temp - temporary, perm - permanent NA - Not Applicable None - Not defined Host Port Flags Age Type Address(es) R2 2003 (perm, OK) 0 IP 10.10.10.10 R3 2004 (perm, OK) 0 IP 10.10.10.10 R4 2005 (perm, OK) 0 IP 10.10.10.10 R5 2006 (perm, OK) 0 IP 10.10.10.10 R6 2007 (perm, OK) 0 IP 10.10.10.10 S1 2008 (perm, OK) 0 IP 10.10.10.10 S2 2009 (perm, OK) 0 IP 10.10.10.10 S3 2010 (perm, OK) 0 IP 10.10.10.10 r2 2003 (perm, OK) 0 IP 10.10.10.10 r3 2004 (perm, OK) 0 IP 10.10.10.10 r4 2005 (perm, OK) 0 IP 10.10.10.10 r5 2006 (perm, OK) 0 IP 10.10.10.10 r6 2007 (perm, OK) 0 IP 10.10.10.10 s1 2008 (perm, OK) 0 IP 10.10.10.10 s2 2009 (perm, OK) 0 IP 10.10.10.10 s3 2010 (perm, OK) 0 IP 10.10.10.10- 1
- 2
- 3
- 4
- 5
- 6
- 7
- 8
- 9
- 10
- 11
- 12
- 13
- 14
- 15
- 16
- 17
- 18
- 19
- 20
- 21
- 22
- 23
- 24
- 25
- 26
- 27
- 28
- 29
- 30
- 31
- 32
- 33
- 34
- 35
- 36
- 37
- 38
- 39
- 40
- 41
- 42
- 43
- 44
- 45
- 46
- 47
- 48
- 49
- 50
- 51
- 52
- 53
- 54
- 55
- 56
- 57
- 58
- 59
- 60
- 61
- 62
- 63
- 64
- 65
- 66
- 67
- 68
- 69
- 70
- 71
- 72
- 73
- 74
- 75
- 76
- 77
- 78
- 79
- 80
- 81
配置SSH
- 在 6 台路由器上开启远程 SSH 管理;
- 设置域名为 ytvc.lab ;
- 设置用户名为 Admin ,口令为 ciscopass ;
- 最多允许 9 个用户同时登录。
# --- R1配置SSH --- R1#conf t R1(config)#int g R1(config)#int g0/0 R1(config-if)#ip add 192.168.0.1 255.255.255.0 R1(config-if)#no shutdown R1(config-if)#exi R1(config)#ip domain-n ytvc.lab R1(config)#crypto key generate rsa The name for the keys will be: R1.ytvc.lab Choose the size of the key modulus in the range of 360 to 2048 for your General Purpose Keys. Choosing a key modulus greater than 512 may take a few minutes. How many bits in the modulus [512]: % Generating 512 bit RSA keys, keys will be non-exportable...[OK] R1(config)#u Admin pr 0 p ciscopass R1(config)#line vty 0 8 R1(config-line)#t i ssh R1(config-line)#logging s R1(config-line)#login l # --- R2配置SSH --- # 以R1为终端,通过反向telnet连接R2 R1#telnet r2 Trying 10.10.10.10 ...Open User Access Verification Password: System Bootstrap, Version 15.1(4)M4, RELEASE SOFTWARE (fc1) Technical Support: http://www.cisco.com/techsupport Copyright (c) 2010 by cisco Systems, Inc. Total memory size = 512 MB - On-board = 512 MB, DIMM0 = 0 MB CISCO1941/K9 platform with 524288 Kbytes of main memory Main memory is configured to 64/-1(On-board/DIMM0) bit mode with ECC disabled # ... R2 con0 is now available Press RETURN to get started. R2> # ...R2配置SSH同R1,区别在于g0/0网卡的IP地址变为192.168.0.2 # --- R3-R6配置SSH --- # ...方法同上 # --- 测试R1 SSH连接 --- S1>exit [Connection to 192.168.0.7 closed by foreign host] PC>ssh -l Admin 192.168.0.1 Open Password: R1>- 1
- 2
- 3
- 4
- 5
- 6
- 7
- 8
- 9
- 10
- 11
- 12
- 13
- 14
- 15
- 16
- 17
- 18
- 19
- 20
- 21
- 22
- 23
- 24
- 25
- 26
- 27
- 28
- 29
- 30
- 31
- 32
- 33
- 34
- 35
- 36
- 37
- 38
- 39
- 40
- 41
- 42
- 43
- 44
- 45
- 46
- 47
- 48
- 49
- 50
- 51
- 52
- 53
配置Telnet
-
在 3 台交换机上开启 Telnet ;
-
最多允许 9 个用户同时登录;
-
设置 VTY ロ令为 ytvcpass ;
-
配置交换机的管理性 IP 地址,可以让网络管理员使用 telnet 或网络管理软件等方式远程管理该交换机 ,通过如下命令实现:
(switch-config)# interface vlan 1 (switch-config-if)# ip address w.x.y.z netmask a.b.c.d (switch-config-if)# no shutdown- 1
- 2
- 3
-
注意:所有设备的 enable 口令为 cisco ; console ロ令为 jsjwl ,主机名按照上图所示进行配置。
# --- S1配置Telnet --- # 以R1为终端,通过反向telnet连接S1 R1>telnet s1 Trying 10.10.10.10 ...Open User Access Verification Password: C2960 Boot Loader (C2960-HBOOT-M) Version 12.2(25r)FX, RELEASE SOFTWARE (fc4) Cisco WS-C2960-24TT (RC32300) processor (revision C0) with 21039K bytes of memory. 2960-24TT starting... Base ethernet MAC Address: 0000.0C02.9294 Xmodem file system is available. Initializing Flash... # ... S1 con0 is now available Press RETURN to get started. S1>en S1#conf t S1(config)#int v1 S1(config-if)#ip add 192.168.0.7 255.255.255.0 S1(config-if)#no sh S1(config-if)#line vty 0 8 S1(config-line)#pas ytvcpass S1(config-line)#login # --- S2-S3配置Telnet --- # ...方法同S1 # --- 测试S1 Telnet连接 --- # 通过`config`设置`Admin`的`fastEthernet`网卡IP地址192.168.0.10/24 PC>ping 192.168.0.7 # S1 IP地址192.168.0.7 Pinging 192.168.0.7 with 32 bytes of data: Reply from 192.168.0.7: bytes=32 time=1ms TTL=255 Reply from 192.168.0.7: bytes=32 time=0ms TTL=255 Reply from 192.168.0.7: bytes=32 time=0ms TTL=255 Reply from 192.168.0.7: bytes=32 time=1ms TTL=255 Ping statistics for 192.168.0.7: Packets: Sent = 4, Received = 4, Lost = 0 (0% loss), Approximate round trip times in milli-seconds: Minimum = 0ms, Maximum = 1ms, Average = 0ms PC>telnet 192.168.0.7 Trying 192.168.0.7 ...Open User Access Verification Password: S1>- 1
- 2
- 3
- 4
- 5
- 6
- 7
- 8
- 9
- 10
- 11
- 12
- 13
- 14
- 15
- 16
- 17
- 18
- 19
- 20
- 21
- 22
- 23
- 24
- 25
- 26
- 27
- 28
- 29
- 30
- 31
- 32
- 33
- 34
- 35
- 36
- 37
- 38
- 39
- 40
- 41
- 42
- 43
- 44
- 45
- 46
- 47
- 48
- 49
- 50
- 51
- 52

原创文章,转载请注明出处:©️Sylvan Ding ❤️
参考文献
-
相关阅读:
Python中取2023, 9, 1——2023, 10, 31的全部时间
创建javaEE项目(无maven),JSP(九大内置对象)、Servlet(生命周期)了解
你真的会开发测试框架?
电离层简介及短波在电离层中的传播特性
QStringList
DiagnosisPrintDialog 使用广播导致关闭不了的问题
分享一个你很可能不知道的Java异常实现的缺陷
解析java中的包装类
APP中有html5页面的时候,怎么进行元素定位
Error creating bean with name 'xImpl': Unsatisfied dependency expressed through field 'baseMapper'
- 原文地址:https://blog.csdn.net/IYXUAN/article/details/126576366
