-
【云计算 | OpenStack】从零开始使用libvirt创建一个kvm虚机
环境:
os镜像:CentOS-7-x86_64-Minimal-2009.iso
qemu-kvm:qemu-kvm.x86_64 10:1.5.3-175.el7_9.6
Libvirt:libvirt-4.5.0-36.el7.x86_641. 背景
1.1 KVM
基于内核的虚拟机
KVM (Kernel-Based Virtual Machine)需要两个条件:硬件支持全虚拟化、操作系统为Linux。KVM只支持对虚拟机的虚拟CPU、虚拟内存进行管理和调度;针对其他的虚拟外设,KVM需要借助另一个虚拟化项目Qemu1.2 Libvirt
针对不同的
Hypervisor(如KVM、Xen和其他商业虚拟化软件等),Libvirt提供了一种统一的管理方式(简单理解就是统一接口,都可以使用xml文件来创建虚机)。Libvirt是一个软件集合,包括API库、后台运行程序(Libvirtd)和命令行工具(virsh)。2. 实践
2.1 准备一台vmware虚机
1、创建一个centos镜像为
CentOS-7-x86_64-Minimal-2009.iso,2核2G的虚拟机,镜像可以到Centos官网下载http://ftp.sjtu.edu.cn/centos/7.9.2009/isos/x86_64/CentOS-7-x86_64-Minimal-2009.iso

2、注意关机状态下开启虚机的
虚拟化技术(不同厂商称呼不同,Intel称为Intel-VT,AMD称为AMD-V)

2.2 安装KVM
1、确认虚机正常联网后,直接使用
yum工具安装KVM
yum install -y qemu-kvm
2、启用kvm内核模块modprobe kvm2.3 安装Libvirt
1、使用
yum工具直接安装yum install -y libvirt
2、启动libvirtd服务,使用virsh list有正常输出结果就是安装成功了

注:如果没有开启
libvirtd服务,直接使用virsh命令,一般会有如下报错:
error: failed to connect to the hypervisor error: Failed to connect socket to '/var/run/libvirt/libvirt-sock': No such file or directory2.4 准备Libvirt配置文件
前文说到
virsh是Libvirt自带的命令行工具。通过virsh命令可以对虚拟机的CPU、内存、网络和磁盘等各种资源进行管理, 而xml配置文件就是对这些资源进行描述的1、先来准备一个xml文件,各字段简要的含义xml中已有注释,官网:https://libvirt.org/format.html 提供了完整虚机xml文件说明
<domain type='kvm'> //如果是Xen,则type='xen' #虚拟机整体信息 <name>vm1name> //虚拟机名称,同一物理机唯一 <uuid>fd3535db-2558-43e9-b067-314f48211343uuid> //同一物理机唯一,可用uuidgen生成 <memory>524288memory> //单位为KB <currentMemory>524288currentMemory> //memory这两个值最好设成一样 <vcpu>1vcpu> //vcpu个数 #系统信息 <os> <type arch='x86_64'>hvmtype> //arch指出系统架构类型,machine 则是机器类型,查看机器类型:qemu-system-x86_64 -M ? <boot dev='cdrom'/> //启动介质,第一次需要装系统可以选择cdrom光盘启动;之后可以修改为'hd' <bootmenu enable='yes'/> //表示启动按F12进入启动菜单 os> #硬件资源特性 <features> <acpi/> //Advanced Configuration and Power Interface,高级配置与电源接口 <apic/> //Advanced Programmable Interrupt Controller,高级可编程中断控制器 <pae/> //Physical Address Extension,物理地址扩展 features> <clock offset='localtime'/> //虚拟机时钟设置,这里表示本地本机时间 #突发事件处理 <on_poweroff>destroyon_poweroff> <on_reboot>restarton_reboot> <on_crash>restarton_crash> #设备配置 <devices> <emulator>/usr/libexec/qemu-kvmemulator> //如果是Xen则是/usr/lib/xen/binqemu-dm #硬盘配置 <disk type='file' device='cdrom'> <driver name='qemu' type='raw'/> <source file='/home/CentOS-7-x86_64-Minimal-2009.iso'/> <target dev='hdb' bus='ide'/> <readonly/> <address type='drive' controller='0' bus='1' unit='0'/> disk> <disk type='file' device='disk'> <driver name='qemu' type='qcow2'/> <source file='/home/vm1.qcow2'/> <target dev='vda' bus='virtio'/> disk> #添加网络配置,基于网桥 <interface type='bridge'> <source bridge='br0'/> <target dev='vnet0'/> <alias name='net0'/> <address type='pci' domain='0x0000' bus='0x00' slot='0x03' function='0x0'/> interface> #配置vnc <graphics type='vnc' port='5900' autoport='yes' listen='0.0.0.0' keymap='en-us'> <listen type='address' address='0.0.0.0'/> graphics> devices> domain>- 1
- 2
- 3
- 4
- 5
- 6
- 7
- 8
- 9
- 10
- 11
- 12
- 13
- 14
- 15
- 16
- 17
- 18
- 19
- 20
- 21
- 22
- 23
- 24
- 25
- 26
- 27
- 28
- 29
- 30
- 31
- 32
- 33
- 34
- 35
- 36
- 37
- 38
- 39
- 40
- 41
- 42
- 43
- 44
- 45
- 46
- 47
- 48
- 49
- 50
- 51
- 52
- 53
- 54
- 55
- 56
- 57
- 58
- 59
- 60
- 61
- 系统信息里的
boot元素有属性dev='cdrom',意在从光驱启动,安装os。结合硬盘配置里的元素.iso镜像上传到/home目录下 - xml中共有两个
disk元素,第一块是cdrom,第二块是qcow2格式的硬盘,使用cdrom安装的os最终会落到第二块qcow2的盘里,使其成为一个可启动盘。使用命令qemu-img create -f qcow2 vm1.qcow2 10G在home目录下创建vm1.qcow2,对应元素

- 元素
interface意在给虚机添加一个虚拟网卡,这里配置的是基于网桥的虚拟网卡。元素brctl addbr br0添加网桥br0,然后up网桥同时给网桥添加一个地址ifup br0 && ip a add 192.16.1.10/24 dev br0(这种是临时方式,可以通过添加配置文件使网桥永久生效,建议使用配置文件的方式,实际操作时后续vnc里安装os会导致网桥ip丢失,导致vnc断链)

[root@localhost home]# cat /etc/sysconfig/network-scripts/ifcfg-br0 TYPE=Bridge BOOTPROTO=static NAME=br0 DEVICE=br0 ONBOOT=yes IPADDR=192.168.1.10 NETMASK=255.255.255.0 [root@localhost home]#- 1
- 2
- 3
- 4
- 5
- 6
- 7
- 8
- 9
2.5 使用xml文件开启虚拟机
1、使用
virsh define纳管vm1

- 注意步骤2.1里开启虚拟化技术,否则会报错:
error: Failed to define domain from vm1.xml error: invalid argument: could not find capabilities for arch=x86_64 domaintype=kvm - xml文件中的元素
/usr/libexec/qemu-kvm find / -name qemu-kvm找到qemu-kvm的具体位置

2、使用命令
virsh start vm1开启套娃虚拟vm1

3、通过vnc工具查看虚拟机
首先使用命令yum install -y tigervnc-1.8.0-21.el7.x86_64安装vncviewer(具体版本可以使用yum provides查看下)

4、使用
virsh vncdisplay vm1查看vm1的vnc端口,此处为:0
5、使用
vncviewer ip:port查看套娃虚机,可以看到进入了os安装界面(这里直接在vmware里操作可能会无法启动vnc,可以使用mobaxterm等终端工具)

这里省略了os安装的过程(就跟用这个iso镜像起vmware虚机类似),安装完成后如下图

注:如果在vmware虚机里打开vnc还是不行,可以从你的pc机上使用vnc。首先关闭vmware虚机的
firewalld防火墙,然后官网下载一个vnc工具https://www.realvnc.com/en/connect/download/viewer/,安装后打开,输入ip:port即可登录vm1虚机

6 安装完成后,原来的vm1.qcow2变成了1.7G大小,后面就可以用这个可启动盘来创建虚机2.6 使用vm1.qcow2创建vm2
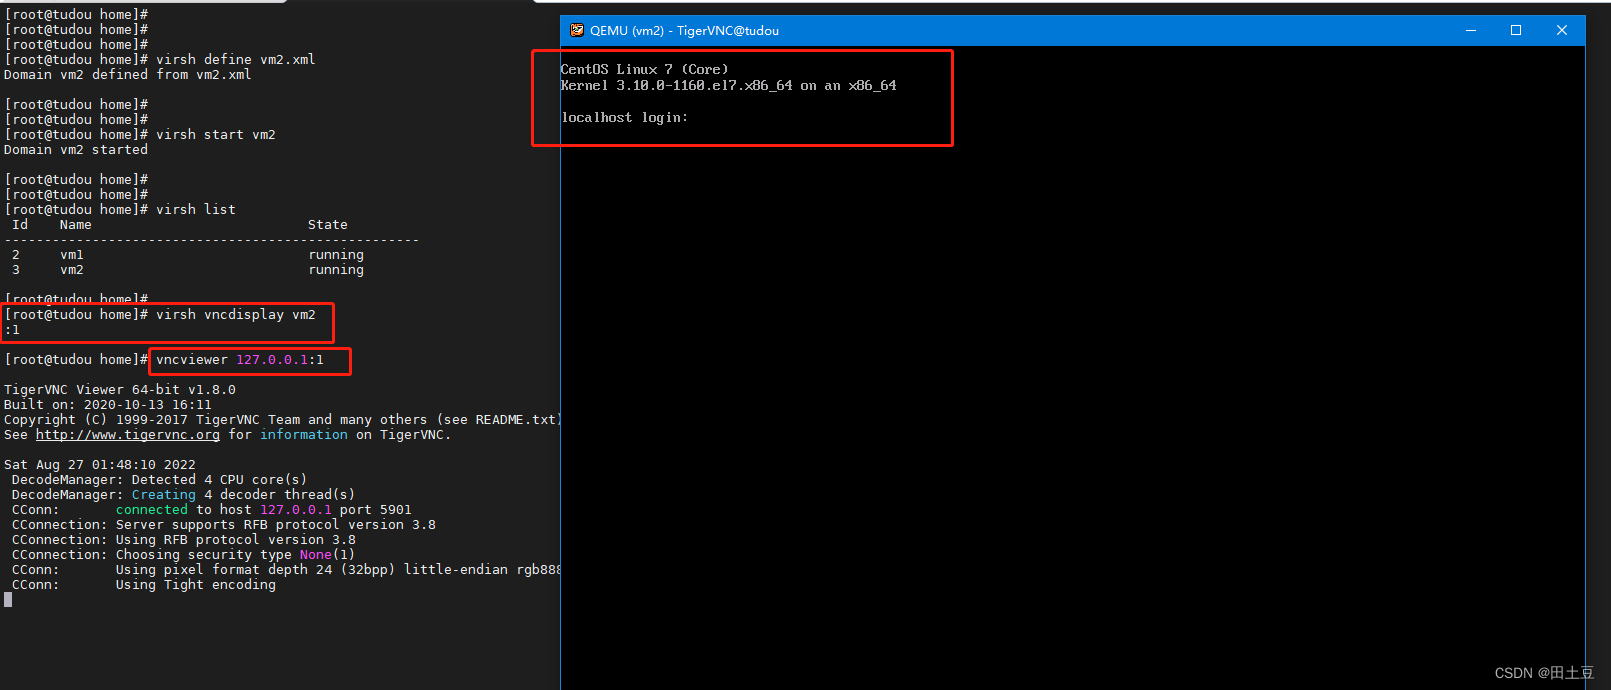
1、可以先复制一份镜像
cp /home/vm1.qcow2 /home/vm2.qcow2
2、修改xml文件(主要包括name、uuid、boot、disk、interface等元素)<domain type='kvm'> //如果是Xen,则type='xen' #虚拟机整体信息 <name>vm2name> //虚拟机名称,同一物理机唯一 <uuid>fd3535gb-2558-43e9-b067-314f48211343uuid> //同一物理机唯一,可用uuidgen生成 <memory>524288memory> //单位为KB <currentMemory>524288currentMemory> //memory这两个值最好设成一样 <vcpu>1vcpu> //vcpu个数 #系统信息 <os> <type arch='x86_64'>hvmtype> //arch指出系统架构类型,machine 则是机器类型,查看机器类型:qemu-system-x86_64 -M ? <boot dev='hd'/> //启动介质,第一次需要装系统可以选择cdrom光盘启动 <bootmenu enable='yes'/> //表示启动按F12进入启动菜单 os> #硬件资源特性 <features> <acpi/> //Advanced Configuration and Power Interface,高级配置与电源接口 <apic/> //Advanced Programmable Interrupt Controller,高级可编程中断控制器 <pae/> //Physical Address Extension,物理地址扩展 features> <clock offset='localtime'/> //虚拟机时钟设置,这里表示本地本机时间 #突发事件处理 <on_poweroff>destroyon_poweroff> <on_reboot>restarton_reboot> <on_crash>restarton_crash> #设备配置 <devices> <emulator>/usr/libexec/qemu-kvmemulator> //如果是Xen则是/usr/lib/xen/binqemu-dm <disk type='file' device='disk'> <driver name='qemu' type='qcow2'/> <source file='/home/vm2.qcow2'/> <target dev='vda' bus='virtio'/> disk> #添加网络配置,基于网桥 <interface type='bridge'> <source bridge='br0'/> <target dev='vnet1'/> <alias name='net1'/> <address type='pci' domain='0x0000' bus='0x00' slot='0x03' function='0x0'/> interface> #配置vnc <graphics type='vnc' port='5900' autoport='yes' listen='0.0.0.0' keymap='en-us'> <listen type='address' address='0.0.0.0'/> graphics> devices> domain>- 1
- 2
- 3
- 4
- 5
- 6
- 7
- 8
- 9
- 10
- 11
- 12
- 13
- 14
- 15
- 16
- 17
- 18
- 19
- 20
- 21
- 22
- 23
- 24
- 25
- 26
- 27
- 28
- 29
- 30
- 31
- 32
- 33
- 34
- 35
- 36
- 37
- 38
- 39
- 40
- 41
- 42
- 43
- 44
- 45
- 46
- 47
- 48
- 49
- 50
- 51
- 52
3、启动vm2虚机

4、使用vncviewer登录vm2,可以看到os直接起来了
5、给vm2的虚拟网卡添加ip

6、从vmware虚机中ping vm2虚机,同时ssh

3. 总结
- 一开始没有可启动盘时,将vm从光驱启动,从vnc进入虚机,开始安装,可以获得可启动盘,也就是制作了带系统的
image镜像 - 有了这个带系统的
image镜像,可以多次拷贝重复利用,创建虚机时直接从硬盘启动
-
相关阅读:
Django — 介绍和搭建
Rust trait、动态派发和向上转型
荧光聚苯乙烯AIE微球,氨基的产品波长和粒径范围
初识C语言 -- 数组
语文提高计划
Python异常、模块与包
LabVIEW性能和内存管理 3
【Python实战】美哭你的极品壁纸推荐|1800+壁纸自动换?美女动漫随心选(高清无码)
基于nodejs+vue+elementui旅游攻略资讯网python java
掌握Perl命令行:深入解析命令行参数的艺术
- 原文地址:https://blog.csdn.net/weixin_42216109/article/details/126549041
