-
spring security 身份认证的实现
目录
一、引入依赖,开箱即用
1、基于Spring Boot实现,首先引入依赖,版本跟随spring boot
- <!-- 实现对 Spring MVC 的自动化配置 -->
- <dependency>
- <groupId>org.springframework.boot</groupId>
- <artifactId>spring-boot-starter-web</artifactId>
- </dependency>
- <!-- 实现对 Spring Security 的自动化配置 -->
- <dependency>
- <groupId>org.springframework.boot</groupId>
- <artifactId>spring-boot-starter-security</artifactId>
- </dependency>
2、编写 controller
- import org.springframework.web.bind.annotation.GetMapping;
- import org.springframework.web.bind.annotation.RequestMapping;
- import org.springframework.web.bind.annotation.RestController;
- /**
- * @author Administrator
- * @date 2019/7/6/006 20:25
- * @Version 1.0
- */
- @RestController
- @RequestMapping("/admin")
- public class AdminController {
- @GetMapping("/test")
- public String test(){
- return "Spring Security Test";
- }
- }
引入Spring Security之后 ,访问 API 接口时,需要首先进行登录,才能进行访问。
测试 http://localhost:8080/admin/test,会跳转到

该登陆页面通过以下接口生成:DefaultLoginPageGeneratingFilter#generateLoginPageHtml
默认用户名:user,密码可以查看控制台日志获取,这个默认用户生成的逻辑在SecurityProperties.class 中,用户名和密码也可以通过属性配置进行覆盖。
默认用户原理:
默认情况下,UserDetailsServiceAutoConfiguration.class 自动化配置类会创建一个内存级别的
InMemoryUserDetailsManager对象,提供认证的用户信息。
- 添加 spring.security.user 配置项,UserDetailsServiceAutoConfiguration 会基于配置的信息在内存中创建一个用户User。
- 未添加 spring.security.user 配置项,UserDetailsServiceAutoConfiguration 会自动在内存中创建一个用户名为 user,密码为 UUID 随机的用户 User。
UserDetailsServiceAutoConfiguration#inMemoryUserDetailsManager
- @Lazy
- public InMemoryUserDetailsManager inMemoryUserDetailsManager(
- SecurityProperties properties,
- ObjectProvider<PasswordEncoder> passwordEncoder) {
- SecurityProperties.User user = properties.getUser();
- List<String> roles = user.getRoles();
- return new InMemoryUserDetailsManager(User.withUsername(user.getName())
- .password(getOrDeducePassword(user, passwordEncoder.getIfAvailable()))
- .roles(StringUtils.toStringArray(roles)).build());
- }
二、自定义用户名和密码
1、方式一:基于UserDetailsService接口
- import org.springframework.security.core.authority.AuthorityUtils;
- import org.springframework.security.core.userdetails.User;
- import org.springframework.security.core.userdetails.UserDetails;
- import org.springframework.security.core.userdetails.UserDetailsService;
- import org.springframework.security.core.userdetails.UsernameNotFoundException;
- import org.springframework.stereotype.Service;
- @Service
- public class MyUserDetailsService implements UserDetailsService {
- // 用户信息
- @Override
- public UserDetails loadUserByUsername(String username) throws UsernameNotFoundException {
- // 方式:1-内存、2-DB
- // 需要处理密码编码,无编码{noop} 、 User(用户名,密码,权限)
- UserDetails userDetails = new User("admin","{noop}123456",
- AuthorityUtils.commaSeparatedStringToAuthorityList("ADMIN"));
- return userDetails;
- }
- }
注意
- UserDetails userDetails = new User("admin","{noop}123456",
- AuthorityUtils.commaSeparatedStringToAuthorityList("ADMIN"));
Spring security5 中新增加了加密方式,并把原有的spring security的密码存储格式改了,修改后的密码存储格式为:{id}encodedPassword
如果密码不指定加密方式{id}会抛异常:

支持的加密方式可以通过 PasswordEncoderFactories.class 查看
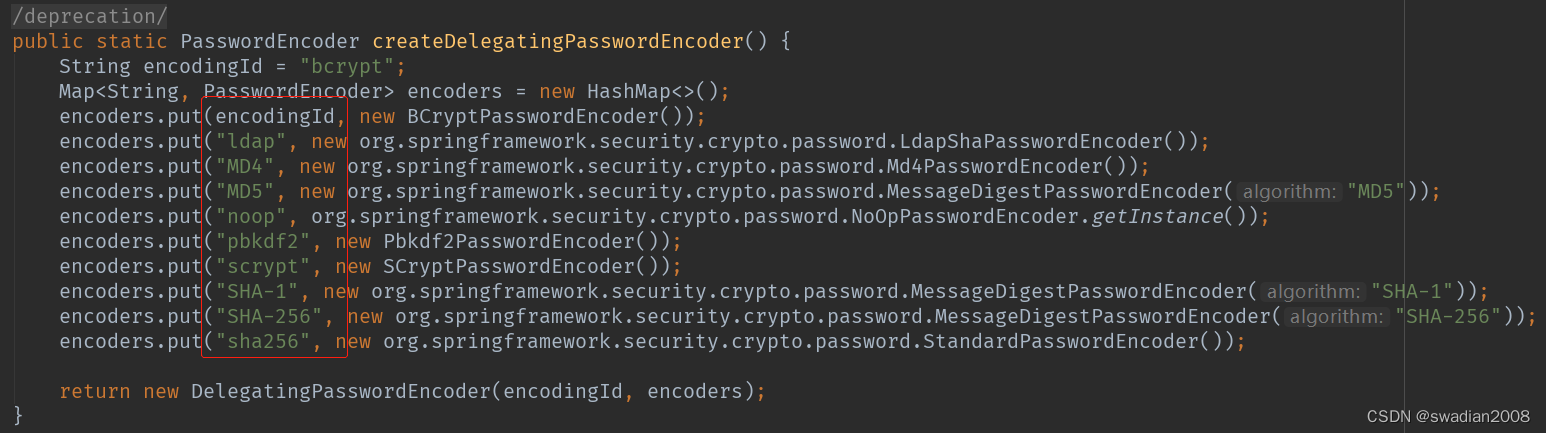
也可以通过增加PasswordEncoder配置指定加密方式,spring security官方推荐的加密方式 BCrypt
- import org.springframework.context.annotation.Bean;
- import org.springframework.context.annotation.Configuration;
- org.springframework.security.config.annotation.web.configuration.WebSecurityConfigurerAdapter;
- import org.springframework.security.crypto.bcrypt.BCryptPasswordEncoder;
- import org.springframework.security.crypto.password.PasswordEncoder;
- @Configuration // 标记为注解类
- public class WebSecurityConfigurer extends WebSecurityConfigurerAdapter {
- @Bean
- public PasswordEncoder passwordEncoder() {
- return new BCryptPasswordEncoder();
- }
- }
- @Service
- public class MyUserDetailsService implements UserDetailsService {
- @Autowired
- PasswordEncoder passwordEncoder;
- // 用户信息
- @Override
- public UserDetails loadUserByUsername(String username) throws UsernameNotFoundException {
- // 方式:1-内存、2-DB
- // 需要处理密码编码,无编码{noop} 、 User(用户名,密码,权限)
- // UserDetails userDetails = new User("admin","{noop}123456",
- // AuthorityUtils.commaSeparatedStringToAuthorityList("ADMIN"));
- UserDetails userDetails = new User("admin",passwordEncoder.encode("123456"),
- AuthorityUtils.commaSeparatedStringToAuthorityList("ADMIN"));
- return userDetails;
- }
- }
2、方式二:基于配置类 WebSecurityConfigurerAdapter
创建 WebSecurityConfig配置类,继承 WebSecurityConfigurerAdapter抽象类,实现 Spring Security 在 Web 场景下的自定义配置。
注:springboot 项目中如果引入的是 spring-boot-starter-security 依赖可以不需要添加
@EnableWebSecurity因为在 spring-boot-autoconfigure-2.3.5.RELEASE.jar!/META-INF/spring.factories 下SecurityAutoConfiguration.class 中已经有引入
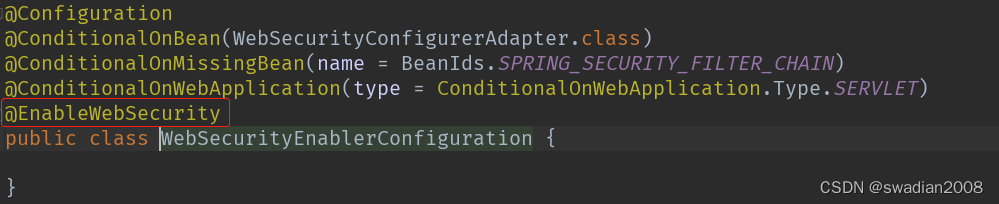
但如果引入的是 spring-security-config 和 spring-security-web 依赖,则需要添加@EnableWebSecurity注解。 // 非springboot项目
(1)重写 #configure(AuthenticationManagerBuilder auth) 方法,实现 AuthenticationManager认证管理器。
- import org.springframework.context.annotation.Bean;
- import org.springframework.context.annotation.Configuration;
- import org.springframework.security.config.annotation.authentication.builders.AuthenticationManagerBuilder;
- import org.springframework.security.config.annotation.web.configuration.WebSecurityConfigurerAdapter;
- import org.springframework.security.crypto.bcrypt.BCryptPasswordEncoder;
- import org.springframework.security.crypto.password.PasswordEncoder;
- @Configuration // 标记为注解类
- public class WebSecurityConfigurer extends WebSecurityConfigurerAdapter {
- @Bean
- public PasswordEncoder passwordEncoder() {
- return new BCryptPasswordEncoder(); // 加密方式
- }
- @Override
- protected void configure(AuthenticationManagerBuilder auth) throws Exception {
- String password = passwordEncoder().encode("123456");
- auth.inMemoryAuthentication() // 使用基于内存的InMemoryUserDetailsManager
- .passwordEncoder(passwordEncoder()) //使用 PasswordEncoder 密码编码器
- .withUser("admin").password(password).roles("admin") // 配置用户
- .and().withUser("admin2").password(password).roles("user");// 配置其他用户
- }
- }
(2)也可以重写WebSecurityConfigurerAdapter#userDetailsService()方法或者
WebSecurityConfigurerAdapter#userDetailsServiceBean(),并通过@Bean交给spring管理- @Configuration // 标记为注解类
- public class WebSecurityConfigurer extends WebSecurityConfigurerAdapter {
- @Bean
- public PasswordEncoder passwordEncoder() {
- return new BCryptPasswordEncoder();
- }
- // @Override
- // protected void configure(AuthenticationManagerBuilder auth) throws Exception {
- // String password = passwordEncoder().encode("123456");
- // auth.inMemoryAuthentication() // 使用基于内存的InMemoryUserDetailsManager
- // .passwordEncoder(passwordEncoder()) //使用 PasswordEncoder 密码编码器
- // .withUser("admin").password(password).roles("admin") // 配置用户
- // .and().withUser("admin2").password(password).roles("user");// 配置其他用户
- // }
- @Bean
- @Override
- protected UserDetailsService userDetailsService() {
- return username -> {
- String pw = passwordEncoder().encode("123456");
- return new User("admin", pw,
- AuthorityUtils.commaSeparatedStringToAuthorityList("admin,user"));
- };
- }
- }
3、方式三:从数据库获取用户名和授权信息
首先创建数据库表,用户表、角色表,权限表,用户角色关联表,角色权限关联表
- -- ----------------------------
- -- Table structure for tb_user 用户表
- -- ----------------------------
- DROP TABLE IF EXISTS `tb_user`;
- CREATE TABLE `tb_user` (
- `id` bigint(20) NOT NULL AUTO_INCREMENT,
- `username` varchar(50) CHARACTER SET utf8 COLLATE utf8_general_ci NOT NULL COMMENT '用户名',
- `password` varchar(64) CHARACTER SET utf8 COLLATE utf8_general_ci NOT NULL COMMENT '密码,加密存储',
- `phone` varchar(20) CHARACTER SET utf8 COLLATE utf8_general_ci NULL DEFAULT NULL COMMENT '注册手机号',
- `email` varchar(50) CHARACTER SET utf8 COLLATE utf8_general_ci NULL DEFAULT NULL COMMENT '注册邮箱',
- `created` datetime NOT NULL,
- `updated` datetime NOT NULL,
- PRIMARY KEY (`id`) USING BTREE,
- UNIQUE INDEX `username`(`username`) USING BTREE,
- UNIQUE INDEX `phone`(`phone`) USING BTREE,
- UNIQUE INDEX `email`(`email`) USING BTREE
- ) ENGINE = InnoDB AUTO_INCREMENT = 38 CHARACTER SET = utf8 COLLATE = utf8_general_ci COMMENT = '用户表' ROW_FORMAT = Dynamic;
- -- ----------------------------
- -- Records of tb_user 用户数据
- -- ----------------------------
- INSERT INTO `tb_user` VALUES (37, 'admin', '$2a$10$9ZhDOBp.sRKat4l14ygu/.LscxrMUcDAfeVOEPiYwbcRkoB09gCmi', '158xxx xxxx', 'xxxxxxx@gmail.com', '2019-04-04 23:21:27', '2019-04-04 23:21:29');
- -- ----------------------------
- -- Table structure for tb_role 角色表
- -- ----------------------------
- DROP TABLE IF EXISTS `tb_role`;
- CREATE TABLE `tb_role` (
- `id` bigint(20) NOT NULL AUTO_INCREMENT,
- `parent_id` bigint(20) NULL DEFAULT NULL COMMENT '父角色',
- `name` varchar(64) CHARACTER SET utf8 COLLATE utf8_general_ci NULL DEFAULT NULL COMMENT '角色名称',
- `en_name` varchar(64) CHARACTER SET utf8 COLLATE utf8_general_ci NOT NULL COMMENT '角色英文名称',
- `description` varchar(200) CHARACTER SET utf8 COLLATE utf8_general_ci NULL DEFAULT NULL COMMENT '备注',
- `created` datetime NOT NULL,
- `updated` datetime NOT NULL,
- PRIMARY KEY (`id`) USING BTREE
- ) ENGINE = InnoDB AUTO_INCREMENT = 38 CHARACTER SET = utf8 COLLATE = utf8_general_ci COMMENT = '角色表' ROW_FORMAT = Dynamic;
- -- ----------------------------
- -- Records of tb_role 角色信息
- -- ----------------------------
- INSERT INTO `tb_role` VALUES (37, 0, '超级管理员', 'swadian', NULL, '2019-04-04 23:22:03', '2019-04-04 23:22:05');
- -- ----------------------------
- -- Table structure for tb_permission 权限表
- -- ----------------------------
- DROP TABLE IF EXISTS `tb_permission`;
- CREATE TABLE `tb_permission` (
- `id` bigint(20) NOT NULL AUTO_INCREMENT,
- `parent_id` bigint(20) NULL DEFAULT NULL COMMENT '父权限',
- `name` varchar(64) CHARACTER SET utf8 COLLATE utf8_general_ci NOT NULL COMMENT '权限名称',
- `en_name` varchar(64) CHARACTER SET utf8 COLLATE utf8_general_ci NOT NULL COMMENT '权限英文名称',
- `url` varchar(255) CHARACTER SET utf8 COLLATE utf8_general_ci NOT NULL COMMENT '授权路径',
- `description` varchar(200) CHARACTER SET utf8 COLLATE utf8_general_ci NULL DEFAULT NULL COMMENT '备注',
- `created` datetime NOT NULL,
- `updated` datetime NOT NULL,
- PRIMARY KEY (`id`) USING BTREE
- ) ENGINE = InnoDB AUTO_INCREMENT = 49 CHARACTER SET = utf8 COLLATE = utf8_general_ci COMMENT = '权限表' ROW_FORMAT = Dynamic;
- -- ----------------------------
- -- Records of tb_permission 权限信息
- -- ----------------------------
- INSERT INTO `tb_permission` VALUES (37, 0, '系统管理', 'System', '/', NULL, '2019-04-04 23:22:54', '2019-04-04 23:22:56');
- INSERT INTO `tb_permission` VALUES (38, 37, '用户管理', 'SystemUser', '/users/', NULL, '2019-04-04 23:25:31', '2019-04-04 23:25:33');
- INSERT INTO `tb_permission` VALUES (39, 38, '查看用户', 'SystemUserView', '', NULL, '2019-04-04 15:30:30', '2019-04-04 15:30:43');
- INSERT INTO `tb_permission` VALUES (40, 38, '新增用户', 'SystemUserInsert', '', NULL, '2019-04-04 15:30:31', '2019-04-04 15:30:44');
- INSERT INTO `tb_permission` VALUES (41, 38, '编辑用户', 'SystemUserUpdate', '', NULL, '2019-04-04 15:30:32', '2019-04-04 15:30:45');
- INSERT INTO `tb_permission` VALUES (42, 38, '删除用户', 'SystemUserDelete', '', NULL, '2019-04-04 15:30:48', '2019-04-04 15:30:45');
- INSERT INTO `tb_permission` VALUES (44, 37, '内容管理', 'SystemContent', '/contents/', NULL, '2019-04-06 18:23:58', '2019-04-06 18:24:00');
- INSERT INTO `tb_permission` VALUES (45, 44, '查看内容', 'SystemContentView', '/contents/view/**', NULL, '2019-04-06 23:49:39', '2019-04-06 23:49:41');
- INSERT INTO `tb_permission` VALUES (46, 44, '新增内容', 'SystemContentInsert', '/contents/insert/**', NULL, '2019-04-06 23:51:00', '2019-04-06 23:51:02');
- INSERT INTO `tb_permission` VALUES (47, 44, '编辑内容', 'SystemContentUpdate', '/contents/update/**', NULL, '2019-04-06 23:51:04', '2019-04-06 23:51:06');
- INSERT INTO `tb_permission` VALUES (48, 44, '删除内容', 'SystemContentDelete', '/contents/delete/**', NULL, '2019-04-06 23:51:08', '2019-04-06 23:51:10');
- -- ----------------------------
- -- Table structure for tb_user_role 用户角色关联表
- -- ----------------------------
- DROP TABLE IF EXISTS `tb_user_role`;
- CREATE TABLE `tb_user_role` (
- `id` bigint(20) NOT NULL AUTO_INCREMENT,
- `user_id` bigint(20) NOT NULL COMMENT '用户 ID',
- `role_id` bigint(20) NOT NULL COMMENT '角色 ID',
- PRIMARY KEY (`id`) USING BTREE
- ) ENGINE = InnoDB AUTO_INCREMENT = 38 CHARACTER SET = utf8 COLLATE = utf8_general_ci COMMENT = '用户角色表' ROW_FORMAT = Dynamic;
- -- ----------------------------
- -- Records of tb_user_role 用户角色关联信息
- -- ----------------------------
- INSERT INTO `tb_user_role` VALUES (37, 37, 37);
- -- ----------------------------
- -- Table structure for tb_role_permission 角色权限关联表
- -- ----------------------------
- DROP TABLE IF EXISTS `tb_role_permission`;
- CREATE TABLE `tb_role_permission` (
- `id` bigint(20) NOT NULL AUTO_INCREMENT,
- `role_id` bigint(20) NOT NULL COMMENT '角色 ID',
- `permission_id` bigint(20) NOT NULL COMMENT '权限 ID',
- PRIMARY KEY (`id`) USING BTREE
- ) ENGINE = InnoDB AUTO_INCREMENT = 48 CHARACTER SET = utf8 COLLATE = utf8_general_ci COMMENT = '角色权限表' ROW_FORMAT = Dynamic;
- -- ----------------------------
- -- Records of tb_role_permission 角色权限关信息
- -- ----------------------------
- INSERT INTO `tb_role_permission` VALUES (37, 37, 37);
- INSERT INTO `tb_role_permission` VALUES (38, 37, 38);
- INSERT INTO `tb_role_permission` VALUES (39, 37, 39);
- INSERT INTO `tb_role_permission` VALUES (40, 37, 40);
- INSERT INTO `tb_role_permission` VALUES (41, 37, 41);
- INSERT INTO `tb_role_permission` VALUES (42, 37, 42);
- INSERT INTO `tb_role_permission` VALUES (43, 37, 44);
- INSERT INTO `tb_role_permission` VALUES (44, 37, 45);
- INSERT INTO `tb_role_permission` VALUES (45, 37, 46);
- INSERT INTO `tb_role_permission` VALUES (46, 37, 47);
- INSERT INTO `tb_role_permission` VALUES (47, 37, 48);
然后引入数据库相关依赖
- <--mybaits plus 框架-->
- <dependency>
- <groupId>com.baomidou</groupId>
- <artifactId>mybatis-plus-boot-starter</artifactId>
- <version>3.3.2</version>
- </dependency>
- <--mysql-->
- <dependency>
- <groupId>mysql</groupId>
- <artifactId>mysql-connector-java</artifactId>
- <version>5.1.39</version>
- </dependency>
- <dependency>
- <groupId>org.projectlombok</groupId>
- <artifactId>lombok</artifactId>
- </dependency>
在配置文件 application.yml 中,配置数据源
- spring:
- datasource:
- driver-class-name: com.mysql.jdbc.Driver
- url: jdbc:mysql://localhost:3306/security?useSSL=false
- password: root
- username: root
关键步骤:修改获取用户信息的 MyUserDetailsService 逻辑,改为从数据库获取
- import com.baomidou.mybatisplus.core.toolkit.Wrappers;
- import com.swadian.security.entity.TbPermission;
- import com.swadian.security.entity.TbUser;
- import com.swadian.security.mapper.TbPermissionMapper;
- import com.swadian.security.mapper.TbUserMapper;
- import org.springframework.security.core.GrantedAuthority;
- import org.springframework.security.core.authority.SimpleGrantedAuthority;
- import org.springframework.security.core.userdetails.User;
- import org.springframework.security.core.userdetails.UserDetails;
- import org.springframework.security.core.userdetails.UserDetailsService;
- import org.springframework.security.core.userdetails.UsernameNotFoundException;
- import org.springframework.stereotype.Service;
- import org.springframework.util.StringUtils;
- import javax.annotation.Resource;
- import java.util.ArrayList;
- import java.util.List;
- @Service
- public class MyUserDetailsService implements UserDetailsService {
- @Resource // 用户表
- private TbUserMapper userMapper;
- @Resource // 权限表
- private TbPermissionMapper permissionMapper;
- public TbUser getByUsername(String username) {
- return userMapper.selectList(Wrappers.lambdaQuery(TbUser.class).eq(TbUser::getUsername, username)
- ).stream().findFirst().orElse(null);
- }
- @Override
- public UserDetails loadUserByUsername(String username) throws UsernameNotFoundException {
- // 从mysql查询用户
- TbUser user = getByUsername(username);
- // 封装权限的集合
- List
authorities = new ArrayList<>(); - if (user != null) {
- // 获取用户的权限 用户->角色->权限:注,这个三个表的id被设置为一样,所以可以直接用 userId 获取权限
- List
permissions = permissionMapper.selectList(Wrappers.lambdaQuery(TbPermission.class) - .eq(TbPermission::getId, user.getId()));
- permissions.forEach(permission -> {
- if (permission != null && !StringUtils.isEmpty(permission.getEnName())) {
- GrantedAuthority grantedAuthority = new SimpleGrantedAuthority(permission.getEnName());
- authorities.add(grantedAuthority);
- }
- });
- // 封装成UserDetails的实现类
- return new User(user.getUsername(), user.getPassword(), authorities);
- } else {
- throw new UsernameNotFoundException("用户名不存在");
- }
- }
- }
spring secutiry 的 配置如下:
- import com.swadian.security.service.MyUserDetailsService;
- import org.springframework.beans.factory.annotation.Autowired;
- import org.springframework.context.annotation.Bean;
- import org.springframework.context.annotation.Configuration;
- import org.springframework.context.annotation.Lazy;
- import org.springframework.security.config.annotation.authentication.builders.AuthenticationManagerBuilder;
- import org.springframework.security.config.annotation.web.builders.HttpSecurity;
- import org.springframework.security.config.annotation.web.configuration.WebSecurityConfigurerAdapter;
- import org.springframework.security.crypto.bcrypt.BCryptPasswordEncoder;
- import org.springframework.security.crypto.password.PasswordEncoder;
- @Configuration // 标记为注解类
- public class WebSecurityConfigurer extends WebSecurityConfigurerAdapter {
- @Autowired
- @Lazy // 解决循环依赖
- private MyUserDetailsService userService;
- @Bean
- public PasswordEncoder passwordEncoder() {
- return new BCryptPasswordEncoder();
- }
- @Override
- protected void configure(AuthenticationManagerBuilder auth) throws Exception {
- //设置UserDetailsService的实现类
- auth.userDetailsService(userService);
- }
- @Override
- protected void configure(HttpSecurity http) throws Exception {
- http.formLogin(); //表单提交
- http.logout()
- .logoutUrl("/logout")
- .logoutSuccessUrl("/login.html"); // 退出后跳转到登陆页面
- http.authorizeRequests()
- .antMatchers("/login.html", "/error.html", "/main.html").permitAll() // 不需要认证
- .anyRequest()
- .authenticated() // 认证拦截
- .and().csrf().disable(); //关闭csrf防护
- }
- }
修改下 controller 的内容,修改为返回用户信息
- @RestController
- @RequestMapping("/admin")
- public class AdminController {
- @GetMapping("/test")
- public Object test() {
- // 返回用户信息
- return SecurityContextHolder.getContext().getAuthentication().getPrincipal();
- }
- }
测试结果:

从数据库获取用户信息成功
三、自定义登陆页面
默认登录页面通过DefaultLoginPageGeneratingFilter#generateLoginPageHtml生成,下边替换成自定义登陆页面:login.html
- <!DOCTYPE html>
- <html lang="en">
- <head>
- <meta charset="UTF-8">
- <title>Title</title>
- </head>
- <body>
- <form action="/user/login" method="post">
- 用户名:<input type="text" name="username"/><br/>
- 密码: <input type="password"name="password"/><br/>
- <input type="submit" value="提交"/>
- </form>
- </body>
- </html>
自定义登陆页面配置
- import com.swadian.userdemo.service.MyUserDetailsService;
- import org.springframework.beans.factory.annotation.Autowired;
- import org.springframework.context.annotation.Bean;
- import org.springframework.context.annotation.Configuration;
- import org.springframework.security.config.annotation.authentication.builders.AuthenticationManagerBuilder;
- import org.springframework.security.config.annotation.web.builders.HttpSecurity;
- import org.springframework.security.config.annotation.web.configuration.WebSecurityConfigurerAdapter;
- import org.springframework.security.crypto.bcrypt.BCryptPasswordEncoder;
- import org.springframework.security.crypto.password.PasswordEncoder;
- @Configuration // 标记为注解类
- public class WebSecurityConfigurer extends WebSecurityConfigurerAdapter {
- @Autowired
- private MyUserDetailsService userService;
- @Bean
- public PasswordEncoder passwordEncoder() {
- return new BCryptPasswordEncoder();
- }
- @Override
- protected void configure(AuthenticationManagerBuilder auth) throws Exception {
- //设置UserDetailsService的实现类
- auth.userDetailsService(userService);
- }
- // 自定义登陆页面配置
- @Override
- protected void configure(HttpSecurity http) throws Exception {
- http.formLogin() //表单提交
- .loginPage("/login.html") //自定义登录页面
- .loginProcessingUrl("/user/login") //登录访问路径,必须和表单提交接口一样
- //.usernameParameter("my-username") // 自定义参数名
- //.passwordParameter("my-password")
- //.defaultSuccessUrl("/main.html") //认证成功之后跳转的路径
- .successForwardUrl("/login/main") //认证成功之后转发的路径,必须是Post请求
- .failureForwardUrl("/login/error") //认证失败之后转发的路径,必须是Post请求
- .and()
- // 认证配置
- .authorizeRequests() //设置哪些路径可以直接访问,不需要认证
- .antMatchers("/user/login", "/login.html","/error.html","/main.html").permitAll()
- .anyRequest()
- .authenticated() //需要认证
- .and().csrf().disable(); //关闭csrf防护
- }
- // @Bean
- // @Override
- // protected UserDetailsService userDetailsService() {
- // return username -> {
- // String pw = passwordEncoder().encode("123456");
- // return new User("admin", pw,
- // AuthorityUtils.commaSeparatedStringToAuthorityList("admin,user"));
- // };
- // }
- }
通过successForwardUrl和failureForwardUrl设置登录成功和失败后的跳转页面
- import org.springframework.stereotype.Controller;
- import org.springframework.web.bind.annotation.RequestMapping;
- @Controller
- @RequestMapping("/login")
- public class LoginController {
- @RequestMapping("/main") // 认证成功后执行方法
- public String main() {
- return "redirect:/main.html"; // 跳转页面
- }
- @RequestMapping("/error") // 认证失败后执行方法
- public String error() {
- return "redirect:/error.html";
- }
- }
需要注意的点,代码和页面两边的路径需要保持一致

页面路径,统一放在资源包static下,至于为什么在static,后续可以探讨下

使用过滤器的页面重定向
比如想实现登录成功后重定向其他页面,可以利用AuthenticationSuccessHandler接口实现自定义的认证成功控制器。
- import org.springframework.security.core.Authentication;
- import org.springframework.security.web.authentication.AuthenticationSuccessHandler;
- import javax.servlet.ServletException;
- import javax.servlet.http.HttpServletRequest;
- import javax.servlet.http.HttpServletResponse;
- import java.io.IOException;
- public class MyAuthenticationSuccessHandler implements AuthenticationSuccessHandler {
- // 重定向 url
- private String redirectUrl;
- public MyAuthenticationSuccessHandler(String redirectUrl) {
- this.redirectUrl = redirectUrl;
- }
- @Override
- public void onAuthenticationSuccess(HttpServletRequest request, HttpServletResponse response, Authentication authentication) throws IOException, ServletException {
- response.sendRedirect(redirectUrl);
- }
- }
在代码中使用 successHandler() 进行配置
- // 自定义登陆页面配置
- @Override
- protected void configure(HttpSecurity http) throws Exception {
- http.formLogin() //表单提交
- .loginPage("/login.html") //自定义登录页面
- .loginProcessingUrl("/my-user/login") //登录访问路径,必须和表单提交接口一样
- .successHandler(new MyAuthenticationSuccessHandler("/main.html"))
- .and()
- .authorizeRequests() //设置哪些路径可以直接访问,不需要认证
- .antMatchers("/login.html","/error.html","/main.html").permitAll()
- .anyRequest()
- .authenticated() //需要认证
- .and().csrf().disable(); //关闭csrf防护
- }
同样的,当登录认证失败后,想做一些事情,可以实现AuthenticationFailureHandler接口。
-
相关阅读:
浏览器工作原理与实践学习笔记(一)宏观视角下的浏览器
一、MongoDB安装(CentOS7)
JSP 基本介绍及使用。
shell脚本之文件读写
IDEA Error: java: -source 1.5中不支持 lambda 表达式和 Error:java: Compilation failed
是的,决定放弃算法去机器学习了
游戏设计模式专栏(十三):在Cocos游戏开发中运用责任链模式
【云原生之Docker实战】使用docker部署Wiznote私人笔记系统
新手开抖店之前,这三个核心点,一定要提前了解!
软件测试高频面试题真实分享/网上银行转账是怎么测的,设计一下测试用例。
- 原文地址:https://blog.csdn.net/swadian2008/article/details/126191823
