-
37-Spring
37-Spring-qianfeng-笔记
文章目录
- 37-Spring-qianfeng-笔记
- 一、Spring概述
- 二、Spring IoC(基于XML)
- 三、Spring IoC(基于注解)
- 四、代理设计模式
- 五、Spring AOP(XML)
- 六、Spring-AOP(注解配置)
- 七、Spring整合MyBatis(使用XML)
- 八、Spring整合MyBatis👉使用类代替XML(补)
- 九、Spring整合Junit(补)
一、Spring概述
①:web项目开发中的耦合度问题
- 在Servlet中需要调用Service中的方法,则需要在Service类中通过new关键字创建Service的实例
public interface ProductService{ public List<Product>listProducts(); }- 1
- 2
- 3
public class ProductServiceImpl1 implements ProductService{ public List<Product>listProducts(){ //查询热销商品 } }- 1
- 2
- 3
- 4
- 5
public class ProductServiceImpl2 implements ProductService{ public List<Product>listProducts(){ //查询好评商品 } }- 1
- 2
- 3
- 4
- 5
public class ProductListServlet extends HttpServlet{ //在servlet中使用new关键字创建ProductServiceImpl1对象,增加了servlet和service的耦合度 private ProductService productService new ProductServiceImpl1(); protected void doGet(HttpServletRequest request,HttpServletResponse response){ doPost(request,response); } protected void doPost(HttpServletRequest request,HttpServletResponse response){ productService.listProducts(); } }- 1
- 2
- 3
- 4
- 5
- 6
- 7
- 8
- 9
- 10
- 在service?实现类中需要调用DAO中的方法,也需要在servcie3实现类通过new关键字创建DAO实现类对象
- 如果使用new关键字创建对象:
- 失去了面向接口编程的灵活性
- 代码的侵入性增强(增加了耦合度)、降低了代码的灵活性
②:面向接口编程
面向接口编程
解决方案:在Servlet中定义Service?接口的对象变量,不使用new关键字创建实现类对象,在servlet的实例化的时候,通过反射动态的给Service对象变量赋值。如何实现:Spring可以做到!!!
③:Spring介绍
Spring是一个
轻量级的控制反转和面向切面的容器框架,用来解决企业项目开发的复杂度问题一解耦- 轻量级: 体积小,对代码没有侵入性
- 控制反转: IoC(Inverse of Control),把创建对象的工作交由Spring完成,Spring在创建对象的时候同时可以完成对象属性赋值(DI)
- 面向切面: AOP(Aspect Oriented Programming)面向切面编程,可以在不改变原有业务逻辑的情况下实现对业务的增强
- 容器: 实例的容器,管理创建的对象
④:Spring架构
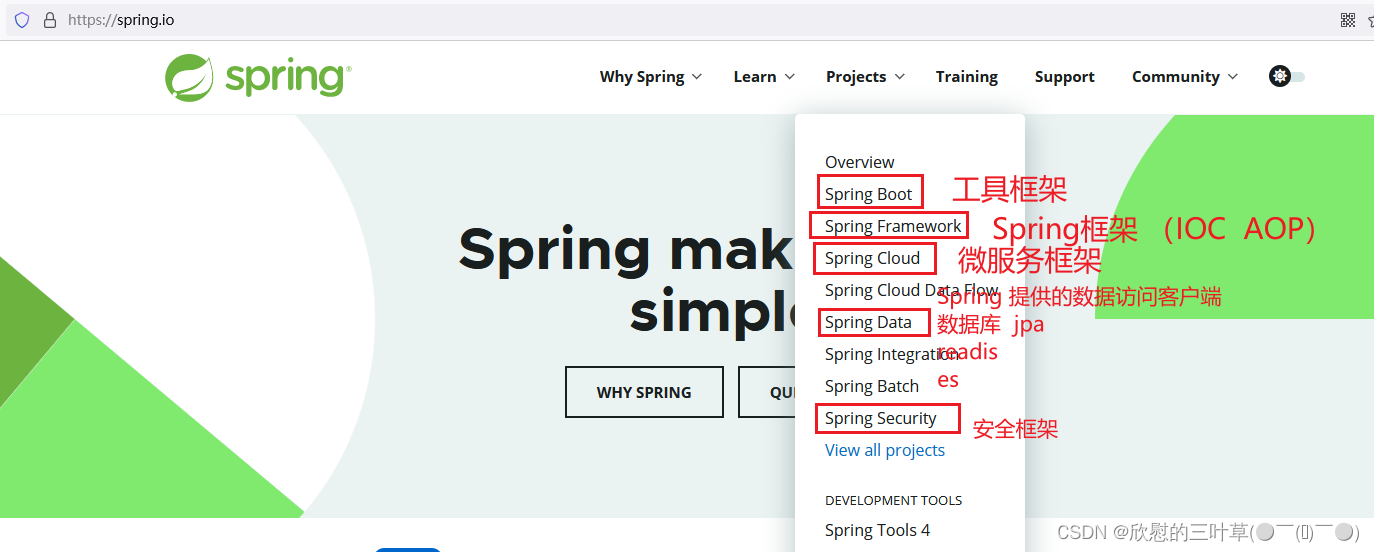
- 官网地址: https://spring.io/
Spring架构图
01. Core Container(核心容器)
Spring容器组件,用于完成实例的创建和管理
- core
- beans实例管理
- context容器上下文
02. AOP Aspects
Spring AOPs组件,实现面向切面编程
- aop
- aspects
03. Web
Spring web组件实际指的是SpringMVC框架,实现web项目的MVCc控制
- web(Spring对web项目的支持)
- webmvc(SpringMVC组件)
04. Data Access
Spring数据访问组件,也是一个基于JDBC封装的持久层框架(即使没有mybatis,Spring也可以完成持久化操作)
- tx
05.Test
Spring的单元测试组件,提供了Spring环境下的单元测试支持
- test
二、Spring IoC(基于XML)
①:Spring框架部署(IoC)
01. 创建Maven工程
- 可以创建Java工程也可以创建Web工程
- 步骤略~
02.添加SpringIoC依赖
1. core依赖<dependency> <groupId>org.springframeworkgroupId> <artifactId>spring-coreartifactId> <version>5.3.20version> dependency>- 1
- 2
- 3
- 4
- 5
- 6
- 7
2. beans依赖<dependency> <groupId>org.springframeworkgroupId> <artifactId>spring-beansartifactId> <version>5.3.18version> dependency>- 1
- 2
- 3
- 4
- 5
- 6
3. aop依赖<dependency> <groupId>org.springframeworkgroupId> <artifactId>spring-aopartifactId> <version>5.3.18version> dependency>- 1
- 2
- 3
- 4
- 5
- 6
- 7
4. expression依赖<dependency> <groupId>org.springframeworkgroupId> <artifactId>spring-expressionartifactId> <version>5.3.18version> dependency>- 1
- 2
- 3
- 4
- 5
- 6
- 7
5. context依赖(也可以只导入context依赖以上的依赖会自动导入)<dependency> <groupId>org.springframeworkgroupId> <artifactId>spring-contextartifactId> <version>5.3.18version> dependency>- 1
- 2
- 3
- 4
- 5
- 6
03.创建Spring配置文件
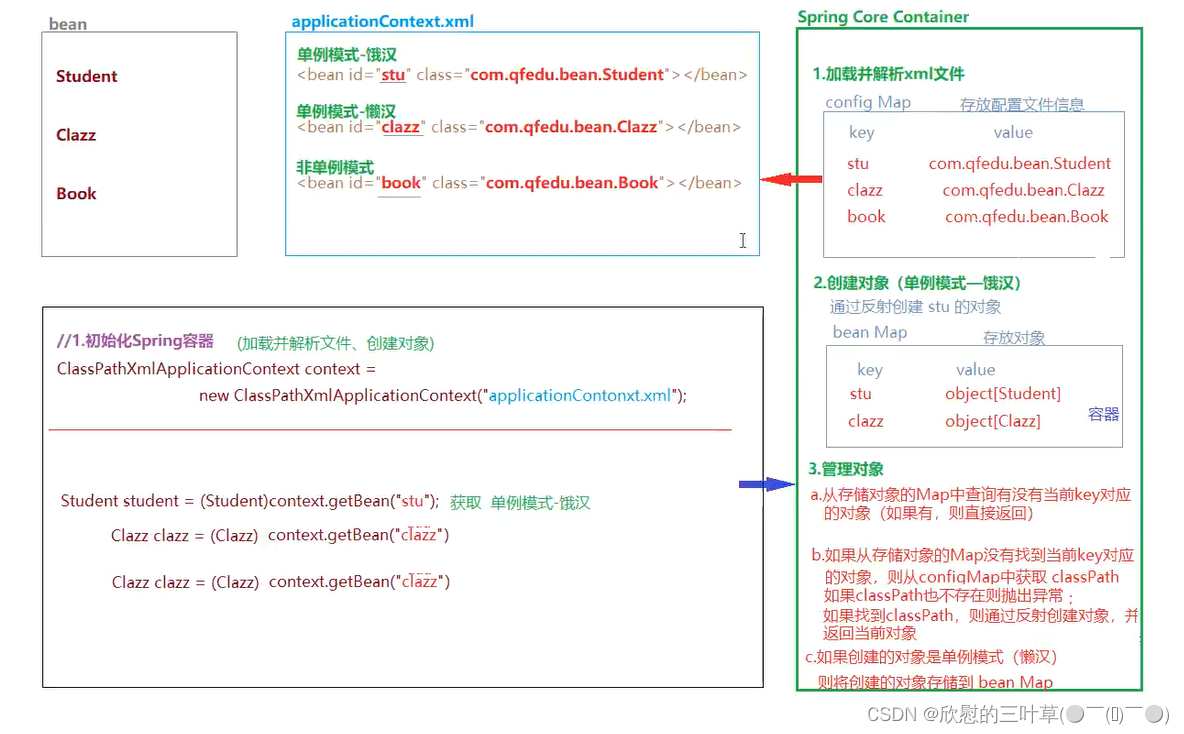
通过配置文件"告诉"Spring?容器创建什么对象,给对象属性赋什么值
- 在resources目录下创建名为
appicationContext.xml的文件(文件名是可以自定义的)
可以配置模板(Spring-ioc)文件<beans xmlns="http://www.springframework.org/schema/beans" xmlns:xsi="http://www.w3.org/2001/XMLSchema-instance" xsi:schemaLocation="http://www.springframework.org/schema/beans http://www.springframework.org/schema/beans/spring-beans.xsd"> beans>- 1
- 2
- 3
- 4
- 5
- 6
- 7

②:SpringIoC使用
使用SpringIoc组件创建并管理对象
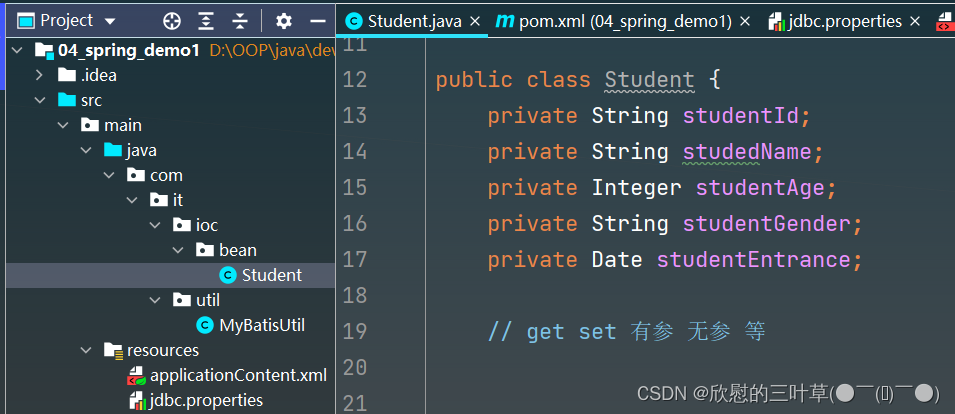
01.创建实体类
public class Student { private String studentId; private String studedName; private Integer studentAge; private String studentGender; private Date studentEntrance; // get set 有参 无参 等 }- 1
- 2
- 3
- 4
- 5
- 6
- 7
- 8
- 9
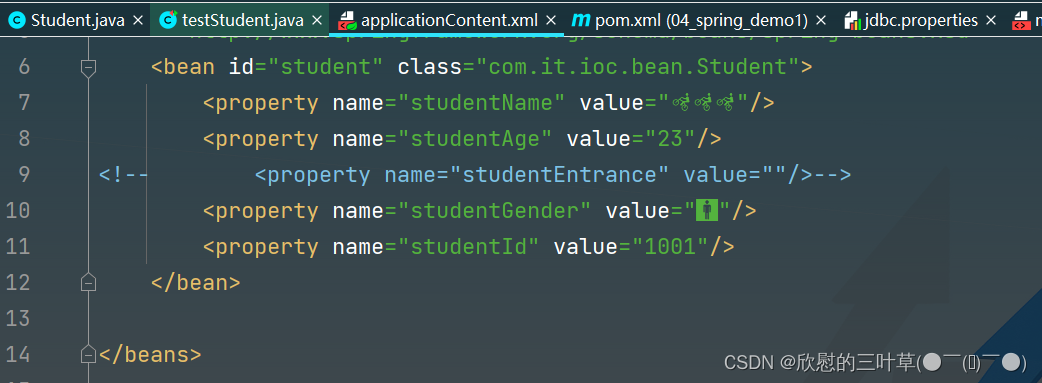
02.在Spring配置文件中配置实体类
<beans xmlns="http://www.springframework.org/schema/beans" xmlns:xsi="http://www.w3.org/2001/XMLSchema-instance" xsi:schemaLocation="http://www.springframework.org/schema/beans http://www.springframework.org/schema/beans/spring-beans.xsd"> <bean id="student" class="com.it.ioc.bean.Student"> <property name="studentName" value="🚵🚵🚵"/> <property name="studentAge" value="23"/> <property name="studentGender" value="🚹"/> <property name="studentId" value="1001"/> bean> beans>- 1
- 2
- 3
- 4
- 5
- 6
- 7
- 8
- 9
- 10
- 11
- 12
- 13
- 14
- 15
- 16
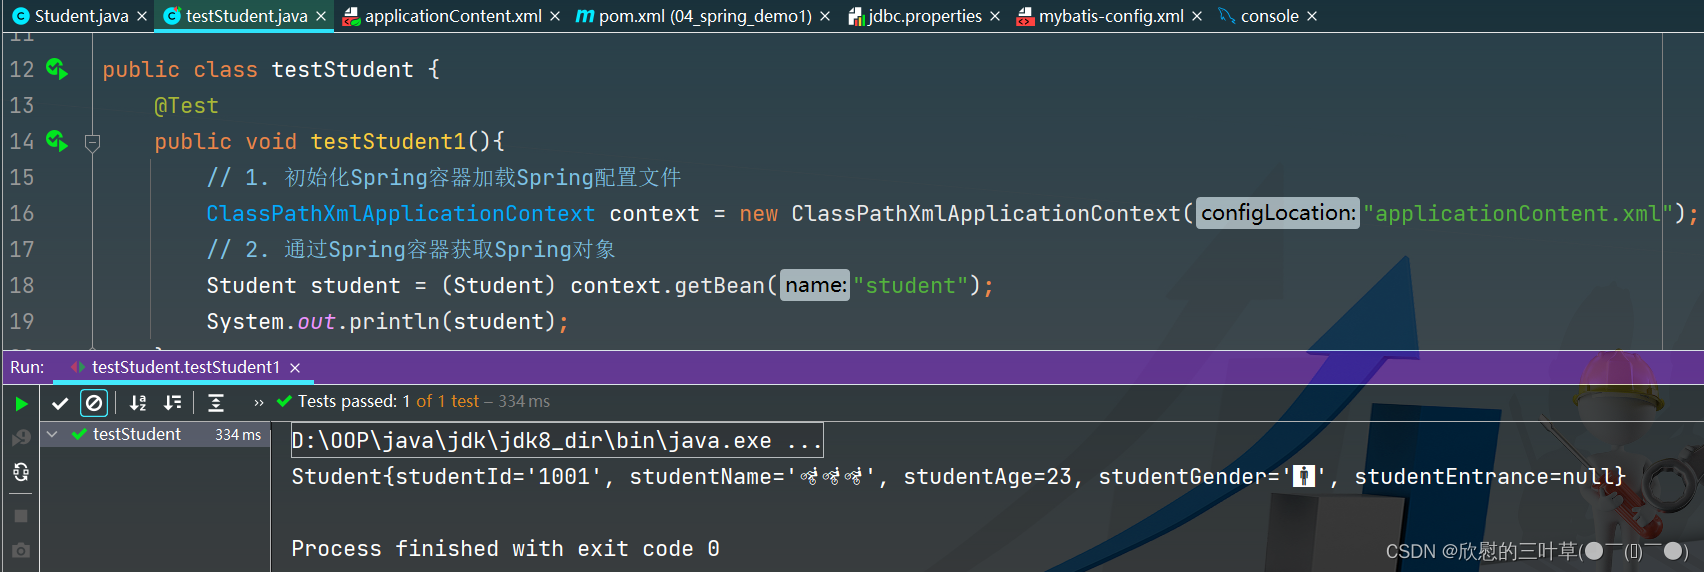
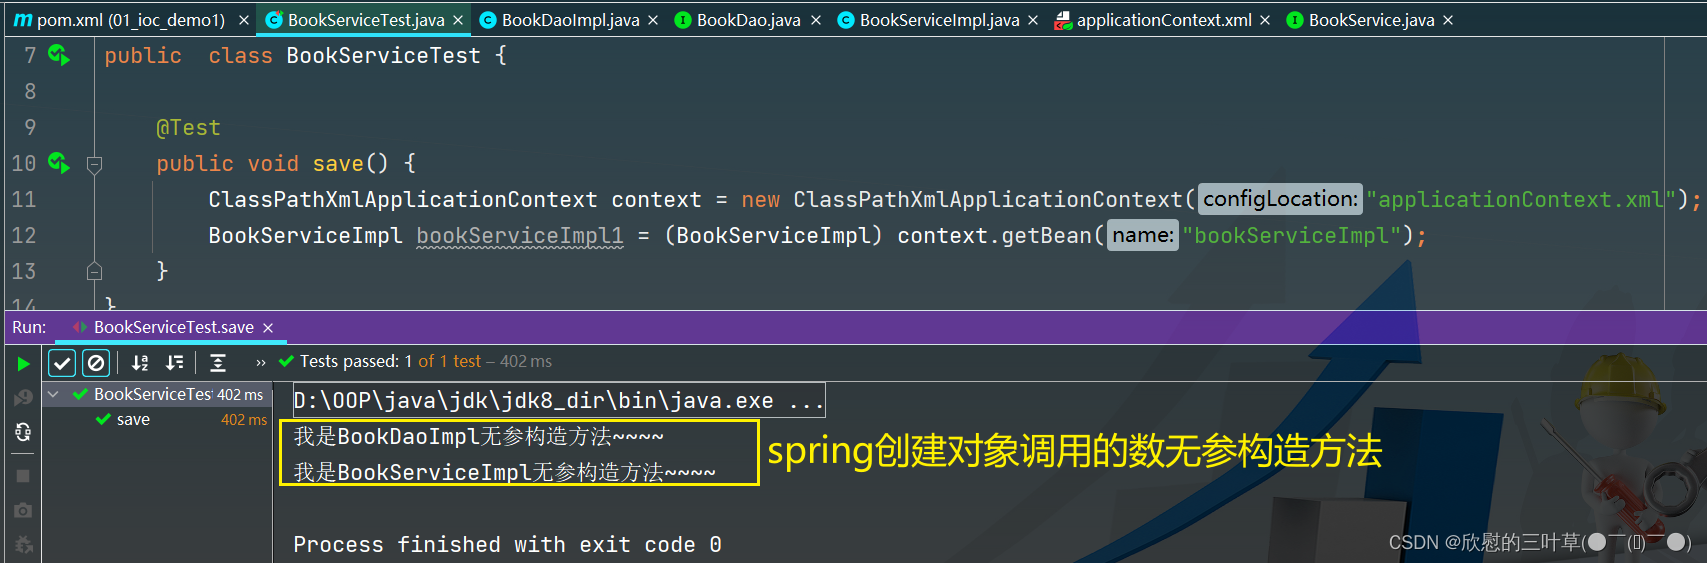
03. 初始化Spring对象工厂,获取对象
public class testStudent { @Test public void testStudent1(){ // 1. 初始化Spring容器加载Spring配置文件 ClassPathXmlApplicationContext context = new ClassPathXmlApplicationContext("applicationContent.xml"); // 2. 通过Spring容器获取Spring对象 Student student = (Student) context.getBean("student"); System.out.println(student); } }- 1
- 2
- 3
- 4
- 5
- 6
- 7
- 8
- 9
- 10
04.bean实例化👉👉构造方法(补)
1.
2.
3.
4.
05.bean实例化👉👉静态工厂(补)
1.
2.
3.
4.
5.
06.bean实例化👉👉实例工厂与FactoryBean(补)
1.方式一
1
2
3
2.方式二(Spring提供的FactoryBean)
1
2
3
③:Ioc和DI
- IoC(Inverse of Control)控制反转,通过Spring对象工厂完成对象的创建
- DI(Dependency Injection)依赖注入,在Spring完成对象创建的同时依赖Spring容器完成对象属性的赋值
01.Ioc
当我们需要通过Spring对象工厂创建某个类的对象时候,需要将这个交给Spring管理-一通过bean标签配置
<bean id="student" class="com.it.ioc.bean.Student">- 1
02. DI
通过Spring容器给创建的对象属性赋值
<bean id="student" class="com.it.ioc.bean.Student"> <property name="studentName" value="🚵🚵🚵"/> <property name="studentAge" value="23"/> <property name="studentEntrance" ref="data"/> <property name="studentGender" value="🚹"/> <property name="studentId" value="1001"/> bean> <bean id="data" class="java.util.Date"/>- 1
- 2
- 3
- 4
- 5
- 6
- 7
- 8
- 9
给Student类中Data属性赋值

④:DI依赖注入(set)
01. 依赖注入三种方式
Spring容器加载配置文件之后,通过反射创建类的对象,并给属性赋值:
Spring容器通过反射实现属性注入有三种方式:- set方法注入
- 构造器注入
- 接口注入(不常用)
02.set方法注入(简单类型及字符串)
在bean标签中通过配置property标签给属性属性赋值,实际上就是通过反射调用set方法完成属性的注入
- 直接通过property标签的value属性赋值
<bean id="student" class="com.it.ioc.bean.Student"> <property name="studentName" value="🚵🚵🚵"/> <property name="studentAge" value="23"/> <property name="studentWight" value="130.5"/> <property name="studentId" value="1001"/> bean>- 1
- 2
- 3
- 4
- 5
- 6
- 7
- 8
- 9
03.set方法注入(日期类型)
- 方式 一:在property标签中通过ref引用Spring容器中的一个对象
<bean id="student" class="com.it.ioc.bean.Student"> <property name="studentEntrance" ref="data"/> bean> <bean id="data" class="java.util.Date"/>- 1
- 2
- 3
- 4
- 5
- 6
- 方式二:在property标签中添加子标签bean来指定对象
<bean id="student" class="com.it.ioc.bean.Student"> <property name="studentEntrance"> <bean class="java.util.Date"/> property> bean>- 1
- 2
- 3
- 4
- 5
- 6
04.set方法注入(自定义对象属性)
- 方式一:
<bean id="student" class="com.it.ioc.bean.Student"> <property name="clazz" ref="clazz"/> bean> <bean id="clazz" class="com.it.ioc.bean.Clazz"> <property name="classId" value="1"/> <property name="className" value="Java1班"/> bean>- 1
- 2
- 3
- 4
- 5
- 6
- 7
- 8
- 9
- 方式二:
<bean id="student" class="com.it.ioc.bean.Student"> <property name="clazz" > <bean class="com.it.ioc.bean.Clazz"> <property name="classId" value="1"/> <property name="className" value="Java1班"/> bean> property> bean>- 1
- 2
- 3
- 4
- 5
- 6
- 7
- 8
- 9
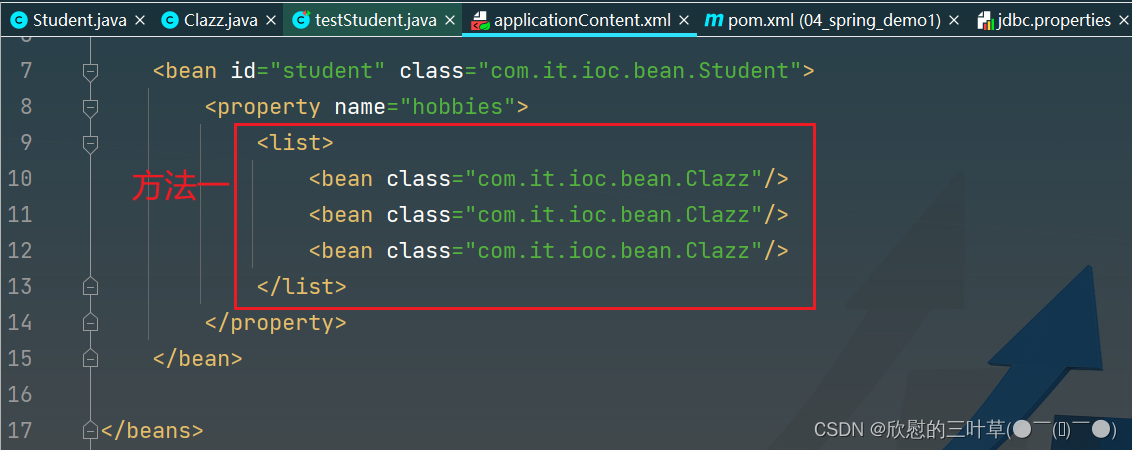
05.set方法注入(List集合)
1. List中的元素时字符串或者简单类型的封装类

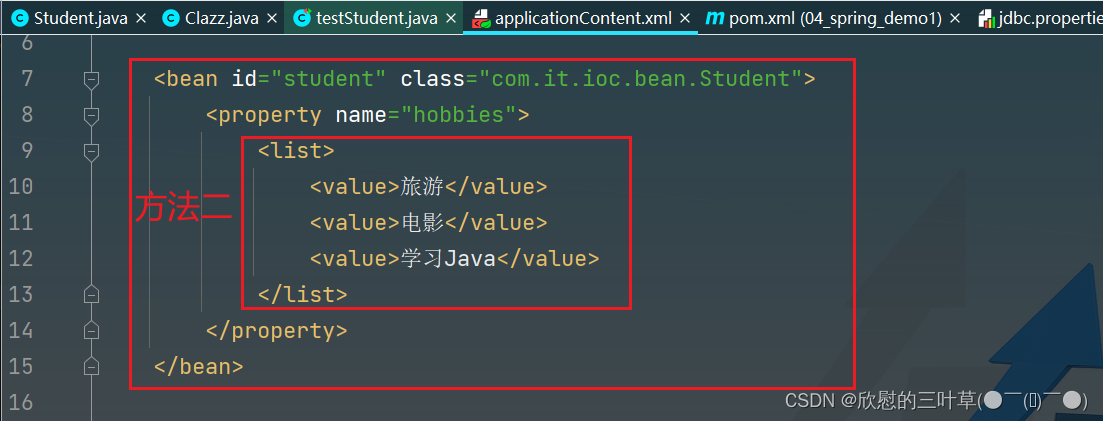

2. List


06.set方法注入(Set集合)
和List集合的使用方法一致(唯独List标签换成set标签)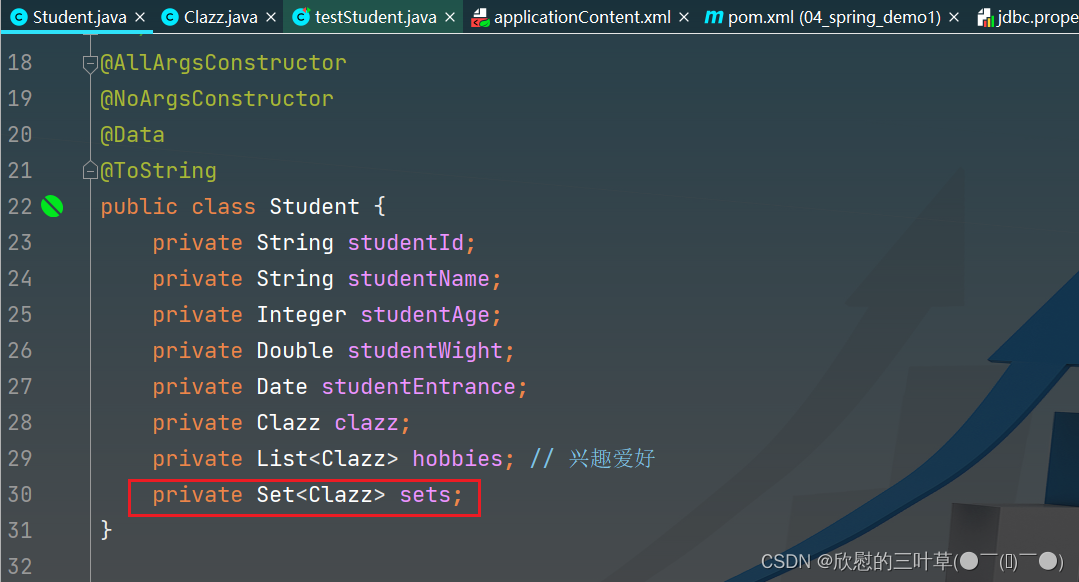

07.set方法注入(Map集合)
1. Map的key和value都是基本类型封装


2. Map中的key或value是对象类型


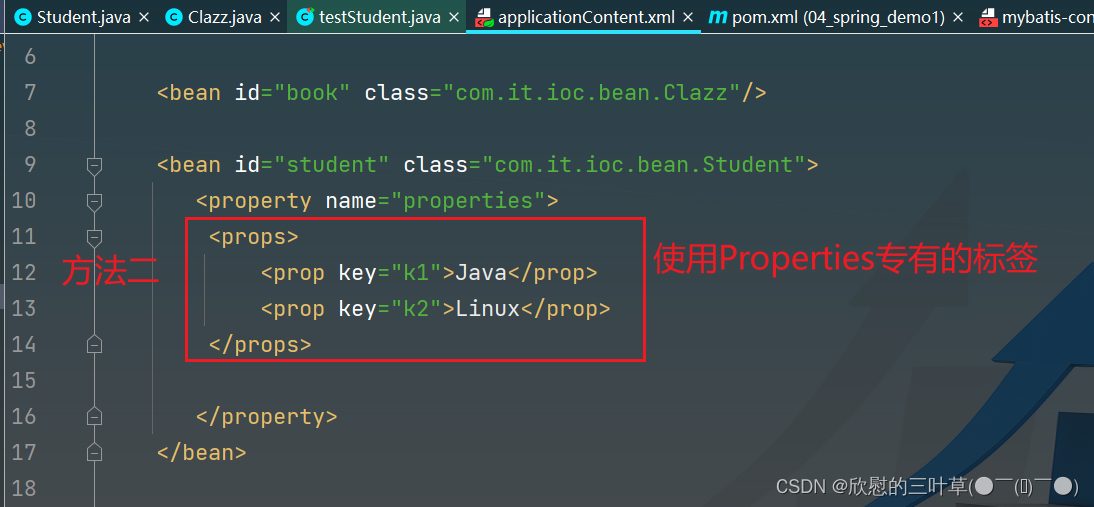
08.set方法注入(Properties集合)


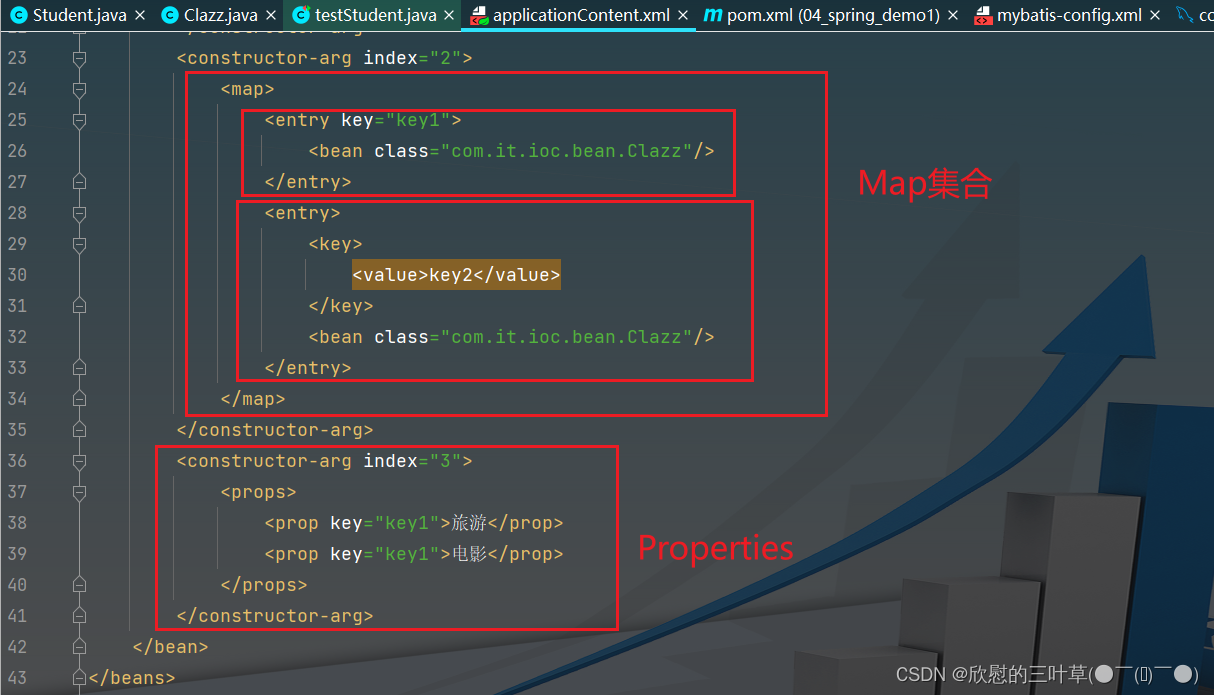
⑤:DI依赖注入(构造器)
01. 简单类型、字符串、对象
<bean id="date" class="java.util.Date"/> <bean id="student" class="com.it.ioc.bean.Student"> <constructor-arg value="张三"/> <constructor-arg value="20"/> <constructor-arg value="66.6"/> <constructor-arg ref="date"/> <constructor-arg> <bean class="com.it.ioc.bean.Clazz"/> constructor-arg> bean>- 1
- 2
- 3
- 4
- 5
- 6
- 7
- 8
- 9
- 10
- 11

02.集合类型
<bean id="clazz" class="com.it.ioc.bean.Clazz"/> <bean id="date" class="java.util.Date"/> <bean id="student" class="com.it.ioc.bean.Student"> <constructor-arg index="0"> <list> <bean class="com.it.ioc.bean.Clazz"/> <ref bean="clazz"/> list> constructor-arg> <constructor-arg index="1"> <set> <bean class="com.it.ioc.bean.Clazz"/> <ref bean="clazz"/> set> constructor-arg> <constructor-arg index="2"> <map> <entry key="key1"> <bean class="com.it.ioc.bean.Clazz"/> entry> <entry> <key> <value>key2value> key> <bean class="com.it.ioc.bean.Clazz"/> entry> map> constructor-arg> <constructor-arg index="3"> <props> <prop key="key1">旅游prop> <prop key="key1">电影prop> props> constructor-arg> bean>- 1
- 2
- 3
- 4
- 5
- 6
- 7
- 8
- 9
- 10
- 11
- 12
- 13
- 14
- 15
- 16
- 17
- 18
- 19
- 20
- 21
- 22
- 23
- 24
- 25
- 26
- 27
- 28
- 29
- 30
- 31
- 32
- 33
- 34
- 35
- 36


03. 数组类型
1


⑥:Bean的作用域
在bean标签可以通过scope属性指定对象的的作用域
- scope=:"singleton"表示当前bean是单例模式(默认饿汉模式,Spring容器初始化阶段就会完成此对象的创建;当在bean标签中设置lay-init="true"变为懒汉模式)
- scope=:"prototype"表示当前bean为非单例模式,每次通过Spring容器获取此bean的对象时都会创建个新的对象
01.单例
1. 单例饿汉模式


2. 单例懒汉模式


02.多例(非单例)
1. 默认单例(不开启多例模式)
2. 开启多例模式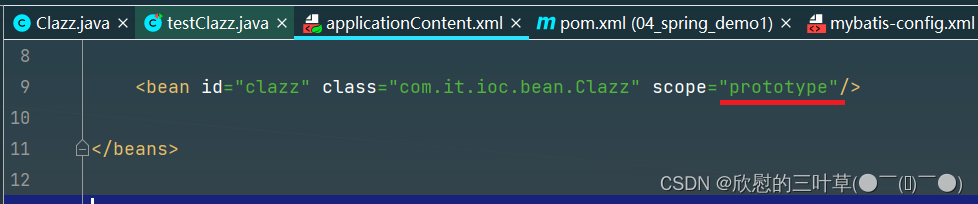

⑦:Bean的声明周期方法(初始化/销毁)
01. 通过配置Bean实现
- 1
- 2
1. 定义初始化方法和销毁方法
2.在Bean标签中引用初始化方法及销毁方法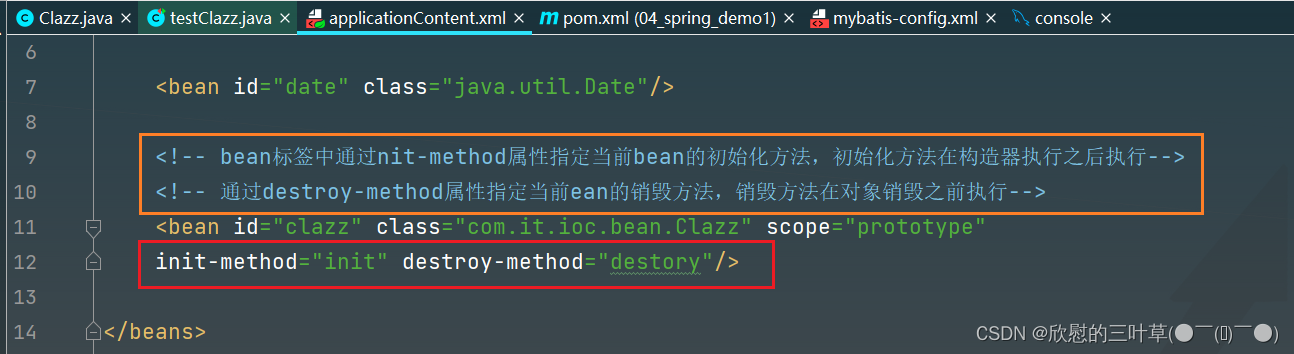
3. 测试代码

02.通过实现
1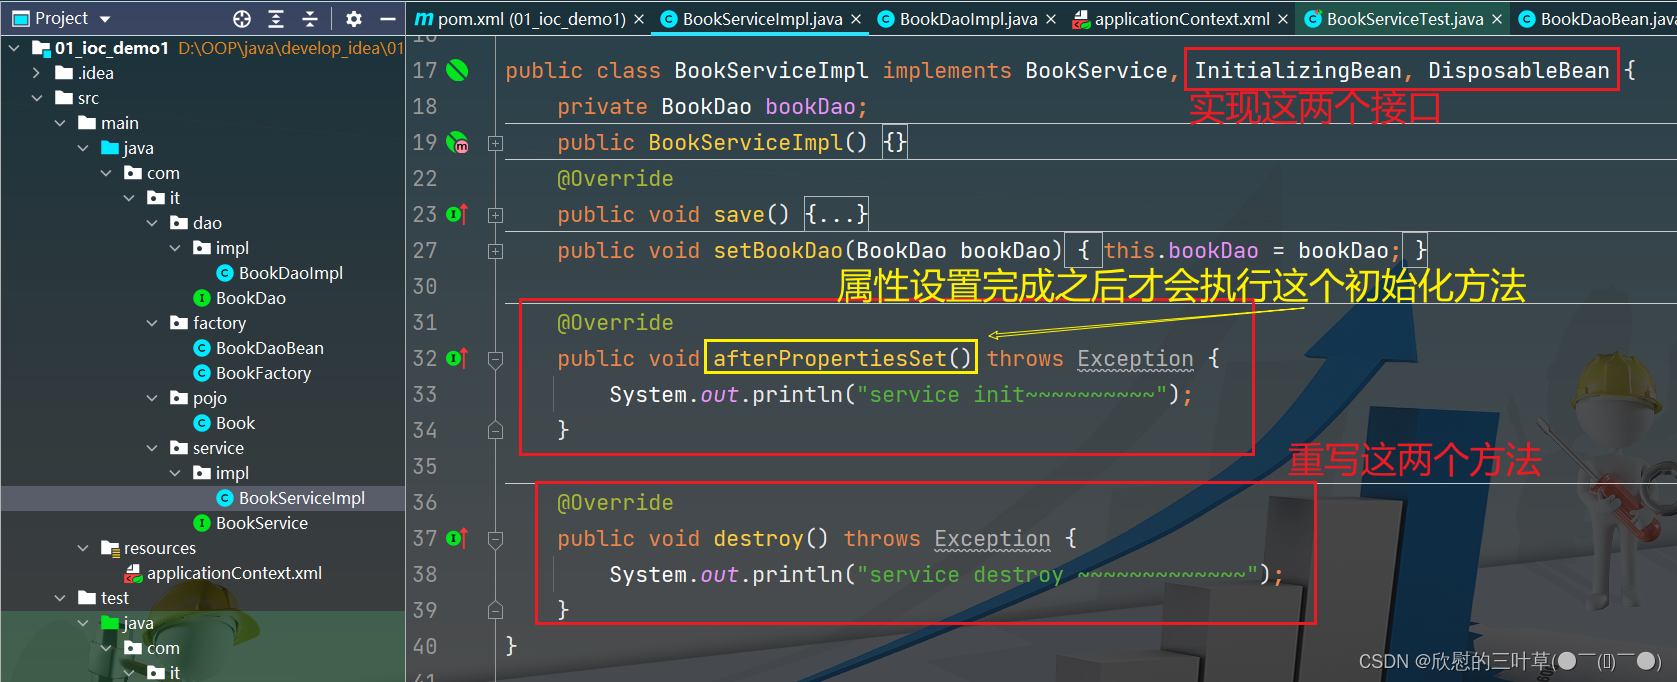

⑧:IoC自动装配
自动装配:Spring在实例化当前bean的时候从Spring?容器中找到匹配的实例赋值给当前bean的属性
自动装配策略有两种:- byName根据当前Bean的属性名在Spring容器中寻找匹配的对象,如果根据name找打了bean但是类型不匹配则抛出异常
- byType根据当前Bean的属性类型在Spring容器中寻找匹配的对象,如果根据类型找到了多个bean也会抛出异常
- byName
<bean id="student" class="com.it.ioc.bean.Student"/> <bean id="clazz" class="com.it.ioc.bean.Clazz" autowire="byName"/>- 1
- 2
- 3

- byType
<bean id="student2" class="com.it.ioc.bean.Student"/> <bean id="clazz" class="com.it.ioc.bean.Clazz" autowire="byType"/>- 1
- 2
- 3

⑨:IoC案例使用
1.创建一个接口(ProductService1)
2. 创建接口实现类
3.创建ProductServlet
4.使用bean管理对象
5.测试
6. 假设有第二个实现类
7. 添加bean标签管理对象,其他代码无需修改
⑩:IoC工作原理
三、Spring IoC(基于注解)
Springloc的使用,需要我们通过XML将类声明给Spring容器进行管理,从而通过Spring工厂完成对象的创建及属性值的注入:
Springl除了提供基于XML的配置方式,同时提供了基于注解的配置:直接在实体类中添加注解声明给Spring容器管理,以简化开发步骤。①:Spring框架部署
01.创建meven项目
步骤 略~
02. 添加SpringIoc依赖
<dependency> <groupId>org.springframeworkgroupId> <artifactId>spring-contextartifactId> <version>5.3.18version> dependency>- 1
- 2
- 3
- 4
- 5
03.创建Spring配置文件(可以创建为模板文件)
因为Spring容器初始化时,
只会加载applicationContext.xm文件,那么我们在实体类中添加的注解就不会被Spring?扫描,所以我们需要在applicationContext.xml声明Spring的扫描范围,以达到Spring初始化时扫描带有注解的实体类并完成初始化工作<beans xmlns="http://www.springframework.org/schema/beans" xmlns:xsi="http://www.w3.org/2001/XMLSchema-instance" xmlns:context="http://www.springframework.org/schema/context" xsi:schemaLocation="http://www.springframework.org/schema/beans http://www.springframework.org/schema/beans/spring-beans.xsd http://www.springframework.org/schema/context http://www.springframework.org/schema/context/spring-context.xsd"> <context:annotation-config/> <context:component-scan base-package="com.it"/> beans>- 1
- 2
- 3
- 4
- 5
- 6
- 7
- 8
- 9
- 10
- 11
- 12
- 13
- 14

②:IoC常用注解
01.
@component(类声明给Spring管理)- 类注解,声明此类被Spring容器进行管理,相当于bean标签的作用
@Component(value="stu")value属性用于指定当前bean的id,相当于bean标签的id属性;value属性也可以省略,如果省略当前类的id默认为类名首字母改小写- 除了@Component之外@Service、@Controller、@Repositoryi这三个注解也可以将类声明给Spring?管理,他们主要是语义上的区别
- @Controller注解主要声明将控制器类配置给Spring管理,例如Servlet
- @Service注解主要声明业务处理类配置Spring管理,Service接口的实现类
- @Repository直接主要声明持久化类配置给Spring?管理,DAO接口
- @Component除了控制器、servcie和DAO之外的类一律使用此注解声明

02.
@Scope(单例 非单例)- 类注解,用于声明当前类单例模式还是非单例模式,相当于bean标签的scope属性
- @Scope(“prototype’”)表示声明当前类为非单例模式(默认单例模式)

03.
@Lazy(懒汉 饿汉)- 类注解,用于声明一个单例模式的Bean是否为懒汉模式
- @Lazy(true)表示声明为懒汉模式,默认为饿汉模式
1. @Lazy(false)饿汉模式
2. @Lazy(true)懒汉模式
04.
@PostConstruct(初始化方法)- 方法注解,声明一个方法为当前类的初始化方法(在构造器之后执行),相当于bean标签的init-method)属性
05.
@PreDestory(销毁方法)- 方法注解x声明一个方法为当前类的销毁方法(在对象从容器中释放之前执行),相当于bean标签的destorymethod)属性

06.
@Autowired(自动装配1)- 属性注解、方法注解(set方法),声明当前属性自动装配,默认byType
- @Autowired(required=false)通过requried,属性设置当前自动装配是否为必须(默认必须一一如果没有找到类型与属性类型匹配的bean则抛出异常)
- byType
- ref引用


07.
@Resource(自动装配2)- 属性注解,也用于声明属性自动装配
- 默认装配方式为byName,如果根据byName没有找到对应的bean,则继续根据byType寻找对应的bean,根据byType如果依然有找到Bean或者找到不止一个类型匹配的bean,则抛出异常。

08.自动读取配置文件
1.创建一个properties文件
2. 使用注解加载properties文件
3.
4.
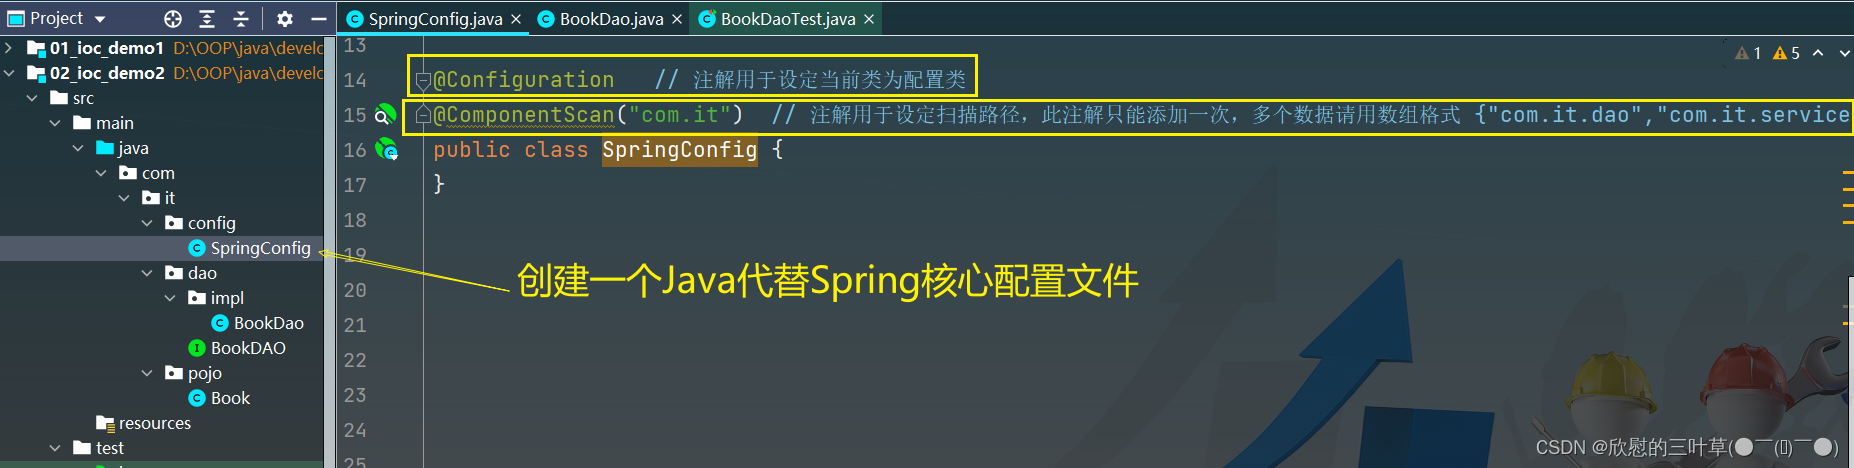
③:纯注解开发(补)
1.创建一个新项目(使用Java类代替Spring核心配置文件)2.
3.
④:第三方bean管理(补)
1. 使用到jdbc需要添加Druid依赖<dependency> <groupId>com.alibabagroupId> <artifactId>druidartifactId> <version>1.2.8version> dependency>- 1
- 2
- 3
- 4
- 5
2. 创建一个配置类
3. 引入配置
4. 测试
⑤:为第三方bean注入资源(补)
01. 简单类型

02. 引用类型
1
2
3.测试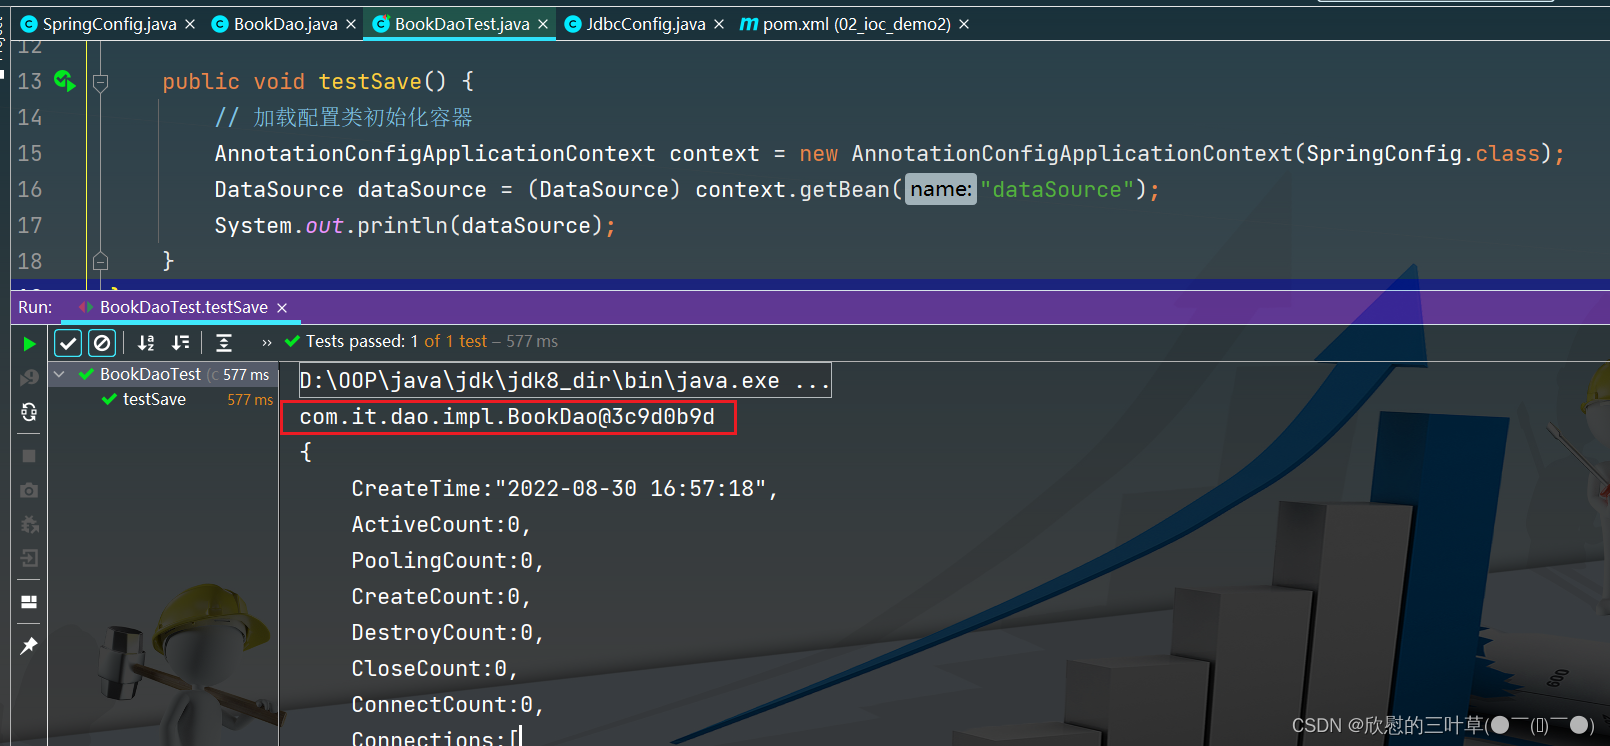
⑥:注解开发总结(补)

四、代理设计模式
①:生活中的代理

代理设计模式的优点:将通用性的工作都交给代理对象完成,被代理对象只需专注自己的核心业务。
②: 静态代理
静态代理,代理类只能够为特定的类生产代理对象,不能代理任意类
1. 创建通用接口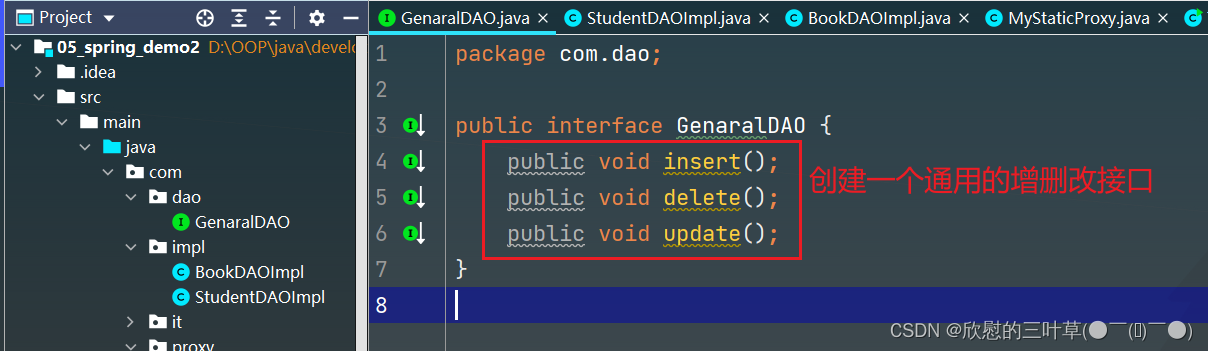
2.创建接口实现类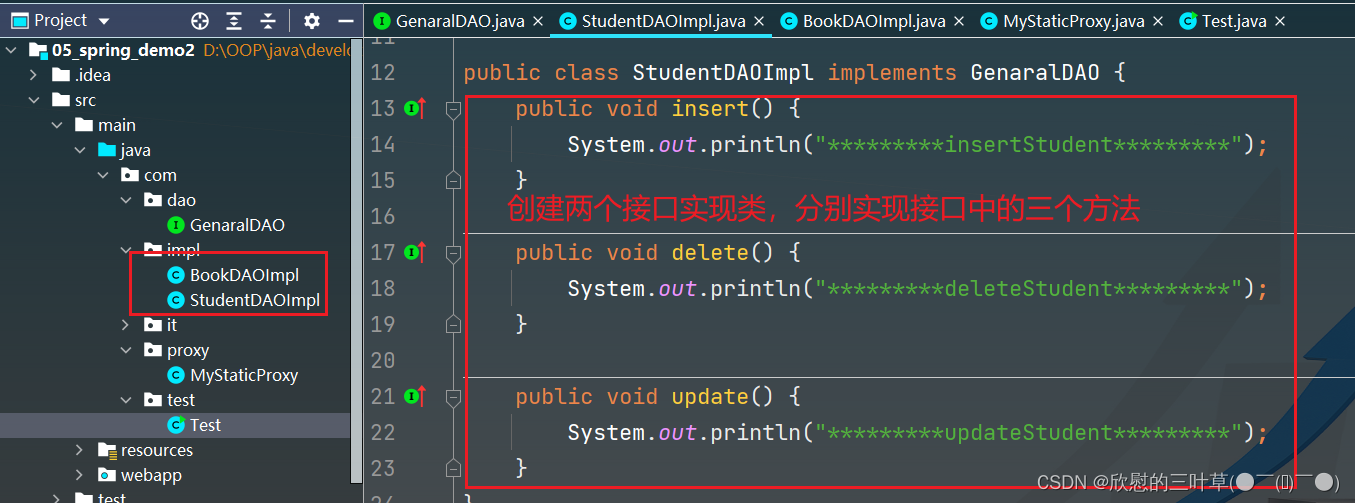

3.创建一个类(实现代理功能)
4. 测试
使用代理的好处 1被代理类中只用关注核心业务的实现,将通用的管理型逻辑(事务管理、日志管理)和业务逻辑分离
2.将通用的代码放在代理类中实现,提供了代码的复用性
3.通过在代理类添加业务逻辑,实现对原有业务逻辑的扩展(增强)③:动态代理
动态代理,几乎可以为所有的类产生代理对象
动态代理的实现方式有2种:- JDK动态代理
- CGLib动态大力
01. JDK 动态代理类实现
/* * JDK动态代理:是通过被代理对象实现的接口产生其代理对象的 * 1.创建一个类,实现InvocationHandler接口,重写invoke方法 2.在类中定义一个Object类型的变量,并提供这个变量的有参构造器。用于将被代理付象传递进来 3.定义getProxy方法,用下创建并返回代理对象 * */ public class JDKDynamicProxy implements InvocationHandler { // 被代理对象 private Object object; public JDKDynamicProxy(Object object) { this.object = object; } // 产生代理对象,返回代理对象 public Object getProxy(){ // 1.获取被代理对象的类加载器 ClassLoader classLoader = object.getClass().getClassLoader(); // 2. 获取被代理对象的实现的接口 Class<?>[] interfaces = object.getClass().getInterfaces(); // 3. 产生代理对象 // 第一个参数:被代理付象的类加载器 // 第二个参数:被代理对象实现的接口 // 1第三个参数:使用产生代理对象调用方法时,用于拦截方法执行的处理器 Object proxy = Proxy.newProxyInstance(classLoader, interfaces, this); return proxy; } public Object invoke(Object proxy, Method method, Object[] args) throws Throwable { begin(); Object returnValue = method.invoke(object); commit(); return returnValue; } public void begin(){ System.out.println("*********开启事务~*********"); } public void commit(){ System.out.println("*********提交事务~*********"); } }- 1
- 2
- 3
- 4
- 5
- 6
- 7
- 8
- 9
- 10
- 11
- 12
- 13
- 14
- 15
- 16
- 17
- 18
- 19
- 20
- 21
- 22
- 23
- 24
- 25
- 26
- 27
- 28
- 29
- 30
- 31
- 32
- 33
- 34
- 35
- 36
- 37
- 38
- 39
- 40
- 41
- 42
- 43
- 测试
public class TestDynamicProxy { public static void main(String[] args) { // 被代理对象 BookDAOImpl bookDAO = new BookDAOImpl(); StudentDAOImpl studentDAO = new StudentDAOImpl(); // 创建动态代理类对象,并将被代理对象传递到代理类中赋值给object // proxy就是产生的代理对象:可以强转成被代理对象实现的接口类型 GenaralDAO proxy = (GenaralDAO) new JDKDynamicProxy(studentDAO).getProxy(); // 使用代理对象调用方法,并不会执行调用的方法,而是进入到创建代理对象时指定的,InvocationHandler类种的invoke方法, // 调用的方法作为一个Method参数,传递给了invoke方法 proxy.insert(); System.out.println(); GenaralDAO proxy2 = (GenaralDAO) new JDKDynamicProxy(bookDAO).getProxy(); proxy2.insert(); } }- 1
- 2
- 3
- 4
- 5
- 6
- 7
- 8
- 9
- 10
- 11
- 12
- 13
- 14
- 15
- 16
- 17
- 18
02.CGLib动态代理
由于JDK动态代理是通过被代理类实现的接口来创建代理对象的,因此JDK动态代理只能代理实现了接口的类的对象。如果一个类没有实现任何接口,该如何产生代理对象呢?
CGLb动态代理,是通过创建被代理类的子类来创建代理对象的,因此即使没有实现任何接口的类也可以通过GLib产生代理对象
CGLibi动态代理不能为fina类创建代理对象- 添加CGLib依赖
<dependency> <groupId>cglibgroupId> <artifactId>cglibartifactId> <version>3.3.0version> dependency>- 1
- 2
- 3
- 4
- 5
- 6
- 7
- CGLib动态代理实现
/** 1.添加cglib依赖 2.创建一个类,实现MethodInterceptor接口,同时实现接口中的ntercept方法 3.在类中定义一个obct类型的变量,并提供这个变量的有参构造器,用于传递被代理付象 4.定义getProxy方法创建并返回代理对象(代理对象是通过创建被代理类的子类来创建的) * */ public class CGLibDynamicProxy implements MethodInterceptor { private Object object; public CGLibDynamicProxy(Object object) { this.object = object; } public Object getProxy(){ Enhancer enhancer = new Enhancer(); enhancer.setSuperclass(object.getClass()); enhancer.setCallback(this); Object o = enhancer.create(); return o; } public Object intercept(Object o, Method method, Object[] objects, MethodProxy methodProxy) throws Throwable { begin(); Object returnValue = method.invoke(object); commit(); return returnValue; } public void begin(){ System.out.println("*********开启事务~*********"); } public void commit(){ System.out.println("*********提交事务~*********"); } }- 1
- 2
- 3
- 4
- 5
- 6
- 7
- 8
- 9
- 10
- 11
- 12
- 13
- 14
- 15
- 16
- 17
- 18
- 19
- 20
- 21
- 22
- 23
- 24
- 25
- 26
- 27
- 28
- 29
- 30
- 31
- 32
- 33
- 34
- 35
- 36
- 37
- 测试
public class TestDynamicProxy2 { public static void main(String[] args) { // 创建被代理对象 BookDAOImpl bookDAO = new BookDAOImpl(); StudentDAOImpl studentDAO = new StudentDAOImpl(); // 通过cgLib动态代理类创建代理对象 CGLibDynamicProxy cglibDynamicProxy = new CGLibDynamicProxy(bookDAO); // 代理对象实际上是被代理对象子类,因此代理对象可直接强转为被代理类类型 BookDAOImpl proxy = (BookDAOImpl) cglibDynamicProxy.getProxy(); proxy.insert(); System.out.println(); // 使用对象调用方法,实际上并没有执行这个方法,而是执行了代理类中的intercept方法,将当前调用的方法以及方法中的参 // 数传递到intercept方法 CGLibDynamicProxy cglibDynamicProxy2 = new CGLibDynamicProxy(studentDAO); StudentDAOImpl proxy2 = (StudentDAOImpl) cglibDynamicProxy2.getProxy(); proxy2.insert(); } }- 1
- 2
- 3
- 4
- 5
- 6
- 7
- 8
- 9
- 10
- 11
- 12
- 13
- 14
- 15
- 16
- 17
- 18
- 19
五、Spring AOP(XML)
①:AOP
Aspect Oriented Programming面向切面编程,是一种利用“横切”的技术(底层实现就是动态代理),对原有的业务逻辑进行拦截,并且可以在这个拦截的横切面上添加特定的业务逻辑,对原有的业务进行增强。
基于动态代理实现在不改变原有业务的情况下对业务逻辑进行增强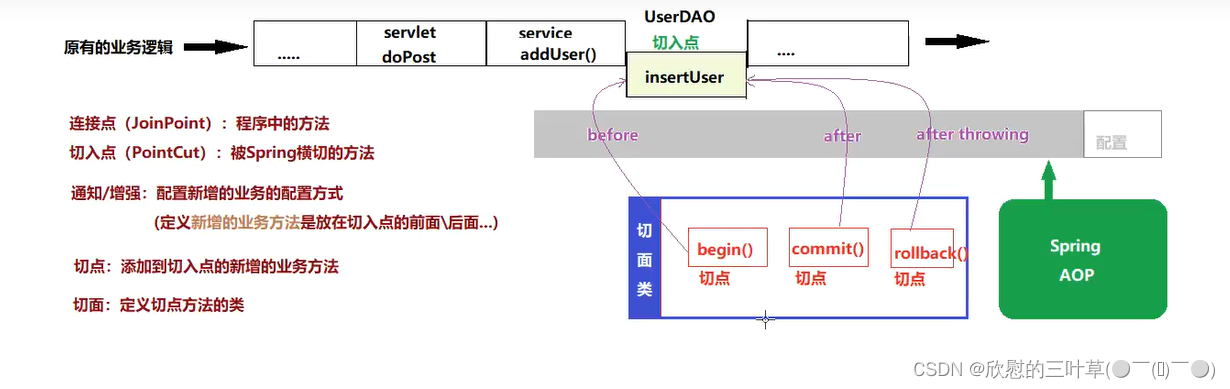
②:Spring-aop-框架部署
01. 创建项目(Maven / Web)
02. 添加依赖
<dependency> <groupId>org.springframeworkgroupId> <artifactId>spring-contextartifactId> <version>5.3.18version> dependency> <dependency> <groupId>org.springframeworkgroupId> <artifactId>spring-aspectsartifactId> <version>5.3.18version> dependency>- 1
- 2
- 3
- 4
- 5
- 6
- 7
- 8
- 9
- 10
- 11
- 12
03. 创建spring配置文件
- 需要引入aop的命名空间
<beans xmlns="http://www.springframework.org/schema/beans" xmlns:xsi="http://www.w3.org/2001/XMLSchema-instance" xmlns:aop="http://www.springframework.org/schema/aop" xmlns:context="http://www.springframework.org/schema/context" xsi:schemaLocation="http://www.springframework.org/schema/beans http://www.springframework.org/schema/beans/spring-beans.xsd http://www.springframework.org/schema/context http://www.springframework.org/schema/context/spring-context.xsd http://www.springframework.org/schema/aop http://www.springframework.org/schema/aop/spring-aop.xsd"> beans>- 1
- 2
- 3
- 4
- 5
- 6
- 7
- 8
- 9
- 10
- 11
- 12
- 13
③:AOP配置–基于XML
在DAO的方法添加开启事务和提交事务的逻辑
01.创建一个类,地暖管一要添加的业务逻辑
public class TxManager { public void begin(){ System.out.println("*********开启事务~*********"); } public void commit(){ System.out.println("*********提交事务~*********"); } }- 1
- 2
- 3
- 4
- 5
- 6
- 7
- 8
02. 配置aop
<bean id="bookDAO" class="com.dao.BookDAO"/> <bean id="txManager" class="com.utils.TxManager"/> <aop:config> <aop:pointcut id="book_all" expression="execution(* com.dao.*.*(..))"/> <aop:aspect ref="txManager"> <aop:before method="begin" pointcut-ref="book_all"/> <aop:after method="commit" pointcut-ref="book_all"/> aop:aspect> aop:config>- 1
- 2
- 3
- 4
- 5
- 6
- 7
- 8
- 9
- 10
- 11
- 12
- 13
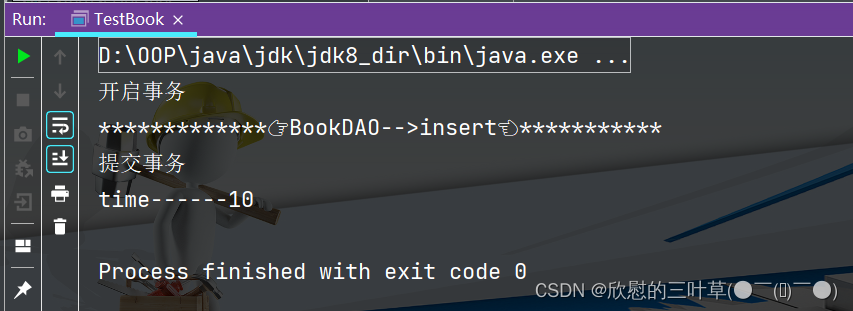
1. 创建BookDAO并添加三个方法
2.BookDAO和TxManager类都交给bean管理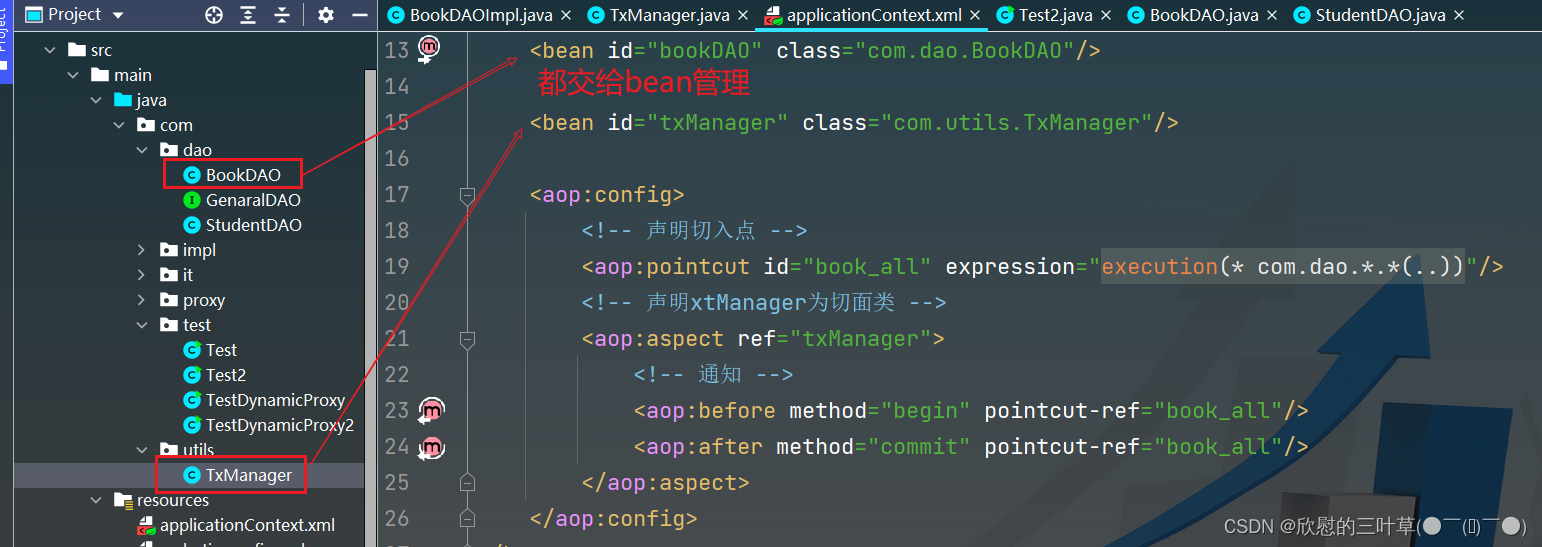
3. 配置Xml文档
4. 测试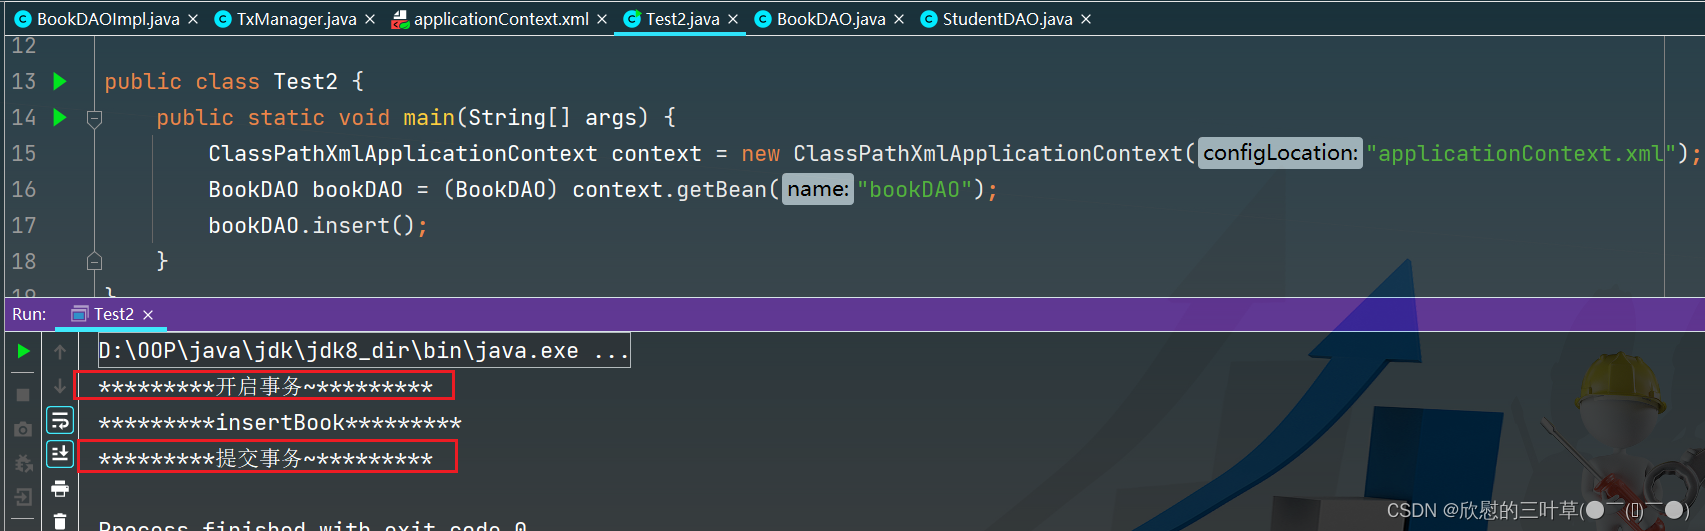
④. Spring-AOP切入点声明
01.各种切入点声明
<aop:config> <aop:pointcut id="book_all" expression="execution(* com.dao.*.*(..))"/> <aop:pointcut id="book_all2" expression="execution(Void com.dao.*.*(..))"/> <aop:pointcut id="book_all3" expression="execution(Void com.dao.BookDAO.*())"/> <aop:pointcut id="all4" expression="execution(* *(..))"/> <aop:aspect ref="txManager"> <aop:before method="begin" pointcut-ref="book_all"/> <aop:after method="commit" pointcut-ref="book_all"/> aop:aspect> aop:config>- 1
- 2
- 3
- 4
- 5
- 6
- 7
- 8
- 9
- 10
- 11
- 12
- 13
- 14
- 15
- 16
- 17
- 18
- 19
1. 各种切入点声明方式
02.AOP使用注意事项
//如果要使用Spring aop面向切面编程,调用切入点方法的对象必须通过Spring容器获取 //如果一个类中的方法被声明为切入点并且织入了切点之后,通过Sprig容器获取该类对象,实则获取到的是一个代理对象 //如果一个类中的方法没有被声明为切入点,通过Spring容器获取的就是这个类真实创建的对象 //BookServiceImpl bookService new BookServiceImpl(); ClassPathXmlApplicationContext context = new ClassPathXmlApplicationContext("applicationContext.xml"); BookService bookService = (BookService) context.getBean("bookService"); bookService.addBook();- 1
- 2
- 3
- 4
- 5
- 6
- 7
03. 测试
1. 添加一个类
2.声明切入点(所有包中所有的方法)
3. 测试代码⑤:Spring-AOP通知策略
01.前置通知和后置通知
1. 创建一个切面类(定义多个方法)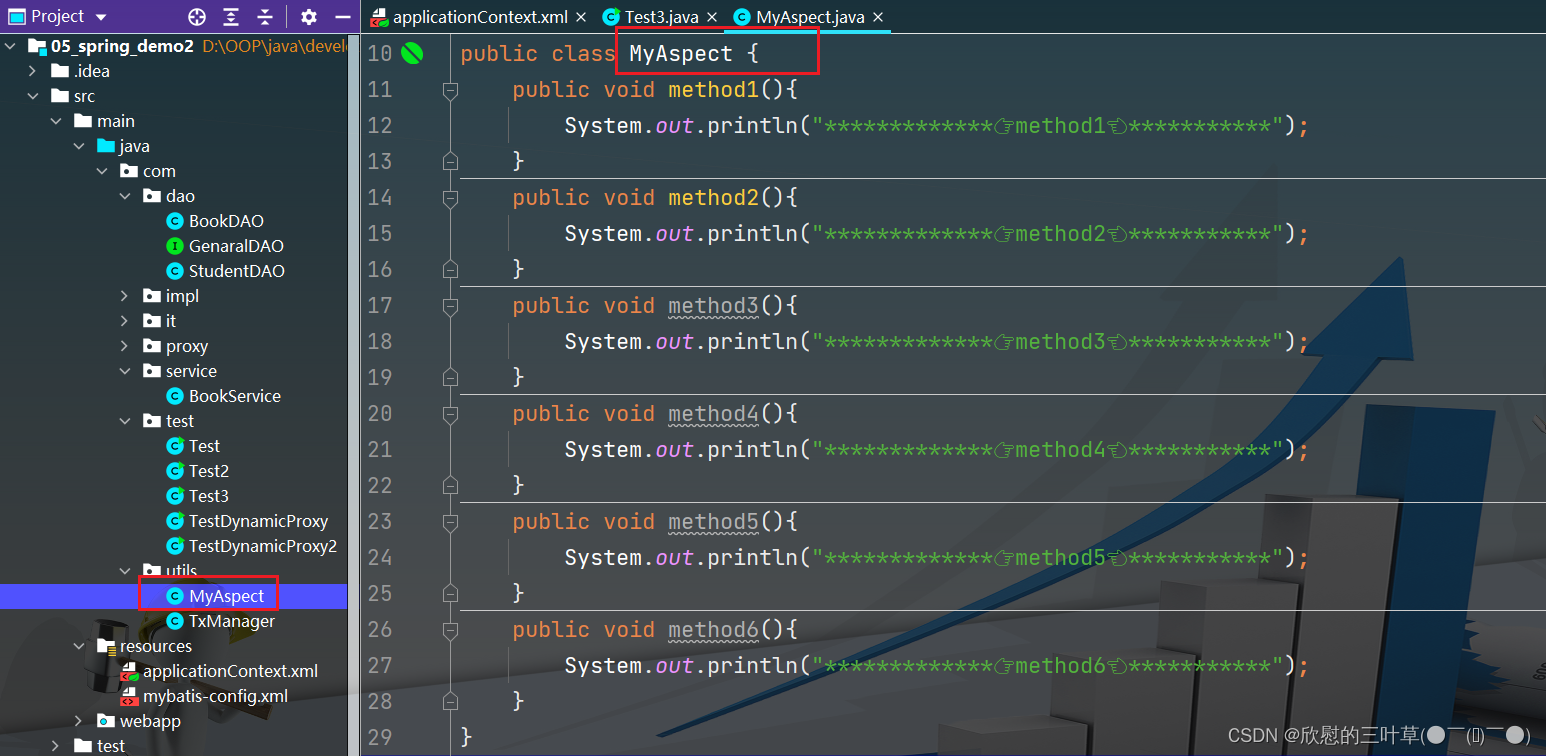
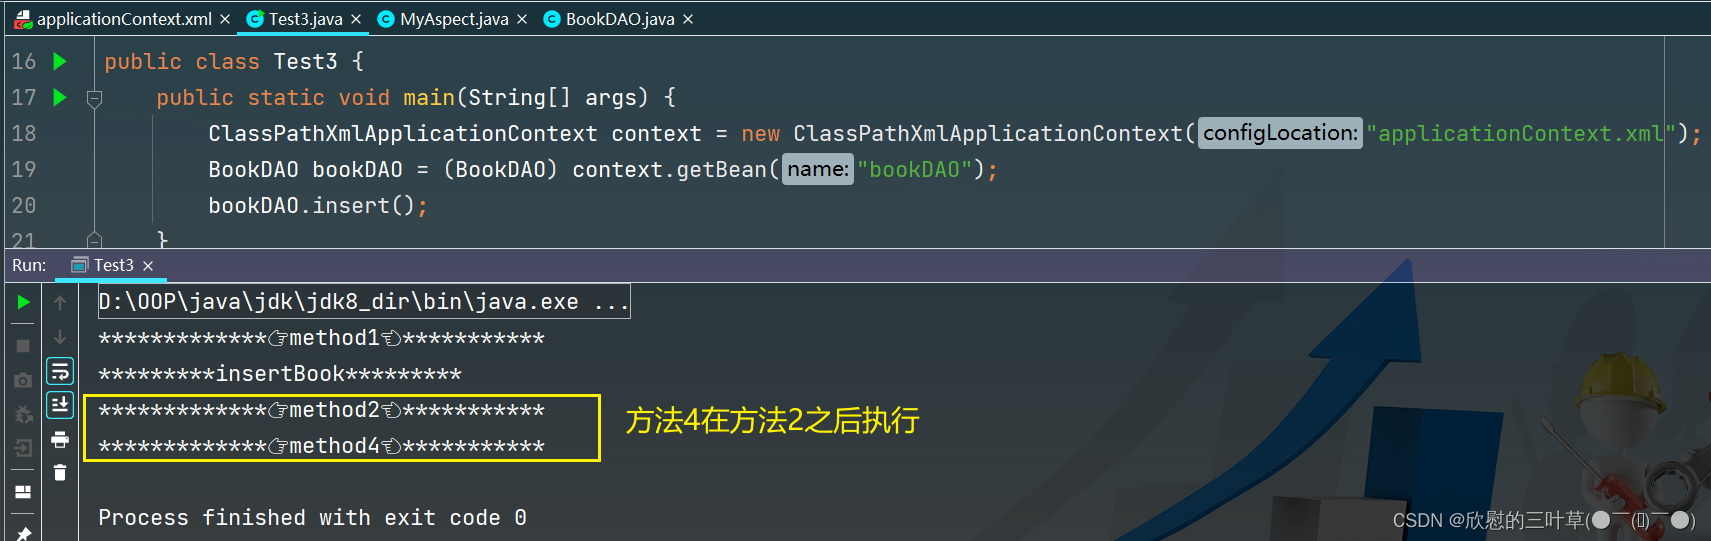
2. 通知策略将method1插入到最前面method2插入到最后面
3. 测试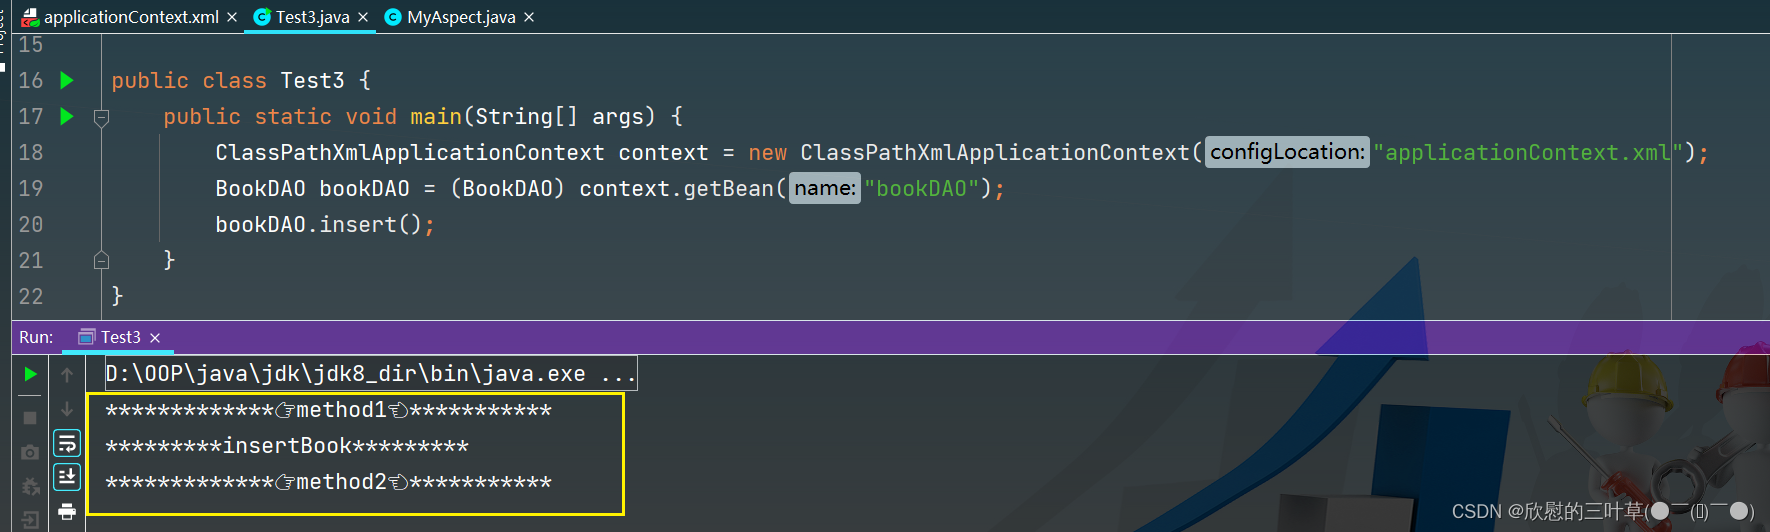
02. 异常通知(可用于)
1. 制造一个异常
2. 测试
03. after-returning(方法返回结果后)
aop:after-returning方法返回值返回之后,对于一个Java方法而言return返回值也是方法的一部分因此“方法返回值返回之后方法执行结束是同一个时间点,所以after和after-returning根据配置的顺序决定执行顺序
1. after-returning标签放在after标签之后
2.after-returning标签放在after标签之前

04.环绕通知(around)
1. 定义方法
2. xml文件配置
3. 测试
六、Spring-AOP(注解配置)


①:注解+XML
01.创建Maven项目
步骤略~
02. 添加依赖
<dependencies> <dependency> <groupId>org.springframeworkgroupId> <artifactId>spring-contextartifactId> <version>5.3.18version> dependency> <dependency> <groupId>org.springframeworkgroupId> <artifactId>spring-aspectsartifactId> <version>5.3.18version> dependency> dependencies>- 1
- 2
- 3
- 4
- 5
- 6
- 7
- 8
- 9
- 10
- 11
- 12
- 13
03.配置applicationContext.xml
<beans xmlns="http://www.springframework.org/schema/beans" xmlns:xsi="http://www.w3.org/2001/XMLSchema-instance" xmlns:aop="http://www.springframework.org/schema/aop" xmlns:context="http://www.springframework.org/schema/context" xsi:schemaLocation="http://www.springframework.org/schema/beans http://www.springframework.org/schema/beans/spring-beans.xsd http://www.springframework.org/schema/context http://www.springframework.org/schema/context/spring-context.xsd http://www.springframework.org/schema/aop http://www.springframework.org/schema/aop/spring-aop.xsd"> <context:annotation-config/> <context:component-scan base-package="com.it"/> <aop:aspectj-autoproxy/> beans>- 1
- 2
- 3
- 4
- 5
- 6
- 7
- 8
- 9
- 10
- 11
- 12
- 13
- 14
- 15
- 16
- 17
- 18
- 19
- 20
- 21
04. 前置通知和后置通知
1. 数据准备

2. 使用注解定义before和after
3. 代码优化
05.after-returning和异常通知
步骤略~ 和前置、后置通知使用方法一样
06. 环绕通知
1. 使用环绕通知记录环绕时间
注意:注解使用虽然方便,但是只能在源码上添加注解,因此我们的自定义类提倡使用注解配置:但如果如果使用到第三方提供的类则需要通过配置形式完成配置。②:纯注解开发(补)
01.项目数据准备
1.实体类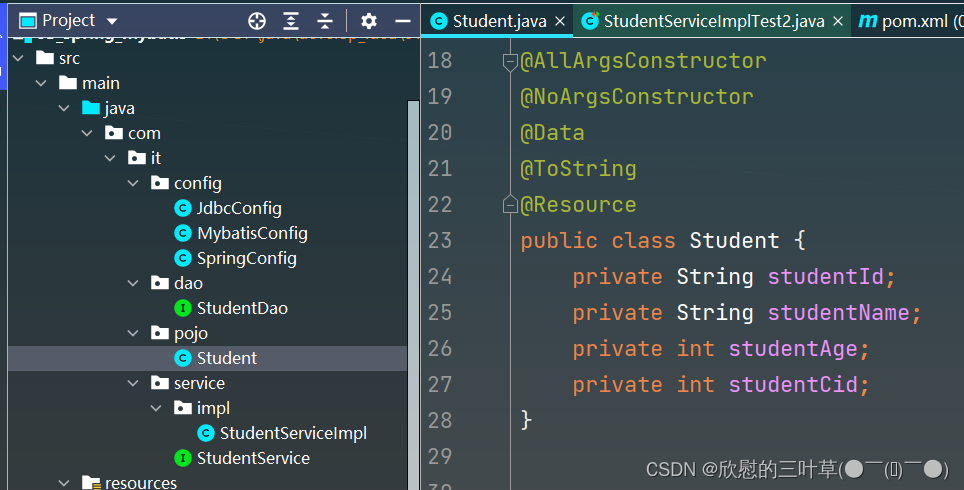
2.DAO接口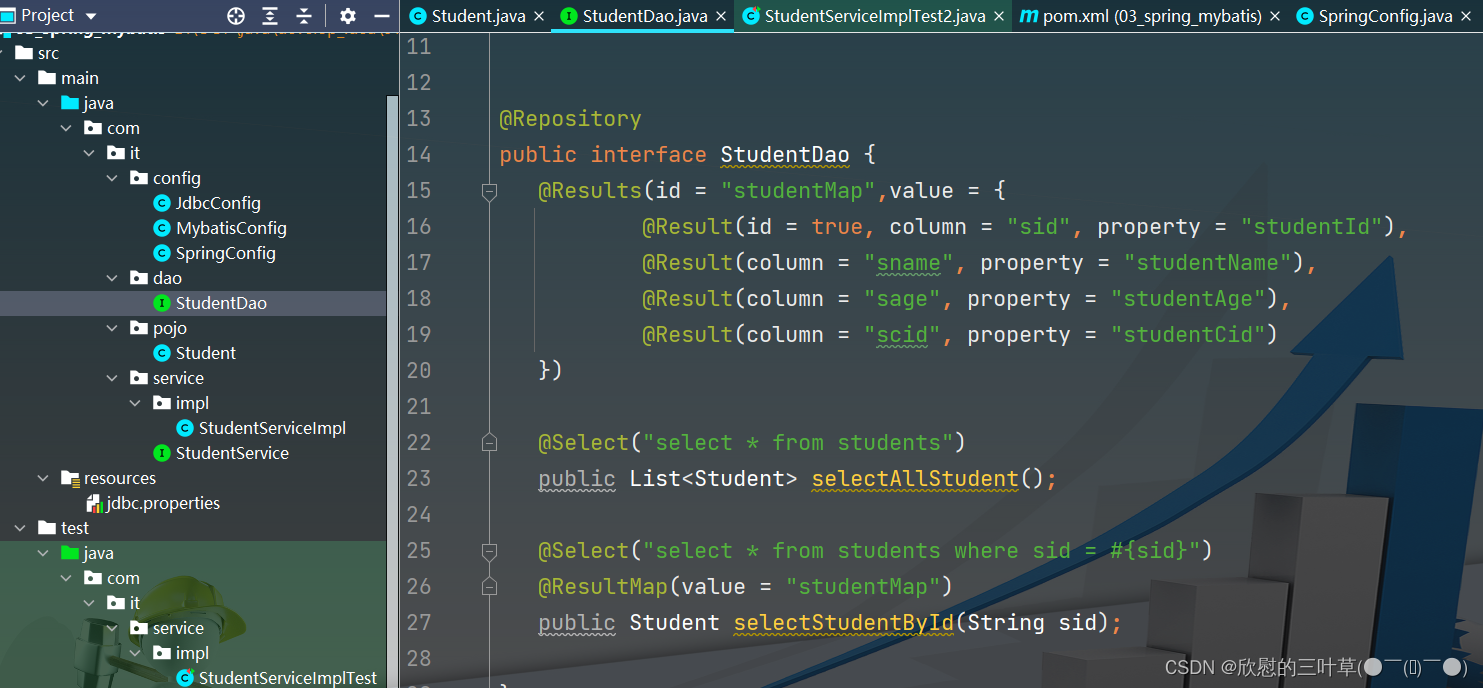
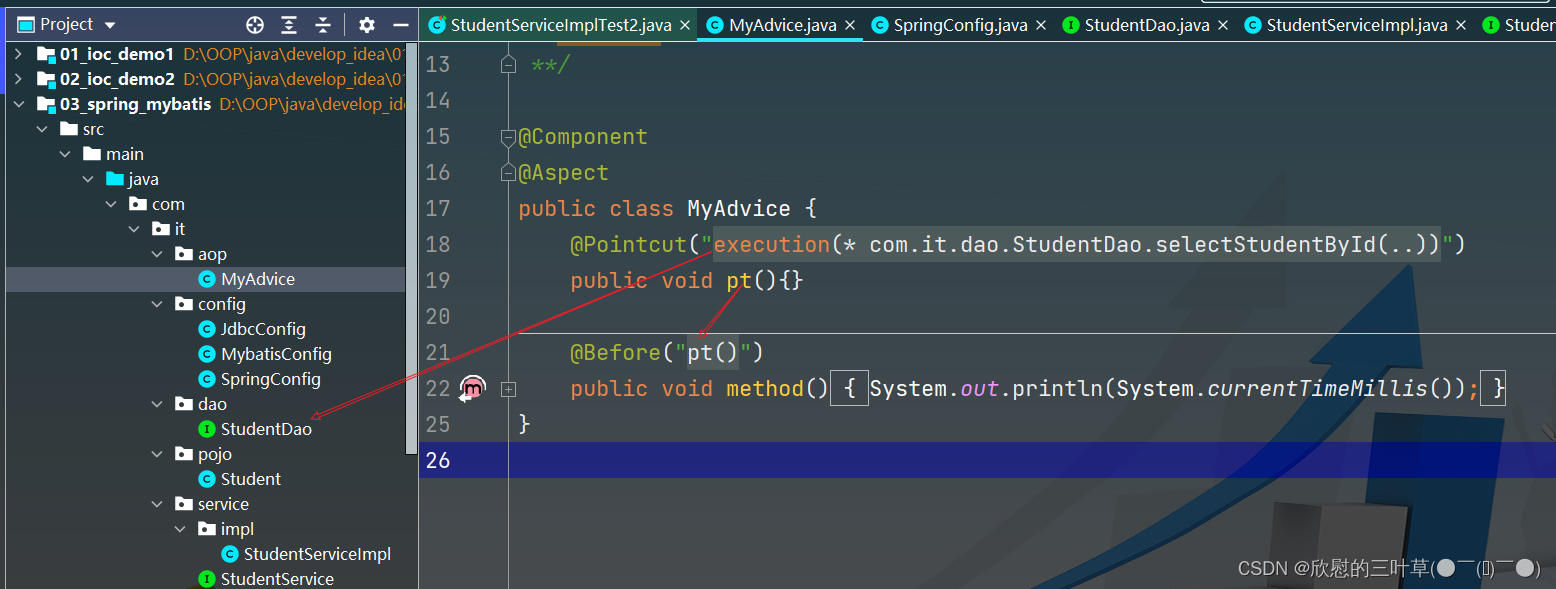
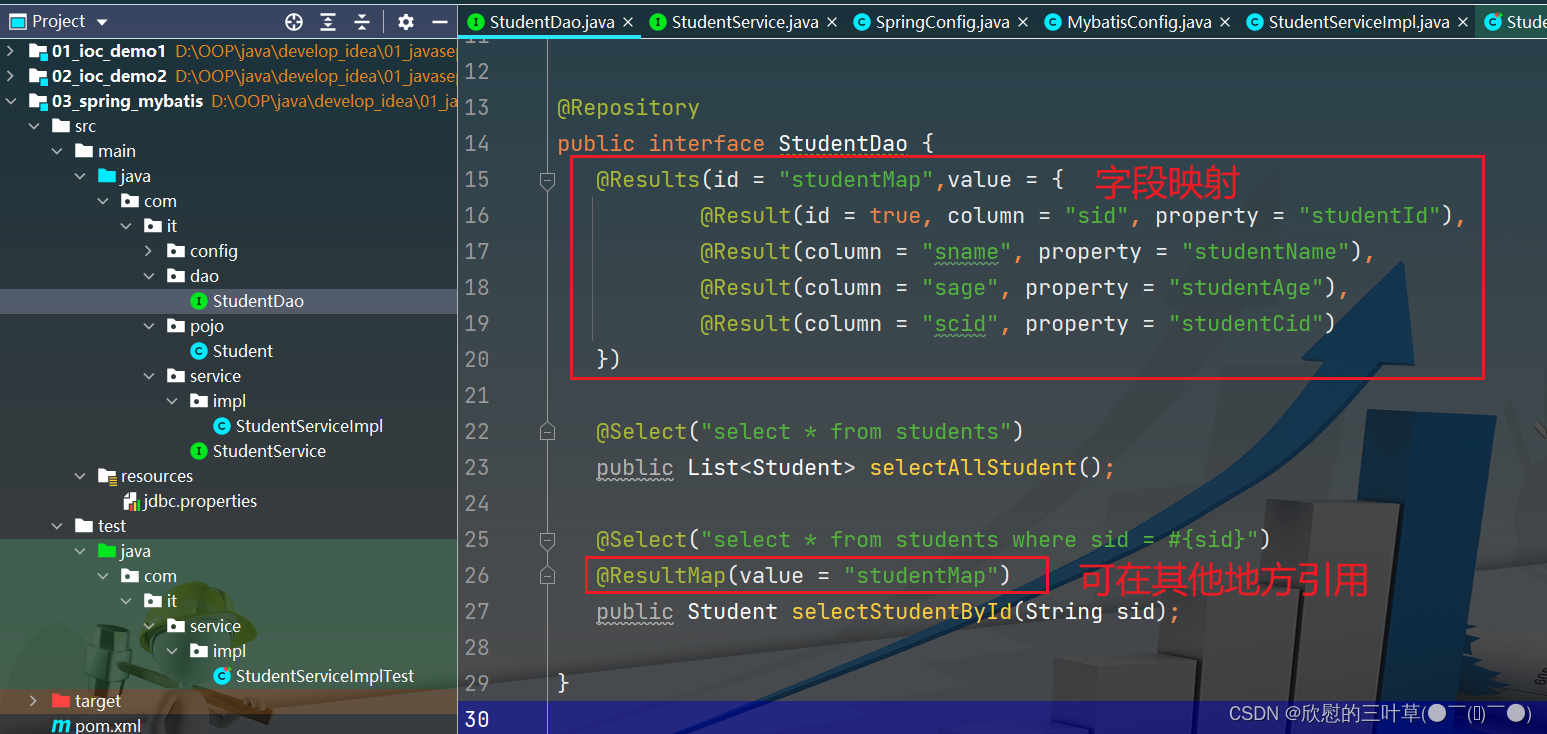
@Repository public interface StudentDao { @Results(id = "studentMap",value = { @Result(id = true, column = "sid", property = "studentId"), @Result(column = "sname", property = "studentName"), @Result(column = "sage", property = "studentAge"), @Result(column = "scid", property = "studentCid") }) @Select("select * from students") public List<Student> selectAllStudent(); @Select("select * from students where sid = #{sid}") @ResultMap(value = "studentMap") public Student selectStudentById(String sid); }- 1
- 2
- 3
- 4
- 5
- 6
- 7
- 8
- 9
- 10
- 11
- 12
- 13
- 14
- 15
- 16
- 17
3.Service接口及实现类

4.jdbc.propertiesjdbc.driver=com.mysql.jdbc.Driver jdbc.url=jdbc:mysql://localhost:3306/db_mybatis_demo2?characterEncoding=utf-8 jdbc.username=root jdbc.password=root- 1
- 2
- 3
- 4
5. 配置类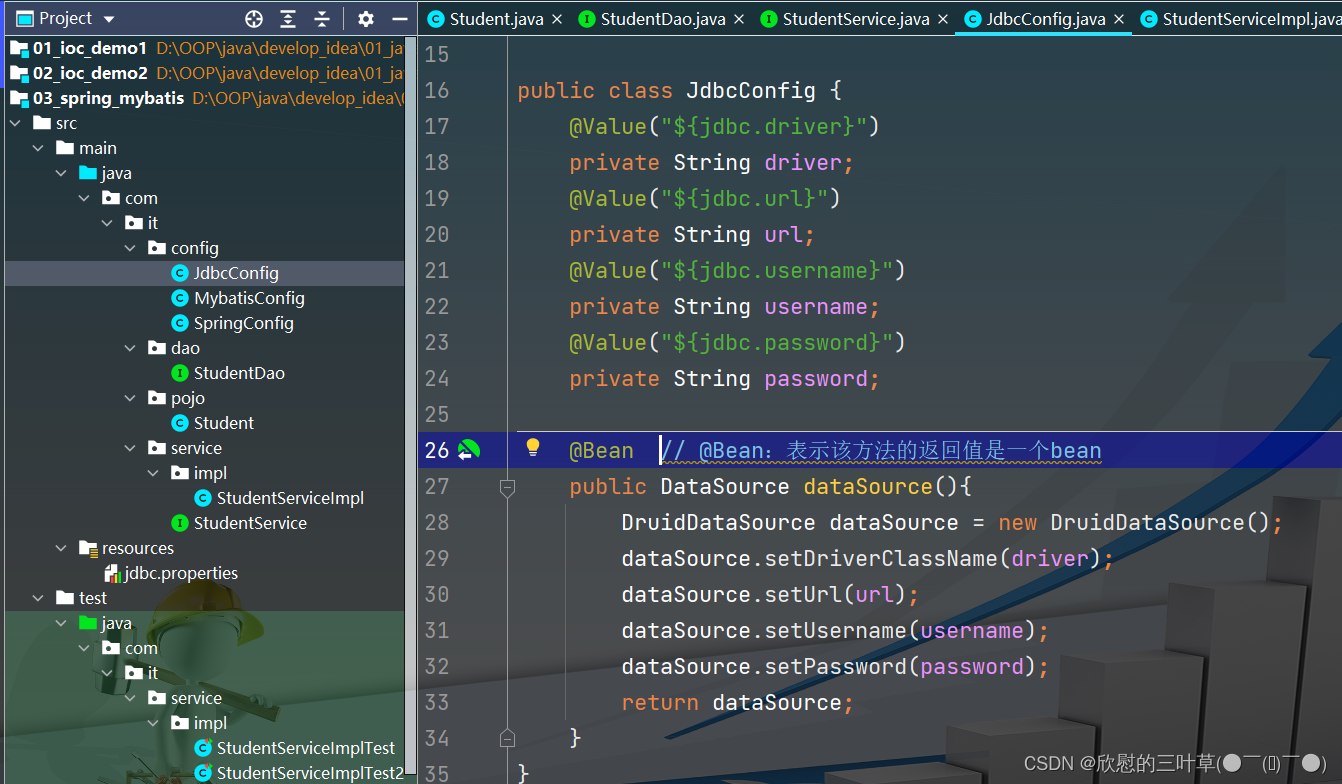

public class JdbcConfig { @Value("${jdbc.driver}") private String driver; @Value("${jdbc.url}") private String url; @Value("${jdbc.username}") private String username; @Value("${jdbc.password}") private String password; @Bean // @Bean:表示该方法的返回值是一个bean public DataSource dataSource(){ DruidDataSource dataSource = new DruidDataSource(); dataSource.setDriverClassName(driver); dataSource.setUrl(url); dataSource.setUsername(username); dataSource.setPassword(password); return dataSource; } }- 1
- 2
- 3
- 4
- 5
- 6
- 7
- 8
- 9
- 10
- 11
- 12
- 13
- 14
- 15
- 16
- 17
- 18
- 19
- 20
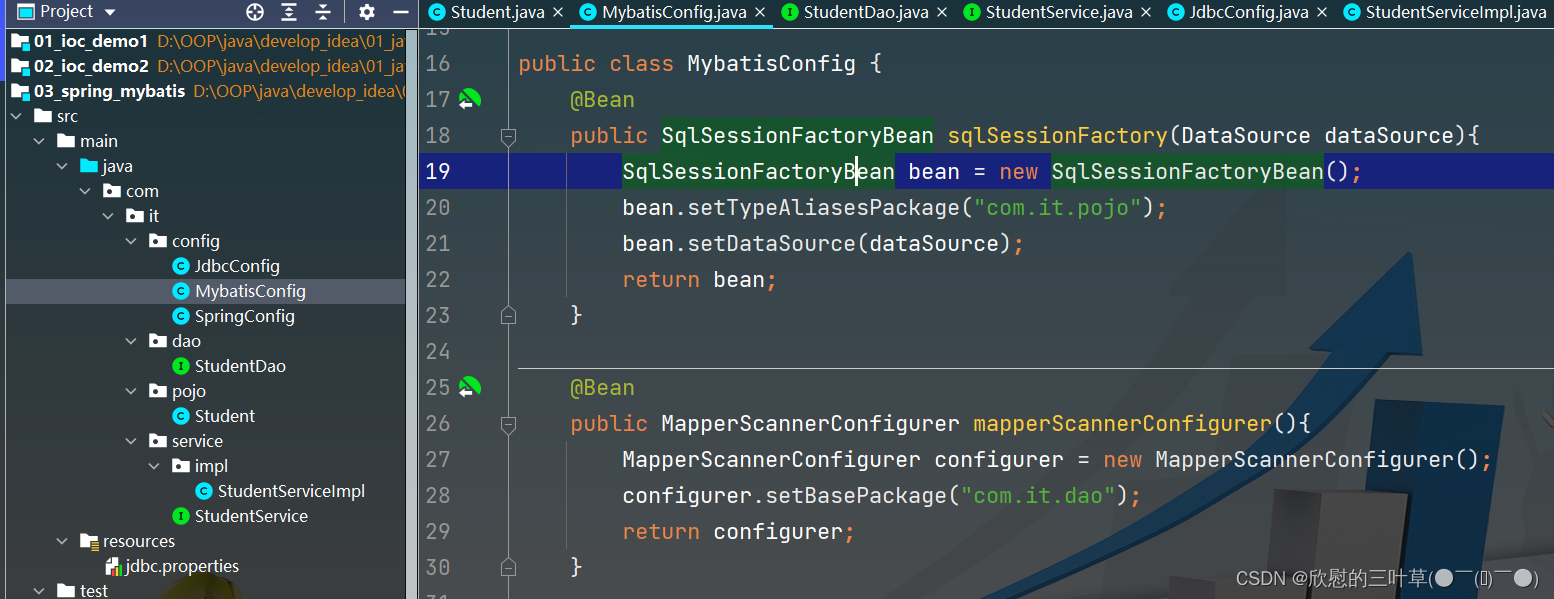
public class MybatisConfig { @Bean public SqlSessionFactoryBean sqlSessionFactory(DataSource dataSource){ SqlSessionFactoryBean bean = new SqlSessionFactoryBean(); bean.setTypeAliasesPackage("com.it.pojo"); bean.setDataSource(dataSource); return bean; } @Bean public MapperScannerConfigurer mapperScannerConfigurer(){ MapperScannerConfigurer configurer = new MapperScannerConfigurer(); configurer.setBasePackage("com.it.dao"); return configurer; } }- 1
- 2
- 3
- 4
- 5
- 6
- 7
- 8
- 9
- 10
- 11
- 12
- 13
- 14
- 15
- 16
- 17
@Configuration @ComponentScan("com.it") @PropertySource("classpath:jdbc.properties") @Import({JdbcConfig.class,MybatisConfig.class}) public class SpringConfig { }- 1
- 2
- 3
- 4
- 5
- 6
- 7
02.添加依赖
<dependency> <groupId>org.springframeworkgroupId> <artifactId>spring-contextartifactId> <version>5.3.18version> dependency> <dependency> <groupId>org.aspectjgroupId> <artifactId>aspectjweaverartifactId> <version>1.9.6version> dependency>- 1
- 2
- 3
- 4
- 5
- 6
- 7
- 8
- 9
- 10
- 11
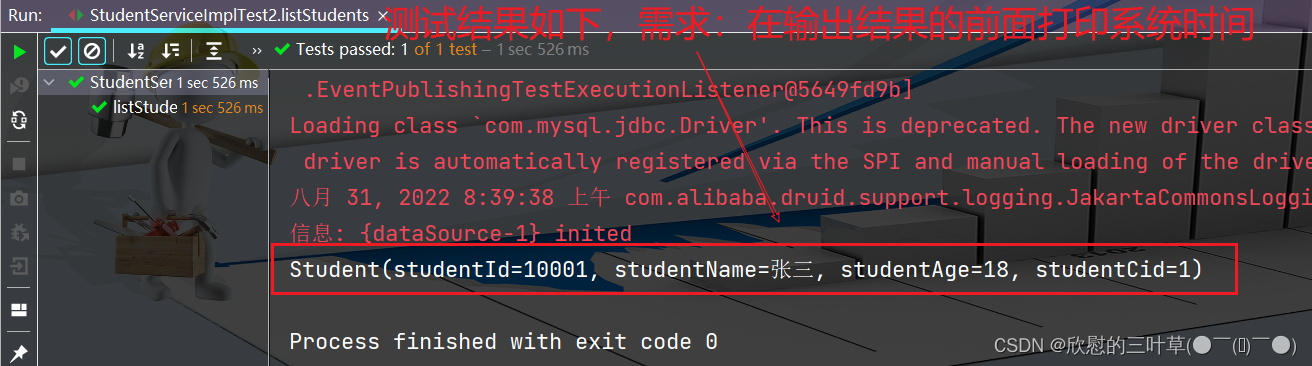
03. 需求分析
测试代码
@RunWith(SpringJUnit4ClassRunner.class) @ContextConfiguration(classes = SpringConfig.class) public class StudentServiceImplTest2 { @Autowired private StudentService studentService; @Test public void listStudents() { Student student = studentService.findStudentById("10001"); System.out.println(student); } }- 1
- 2
- 3
- 4
- 5
- 6
- 7
- 8
- 9
- 10
- 11
- 12
- 13
04.定义一个切面类

05.测试代码

06.案例(业务层接口执行效率)


07.AOP通知获取数据


08.百度网盘密码数据兼容问题

1.数据准备
七、Spring整合MyBatis(使用XML)
Springi两大核心思想:IoC和AOP
- loC:控制反转,Spig容器可以完成对象的创建、属性注入、对象管理等工作
- AOP:面向切面,在不修改原有业务逻辑的情况下,实现原有业务的增强
①:Spring可以对MyBatis提供哪些支持?
01.Spring IoC
- 需要创建数据源DataSource
- 需要创建SqlSessionFactory对象
- 需要创建SqlSession对象
- 需要创建DAO对象(Mapper)
SpringloC可以为MyBatis完成DataSource.SqlSessionFactory、SqlSession以及DAO对象的创建
02. Spring AOP
使用Spring提供的事务管理切面类完成对MyBatis数据库操作中的事务管理
②:Spring整合MyBatis准备工作
01.创建Maven项目
02. 部署MyBatis框架
1.添加依赖
<dependency> <groupId>mysqlgroupId> <artifactId>mysql-connector-javaartifactId> <version>8.0.28version> dependency> <dependency> <groupId>org.mybatisgroupId> <artifactId>mybatisartifactId> <version>3.4.6version> dependency>- 1
- 2
- 3
- 4
- 5
- 6
- 7
- 8
- 9
- 10
2. 创建MyBatis配置文件
- 创建文件后无需进行任何配置
DOCTYPE configuration PUBLIC "-//mybatis.org//DTD Config 3.0//EN" "http://mybatis.org/dtd/mybatis-3-config.dtd"> <configuration> configuration>- 1
- 2
- 3
- 4
- 5
- 6
03.部署Spring框架
1.添加依赖
<dependency> <groupId>org.springframeworkgroupId> <artifactId>spring-contextartifactId> <version>5.3.18version> dependency> <dependency> <groupId>org.springframeworkgroupId> <artifactId>spring-aspectsartifactId> <version>5.3.18version> dependency> <dependency> <groupId>org.springframeworkgroupId> <artifactId>spring-jdbcartifactId> <version>5.3.18version> dependency>- 1
- 2
- 3
- 4
- 5
- 6
- 7
- 8
- 9
- 10
- 11
- 12
- 13
- 14
- 15
2. 创建Spring配置文件
- 创建Springi配置文件:applicationContext,xml
<beans xmlns="http://www.springframework.org/schema/beans" xmlns:xsi="http://www.w3.org/2001/XMLSchema-instance" xmlns:aop="http://www.springframework.org/schema/aop" xmlns:context="http://www.springframework.org/schema/context" xsi:schemaLocation="http://www.springframework.org/schema/beans http://www.springframework.org/schema/beans/spring-beans.xsd http://www.springframework.org/schema/context http://www.springframework.org/schema/context/spring-context.xsd http://www.springframework.org/schema/aop http://www.springframework.org/schema/aop/spring-aop.xsd"> beans>- 1
- 2
- 3
- 4
- 5
- 6
- 7
- 8
- 9
- 10
- 11
- 12
- 13
04.添加Spring整合MyBatis整合依赖
- mybatis–spring就是mybatis提拱的兼容Springl的补丁
<dependency> <groupId>org.mybatisgroupId> <artifactId>mybatis-springartifactId> <version>2.0.6version> dependency>- 1
- 2
- 3
- 4
- 5
- 6
③:Spring整合MyBatis配置
01.整合Druid连接池
- 添加druid的依赖
<dependency> <groupId>com.alibabagroupId> <artifactId>druidartifactId> <version>1.2.8version> dependency>- 1
- 2
- 3
- 4
- 5
- 6
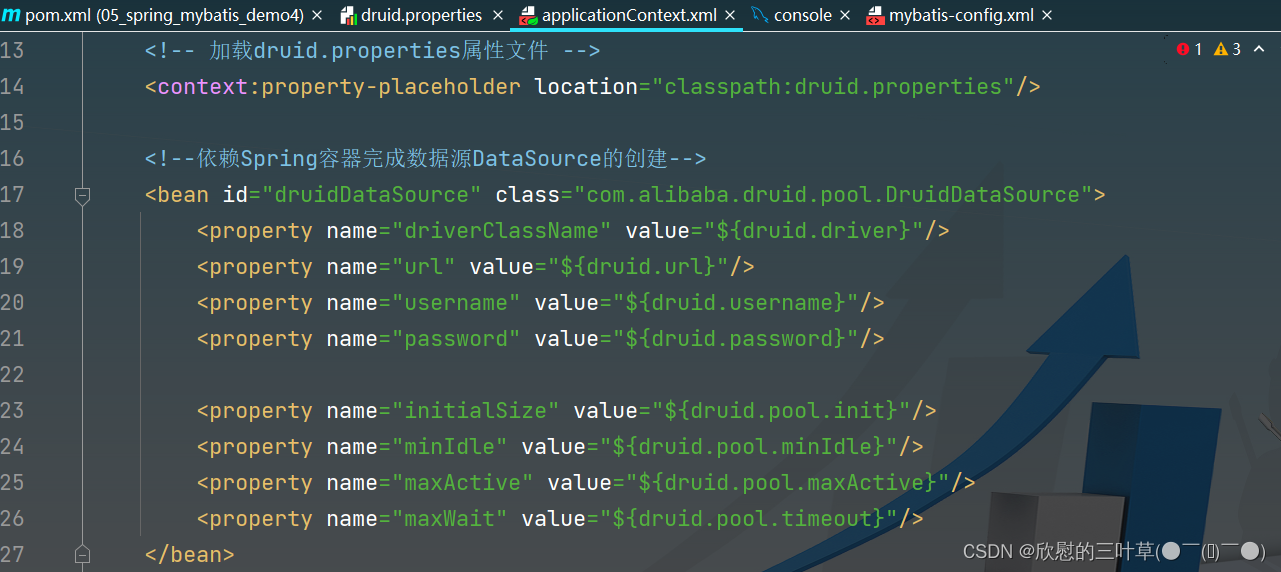
- 创建druid.properties.xml文件
druid.driver=com.mysql.jdbc.Driver druid.url=jdbc:mysql://localhost:3306/db_mybatis?characterEncoding=utf-8 druid.username=root druid.password=root ## 连接池参数 druid.pool.init=1 druid.pool.minIdle=3 druid.pool.maxActive=20 druid.pool.timeout=30000- 1
- 2
- 3
- 4
- 5
- 6
- 7
- 8
- 9
- 10
- 在applicationContext.xml中配置DruidDataSource
<context:property-placeholder location="classpath:druid.properties"/> <bean id="druidDataSource" class="com.alibaba.druid.pool.DruidDataSource"> <property name="driverClassName" value="${druid.driver}"/> <property name="url" value="${druid.url}"/> <property name="username" value="${druid.username}"/> <property name="password" value="${druid.password}"/> <property name="initialSize" value="${druid.pool.init}"/> <property name="minIdle" value="${druid.pool.minIdle}"/> <property name="maxActive" value="${druid.pool.maxActive}"/> <property name="maxWait" value="${druid.pool.timeout}"/> bean>- 1
- 2
- 3
- 4
- 5
- 6
- 7
- 8
- 9
- 10
- 11
- 12
- 13
- 14
- 15
- 16
02.整合MyBatis-创建SqlSessionFactory
依赖Spring容器创建MyBatis的SqlSessionFactory对
1. 创建 mybatis-config.xmlDOCTYPE configuration PUBLIC "-//mybatis.org//DTD Config 3.0//EN" "http://mybatis.org/dtd/mybatis-3-config.dtd"> <configuration> configuration>- 1
- 2
- 3
- 4
- 5
- 6

2. 在applicationContext.xml中进行以下配置<bean id="sqlSessionFactory" class="org.mybatis.spring.SqlSessionFactoryBean"> <property name="dataSource" ref="druidDataSource"/> <property name="mapperLocations" value="classpath:mappers/*Mapper.xml"/> <property name="typeAliasesPackage" value="com.it.pojo"/> <property name="configLocation" value="classpath:mybatis-config.xml"/> bean>- 1
- 2
- 3
- 4
- 5
- 6
- 7
- 8
- 9
- 10
- 11

03.整合C3P0连接池(补)
1. 添加C3P0依赖<dependency> <groupId>c3p0groupId> <artifactId>c3p0artifactId> <version>0.9.1.2version> dependency>- 1
- 2
- 3
- 4
- 5
- 6
2.
jdbc.driver=com.mysql.jdbc.Driver jdbc.url=jdbc:mysql://localhost:3306/db_mybatis_demo2?characterEncoding=utf-8 jdbc.username=root jdbc.password=root- 1
- 2
- 3
- 4
3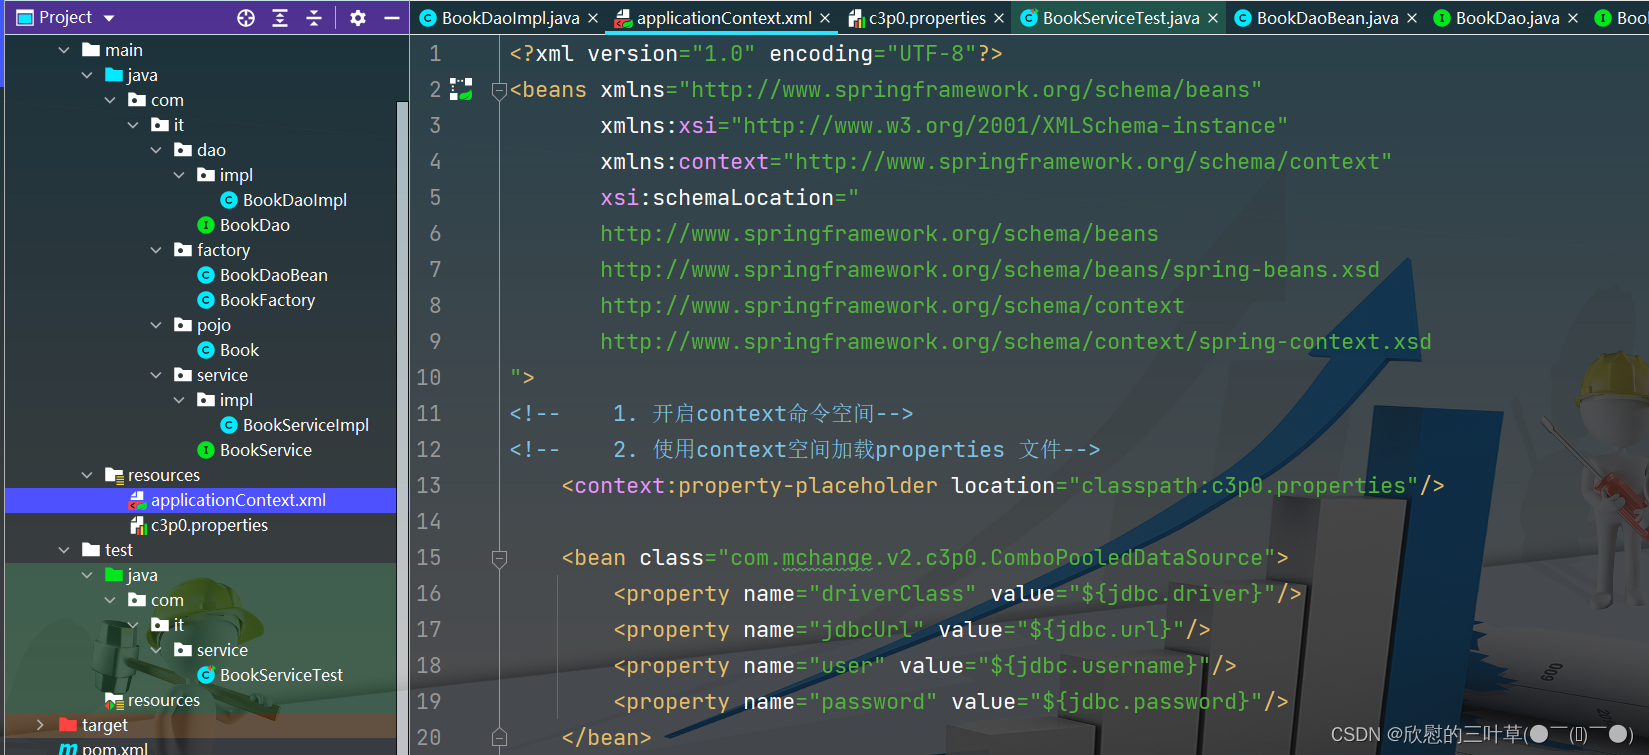
<beans xmlns="http://www.springframework.org/schema/beans" xmlns:xsi="http://www.w3.org/2001/XMLSchema-instance" xmlns:context="http://www.springframework.org/schema/context" xsi:schemaLocation=" http://www.springframework.org/schema/beans http://www.springframework.org/schema/beans/spring-beans.xsd http://www.springframework.org/schema/context http://www.springframework.org/schema/context/spring-context.xsd "> <context:property-placeholder location="classpath:c3p0.properties"/> <bean class="com.mchange.v2.c3p0.ComboPooledDataSource"> <property name="driverClass" value="${jdbc.driver}"/> <property name="jdbcUrl" value="${jdbc.url}"/> <property name="user" value="${jdbc.username}"/> <property name="password" value="${jdbc.password}"/> bean>- 1
- 2
- 3
- 4
- 5
- 6
- 7
- 8
- 9
- 10
- 11
- 12
- 13
- 14
- 15
- 16
- 17
- 18
- 19
4


④:配置MapperScannerConfigurer
01.创建实体类User

02. 创建接口方法

03. 创建UserMapper文件,定义sql语句
<mapper namespace="com.it.dao.UserDAO"> <resultMap id="userMap" type="User"> <id column="user_id" property="userId"/> <result column="user_name" property="userName"/> <result column="user_pwd" property="userPwd"/> <result column="user_realname" property="userRealName"/> <result column="user_img" property="userImg"/> resultMap> <select id="selectAllUsers" resultMap="userMap"> select user_id, user_name, user_pwd, user_realname, user_img from users; select> mapper>- 1
- 2
- 3
- 4
- 5
- 6
- 7
- 8
- 9
- 10
- 11
- 12
- 13
- 14
- 15
- 16

04. 配置MapperScannerConfigurer
<bean class="org.mybatis.spring.mapper.MapperScannerConfigurer"> <property name="sqlSessionFactoryBeanName" value="sqlSessionFactory"/> <property name="basePackage" value="com.it.dao"/> bean>- 1
- 2
- 3
- 4
- 5
- 6

05. 测试


⑤:使用示例
1. 创建service接口
2. 配置注解的使用范围
3. 创建接口实现类
4. 测试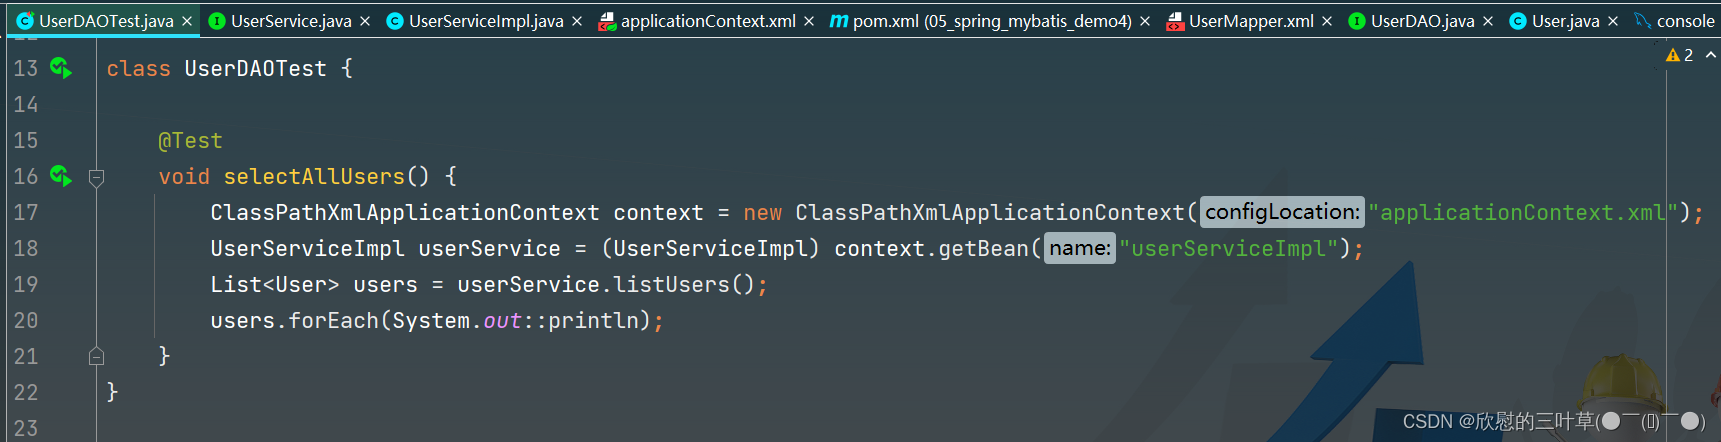

⑥:Spring整合MyBatis的AOP配置-XML(1)
使用Spring提供的事务管理切面类完成DAO中增删改操作的事务管理
01.完成添加操作
1. 在UserDAO添加接口方法
2
3. 定义接口方法的实现类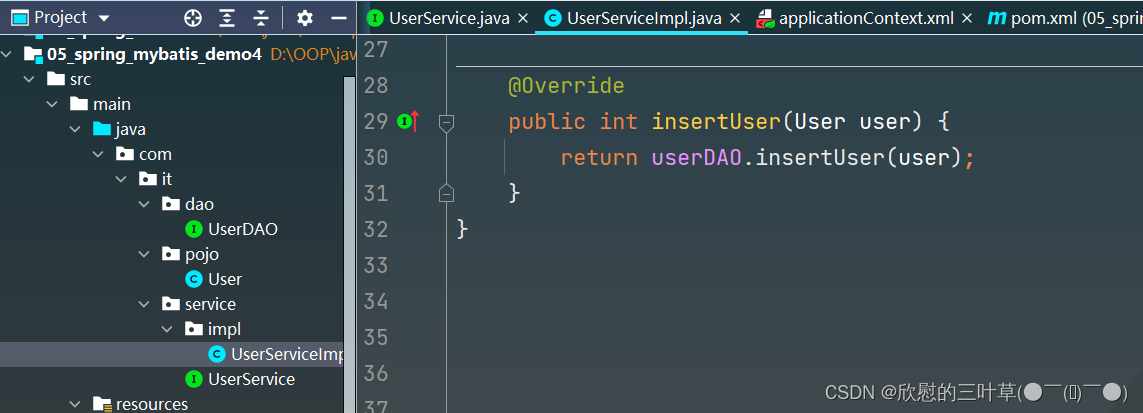
4. 定义sql语句
5. 测试

02.事务管理配置
<beans xmlns="http://www.springframework.org/schema/beans" xmlns:xsi="http://www.w3.org/2001/XMLSchema-instance" xmlns:aop="http://www.springframework.org/schema/aop" xmlns:tx="http://www.springframework.org/schema/tx" xmlns:context="http://www.springframework.org/schema/context" xsi:schemaLocation="http://www.springframework.org/schema/beans http://www.springframework.org/schema/beans/spring-beans.xsd http://www.springframework.org/schema/context http://www.springframework.org/schema/context/spring-context.xsd http://www.springframework.org/schema/aop http://www.springframework.org/schema/aop/spring-aop.xsd http://www.springframework.org/schema/tx http://www.springframework.org/schema/tx/spring-tx.xsd">- 1
- 2
- 3
- 4
- 5
- 6
- 7
- 8
- 9
- 10
- 11
- 12
- 13
- 14

<bean id="transactionManager" class="org.springframework.jdbc.datasource.DataSourceTransactionManager"> <property name="dataSource" ref="druidDataSource"/> bean> <tx:advice id="txAdvice" transaction-manager="transactionManager"> <tx:attributes> <tx:method name="insert*" isolation="REPEATABLE_READ" propagation="REQUIRED"/> <tx:method name="query*" isolation="REPEATABLE_READ" propagation="SUPPORTS"/> tx:attributes> tx:advice>- 1
- 2
- 3
- 4
- 5
- 6
- 7
- 8
- 9
- 10
- 11

⑦:事务隔离级别

事务的四大特性分别是:原子性、一致性、隔离性、持久性
幻读和不可重复读都是在同一个事务中多次读取了其他事务已经提交的事务的数据导致每次读取的数据不一致,所不同的是不可重复读读取的是同一条数据,而幻读针对的是一批数据整体的统计(比如数据的个数)
以MYSQL数据库来分析四种隔离级别
第一种隔离级别:Read uncommitted(读未提交)
如果一个事务已经开始写数据,则另外一个事务不允许同时进行写操作,但允许其他事务读此行数据,该隔离级别可以通过“排他写锁”,但是不排斥读线程实现。这样就避免了更新丢失,却可能出现脏读,也就是说事务B读取到了事务A未提交的数据
解决了更新丢失,但还是可能会出现脏读
第二种隔离级别:Read committed(读提交)
如果是一个读事务(线程),则允许其他事务读写,如果是写事务将会禁止其他事务访问该行数据,该隔离级别避免了脏读,但是可能出现不可重复读。事务A事先读取了数据,事务B紧接着更新了数据,并提交了事务,而事务A再次读取该数据时,数据已经发生了改变。
解决了更新丢失和脏读问题
第三种隔离级别:Repeatable read(可重复读取)
可重复读取是指在一个事务内,多次读同一个数据,在这个事务还没结束时,其他事务不能访问该数据(包括了读写),这样就可以在同一个事务内两次读到的数据是一样的,因此称为是可重复读隔离级别,读取数据的事务将会禁止写事务(但允许读事务),写事务则禁止任何其他事务(包括了读写),这样避免了不可重复读和脏读,但是有时可能会出现幻读。(读取数据的事务)可以通过“共享读镜”和“排他写锁”实现。
解决了更新丢失、脏读、不可重复读、但是还会出现幻读
第四种隔离级别:Serializable(可序化)
提供严格的事务隔离,它要求事务序列化执行,事务只能一个接着一个地执行,但不能并发执行,如果仅仅通过“行级锁”是无法实现序列化的,必须通过其他机制保证新插入的数据不会被执行查询操作的事务访问到。序列化是最高的事务隔离级别,同时代价也是最高的,性能很低,一般很少使用,在该级别下,事务顺序执行,不仅可以避免脏读、不可重复读,还避免了幻读
解决了更新丢失、脏读、不可重复读、幻读(虚读)
以上四种隔离级别最高的是Serializable级别,最低的是Read uncommitted级别,当然级别越高,执行效率就越低,像Serializeble这样的级别,就是以锁表的方式(类似于Java多线程中的锁)使得其他线程只能在锁外等待,所以平时选用何种隔离级别应该根据实际情况来,在MYSQL数据库中默认的隔离级别是Repeatable read(可重复读)。
在MYSQL数据库中,支持上面四种隔离级别,默认的为Repeatable read(可重复读);而在Oracle数据库中,只支持Serializeble(串行化)级别和Read committed(读已提交)这两种级别,其中默认的为Read committed级别
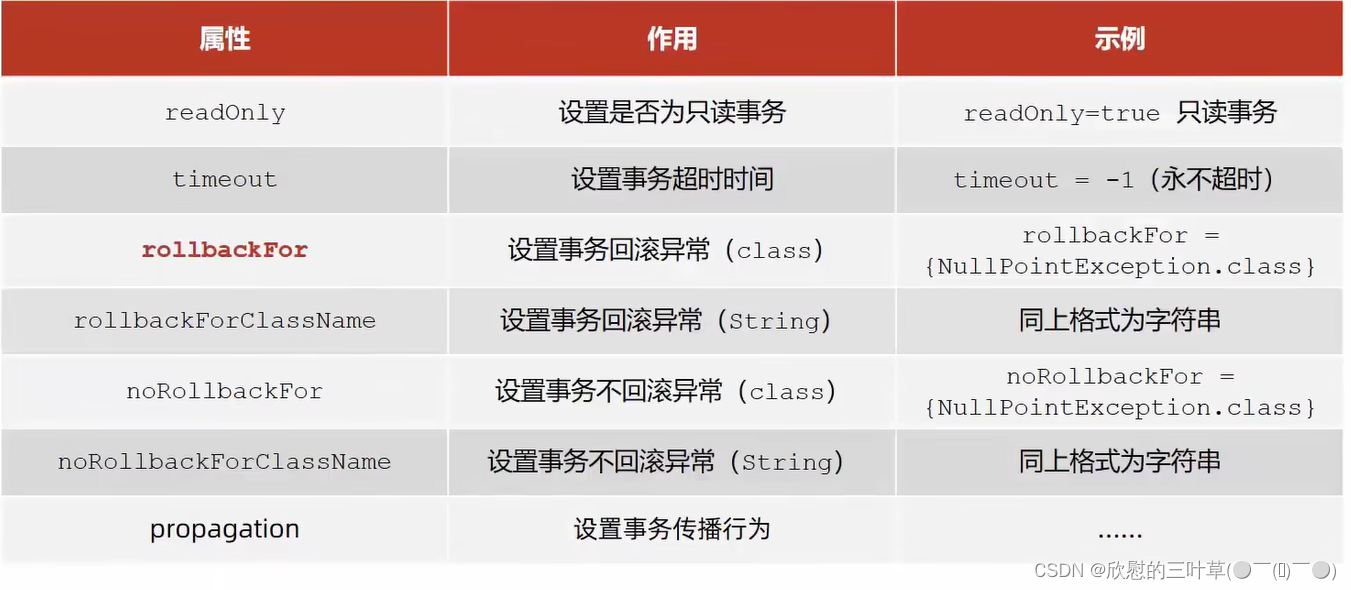
⑧:事务传播机制
- REQUIRED(默认):支持使用当前事务,如果当前事务不存在,创建一个新事务。
- SUPPORTS:支持使用当前事务,如果当前事务不存在,则不使用事务。
- MANDATORY:中文翻译为强制,支持使用当前事务,如果当前事务不存在,则抛出Exception。
- REQUIRES_NEW:创建一个新事务,如果当前事务存在,把当前事务挂起。
- NOT_SUPPORTED:无事务执行,如果当前事务存在,把当前事务挂起。
- NEVER:无事务执行,如果当前有事务则抛出Exception。
- NESTED:嵌套事务,如果当前事务存在,那么在嵌套的事务中执行。如果当前事务不存在,则表现跟REQUIRED一样。
⑨:Spring整合MyBatis的AOP配置-XML(2)
<aop:config> <aop:pointcut id="crud" expression="execution(* com.it.service.*.*(..))"/> <aop:advisor advice-ref="txAdvice" pointcut-ref="crud"/> aop:config>- 1
- 2
- 3
- 4
- 5
<context:annotation-config/> <context:component-scan base-package="com.it"/> <context:property-placeholder location="classpath:druid.properties"/> <bean id="druidDataSource" class="com.alibaba.druid.pool.DruidDataSource"> <property name="driverClassName" value="${druid.driver}"/> <property name="url" value="${druid.url}"/> <property name="username" value="${druid.username}"/> <property name="password" value="${druid.password}"/> <property name="initialSize" value="${druid.pool.init}"/> <property name="minIdle" value="${druid.pool.minIdle}"/> <property name="maxActive" value="${druid.pool.maxActive}"/> <property name="maxWait" value="${druid.pool.timeout}"/> bean> <bean id="sqlSessionFactory" class="org.mybatis.spring.SqlSessionFactoryBean"> <property name="dataSource" ref="druidDataSource"/> <property name="mapperLocations" value="classpath:mappers/*Mapper.xml"/> <property name="typeAliasesPackage" value="com.it.pojo"/> <property name="configLocation" value="classpath:mybatis-config.xml"/> bean> <bean class="org.mybatis.spring.mapper.MapperScannerConfigurer"> <property name="sqlSessionFactoryBeanName" value="sqlSessionFactory"/> <property name="basePackage" value="com.it.dao"/> bean> <bean id="transactionManager" class="org.springframework.jdbc.datasource.DataSourceTransactionManager"> <property name="dataSource" ref="druidDataSource"/> bean> <tx:advice id="txAdvice" transaction-manager="transactionManager"> <tx:attributes> <tx:method name="insert*" isolation="REPEATABLE_READ" propagation="REQUIRED"/> <tx:method name="query*" isolation="REPEATABLE_READ" propagation="SUPPORTS"/> <tx:method name="select*" isolation="REPEATABLE_READ" propagation="SUPPORTS"/> <tx:method name="update*" isolation="REPEATABLE_READ" propagation="REQUIRED"/> <tx:method name="delete*" isolation="REPEATABLE_READ" propagation="REQUIRED"/> tx:attributes> tx:advice> <aop:config> <aop:pointcut id="crud" expression="execution(* com.it.service.*.*(..))"/> <aop:advisor advice-ref="txAdvice" pointcut-ref="crud"/> aop:config>- 1
- 2
- 3
- 4
- 5
- 6
- 7
- 8
- 9
- 10
- 11
- 12
- 13
- 14
- 15
- 16
- 17
- 18
- 19
- 20
- 21
- 22
- 23
- 24
- 25
- 26
- 27
- 28
- 29
- 30
- 31
- 32
- 33
- 34
- 35
- 36
- 37
- 38
- 39
- 40
- 41
- 42
- 43
- 44
- 45
- 46
- 47
- 48
- 49
- 50
- 51
- 52
- 53
- 54
- 55
- 56
- 57
- 58
- 59
- 60
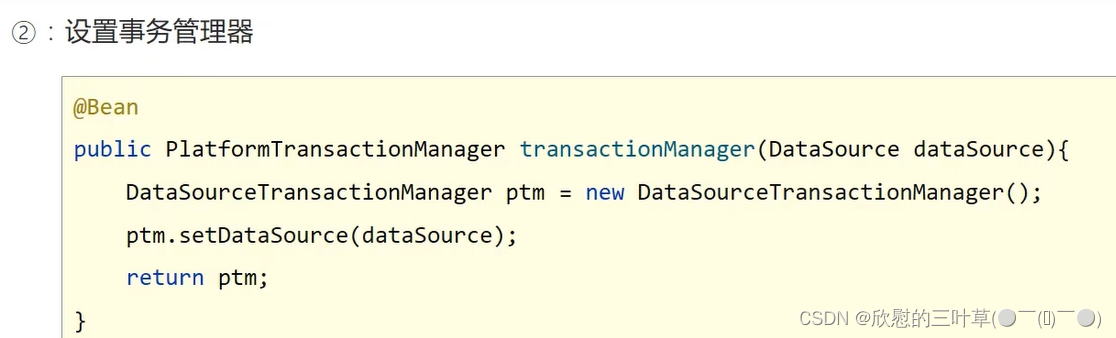
⑩:Spring整合MyBatis的AOP配置(注解)
- 在applicationContext.xml配置事务管理,声明使用注解方式进行事务配置
<bean id="transactionManager" class="org.springframework.jdbc.datasource.DataSourceTransactionManager"> <property name="dataSource" ref="druidDataSource"/> bean> <tx:annotation-driven transaction-manager="transactionManager"/>- 1
- 2
- 3
- 4
- 5
- 6
- 7
- 在需要Springi进行事务管理的方法上添加@Transactional注解
@Override @Transactional(isolation = Isolation.READ_COMMITTED,propagation = Propagation.SUPPORTS) public List<User> listUsers() { return userDAO.selectAllUsers(); }- 1
- 2
- 3
- 4
- 5

⑩①:案例(银行转账)


八、Spring整合MyBatis👉使用类代替XML(补)
①:添加依赖(注解解决字段名不一样)
<dependencies> <dependency> <groupId>mysqlgroupId> <artifactId>mysql-connector-javaartifactId> <version>8.0.28version> dependency> <dependency> <groupId>org.mybatisgroupId> <artifactId>mybatisartifactId> <version>3.4.6version> dependency> <dependency> <groupId>org.springframeworkgroupId> <artifactId>spring-contextartifactId> <version>5.3.18version> dependency> <dependency> <groupId>org.springframeworkgroupId> <artifactId>spring-aspectsartifactId> <version>5.3.18version> dependency> <dependency> <groupId>org.springframeworkgroupId> <artifactId>spring-jdbcartifactId> <version>5.3.18version> dependency> <dependency> <groupId>org.mybatisgroupId> <artifactId>mybatis-springartifactId> <version>2.0.6version> dependency> <dependency> <groupId>com.alibabagroupId> <artifactId>druidartifactId> <version>1.2.8version> dependency> <dependency> <groupId>org.projectlombokgroupId> <artifactId>lombokartifactId> <version>1.18.24version> dependency> <dependency> <groupId>junitgroupId> <artifactId>junitartifactId> <version>4.13version> <scope>testscope> dependency> dependencies>- 1
- 2
- 3
- 4
- 5
- 6
- 7
- 8
- 9
- 10
- 11
- 12
- 13
- 14
- 15
- 16
- 17
- 18
- 19
- 20
- 21
- 22
- 23
- 24
- 25
- 26
- 27
- 28
- 29
- 30
- 31
- 32
- 33
- 34
- 35
- 36
- 37
- 38
- 39
- 40
- 41
- 42
- 43
- 44
- 45
- 46
- 47
- 48
- 49
- 50
- 51
- 52
- 53
②:项目操作
01.创建实体类
1.创建实体类(字段与数据库保持一致)
02.创建DAO接口方法
使用Results和Result两个注解,Result的id=true表示主键,默认是flase,Results的id可以用来表示当前定义的这个Results,方便其他的函数引用
03.创建Service接口方法
04.实现Service接口方法

05.配置jdbc.prperties文件
jdbc.driver=com.mysql.jdbc.Driver jdbc.url=jdbc:mysql://localhost:3306/db_mybatis_demo2?characterEncoding=utf-8 jdbc.username=root jdbc.password=root- 1
- 2
- 3
- 4
06.创建JdbcConfig类代替XML
public class JdbcConfig { @Value("${jdbc.driver}") private String driver; @Value("${jdbc.url}") private String url; @Value("${jdbc.username}") private String username; @Value("${jdbc.password}") private String password; @Bean // @Bean:表示该方法的返回值是一个bean public DataSource dataSource(){ DruidDataSource dataSource = new DruidDataSource(); dataSource.setDriverClassName(driver); dataSource.setUrl(url); dataSource.setUsername(username); dataSource.setPassword(password); return dataSource; } }- 1
- 2
- 3
- 4
- 5
- 6
- 7
- 8
- 9
- 10
- 11
- 12
- 13
- 14
- 15
- 16
- 17
- 18
- 19
- 20

07.创建JdbcConfig类代替XML
public class MybatisConfig { @Bean public SqlSessionFactoryBean sqlSessionFactory(DataSource dataSource){ SqlSessionFactoryBean bean = new SqlSessionFactoryBean(); bean.setTypeAliasesPackage("com.it.pojo"); bean.setDataSource(dataSource); return bean; } @Bean public MapperScannerConfigurer mapperScannerConfigurer(){ MapperScannerConfigurer configurer = new MapperScannerConfigurer(); configurer.setBasePackage("com.it.dao"); return configurer; } }- 1
- 2
- 3
- 4
- 5
- 6
- 7
- 8
- 9
- 10
- 11
- 12
- 13
- 14
- 15
- 16
- 17
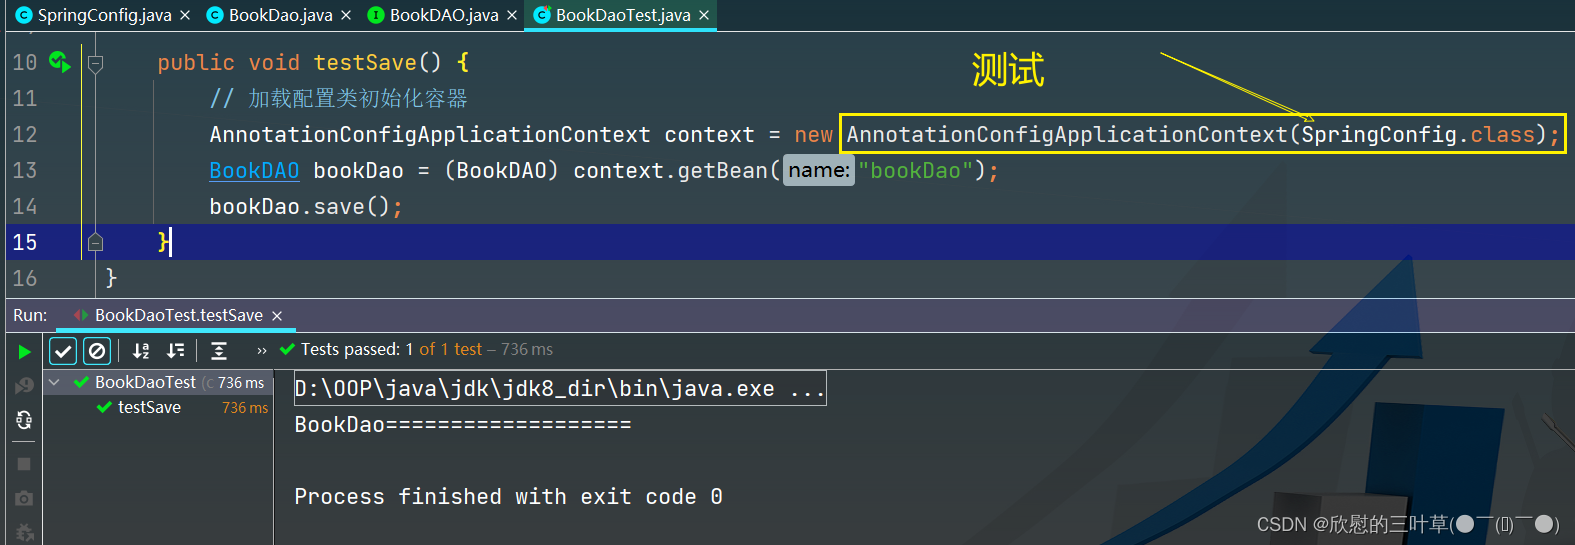
08.创建SpringConfig类代替XML
@Configuration @ComponentScan("com.it") @PropertySource("classpath:jdbc.properties") @Import({JdbcConfig.class,MybatisConfig.class}) public class SpringConfig { }- 1
- 2
- 3
- 4
- 5
- 6

09.测试
public class StudentServiceImplTest { @Test public void listStudents() { AnnotationConfigApplicationContext context = new AnnotationConfigApplicationContext(SpringConfig.class); StudentService studentService = context.getBean(StudentService.class); Student student = studentService.findStudentById("10002"); System.out.println(student); System.out.println("*********************************"); List<Student> studentList = studentService.listStudents(); studentList.forEach(System.out::println); } }- 1
- 2
- 3
- 4
- 5
- 6
- 7
- 8
- 9
- 10
- 11
- 12
- 13
- 14


九、Spring整合Junit(补)
①:添加依赖
<dependency> <groupId>org.springframeworkgroupId> <artifactId>spring-testartifactId> <version>5.3.18version> <scope>testscope> dependency> <dependency> <groupId>junitgroupId> <artifactId>junitartifactId> <version>4.13version> <scope>testscope> dependency>- 1
- 2
- 3
- 4
- 5
- 6
- 7
- 8
- 9
- 10
- 11
- 12
- 13
1. 添加测试类
②:测试代码
@RunWith(SpringJUnit4ClassRunner.class) @ContextConfiguration(classes = SpringConfig.class) public class StudentServiceImplTest2 { @Autowired private StudentService studentService; @Test public void listStudents() { List<Student> studentList = studentService.listStudents(); studentList.forEach(System.out::println); } }- 1
- 2
- 3
- 4
- 5
- 6
- 7
- 8
- 9
- 10
- 11
- 12
- 13
-
相关阅读:
一篇必读的物联网平台物模型开发指南,为你解锁未来科技趋势
What is SVM algorithm
jenkins集成gitlab
JAVA 多态
人机交互的周期性与非周期性
Python中如何在模块搜索路径中添加自己的目录
1. js中let、var、const定义变量区别与方式
xilinx hls实现sobel检测
策略+枚举 优雅的解决 if-else
【c#】yield、Unity协程
- 原文地址:https://blog.csdn.net/cygqtt/article/details/126423359
