-
Three.js使用ExtrudeGeometry拉伸模型
Three.js使用ExtrudeGeometry拉伸模型
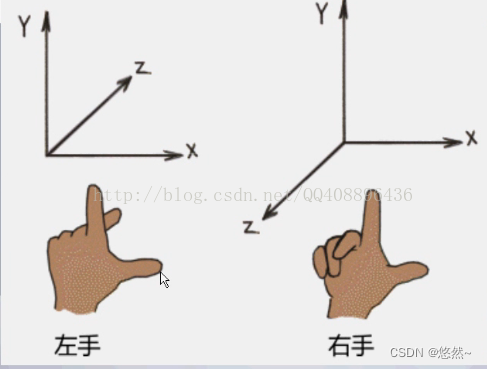
Three.js坐标系
坐标系分为左手坐标系和右手坐标系,Three.js采用右手坐标系。
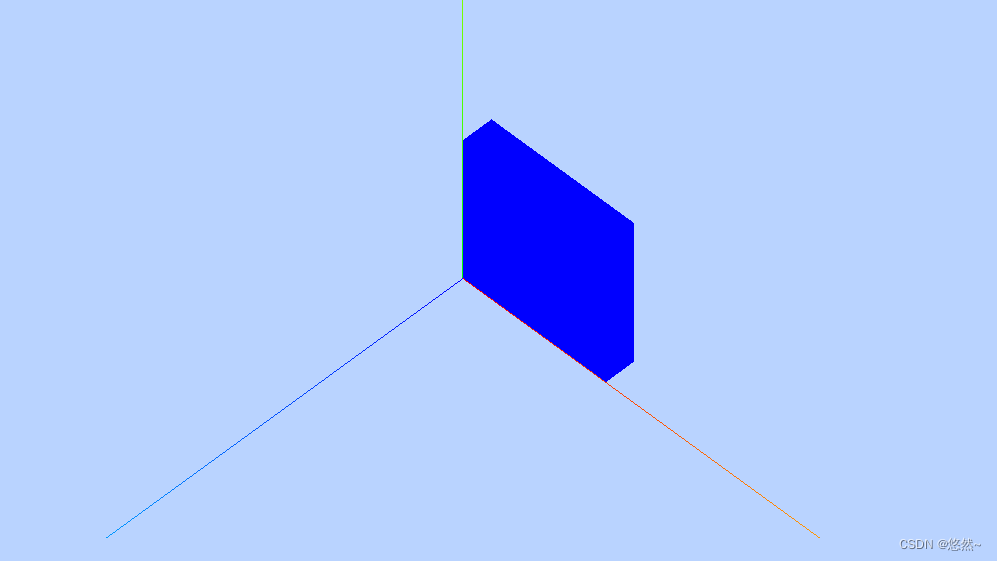
ExtrudeGeometry拉伸模型
Three.js新建Plane后,图形会生成在XY面,然后沿着Z轴拉伸。测试例子向-Z轴拉伸。
DOCTYPE html> <html lang="en"> <head> <meta charset="UTF-8" /> <title>第一个three.js文件_WebGL三维场景title> <style> body { margin: 0; overflow: hidden; /* 隐藏body窗口区域滚动条 */ } style> <script src="../three.js-master/build/three.js">script> <script src="../three.js-master/examples/js/controls/OrbitControls.js">script> head> <body> <script> /** * 创建场景对象Scene */ var scene = new THREE.Scene(); var shape = new THREE.Shape(); /**四条直线绘制一个矩形轮廓*/ shape.moveTo(0, 0); //起点 shape.lineTo(0, 100); //第2点 shape.lineTo(100, 100); //第3点 shape.lineTo(100, 0); //第4点 shape.lineTo(0, 0); //第5点 var geometry = new THREE.ExtrudeGeometry( //拉伸造型 shape, //二维轮廓 //拉伸参数 { depth: -20, //拉伸长度 bevelEnabled: false, //无倒角 } ); var material = new THREE.MeshBasicMaterial({ color: 0x0000ff, }); const plane = new THREE.Mesh(geometry, material); scene.add(plane); // 平行光 directionalLight = new THREE.DirectionalLight(0xffffff); // 平行光配置 directionalLight.position.set(-40, 60, -10); directionalLight.castShadow = true; directionalLight.shadow.camera.near = 20; directionalLight.shadow.camera.far = 200; directionalLight.shadow.camera.left = -50; directionalLight.shadow.camera.right = 50; directionalLight.shadow.camera.top = 50; directionalLight.shadow.camera.bottom = -50; // 距离和强度 directionalLight.distance = 0; directionalLight.intensity = 0.5; // 设置阴影的分辨率 directionalLight.shadow.mapSize.width = 1024; directionalLight.shadow.mapSize.height = 1024; scene.add(directionalLight); //环境光 var ambient = new THREE.AmbientLight(0x444444); scene.add(ambient); // 辅助坐标系 参数250表示坐标系大小,可以根据场景大小去设置 var axisHelper = new THREE.AxesHelper(250); scene.add(axisHelper); const cameraHelper = new THREE.CameraHelper( directionalLight.shadow.camera ); // scene.add(cameraHelper); /** * 相机设置 */ var width = window.innerWidth; //窗口宽度 var height = window.innerHeight; //窗口高度 var k = width / height; //窗口宽高比 var s = 200; //三维场景显示范围控制系数,系数越大,显示的范围越大 //创建相机对象 var camera = new THREE.OrthographicCamera(-s * k, s * k, s, -s, 1, 1000); camera.position.set(200, 300, 200); //设置相机位置 camera.lookAt(scene.position); //设置相机方向(指向的场景对象) /** * 创建渲染器对象 */ var renderer = new THREE.WebGLRenderer(); renderer.setSize(width, height); //设置渲染区域尺寸 renderer.setClearColor(0xb9d3ff, 1); //设置背景颜色 document.body.appendChild(renderer.domElement); //body元素中插入canvas对象 renderer.shadowMap.enabled = true; //执行渲染操作 指定场景、相机作为参数 // renderer.render(scene, camera); function render() { renderer.render(scene, camera); //执行渲染操作 // mesh.rotateY(0.01);//每次绕y轴旋转0.01弧度 requestAnimationFrame(render); //请求再次执行渲染函数render } render(); var controls = new THREE.OrbitControls(camera, renderer.domElement); //创建控件对象 script> body> html>- 1
- 2
- 3
- 4
- 5
- 6
- 7
- 8
- 9
- 10
- 11
- 12
- 13
- 14
- 15
- 16
- 17
- 18
- 19
- 20
- 21
- 22
- 23
- 24
- 25
- 26
- 27
- 28
- 29
- 30
- 31
- 32
- 33
- 34
- 35
- 36
- 37
- 38
- 39
- 40
- 41
- 42
- 43
- 44
- 45
- 46
- 47
- 48
- 49
- 50
- 51
- 52
- 53
- 54
- 55
- 56
- 57
- 58
- 59
- 60
- 61
- 62
- 63
- 64
- 65
- 66
- 67
- 68
- 69
- 70
- 71
- 72
- 73
- 74
- 75
- 76
- 77
- 78
- 79
- 80
- 81
- 82
- 83
- 84
- 85
- 86
- 87
- 88
- 89
- 90
- 91
- 92
- 93
- 94
- 95
- 96
- 97
- 98
- 99
- 100
- 101
- 102
- 103
- 104
- 105
- 106
- 107
- 108
- 109
- 110
- 111
- 112
沿Y轴拉伸图形
如果需要沿着XZ平面,向Y轴拉伸。则使用plane.rotation.x = Math.PI / 2 旋转图形即可。
DOCTYPE html> <html lang="en"> <head> <meta charset="UTF-8" /> <title>第一个three.js文件_WebGL三维场景title> <style> body { margin: 0; overflow: hidden; /* 隐藏body窗口区域滚动条 */ } style> <script src="../three.js-master/build/three.js">script> <script src="../three.js-master/examples/js/controls/OrbitControls.js">script> head> <body> <script> /** * 创建场景对象Scene */ var scene = new THREE.Scene(); var shape = new THREE.Shape(); /**四条直线绘制一个矩形轮廓*/ shape.moveTo(0, 0); //起点 shape.lineTo(0, 100); //第2点 shape.lineTo(100, 100); //第3点 shape.lineTo(100, 0); //第4点 shape.lineTo(0, 0); //第5点 var geometry = new THREE.ExtrudeGeometry( //拉伸造型 shape, //二维轮廓 //拉伸参数 { depth: -20, //拉伸长度 bevelEnabled: false, //无倒角 } ); var material = new THREE.MeshBasicMaterial({ color: 0x0000ff, }); const plane = new THREE.Mesh(geometry, material); plane.rotation.x = Math.PI / 2; scene.add(plane); // 平行光 directionalLight = new THREE.DirectionalLight(0xffffff); // 平行光配置 directionalLight.position.set(-40, 60, -10); directionalLight.castShadow = true; directionalLight.shadow.camera.near = 20; directionalLight.shadow.camera.far = 200; directionalLight.shadow.camera.left = -50; directionalLight.shadow.camera.right = 50; directionalLight.shadow.camera.top = 50; directionalLight.shadow.camera.bottom = -50; // 距离和强度 directionalLight.distance = 0; directionalLight.intensity = 0.5; // 设置阴影的分辨率 directionalLight.shadow.mapSize.width = 1024; directionalLight.shadow.mapSize.height = 1024; scene.add(directionalLight); //环境光 var ambient = new THREE.AmbientLight(0x444444); scene.add(ambient); // 辅助坐标系 参数250表示坐标系大小,可以根据场景大小去设置 var axisHelper = new THREE.AxesHelper(250); scene.add(axisHelper); const cameraHelper = new THREE.CameraHelper( directionalLight.shadow.camera ); // scene.add(cameraHelper); /** * 相机设置 */ var width = window.innerWidth; //窗口宽度 var height = window.innerHeight; //窗口高度 var k = width / height; //窗口宽高比 var s = 200; //三维场景显示范围控制系数,系数越大,显示的范围越大 //创建相机对象 var camera = new THREE.OrthographicCamera(-s * k, s * k, s, -s, 1, 1000); camera.position.set(200, 300, 200); //设置相机位置 camera.lookAt(scene.position); //设置相机方向(指向的场景对象) /** * 创建渲染器对象 */ var renderer = new THREE.WebGLRenderer(); renderer.setSize(width, height); //设置渲染区域尺寸 renderer.setClearColor(0xb9d3ff, 1); //设置背景颜色 document.body.appendChild(renderer.domElement); //body元素中插入canvas对象 renderer.shadowMap.enabled = true; //执行渲染操作 指定场景、相机作为参数 // renderer.render(scene, camera); function render() { renderer.render(scene, camera); //执行渲染操作 // mesh.rotateY(0.01);//每次绕y轴旋转0.01弧度 requestAnimationFrame(render); //请求再次执行渲染函数render } render(); var controls = new THREE.OrbitControls(camera, renderer.domElement); //创建控件对象 script> body> html>- 1
- 2
- 3
- 4
- 5
- 6
- 7
- 8
- 9
- 10
- 11
- 12
- 13
- 14
- 15
- 16
- 17
- 18
- 19
- 20
- 21
- 22
- 23
- 24
- 25
- 26
- 27
- 28
- 29
- 30
- 31
- 32
- 33
- 34
- 35
- 36
- 37
- 38
- 39
- 40
- 41
- 42
- 43
- 44
- 45
- 46
- 47
- 48
- 49
- 50
- 51
- 52
- 53
- 54
- 55
- 56
- 57
- 58
- 59
- 60
- 61
- 62
- 63
- 64
- 65
- 66
- 67
- 68
- 69
- 70
- 71
- 72
- 73
- 74
- 75
- 76
- 77
- 78
- 79
- 80
- 81
- 82
- 83
- 84
- 85
- 86
- 87
- 88
- 89
- 90
- 91
- 92
- 93
- 94
- 95
- 96
- 97
- 98
- 99
- 100
- 101
- 102
- 103
- 104
- 105
- 106
- 107
- 108
- 109
- 110
- 111
- 112

-
相关阅读:
前后端分离技术逐步深入,让你更加深入理解Nginx+Tomcat
【scikit-learn基础】--『分类模型评估』之系数分析
2.0SpringMVC中报文信息转换器HttpMessageConverter
服务器正文21:不同编译器对预编译的处理(简单介绍msvc和gcc)
阿里云服务器公网带宽升级的三种方法
[野火]STM32 F103 HAL库开发实战指南笔记之简单外设总结
一、pycharm小插件和最基本的python语法规则
【机器学习】三要素——数据、模型、算法
Vue3 - Pinia 模块化(详细教程)
阅读JavaScript文档-一些常用方法
- 原文地址:https://blog.csdn.net/wz122330/article/details/125635501
