-
数据结构——单链表(C语言实现)
单链表(C语言实现)
单链表
1.单链表的概念
- 单链表是一种链式存取的数据结构,链表中的数据是以结点来表示的,每个结点的构成:元素(数据元素的映象) + 指针(指示后继元素存储位置),元素就是存储数据的存储单元,指针就是连接每个结点的地址数据。以“结点的序列”表示的线性表称作线性链表(单链表),单链表是链式存取的结构。

2.单链表的结构体设计
- 结构体中有个数据类型,一个保存有效值,另一个保存下一个有效节点的地址
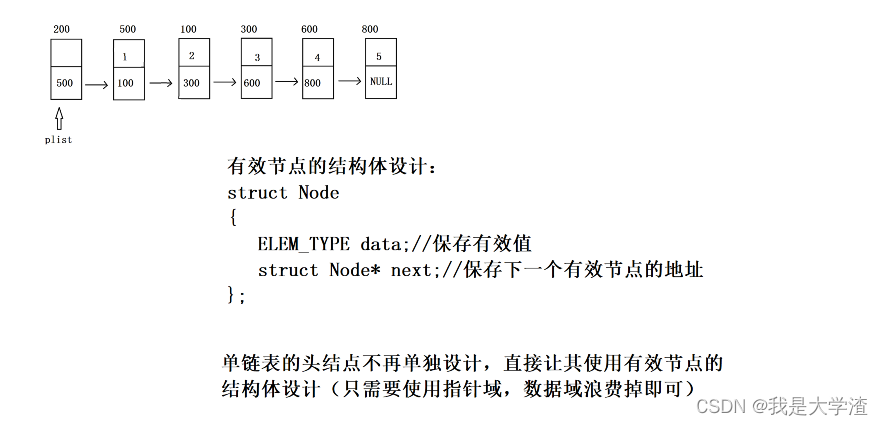
typedef int ELEM_TYPE; //带头结点的单链表 //有效节点的结构体设计 typedef struct Node { ELEM_TYPE data; //数据域 //保存节点有效值 struct Node *next; //指针域 //保存下一个有效节点的地址 }Node, *PNode; //typedef struct Node Node; //typedef struct Node* PNode;- 1
- 2
- 3
- 4
- 5
- 6
- 7
- 8
- 9
- 10
3.单链表的基本操作
单链表的基本操作有 初始化,头插,尾插,按位置插,头删,尾删,按位置删,查找,按值删,获取有效值个数,判空,清空,销毁,打印
函数//初始化 void Init_list(PNode plist); //头插 bool Insert_Head(struct Node *plist, ELEM_TYPE val); //尾插 bool Insert_Tail(struct Node *plist, ELEM_TYPE val); //按位置插 bool Insert_pos(struct Node *plist, int pos, ELEM_TYPE val); //头删 bool Del_head(struct Node* plist); //尾删 bool Del_tail(struct Node *plist); //按位置删 bool Del_pos(struct Node *plist, int pos); //按值删 bool Del_val(struct Node *plist, ELEM_TYPE val); //查找节点 struct Node* Search(struct Node *plist, ELEM_TYPE val); //获取有效值个数 int Get_Length(struct Node *plist); //判空 bool IsEmpty(struct Node *plist); //清空 void Clear(struct Node *plist); //20:10 //销毁 void Destroy(struct Node *plist); //打印 void Show(struct Node *plist);- 1
- 2
- 3
- 4
- 5
- 6
- 7
- 8
- 9
- 10
- 11
- 12
- 13
- 14
- 15
- 16
- 17
- 18
- 19
- 20
- 21
- 22
- 23
- 24
- 25
- 26
- 27
- 28
- 29
- 30
- 31
- 32
- 33
- 34
- 35
- 36
- 37
- 38
- 39
- 40
- 41
- 42
3.1 初始化
- 初始化,将头节点的指针域置为空,数据域不使用
void Init_list(PNode plist) { //assert plist plist->next = NULL; //plist->data; 头结点的数据域不使用 }- 1
- 2
- 3
- 4
- 5
- 6
- 7
3.2 头插
- 申请一个新结点,将数据放入到新结点之中,然后将新结点插入到头节点之后即可。

//头插 bool Insert_Head(struct Node *plist, ELEM_TYPE val) { //1.assert plist assert(plist != NULL); //2.购买新节点(购买好节点之后,记得将val值赋值进去) struct Node *pnewnode = (struct Node *)malloc(1 * sizeof(struct Node)); assert(pnewnode != NULL); pnewnode->data = val; //3.找到合适的插入位置 //因为是头插函数 所以不需要特意的去合适的位置 直接向plist后面插即可 //4.插入 pnewnode->next = plist->next; plist->next = pnewnode; return true; }- 1
- 2
- 3
- 4
- 5
- 6
- 7
- 8
- 9
- 10
- 11
- 12
- 13
- 14
- 15
- 16
- 17
- 18
- 19
- 20
3.3 尾插
- 将新结点插入到当前单链表的表尾

//尾插 bool Insert_Tail(struct Node *plist, ELEM_TYPE val) { //1.assert plist assert(plist != NULL); //2.购买新节点(购买好节点之后,记得将val值赋值进去) struct Node *pnewnode = (struct Node *)malloc(1 * sizeof(struct Node)); assert(pnewnode != NULL); pnewnode->data = val; //3.找到合适的插入位置 struct Node *p = plist; for(p; p->next!=NULL; p=p->next); //此时 p就指向尾结点 //4.插入 pnewnode->next = p->next; p->next = pnewnode; return true; }- 1
- 2
- 3
- 4
- 5
- 6
- 7
- 8
- 9
- 10
- 11
- 12
- 13
- 14
- 15
- 16
- 17
- 18
- 19
- 20
- 21
3.4 按位置插
- 首先要判断 pos是否合法,要插入的位置必须大于零小于等于链表总长度


//按位置插 bool Insert_pos(struct Node *plist, int pos, ELEM_TYPE val) { //assert assert(plist != NULL); assert(pos>=0 && pos<=Get_Length(plist)); //1.购买新节点(购买好节点之后,记得将val值赋值进去) struct Node *pnewnode = (struct Node *)malloc(sizeof(struct Node)); assert(pnewnode != NULL); pnewnode->data = val; //2.找到合适的插入位置(让指针p指向合适的节点) struct Node *p = plist; for(int i=0; i<pos; i++) { p=p->next; } //3.插入 pnewnode->next = p->next; p->next = pnewnode; return true; }- 1
- 2
- 3
- 4
- 5
- 6
- 7
- 8
- 9
- 10
- 11
- 12
- 13
- 14
- 15
- 16
- 17
- 18
- 19
- 20
- 21
- 22
- 23
- 24
- 25
3.5 头删
- 和头插类似,只不过一个是插入一个是删除,删除需要判空空链表不能删除

//头删 bool Del_head(struct Node* plist) { //1.对plist 断言 assert(plist != NULL); //2.删除需要判空 if(IsEmpty(plist)) { return false; } //3.先申请一个临时指针p,指向第一个有效节点的地址 struct Node *p = plist->next; //4.头结点的next域跨越指向(不再指向第一个有效节点,而是指向第二个) plist->next = p->next; //plist->next = plist->next->next; free(p); return true; }- 1
- 2
- 3
- 4
- 5
- 6
- 7
- 8
- 9
- 10
- 11
- 12
- 13
- 14
- 15
- 16
- 17
- 18
- 19
- 20
- 21
3.6 尾删
- 删除链表中最后一个结点

//尾删 bool Del_tail(struct Node *plist) { //1.对plist 断言 assert(plist != NULL); //2.删除需要判空(判空链表) if(IsEmpty(plist)) { return false; } //3.让临时指针p指向待删除节点(尾结点) struct Node *p = plist; for(; p->next!=NULL; p=p->next); //4.再让临时指针q指向倒数的第二个节点 struct Node *q = plist; for(; q->next!=p; q=q->next); //5.跨越指向,并释放待删除节点 q->next = p->next; //q->next = NULL; free(p); return true; }- 1
- 2
- 3
- 4
- 5
- 6
- 7
- 8
- 9
- 10
- 11
- 12
- 13
- 14
- 15
- 16
- 17
- 18
- 19
- 20
- 21
- 22
- 23
- 24
- 25
- 26
3.7 按位置删
- 根据位置删除结点,需要判断结点的合法性,这次的pos需要小于链表长度

//按位置删 bool Del_pos(struct Node *plist, int pos) { //1.对plist 断言 pos做合法性判断 assert(plist != NULL); assert(pos >=0 && pos < Get_Length(plist)); //2.删除需要判空(判空链表) if(IsEmpty(plist)) { return false; } //3.pos="几",则让指针q从头结点开始向后跑"几"步(此时,q指向待删除节点的上一个节点) struct Node *q = plist; for(int i=0; i<pos; i++)//此时,for循环结束,指针q指向待删除节点的上一个节点 { q=q->next; } //4.直接让q的next域给到指针p(此时,指针p指向待删除节点) struct Node *p = q->next;//此时,指针p指向待删除节点 //5.跨越指向,释放待删除节点 q->next = p->next; free(p); return true; }- 1
- 2
- 3
- 4
- 5
- 6
- 7
- 8
- 9
- 10
- 11
- 12
- 13
- 14
- 15
- 16
- 17
- 18
- 19
- 20
- 21
- 22
- 23
- 24
- 25
- 26
- 27
- 28
- 29
3.8 按值删
- 按值删需要先找到数据域是该值的结点,然后将其删除

//按值删 bool Del_val(struct Node *plist, ELEM_TYPE val) { //assert plist //删除需要判空(判空链表) if(IsEmpty(plist)) { return false; } //用指针p去接收Search函数的返回值 struct Node *p = Search(plist, val); if(p == NULL)//如果p==NULL 代表val不存在 { return false; } //执行这一行时,代表val值节点存在,且此时用p指向 //让指着q停留在指针p的上一个节点位置 struct Node *q = plist; for(; q->next!=p; q=q->next); //此时p和q分别已经指向了待删除节点和待删除节点的上一个节点 //,则此时直接跨越指向,并且释放待删除节点 q->next = p->next; free(p); return true; }- 1
- 2
- 3
- 4
- 5
- 6
- 7
- 8
- 9
- 10
- 11
- 12
- 13
- 14
- 15
- 16
- 17
- 18
- 19
- 20
- 21
- 22
- 23
- 24
- 25
- 26
- 27
- 28
- 29
- 30
- 31
3.9 查找
- 按值查找,返回该值的结点

//查找节点 struct Node* Search(struct Node *plist, ELEM_TYPE val) { //assert plist struct Node *p = plist->next; for(; p!=NULL; p=p->next) { if(p->data == val) { return p; } } return NULL; }- 1
- 2
- 3
- 4
- 5
- 6
- 7
- 8
- 9
- 10
- 11
- 12
- 13
- 14
- 15
3.10 获取有效值个数
- 计算出有效节点的个数
int Get_Length(struct Node *plist) { //assert int count = 0; struct Node *p = plist->next; for(; p!=NULL; p=p->next) { count++; } return count; }- 1
- 2
- 3
- 4
- 5
- 6
- 7
- 8
- 9
- 10
- 11
- 12
- 13
3.11 判空
- 在删除时需要进行判空
//判空 bool IsEmpty(struct Node *plist) { assert(plist != NULL); //如果头结点的next域为NULL,则代表没有有效节点,为空链表 return plist->next == NULL; }- 1
- 2
- 3
- 4
- 5
- 6
- 7
- 8
3.12 销毁
-
有两种销毁方式
无限头删

双指针

//销毁1(无限头删) void Destroy1(struct Node *plist) { /*while(!IsEmpty(plist)) { Del_head(plist); }*/ while(plist->next != NULL) { struct Node *p = plist->next; plist->next = p->next; free(p); } } //销毁2(不借助头结点, 需要两个指针) void Destroy(struct Node *plist) { //assert struct Node *p = plist->next; struct Node *q = NULL; while(p != NULL) { q = p->next; free(p); p = q; } plist->next = NULL; }- 1
- 2
- 3
- 4
- 5
- 6
- 7
- 8
- 9
- 10
- 11
- 12
- 13
- 14
- 15
- 16
- 17
- 18
- 19
- 20
- 21
- 22
- 23
- 24
- 25
- 26
- 27
- 28
- 29
- 30
- 31
3.13 打印
//打印 void Show(struct Node *plist) { struct Node *p = plist->next; for(; p!=NULL; p=p->next) { printf("%d ", p->data); } printf("\n"); }- 1
- 2
- 3
- 4
- 5
- 6
- 7
- 8
- 9
- 10
4.主函数
//单链表测试用例 int main() { struct Node head; Init_list(&head); for(int i=0; i<10; i++) { Insert_pos(&head, i, i+1); } Show(&head); Insert_Head(&head, 100); Insert_Tail(&head, 200); Show(&head); Del_head(&head); Del_tail(&head); Show(&head); Del_pos(&head, 3);//1 2 3 5 6 7 8 9 10 Del_val(&head, 7);//1 2 3 5 6 8 9 10 Show(&head); printf("length = %d\n", Get_Length(&head)); Destroy(&head); Show(&head); return 0; }- 1
- 2
- 3
- 4
- 5
- 6
- 7
- 8
- 9
- 10
- 11
- 12
- 13
- 14
- 15
- 16
- 17
- 18
- 19
- 20
- 21
- 22
- 23
- 24
- 25
- 26
- 27
- 28
- 29
- 30
结果如下:

5.总结

-
相关阅读:
[EFI]华硕 Asus VivoBook S510UA 电脑 Hackintosh 黑苹果efi引导文件
XXL-JOB任务分片
Html和Markdown中的空格,  ; &ensp; &emsp; 以及 &thinsp; &zwnj; &zwj;
基于SpringBoot+Vue企业会议室预定管理系统设计和实现
2023年软件测试工具总结 —— 接口测试工具
python计算机毕业设计基于django的空闲教室爬虫系统
判断测试结束的标准有哪些?
C++中float和double的比较
proxy_arp=1与默认路由之争
Linux知识结构体系简述
- 原文地址:https://blog.csdn.net/weixin_57154303/article/details/126477529
