-
【GAMES101 作业3】渲染小奶牛+使用.obj模型+双线性插值+踩坑总结
目录
get_projection_matrix (来自作业1,填充在main.cpp中)
rasterize_triangle(来自作业2,填充在rasterizer.cpp中)
phong_fragment_shader(填充在main.cpp中)
texture_fragment_shader(填充在main.cpp中)
bump_fragment_shader(填充在main.cpp中)
displacement_fragment_shader(填充在main.cpp中)
一、渲染小奶牛
1. normal shader
根据官方教程,我们需要使用 作业1、作业2 里面实现的代码来填充以下两个函数,并得到样例normal shader的渲染结果:
- // TODO: Use the same projection matrix from the previous assignments
- Eigen::Matrix4f get_projection_matrix(float eye_fov, float aspect_ratio, float zNear, float zFar)
- {
- Eigen::Matrix4f projection = Eigen::Matrix4f::Identity();
- Eigen::Matrix4f M_p = Eigen::Matrix4f::Identity();
- M_p << zNear,0,0,0,
- 0,zNear,0,0,
- 0,0,zNear+zFar,(-1.0*zNear*zFar),
- 0,0,1,0;
- //[l,r] [b,t] [f,n]
- float angle = eye_fov*MY_PI/180;
- float t = tan(angle/2)*-zNear;
- float b = -1.0*t;
- float r = t*aspect_ratio;
- float l = -1.0*r;
- Eigen::Matrix4f M_s = Eigen::Matrix4f::Identity();
- M_s << 2/(r-l),0,0,0,
- 0,2/(t-b),0,0,
- 0,0,2/(zNear-zFar),0,
- 0,0,0,1;
- Eigen::Matrix4f M_t = Eigen::Matrix4f::Identity();
- M_t << 1,0,0,(-1.0)*(r+l)/2,
- 0,1,0,(-1.0)*(t+b)/2,
- 0,0,1,(-1.0)*(zNear+zFar)/2,
- 0,0,0,1;
- projection = M_s*M_t*M_p*projection;
- return projection;
- }
- // my func
- float min2(float a, float b) {
- if (a < b) return a;
- else return b;
- }
- // my func
- float min3(float a, float b, float c) {
- return min2(min2(a,b), c);
- }
- // my func
- float max2(float a, float b) {
- if (a > b) return a;
- else return b;
- }
- // my func
- float max3(float a, float b, float c) {
- return max2(max2(a,b), c);
- }
- //Screen space rasterization
- void rst::rasterizer::rasterize_triangle(const Triangle& t, const std::array
- {
- auto v = t.toVector4();
- const Eigen::Vector4f _v[3] = {
- {v[0].x(), v[0].y(), v[0].z(), v[0].w()},
- {v[1].x(), v[1].y(), v[1].z(), v[1].w()},
- {v[2].x(), v[2].y(), v[2].z(), v[2].w()}
- };
- // TODO : Find out the bounding box of current triangle.
- int x_min = (int) (min3(v[0].x(), v[1].x(), v[2].x())/1.0) -1;
- int x_max = (int) (max3(v[0].x(), v[1].x(), v[2].x())/1.0) +1;
- int y_min = (int) (min3(v[0].y(), v[1].y(), v[2].y())/1.0) -1;
- int y_max = (int) (max3(v[0].y(), v[1].y(), v[2].y())/1.0) +1;
- // iterate through the pixel and find if the current pixel is inside the triangle.
- for (int x = x_min-1; x < x_max; ++x) {
- for (int y = y_min-1; y < y_max; ++y) {
- if (insideTriangle(x+0.5, y+0.5, _v)) {
- // If so, use the following code to get the interpolated z value.
- auto[alpha, beta, gamma] = computeBarycentric2D(x, y, t.v);
- // Z is interpolated view space depth for the current pixel
- float Z = 1.0 / (alpha / v[0].w() + beta / v[1].w() + gamma / v[2].w());
- float zp = alpha * v[0].z() / v[0].w() + beta * v[1].z() / v[1].w() + gamma * v[2].z() / v[2].w();
- zp *= Z; // zp is for z-buffer
- auto ind = get_index(x, y);
- if (ind < width * height && zp < depth_buf[ind]) {
- depth_buf[ind] = zp; // update z-buffer
- // TODO: Interpolate the attributes:
- auto interpolated_color = alpha*t.color[0] + beta*t.color[1] + gamma*t.color[2];
- auto interpolated_normal = alpha*t.normal[0] + beta*t.normal[1] + gamma*t.normal[2];
- auto interpolated_texcoords = alpha*t.tex_coords[0] + beta*t.tex_coords[1] + gamma*t.tex_coords[2];
- auto interpolated_shadingcoords = interpolate(alpha, beta, gamma, view_pos[0], view_pos[1], view_pos[2], 1);
- fragment_shader_payload payload(interpolated_color, interpolated_normal.normalized(), interpolated_texcoords, texture ? &*texture : nullptr);
- payload.view_pos = interpolated_shadingcoords;
- auto pixel_color = fragment_shader(payload);
- // TODO : set the current pixel (use the set_pixel function) to the color of the triangle (use getColor function) if it should be painted.
- Eigen::Vector2i point(x, y); // the point of the pixel
- set_pixel(point, pixel_color);
- }
- }
- }
- }
- }
然后在项目文件夹中使用如下指令:
- mkdir build
- cd build
- cmake ..
- make
- ./Rasterizer normal.png normal
即可看到normal shader渲染结果:

normal shader 渲染结果
2. phong shader
这里要注意一个点,ka kd ks这些系数与后面的变量相乘都是使用 cwiseProduct() 方法,其作用为矩阵点对点相乘,因为这些系数都是表示颜色的(R,G,B)三维向量,而不是常数。
- Eigen::Vector3f phong_fragment_shader(const fragment_shader_payload& payload)
- {
- Eigen::Vector3f ka = Eigen::Vector3f(0.005, 0.005, 0.005);
- Eigen::Vector3f kd = payload.color;
- Eigen::Vector3f ks = Eigen::Vector3f(0.7937, 0.7937, 0.7937);
- auto l1 = light{{20, 20, 20}, {500, 500, 500}};
- auto l2 = light{{-20, 20, 0}, {500, 500, 500}};
- std::vector
lights = {l1, l2}; - Eigen::Vector3f amb_light_intensity{10, 10, 10};
- Eigen::Vector3f eye_pos{0, 0, 10};
- float p = 150;
- Eigen::Vector3f color = payload.color;
- Eigen::Vector3f point = payload.view_pos;
- Eigen::Vector3f normal = payload.normal;
- Eigen::Vector3f result_color = {0, 0, 0};
- for (auto& light : lights)
- {
- // TODO: For each light source in the code, calculate what the *ambient*, *diffuse*, and *specular* components are.
- Eigen::Vector3f light_dir = (light.position - point).normalized();
- Eigen::Vector3f view_dir = (eye_pos - point).normalized();
- Eigen::Vector3f half_vector = (light_dir + view_dir).normalized();
- // distance r^2
- float r2 = (light.position - point).dot(light.position - point);
- // ambient
- Eigen::Vector3f La = ka.cwiseProduct(amb_light_intensity); //cwiseProduct():矩阵点对点相乘
- // diffuse
- Eigen::Vector3f Ld = kd.cwiseProduct(light.intensity / r2);
- Ld *= std::max(0.0f, normal.normalized().dot(light_dir));
- // specular
- Eigen::Vector3f Ls = ks.cwiseProduct(light.intensity / r2);
- Ls *= std::pow(std::max(0.0f, normal.normalized().dot(half_vector)), p);
- // Then, accumulate that result on the *result_color* object.
- result_color += (La + Ld + Ls);
- }
- return result_color * 255.f;
- }
然后在项目文件夹中使用如下指令:
- mkdir build
- cd build
- cmake ..
- make
- ./Rasterizer phong.png phong
即可看到phong shader渲染结果:

phong shader 渲染结果
3. texture shader
- Eigen::Vector3f texture_fragment_shader(const fragment_shader_payload& payload)
- {
- Eigen::Vector3f return_color = {0, 0, 0};
- if (payload.texture)
- {
- // TODO: Get the texture value at the texture coordinates of the current fragment
- return_color = payload.texture->getColor(payload.tex_coords.x(), payload.tex_coords.y());
- }
- Eigen::Vector3f texture_color;
- texture_color << return_color.x(), return_color.y(), return_color.z();
- Eigen::Vector3f ka = Eigen::Vector3f(0.005, 0.005, 0.005);
- Eigen::Vector3f kd = texture_color / 255.f; // change kd to texture color, compared to phong shader
- Eigen::Vector3f ks = Eigen::Vector3f(0.7937, 0.7937, 0.7937);
- auto l1 = light{{20, 20, 20}, {500, 500, 500}};
- auto l2 = light{{-20, 20, 0}, {500, 500, 500}};
- std::vector
lights = {l1, l2}; - Eigen::Vector3f amb_light_intensity{10, 10, 10};
- Eigen::Vector3f eye_pos{0, 0, 10};
- float p = 150;
- Eigen::Vector3f color = texture_color;
- Eigen::Vector3f point = payload.view_pos;
- Eigen::Vector3f normal = payload.normal;
- Eigen::Vector3f result_color = {0, 0, 0};
- for (auto& light : lights)
- {
- // TODO: For each light source in the code, calculate what the *ambient*, *diffuse*, and *specular* components are.
- Eigen::Vector3f light_dir = (light.position - point).normalized();
- Eigen::Vector3f view_dir = (eye_pos - point).normalized();
- Eigen::Vector3f half_vector = (light_dir + view_dir).normalized();
- // distance r^2
- float r2 = (light.position - point).dot(light.position - point);
- // ambient
- Eigen::Vector3f La = ka.cwiseProduct(amb_light_intensity); //cwiseProduct():矩阵点对点相乘
- // diffuse
- Eigen::Vector3f Ld = kd.cwiseProduct(light.intensity / r2);
- Ld *= std::max(0.0f, normal.normalized().dot(light_dir));
- // specular
- Eigen::Vector3f Ls = ks.cwiseProduct(light.intensity / r2);
- Ls *= std::pow(std::max(0.0f, normal.normalized().dot(half_vector)), p);
- // Then, accumulate that result on the *result_color* object.
- result_color += (La + Ld + Ls);
- }
- return result_color * 255.f;
- }
然后在项目文件夹中使用如下指令:
- mkdir build
- cd build
- cmake ..
- make
- ./Rasterizer texture.png texture
即可看到phong shader渲染结果:

texture shader 渲染结果
4. bump shader
这里有一点坑,此处参考了大佬的文章:
大体来说,通过改变物体表面的法线朝向而不是改变物体的体积来实现细小的凹凸不平的效果,所以bump mapping译作凹凸贴图。
需注意的是 h(u, v) 的实现方法:
- Eigen::Vector3f bump_fragment_shader(const fragment_shader_payload& payload)
- {
- Eigen::Vector3f ka = Eigen::Vector3f(0.005, 0.005, 0.005);
- Eigen::Vector3f kd = payload.color;
- Eigen::Vector3f ks = Eigen::Vector3f(0.7937, 0.7937, 0.7937);
- auto l1 = light{{20, 20, 20}, {500, 500, 500}};
- auto l2 = light{{-20, 20, 0}, {500, 500, 500}};
- std::vector
lights = {l1, l2}; - Eigen::Vector3f amb_light_intensity{10, 10, 10};
- Eigen::Vector3f eye_pos{0, 0, 10};
- float p = 150;
- Eigen::Vector3f color = payload.color;
- Eigen::Vector3f point = payload.view_pos;
- Eigen::Vector3f normal = payload.normal;
- float kh = 0.2, kn = 0.1;
- // TODO: Implement bump mapping here
- // Let n = normal = (x, y, z)
- // Vector t = (x*y/sqrt(x*x+z*z),sqrt(x*x+z*z),z*y/sqrt(x*x+z*z))
- float x = normal.x(), y = normal.y(), z = normal.z();
- Eigen::Vector3f t(
- x*y/sqrt(x*x+z*z),
- sqrt(x*x+z*z),
- z*y/sqrt(x*x+z*z)
- );
- // Vector b = n cross product t
- Eigen::Vector3f b = normal.cross(t);
- // Matrix TBN = [t b n]
- Eigen::Matrix3f TBN;
- TBN << t.x(), b.x(), normal.x(),
- t.y(), b.y(), normal.y(),
- t.z(), b.z(), normal.z();
- // dU = kh * kn * (h(u+1/w,v)-h(u,v))
- // dV = kh * kn * (h(u,v+1/h)-h(u,v))
- float u = payload.tex_coords.x(), v = payload.tex_coords.y();
- float w = payload.texture->width, h = payload.texture->height;
- float dU = kh * kn * (payload.texture->getColor(u+1.0/w,v).norm() - payload.texture->getColor(u,v).norm());
- float dV = kh * kn * (payload.texture->getColor(u,v+1/h).norm() - payload.texture->getColor(u,v).norm());
- // Vector ln = (-dU, -dV, 1)
- Eigen::Vector3f ln(-dU, -dV, 1.0f);
- // Normal n = normalize(TBN * ln)
- normal = (TBN * ln).normalized();
- Eigen::Vector3f result_color = {0, 0, 0};
- result_color = normal;
- return result_color * 255.f;
- }
然后在项目文件夹中使用如下指令:
- mkdir build
- cd build
- cmake ..
- make
- ./Rasterizer bump.png bump
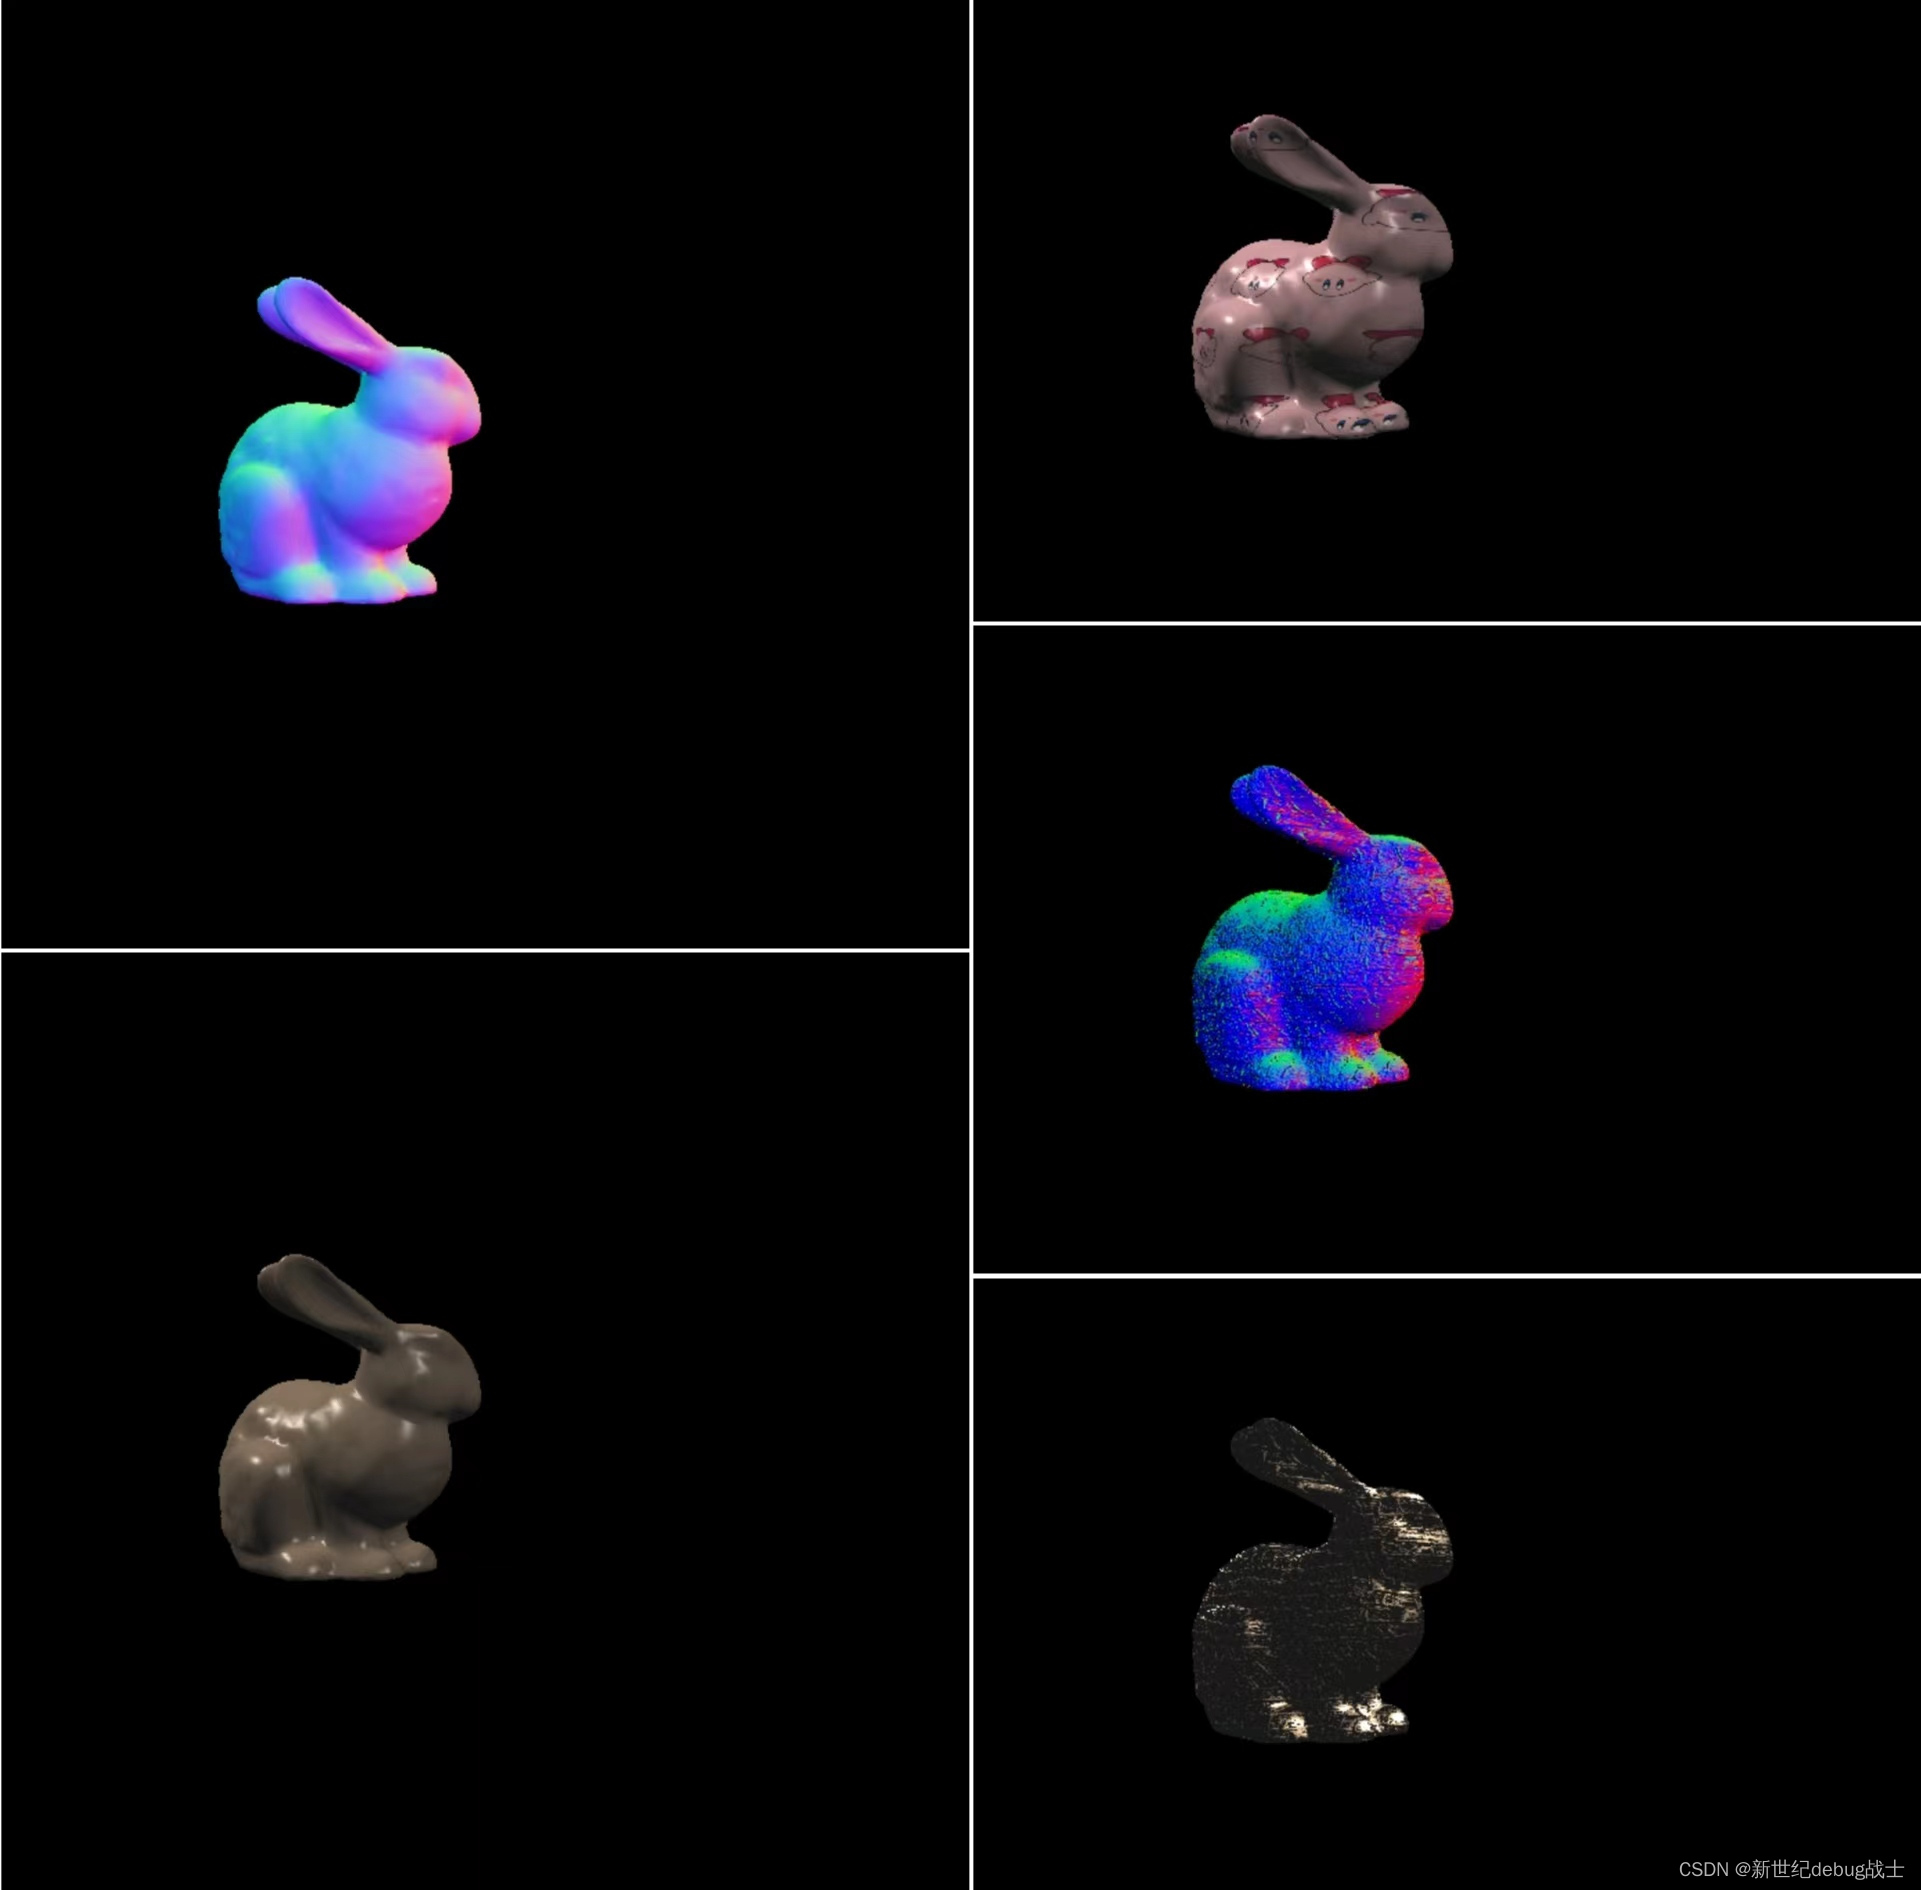
即可看到bump shader渲染结果:

bump shader 渲染结果
4. displacement shader
- Eigen::Vector3f displacement_fragment_shader(const fragment_shader_payload& payload)
- {
- Eigen::Vector3f ka = Eigen::Vector3f(0.005, 0.005, 0.005);
- Eigen::Vector3f kd = payload.color;
- Eigen::Vector3f ks = Eigen::Vector3f(0.7937, 0.7937, 0.7937);
- auto l1 = light{{20, 20, 20}, {500, 500, 500}};
- auto l2 = light{{-20, 20, 0}, {500, 500, 500}};
- std::vector
lights = {l1, l2}; - Eigen::Vector3f amb_light_intensity{10, 10, 10};
- Eigen::Vector3f eye_pos{0, 0, 10};
- float p = 150;
- Eigen::Vector3f color = payload.color;
- Eigen::Vector3f point = payload.view_pos;
- Eigen::Vector3f normal = payload.normal;
- float kh = 0.2, kn = 0.1;
- // Let n = normal = (x, y, z)
- // Vector t = (x*y/sqrt(x*x+z*z),sqrt(x*x+z*z),z*y/sqrt(x*x+z*z))
- float x = normal.x(), y = normal.y(), z = normal.z();
- Eigen::Vector3f t(
- x*y/sqrt(x*x+z*z),
- sqrt(x*x+z*z),
- z*y/sqrt(x*x+z*z)
- );
- // Vector b = n cross product t
- Eigen::Vector3f b = normal.cross(t);
- // Matrix TBN = [t b n]
- Eigen::Matrix3f TBN;
- TBN << t.x(), b.x(), normal.x(),
- t.y(), b.y(), normal.y(),
- t.z(), b.z(), normal.z();
- // dU = kh * kn * (h(u+1/w,v)-h(u,v))
- // dV = kh * kn * (h(u,v+1/h)-h(u,v))
- float u = payload.tex_coords.x(), v = payload.tex_coords.y();
- float w = payload.texture->width, h = payload.texture->height;
- float dU = kh * kn * (payload.texture->getColor(u+1.0/w,v).norm() - payload.texture->getColor(u,v).norm());
- float dV = kh * kn * (payload.texture->getColor(u,v+1/h).norm() - payload.texture->getColor(u,v).norm());
- // Vector ln = (-dU, -dV, 1)
- Eigen::Vector3f ln(-dU, -dV, 1.0f);
- // Position p = p + kn * n * h(u,v)
- point = point + kn * normal * payload.texture->getColor(u,v).norm();
- // Normal n = normalize(TBN * ln)
- normal = (TBN * ln).normalized();
- Eigen::Vector3f result_color = {0, 0, 0};
- for (auto& light : lights)
- {
- // TODO: For each light source in the code, calculate what the *ambient*, *diffuse*, and *specular* components are.
- Eigen::Vector3f light_dir = (light.position - point).normalized();
- Eigen::Vector3f view_dir = (eye_pos - point).normalized();
- Eigen::Vector3f half_vector = (light_dir + view_dir).normalized();
- // distance r^2
- float r2 = (light.position - point).dot(light.position - point);
- // ambient
- Eigen::Vector3f La = ka.cwiseProduct(amb_light_intensity); //cwiseProduct():矩阵点对点相乘
- // diffuse
- Eigen::Vector3f Ld = kd.cwiseProduct(light.intensity / r2);
- Ld *= std::max(0.0f, normal.normalized().dot(light_dir));
- // specular
- Eigen::Vector3f Ls = ks.cwiseProduct(light.intensity / r2);
- Ls *= std::pow(std::max(0.0f, normal.normalized().dot(half_vector)), p);
- // Then, accumulate that result on the *result_color* object.
- result_color += (La + Ld + Ls);
- }
- return result_color * 255.f;
- }
然后在项目文件夹中使用如下指令:
- mkdir build
- cd build
- cmake ..
- make
- ./Rasterizer displacement.png displacement
即可看到displacement shader渲染结果:

displacement shader 渲染结果
到这里基础部分已经全部做完!
二、使用.obj模型
这里还是参考大佬的文章:
Games101|作业3 + shading + 双线性插值 + 疑惑 - 知乎
重点如下:

其中提到了meshlab,在虚拟机ubuntu系统中直接搜索就能安装了:


然后按照大佬前面说的步骤,将.obj文件载入并添加一些变量就行。
最后修改main.cpp中对应的文件路径、贴图路径即可。
下面是我做的效果图(bunny.obj):(texture那里换了一张卡比的贴图,欸嘿~)
三、双线性插值
这里参考了大佬:
GAMES101-现代计算机图形学学习笔记(作业03)_CCCCCCros____的博客-CSDN博客_games101 作业3
需要注意的是,不同于我们往常使用的XY坐标轴,opencv图像中的坐标轴是这样的:

所以需要先经过 v' = 1 - v 转换后才能取颜色值!
先在Texture.hpp里面加一句:

然后在Texture.cpp中实现如下函数:
- //
- // Created by LEI XU on 4/27/19.
- //
- #include "Texture.hpp"
- #include "global.hpp"
- #include
- #include
- // my func
- cv::Vec3b lerp(float x, cv::Vec3b v0, cv::Vec3b v1)
- {
- return v0 + x*(v1-v0);
- };
- // my func
- float adjust_by_range(float x, float x_min, float x_max)
- {
- if (x < x_min) return x_min;
- if (x > x_max) return x_max;
- return x;
- };
- Eigen::Vector3f Texture::getColor(float u, float v)
- {
- // 防止数组越界
- u = adjust_by_range(u, 0, 1.0f);
- v = adjust_by_range(v, 0, 1.0f);
- auto u_img = u * (width - 1);
- auto v_img = (1 - v) * (height-1);
- auto color = image_data.at
- return Eigen::Vector3f(color[0], color[1], color[2]);
- }
- Eigen::Vector3f Texture::getColorBilinear(float u,float v)
- {
- // 防止数组越界
- u = adjust_by_range(u, 0, 1.0f);
- v = adjust_by_range(v, 0, 1.0f);
- // height和width都-1是指数组从0开始
- float u_img = u * (width - 1);
- float v_img = (1 - v) * (height - 1);
- float u_min = std::floor(u_img);
- float u_max = std::ceil(u_img);
- float v_min = std::floor(v_img);
- float v_max = std::ceil(v_img);
- // auto color = image_data.at
- auto u00 = image_data.at
- auto u10 = image_data.at
- auto u01 = image_data.at
- auto u11 = image_data.at
- float s = (u_img - u_min) / (u_max - u_min);
- float t = (v_img - v_min) / (v_max - v_min);
- auto u0 = lerp(s, u00, u10);
- auto u1 = lerp(s, u01, u11);
- auto result = lerp(t, u0, u1);
- return Eigen::Vector3f(result[0], result[1], result[2]);
- };
使用以下网站压缩小奶牛的图片,为了效果明显,我压缩到100*100:
然后记得替换main.cpp中的文件路径:

得到结果如下:
使用双线性插值前(100*100)

使用双线性插值后(100*100)
可以看见,插值前小奶牛的纹路边缘较为锋利,像素感比较明显;而插值后的像素感(尤其是眼睛、鼻子处)明显减弱了很多,出现了预料中的与周围颜色平均的结果。
四、踩坑总结
记得检查数组越界!!!记得检查数组越界!!!记得检查数组越界!!!
否则在模型超出opencv的窗口大小(width*height)的时候,容易报错(core dumped)!
1)在rasterizer类中,depth_buf(存储深度值的数组)和frame_buf(存储像素颜色的数组)是容易产生越界的,检查方法为 :
① 在z value存入depth_buf之前先检查get_index函数的返回值ind是否越界,即使用如下语句:

② 在frame_buf的修改函数set_pixel中设置数组越界检查:

2)在Texture类中增加如下代码,限制(u, v)越界(u, v的范围应为0~1):

-
相关阅读:
集美大学计算机改考408!福建省全面改考,仅剩一个自命题院校
苍穹外卖-01
亚马逊,富士康,腾讯等大厂的3亿美元打水漂,Android之父公司宣布关闭
【svn】svn分支(branch)如何同步主干(trunk)的代码?
【MySQL】(五)DML表数据操作——数据的插入、修改、删除
c++ 回调函数,std::function,std::bind
牛顿法(牛顿拉夫逊)配电网潮流计算matlab程序
[C++]:8.C++ STL引入+string(介绍)
【Docker 那些事儿】如何高效地搭建 Docker 私有仓库
Linux网络套接字编程
- 原文地址:https://blog.csdn.net/onion23/article/details/126456501
