-
Lecture 12 Memory Management(内存管理)
1 进程内存空间
1.1 逻辑地址和物理地址
- 编写示例代码
// sample.c int sum(int x, int y) { return x + y; } int main() { sum(2,3); return 0; }- 1
- 2
- 3
- 4
- 5
- 6
- 7
- 8
- 9
- 10
- 使用gcc进行编译和汇编但不链接成可执行文件,得到目标代码sample.o
$ gcc -g -c sample.c
- 使用objdump对sample.o进行反编译查看其汇编代码。
$ objdump -d sample.o
在XUbuntu环境下运行的结果如下所示:
sample.o: 文件格式 elf64-x86-64
Disassembly of section .text:
0000000000000000 :
0: f3 0f 1e fa endbr64
4:	55                   		push   %rbp
5:	48 89 e5             		mov    %rsp,%rbp
8:	89 7d fc             		mov    %edi,-0x4(%rbp)
b:	89 75 f8             		mov    %esi,-0x8(%rbp)
e: 8b 55 fc mov -0x4(%rbp),%edx
11: 8b 45 f8 mov -0x8(%rbp),%eax
14: 01 d0 add %edx,%eax
16: 5d pop %rbp
17: c3 retq0000000000000018 :
18: f3 0f 1e fa endbr64
1c: 55 push %rbp
1d: 48 89 e5 mov %rsp,%rbp
20: be 03 00 00 00 mov $0x3,%esi
25: bf 02 00 00 00 mov $0x2,%edi
2a: e8 00 00 00 00 callq 2f
2f: b8 00 00 00 00 mov $0x0,%eax
34: 5d pop %rbp
35: c3 retq
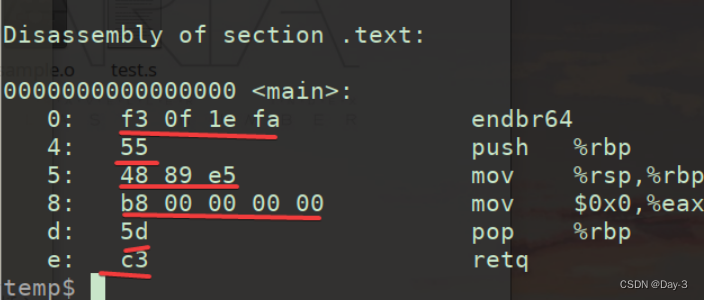
特别关注上述结果中从第7⾏开始的最靠左的数字,从0开始递增,直到35为⽌。这些数字即为程 序的逻辑地址(Logical Address) 。这种地址也称虚拟地址(Virtual Address) ,对每⼀个程序 (Program)⽽⾔总是从0开始,每⼀个地址对应⼀条指令,我们把第4~b⾏单独拿出来分析⼀下 (所有的数字都是以16进制[即4个⼆进制]书写):4: 55 push %rbp 5: 48 89 e5 mov %rsp,%rbp 8: 89 7d fc mov %edi,-0x4(%rbp) b: 89 75 f8 mov %esi,-0x8(%rbp)- 1
- 2
- 3
- 4
- 4是刚才我们提到的每个程序的起始逻辑地址;
- 0x55是 push %rbp 汇编语句对应的机器指令, 正好1个字节,因此第2条指令的逻辑地址等于第1 条指令逻辑地址+1=1;
- 0x48 89 e5这3个字节的机器指令对应的汇编语句是 mov %rsp, %rbp ,因为这条指令占了3个字节,所以下⼀条 指令的逻辑地址等本条指令逻辑地址+3=8;
- 逻辑地址0x0~0x17对应的是sum函数的所有指令, 0x18~0x35是main函数的所有指令,在逻辑地 址0x22处执⾏了 call 指令,是要调⽤sum函数了,但此处并没有指明sum的逻辑地址,因为这份⽬标代码还未link,所以很多的地址有可能还会发⽣变化。那么我们去掉-g -c参数,⽤gcc对 sample.c执⾏编译链接形成可执⾏⽂件sample,再⽤objdump对其反编译。
0000000000001129 :
1129: f3 0f 1e fa endbr64
112d: 55 push %rbp
112e: 48 89 e5 mov %rsp,%rbp
1131: 89 7d fc mov %edi,-0x4(%rbp)
1134: 89 75 f8 mov %esi,-0x8(%rbp)
1137: 8b 55 fc mov -0x4(%rbp),%edx
113a: 8b 45 f8 mov -0x8(%rbp),%eax
113d: 01 d0 add %edx,%eax
113f: 5d pop %rbp
1140: c3 retq0000000000001141 :
1141: f3 0f 1e fa endbr64
1145: 55 push %rbp
1146: 48 89 e5 mov %rsp,%rbp
1149: be 03 00 00 00 mov $0x3,%esi
114e: bf 02 00 00 00 mov $0x2,%edi
1153: e8 d1 ff ff ff callq 1129
1158: b8 00 00 00 00 mov $0x0,%eax
115d: 5d pop %rbp
115e: c3 retq
115f: 90 nop不难发现sum的起始地址变成了1129, main的起始逻辑地址变成了1141,在1153上找到**callq 1129 **指令,旨在调用sum函数,即跳转到sum的起始地址。
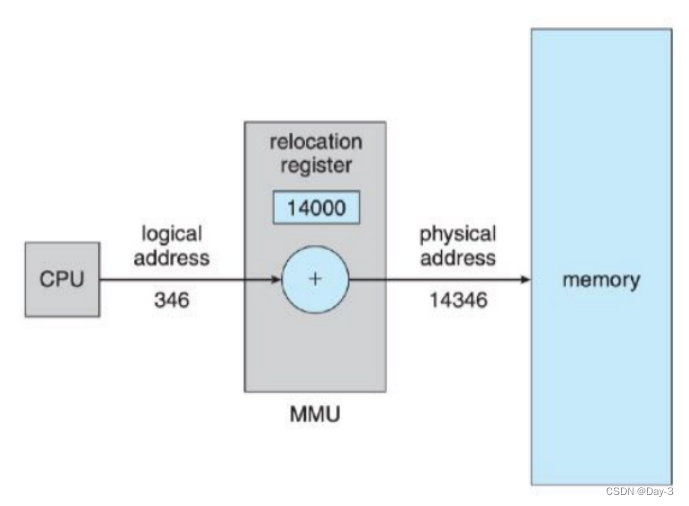
- 物理地址是内存单元看到的地址,是指令和数据真实的内存地址,⽽逻辑地址是⾯向程序⽽⾔的。 CPU在执⾏指令的时候,⽐如上⾯提到的 call 1129 ,会先将逻辑地址经⼀个MMU(Memory Managment Unit)的硬件设备转换成物理地址,然后再进⾏跳转。
物理地址 = 基地址 + 逻辑地址
1.2 进程的内存镜像
内存映象指的是内核如何在内存中存放可执⾏程序。
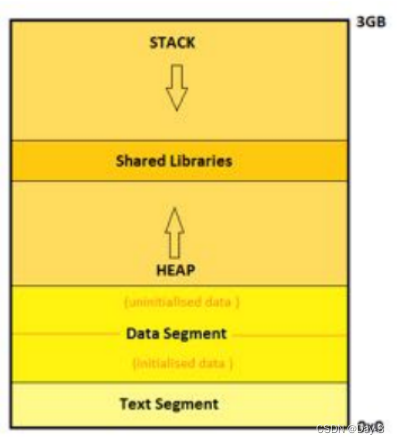
在程序转化为进程的过程中,操作系统可直接将可执⾏程序复制到内存中以 32 位机器为例,地址总线是32位,可寻址的最⼤内存空间是2^32Bytes,即4GBytes。每⼀个运⾏ 的进程都可以获得⼀个4GB的逻辑地址空间,这个空间被分成两个部分: 内核空间和⽤⼾空间,其中 ⽤⼾空间分配到从0x00000000到0xC0000000共3GB的地址,⽽内核空间分配了0xC0000000到 0xFFFFFFFF⾼位的1GB地址(如下图所⽰)

⽽⽤户进程的虚拟空间内容就是我们之前学过的进程内存镜像,它⼀共包括四个部分的内容:- text代码段:是只读的,存放要执⾏的指令,你们在上⾯已经看到了,就是text section字眼;
- data数据段:存放全局或静态变量;
- heap堆:运⾏时(Run time)分配的内存(如⽤malloc函数申请内存);
- stack栈:存放局部变量和函数返回地址。
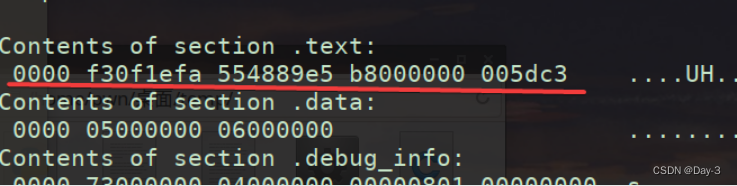
因为堆栈段的内容要程序运⾏起来才能观察到,我们先看⼀下data段的情况,我们再编写⼀个 sample.c ,代码如下:int global_var = 5; int main() { static int static_var = 6; return 0; }- 1
- 2
- 3
- 4
- 5
- 6

section.data是data段,⾥⾯已经写好了global_var和static_var的初始值;
section.text那⼀串16进制数和下⾯main函数的⼀串16进制数是不是很 匹配?上⾯的就是main函数指令集合在text段中的存放形式,下⽅的是objdump为了⽅便我们阅读⽽ 重新排了版。
!
再在程序中添加一个局部变量,并使用malloc在运行时申请一段内存空间。
#include#include #include int global_var = 5; int main() { static int static_var = 6; int local_var = 7; int*p = (int*)malloc(100); //Be careful: we must use %lx to show a 64bits address!! printf("the global_var address is %lx\n", &global_var); printf("the static_var address is %lx\n", &static_var); printf("the local_var address is %lx\n", &local_var); printf("the address which the p points to %lx\n", p); free(p); sleep(1000);//We need watch the process state, so let it sleep deeply. return 0; } - 1
- 2
- 3
- 4
- 5
- 6
- 7
- 8
- 9
- 10
- 11
- 12
- 13
- 14
- 15
- 16
- 17
- 18
- 19
- 20
编译运行后重新打开一个窗口。
运行结果:the global_var address is 55d02d347010
the static_var address is 55d02d347014
the local_var address is 7ffc7a774a1c
the address which the p points to 55d02d6a62a0
~$ ps -e
~$ cat: /proc/2302/maps
zsh: command not found: cat:
~$ cat /proc/2302/maps
55d02d343000-55d02d344000 r–p 00000000 08:05 690213 /home/pwn/桌面/temp/sample
55d02d344000-55d02d345000 r-xp 00001000 08:05 690213 /home/pwn/桌面/temp/sample
55d02d345000-55d02d346000 r–p 00002000 08:05 690213 /home/pwn/桌面/temp/sample
55d02d346000-55d02d347000 r–p 00002000 08:05 690213 /home/pwn/桌面/temp/sample
55d02d347000-55d02d348000 rw-p 00003000 08:05 690213 /home/pwn/桌面/temp/sample
55d02d6a6000-55d02d6c7000 rw-p 00000000 00:00 0 [heap]
7f82f09c3000-7f82f09e8000 r–p 00000000 08:05 925207 /usr/lib/x86_64-linux-gnu/libc-2.31.so
7f82f09e8000-7f82f0b60000 r-xp 00025000 08:05 925207 /usr/lib/x86_64-linux-gnu/libc-2.31.so
7f82f0b60000-7f82f0baa000 r–p 0019d000 08:05 925207 /usr/lib/x86_64-linux-gnu/libc-2.31.so
7f82f0baa000-7f82f0bab000 —p 001e7000 08:05 925207 /usr/lib/x86_64-linux-gnu/libc-2.31.so
7f82f0bab000-7f82f0bae000 r–p 001e7000 08:05 925207 /usr/lib/x86_64-linux-gnu/libc-2.31.so
7f82f0bae000-7f82f0bb1000 rw-p 001ea000 08:05 925207 /usr/lib/x86_64-linux-gnu/libc-2.31.so
7f82f0bb1000-7f82f0bb7000 rw-p 00000000 00:00 0
7f82f0bc9000-7f82f0bca000 r–p 00000000 08:05 924944 /usr/lib/x86_64-linux-gnu/ld-2.31.so
7f82f0bca000-7f82f0bed000 r-xp 00001000 08:05 924944 /usr/lib/x86_64-linux-gnu/ld-2.31.so
7f82f0bed000-7f82f0bf5000 r–p 00024000 08:05 924944 /usr/lib/x86_64-linux-gnu/ld-2.31.so
7f82f0bf6000-7f82f0bf7000 r–p 0002c000 08:05 924944 /usr/lib/x86_64-linux-gnu/ld-2.31.so
7f82f0bf7000-7f82f0bf8000 rw-p 0002d000 08:05 924944 /usr/lib/x86_64-linux-gnu/ld-2.31.so
7f82f0bf8000-7f82f0bf9000 rw-p 00000000 00:00 0
7ffc7a755000-7ffc7a776000 rw-p 00000000 00:00 0 [stack]
7ffc7a7eb000-7ffc7a7ee000 r–p 00000000 00:00 0 [vvar]
7ffc7a7ee000-7ffc7a7ef000 r-xp 00000000 00:00 0 [vdso]
ffffffffff600000-ffffffffff601000 --xp 00000000 00:00 0 [vsyscall]每列的标题分别是Address, Permissions, Offset, Device, iNode, Pathname。
- Address: the start address and the end address in the process that the mapping occupies.
- Permissions: readable, writable, executable, private, shared. •Offset: the o!set in the file where the mapping begins. Not every mapping is mapped from afile, so the value of offset is zero.
- Device: In the form “major number : minor number” of the associated device, as in, the filefrom which this mapping is mapped from. Again, the mappings which are not mapped fromany file, value is 00:00.
- iNode: i-node of the related file.
- Pathname: The path of the related file. Its blank in case there is no related file.
现在找到这个进程在内存中四个部分所在的地址区间(我以⾏号标注):
- text:第5⾏ 55d02d347000-55d02d348000
- data:第8⾏ 7f82f09c3000-7f82f09e8000
- heap:第9⾏ 55d02d6a6000-55d02d6c7000
- stack:第28⾏ 7ffc7a755000-7ffc7a776000
我们对照着smaple.c的输出结果和上述的区间⽐较,可以发现正好出现在了对应的区间内
2 内存管理目标
2.1 Main Memory
- 主存储器是现代计算机系统运⾏的核⼼
- 内存由⼤量字节组成,每个字节都有⾃⼰的地址
- CPU 根据程序计数器(PC)的值从内存中获取指令。 这些指令可能会导致从特定内存地址进⾏ 额外加载和存储
- ⼀个典型的指令执⾏周期,例如,⾸先从内存中取出⼀条指令。 然后对该指令进⾏解码,并可 能导致从内存中取出操作数。 在操作数上执⾏指令后,结果可能会存储回内存中。
2.2 高速缓存 Cache
⼤家都知道计算机在执⾏程序时,是处理器CPU在执⾏,具体到每条指令。⽽这些 ,涉及了 读取和写⼊,也就是内存。CPU的速度不⽤多说,是极快的,但是读取和写⼊内存这个操作却远远跟 不上CPU的处理速度,如果每条指令都得等从内存中存取,那就太影响效率了。所以这时候,CPU中 就加了⼀层⾼速缓存,作为内存与CPU之间的缓冲。
将每次运算需要使⽤到的数据复制到缓存中,让运算能够快速进⾏,当运算处理结束后,再从缓存同 步回内存,这样CPU就不⽤执⾏每条指令都等内存了。⾼速缓存是⼀种存取速度⽐内存快,但容量⽐内存⼩的多的存储器,它可以加快访问物理内存的相对速度。
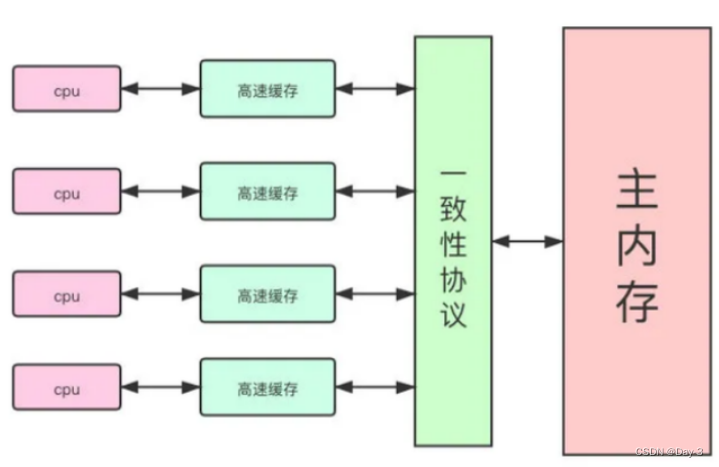
- CPU读取数据时先访问Cache⾼速缓存
- 如果⾼速缓存中没有,则去访问真实内存;然后将内存中的数据复制⼀份到缓存中
- 下⼀次访问直接从缓存中读取
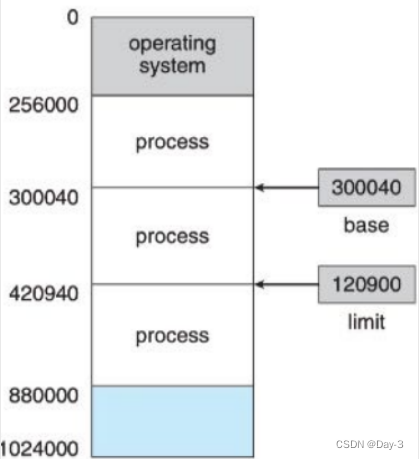
保存操作系统和⽤⼾进程
•⽤⼾进程不可以访问操作系统内存数据,以及⽤⼾进程空间之间不能互相影响
◦ 通过硬件实现,因为操作系统⼀般不⼲预CPU对内存的访问
◦ base register:基础寄存器
◦ limit register:限⻓寄存器
•上述两个寄存器的值只能被操作系统的特权指令加载
◦ 特权指令指具有特殊权限的指令。这类指令只⽤于操作系统或其他系统软件,⼀般不直接提供
给⽤⼾使⽤。
3 地址转换时机
3.1 地址空间和地址转换
•逻辑地址:⾯向程序的地址,总是从0开始编址,每⼀条指令的逻辑地址就是与第1条指令之间的相
对偏移,因此逻辑地址也叫相对地址或虚拟地址。
•物理地址:内存单元看到的实际地址,也称为绝对地址。
•所有逻辑地址的集合称为逻辑地址空间,这些逻辑地址对应的所有物理地址集合称为物理地址空
间。
•地址转换:由逻辑地址转换成物理地址。
3.2 内存管理单元MMU
Memory-Management Unit完成逻辑地址到物理地址运⾏时的转换⼯作
•通过重定位寄存器(relocation register)或基址寄存器
3.3 连续内存分配
- 在连续内存分配中,每个进程都包含在单个内存部分中,该部分与包含下⼀个进程的部分相邻
- Memory allocation:内存分配 ◦
- Memory recycle:内存回收
- Memory protection:内存保护
内存被分成⼏个固定⼤⼩的分区。 每个分区可能只包含⼀个进程
4 分页和分表
我们先来讨论⼀下分⻚和分表的动机:
•Solution to fragmentation: permit the logical address space of processes to be noncontiguous.
◦ 碎⽚化解决⽅案:允许进程的逻辑地址空间不连续
•The view of memory is different between
◦ logical (programmer’s ): a variable-sized segments:
◦ physical : a linear array of bytes
◦ 内存在逻辑和物理上是不同的,对于逻辑上(程序员写的代码⽽⾔)内存是⼀个可变⼤⼩的代 码⽚段;⽽内存在物理上是⼀个线性字节数组
•The hardware could provide a memory mechanism that mapped the logical view to the actual physical memory.
◦ 硬件可以提供⼀种将逻辑视图映射到实际物理内存的内存机制。
4.1 划分段

- 每⼀段的逻辑地址都是从0开始的
- ⼀个程序分段后,指令真实的逻辑地址⽤
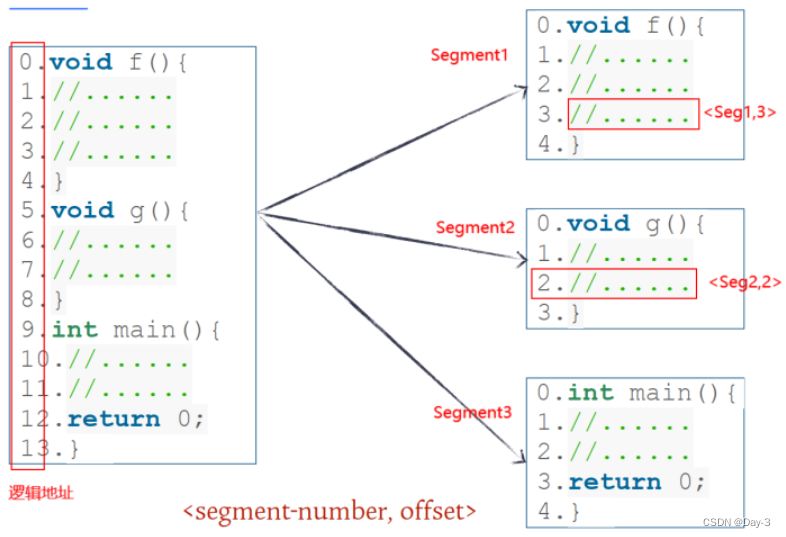
4.2 分段硬件
分段硬件包括三个部分:
- 段地址
- 段限长
- 段表

现在经过分段后,具体某个段的基址和限⻓都存储在段表中:

那么我们要计算⼀个程序中的某⼀个指令真实的物理地址⽅式如下:
- 根据段号查表
- 如果段内位移 > 表中的限⻓,则报错
- 否则计算物理地址:物理地址 = 表中的基址 + 段内位移
4.3 分页

- 我们将内存中分成每⼀个⼤⼩都相同的frame
- 我们将程序剪成⼀⻚(pages)⼀⻚的,然后将其随意分配到⼀个个的⻚框中
- frame_size = page_size
physical address = frame_no * pagesize + offset
4.4 分页硬件

-
相关阅读:
升级了Springboot版本后项目启动不了了
景联文科技:3D点云标注应用场景和专业平台
postgres创建递归视图
正则表达式
基于Springboot+vue的停车场管理系统(Java毕业设计)
LINUX网络设置
图文详解Linux基础经典教程(10)——阿里云安装开发工具
JavaScript学习笔记——对象
【MacOS】常用快捷键
springboot大学生拼车管理系统毕业设计源码201507
- 原文地址:https://blog.csdn.net/weixin_61823031/article/details/126431923
