-
TensorFlow搭建LSTM实现时间序列预测(负荷预测)
I. 前言
前面已经写过不少时间序列预测的文章:
- 深入理解PyTorch中LSTM的输入和输出(从input输入到Linear输出)
- PyTorch搭建LSTM实现时间序列预测(负荷预测)
- PyTorch中利用LSTMCell搭建多层LSTM实现时间序列预测
- PyTorch搭建LSTM实现多变量时间序列预测(负荷预测)
- PyTorch搭建双向LSTM实现时间序列预测(负荷预测)
- PyTorch搭建LSTM实现多变量多步长时间序列预测(一):直接多输出
- PyTorch搭建LSTM实现多变量多步长时间序列预测(二):单步滚动预测
- PyTorch搭建LSTM实现多变量多步长时间序列预测(三):多模型单步预测
- PyTorch搭建LSTM实现多变量多步长时间序列预测(四):多模型滚动预测
- PyTorch搭建LSTM实现多变量多步长时间序列预测(五):seq2seq
- PyTorch中实现LSTM多步长时间序列预测的几种方法总结(负荷预测)
- PyTorch-LSTM时间序列预测中如何预测真正的未来值
- PyTorch搭建LSTM实现多变量输入多变量输出时间序列预测(多任务学习)
- PyTorch搭建ANN实现时间序列预测(风速预测)
- PyTorch搭建CNN实现时间序列预测(风速预测)
- PyTorch搭建CNN-LSTM混合模型实现多变量多步长时间序列预测(负荷预测)
- PyTorch搭建Transformer实现多变量多步长时间序列预测(负荷预测)
- PyTorch时间序列预测系列文章总结(代码使用方法)
- TensorFlow搭建LSTM实现时间序列预测(负荷预测)
- TensorFlow搭建LSTM实现多变量时间序列预测(负荷预测)
- TensorFlow搭建双向LSTM实现时间序列预测(负荷预测)
- TensorFlow搭建LSTM实现多变量多步长时间序列预测(一):直接多输出
- TensorFlow搭建LSTM实现多变量多步长时间序列预测(二):单步滚动预测
- TensorFlow搭建LSTM实现多变量多步长时间序列预测(三):多模型单步预测
- TensorFlow搭建LSTM实现多变量多步长时间序列预测(四):多模型滚动预测
- TensorFlow搭建LSTM实现多变量多步长时间序列预测(五):seq2seq
- TensorFlow搭建LSTM实现多变量输入多变量输出时间序列预测(多任务学习)
- TensorFlow搭建ANN实现时间序列预测(风速预测)
- TensorFlow搭建CNN实现时间序列预测(风速预测)
- TensorFlow搭建CNN-LSTM混合模型实现多变量多步长时间序列预测(负荷预测)
- PyG搭建图神经网络实现多变量输入多变量输出时间序列预测
- PyTorch搭建GNN-LSTM和LSTM-GNN模型实现多变量输入多变量输出时间序列预测
- PyG Temporal搭建STGCN实现多变量输入多变量输出时间序列预测
- 时序预测中Attention机制是否真的有效?盘点LSTM/RNN中24种Attention机制+效果对比
- 详解Transformer在时序预测中的Encoder和Decoder过程:以负荷预测为例
上述文章中的代码都是基于PyTorch写的,考虑到目前TensorFlow的使用人群也较多,因此接下来一段时间会逐步将上面文章中的代码改用TensorFlow实现。
这篇文章是PyTorch搭建LSTM实现时间序列预测(负荷预测)的TensorFlow实现。
II. 数据处理
数据集为某个地区某段时间内的电力负荷数据,除了负荷以外,还包括温度、湿度等信息。
本篇文章暂时不考虑其它变量,只考虑用历史负荷来预测未来负荷。本文中,我们根据前24个时刻的负荷下一时刻的负荷。
代码风格和之前PyTorch类似:
def nn_seq_us(seq_len, B): print('data processing...') dataset = load_data() # split train = dataset[:int(len(dataset) * 0.6)] val = dataset[int(len(dataset) * 0.6):int(len(dataset) * 0.8)] test = dataset[int(len(dataset) * 0.8):len(dataset)] m, n = np.max(train[train.columns[1]]), np.min(train[train.columns[1]]) def process(data, batch_size, shuffle): load = data[data.columns[1]] data = data.values.tolist() load = (load - n) / (m - n) load = load.tolist() X, Y = [], [] for i in range(len(data) - seq_len): train_seq = [] train_label = [] for j in range(i, i + seq_len): x = [load[j]] # for c in range(2, 8): # x.append(data[i + 24][c]) train_seq.append(x) train_label.append(load[i + seq_len]) X.append(train_seq) Y.append(train_label) X = tf.data.Dataset.from_tensor_slices(X) Y = tf.data.Dataset.from_tensor_slices(Y) seq = tf.data.Dataset.zip((X, Y)) if shuffle: seq = seq.batch(batch_size, drop_remainder=False).shuffle(batch_size).prefetch(batch_size) else: seq = seq.batch(batch_size, drop_remainder=False).prefetch(batch_size) return seq Dtr = process(train, B, shuffle=True) Val = process(val, B, shuffle=True) Dte = process(test, B, shuffle=False)- 1
- 2
- 3
- 4
- 5
- 6
- 7
- 8
- 9
- 10
- 11
- 12
- 13
- 14
- 15
- 16
- 17
- 18
- 19
- 20
- 21
- 22
- 23
- 24
- 25
- 26
- 27
- 28
- 29
- 30
- 31
- 32
- 33
- 34
- 35
- 36
- 37
- 38
- 39
- 40
前面PyTorch中数据的分批处理:
seq = MyDataset(seq) seq = DataLoader(dataset=seq, batch_size=batch_size, shuffle=shuffle, num_workers=0, drop_last=False)- 1
- 2
TensorFlow中数据的分批处理:
X = tf.data.Dataset.from_tensor_slices(X) Y = tf.data.Dataset.from_tensor_slices(Y) seq = tf.data.Dataset.zip((X, Y)) seq = seq.batch(batch_size, drop_remainder=False).prefetch(batch_size)- 1
- 2
- 3
- 4
III. 模型
利用TensorFlow搭建的LSTM模型如下所示:
class LSTM(keras.Model): def __init__(self, args): super(LSTM, self).__init__() self.lstm = Sequential() for i in range(args.num_layers): self.lstm.add(layers.LSTM(units=args.hidden_size, input_shape=(args.seq_len, args.input_size), activation='tanh', return_sequences=True)) self.fc1 = layers.Dense(64, activation='relu') self.fc2 = layers.Dense(args.output_size) def call(self, data, training=None, mask=None): x = self.lstm(data) x = self.fc1(x) x = self.fc2(x) return x[:, -1:, :]- 1
- 2
- 3
- 4
- 5
- 6
- 7
- 8
- 9
- 10
- 11
- 12
- 13
- 14
- 15
- 16
参数同PyTorch中的类似:
units表示hidden_size,input_shape=(seq_len, input_size),return_sequences=True表示返回所有时间步的输出,我们只需要取最后一个时间步的输出,由于keras中的LSTM没有类似于PyTorch中LSTM的num_layers参数,所以我们需要手动添加。作为对比,我们给出前面利用PyTorch定义的LSTM模型:
class LSTM(nn.Module): def __init__(self, input_size, hidden_size, num_layers, output_size, batch_size): super().__init__() self.input_size = input_size self.hidden_size = hidden_size self.num_layers = num_layers self.output_size = output_size self.num_directions = 1 # 单向LSTM self.batch_size = batch_size self.lstm = nn.LSTM(self.input_size, self.hidden_size, self.num_layers, batch_first=True) self.linear = nn.Linear(self.hidden_size, self.output_size) def forward(self, input_seq): batch_size, seq_len = input_seq.shape[0], input_seq.shape[1] h_0 = torch.randn(self.num_directions * self.num_layers, self.batch_size, self.hidden_size).to(device) c_0 = torch.randn(self.num_directions * self.num_layers, self.batch_size, self.hidden_size).to(device) # output(batch_size, seq_len, num_directions * hidden_size) output, _ = self.lstm(input_seq, (h_0, c_0)) # output(5, 30, 64) pred = self.linear(output) # (5, 30, 1) pred = pred[:, -1, :] # (5, 1) return pred- 1
- 2
- 3
- 4
- 5
- 6
- 7
- 8
- 9
- 10
- 11
- 12
- 13
- 14
- 15
- 16
- 17
- 18
- 19
- 20
- 21
可以发现,二者基本一致。
IV. 训练/测试
def train(args, Dtr, Val, Dte, M, path): model = LSTM(args) if args.optimizer == 'adam': optimizer = tf.keras.optimizers.Adam(learning_rate=args.lr) else: optimizer = tf.keras.optimizers.SGD(learning_rate=args.lr, momentum=0.9) loss_function = tf.keras.losses.MeanSquaredError() min_val_loss = 5 best_model = None best_test_mape = 0 best_test_res = None min_epochs = 5 for epoch in tqdm(range(args.epochs)): train_loss = [] for batch_idx, (seq, label) in enumerate(Dtr): with tf.GradientTape() as tape: pred = model(seq) loss = loss_function(label, pred) train_loss.append(loss) # 计算梯度 grads = tape.gradient(loss, model.trainable_variables) # 根据梯度更新权重 optimizer.apply_gradients(zip(grads, model.trainable_variables)) val_loss, test_mape, res = test(model, Val, Dte, M) if epoch + 1 > min_epochs and val_loss < min_val_loss: min_val_loss = val_loss best_test_mape = test_mape best_model = copy.deepcopy(model) best_test_res = copy.deepcopy(res) print('epoch {:03d} train_loss {:.8f} val_loss {:.8f} test_mape {:.5f}' .format(epoch, np.mean(train_loss), val_loss, test_mape)) best_model.save_weights(path) return best_test_mape, best_test_res- 1
- 2
- 3
- 4
- 5
- 6
- 7
- 8
- 9
- 10
- 11
- 12
- 13
- 14
- 15
- 16
- 17
- 18
- 19
- 20
- 21
- 22
- 23
- 24
- 25
- 26
- 27
- 28
- 29
- 30
- 31
- 32
- 33
- 34
- 35
- 36
- 37
训练同样返回验证集上表现最优的模型。
需要注意的是,TensorFlow中模型更新的过程为:
for batch_idx, (seq, label) in enumerate(Dtr): with tf.GradientTape() as tape: pred = model(seq) loss = loss_function(pred, label) train_loss.append(loss) # 计算梯度 grads = tape.gradient(loss, model.trainable_variables) # 根据梯度更新权重 optimizer.apply_gradients(zip(grads, model.trainable_variables))- 1
- 2
- 3
- 4
- 5
- 6
- 7
- 8
- 9
与之对比,PyTorch中为:
for (seq, label) in Dtr: seq = seq.to(device) label = label.to(device) y_pred = model(seq) loss = loss_function(y_pred, label) train_loss.append(loss.item()) optimizer.zero_grad() loss.backward() optimizer.step()- 1
- 2
- 3
- 4
- 5
- 6
- 7
- 8
- 9
模型保存:
best_model.save_weights('models/model')- 1
模型加载与预测:
def predict(args, Dte, M, path): model = LSTM(args) model.load_weights(path) y, pred = [], [] for batch_idx, (seq, label) in tqdm(enumerate(Dte)): # print(seq.shape) # print(label.shape) p = model(seq) label = label.numpy().flatten().tolist() p = p.numpy().flatten().tolist() # print(len(p), len(label)) y.extend(label) pred.extend(p) # 计算mape m, n = M[0], M[1] y, pred = np.array(y), np.array(pred) y = (m - n) * y + n pred = (m - n) * pred + n plot(y, pred) return get_mape(y, pred)- 1
- 2
- 3
- 4
- 5
- 6
- 7
- 8
- 9
- 10
- 11
- 12
- 13
- 14
- 15
- 16
- 17
- 18
- 19
- 20
- 21
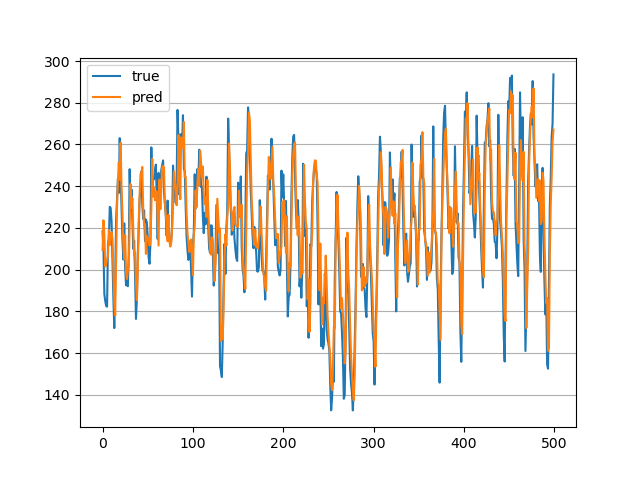
训练30个epoch,测试集上的MAPE为:
best_test_mape: 0.052237886800780085- 1
画图:
V. 源码及数据
后面统一整理。
-
相关阅读:
计算机网络-传输层:TCP协议
CodeMirror 创建标签计算编辑器
Cmder: 懒癌必备!从此告别记事本记命令的日子
MVCC,主要是为了做什么?
(5)建造者模式
Scroll 生态明星项目Pencils Protocol,发展潜力巨大
一、爬虫基本概念
数据结构高阶--AVL(平衡二叉树)(图解+实现)
一个月一个基于SpringBoot的在线教育系统「源码开源」
【云原生】HBase on k8s 编排部署讲解与实战操作
- 原文地址:https://blog.csdn.net/Cyril_KI/article/details/126420761