-
Linux下线程间通讯---读写锁和条件变量
Linux下线程间通讯 - - - 读写锁和条件变量
1.读写锁简介
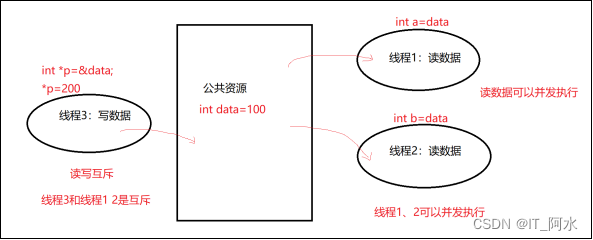
读写锁,它把对共享资源的访问者划分成读者和写者,读者只对共享资源进行读访问,写者则需要对共享资源进行写操作。
一次只有一个线程可以占有写模式的读写锁,但是可以有多个线程同时占有读模式的读写锁。正是因为这个特性,当读写锁是写加锁状态时,在这个锁被解锁之前,所有试图对这个锁加锁的线程都会被阻塞。
当读写锁在读加锁状态时,所有试图以读模式对它进行加锁的线程都可以得到访问权, 但是如果线程希望以写模式对此锁进行加锁,它必须直到所有的线程释放锁。
通常,当读写锁处于读模式锁住状态时,如果有另外线程试图以写模式加锁,读写锁通常会阻塞随后的读模式锁请求,这样可以避免读模式锁长期占用,而等待的写模式锁请求长期阻塞。
读写锁适合于对数据结构的读次数比写次数多得多的情况。因为,读模式锁定时可以共享, 以写模式锁住时意味着独占, 所以读写锁又叫共享-独占锁。
1.1 相关函数
#include
//销毁读写锁
int pthread_rwlock_destroy(pthread_rwlock_t *rwlock);
//读写锁初始化
int pthread_rwlock_init(pthread_rwlock_t *restrict rwlock,const pthread_rwlockattr_t *restrict attr);
//读加锁
int pthread_rwlock_rdlock(pthread_rwlock_t *rwlock);
int pthread_rwlock_tryrdlock(pthread_rwlock_t *rwlock);
//写加锁
int pthread_rwlock_wrlock(pthread_rwlock_t *rwlock);
int pthread_rwlock_trywrlock(pthread_rwlock_t *rwlock);
//解锁
pthread_rwlock_unlock(pthread_rwlock_t *rwlock);1.2 示例
创建两个线程,2个子线程读数据,主线程负责写数据。
#include#include #include int data=0; pthread_rwlock_t rwlock; /*读线程1*/ void *pth1_work(void *arg) { int a; while(1) { pthread_rwlock_rdlock(&rwlock);//读上锁 a=data; printf("----------------线程1读数据-----------------------\n"); sleep(5); printf("[%s]线程1,data=%d\n",__FUNCTION__,a); pthread_rwlock_unlock(&rwlock);//解锁 usleep(10); } } /*读线程2*/ void *pth2_work(void *arg) { int a; while(1) { pthread_rwlock_rdlock(&rwlock);//读上锁 a=data; printf("----------------线程2读数据-----------------------\n"); sleep(5); printf("[%s]线程1,data=%d\n",__FUNCTION__,a); pthread_rwlock_unlock(&rwlock);//解锁 usleep(10); } } int main() { pthread_rwlock_init(&rwlock,NULL);/*创建读写锁*/ /*创建线程1*/ pthread_t id; pthread_create(&id,NULL,pth1_work,NULL); pthread_detach(id);//设置为分离属性 /*创建线程2*/ pthread_create(&id,NULL,pth2_work,NULL); pthread_detach(id);//设置为分离属性 /*写线程*/ while(1) { pthread_rwlock_wrlock(&rwlock);//写加锁 printf("主线程写数据............\n"); sleep(3); data+=100; printf("主线程写数据完\n"); pthread_rwlock_unlock(&rwlock);//解锁 usleep(10); } } - 1
- 2
- 3
- 4
- 5
- 6
- 7
- 8
- 9
- 10
- 11
- 12
- 13
- 14
- 15
- 16
- 17
- 18
- 19
- 20
- 21
- 22
- 23
- 24
- 25
- 26
- 27
- 28
- 29
- 30
- 31
- 32
- 33
- 34
- 35
- 36
- 37
- 38
- 39
- 40
- 41
- 42
- 43
- 44
- 45
- 46
- 47
- 48
- 49
- 50
- 51
- 52
- 53
- 54
- 55
- 56
- 57
- 58
- 59

2.条件变量
2.1 条件变量简介
条件变量是线程可用的一种同步机制,条件变量给多个线程提供了一个回合的场所,条件变量和互斥量一起使用,允许线程以无竞争的方式等待特定的条件发生。
条件变量是利用线程间共享的全局变量进行同步的一种机制,主要包括两个动作:一个线程等待"条件变量的条件成立"而挂起;另一个线程使"条件成立"(给出条件成立信号)。为了防止竞争,条件变量的使用总是和一个互斥锁结合在一起。
注意:条件变量需要和互斥锁一起使用。例如:线程4推送屏幕图像数据给各个子线程,需要1s推送一次;线程1、2、3获取推送的数据的频率则远小于1s时间,若此类情况使用读写锁则会导致子线程频繁获取相同数据帧,极大浪费CPU资源。而使用条件变量则可以有效解决资源浪费问题。

2.2 相关函数
#include
//销毁条件变量
int pthread_cond_destroy(pthread_cond_t *cond);
//动态初始化条件变量
int pthread_cond_init(pthread_cond_t *restrict cond,const pthread_condattr_t *restrict attr);
//静态初始化条件变量
pthread_cond_t cond = PTHREAD_COND_INITIALIZER;
//等待条件变量产生
pthread_cond_wait(pthread_cond_t *restrict cond,pthread_mutex_t *restrict mutex);
//广播唤醒所有线程
int pthread_cond_broadcast(pthread_cond_t *cond);
//随机唤醒一个线程
int pthread_cond_signal(pthread_cond_t *cond);2.3 示例
创建5个子线程,子线程等待条件变量产生,主线程捕获 SIGINT(CTRL+C信号)和SIGQUIT(CTRL+\)信号,通过信号实现广播唤醒所有线程和随机唤醒一个线程。
#include#include #include #include pthread_mutex_t mutex = PTHREAD_MUTEX_INITIALIZER;//互斥锁 pthread_cond_t cond; void *pth_work(void *arg) { int cnt=(int *)arg; pthread_mutex_lock(&mutex);//互斥锁上锁 printf("线程%d运行中.....\n",cnt); pthread_cond_wait(&cond,&mutex);//等待条变量产生,本身自带解锁功能 printf("线程%d唤醒成功,id=%lu\n",cnt,pthread_self()); pthread_mutex_unlock(&mutex);//互斥锁解锁 } void sig_work(int sig) { if(sig==SIGINT) { pthread_mutex_lock(&mutex);//互斥锁上锁 pthread_cond_signal (&cond);//随机唤醒一个线程 pthread_mutex_unlock(&mutex);//互斥锁解锁 } if(sig==SIGQUIT) { pthread_mutex_lock(&mutex);//互斥锁上锁 pthread_cond_broadcast(&cond);//广播唤醒所有线程 pthread_mutex_unlock(&mutex);//互斥锁解锁 } } int main() { signal(SIGINT,sig_work);//捕获CTRL+C signal(SIGQUIT,sig_work);//捕获CTRL+\ /*创建条件变量*/ pthread_cond_init(&cond,NULL); pthread_t pth[5]; int i=0; for(i=0;i<5;i++) { pthread_create(&pth[i],NULL,pth_work,(void*)i); } for(i=0;i<5;i++) { pthread_join(pth[i],NULL); } pthread_cond_destroy(&cond); pthread_mutex_destroy(&mutex); printf("所有线程结束\n"); return 0; } - 1
- 2
- 3
- 4
- 5
- 6
- 7
- 8
- 9
- 10
- 11
- 12
- 13
- 14
- 15
- 16
- 17
- 18
- 19
- 20
- 21
- 22
- 23
- 24
- 25
- 26
- 27
- 28
- 29
- 30
- 31
- 32
- 33
- 34
- 35
- 36
- 37
- 38
- 39
- 40
- 41
- 42
- 43
- 44
- 45
- 46
- 47
- 48
- 49
- 50
- 51
- 52

2.4 示例2
编写程序完成如下功能:
1)有一int型全局变量g_Flag初始值为0;
2) 在主线称中起动线程1,打印“this is thread1”,并将g_Flag设置为1
3) 在主线称中启动线程2,打印“this is thread2”,并将g_Flag设置为2
4) 主线程在检测到g_Flag从1变为2,或者从2变为1的时候退出#include#include #include #include pthread_mutex_t mutex = PTHREAD_MUTEX_INITIALIZER;//互斥锁 pthread_cond_t cond = PTHREAD_COND_INITIALIZER; int g_Flag=0; void *pth_work(void *arg) { printf("this is thread1\n"); pthread_mutex_lock(&mutex); if(g_Flag==2) { g_Flag=1; pthread_cond_signal(&cond);//随机唤醒一个线程 } else { g_Flag=1; } printf("线程1:%d\n",g_Flag); pthread_mutex_unlock(&mutex); } void *pth2_work(void *arg) { printf("this is thread2\n"); pthread_mutex_lock(&mutex); if(g_Flag==1) { g_Flag=2;; pthread_cond_signal(&cond);//随机唤醒一个线程 } else { g_Flag=2; } printf("线程2:%d\n",g_Flag); pthread_mutex_unlock(&mutex); } int main() { pthread_t pth; /*创建线程1*/ pthread_create(&pth,NULL,pth_work,NULL); pthread_detach(pth);//设置为分离属性 /*创建线程2*/ pthread_create(&pth,NULL,pth2_work,NULL); pthread_detach(pth);//设置为分离属性 pthread_mutex_lock(&mutex); pthread_cond_wait(&cond,&mutex); pthread_mutex_unlock(&mutex); pthread_cond_destroy(&cond); pthread_mutex_destroy(&mutex); printf("所有线程结束\n"); return 0; } - 1
- 2
- 3
- 4
- 5
- 6
- 7
- 8
- 9
- 10
- 11
- 12
- 13
- 14
- 15
- 16
- 17
- 18
- 19
- 20
- 21
- 22
- 23
- 24
- 25
- 26
- 27
- 28
- 29
- 30
- 31
- 32
- 33
- 34
- 35
- 36
- 37
- 38
- 39
- 40
- 41
- 42
- 43
- 44
- 45
- 46
- 47
- 48
- 49
- 50
- 51
- 52
- 53
- 54
- 55
- 56
- 57
- 58
- 59
运行效果:

-
相关阅读:
JavaIO流:模型
各种神经网络的特点、应用和发展史
电脑蓝屏怎么办 七大原因及解决办法来帮你
宜搜科技死磕港交所上市:从搜索引擎到广告投放,业绩疲态凸显
maven依赖报红
傅里叶变换应用 (02/2):频域和相位
算法刷题—树
Can Large Language Models Understand Real-World Complex Instructions?
第一次前端笔试复盘(蔚来)
net-java-php-python-大学生互助旅游网站修改计算机毕业设计程序
- 原文地址:https://blog.csdn.net/weixin_44453694/article/details/126404622
