-
20. 数据库操作
文章目录
20.1 JDBC+HikariDataSource
20.1.1 应用实例-需求
-
演示 Spring Boot 如何通过 jdbc+HikariDataSource 完成对 Mysql 操作
-
说明:
- HikariDataSource : 目前市面上非常优秀的数据源
- 是 springboot2 默认数据源
20.1.2 应用实例-代码实现
- 创建测试数据库和表
-- 创建数据库 spring_boot DROP DATABASE IF EXISTS spring_boot; CREATE DATABASE spring_boot; USE spring_boot; -- 创建家居表 CREATE TABLE furn( `id` INT(11) PRIMARY KEY AUTO_INCREMENT, ## id `name` VARCHAR(64) NOT NULL, ## 家居名 `maker` VARCHAR(64) NOT NULL, ## 厂商 `price` DECIMAL(11,2) NOT NULL, ## 价格 `sales` INT(11) NOT NULL, ## 销量 `stock` INT(11) NOT NULL, ## 库存 `img_path` VARCHAR(256) NOT NULL ## 照片路径 ); -- 初始化家居数据 INSERT INTO furn(`id` , `name` , `maker` , `price` , `sales` , `stock` , `img_path`) VALUES(NULL , '北欧风格小桌子' , '熊猫家居' , 180 , 666 , 7 , 'assets/images/product-image/1.jpg'); INSERT INTO furn(`id` , `name` , `maker` , `price` , `sales` , `stock` , `img_path`) VALUES(NULL , '简约风格小椅子' , '熊猫家居' , 180 , 666 , 7 , 'assets/images/product-image/2.jpg'); INSERT INTO furn(`id` , `name` , `maker` , `price` , `sales` , `stock` , `img_path`) VALUES(NULL , '典雅风格小台灯' , '蚂蚁家居' , 180 , 666 , 7 , 'assets/images/product-image/3.jpg'); INSERT INTO furn(`id` , `name` , `maker` , `price` , `sales` , `stock` , `img_path`) VALUES(NULL , '温馨风格盆景架' , '蚂蚁家居' , 180 , 666 , 7 , 'assets/images/product-image/4.jpg'); SELECT * FROM furn;- 1
- 2
- 3
- 4
- 5
- 6
- 7
- 8
- 9
- 10
- 11
- 12
- 13
- 14
- 15
- 16
- 17
- 18
- 19
- 20
- 21
- 22
- 23
- 24
- 25
- 26
- 27
- 28
- 29
- 30
- 31
- 32
- 进行数据库开发,在 pom.xml 引入 data-jdbc starter
参考官方文档 ==> 文档链接
<dependency> <groupId>org.springframework.bootgroupId> <artifactId>spring-boot-starter-data-jdbcartifactId> dependency>- 1
- 2
- 3
- 4
- 5


- Spring Boot 不知道项目要操作 Mysql 还是 Oracle , 需要在 pom.xml 指定导入数据库驱动, 并指定对应版本
<dependency> <groupId>mysqlgroupId> <artifactId>mysql-connector-javaartifactId> <version>5.1.49version> dependency>- 1
- 2
- 3
- 4
- 5
- 6
- 7
- 8
- 9
- 10
- 11
- 12
- 13
- 14
- 15
- 16
- 在 application.yml 配置操作数据源的信息
spring: datasource: #配置数据源 # 说明:如果没有指定 useSSL=true , 启动项目会有报红警告 url: jdbc:mysql://localhost:3306/spring_boot?useSSL=true&useUnicode=true&characterEncoding=UTF-8 username: root password: hsp driver-class-name: com.mysql.jdbc.Driver- 1
- 2
- 3
- 4
- 5
- 6
- 7
- 创建 com/xjs/springboot/bean/Furn.java
package com.xjs.springboot.bean; import java.math.BigDecimal; /** * @Author: 谢家升 * @Version: 1.0 */ public class Furn { private Integer id; private String name; private String maker; private BigDecimal price; private Integer sales; private Integer stock; private String imgPath = "assets/images/product-image/1.jpg"; public Furn(Integer id, String name, String maker, BigDecimal price, Integer sales, Integer stock, String imgPath) { this.id = id; this.name = name; this.maker = maker; this.price = price; this.sales = sales; this.stock = stock; this.imgPath = imgPath; } public Furn() { } public Integer getId() { return id; } public void setId(Integer id) { this.id = id; } public String getName() { return name; } public void setName(String name) { this.name = name; } public String getMaker() { return maker; } public void setMaker(String maker) { this.maker = maker; } public BigDecimal getPrice() { return price; } public void setPrice(BigDecimal price) { this.price = price; } public Integer getSales() { return sales; } public void setSales(Integer sales) { this.sales = sales; } public Integer getStock() { return stock; } public void setStock(Integer stock) { this.stock = stock; } public String getImgPath() { return imgPath; } public void setImgPath(String imgPath) { this.imgPath = imgPath; } @Override public String toString() { return "Furn{" + "id=" + id + ", name='" + name + '\'' + ", maker='" + maker + '\'' + ", price=" + price + ", sales=" + sales + ", stock=" + stock + ", imgPath='" + imgPath + '\'' + '}'; } }- 1
- 2
- 3
- 4
- 5
- 6
- 7
- 8
- 9
- 10
- 11
- 12
- 13
- 14
- 15
- 16
- 17
- 18
- 19
- 20
- 21
- 22
- 23
- 24
- 25
- 26
- 27
- 28
- 29
- 30
- 31
- 32
- 33
- 34
- 35
- 36
- 37
- 38
- 39
- 40
- 41
- 42
- 43
- 44
- 45
- 46
- 47
- 48
- 49
- 50
- 51
- 52
- 53
- 54
- 55
- 56
- 57
- 58
- 59
- 60
- 61
- 62
- 63
- 64
- 65
- 66
- 67
- 68
- 69
- 70
- 71
- 72
- 73
- 74
- 75
- 76
- 77
- 78
- 79
- 80
- 81
- 82
- 83
- 84
- 85
- 86
- 87
- 88
- 89
- 90
- 91
- 92
- 93
- 94
- 95
- 96
- 97
- 98
- 99
- 100
20.1.3 应用实例-测试结果
- test 目录下的 src/test/java/com/xjs/springboot/ApplicationTests.java
- 完成测试
package com.xjs.springboot; import com.xjs.springboot.bean.Furn; import org.junit.jupiter.api.Test; import org.springframework.boot.test.context.SpringBootTest; import org.springframework.jdbc.core.BeanPropertyRowMapper; import org.springframework.jdbc.core.JdbcTemplate; import javax.annotation.Resource; import java.util.List; /** * @Author: 谢家升 * @Version: 1.0 * * 这里演示一下 如何在springboot中开发测试类 */ @SpringBootTest public class ApplicationTests { //回顾一下 => spring 的 JdbcTemplate @Resource private JdbcTemplate jdbcTemplate; @Test public void contextLoads() { BeanPropertyRowMapper<Furn> rowMapper = new BeanPropertyRowMapper<>(Furn.class); List<Furn> furns = jdbcTemplate.query("SELECT * FROM `furn`", rowMapper); for (Furn furn : furns) { System.out.println(furn); } //看看底层使用的是什么数据源类型[HikariDataSource] System.out.println(jdbcTemplate.getDataSource().getClass()); //com.zaxxer.hikari.HikariDataSource } }- 1
- 2
- 3
- 4
- 5
- 6
- 7
- 8
- 9
- 10
- 11
- 12
- 13
- 14
- 15
- 16
- 17
- 18
- 19
- 20
- 21
- 22
- 23
- 24
- 25
- 26
- 27
- 28
- 29
- 30
- 31
- 32
- 33
- 34
- 35
- 36
- 37
- 38
- 39
- 40
- 41
- 42

20.2 整合 Druid 到 Spring-Boot
20.2.1 官方文档
- 使用手册:https://github.com/alibaba/druid
- 中文手册:链接地址
20.2.2 基本介绍
-
HiKariCP:目前市面上非常优秀的数据源,是 springboot2 默认数据源
-
Druid:性能优秀,Druid 提供性能卓越的连接池功能外【Java 基础】,还集成了 SQL 监控,黑名单拦截等功能,强大的监控特性,通过 Druid 提供的监控功能,可以清楚知道连接池和 SQL 的工作情况,所以根据项目需要,我们也要掌握 Druid 和 SpringBoot 整合
-
整合 Druid 到 Spring-Boot 方式
- 自定义方式
- 引入 starter 方式
20.2.3 Durid 基本使用
20.2.3.1 需求说明: 将 Spring-Boot 的数据源切换成 Druid
20.2.3.2 代码实现
- 修改 pom.xml,引入 druid 依赖
<dependency> <groupId>com.alibabagroupId> <artifactId>druidartifactId> <version>1.1.17version> dependency>- 1
- 2
- 3
- 4
- 5
- 6
- 创建 com/xjs/springboot/config/DruidDataSourceConfig.java
package com.xjs.springboot.config; import com.alibaba.druid.pool.DruidDataSource; import org.springframework.boot.context.properties.ConfigurationProperties; import org.springframework.context.annotation.Bean; import org.springframework.context.annotation.Configuration; import javax.sql.DataSource; /** * @Author: 谢家升 * @Version: 1.0 * * DruidDataSourceConfig -配置类 */ @Configuration public class DruidDataSourceConfig { //编写方法,注入DruidDataSource /**为什么我们注入了自己的DataSource , 原来的 HikariDataSource就失效了呢?? 1. 默认的数据源是如何配置的? @ConditionalOnMissingBean({ DataSource.class, XADataSource.class }) 通过 @ConditionalOnMissingBean({ DataSource.class}) 判断如果容器有 DataSource Bean 就不注入默认的 HikariDataSource 2. debug 源码 */ @ConfigurationProperties("spring.datasource") @Bean public DataSource dataSource() { //1. 配置了 @ConfigurationProperties("spring.datasource") // 就可以读取到 application.yml 的配置 //2. 我们就不需要调用 DruidDataSource 对象的 setXXX() , 会自动关联调用 DruidDataSource druidDataSource = new DruidDataSource(); //druidDataSource.setUsername(); //druidDataSource.setPassword(); //druidDataSource.setUrl(); return druidDataSource; } }- 1
- 2
- 3
- 4
- 5
- 6
- 7
- 8
- 9
- 10
- 11
- 12
- 13
- 14
- 15
- 16
- 17
- 18
- 19
- 20
- 21
- 22
- 23
- 24
- 25
- 26
- 27
- 28
- 29
- 30
- 31
- 32
- 33
- 34
- 35
- 36
- 37
- 38
- 39
- 40
- 41
- 42
- 43
- 44
- 完成测试,运行 ApplicationTests.java ,观察数据源的运行类型

- 原理分析-debug


20.2.4 Durid 监控功能-SQL 监控
20.2.4.1 需求说明
- 配置 Druid 的监控功能
- 包括 SQL 监控、SQL 防火墙、Web 应用、Session 监控等

- 修改 com/xjs/springboot/config/DruidDataSourceConfig.java ,增加 druid 监控功能 ,文档链接

package com.xjs.springboot.config; import com.alibaba.druid.pool.DruidDataSource; import com.alibaba.druid.support.http.StatViewServlet; import org.springframework.boot.context.properties.ConfigurationProperties; import org.springframework.boot.web.servlet.ServletRegistrationBean; import org.springframework.context.annotation.Bean; import org.springframework.context.annotation.Configuration; import javax.sql.DataSource; /** * @Author: 谢家升 * @Version: 1.0 ** DruidDataSourceConfig -配置类 */
@Configuration public class DruidDataSourceConfig { //编写方法,注入DruidDataSource /** * 为什么我们注入了自己的DataSource , 原来的 HikariDataSource就失效了呢?? * 1. 默认的数据源是如何配置的? @ConditionalOnMissingBean({ DataSource.class, XADataSource.class }) * 通过 @ConditionalOnMissingBean({ DataSource.class}) 判断如果容器有 DataSource Bean 就不注入默认的 HikariDataSource * 2. debug 源码 */ @ConfigurationProperties("spring.datasource") @Bean public DataSource dataSource() { //1. 配置了 @ConfigurationProperties("spring.datasource") // 就可以读取到 application.yml 的配置 //2. 我们就不需要调用 DruidDataSource 对象的 setXXX() , 会自动关联调用 DruidDataSource druidDataSource = new DruidDataSource(); //druidDataSource.setUsername(); //druidDataSource.setPassword(); //druidDataSource.setUrl(); return druidDataSource; } //配置druid的监控功能 @Bean public ServletRegistrationBean statViewServlet() { //创建 StatViewServlet StatViewServlet statViewServlet = new StatViewServlet(); ServletRegistrationBean<StatViewServlet> registrationBean = new ServletRegistrationBean<>(statViewServlet, "/druid/*"); //设置 init-parameter , 设置用户名和密码 registrationBean.addInitParameter("loginUsername", "xjs"); registrationBean.addInitParameter("loginPassword", "123456"); return registrationBean; } }- 1
- 2
- 3
- 4
- 5
- 6
- 7
- 8
- 9
- 10
- 11
- 12
- 13
- 14
- 15
- 16
- 17
- 18
- 19
- 20
- 21
- 22
- 23
- 24
- 25
- 26
- 27
- 28
- 29
- 30
- 31
- 32
- 33
- 34
- 35
- 36
- 37
- 38
- 39
- 40
- 41
- 42
- 43
- 44
- 45
- 46
- 47
- 48
- 49
- 50
- 51
- 52
- 53
- 54
- 55
- 56
- 57
- 58
- 59
- 60
- 61
- 62
- 63
- 64
- 65
- 66
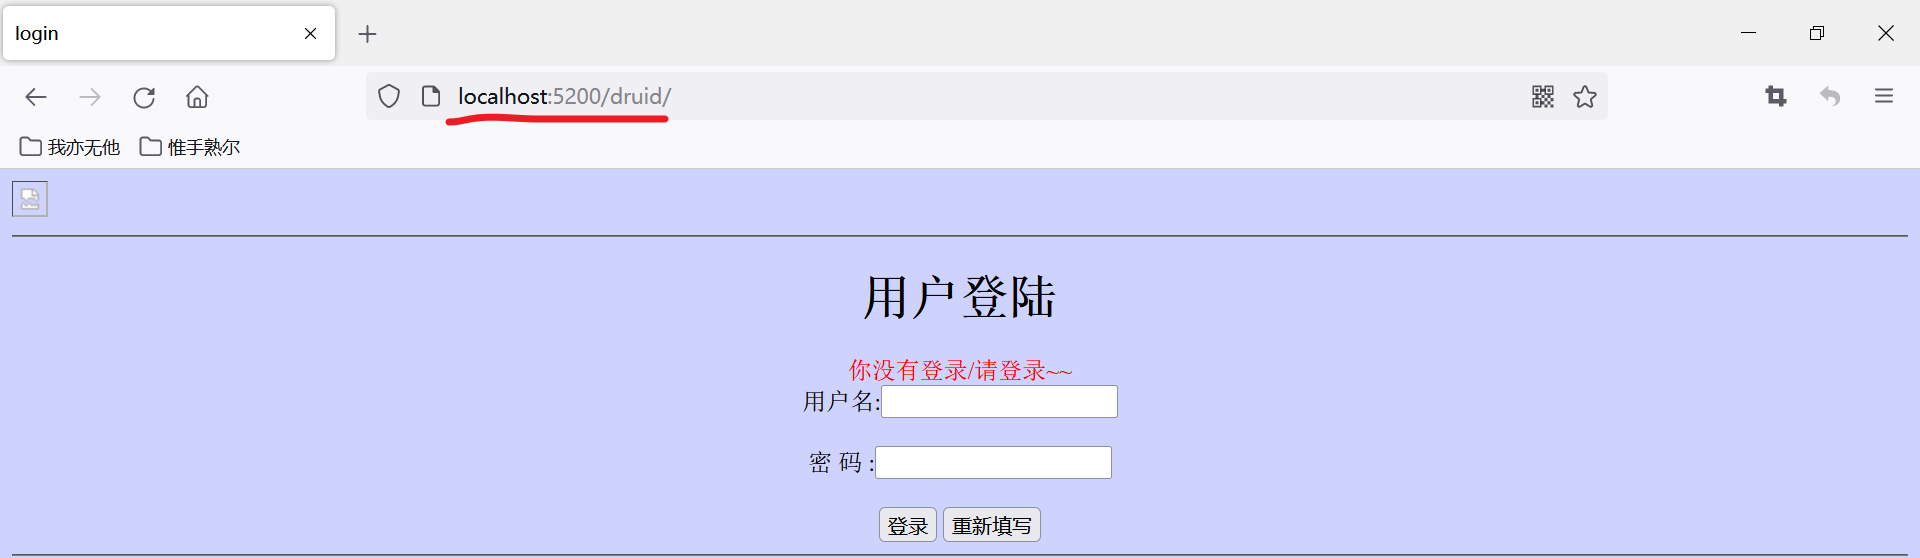
- 完成测试:访问 http://localhost:5200/druid/index.html 不会被拦截,如果没有问题,会看到这个页面

- 修改 com/xjs/springboot/config/DruidDataSourceConfig.java ,增加 监控功能,参考文档


package com.xjs.springboot.config; import com.alibaba.druid.pool.DruidDataSource; import com.alibaba.druid.support.http.StatViewServlet; import org.springframework.boot.context.properties.ConfigurationProperties; import org.springframework.boot.web.servlet.ServletRegistrationBean; import org.springframework.context.annotation.Bean; import org.springframework.context.annotation.Configuration; import javax.sql.DataSource; import java.sql.SQLException; /** * @Author: 谢家升 * @Version: 1.0 ** DruidDataSourceConfig -配置类 */
@Configuration public class DruidDataSourceConfig { //编写方法,注入DruidDataSource /** * 为什么我们注入了自己的DataSource , 原来的 HikariDataSource就失效了呢?? * 1. 默认的数据源是如何配置的? @ConditionalOnMissingBean({ DataSource.class, XADataSource.class }) * 通过 @ConditionalOnMissingBean({ DataSource.class}) 判断如果容器有 DataSource Bean 就不注入默认的 HikariDataSource * 2. debug 源码 */ @ConfigurationProperties("spring.datasource") @Bean public DataSource dataSource() throws SQLException { //1. 配置了 @ConfigurationProperties("spring.datasource") // 就可以读取到 application.yml 的配置 //2. 我们就不需要调用 DruidDataSource 对象的 setXXX() , 会自动关联调用 DruidDataSource druidDataSource = new DruidDataSource(); //druidDataSource.setUsername(); //druidDataSource.setPassword(); //druidDataSource.setUrl(); //加入监控功能 druidDataSource.setFilters("stat"); return druidDataSource; } //配置druid的监控功能 @Bean public ServletRegistrationBean statViewServlet() { //创建 StatViewServlet StatViewServlet statViewServlet = new StatViewServlet(); ServletRegistrationBean<StatViewServlet> registrationBean = new ServletRegistrationBean<>(statViewServlet, "/druid/*"); //设置 init-parameter , 设置用户名和密码 registrationBean.addInitParameter("loginUsername", "xjs"); registrationBean.addInitParameter("loginPassword", "123456"); return registrationBean; } }- 1
- 2
- 3
- 4
- 5
- 6
- 7
- 8
- 9
- 10
- 11
- 12
- 13
- 14
- 15
- 16
- 17
- 18
- 19
- 20
- 21
- 22
- 23
- 24
- 25
- 26
- 27
- 28
- 29
- 30
- 31
- 32
- 33
- 34
- 35
- 36
- 37
- 38
- 39
- 40
- 41
- 42
- 43
- 44
- 45
- 46
- 47
- 48
- 49
- 50
- 51
- 52
- 53
- 54
- 55
- 56
- 57
- 58
- 59
- 60
- 61
- 62
- 63
- 64
- 65
- 66
- 67
- 68
- 69
- 70
- 创建 com/xjs/springboot/controller/DruidSqlController.java ,模拟操作 DB 的请求
package com.xjs.springboot.controller; import com.xjs.springboot.bean.Furn; import org.springframework.jdbc.core.BeanPropertyRowMapper; import org.springframework.jdbc.core.JdbcTemplate; import org.springframework.stereotype.Controller; import org.springframework.web.bind.annotation.GetMapping; import org.springframework.web.bind.annotation.ResponseBody; import javax.annotation.Resource; import java.util.List; /** * @Author: 谢家升 * @Version: 1.0 */ @Controller public class DruidSqlController { @Resource private JdbcTemplate jdbcTemplate; @ResponseBody @GetMapping("/sql") public List<Furn> crudDB() { BeanPropertyRowMapper<Furn> rowMapper = new BeanPropertyRowMapper<>(Furn.class); List<Furn> furns = jdbcTemplate.query("select * from furn", rowMapper); for (Furn furn : furns) { System.out.println(furn); } return furns; } }- 1
- 2
- 3
- 4
- 5
- 6
- 7
- 8
- 9
- 10
- 11
- 12
- 13
- 14
- 15
- 16
- 17
- 18
- 19
- 20
- 21
- 22
- 23
- 24
- 25
- 26
- 27
- 28
- 29
- 30
- 31
- 32
- 33
- 34
- 35
- 36
- 37
- 38
20.2.4.3 SQL 监控数据-测试页面
- 完成测试,观察 SQL 监控数据
- 浏览器 http://localhost:10000/druid/sql.html
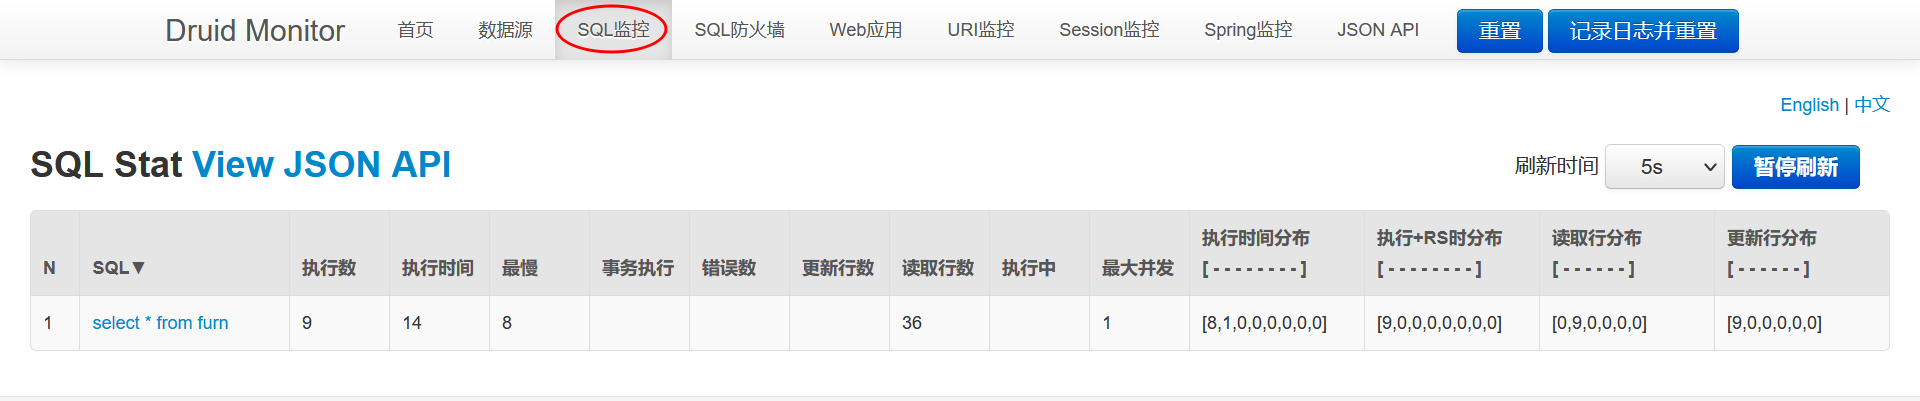
- 相关参数参考文档

20.2.5 Durid 监控功能-Web 关联监控
20.2.5.1 需求说明
- 配置 Web 关联监控配置:Web 应用、URI 监控
20.2.5.2 官方文档

20.2.5.3 Web 关联监控配置-Web 应用、URI 监控
- 修改 com/xjs/springboot/config/DruidDataSourceConfig.java ,注入/增加 WebStatFilter 用于采集 web-jdbc 关联监控的数据
//配置webStatFilter , 用于采集web-jdbc关联的监控数据 @Bean public FilterRegistrationBean webStatFilter() { //创建WebStatFilter WebStatFilter webStatFilter = new WebStatFilter(); FilterRegistrationBean<WebStatFilter> filterRegistrationBean = new FilterRegistrationBean<>(webStatFilter); //默认对所有的 url请求 进行监控 filterRegistrationBean.setUrlPatterns(Arrays.asList("/*")); //排除指定的 url filterRegistrationBean.addInitParameter("exclusions", "*.js,*.gif,*.jpg,*.png,*.css,*.ico,/druid/*"); return filterRegistrationBean; }- 1
- 2
- 3
- 4
- 5
- 6
- 7
- 8
- 9
- 10
- 11
- 12
- 13
- 14
- 15
- 16
- 17
- 为了测试方便,修改 com/xjs/springboot/config/WebConfig.java ,放行 /sql 请求

20.2.5.4 重启项目,看看 Web应用和 URI 监控页面
- 完成测试,重启项目,看看 Web 应用和 URI 监控是否生效


20.2.6 Durid 监控功能-SQL 防火墙
20.2.6.1 需求: 配置 SQL 防火墙
20.2.6.2 官方文档

20.2.6.3 SQL 防火墙
- 修改 com/xjs/springboot/config/DruidDataSourceConfig.java ,加入防火墙监控

- 完成测试,重启项目,看看 SQL 防火墙监控是否生效


20.2.7 Durid 监控功能-Session 监控
20.2.7.1 需求: 配置 Session 监控
20.2.7.2 官方文档
20.2.7.3 Session 监控
- 重启项目,先登录管理系统

- 完成测试,查看监控页需要输入用户名和密码,点击 Session 监控,可以看到相关信息 (注意要登录用户系统,才能看到 Session 监控信息)

20.2.8 Druid Spring Boot Starter
20.2.8.1 基本介绍
- 前面我们使用的是自己引入 druid+配置类方式整合 Druid 和监控
- Druid Spring Boot Starter 可以让程序员在 Spring Boot 项目中更加轻松集成 Druid 和监控
20.2.8.2 应用实例
20.2.8.2.1 需求说明
- 使用 Druid Spring Boot Starter 方式完成 Druid 集成和监控
20.2.8.2.2 具体实现
- 修改 pom.xml ,注销 druid 的依赖

- 注销 com/xjs/springboot/config/DruidDataSourceConfig.java

- 这时测试,druid 失效
- 查看 druid 文档 ,pom.xml 文件中 引入 druid starter

<dependency> <groupId>com.alibabagroupId> <artifactId>druid-spring-boot-starterartifactId> <version>1.1.17version> dependency>- 1
- 2
- 3
- 4
- 5
- 6
- 确认 druid starter 引入哪些依赖

- 修改 resources/application.yml 增加配置参数
spring: servlet: multipart: max-file-size: 10MB # 表示单个文件上传最大 10MB max-request-size: 50MB # 表示一次请求上传多文件最多上传 10MB datasource: #配置数据源 # 说明:如果没有指定 useSSL=true , 启动项目会有报红警告 url: jdbc:mysql://localhost:3306/spring_boot?useSSL=true&useUnicode=true&characterEncoding=UTF-8 username: root password: hsp driver-class-name: com.mysql.jdbc.Driver # 配置druid 和 监控功能 druid: stat-view-servlet: enabled: true login-username: xjs login-password: 888 reset-enable: false web-stat-filter: #配置web监控 enabled: true url-pattern: /* exclusions: "*.js,*.gif,*.jpg,*.png,*.css,*.ico,/druid/*" filter: stat: #配置sql监控 slow-sql-millis: 1000 log-slow-sql: true enabled: true wall: #配置sql防火墙 enabled: true config: drop-table-allow: false #不允许修改表 select-all-column-allow: false #不允许执行SELECT * FROM T这样的语句- 1
- 2
- 3
- 4
- 5
- 6
- 7
- 8
- 9
- 10
- 11
- 12
- 13
- 14
- 15
- 16
- 17
- 18
- 19
- 20
- 21
- 22
- 23
- 24
- 25
- 26
- 27
- 28
- 29
- 30
- 31
- 32
- 33
20.2.8.2.3 重启项目,完成测试


-
-
相关阅读:
如何使用Python和Plotly绘制3D图形
写几个获取搜索引擎提示关键词列表的方法,方便以后使用
Vue3 + TypeSciprt+Vant 项目框架构建
银河麒麟/ubuntu 下安装/卸载软件包命令大全
力扣第18题 四数之和 c++双指针注释版。
Docker-07:Docker网络管理
『NLP学习笔记』TextCNN文本分类原理及Pytorch实现
App测试中ios和Android的区别
http基础了解
【软件STM32cubeIDE下STM32H743xx使用:看门狗iwdg+复位标志位-基础样例】
- 原文地址:https://blog.csdn.net/weixin_60766221/article/details/126384289
