-
【Java面试题】《尚硅谷Java大厂面试题第2季,面试必刷,跳槽大厂神器》学习笔记
文章目录
volatile是什么
volatile是java虚拟机提供的轻量级的同步机制。三大特性:(代码示例在下一节)
- 保证可见性
- 不保证原子性
- 禁止指令重排
JMM内存模型
1、并不真实存在,是规则、规范,定义了程序中各个变量(包括实例字段,静态字段和构成数组对象的元素)的访问方式。
2、三大特性:
- 可见性
- 原子性
- 有序性
3、JMM关于同步的规定:
- 线程解锁前,必须把共享变量的值刷新回主内存
- 线程加锁前,必须读取主内存的最新值到自己的工作内存
- 加锁解锁是同一把锁
4、线程对变量的操作(读取赋值等)必须在工作内存中进行,首先要将变量从主内存拷贝到自己的工作内存空间,然后对变量进行操作,操作完成后在将变量写回主内存


5、可见性:
- 可见性即别的线程修改变量写回主内存后,对当前线程是可见的
- 代码:
public class P03 { volatile int num;//加volatile程序才能正常停止 // int num; void add1(){ num++; } public static void main(String[] args) { P03 p = new P03(); //开启一个线程,改变num的数值 new Thread(() -> { try { TimeUnit.SECONDS.sleep(1); } catch (InterruptedException e) { e.printStackTrace(); } p.add1(); System.out.println("add1完成"); }).start(); //按理,当上面的线程执行完之后,应该立即结束,但未加volatile修饰变量时一直没结束 while (p.num == 0){ } } }- 1
- 2
- 3
- 4
- 5
- 6
- 7
- 8
- 9
- 10
- 11
- 12
- 13
- 14
- 15
- 16
- 17
- 18
- 19
- 20
- 21
- 22
- 23
- 24
- 25
- 26
- 27
- 28
- 29
6、原子性:
- 不可分割,完整性,自己在做的事不应该被别的线程打断; 要么同时成功,要么同时失败
- volatile 不保证原子性,解决方案:
- synchronized
- lock
- AtomicInteger
- 代码:
public class P05 { volatile int num; void add1(){ num++; } public static void main(String[] args) { P05 p = new P05(); //10个线程,每个加1000 for (int i = 0; i < 10; i++) { new Thread(() ->{ for (int j = 0; j < 1000; j++) { p.add1(); } }).start(); } // 2个线程时,是指:main线程、gc线程 while (Thread.activeCount() > 2){ Thread.yield(); } // 理论上时10 * 1000,但测试结果小于该值; 说明volatile不保证原子性 // 想要结果是10000,使用synchronized、lock或者AtomicInteger System.out.println(p.num); } }- 1
- 2
- 3
- 4
- 5
- 6
- 7
- 8
- 9
- 10
- 11
- 12
- 13
- 14
- 15
- 16
- 17
- 18
- 19
- 20
- 21
- 22
- 23
- 24
- 25
- 26
- 27
- 28
- 29
7、指令重排
方式:- 编译器优化的重排
- 指令并行的重排
- 内存系统的重排
说明:
- 单线程执行结果确定,多线程情况下结果可能无法预测
- 考虑数据依赖性

例如:
- 重排1

语句4永远不会是第一句,因为要考虑数据依赖性
- 重排2

- 重排3
- 多线程环境中线程交替执行,由于编译器优化重排的存在,
- 两个线程中使用的变量能否保证一致性是无法确定的,结果无法预测

总结:

-
工作内存与主内存同步延迟现象导致的
可见性问题,可以使用synchronized或volatile关键字解决,它们都可以使一个线程修改后的变量立即对其他线程可见. -
对于指令重排导致的可见性问题和
有序性问题,可以利用volatile关键字解决,因为volatile的另外一个作用就是禁止重排序优化。
单例模式 volatile
单例模式:
public class P11 { private static P11 instance; private P11() { System.out.println("构造方法..."); } // DCL, double check lock,双端检验机制 public static P11 getInstance() { if (instance != null) { synchronized (P11.class){ if (instance != null) { instance = new P11(); } } } return instance; } }- 1
- 2
- 3
- 4
- 5
- 6
- 7
- 8
- 9
- 10
- 11
- 12
- 13
- 14
- 15
- 16
- 17
- 18
- 19
- 20
- 上述代码存在指令重排,在单线程下是没有问题的,在多线程下,低概率出现问题。
- 为了防止指令重排,考虑给变量instance加volatile修饰,这样就可以避免指令重排。

CAS
Compare And Swap,比较并交换。
- 比较当前工作内存中的值和主内存中的值,如果相同,则执行规定操作;
否则继续比较直到主内存和工作内存中的值一致为止 - CAS有3个操作数,内存值V,旧的预期值A,要修改的更新值B。
当且仅当预期值A和内存值V相同时,将内存值V修改为B,否则什么都不做。
Unsafe:
- 是CAS的核心类,由于Java方法无法直接访问底层系统,需要通过本地〈native)方法来访问,Unsafe相当于一个后门,基于该类可以直接操作特定内存的数据。Unsafe类存在于sun.misc包中,其内部方法操作可以像c的指针一样直接操作内存,因为Java中CAS操作的执行依赖于Unsafe类的方法。
- Unsafe类中的所有方法都是native修饰的,也就是说Unsafe类中的方法都直接调用操作系统底层资源执行相应任务
缺点:
-
循环时间长,开销很大。如果CAS失败,会一直进行尝试;如果CAS长时间一直不成功,可能会给CPU带来很大的开销。
-
只能保证一个共享变量的原子操作。如果是多个只能加锁了
-
ABA问题。当前线程获取到的是A,执行修改获取到的也是A,以为这个A没变化;实际有可能A被别的线程修改成B,但在当前线程准备修改之前又修改回A了;这样当前线程以为没有修改,产生ABA问题
自定义类型原子类:
- 代码:
public class P17 { public static void main(String[] args) { // 自定义两个日期: LocalDate ld1 = LocalDate.now(); LocalDate ld2 = LocalDate.now(); // 日期原子类 AtomicReference<LocalDate> localDateAtomicReference = new AtomicReference<>(ld1); //第一次修改: boolean cas1 = localDateAtomicReference.compareAndSet(ld1, ld2); System.out.println("cas1 = " + cas1); System.out.println("localDateAtomicReference.get() = " + localDateAtomicReference.get()); // 第二次修改: boolean cas2 = localDateAtomicReference.compareAndSet(ld1, ld2); System.out.println("cas2 = " + cas2); System.out.println("localDateAtomicReference.get() = " + localDateAtomicReference.get()); } }- 1
- 2
- 3
- 4
- 5
- 6
- 7
- 8
- 9
- 10
- 11
- 12
- 13
- 14
- 15
- 16
- 17
- 18
- 19
- 20
- 结果:


看一眼getAndIncrement方法:

更底层的:

ABA问题
例如
- 两个线程t1、t2都要修改变量v的值
- t1在修改前获取到v的值是A
- t2获取到v的值并修改为B,随后又修改回A
- 此时t1准备修改v的值,cas成功,因为v的值为A,与预期值相同;
- A以为v没变,实际产生ABA问题
代码:(ABA的产生)
AtomicReference<String> stringAtomicReference = new AtomicReference<>("A"); //t1 改为B再改回A new Thread(() -> { stringAtomicReference.compareAndSet("A","B"); System.out.println("v1 = " + stringAtomicReference.get()); stringAtomicReference.compareAndSet("B","A"); System.out.println("v2 = " + stringAtomicReference.get()); },"t1").start(); //t2 将A改为B new Thread(() -> { try { TimeUnit.SECONDS.sleep(1); } catch (InterruptedException e) { e.printStackTrace(); } stringAtomicReference.compareAndSet("A","B"); System.out.println("v3 = " + stringAtomicReference.get()); },"t2").start();- 1
- 2
- 3
- 4
- 5
- 6
- 7
- 8
- 9
- 10
- 11
- 12
- 13
- 14
- 15
- 16
- 17
- 18
- 19
- 20
- 21
代码:(ABA的解决,使用包含时间戳的原子类:
AtomicStampedReference)AtomicStampedReference<String> stampedReference = new AtomicStampedReference<>("A", 1); //t3 改为B再改回A new Thread(() -> { //保证t4先获取到版本号 try { TimeUnit.SECONDS.sleep(1); } catch (InterruptedException e) { e.printStackTrace(); } boolean compareAndSet1 = stampedReference.compareAndSet("A", "B", stampedReference.getStamp(), stampedReference.getStamp() + 1); System.out.println("compareAndSet1 = " + compareAndSet1); boolean compareAndSet2 = stampedReference.compareAndSet("B", "A", stampedReference.getStamp(), stampedReference.getStamp() + 1); System.out.println("compareAndSet2 = " + compareAndSet2); }, "t3").start(); //t4 将A改为B new Thread(() -> { int stamp = stampedReference.getStamp(); //保证t3执行一次ABA操作了 try { TimeUnit.SECONDS.sleep(2); } catch (InterruptedException e) { e.printStackTrace(); } boolean compareAndSet3 = stampedReference.compareAndSet("A", "B", stamp, stamp + 1); System.out.println("compareAndSet3 = " + compareAndSet3); }, "t4").start();- 1
- 2
- 3
- 4
- 5
- 6
- 7
- 8
- 9
- 10
- 11
- 12
- 13
- 14
- 15
- 16
- 17
- 18
- 19
- 20
- 21
- 22
- 23
- 24
- 25
- 26
- 27
- 28
- 29
- 30
- 31
集合类异常 ConcurrentModificationException
产生:
- 代码:
List<Integer> list = new ArrayList<>(); for (int i = 0; i < 10; i++) { int finalI = i; new Thread(() -> { for (int j = 0; j < 100; j++) { list.add(finalI * j); } System.out.println(list); }).start(); }- 1
- 2
- 3
- 4
- 5
- 6
- 7
- 8
- 9
- 10
- 11
- 会出现java.util.ConcurrentModificationException:

原因:
- 并发争抢修改导致
解决方法:
-
使用vector,底层给方法加了synchronized,效率低

-
使用Collections工具类,将不安全的集合包装成安全的集合类,

实际是在方法体内加synchronized:

-
使用juc中的类


写时复制- CopyOnWrite容器即写时复制的容器。
- 往一个容器添加元素的时候,不直接往当前容器Object[]添加,而是先将当前容器Object[]进icopy,复制出一个新的容器object[] newELements
- 然后新的容器object[] newELements里添加元素
- 添加完元素之后,再将原容器的引用指向新的容器: setArray(newELements);
- 这样做的好处是可以对Copyonwrite容器进行并发的读,而不需要加锁,因为当前容器不会添加任何元素。所以Copyonwrite容器也是一种读写分离的思想,读和写不同的容器
不安全的类及其对应的juc类:
- ArrayList —> CopyOnWriteArrayList
- HashSet —> CopyOnWriteArraySet
- HashMap —> ConcurrentHashMap
方法参数传递机制:
题目:
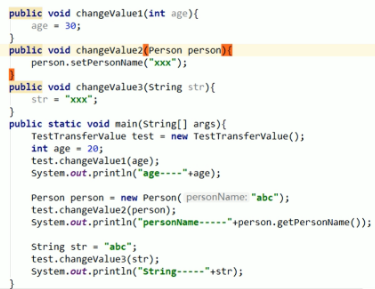
结果:

锁
公平锁/非公平锁
主要看有线程没有排队
- 公平锁是指多个线程按照申请锁的顺序来获取锁
- 非公平锁是指多个线程获取锁的顺序并不是按照申请锁的顺序,有可能后申请的线程比先申请的线程优先获取,在高并发的情况下,有可能会造成优先级反转或者饥饿现象
公平锁/非公平锁
- 并发包中ReentrantLock的创建可以指定构造函数的boolean类型来得到公平锁或非公平锁,默认是非公平锁
关于两者区别:
- 公平锁:Threads acquire a fair lock in the order in which they requested it
公平锁,就是很公平,在并发环境中,每个线程在获取锁时会先查看此锁维护的等待队列,如果为空,或者当前线程是等待队列的第一个,就占有锁,否则就会加入到等待队列中,以后会按照FIFO的规则从队列中取到自己 - 非公平锁: a nonfair lock permits barging: threads requesting a lock can jump ahead of the queue of waiting threads if the lockhappens to be available when it is requested.
非公平锁比较粗鲁,上来就直接尝试占有锁,如果尝试失败,就再采用类似公平锁那种方遗。
ReentrantLock默认采用的是非公平锁,可以增大吞吐量;synchronized也是一种非公平锁.

可重入锁 (递归锁)
- 同一个线程在外层方法获取锁的时候,在进入内层方法会自动获取锁
- 也就是说,线程可以进入任何一个它已经拥有的锁所同步着的代码块。
A调用B方法,A获得了锁,则B不用再获取锁
代码:
- synchronized版:
@Slf4j public class P27 { public static void main(String[] args) { P27 p = new P27(); p.sendSms(); } synchronized void sendSms() { log.info("发短信..."); sendEmail(); } synchronized void sendEmail() { log.info("发邮箱..."); } }- 1
- 2
- 3
- 4
- 5
- 6
- 7
- 8
- 9
- 10
- 11
- 12
- 13
- 14
- 15
- 16

解释:
- synchronized修饰普通方法,锁的是对象,即锁是调用的对象
- sendSms获得了锁,内部调用sendEmail又要获取锁,按理已经被获取了,是获取不到的
- 但是,由于是可重入锁,sendEmail在sendSms内部,sendSms已经获取到锁了,内部方法不用再去获取锁了,已经自动获取了
- lock版:
@Slf4j public class P27 { Lock lock = new ReentrantLock(); public static void main(String[] args) { P27 p = new P27(); p.sendSms(); } void sendSms() { lock.lock(); try { log.info("发短信..."); sendEmail(); } finally { lock.unlock(); } } void sendEmail() { lock.lock(); try { log.info("发邮箱..."); } finally { lock.unlock(); } } }- 1
- 2
- 3
- 4
- 5
- 6
- 7
- 8
- 9
- 10
- 11
- 12
- 13
- 14
- 15
- 16
- 17
- 18
- 19
- 20
- 21
- 22
- 23
- 24
- 25
- 26
- 27
- 28
- 29
- 30
自旋锁
- 循环比较,直到成功为止.
- 没有类似wait的阻塞
手写一个自旋锁:
@Slf4j public class P29 { AtomicReference<Thread> atomicReference = new AtomicReference<>(); //加锁 void myLock() { log.info("准备获取锁..."); while (!atomicReference.compareAndSet(null, Thread.currentThread())) { } log.info("获取到锁"); } //解锁 void myUnlock() { log.info("准备释放锁..."); atomicReference.compareAndSet(Thread.currentThread(), null); log.info("释放锁成功"); } public static void main(String[] args) { P29 p = new P29(); //线程1先获取到锁 new Thread(() -> { p.myLock(); try { log.info("do something"); //保证线程2准备获取锁,但又没获取到 TimeUnit.SECONDS.sleep(2); } catch (InterruptedException e) { e.printStackTrace(); } finally { p.myUnlock(); } }).start(); //保证线程1获取到锁 try { TimeUnit.SECONDS.sleep(1); } catch (InterruptedException e) { e.printStackTrace(); } //线程1释放锁之后,线程2才能获取到锁 new Thread(() -> { p.myLock(); try { log.info("do something"); } finally { p.myUnlock(); } }).start(); } }- 1
- 2
- 3
- 4
- 5
- 6
- 7
- 8
- 9
- 10
- 11
- 12
- 13
- 14
- 15
- 16
- 17
- 18
- 19
- 20
- 21
- 22
- 23
- 24
- 25
- 26
- 27
- 28
- 29
- 30
- 31
- 32
- 33
- 34
- 35
- 36
- 37
- 38
- 39
- 40
- 41
- 42
- 43
- 44
- 45
- 46
- 47
- 48
- 49
- 50
- 51
- 52
- 53
- 54
- 55
- 56
- 57

独占锁(写锁)、共享锁(读锁)、互斥锁
- 读读可以共存
- 读写、写写不能共存
代码:
@Slf4j public class P31 { volatile Map<Integer, Integer> cache = new HashMap<>(); ReadWriteLock rwLock = new ReentrantReadWriteLock(); /** * 放入数据 */ void put(int key, int val) { Lock writeLock = rwLock.writeLock(); writeLock.lock(); try { log.info("准备写入:{}", key); cache.put(key, val); log.info("{}写入完成!", key); } finally { writeLock.unlock(); } } /** * 读取数据 */ void get(int key) { Lock readLock = rwLock.readLock(); readLock.lock(); try { log.info("准备读取:{}", key); Integer val = cache.get(key); log.info("读取到的结果:{}", val); } finally { readLock.unlock(); } } public static void main(String[] args) { P31 p = new P31(); for (int i = 0; i < 3; i++) { int finalI = i; new Thread(() -> { p.put(finalI, finalI); }, String.valueOf(i)).start(); } for (int i = 0; i < 3; i++) { int finalI = i; new Thread(() -> { p.get(finalI); }, String.valueOf(3 + i)).start(); } } }- 1
- 2
- 3
- 4
- 5
- 6
- 7
- 8
- 9
- 10
- 11
- 12
- 13
- 14
- 15
- 16
- 17
- 18
- 19
- 20
- 21
- 22
- 23
- 24
- 25
- 26
- 27
- 28
- 29
- 30
- 31
- 32
- 33
- 34
- 35
- 36
- 37
- 38
- 39
- 40
- 41
- 42
- 43
- 44
- 45
- 46
- 47
- 48
- 49
- 50
- 51
- 52
- 53
- 54

- 写入不存在插队现象。读取存在插队现象,因为是共享锁。
CounDownLatch
- 让一些线程阻塞直到另一些线程完成一系列操作后才被唤醒
- CountDownLatch主要有两个方法,当一个或多个线程调用await方法时,调用线程会被阻塞。其它线程调用countDown方法会将计数器减1(调用countDown方法的线程不会阻塞),当计数器的值变为零时,因调用await方法被阻塞的线程会被唤醒,继续执行。
例如,一年12个月,12个月都过了,一年才算过完了;
@Slf4j public class P32 { public static void main(String[] args) throws InterruptedException { CountDownLatch countDownLatch = new CountDownLatch(12); for (int i = 1; i <= 12; i++) { int finalI= i; new Thread(() -> { log.info("{}月过了",finalI); countDownLatch.countDown(); }).start(); } countDownLatch.await(); System.out.println("一年过完了"); } }- 1
- 2
- 3
- 4
- 5
- 6
- 7
- 8
- 9
- 10
- 11
- 12
- 13
- 14
- 15
- 16
- 17

CyclicBarrier
- CyclicBarrier的字面意思是可循环(Cyclic)使用的屏障(Barrier)。它要做的事情是,让一组线程到达一个屏障(也可以叫同步点)时被阻塞,直到最后一个线程到达屏障时,屏障才会开门,所有
被屏障拦截的线程才会继续干活,线程进入屏障通过CyclicBarrier的await()方法。 - CounDownLatch和CyclicBarrier除了一个是减的一个是增的外,还有一个区别。
- CounDownLatch是A线程调用await,其他线程做coutDown,做完就没其他线程什么事了。类似于锁教室,人都走了(人走了就没人什么事了),才可以锁。
- CyclicBarrier是每个线程调用await在那等,等到数目达到要求,所有await的线程一起做事。类似于拼团,人到齐了(人到齐了,人还要付款购买),每个人购买。
例如,模拟拼团:
@Slf4j public class P33 { public static void main(String[] args) { CyclicBarrier cyclicBarrier = new CyclicBarrier(7, () -> { System.out.println("---拼团成功!!!---"); }); for (int i = 0; i < 7; i++) { final int finalI = i; new Thread(() -> { log.info("第{}个人参加拼团", finalI); try { cyclicBarrier.await(); log.info("已经够7个人,第{}个人已付款,拼团成功", finalI); } catch (InterruptedException e) { e.printStackTrace(); } catch (BrokenBarrierException e) { e.printStackTrace(); } }).start(); } } }- 1
- 2
- 3
- 4
- 5
- 6
- 7
- 8
- 9
- 10
- 11
- 12
- 13
- 14
- 15
- 16
- 17
- 18
- 19
- 20
- 21
- 22
- 23
- 24

Semaphore
- 信号量主要用于两个目的,一个是用于多个共享资源的互斥使用,另一个用于并发线程数的控制。
例如,饭店来了6个人,却只有三个餐桌可供就餐的例子:
@Slf4j public class P34 { public static void main(String[] args) { Semaphore semaphore = new Semaphore(3); Random random = new Random(); for (int i = 0; i < 6; i++) { int finalI = i; new Thread(() -> { try { log.info("第{}个人准备就餐", finalI); semaphore.acquire(); log.info("第{}个人成功就餐...", finalI); int time = random.nextInt(3); TimeUnit.SECONDS.sleep(time); log.info("第{}个人就餐结束,用时{}秒!", finalI, time); } catch (InterruptedException e) { e.printStackTrace(); } finally { semaphore.release(); } }).start(); } } }- 1
- 2
- 3
- 4
- 5
- 6
- 7
- 8
- 9
- 10
- 11
- 12
- 13
- 14
- 15
- 16
- 17
- 18
- 19
- 20
- 21
- 22
- 23
- 24
- 25
- 26

枚举
- 枚举就类似数据库中的一张不可变的表
- 枚举是java中特殊的类,表示一组常量
常用方法:
- values(), 获取所有的常量
- ordinal(), 获取索引
- valueOf(), 获取指定字符串值的枚举常量
例如,有一张超级用户的表,有id、名称、密码等信息,便可以使用枚举来实现:
import lombok.Getter; public enum AdminEnum { SUPER_ADMIN(1L, "超级管理员", "1234"), COMMON_ADMIN(2L, "普通管理员", "5678"); @Getter private Long id; @Getter private String username; @Getter private String password; AdminEnum(Long id, String username, String password) { this.id = id; this.username = username; this.password = password; } //自定义方法,通过id来找用户 public static AdminEnum getById(Long id){ for (AdminEnum value : values()) { if (id.equals(value.id)){ return value; } } return null; } public static void main(String[] args) { //获取所有枚举元素 AdminEnum[] values = AdminEnum.values(); System.out.println("===================="); for (AdminEnum value : values) { //ordinal -- 枚举的索引 System.out.println("ordinal = " + value.ordinal() + ",value = " + value); } //输出每一个枚举元素的信息 System.out.println("===================="); AdminEnum superAdmin = AdminEnum.SUPER_ADMIN; System.out.println("superAdmin = " + superAdmin); System.out.println("superAdmin.id = " + superAdmin.id); System.out.println("superAdmin.username = " + superAdmin.username); System.out.println("superAdmin.password = " + superAdmin.password); //获取指定字符串值的枚举常量 System.out.println("===================="); AdminEnum valueOf = AdminEnum.valueOf("SUPER_ADMIN"); System.out.println("valueOf super_admin = " + valueOf); //通过id获取用户的方法: System.out.println("===================="); AdminEnum byId = AdminEnum.getById(1L); System.out.println("byId = " + byId); } }- 1
- 2
- 3
- 4
- 5
- 6
- 7
- 8
- 9
- 10
- 11
- 12
- 13
- 14
- 15
- 16
- 17
- 18
- 19
- 20
- 21
- 22
- 23
- 24
- 25
- 26
- 27
- 28
- 29
- 30
- 31
- 32
- 33
- 34
- 35
- 36
- 37
- 38
- 39
- 40
- 41
- 42
- 43
- 44
- 45
- 46
- 47
- 48
- 49
- 50
- 51
- 52
- 53
- 54
- 55
- 56
- 57
- 58
- 59

阻塞队列
概述
- 当阻塞队列是
空时,从队列中获取元素的操作将会被阻塞。 - 当阻塞队列是
满时,往队列里添加元素的操作将会被阻塞。 - 在多线程领域:所谓阻塞,在某些情况下会挂起线程(即阻塞),一旦条件满足
被挂起的线程又会自动被唤醒 - 为什么需要BlockingQueue
- 好处是我们不需要关心什么时候需要阻塞线程,什么时候需要唤醒线程,因为这一切BlockingQueue都给你一手包办了
- 在concurrent包发布以前,在多线程环境下,我们每个程序员都必须去自己控制这些细节,尤其还要兼顾效率和线程安全,而这会给我们的程序带来不小的复杂度。
阻塞队列:(常用已标红)
ArrayBlockingQueue:由数组结构组成的有界阻塞队列。LinkedBlockingQueue:由链衣结构组成的有界(但大小默认值为Integer.MAX_VALUE)阻塞队- PriorityBlockingQueue :支持优先级排序的无界阻塞队列。
- DelayQueue:使用优先级队列实现的延迟无界阻塞队列。
SynchronousQueue:不存储元素的阻塞队列,也即单个元素的队列- LinkedTransferQueue:由链表结构组成的无界阻塞队列。
- LinkedBlockingDeque:由链表结构组成的双向阻塞队列
常用方法:

ArrayBlockingQueue、LinkedBlockingQueue
抛出异常的方法:add、remove
public class P37 { public static void main(String[] args) { BlockingQueue<Integer> blockingQueue = new LinkedBlockingQueue<>(2); System.out.println("add 1:" + blockingQueue.add(1)); System.out.println("add 2:" + blockingQueue.add(2)); try { System.out.println("add 3:" + blockingQueue.add(3)); } catch (Exception e) { e.printStackTrace(); } System.out.println("element:" + blockingQueue.element()); System.out.println("remove 1:" + blockingQueue.remove()); System.out.println("remove 2:" + blockingQueue.remove()); try { System.out.println("element:" + blockingQueue.element()); } catch (Exception e) { e.printStackTrace(); } try { System.out.println("remove 3:" + blockingQueue.remove()); } catch (Exception e) { e.printStackTrace(); } } }- 1
- 2
- 3
- 4
- 5
- 6
- 7
- 8
- 9
- 10
- 11
- 12
- 13
- 14
- 15
- 16
- 17
- 18
- 19
- 20
- 21
- 22
- 23
- 24
- 25
- 26
- 27
- 28
- 29
- 30
- 31

返回特殊值的方法:offer、poll
public class P38 { public static void main(String[] args) { BlockingQueue<Integer> blockingQueue = new LinkedBlockingQueue<>(2); System.out.println("offer 1:" + blockingQueue.offer(1)); System.out.println("offer 2:" + blockingQueue.offer(2)); try { System.out.println("offer 3:" + blockingQueue.offer(3)); } catch (Exception e) { e.printStackTrace(); } System.out.println("peek:" + blockingQueue.peek()); System.out.println("poll 1:" + blockingQueue.poll()); System.out.println("poll 2:" + blockingQueue.poll()); try { System.out.println("peek:" + blockingQueue.peek()); } catch (Exception e) { e.printStackTrace(); } try { System.out.println("poll 3:" + blockingQueue.poll()); } catch (Exception e) { e.printStackTrace(); } } }- 1
- 2
- 3
- 4
- 5
- 6
- 7
- 8
- 9
- 10
- 11
- 12
- 13
- 14
- 15
- 16
- 17
- 18
- 19
- 20
- 21
- 22
- 23
- 24
- 25
- 26
- 27
- 28
- 29
- 30
- 31

一直阻塞:put、take
@Slf4j public class P39 { public static void main(String[] args) { BlockingQueue<Integer> blockingQueue = new ArrayBlockingQueue<>(1); new Thread(() -> { try { blockingQueue.put(1); log.info("放入1成功"); blockingQueue.put(2); log.info("放入2成功"); } catch (InterruptedException e) { e.printStackTrace(); } }).start(); new Thread(() -> { try { TimeUnit.SECONDS.sleep(2); blockingQueue.take(); log.info("取出1成功"); blockingQueue.take(); log.info("取出2成功"); } catch (InterruptedException e) { e.printStackTrace(); } }).start(); } }- 1
- 2
- 3
- 4
- 5
- 6
- 7
- 8
- 9
- 10
- 11
- 12
- 13
- 14
- 15
- 16
- 17
- 18
- 19
- 20
- 21
- 22
- 23
- 24
- 25
- 26
- 27
- 28
- 29
- 30
- 31
- 32
- 33

- 当容量为1时,放入一个元素后,只有当该元素被取出来,才允许放入新元素,否则一直阻塞
超时机制:offer、poll
BlockingQueue<Integer> blockingQueue = new ArrayBlockingQueue<>(1); System.out.println("blockingQueue.offer(1) = " + blockingQueue.offer(1)); try { System.out.println("blockingQueue.offer(2,1,TimeUnit.SECONDS) = " + blockingQueue.offer(2,1,TimeUnit.SECONDS)); } catch (InterruptedException e) { e.printStackTrace(); }- 1
- 2
- 3
- 4
- 5
- 6
- 7
- 8

SynchronousQueue(没有容量)
- SynchronousQueue是一个不存储元素的BlockingQueue。
- 每一个put操作必须要等待I个take操作,否则不能继续添加元素,反之亦然。
- 很类似ArrayBlockingQueue设置容量为1的情况
@Slf4j public class P40 { public static void main(String[] args) { BlockingQueue<Integer> blockingQueue = new SynchronousQueue<>(); new Thread(() -> { try { blockingQueue.put(1); log.info("放入1成功"); blockingQueue.put(2); log.info("放入2成功"); } catch (InterruptedException e) { e.printStackTrace(); } }).start(); new Thread(() -> { try { TimeUnit.SECONDS.sleep(2); blockingQueue.take(); log.info("取出1成功"); TimeUnit.SECONDS.sleep(2); blockingQueue.take(); log.info("取出2成功"); } catch (InterruptedException e) { e.printStackTrace(); } }).start(); } }- 1
- 2
- 3
- 4
- 5
- 6
- 7
- 8
- 9
- 10
- 11
- 12
- 13
- 14
- 15
- 16
- 17
- 18
- 19
- 20
- 21
- 22
- 23
- 24
- 25
- 26
- 27
- 28
- 29
- 30
- 31
- 32
- 33
- 34

线程通信–生产者消费者模型
synchronized、lock
- 线程 — 操作 — 资源类
- 判断 — 干活 — 通知
步骤
- 首先要有一个
资源类,类似于一个商品(但储量只能为1) 操作即方法,假设有两个方法:生产、消费;判断:判断该不该自己干活?如果不该,则等待(类似于已经有商品了,生产者等待)- 如果该自己
干活,则干活(类似于,已经有商品了,消费者该干活了) - 干完活不忘
通知其他线程干活(类似于生产一个商品,就要通知消费者消费;消费一个产品就要通知生产者生产) - 注意:防止虚假唤醒,使用while而不是if,因为现在只有两个操作,如果有还有第三个操作,那么一旦唤醒,其他两个都会被唤醒,实际我们只想唤醒其中一个
synchronized版和lock版:
- sync版,使用sync加锁,wait等待,notify进行通知;
- lock版,使用lock加锁,lock.newCondition()的await进行等待、signal进行通知;
- 后面还有阻塞队列版

public class P41 { public static void main(String[] args) throws InterruptedException { //=============使用synchronized实现========= ResourceSync resourceSync = new ResourceSync(); for (int i = 0; i < 5; i++) { new Thread(() -> { try { resourceSync.add(); } catch (InterruptedException e) { e.printStackTrace(); } }).start(); new Thread(() -> { try { resourceSync.del(); } catch (InterruptedException e) { e.printStackTrace(); } }).start(); } TimeUnit.SECONDS.sleep(1); System.out.println("====================="); //===============使用lock实现=================== ResourceLock resourceLock = new ResourceLock(); for (int i = 0; i < 5; i++) { new Thread(() -> { try { resourceLock.add(); } catch (InterruptedException e) { e.printStackTrace(); } }).start(); new Thread(() -> { try { resourceLock.del(); } catch (InterruptedException e) { e.printStackTrace(); } }).start(); } } } // 使用synchronized实现 @Slf4j class ResourceSync { int count; synchronized void add() throws InterruptedException { while (count != 0) { this.wait(); } log.info("add 1"); count++; this.notifyAll(); } synchronized void del() throws InterruptedException { while (count == 0) { this.wait(); } log.info("del 1"); count--; this.notifyAll(); } } // 使用lock实现 @Slf4j class ResourceLock { int count; Lock lock = new ReentrantLock(); Condition condition = lock.newCondition(); void add() throws InterruptedException { lock.lock(); try { while (count != 0) { condition.await(); } log.info("add 1"); count++; condition.signalAll(); } finally { lock.unlock(); } } void del() throws InterruptedException { lock.lock(); try { while (count == 0) { condition.await(); } log.info("del 1"); count--; condition.signalAll(); } finally { lock.unlock(); } } }- 1
- 2
- 3
- 4
- 5
- 6
- 7
- 8
- 9
- 10
- 11
- 12
- 13
- 14
- 15
- 16
- 17
- 18
- 19
- 20
- 21
- 22
- 23
- 24
- 25
- 26
- 27
- 28
- 29
- 30
- 31
- 32
- 33
- 34
- 35
- 36
- 37
- 38
- 39
- 40
- 41
- 42
- 43
- 44
- 45
- 46
- 47
- 48
- 49
- 50
- 51
- 52
- 53
- 54
- 55
- 56
- 57
- 58
- 59
- 60
- 61
- 62
- 63
- 64
- 65
- 66
- 67
- 68
- 69
- 70
- 71
- 72
- 73
- 74
- 75
- 76
- 77
- 78
- 79
- 80
- 81
- 82
- 83
- 84
- 85
- 86
- 87
- 88
- 89
- 90
- 91
- 92
- 93
- 94
- 95
- 96
- 97
- 98
- 99
- 100
- 101
- 102
- 103
- 104
- 105
- 106
- 107
- 108
- 109
- 110
- 111
- 112
- 113
- 114

阻塞队列
生产者消费者 – 阻塞队列
public class P44 { public static void main(String[] args) throws InterruptedException { Resource44 resource = new Resource44(new ArrayBlockingQueue<>(3)); //生产线程启动 new Thread(() -> { try { resource.product(); } catch (InterruptedException e) { e.printStackTrace(); } }).start(); //消费线程启动 new Thread(() -> { try { resource.consumer(); } catch (InterruptedException e) { e.printStackTrace(); } }).start(); //五秒后强制叫停: TimeUnit.SECONDS.sleep(5); System.out.println("main方法叫停生产消费!!!"); resource.stop(); } } @Slf4j class Resource44 { private volatile boolean flag = true; private BlockingQueue<Integer> blockingQueue; private AtomicInteger atomicInteger = new AtomicInteger(); public Resource44(BlockingQueue<Integer> blockingQueue) { this.blockingQueue = blockingQueue; log.info("BlockingQueue:{}", blockingQueue.getClass().getName()); } /** * 生产者生产 * * @throws InterruptedException */ public void product() throws InterruptedException { while (flag) { int val = atomicInteger.incrementAndGet(); boolean offer = blockingQueue.offer(val, 2, TimeUnit.SECONDS); if (offer) { log.info("生产 资源-{} 成功", val); } else { log.info("生产 资源-{} 失败", val); } TimeUnit.SECONDS.sleep(1); } log.info("生产者停止生产!!!"); } /** * 消费者消费 * * @throws InterruptedException */ public void consumer() throws InterruptedException { while (flag) { Integer poll = blockingQueue.poll(1, TimeUnit.SECONDS); if (StringUtils.isEmpty(poll)) { log.info("消费者1秒钟未收到资源,停止消费!!!"); } else { log.info("消费 资源-{}", poll); } TimeUnit.SECONDS.sleep(1); } log.info("消费者停止消费!!!"); } /** * 强制停止生产消费 */ public void stop() { this.flag = false; } }- 1
- 2
- 3
- 4
- 5
- 6
- 7
- 8
- 9
- 10
- 11
- 12
- 13
- 14
- 15
- 16
- 17
- 18
- 19
- 20
- 21
- 22
- 23
- 24
- 25
- 26
- 27
- 28
- 29
- 30
- 31
- 32
- 33
- 34
- 35
- 36
- 37
- 38
- 39
- 40
- 41
- 42
- 43
- 44
- 45
- 46
- 47
- 48
- 49
- 50
- 51
- 52
- 53
- 54
- 55
- 56
- 57
- 58
- 59
- 60
- 61
- 62
- 63
- 64
- 65
- 66
- 67
- 68
- 69
- 70
- 71
- 72
- 73
- 74
- 75
- 76
- 77
- 78
- 79
- 80
- 81
- 82
- 83
- 84
- 85
- 86
synchronized和lock的区别
1、原始构成
- synchronized是关键字属于JVM层面
- monitorenter(底层是通过monitor对象来完成,其实wait/notify等方法也依赖于moniton对象,只有在同步块或方法中才能调wait/notify等友
- monitorexit
- Lock是具体类(java.util.concurrent.locks.Lock)是api层面的锁
2、使用方法
- synchronized不需要用户去手动释放锁,当synchronized代码执行完后系统会自动让线程释放对锁的占用
- ReentrantLock则需要用户去手动释放锁若没有主动释放锁,就有可能导致出现死锁现象。需要Lock( )利lunLock()方法配合try/finally语句块来完成。
3、等待是否可中断
- synchronized不可中断,除非抛出异常或者正常运行完成
- ReentrantLock可中断
- 1.设置超时方法 tryLock(Long timeout,TimeUnit unit)
- 2.lockInterruptibly()放代码块中,调用interrupt()方法可中断
4、加锁是否公平
- synchronized非公平锁
- ReentrantLock两者都可以,默认非公平锁,构造方法可以传入boolean值,true为公平锁,false为非公平锁
5、锁绑定多个条件condition
- synchronized没有
- ReentrantLock用来实现分组唤醒需要唤醒的线程们,可以精确唤醒,而不是像synchronized要么随机唤醒一个线程要么唤醒全部线程。
即:
- 对于创建,一个是关键字,一个是类,可以指定参数是否公平
- 对于使用,lock需要手动解锁,但是也可以中断
- 优势:lock可以精确唤醒
要求:
- 以 5次AA,10次BB,15次CC 的顺序打印
- 重复10次
实现:(主要就是lock的精准唤醒)
public class P43 { public static void main(String[] args) { Print print = new Print(); for (int i = 0; i < 10; i++) { new Thread(() -> { print.printA(); }).start(); new Thread(() -> { print.printB(); }).start(); new Thread(() -> { print.printC(); }).start(); } } } class Print { Lock lock = new ReentrantLock(); Condition c1 = lock.newCondition(); Condition c2 = lock.newCondition(); Condition c3 = lock.newCondition(); int note; void printA() { lock.lock(); try { while (note != 0) { c1.await(); } for (int i = 0; i < 5; i++) { System.out.println("AA"); } note = 1; c2.signalAll(); } catch (InterruptedException e) { e.printStackTrace(); } finally { lock.unlock(); } } void printB() { lock.lock(); try { while (note != 1) { c2.await(); } for (int i = 0; i < 10; i++) { System.out.println("BB"); } note = 2; c3.signalAll(); } catch (InterruptedException e) { e.printStackTrace(); } finally { lock.unlock(); } } void printC() { lock.lock(); try { while (note != 2) { c3.await(); } for (int i = 0; i < 15; i++) { System.out.println("CC"); } note = 0; c1.signalAll(); } catch (InterruptedException e) { e.printStackTrace(); } finally { lock.unlock(); } } }- 1
- 2
- 3
- 4
- 5
- 6
- 7
- 8
- 9
- 10
- 11
- 12
- 13
- 14
- 15
- 16
- 17
- 18
- 19
- 20
- 21
- 22
- 23
- 24
- 25
- 26
- 27
- 28
- 29
- 30
- 31
- 32
- 33
- 34
- 35
- 36
- 37
- 38
- 39
- 40
- 41
- 42
- 43
- 44
- 45
- 46
- 47
- 48
- 49
- 50
- 51
- 52
- 53
- 54
- 55
- 56
- 57
- 58
- 59
- 60
- 61
- 62
- 63
- 64
- 65
- 66
- 67
- 68
- 69
- 70
- 71
- 72
- 73
- 74
- 75
- 76
- 77
- 78
- 79
- 80
- 81
- 82
- 83
- 84
- 85
- 86
- 87
Callable
public class P45 { public static void main(String[] args) throws ExecutionException, InterruptedException { FutureTask<String> futureTask = new FutureTask<>(new CallableImpl()); new Thread(futureTask).start(); new Thread(futureTask).start(); String res = futureTask.get(); System.out.println(res); } } class CallableImpl implements Callable<String> { @Override public String call() throws Exception { System.out.println("CallableImpl.call..."); return "ok"; } }- 1
- 2
- 3
- 4
- 5
- 6
- 7
- 8
- 9
- 10
- 11
- 12
- 13
- 14
- 15
- 16
- 17
- 18
- 19
- 20

-
FutureTash实现了Runnable:又可以传Callable


-
使用new Thread开启线程,多次传同一个同一个FutureTask对象,只会计算一次,但是传的是不同FutureTask对象,则会计算多次。例如上例中明明开启两个线程,但只计算了一次:


线程池:
总结在另一篇文章:https://blog.csdn.net/m0_55155505/article/details/125191350
死锁:
- 死锁是指两个或两个以上的进程在执行过程中,因争夺资源而造成的一种互相等待的现象,若无外力干滩那它们都将无法推进下去,
- 如果系统资源充足,进程的资源请求都能够得到满足,死锁出现的可能性就很低,否则就会因争夺有限的资源而陷入死锁。
代码
- lock版,模拟变高的人想变瘦,变瘦的人想变高,互相想获得对方的锁:
public class P55 { public static void main(String[] args) { Resource55 resource = new Resource55(); new Thread(() -> { resource.toHigh(); }).start(); new Thread(() -> { resource.toThin(); }).start(); } } @Slf4j class Resource55{ Lock l1 = new ReentrantLock(); Lock l2 = new ReentrantLock(); void toHigh(){ l1.lock(); try{ log.info("变高了..."); TimeUnit.SECONDS.sleep(1); //变高的人想变瘦 toThin(); } catch (InterruptedException e) { e.printStackTrace(); } finally { l1.unlock(); } } void toThin(){ l2.lock(); try{ log.info("变瘦了..."); TimeUnit.SECONDS.sleep(1); //变瘦的人想变高 toHigh(); } catch (InterruptedException e) { e.printStackTrace(); } finally { l2.unlock(); } } }- 1
- 2
- 3
- 4
- 5
- 6
- 7
- 8
- 9
- 10
- 11
- 12
- 13
- 14
- 15
- 16
- 17
- 18
- 19
- 20
- 21
- 22
- 23
- 24
- 25
- 26
- 27
- 28
- 29
- 30
- 31
- 32
- 33
- 34
- 35
- 36
- 37
- 38
- 39
- 40
- 41
- 42
- 43
- 44
- 45
- 46
- 47
如何知道这是死锁,而不是死循环等错误?
- 命令行输入
jps -l查看对应的pid

- 输入
jstack 对应pid

- 最后面写着:Found 1 deadlock

- sync版:
- 持有lockA的准备获取锁lockB,持有lockB的准备获取lockA
@Slf4j class RunnableImpl55 implements Runnable{ private String lockA; private String lockB; public RunnableImpl55(String lockA, String lockB) { this.lockA = lockA; this.lockB = lockB; } private void lockA2lockB() throws InterruptedException { synchronized (lockA){ log.info("已经持有锁:{},想要获取锁:{}",lockA,lockB); TimeUnit.SECONDS.sleep(1); lockB2lockA(); } } private void lockB2lockA() throws InterruptedException { synchronized (lockB){ log.info("已经持有锁:{},想要获取锁:{}",lockB,lockA); TimeUnit.SECONDS.sleep(1); lockA2lockB(); } } @Override public void run() { try { lockA2lockB(); } catch (InterruptedException e) { e.printStackTrace(); } } public static void main(String[] args) { String lockA = "lockA"; String lockB = "lockB"; new Thread(new RunnableImpl55(lockA,lockB)).start(); new Thread(new RunnableImpl55(lockB,lockA)).start(); } }- 1
- 2
- 3
- 4
- 5
- 6
- 7
- 8
- 9
- 10
- 11
- 12
- 13
- 14
- 15
- 16
- 17
- 18
- 19
- 20
- 21
- 22
- 23
- 24
- 25
- 26
- 27
- 28
- 29
- 30
- 31
- 32
- 33
- 34
- 35
- 36
- 37
- 38
- 39
- 40
- 41

JVM
另一篇文章:https://blog.csdn.net/m0_55155505/article/details/125976760
类加载器
类加载器分类(按照java虚拟机规范)
- 引导类加载器(Bootstrap ClassLoader)
- 自定义类加载器(User-Defined ClassLoader,除了引导类加载器以外的)
虚拟机自带的加载器:
1、引导类加载器:Bootstrap ClassLoader- c/c++语言实现,嵌套在jvm内部
- 用来加载java核心库:JAVA_HOME/jre/lib/rt.jar、resources.jar或sun.boot.class.path路径下的内容,用于提供jvm自身需要的类
- 并不继承自java.lang.ClassLoader,没有父加载器
- 架载扩展类和应用程序类加载器,并指定为他们的父类加载器
- 处于安全考虑,只加载包名为java、javax、sun等开头的类
//通过Launcher.getBootstrapClassPath().getURLs()获取: file:/C:/Java/jdk1.8.0_271/jre/lib/resources.jar file:/C:/Java/jdk1.8.0_271/jre/lib/rt.jar file:/C:/Java/jdk1.8.0_271/jre/lib/sunrsasign.jar file:/C:/Java/jdk1.8.0_271/jre/lib/jsse.jar file:/C:/Java/jdk1.8.0_271/jre/lib/jce.jar file:/C:/Java/jdk1.8.0_271/jre/lib/charsets.jar file:/C:/Java/jdk1.8.0_271/jre/lib/jfr.jar file:/C:/Java/jdk1.8.0_271/jre/classes- 1
- 2
- 3
- 4
- 5
- 6
- 7
- 8
- 9
2、扩展类加载器
- java语言编写
- 派生于ClassLoader
- 父类为启动类加载器
- java.ext.dirs系统属性所指定的目录中加载类库,或从jdk安装目录的jre/lib/ext子目录(扩展目录)下加载类库。如果用户创建的jar放在此目录下,也就自动有扩展类加载器加载
//通过System.getProperty("java.ext.dirs")获取: C:\Java\jdk1.8.0_271\jre\lib\ext;C:\Windows\Sun\Java\lib\ext- 1
- 2
3、应用程序类加载器(系统类加载器,appClassLoader)
- java语言编写,有sun.misc.Launcher$AppclassLoader实现
- 派生于ClassLoader类
- 父类加载器为扩展类类加载器
- 它负责加载器环境变量classpath(自定义类)或系统属性java.class.path指定路径下的类库
- 该类加载是程序中默认的类加载器,一般来说,java应用的类都是由它来完成加载
- 通过ClassLoaser#getSystemClassLoader()方法可以获取到该类的类加载器
双亲委派机制
java虚拟机对class文件采用的是按需加载的方式,也就是说当需要使用该类的时候才会将该类的class文件加载到内存生成class对象,而且加载某个类的class文件时,java虚拟机采用的时双亲委派模式,即把请求交由父类处理,他是一种任务委派模式
原理:(向上委托到最顶层之后,依次尝试加载:引导类加载器 -> 扩展类加载器 -> 系统类加载器)
- 如果一个类加载器收到了类加载请求,并不会自己先去加载,而是委托给其父类加载器进行加载
- 如果其父类加载器还存在父类,则会继续向上委托,最终到达引导类加载器
- 如果父类可以完成类加载,则成功返回,否则,子类加载器尝试进行类加载
例子:
- 自定义一个java.lang.String类

- 尝试创建对象

- 发现用不是自定义的String类(未输出"自定义String…")
优点:
- 防止重复加载
- 防止核心api被篡改(例如:不能在java.lang下自定义类,否则会报java.lang.SecurityException)
沙箱安全机制
原文更详细:https://blog.csdn.net/qq_30336433/article/details/83268945
是什么?- Java安全模型的核心就是Java沙箱(sandbox),什么是沙箱?沙箱是一个限制程序运行的环境。
- 沙箱机制就是将 Java 代码限定在虚拟机(JVM)特定的运行范围中,并且
严格限制代码对本地系统资源访问,通过这样的措施来保证对代码的有效隔离,防止对本地系统造成破坏。 - 沙箱主要限制系统资源访问,那系统资源包括什么?——CPU、内存、文件系统、网络。不同级别的沙箱对这些资源访问的限制也可以不一样。
- 所有的Java程序运行都可以指定沙箱,可以定制安全策略。
核心组件:
- 字节码校验器(bytecode verifier):确保Java类文件遵循Java语言规范。这样可以帮助Java程序实现内存保护。但并不是所有的类文件都会经过字节码校验,比如核心类。
- 类装载器(class loader):其中类装载器在3个方面对Java沙箱起作用
- 它防止恶意代码去干涉善意的代码;
- 它守护了被信任的类库边界;
- 它将代码归入保护域,确定了代码可以进行哪些操作。
虚拟机为不同的类加载器载入的类提供不同的命名空间,命名空间由一系列唯一的名称组成,每一个被装载的类将有一个名字,这个命名空间是由Java虚拟机为每一个类装载器维护的,它们互相之间甚至不可见。
类装载器采用的机制是双亲委派模式.
- 从最内层JVM自带类加载器开始加载,外层恶意同名类得不到加载从而无法使用;
- 由于严格通过包来区分了访问域,外层恶意的类通过内置代码也无法获得权限访问到内层类,破坏代码就自然无法生效。
- 存取控制器(access controller):存取控制器可以控制核心API对操作系统的存取权限,而这个控制的策略设定,可以由用户指定。
- 安全管理器(security manager):是核心API和操作系统之间的主要接口。实现权限控制,比存取控制器优先级高。
- 安全软件包(security package):java.security下的类和扩展包下的类,允许用户为自己的应用增加新的安全特性
包括:安全提供者、消息摘要、数字签名、加密、鉴别
如图:自定义java.lang.String类,自其中写main方法尝试运行

运行结果:

说明使用的不是我们自定义的String结论:
-
1、自定义String类,在加载的时候使用引导类加载器进行加载
↓
2、引导类加载器在加载的时候会加载jdk自带的文件中的String类
↓
3、自带jdk中的String没有main方法,导致报错 -
这样可以保证对java核心源代码的保护,这就是沙箱安全机制
垃圾回收(如何判断垃圾、GC Root是什么)
什么是垃圾:内存中不在使用的空间
如何判断:-
引用计数法(了解)

-
枚举根节点做可达性分析(根搜索路径)
- 从GC Root开始,可达的就不是垃圾
- GC Root包括哪些:(熟悉前四种)
- 虚拟机栈中引用的对象
比如:各个线程被调用的方法中使用到的参数、局部变量等。
- 本地方法栈内JNI(通常说的本地方法)引用的对象
- 方法区中类静态属性引用的对象
比如:Java类的引用类型静态变量
- 方法区中常量引用的对象
比如:字符串常量池(stringTable)里的引用、static final修饰的常量
- 所有被同步锁synchronized持有的对象
- Java虚拟机内部的引用。
基本数据类型对应的class对象,一些常驻的异常对象(如:NullPointerException、outofMemoryError),系统类加载器。
- 反映java虚拟机内部情况的JMXBean、JVMTI中注册的回调、本地代码缓存等。
- 虚拟机栈中引用的对象
如何清除:清除阶段算法
- 复制算法
- 标记清除
- 标记整理
JVM参数
分为以下三种参数:
-
标配参数

-
X参数(了解)

-
XX参数(包括Xms、Xmx,类似于起了别名)
XX参数:
-
Boolean类型,-XX:+(或-)参数,例如:
-XX:+PrintGCDetails
查看是否开启:

添加运行参数:

再次查看:

-
KV设置值类型:-XX:属性key=属性value,例如
-XX:MetaspaceSize=11111111
查看:

设置:

再查看:(和设置的不一致应该是动态调整)

jinfo
- 用法:

注意:
- -Xms、-Xmx属于XX参数,类似于起了别名!
-Xms:初始堆空间内存(默认为物理内存的1/64)-Xmx:最大堆空间内存(默认为物理内存的1/4)

查看初始默认参数:
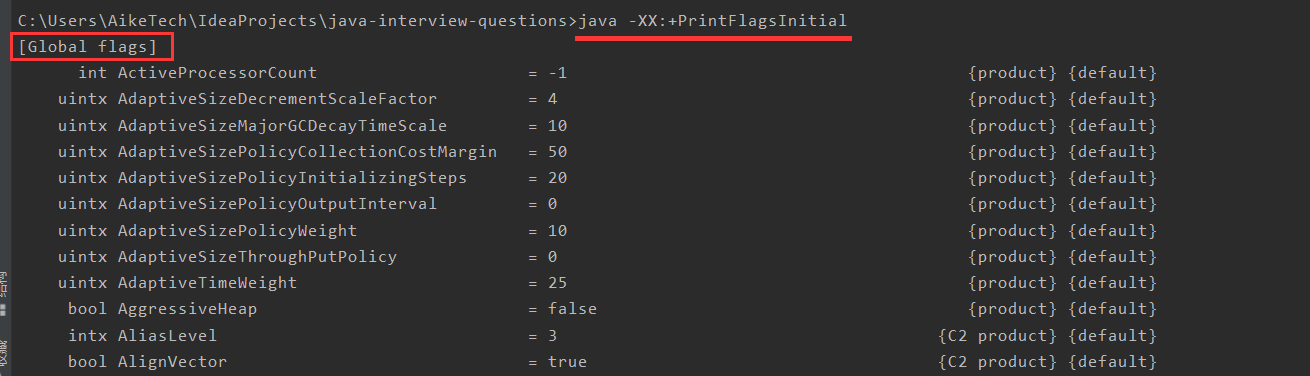
-
java -XX:+PrintFlagsInitial初始化参数
-
java -XX:+PrintFlagsFinal用于查看修改后的参数(=表示默认,:=表示修改过,修改后的值;但jdk17的话,没有使用=和:=,而是在最后面加了一个参数(default、command line)用来表示是默认值还是修改了的值)- jdk 8:

- jdk17:

- jdk 8:
-
java -XX:+PrintCommandLineFlags打印命令行参数

使用代码查看:
public class P65 { public static void main(String[] args) { long totalMemory = Runtime.getRuntime().totalMemory(); long maxMemory = Runtime.getRuntime().maxMemory(); System.out.println("totalMemory = " + totalMemory / 1024 / 1024 + " MB"); System.out.println("64 * totalMemory = " + 64 * totalMemory / 1024 / 1024 + " MB"); System.out.println("maxMemory = " + maxMemory / 1024 / 1024 + " MB"); System.out.println("4 * maxMemory = " + 4 * maxMemory / 1024 / 1024 + " MB"); } }- 1
- 2
- 3
- 4
- 5
- 6
- 7
- 8
- 9
- 10
- 11


你配过哪些参数?
-XX:+PrintFlagsInitial:查看所有的参数的默认初始值(示例在本节最后面)
-XX:+PrintFlagsFinal:查看所有的参数的最终值(可能会存在修改,不再是初始值;=表示初始值,:=表示修改过,修改后的值)
-Xms:初始堆空间内存(默认为物理内存的1/64),等价于-XX:InitialHeapSize
-Xmx:最大堆空间内存(默认为物理内存的1/4),等价于-XX:MaxHeapSize
-Xss:设置单个线程栈的大小,一般为512k~1024k;等价于-XX:ThreadStackSize
-Xmn:设置新生代的大小。(初始值及最大值)
-XX:MetaspaceSize:设置元空间大小
-XX:NewRatio:配置新生代与老年代在堆结构的占比
-XX:SurvivorRatio:设置新生代中Eden和so/s1空间的比例
-XX:MaxTenuringThreshold:设置新生代垃圾的最大年龄
-XX:+PrintGCDetails:输出详细的Gc处理日志
打印gc简要信息:1、-XX:+PrintGC2、-verbose:gc
-XX:HandlePromotionFailure:是否设置空间分配担保关于GC参数可参考:PrintGCDetails 输出参数及解释
强引用、软引用、弱引用、虚引用

详细的,可参考:https://blog.csdn.net/m0_55155505/article/details/125976760#_1355
强引用:默认就是强引用,宁愿OOM也不回收
public class P72 { public static void main(String[] args) { Object obj = new Object(); try { toOOM(); } catch (OutOfMemoryError e) { e.printStackTrace(); System.out.println(obj); } } public static void toOOM() throws OutOfMemoryError { // 设置参数 -Xms10m -Xmx10m byte[] bytes = new byte[10 * 1024 * 1024]; } }- 1
- 2
- 3
- 4
- 5
- 6
- 7
- 8
- 9
- 10
- 11
- 12
- 13
- 14
- 15
- 16
- 17

软引用:内存够不回收,内存不足会被回收
public class P73 { public static void main(String[] args) { Object obj = new Object(); SoftReference softReference = new SoftReference(obj); obj = null; System.gc(); System.out.println("第一次gc后:"); System.out.println("obj = " + obj); System.out.println("softReference.get() = " + softReference.get()); try { toOOM(); } catch (OutOfMemoryError e) { e.printStackTrace(); System.out.println("OOM之后:"); System.out.println("obj = " + obj); System.out.println("softReference.get() = " + softReference.get()); } } public static void toOOM() throws OutOfMemoryError { // -Xms10m -Xmx10m byte[] bytes = new byte[10 * 1024 * 1024]; } }- 1
- 2
- 3
- 4
- 5
- 6
- 7
- 8
- 9
- 10
- 11
- 12
- 13
- 14
- 15
- 16
- 17
- 18
- 19
- 20
- 21
- 22
- 23
- 24
- 25
- 26
- 27
- 28

弱引用:只要发生gc,就会被回收
- 例子
public class P74 { public static void main(String[] args) throws InterruptedException { Object obj = new Object(); WeakReference weakReference = new WeakReference(obj); obj = null; System.gc(); TimeUnit.SECONDS.sleep(1); System.out.println("obj = " + obj); System.out.println("weakReference.get() = " + weakReference.get()); } }- 1
- 2
- 3
- 4
- 5
- 6
- 7
- 8
- 9
- 10
- 11
- 12
- 13
- 14

- ReferenceQueue:被gc清理后,放入到该队列中:
public class P78 { public static void main(String[] args) throws InterruptedException { Object obj = new Object(); ReferenceQueue referenceQueue = new ReferenceQueue(); WeakReference weakReference = new WeakReference(obj, referenceQueue); System.out.println("=====gc前:====="); System.out.println("obj = " + obj); System.out.println("weakReference.get() = " + weakReference.get()); System.out.println("referenceQueue.poll() = " + referenceQueue.poll()); obj = null; System.gc(); TimeUnit.SECONDS.sleep(1); System.out.println("=====gc后:====="); System.out.println("obj = " + obj); System.out.println("weakReference.get() = " + weakReference.get()); System.out.println("referenceQueue.poll() = " + referenceQueue.poll()); } }- 1
- 2
- 3
- 4
- 5
- 6
- 7
- 8
- 9
- 10
- 11
- 12
- 13
- 14
- 15
- 16
- 17
- 18
- 19
- 20
- 21
- 22
- 23

虚引用:
- 在被回收前被引用队列保存下

- 代码:
public class P79 { public static void main(String[] args) throws InterruptedException { Object obj = new Object(); ReferenceQueue referenceQueue = new ReferenceQueue(); PhantomReference phantomReference = new PhantomReference(obj, referenceQueue); System.out.println("=====gc前:====="); System.out.println("obj = " + obj); System.out.println("phantomReference.get() = " + phantomReference.get()); System.out.println("referenceQueue.poll() = " + referenceQueue.poll()); obj = null; System.gc(); TimeUnit.SECONDS.sleep(1); System.out.println("=====gc后:====="); System.out.println("obj = " + obj); System.out.println("phantomReference.get() = " + phantomReference.get()); System.out.println("referenceQueue.poll() = " + referenceQueue.poll()); } }- 1
- 2
- 3
- 4
- 5
- 6
- 7
- 8
- 9
- 10
- 11
- 12
- 13
- 14
- 15
- 16
- 17
- 18
- 19
- 20
- 21
- 22
- 23

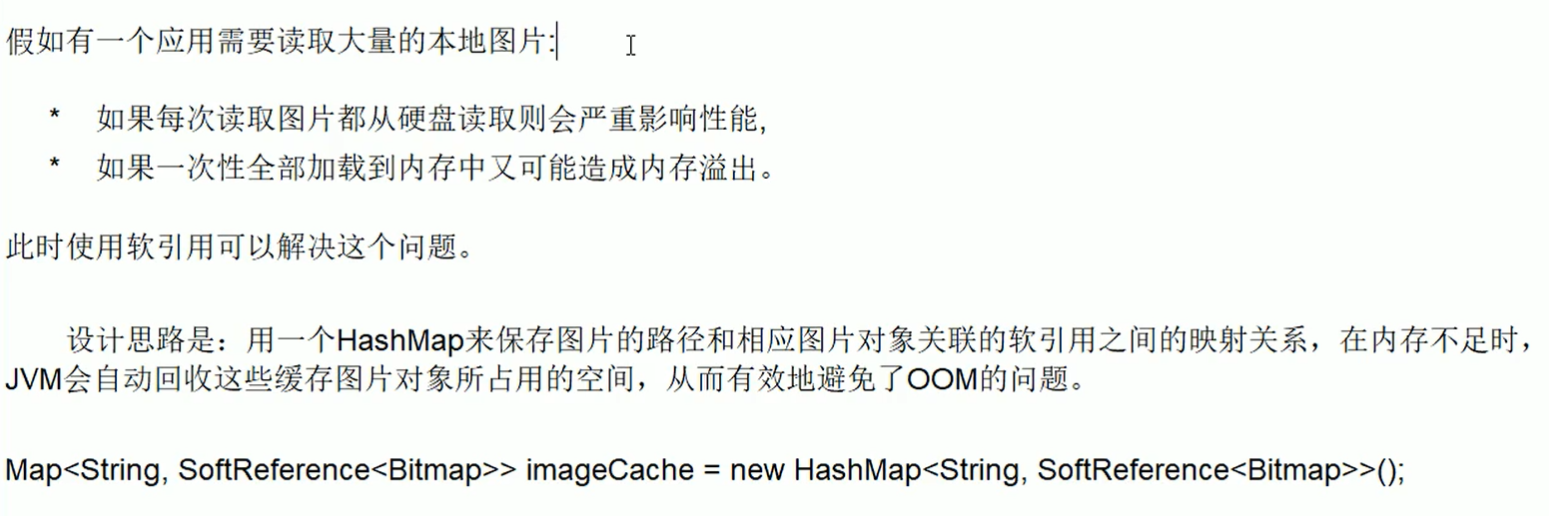
软引用、弱引用的应用:
WeakHashMap:
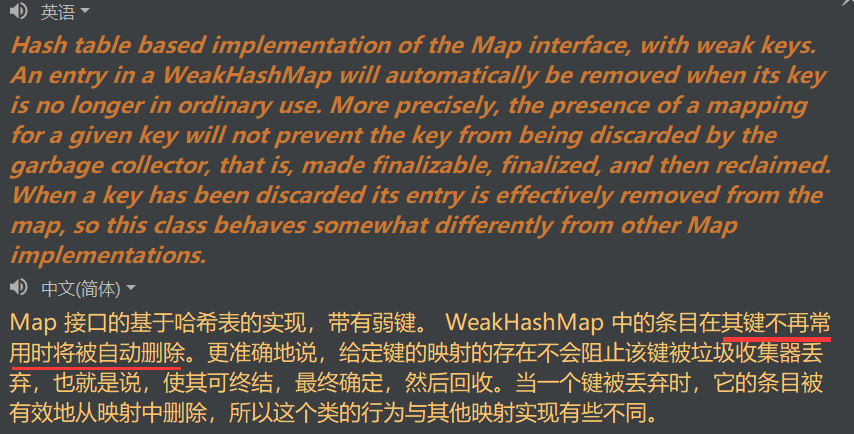
public class P76 { public static void main(String[] args) throws InterruptedException { WeakHashMap<String, Object> weakHashMap = new WeakHashMap<>(); String key = new String("a"); Object val = new Object(); weakHashMap.put(key, val); key = null; System.gc(); TimeUnit.SECONDS.sleep(1); System.out.println(weakHashMap); //{} } }- 1
- 2
- 3
- 4
- 5
- 6
- 7
- 8
- 9
- 10
- 11
- 12
- 13
- 14
- 15
- 16
- 17
SOFE (StackOverflowError)
java.lang.StackOverflowError
public class P81 { public static void main(String[] args) { main(args); } }- 1
- 2
- 3
- 4
- 5

OOM
Java heap space
对象创建的堆装不下了!!!
public class P82 { public static void main(String[] args) { // -Xms10m -Xmx10m byte[] bytes = new byte[10 * 1024 * 1024]; } }- 1
- 2
- 3
- 4
- 5
- 6

GC overhead limit exceeded

- GC
回收时间过长时会抛出OutOfMemroyError。 - 过长的定义是,超过98%的时间用来做GC并且回收了不到2%的堆内存。连续多次GC 都只回收了不到2%的极端情况下才会抛出。
- 假如不抛出 GC overhead limit错误会发生什么情况呢?那就是GC清理的这么点内存很快会再次填满,迫使GC再次执行,这样就形成恶性循环,CPU使用率一直是100%,而GC却没有任何成果
public class P83 { public static void main(String[] args) { // -Xms10m -Xmx10m -XX:+PrintGCDetails List<String> list = new ArrayList<>(); int i = 0; try { while (true) { list.add(String.valueOf(i++).intern()); } } catch (Throwable e) { e.printStackTrace(); } } }- 1
- 2
- 3
- 4
- 5
- 6
- 7
- 8
- 9
- 10
- 11
- 12
- 13
- 14
- 15
- 16

看垃圾回收情况:基本没会受到垃圾!!

Direct buffer memory
导致原因:
-
写NIO程序经常使用ByteBuffer来读取或者写入数据,这是一种基于通道(Channel)与缓冲区(Buffer)的I/O方式,
-
它可以使用Native函数库直接分配堆外内存,然后通过一个存储在Java堆里面的DirectByteBuffer对象作为这块内存的引用进行操作。这样能在一些场景中显著提高性能,因为避免了在ava堆和 Native堆中来回复制数据。
-
ByteBuffer.allocate(capability)第一种方式是分配JVM堆内存,属于GC管辖范围,由于需要拷贝所以速度相对较慢
-
ByteBuffer.allocteDirect(capability)第二种方式是分配OS本地内存,不属于GC管辖范围,由于不需要内存拷贝所以速度相对较快。
-
-
但如果不断分配本地内存,堆内存很少使用,那么JVM就不需要执行GC, DirectByteBuffer对象们就不会被回收.
-
这时候堆内存充足,但本地内存可能已经使用光了,再次尝试分配本地内存就会出现OutOfMemoryError,那程序就直接崩溃了。
例子:
public class P84 { public static void main(String[] args) { // -Xms10m -Xmx10m -XX:+PrintGCDetails -XX:MaxDirectMemorySize=5m // 设置本地内存5M,但申请6M的空间 long maxDirectMemory = VM.maxDirectMemory(); System.out.println("maxDirectMemory = " + maxDirectMemory / (double) 1024 / 1024 + " MB"); ByteBuffer allocate = ByteBuffer.allocateDirect(6 * 1024 * 1024); } }- 1
- 2
- 3
- 4
- 5
- 6
- 7
- 8
- 9
- 10
- 11

unable to create new thread
线程创建的太多了

- 代码:

- 结果:

Linux如何调最大线程数?
-
查看:
ulimit -u

-
修改:
vim /etc/security/limits.d/20-nproc.conf;*表示除了root之外的用户,这里可以看到,root用户没有限制,其他用户是4096(不同的服务器配置不同,也可能是1024)

Metaspace
public class P87 { public static void main(String[] args) { // -XX:MaxMetaspaceSize=10m int i = 0; try { for (; ; i++) { Enhancer enhancer = new Enhancer(); enhancer.setSuperclass(P87.class); // 默认是true,表示是同一个class;设为false,每次在方法区产生新的class enhancer.setUseCache(false); enhancer.setCallback(new MethodInterceptor() { @Override public Object intercept(Object o, Method method, Object[] objects, MethodProxy methodProxy) throws Throwable { return methodProxy.invoke(o, objects); } }); enhancer.create(); } } catch (Throwable e) { e.printStackTrace(); System.out.println("次数:" + i); } } }- 1
- 2
- 3
- 4
- 5
- 6
- 7
- 8
- 9
- 10
- 11
- 12
- 13
- 14
- 15
- 16
- 17
- 18
- 19
- 20
- 21
- 22
- 23
- 24

垃圾收集器

四种类型垃圾回收器:
- Serial:串行;为单线程环境设计,只使用一个线程进行垃圾回收,会停止所有的用户线程。不适合服务器环境(例如双十一,停一下试试)。
- Parallel:并行;多个线程同时进行垃圾回收,用户线程停止。适合做科学计算等弱交互场景。
- CMS:concurrent mark sweep,并发标记清除;用户线程和垃圾回收线程可同时执行(不一定并行,也可能是并发),互联网公司多使用它,适用于对响应时间有要求的场景。存在STW(stop the world),但时间短
- G1:分区垃圾回收,每一个区都可以是Eden、Survivor、Old,较大对象那个可放在H,分区进行清理

详细内容可前往:https://blog.csdn.net/m0_55155505/article/details/125976760#_1511
查看默认垃圾回收器:
java -XX:+PrintCommandLineFlags -version
JVM提供的垃圾收集器:

jdk 8 情况下,查看各个垃圾收集器的使用情况:C:\Users\AikeTech>jps 7092 P91 8648 6828 Launcher 8380 Jps C:\Users\AikeTech>jinfo -flag UseSerialGC 7092 -XX:-UseSerialGC C:\Users\AikeTech>jinfo -flag UseConcMarkSweepGC 7092 -XX:-UseConcMarkSweepGC C:\Users\AikeTech>jinfo -flag UseParNewGC 7092 -XX:-UseParNewGC C:\Users\AikeTech>jinfo -flag UseParallelGC 7092 -XX:+UseParallelGC C:\Users\AikeTech>jinfo -flag UseParallelOldGC 7092 -XX:+UseParallelOldGC C:\Users\AikeTech>jinfo -flag UseG1GC 7092 -XX:-UseG1GC- 1
- 2
- 3
- 4
- 5
- 6
- 7
- 8
- 9
- 10
- 11
- 12
- 13
- 14
- 15
- 16
- 17
- 18
- 19
- 20
- 21
- 22
- 23
- 24
七种垃圾收集器:
- Serial Old已经没有了,但存在过!


DerNew(Serial)、Tenured(Serial old)、ParNew、PSYoungGen、ParOldGen

- 如:下图中的DefNew 、default new generation、Tenured

Server与Client模式:

- 适用范围:只需要掌握Server模式即可,Client模式基本不会用
- 操作系统:
- 32位Window操作系统,不论硬件如何都默认使用Client的JVM模式
- 32位其它操作系统,2G内存同时有2个cpu以上用Server模式,低于该配置还是 Client模式
- 64位only server模式
切换不同的垃圾收集器
Serial

XX:+UseSerialGC,默认和Serial Old配合使用- 代码:
public class P94 { public static void main(String[] args) { // -Xms10m -Xmx10m -XX:+UseSerialGC -XX:+PrintCommandLineFlags -XX:+PrintGCDetails byte[] bytes = new byte[10 * 1024 * 1024]; } }- 1
- 2
- 3
- 4
- 5
- 6

ParNew


-XX:+UseParNewGC,默认和Serial Old搭配,但Serial Old将被废弃- 代码:
public class P95 { public static void main(String[] args) { // -Xms10m -Xmx10m -XX:+UseParNewGC -XX:+PrintCommandLineFlags -XX:+PrintGCDetails byte[] bytes = new byte[10 * 1024 * 1024]; } }- 1
- 2
- 3
- 4
- 5
- 6

Parallel


-XX:+UseParallelGC,老年代默认ParallelOldGC,且可以互相激活- 代码:
public class P96 { public static void main(String[] args) { // -Xms10m -Xmx10m -XX:+UseParallelGC -XX:+PrintCommandLineFlags -XX:+PrintGCDetails byte[] bytes = new byte[10 * 1024 * 1024]; } }- 1
- 2
- 3
- 4
- 5
- 6

CMS


-
-XX:+UseConcMarkSweepGC,年轻代ParNew,还会有Serial Old进行兜底 -
过程:
- 初始标记:STW,标记和GC root直接关联的对象,时间短
- 并发标记:和用户线程一起,标记GC root关联的全部对象
- 重新标记:STW,修正刚刚并发标记期间变动的对象
- 并发清理:和用户线程一起,清理未被标记的对象
-
优点:比较耗时的标记和清理和用户线程一起执行,总体停顿时间少。
-
缺点:
- 对CPU压力大

- 标记清除算法,大量内存碎片

- 对CPU压力大
-
代码:(效果不是很好,本节一开始那有张不错的图)
public class P98 { public static void main(String[] args) { // -Xms10m -Xmx10m -XX:+UseConcMarkSweepGC -XX:+PrintCommandLineFlags -XX:+PrintGCDetails byte[] bytes = new byte[10 * 1024 * 1024]; } }- 1
- 2
- 3
- 4
- 5
- 6

Serial Old

- 在jdk8被优化掉了,例如配置:
-XX:+UseSerialOldGC:

G1


-XX:+UseG1GC- 吞吐量高,停顿时间低,每一个块在不同时间可以充当不同的区(Eden、Survivor、Old)
- 代码:
public class P101 { public static void main(String[] args) { // -Xms10m -Xmx10m -XX:+UseG1GC -XX:+PrintCommandLineFlags -XX:+PrintGCDetails byte[] bytes = new byte[10 * 1024 * 1024]; } }- 1
- 2
- 3
- 4
- 5
- 6
- 结果:


特点:
- 1:G1能充分利用多CPU、多核环境硬件优势,尽量缩短STW。
- 2:G1整体上采用标记-整理算法,局部是通过复制算法,不会产生内存碎片。
- 3:宏观上看G1之中不再区分年轻代和老年代。把内存划分成多个独立的子区域(Region),可以近似理解为一个围棋的棋盘。
- 4:G1收集器里面讲整个的内存区都混合在一起了,但其本身依然在小范围内要进行年轻代和老年代的区分,保留了新生代和老年代,但它们不再是物理隔离的,而是一部分Region的集合且不需要Region是连续的,也就是说依然会采用不同的GC方式来处理不同的区域。
- 5:G1虽然也是分代收集器,但整个内存分区不存在物理上的年轻代与老年代的区别,也不需要完全独立的survivor(to space)堆做复制准备。G1只有逻辑上的分代概念,或者说每个分区都可能随G1的运行在不同代之间前后切换;
区域化内存划片Region
- 区域化内存划片Region,整体变为了一些列不连续的内存区域,避免了全内存区的GC操作。
- 核心思想是将整个堆内存区域分成大小相同的子区域(Region),在JVM启动时会自动设置这些子区域的大小,
- 在堆的使用上,G1并不要求对象的存储一定是物理上连续的只要逻辑上连续即可,每个分区也不会固定地为某个代服务,可以按需在年轻代和老年代之间切换。启动时可以通过参数-XX:G1HeapRegionSize=n可指定分区大小(1MB~32MB,且必须是2的幂),默认将整堆划分为2048个分区。
- 大小范围在1MB~32MB,最多能设置2048个区域,也即能够支持的最大内存为:32MB*2048=65536MB=64G内存
- 这些Region的一部分包含新生代,新生代的垃圾收集依然采用暂停所有应用线程的方式,将存活对象拷贝到老年代或者Survivor空间。
- 这些Region的一部分包含老年代,G1收集器通过将对象从一个区域复制到另外一个区域,完成了清理工作。这就意味着,在正常的处理过程中,G1完成了堆的压缩(至少是部分堆的压缩),这样也就不会有CMS内存碎片问题的存在了。
- 在G1中,还有一种特殊的区域,叫Humongous(巨大的)区域
如果一个对象占用的空间超过了分区容量50%以上,G1收集器就认为这是一个巨型对象。这些巨型对象默认直接会被分配在年老代,但是如果它是一个短期存在的巨型对象,就会对垃圾收集器造成负面影响。为了解决这个问题,G1划分了一个Humongous区工它用来专门存放巨型对象。如果一个H区装不下一个巨型对象,那么Gi会寻找连续的H分区来存储。为了能找到连续的H区,有时候不得不启动Full GC。
回收步骤:小区域收集 + 形成连续的内存块


参数配置:可以配一下最大堆内存、最大停顿时间


和CMS相比:
- G1不会产生内存碎片
- 可以精确控制GC停顿时间。把整个堆划分成固定大小的区域,每次根据允许停顿时间,区收集垃圾最多的区域
如何选择:

总结:

Linux命令

top、(uptime)
-
top命令:

-
可以查看内存(MEM)、cpu等占用情况
-
load average后面有三个值,表示系统1分钟、5分钟、15分钟的负载值;三个值的平均值如果大于0.6,说明系统负载重。图中的负载:(1.51+0.91+0.42)/3=0.95,说明负载重
-
一直按1,可以看到有每个cpu的情况:

-
uptime命令是top的精简版:可以用来看负载

vmstat、(mpstat 、pidstat)
-
vmstat:

-
主要用于查看cpu
-
vmstat -n 2 3表示每隔两秒采样一次,总共采样三次 -
procs
- r:运行和等待CPU时间片的进程数,原则上:1核的CPU的运行队列不要超过2,整个系统的运行队列不能超过总核数的2倍,否则代表系统压力过大│
- b:等待资源的进程数,比如正在等待磁盘I/0、网络I/0等。
-
cpu(前三个重要)
- us:用户进程消耗CPU时间百分比,us值高,用户进程消耗CPUI时间多,如果长期大于50%,优化程序;
- sy:内核进程消耗的CPU时间百分比;
- us + sy参考值为80%,如果us + sy大于80%,说明可能存在CPU不足。
- id(idle):处于空闲的CPU百分比.
- wa:系统等待IO的CPU时间百分比.
- st:来自于一个虚拟机偷取的CPU时间的百分比
-
查看所有cpu核信息:
mpstat -P ALL 2,其中2表示每2秒采样一次

-
每个进程使用cpu用量的分解信息:
pidstat -u 2 -p 进程id,其中2表示每两秒采样一次[root@yy ljy]# ps -ef | grep 'java -jar' root 23534 1 0 Jun17 ? 01:12:01 java -jar wechat-0.0.1-SNAPSHOT.jar root 30815 30045 0 20:46 pts/1 00:00:00 grep --color=auto java -jar [root@yy ljy]# pidstat -u 2 -p 23534 Linux 3.10.0-1160.49.1.el7.x86_64 (yy) 08/17/2022 _x86_64_ (1 CPU) 08:47:01 PM UID PID %usr %system %guest %CPU CPU Command 08:47:03 PM 0 23534 0.51 0.00 0.00 0.51 0 java 08:47:05 PM 0 23534 0.00 0.00 0.00 0.00 0 java 08:47:07 PM 0 23534 0.00 0.00 0.00 0.00 0 java 08:47:09 PM 0 23534 0.00 0.00 0.00 0.00 0 java 08:47:11 PM 0 23534 0.00 0.00 0.00 0.00 0 java- 1
- 2
- 3
- 4
- 5
- 6
- 7
- 8
- 9
- 10
- 11
- 12
free、(pidstat )
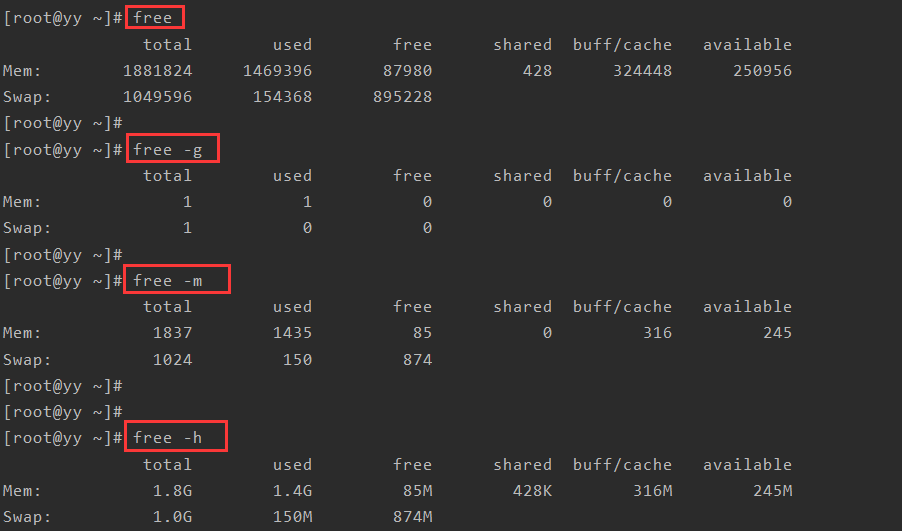
经验值:-
应用程序可用内存/系统物理内存 > 70%内存充足
-
应用程序可用内存/系统物理内存 < 20%内存不足,需要增加内存
-
20% < 应用程序可用内存/系统物理内存 < 70%内存基本够用
-
pidstat -p 进程号 -r 采样间隔秒数:

df
- 查看磁盘剩余空间

iostat

磁盘块设备分布
- rkB/s:每秒读取数据量kB;
- wkB/s:每秒写入数据量kB;
- svctm :l/O请求的平均服务时间,单位毫秒;
- await :l/O请求的平均等待时间,单位毫秒;值越小,性能越好
util:一秒中有百分几的时间用于I/O操作。接近100%时,表示磁盘带宽跑满,需要优化程序或者增加磁盘;- rkB/s、wkB/s根据系统应用不同会有不同的值,但有规律遵循:长期、超大数据读写,肯定不正常,需要优化程序读取。
- svctm的值与await的值很接近,表示几乎没有IO等待,磁盘性能好,
如果await的值远高于svctm的值,则表示IO队列等待太长,需要优化程序或更换更快磁盘。
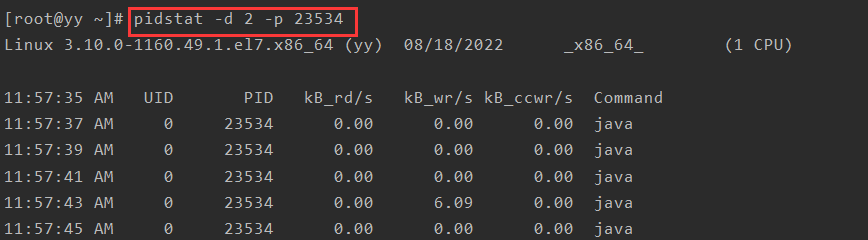
其他命令:
pidstat -d 采样间隔秒数 -p 进程号
ifstat
-
如果没有该命令,安装命令:
wget http://gael.roualland.free.fr/ifstat/ifstat-1.1.tar.gz tar xzvf ifstat-1.1.tar.gz cd ifstat-1.1 ./configure make make install- 1
- 2
- 3
- 4
- 5
- 6
-
使用

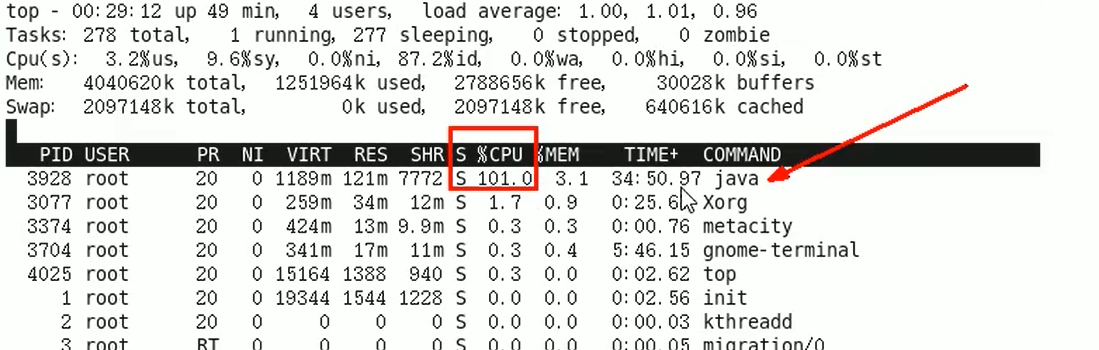
CPU占用过高定位分析

-
top
-
ps -ef或者jps

grep -v grep:查找不含有 grep 的行
-
查具体的线程:
ps -mp 进程id -o THREAD,tid,time
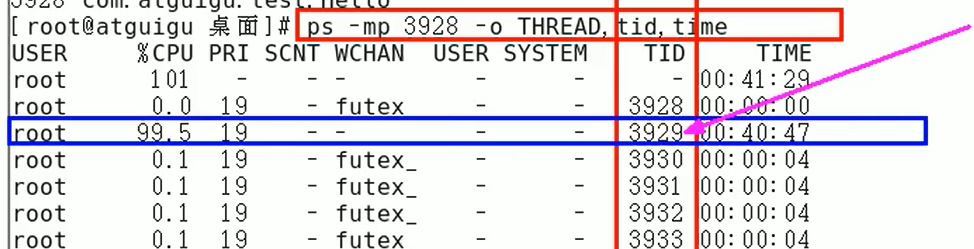
参数解释:
-m:显示所有的线程
-p pid:进程使用cpu的时间
-o:该参数后是用户自定义格式 -
线程id转为16进制:
printf "%x\n” 有问题的线程ID

或者使用计算器:但注意最后要把字母转为小写字母:

-
jstack 进程ID | grep tid(16进制线程ID小写英文) -A60,其中A60表示打印前60行

-
去看第十行:

-
相关阅读:
Android实现设置界面
java毕业设计Steam游戏平台系统(附源码、数据库)
C语言—指针进阶(详解篇)
SaaSBase:什么是SaleSmartly?
六张图详解LinkedList 源码解析
动态爱心-详细教程(小白也会)(HTML)
关于类的继承
2022年4月最新面经答案总结(Java基础、数据库、JVM、计网、计操、集合、多线程、Spring)持续更新
无人机避障技术
k8s集群搭建及对一些组件的简单理解(二)
- 原文地址:https://blog.csdn.net/m0_55155505/article/details/126134031
