-
第5章 Kafka,构建TB级异步消息系统
5.1 阻塞队列

public class BlockingQueueTests { public static void main(String[] args) { BlockingQueue queue = new ArrayBlockingQueue(10); new Thread(new Producer(queue)).start(); new Thread(new Consumer(queue)).start(); new Thread(new Consumer(queue)).start(); new Thread(new Consumer(queue)).start(); } } class Producer implements Runnable{ private BlockingQueue<Integer> queue; public Producer(BlockingQueue<Integer> queue) { this.queue = queue; } @Override public void run() { try { for (int i = 0; i < 100; i++) { Thread.sleep(20); queue.put(i); System.out.println(Thread.currentThread().getName() + "生产:" + queue.size()); } } catch (Exception e) { e.printStackTrace(); } } } class Consumer implements Runnable { private BlockingQueue<Integer> queue; public Consumer(BlockingQueue<Integer> queue) { this.queue = queue; } @Override public void run() { try { while (true) { Thread.sleep(new Random().nextInt(1000)); // 睡觉(随机数,1000ms之内) queue.take(); System.out.println(Thread.currentThread().getName() + "消费:" + queue.size()); } } catch (Exception e) { e.printStackTrace(); } } }- 1
- 2
- 3
- 4
- 5
- 6
- 7
- 8
- 9
- 10
- 11
- 12
- 13
- 14
- 15
- 16
- 17
- 18
- 19
- 20
- 21
- 22
- 23
- 24
- 25
- 26
- 27
- 28
- 29
- 30
- 31
- 32
- 33
- 34
- 35
- 36
- 37
- 38
- 39
- 40
- 41
- 42
- 43
- 44
- 45
- 46
- 47
- 48
- 49
- 50
- 51
- 52
- 53
5.2 Kafka入门

http://kafka.apache.org
-
Broker:Kafka的服务器,每一台服务器称其为Broker
-
Zookeeper:可以用 Zookeeper 管理 Kafka 的集群
-
Topic:主题,理解为文件夹,用来存放消息的位置
-
Partition:分区,是对主题位置的分区
-
Offset:消息在分区内存放的索引
-
Leader Replica:祖副本,可以从祖副本读数据,也可以对数据做备份,
-
Follower Replica:随从副本,只是备份
Kafka下载
kafka不分操作系统,都是一个包


配置 zookeeper.properties
Zookeeper 在运行的时候会产生一些数据,这些数据应该存在哪?

然后配置server.properties:

演示一下Kafka命令
得先启动 Zookeeper ,因为 Kafka依赖于 Zookeeper ,还有指定使用config目录下 zookeeper.properties 配置文件
d: cd d:\work\kafka_2.13-3.2.0 bin\windows\zookeeper-server-start.bat config\zookeeper.properties- 1
- 2
- 3
- 4
- 5
- 6

这个命令行窗口不要关,再启动一个命令行窗口去启动Kafka
d: cd d:\work\kafka_2.13-3.2.0 bin\windows\kafka-server-start.bat config\server.properties- 1
- 2
- 3
- 4
- 5
启动kafka,指定配置文件启动

现在 Zookeeper 和 kafka 都启动了,要使用 kafka,(以前的cmd不要关)再启动一个cmd
创建 Topic(主题)
d: cd d:\work\kafka_2.13-3.2.0\bin\windows kafka-topics.bat --create --bootstrap-server localhost:9092 --replication-factor 1 --partitions 1 --topic test 上面命令: 1个副本 1个分区 主题名字:test- 1
- 2
- 3
- 4
- 5
- 6
- 7
- 8
- 9
查看所有主题
kafka-topics.bat --list --bootstrap-server localhost:9092- 1

启动生产者发消息
kafka-console-producer.bat --broker-list localhost:9092 --topic test- 1

再开一个cmd启动消费者查看消息
kafka-console-consumer.bat --bootstrap-server localhost:9092 --topic test --from-beginning- 1
- 2

5.3 Spring整合Kafka

1. 引入依赖
<dependency> <groupId>org.springframework.kafkagroupId> <artifactId>spring-kafkaartifactId> dependency>- 1
- 2
- 3
- 4
2. 配置Kafka
在 application.properties 配置Kafka
# KafkaProperties # 启动哪个服务器的kafka spring.kafka.bootstrap-servers=localhost:9092 # 配置消费者的分组id(可以在consumer.properties配置文件中找到) spring.kafka.consumer.group-id=test-consumer-group # 是否自动提交(是否自动提交消费者的偏移量) spring.kafka.consumer.enable-auto-commit=true # 自动提交的频率(3000表示3000ms也就是3s提交一次) spring.kafka.consumer.auto-commit-interval=3000- 1
- 2
- 3
- 4
- 5
- 6
- 7
- 8
- 9

3. 访问Kafka
在cmd命令行窗口分别启动 zookeeper 和 Kafka ,然后运行下面测试代码
下面写一段测试代码来看一下怎么去用
@SpringBootTest @RunWith(SpringRunner.class) @ContextConfiguration(classes = CommunityApplication.class) public class KafkaTests { @Autowired private KafkaProducer kafkaProducer; @Test public void testKafka(){ kafkaProducer.sendMessage("test", "111"); kafkaProducer.sendMessage("test", "222"); try { Thread.sleep(1000 * 10); } catch (InterruptedException e) { e.printStackTrace(); } } } @Component class KafkaProducer{ @Autowired private KafkaTemplate kafkaTemplate; public void sendMessage(String topic, String context){ kafkaTemplate.send(topic, context); } } @Component class KafkaConsumer { @KafkaListener(topics = {"test"}) public void handlerMessage(ConsumerRecord record){ System.out.println(record.value()); } }- 1
- 2
- 3
- 4
- 5
- 6
- 7
- 8
- 9
- 10
- 11
- 12
- 13
- 14
- 15
- 16
- 17
- 18
- 19
- 20
- 21
- 22
- 23
- 24
- 25
- 26
- 27
- 28
- 29
- 30
- 31
- 32
- 33
- 34
- 35
- 36
- 37
- 38
- 39
- 40
- 41

5.4 发送系统通知

定义三个 topic:Comment、Like、Follow
从业务角度,称解决问题的方式是事件驱动的方式(评论是一个事件,点赞是一个事件,关注是一个事件),在解决问题的时候是以事件为目标来解决的,所以在开发的时候是基于事件对代码的逻辑再进一步的封装,而不是消息。
定义事件对象,对事件发生的时候所需的数据进行封装,而不是说就发一条消息拼一个字符串,我们拼一个事件对象,这个事件对象中包含了这条消息所需要的所有的数据,至于说消费者想怎么拼,那就是你的事,这样的话会更具扩展性一些,而不是拼死一个字符串。
封装事件对象之后开发生产者、消费者,生产的是事件,消费的也是事件,最终是要把事件转换为消息插入到数据库里。
使用kafka之前记得在application.properties配置文件中配置一下kafka
# KafkaProperties # 启动哪个服务器的kafka spring.kafka.bootstrap-servers=localhost:9092 # 配置消费者的分组id(可以在consumer.properties配置文件中找到) spring.kafka.consumer.group-id=test-consumer-group # 是否自动提交(是否自动提交消费者的偏移量) spring.kafka.consumer.enable-auto-commit=true # 自动提交的频率(3000表示3000ms也就是3s提交一次) spring.kafka.consumer.auto-commit-interval=3000- 1
- 2
- 3
- 4
- 5
- 6
- 7
- 8
- 9
定义一个事件对象
首先定义一个事件对象对事件进行封装,封装事件触发的时候相关的一切的信息。
对于这个事件对象,为了以后调用方便,我们把所有的set方法返回值都不设置为空,而是设置为返回Event事件对象,还有setDate方法,我们修改为往里面存值,返回值还是Event事件对象。
public class Event { private String topic; // 主题(由事件的类型分别存到不同的位置) private int userId; // 这个事件是谁发的 private int entityType; // 这个人做了什么操作(点赞/回复/关注) private int entityId; // 实体id private int entityUserId; // 这个实体的作者是谁 private Map<String, Object> data = new HashMap<>(); // 其他额外的数据都存到这个map里 public String getTopic() { return topic; } public Event setTopic(String topic) { this.topic = topic; return this; } public int getUserId() { return userId; } public Event setUserId(int userId) { this.userId = userId; return this; } public int getEntityType() { return entityType; } public Event setEntityType(int entityType) { this.entityType = entityType; return this; } public int getEntityId() { return entityId; } public Event setEntityId(int entityId) { this.entityId = entityId; return this; } public int getEntityUserId() { return entityUserId; } public Event setEntityUserId(int entityUserId) { this.entityUserId = entityUserId; return this; } public Map<String, Object> getData() { return data; } public Event setData(String key, Object value) { this.data.put(key, value); return this; } }- 1
- 2
- 3
- 4
- 5
- 6
- 7
- 8
- 9
- 10
- 11
- 12
- 13
- 14
- 15
- 16
- 17
- 18
- 19
- 20
- 21
- 22
- 23
- 24
- 25
- 26
- 27
- 28
- 29
- 30
- 31
- 32
- 33
- 34
- 35
- 36
- 37
- 38
- 39
- 40
- 41
- 42
- 43
- 44
- 45
- 46
- 47
- 48
- 49
- 50
- 51
- 52
- 53
- 54
- 55
- 56
- 57
- 58
- 59
- 60
- 61
- 62
- 63
- 64

开发事件的生产者
@Component public class EventProducer { @Autowired private KafkaTemplate kafkaTemplate; // 处理事件 public void fireEvent(Event event) { // 将事件发布到指定的主题 // 参数1:topic 参数2:事件对象转化成的json字符串 kafkaTemplate.send(event.getTopic(), JSONObject.toJSONString(event)); } }- 1
- 2
- 3
- 4
- 5
- 6
- 7
- 8
- 9
- 10
- 11
- 12
- 13
- 14

开发消费者
一个方法可以消费一个主题,也可以一个方法消费多个主题,同时,一个主题也可以被多个方法消费,多对多的关系,因为评论、点赞、关注三种事件的通知逻辑很相似,这里写一个方法把这三个主题都处理掉。
在CommunityConstant常量接口中定义主题常量
/** * 主题: 评论 */ String TOPIC_COMMENT = "comment"; /** * 主题: 点赞 */ String TOPIC_LIKE = "like"; /** * 主题: 关注 */ String TOPIC_FOLLOW = "follow"; /** * 系统用户ID */ int SYSTEM_USER_ID = 1;- 1
- 2
- 3
- 4
- 5
- 6
- 7
- 8
- 9
- 10
- 11
- 12
- 13
- 14
- 15
- 16
- 17
- 18
- 19

message表 CREATE TABLE `message` ( `id` int(11) NOT NULL AUTO_INCREMENT, `from_id` int(11) DEFAULT NULL, `to_id` int(11) DEFAULT NULL, `conversation_id` varchar(45) NOT NULL, `content` text, `status` int(11) DEFAULT NULL COMMENT '0-未读;1-已读;2-删除;', `create_time` timestamp NULL DEFAULT NULL, PRIMARY KEY (`id`), KEY `index_from_id` (`from_id`), KEY `index_to_id` (`to_id`), KEY `index_conversation_id` (`conversation_id`) ) ENGINE=InnoDB AUTO_INCREMENT=357 DEFAULT CHARSET=utf8; 回顾一下message表, 其中conversation_id 是会话id,是form_id和to_id拼到一起的 但是现在发的消息和之前发的私信有所区别,私信是张三发给李四, 是两个用户之间发,而现在发的通知是我们的系统发给用户,后台的话 from_id其实真实不存在,我们可以假设后台也是一个user,假设这个 user的id是1,造一个虚拟的用户,永远都是1向某人发消息,这个时候 conversation_id再去存这个两个id拼在一起就没有意义了,因为肯定 form_id是1固定的,因此conversation_id改存为主题,比如:comment、like、follow 内容content存的就不是一句话,存的是在页面展示出的那句话要依赖的条件json字符串, 这个字符串包含了我们在页面上要拼出的展示的那句话的各种条件 也就是说复用message这张表,或者说message这张表存了两类数据,一类是人与人之间的私信, 一类是系统发的通知,它们存的时候有所变通- 1
- 2
- 3
- 4
- 5
- 6
- 7
- 8
- 9
- 10
- 11
- 12
- 13
- 14
- 15
- 16
- 17
- 18
- 19
- 20
- 21
- 22
- 23
- 24
- 25
- 26
- 27
- 28
- 29
- 30
消费者:EventConsumer
@Component public class EventConsumer implements CommunityConstant { private static final Logger logger = LoggerFactory.getLogger(EventConsumer.class); @Autowired private MessageService messageService; @KafkaListener(topics = {TOPIC_COMMENT, TOPIC_LIKE, TOPIC_FOLLOW}) public void handleCommentMessage(ConsumerRecord record) { // 这个参数用来接收相关的数据 if (record == null || record.value() == null) { logger.error("消息的内容为空!"); return; } // 将record的value(json类型字符串)转换为Event类型 Event event = (Event) JSONObject.parseObject(record.value().toString(), Event.class); if (event == null) { logger.error("消息格式错误!"); return; } // 发送站内通知 Message message = new Message(); message.setFromId(SYSTEM_USER_ID); message.setToId(event.getEntityUserId()); message.setConversationId(event.getTopic()); // 状态默认就是0,表示未读,不用去设置 message.setCreateTime(new Date()); Map<String, Object> content = new HashMap<>(); content.put("userId", event.getUserId()); // 为了查找用户名 content.put("entityType", event.getEntityType()); // 为了知道类型 content.put("entityId", event.getEntityId()); // 为了传帖子id然后跳转到帖子详情 if (!event.getData().isEmpty()) { for (Map.Entry<String, Object> entry : event.getData().entrySet()) { content.put(entry.getKey(), entry.getValue()); } } // 将Map类型的content转换为json字符串存到message的content字段 message.setContent(JSONObject.toJSONString(content)); // 将message存入数据库 messageService.addMessage(message); } }- 1
- 2
- 3
- 4
- 5
- 6
- 7
- 8
- 9
- 10
- 11
- 12
- 13
- 14
- 15
- 16
- 17
- 18
- 19
- 20
- 21
- 22
- 23
- 24
- 25
- 26
- 27
- 28
- 29
- 30
- 31
- 32
- 33
- 34
- 35
- 36
- 37
- 38
- 39
- 40
- 41
- 42
- 43
- 44

接下来我们需要找个地方去调这个程序,什么时候触发事件就去调一下生产者处理事件,消费者是被动触发的,只要队列中有数据就自动执行了,这个不用我们主动去调,我们只要主动去调生产者就行,按照之前的业务,我们应该是在 评论、点赞、关注 这三个地方调的
在CommentMapper中增加根据id查询评论方法
Comment selectCommentById(int id); /** * 根据评论id查询评论 */- 1
- 2
- 3
- 4

然后是comment-mapper.xml
<select id="selectCommentById" resultType="Comment"> select <include refid="selectFields">include> from comment where id = #{id} select>- 1
- 2
- 3
- 4
- 5

然后是CommentService
public Comment findCommentById(int id) { return commentMapper.selectCommentById(id); }- 1
- 2
- 3

CommentController
所以打开对应的controller,首先是 CommentController


后续消息的发布,就是由消息队列去处理了,可能略有一点点延迟,
LikeController
然后是 LikeController

重构一下方法,要求方法再多接收一个参数 要求点赞的时候把它传进来 新的字段

重构了方法,所以我们要去修改对应的themeleaf模板文件和js
**discuss-detail.html **
,${post.id}- 1


discuss.js

FollowController
还有 FollowController
关注的时候发通知,取消关注的时候不用

测试
在测试时一定要在cmd窗口把zookeeper和kafka启动
5.5 显示系统通知
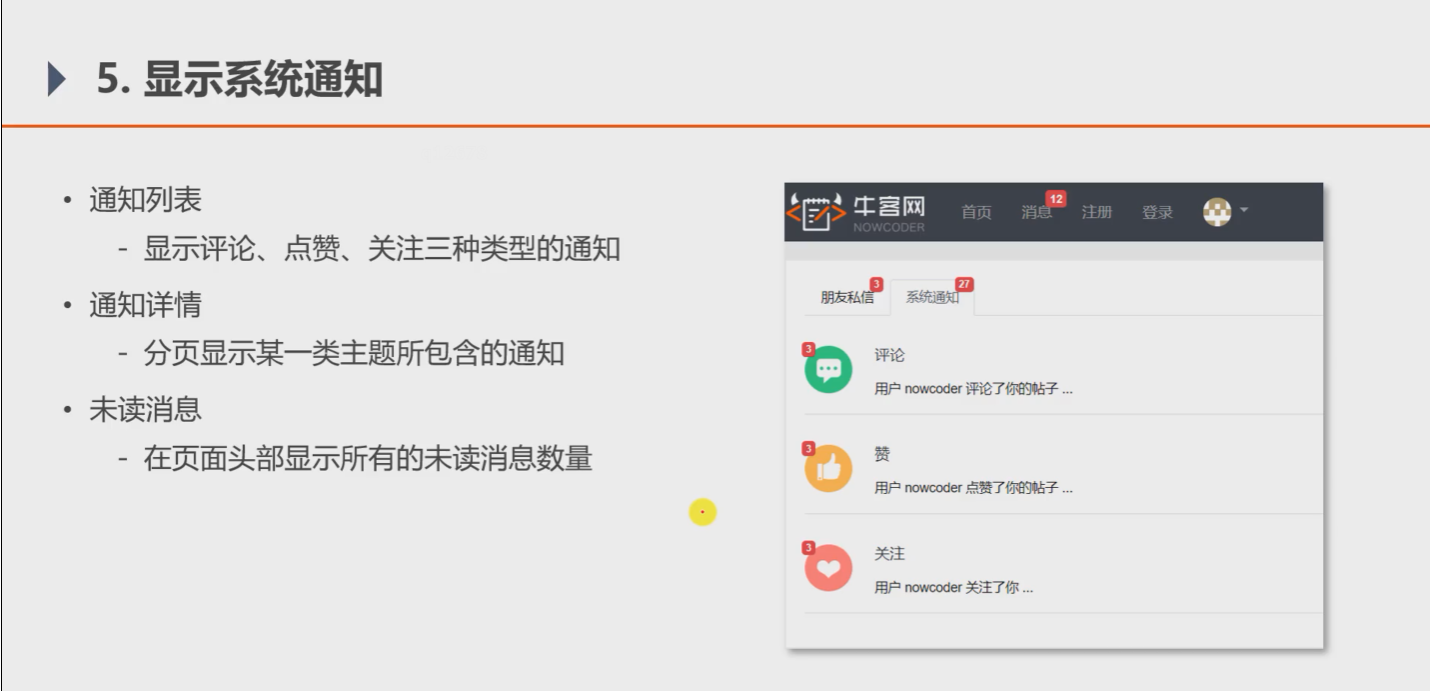
1. 通知列表
数据访问层(dao)
因为通知数据存到了Message表里,所以在MessageMapper里增加一些方法
// 查询某个主题下最新的通知 Message selectLatestNotice(int userId, String topic); // 查询某个主题所包含的通知的数量 int selectNoticeCount(int userId, String topic); // 查询未读的通知的数量 int selectNoticeUnreadCount(int userId, String topic);- 1
- 2
- 3
- 4
- 5
- 6
- 7
- 8

然后是message-mapper.xml
<select id="selectLatestNotice" resultType="Message"> select <include refid="selectFields">include> from message where id in ( select max(id) from message where status != 2 and from_id = 1 and to_id = #{userId} and conversation_id = #{topic} ) select> <select id="selectNoticeCount" resultType="int"> select count(id) from message where status != 2 and from_id = 1 and to_id = #{userId} and conversation_id = #{topic} select> <select id="selectNoticeUnreadCount" resultType="int"> select count(id) from message where status = 0 and from_id = 1 and to_id = #{userId} <if test="topic!=null"> and conversation_id = #{topic} if> select>- 1
- 2
- 3
- 4
- 5
- 6
- 7
- 8
- 9
- 10
- 11
- 12
- 13
- 14
- 15
- 16
- 17
- 18
- 19
- 20
- 21
- 22
- 23
- 24
- 25
- 26
- 27
- 28
- 29

业务层(Service)
MessageService:
// 查询最新的一条消息 public Message findLatestNotice(int userId, String topic) { return messageMapper.selectLatestNotice(userId, topic); } // 查询某个主题未读的消息总数 public int findNoticeCount(int userId, String topic) { return messageMapper.selectNoticeCount(userId, topic); } // 查询总的未读消息数 public int findNoticeUnreadCount(int userId, String topic) { return messageMapper.selectNoticeUnreadCount(userId, topic); }- 1
- 2
- 3
- 4
- 5
- 6
- 7
- 8
- 9
- 10
- 11
- 12

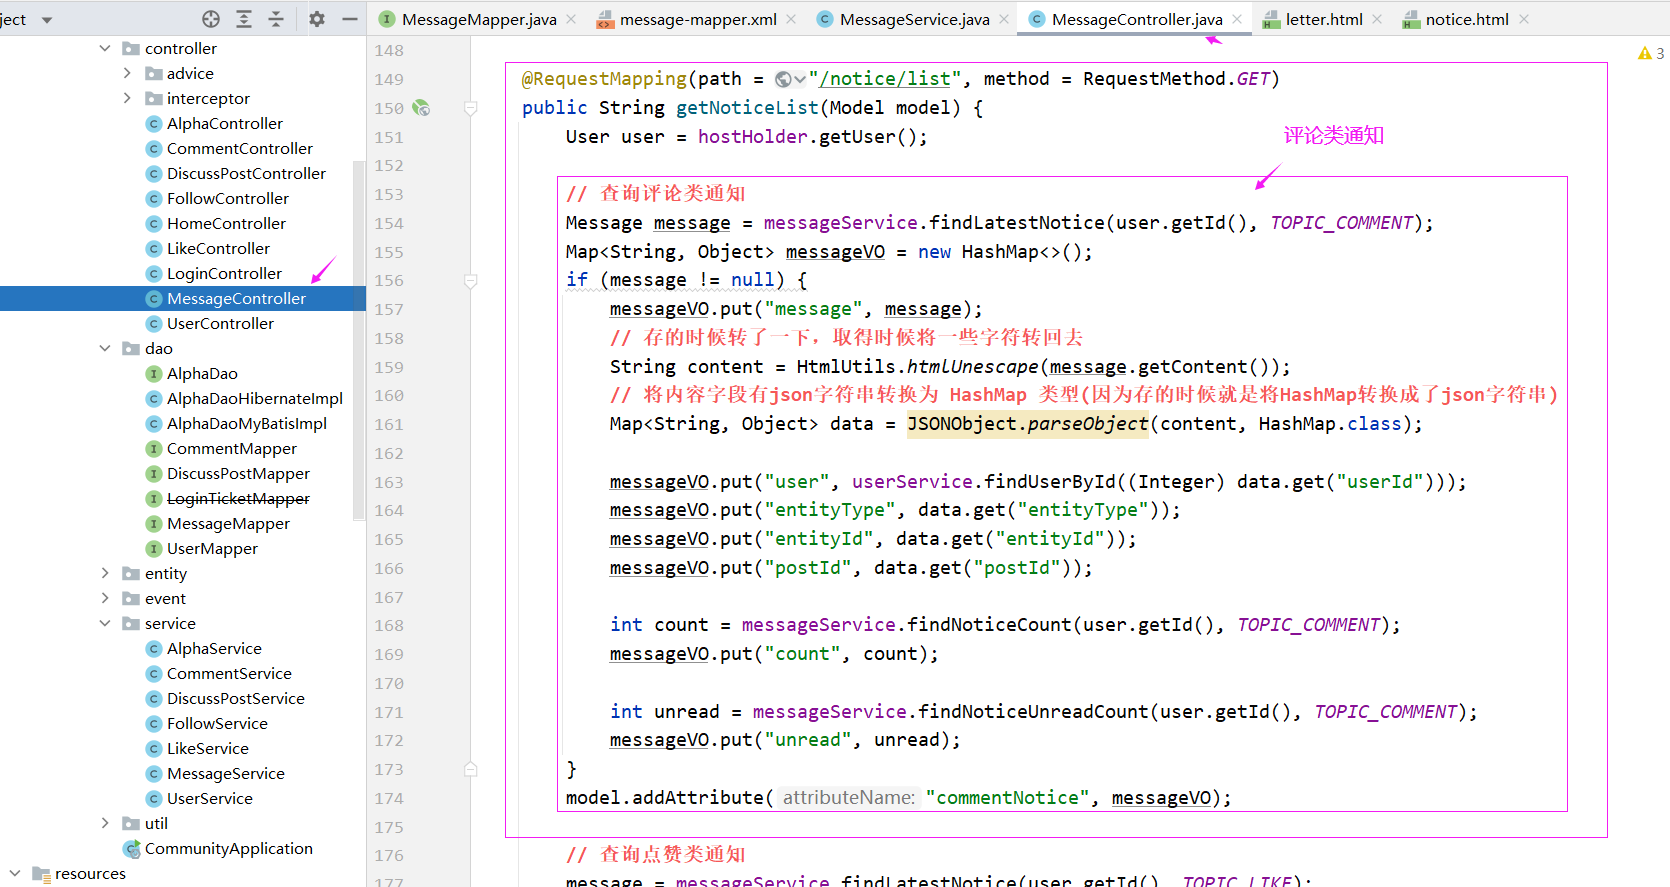
表现层(Controller)
MessageController 实现 接口
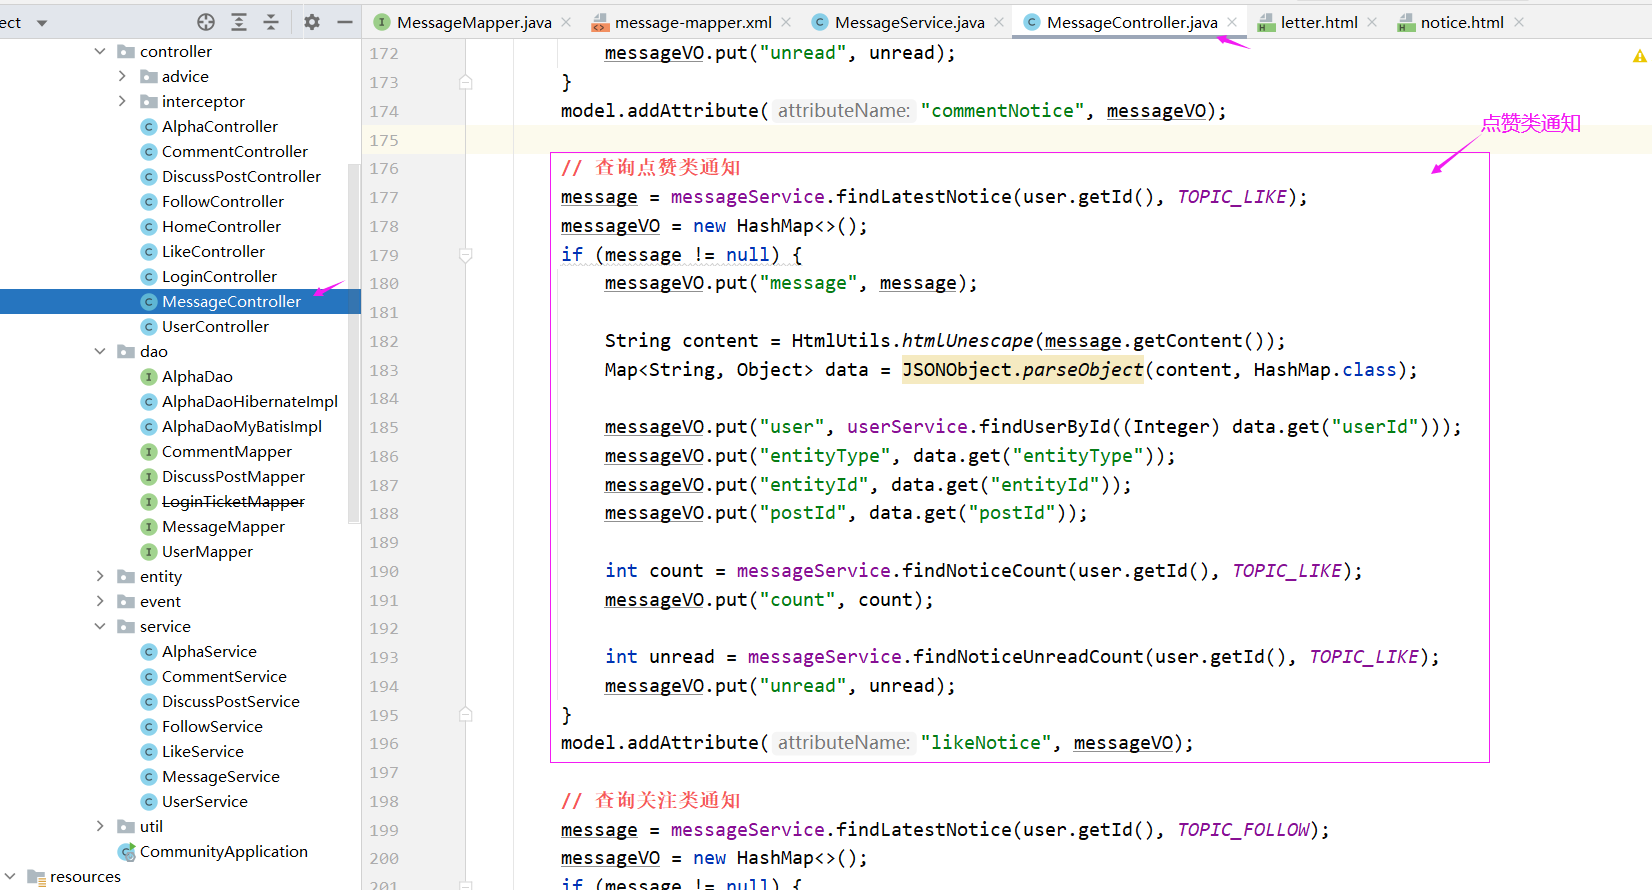
@RequestMapping(path = "/notice/list", method = RequestMethod.GET) public String getNoticeList(Model model) { User user = hostHolder.getUser(); // 查询评论类通知 Message message = messageService.findLatestNotice(user.getId(), TOPIC_COMMENT); Map<String, Object> messageVO = new HashMap<>(); if (message != null) { messageVO.put("message", message); // 存的时候转了一下,取得时候将一些字符转回去 String content = HtmlUtils.htmlUnescape(message.getContent()); // 将内容字段有json字符串转换为 HashMap 类型(因为存的时候就是将HashMap转换成了json字符串) Map<String, Object> data = JSONObject.parseObject(content, HashMap.class); messageVO.put("user", userService.findUserById((Integer) data.get("userId"))); messageVO.put("entityType", data.get("entityType")); messageVO.put("entityId", data.get("entityId")); messageVO.put("postId", data.get("postId")); int count = messageService.findNoticeCount(user.getId(), TOPIC_COMMENT); messageVO.put("count", count); int unread = messageService.findNoticeUnreadCount(user.getId(), TOPIC_COMMENT); messageVO.put("unread", unread); } model.addAttribute("commentNotice", messageVO); // 查询点赞类通知 message = messageService.findLatestNotice(user.getId(), TOPIC_LIKE); messageVO = new HashMap<>(); if (message != null) { messageVO.put("message", message); String content = HtmlUtils.htmlUnescape(message.getContent()); Map<String, Object> data = JSONObject.parseObject(content, HashMap.class); messageVO.put("user", userService.findUserById((Integer) data.get("userId"))); messageVO.put("entityType", data.get("entityType")); messageVO.put("entityId", data.get("entityId")); messageVO.put("postId", data.get("postId")); int count = messageService.findNoticeCount(user.getId(), TOPIC_LIKE); messageVO.put("count", count); int unread = messageService.findNoticeUnreadCount(user.getId(), TOPIC_LIKE); messageVO.put("unread", unread); } model.addAttribute("likeNotice", messageVO); // 查询关注类通知 message = messageService.findLatestNotice(user.getId(), TOPIC_FOLLOW); messageVO = new HashMap<>(); if (message != null) { messageVO.put("message", message); String content = HtmlUtils.htmlUnescape(message.getContent()); Map<String, Object> data = JSONObject.parseObject(content, HashMap.class); messageVO.put("user", userService.findUserById((Integer) data.get("userId"))); messageVO.put("entityType", data.get("entityType")); messageVO.put("entityId", data.get("entityId")); int count = messageService.findNoticeCount(user.getId(), TOPIC_FOLLOW); messageVO.put("count", count); int unread = messageService.findNoticeUnreadCount(user.getId(), TOPIC_FOLLOW); messageVO.put("unread", unread); } model.addAttribute("followNotice", messageVO); // 查询未读消息数量 int letterUnreadCount = messageService.findLetterUnreadCount(user.getId(), null); model.addAttribute("letterUnreadCount", letterUnreadCount); int noticeUnreadCount = messageService.findNoticeUnreadCount(user.getId(), null); model.addAttribute("noticeUnreadCount", noticeUnreadCount); return "/site/notice"; }- 1
- 2
- 3
- 4
- 5
- 6
- 7
- 8
- 9
- 10
- 11
- 12
- 13
- 14
- 15
- 16
- 17
- 18
- 19
- 20
- 21
- 22
- 23
- 24
- 25
- 26
- 27
- 28
- 29
- 30
- 31
- 32
- 33
- 34
- 35
- 36
- 37
- 38
- 39
- 40
- 41
- 42
- 43
- 44
- 45
- 46
- 47
- 48
- 49
- 50
- 51
- 52
- 53
- 54
- 55
- 56
- 57
- 58
- 59
- 60
- 61
- 62
- 63
- 64
- 65
- 66
- 67
- 68
- 69
- 70
- 71
- 72
- 73
- 74
- 75
- 76
- 77
- 78


之前开发私信列表的时候没有带上系统通知的数量,这里在相关方法上查询一下并传入model

然后是themeleaf模板,首先处理私信列表,把模板补充一下,letter.html

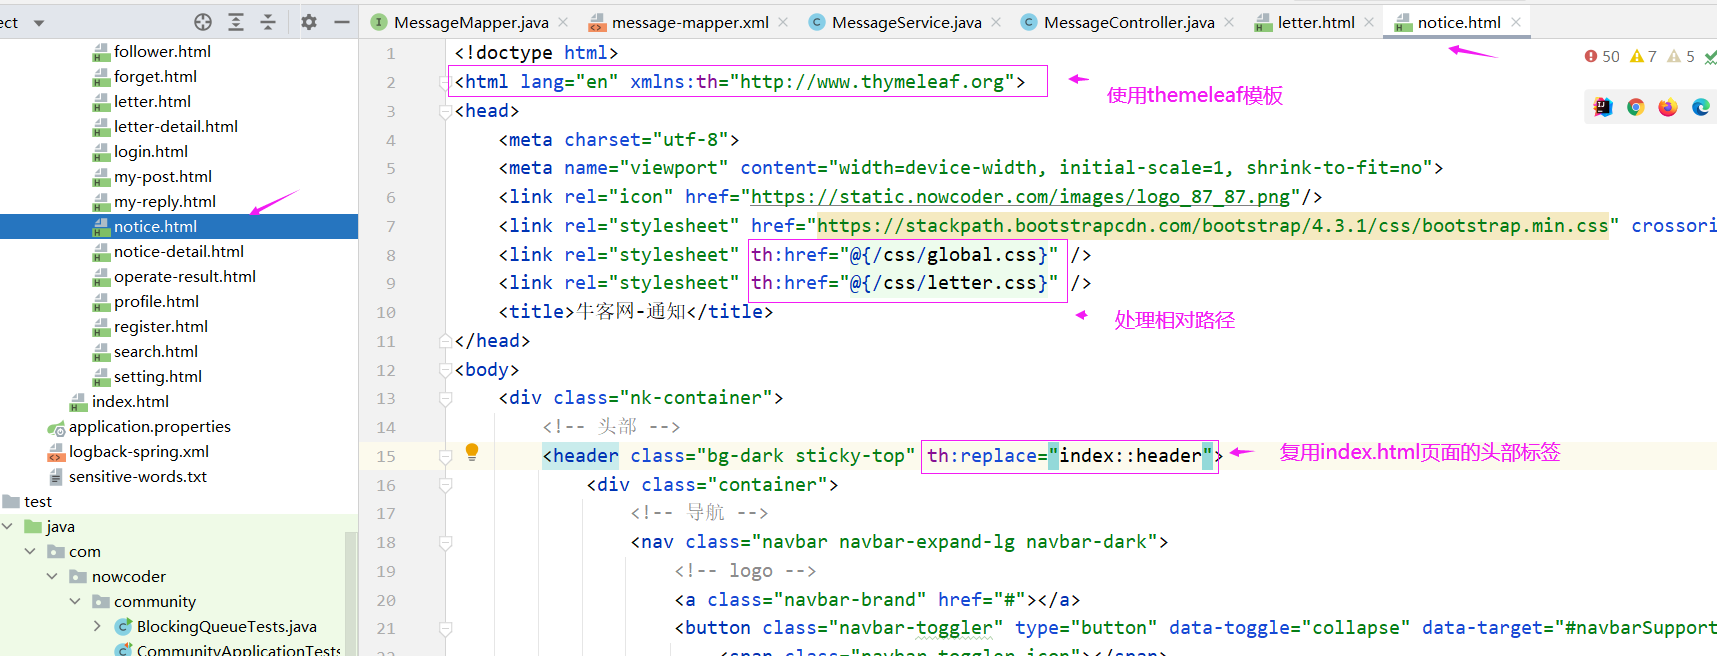
接下来处理通知的模板 notice.html


2. 通知详情
数据访问层(dao)
MessageMapper:
// 查询某个主题所包含的通知列表 List<Message> selectNotices(int userId, String topic, int offset, int limit);- 1
- 2

message-mapper.xml:
<select id="selectNotices" resultType="Message"> select <include refid="selectFields"></include> from message where status != 2 and from_id = 1 and to_id = #{userId} and conversation_id = #{topic} order by create_time desc limit #{offset}, #{limit} </select>- 1
- 2
- 3
- 4
- 5
- 6
- 7
- 8
- 9
- 10

业务层(Service)
MessageService:
// 查询某个主题所包含的通知列表 public List<Message> findNotices(int userId, String topic, int offset, int limit) { return messageMapper.selectNotices(userId, topic, offset, limit); }- 1
- 2
- 3
- 4

表现层(Controller)
MessageController:
@RequestMapping(path = "/notice/detail/{topic}", method = RequestMethod.GET) public String getNoticeDetail(@PathVariable("topic") String topic, Page page, Model model) { User user = hostHolder.getUser(); page.setLimit(5); page.setPath("/notice/detail/" + topic); page.setRows(messageService.findNoticeCount(user.getId(), topic)); List<Message> noticeList = messageService.findNotices(user.getId(), topic, page.getOffset(), page.getLimit()); List<Map<String, Object>> noticeVoList = new ArrayList<>(); if (noticeList != null) { for (Message notice : noticeList) { Map<String, Object> map = new HashMap<>(); // 通知 map.put("notice", notice); // 内容 String content = HtmlUtils.htmlUnescape(notice.getContent()); Map<String, Object> data = JSONObject.parseObject(content, HashMap.class); map.put("user", userService.findUserById((Integer) data.get("userId"))); map.put("entityType", data.get("entityType")); map.put("entityId", data.get("entityId")); map.put("postId", data.get("postId")); // 通知作者 map.put("fromUser", userService.findUserById(notice.getFromId())); noticeVoList.add(map); } } model.addAttribute("notices", noticeVoList); // 设置已读 List<Integer> ids = getLetterIds(noticeList); if (!ids.isEmpty()) { messageService.readMessage(ids); } return "/site/notice-detail"; }- 1
- 2
- 3
- 4
- 5
- 6
- 7
- 8
- 9
- 10
- 11
- 12
- 13
- 14
- 15
- 16
- 17
- 18
- 19
- 20
- 21
- 22
- 23
- 24
- 25
- 26
- 27
- 28
- 29
- 30
- 31
- 32
- 33
- 34
- 35
- 36
- 37
- 38

通知详情页面是通过通知列表notice.html页面点进来的,所以我们要处理一下通知列表notice.html上的路径


然后是处理通知详情页面notice-detail.html


3. 未读消息数
还要处理未读消息总的数量(未读私信数理+未读通知数量),这个消息未读数量的显示很显然是用拦截器处理,因为我们每个请求都要显示未读消息数,我们需要统一处理。
MessageInterceptor 拦截器
@Component public class MessageInterceptor implements HandlerInterceptor { @Autowired private HostHolder hostHolder; @Autowired private MessageService messageService; @Override public void postHandle(HttpServletRequest request, HttpServletResponse response, Object handler, ModelAndView modelAndView) throws Exception { User user = hostHolder.getUser(); if (user != null && modelAndView != null) { int letterUnreadCount = messageService.findLetterUnreadCount(user.getId(), null); int noticeUnreadCount = messageService.findNoticeUnreadCount(user.getId(), null); modelAndView.addObject("allUnreadCount", letterUnreadCount + noticeUnreadCount); } } }- 1
- 2
- 3
- 4
- 5
- 6
- 7
- 8
- 9
- 10
- 11
- 12
- 13
- 14
- 15
- 16
- 17
- 18
- 19

进行拦截器的配置
@Autowired private MessageInterceptor messageInterceptor; registry.addInterceptor(messageInterceptor) .excludePathPatterns("/**/*.css", "/**/*.js", "/**/*.png", "/**/*.jpg", "/**/*.jpeg");- 1
- 2
- 3
- 4
- 5
- 6

最终我们是要在头部显示这个数据,而所有页面的头部都是共用的index.html

测试的时候评论的话记得打开kafka,因为我们引入了kafka处理消息队列
### 显示系统通知
1. 通知列表
数据访问层(dao)
因为通知数据存到了Message表里,所以在MessageMapper里增加一些方法
// 查询某个主题下最新的通知 Message selectLatestNotice(int userId, String topic); // 查询某个主题所包含的通知的数量 int selectNoticeCount(int userId, String topic); // 查询未读的通知的数量 int selectNoticeUnreadCount(int userId, String topic);- 1
- 2
- 3
- 4
- 5
- 6
- 7
- 8
然后是message-mapper.xml
<select id="selectLatestNotice" resultType="Message"> select <include refid="selectFields">include> from message where id in ( select max(id) from message where status != 2 and from_id = 1 and to_id = #{userId} and conversation_id = #{topic} ) select> <select id="selectNoticeCount" resultType="int"> select count(id) from message where status != 2 and from_id = 1 and to_id = #{userId} and conversation_id = #{topic} select> <select id="selectNoticeUnreadCount" resultType="int"> select count(id) from message where status = 0 and from_id = 1 and to_id = #{userId} <if test="topic!=null"> and conversation_id = #{topic} if> select>- 1
- 2
- 3
- 4
- 5
- 6
- 7
- 8
- 9
- 10
- 11
- 12
- 13
- 14
- 15
- 16
- 17
- 18
- 19
- 20
- 21
- 22
- 23
- 24
- 25
- 26
- 27
- 28
- 29

业务层(Service)
MessageService:
// 查询最新的一条消息 public Message findLatestNotice(int userId, String topic) { return messageMapper.selectLatestNotice(userId, topic); } // 查询某个主题未读的消息总数 public int findNoticeCount(int userId, String topic) { return messageMapper.selectNoticeCount(userId, topic); } // 查询总的未读消息数 public int findNoticeUnreadCount(int userId, String topic) { return messageMapper.selectNoticeUnreadCount(userId, topic); }- 1
- 2
- 3
- 4
- 5
- 6
- 7
- 8
- 9
- 10
- 11
- 12
表现层(Controller)
MessageController 实现 接口
@RequestMapping(path = "/notice/list", method = RequestMethod.GET) public String getNoticeList(Model model) { User user = hostHolder.getUser(); // 查询评论类通知 Message message = messageService.findLatestNotice(user.getId(), TOPIC_COMMENT); Map<String, Object> messageVO = new HashMap<>(); if (message != null) { messageVO.put("message", message); // 存的时候转了一下,取得时候将一些字符转回去 String content = HtmlUtils.htmlUnescape(message.getContent()); // 将内容字段有json字符串转换为 HashMap 类型(因为存的时候就是将HashMap转换成了json字符串) Map<String, Object> data = JSONObject.parseObject(content, HashMap.class); messageVO.put("user", userService.findUserById((Integer) data.get("userId"))); messageVO.put("entityType", data.get("entityType")); messageVO.put("entityId", data.get("entityId")); messageVO.put("postId", data.get("postId")); int count = messageService.findNoticeCount(user.getId(), TOPIC_COMMENT); messageVO.put("count", count); int unread = messageService.findNoticeUnreadCount(user.getId(), TOPIC_COMMENT); messageVO.put("unread", unread); } model.addAttribute("commentNotice", messageVO); // 查询点赞类通知 message = messageService.findLatestNotice(user.getId(), TOPIC_LIKE); messageVO = new HashMap<>(); if (message != null) { messageVO.put("message", message); String content = HtmlUtils.htmlUnescape(message.getContent()); Map<String, Object> data = JSONObject.parseObject(content, HashMap.class); messageVO.put("user", userService.findUserById((Integer) data.get("userId"))); messageVO.put("entityType", data.get("entityType")); messageVO.put("entityId", data.get("entityId")); messageVO.put("postId", data.get("postId")); int count = messageService.findNoticeCount(user.getId(), TOPIC_LIKE); messageVO.put("count", count); int unread = messageService.findNoticeUnreadCount(user.getId(), TOPIC_LIKE); messageVO.put("unread", unread); } model.addAttribute("likeNotice", messageVO); // 查询关注类通知 message = messageService.findLatestNotice(user.getId(), TOPIC_FOLLOW); messageVO = new HashMap<>(); if (message != null) { messageVO.put("message", message); String content = HtmlUtils.htmlUnescape(message.getContent()); Map<String, Object> data = JSONObject.parseObject(content, HashMap.class); messageVO.put("user", userService.findUserById((Integer) data.get("userId"))); messageVO.put("entityType", data.get("entityType")); messageVO.put("entityId", data.get("entityId")); int count = messageService.findNoticeCount(user.getId(), TOPIC_FOLLOW); messageVO.put("count", count); int unread = messageService.findNoticeUnreadCount(user.getId(), TOPIC_FOLLOW); messageVO.put("unread", unread); } model.addAttribute("followNotice", messageVO); // 查询未读消息数量 int letterUnreadCount = messageService.findLetterUnreadCount(user.getId(), null); model.addAttribute("letterUnreadCount", letterUnreadCount); int noticeUnreadCount = messageService.findNoticeUnreadCount(user.getId(), null); model.addAttribute("noticeUnreadCount", noticeUnreadCount); return "/site/notice"; }- 1
- 2
- 3
- 4
- 5
- 6
- 7
- 8
- 9
- 10
- 11
- 12
- 13
- 14
- 15
- 16
- 17
- 18
- 19
- 20
- 21
- 22
- 23
- 24
- 25
- 26
- 27
- 28
- 29
- 30
- 31
- 32
- 33
- 34
- 35
- 36
- 37
- 38
- 39
- 40
- 41
- 42
- 43
- 44
- 45
- 46
- 47
- 48
- 49
- 50
- 51
- 52
- 53
- 54
- 55
- 56
- 57
- 58
- 59
- 60
- 61
- 62
- 63
- 64
- 65
- 66
- 67
- 68
- 69
- 70
- 71
- 72
- 73
- 74
- 75
- 76
- 77
- 78


之前开发私信列表的时候没有带上系统通知的数量,这里在相关方法上查询一下并传入model

然后是themeleaf模板,首先处理私信列表,把模板补充一下,letter.html
接下来处理通知的模板 notice.html

2. 通知详情
数据访问层(dao)
MessageMapper:
// 查询某个主题所包含的通知列表 List<Message> selectNotices(int userId, String topic, int offset, int limit);- 1
- 2
message-mapper.xml:
<select id="selectNotices" resultType="Message"> select <include refid="selectFields"></include> from message where status != 2 and from_id = 1 and to_id = #{userId} and conversation_id = #{topic} order by create_time desc limit #{offset}, #{limit} </select>- 1
- 2
- 3
- 4
- 5
- 6
- 7
- 8
- 9
- 10
业务层(Service)
MessageService:
// 查询某个主题所包含的通知列表 public List<Message> findNotices(int userId, String topic, int offset, int limit) { return messageMapper.selectNotices(userId, topic, offset, limit); }- 1
- 2
- 3
- 4
表现层(Controller)
MessageController:
@RequestMapping(path = "/notice/detail/{topic}", method = RequestMethod.GET) public String getNoticeDetail(@PathVariable("topic") String topic, Page page, Model model) { User user = hostHolder.getUser(); page.setLimit(5); page.setPath("/notice/detail/" + topic); page.setRows(messageService.findNoticeCount(user.getId(), topic)); List<Message> noticeList = messageService.findNotices(user.getId(), topic, page.getOffset(), page.getLimit()); List<Map<String, Object>> noticeVoList = new ArrayList<>(); if (noticeList != null) { for (Message notice : noticeList) { Map<String, Object> map = new HashMap<>(); // 通知 map.put("notice", notice); // 内容 String content = HtmlUtils.htmlUnescape(notice.getContent()); Map<String, Object> data = JSONObject.parseObject(content, HashMap.class); map.put("user", userService.findUserById((Integer) data.get("userId"))); map.put("entityType", data.get("entityType")); map.put("entityId", data.get("entityId")); map.put("postId", data.get("postId")); // 通知作者 map.put("fromUser", userService.findUserById(notice.getFromId())); noticeVoList.add(map); } } model.addAttribute("notices", noticeVoList); // 设置已读 List<Integer> ids = getLetterIds(noticeList); if (!ids.isEmpty()) { messageService.readMessage(ids); } return "/site/notice-detail"; }- 1
- 2
- 3
- 4
- 5
- 6
- 7
- 8
- 9
- 10
- 11
- 12
- 13
- 14
- 15
- 16
- 17
- 18
- 19
- 20
- 21
- 22
- 23
- 24
- 25
- 26
- 27
- 28
- 29
- 30
- 31
- 32
- 33
- 34
- 35
- 36
- 37
- 38
通知详情页面是通过通知列表notice.html页面点进来的,所以我们要处理一下通知列表notice.html上的路径
然后是处理通知详情页面notice-detail.html
3. 未读消息数
还要处理未读消息总的数量(未读私信数理+未读通知数量),这个消息未读数量的显示很显然是用拦截器处理,因为我们每个请求都要显示未读消息数,我们需要统一处理。
MessageInterceptor 拦截器
@Component public class MessageInterceptor implements HandlerInterceptor { @Autowired private HostHolder hostHolder; @Autowired private MessageService messageService; @Override public void postHandle(HttpServletRequest request, HttpServletResponse response, Object handler, ModelAndView modelAndView) throws Exception { User user = hostHolder.getUser(); if (user != null && modelAndView != null) { int letterUnreadCount = messageService.findLetterUnreadCount(user.getId(), null); int noticeUnreadCount = messageService.findNoticeUnreadCount(user.getId(), null); modelAndView.addObject("allUnreadCount", letterUnreadCount + noticeUnreadCount); } } }- 1
- 2
- 3
- 4
- 5
- 6
- 7
- 8
- 9
- 10
- 11
- 12
- 13
- 14
- 15
- 16
- 17
- 18
- 19
进行拦截器的配置
@Autowired private MessageInterceptor messageInterceptor; registry.addInterceptor(messageInterceptor) .excludePathPatterns("/**/*.css", "/**/*.js", "/**/*.png", "/**/*.jpg", "/**/*.jpeg");- 1
- 2
- 3
- 4
- 5
- 6
最终我们是要在头部显示这个数据,而所有页面的头部都是共用的index.html
测试的时候评论的话记得打开kafka,因为我们引入了kafka处理消息队列
-
相关阅读:
Python Spider学习笔记(一):爬取B站视频基本信息
Python函数式编程
大数据学习笔记1.2 登录配置虚拟机
什么影响香港服务器的速度原因
使用 ThreadPoolExecutor 管理线程池
牛顿迭代法求平方根--C++简单实现
ThingsBoard IoT Gateway 实战(三)- 使用 MQTT Connector 转接灯
产品经理,要有怎样的思维方式?
解决老版本Oracle VirtualBox 此应用无法在此设备上运行问题
C++的命名空间、缺省参数、函数重载 及引用
- 原文地址:https://blog.csdn.net/qq_50313418/article/details/126398017