-
Spring Boot 6.1 ( Wobsoeckt的简单匹配)
1.流程图片
2.后端:添加依赖(重点)2.1依赖
spring-boot-starter-websocket:websocket需要
fastjson:JSON用来前后端通信,方便一点<!-- https://mvnrepository.com/artifact/com.alibaba/fastjson --> <dependency> <groupId>com.alibaba</groupId> <artifactId>fastjson</artifactId> <version>2.0.11</version> </dependency> <!-- https://mvnrepository.com/artifact/org.springframework.boot/spring-boot-starter-websocket --> <dependency> <groupId>org.springframework.boot</groupId> <artifactId>spring-boot-starter-websocket</artifactId> <version>2.7.2</version> </dependency>- 1
- 2
- 3
- 4
- 5
- 6
- 7
- 8
- 9
- 10
- 11
- 12
- 13
- 14
- 15
2.2添加
config.WebSocketConfig配置类import org.springframework.context.annotation.Bean; import org.springframework.context.annotation.Configuration; import org.springframework.web.socket.server.standard.ServerEndpointExporter; @Configuration public class WebSocketConfig { @Bean public ServerEndpointExporter serverEndpointExporter() { return new ServerEndpointExporter(); } }- 1
- 2
- 3
- 4
- 5
- 6
- 7
- 8
- 9
- 10
- 11
- 12
- 13
- 14
2.3添加
consumer.WebSocketServer类import org.springframework.stereotype.Component; import javax.websocket.*; import javax.websocket.server.PathParam; import javax.websocket.server.ServerEndpoint; @Component @ServerEndpoint("/websocket/{token}") // 注意不要以'/'结尾 public class WebSocketServer { @OnOpen public void onOpen(Session session, @PathParam("token") String token) { // 建立连接 } @OnClose public void onClose() { // 关闭链接 } @OnMessage public void onMessage(String message, Session session) { // 从Client接收消息 } @OnError public void onError(Session session, Throwable error) { error.printStackTrace(); } }- 1
- 2
- 3
- 4
- 5
- 6
- 7
- 8
- 9
- 10
- 11
- 12
- 13
- 14
- 15
- 16
- 17
- 18
- 19
- 20
- 21
- 22
- 23
- 24
- 25
- 26
- 27
- 28
- 29
- 30
2.4配置
config.SecurityConfig因为Spring Security会屏蔽掉websocket链接
向config.SecurityConfig中加入以下@Override public void configure(WebSecurity web) throws Exception { web.ignoring().antMatchers("/websocket/**"); }- 1
- 2
- 3
- 4
3.前后端:简单实现前后端建立连接(重点)3.1传递参数userId(此处token是userId)
前后端需要各自实现
前端:固定API
socket.onopen = () =>{}
socket.onmessage = () =>{}
socket.onclose = () =>{}
socket.close = () =>{}
后端:固定API (sendMessage(){}是自己实现的)
public void onOpen(){}
public void onClose() {}
public void onMessage() { }
public void onError() {}consumer.WebSocketServer
此处token传的是userIdpackage com.kob.backend.consumer; import com.kob.backend.mapper.UserMapper; import com.kob.backend.pojo.User; import org.springframework.beans.factory.annotation.Autowired; import org.springframework.stereotype.Component; import javax.websocket.*; import javax.websocket.server.PathParam; import javax.websocket.server.ServerEndpoint; import java.io.IOException; import java.util.concurrent.ConcurrentHashMap; @Component @ServerEndpoint("/websocket/{token}") // 注意不要以'/'结尾 public class WebSocketServer { //ConcurrentHashMap 的优势在于兼顾性能和线程安全,一个线程进行写操作时, //它会锁住一小部分,其他部分的读写不受影响,其他线程访问没上锁的地方不会被阻塞。 //(userId,WebSocketServer实例) private static ConcurrentHashMap<Integer,WebSocketServer> users = new ConcurrentHashMap<>(); //当前用户 private User user ; //session维护(存)链接 private Session session = null ; //加入数据库 private static UserMapper userMapper; @Autowired public void setUserMapper(UserMapper userMapper){ WebSocketServer.userMapper = userMapper; } @OnOpen public void onOpen(Session session, @PathParam("token") String token) { // 建立连接 this.session = session ;//将session存起来--》一个用户一个session System.out.println("connected!"); Integer userId = Integer.parseInt(token);//获取id this.user = userMapper.selectById(userId);//获取用户 users.put(userId,this);//用户链接--》加入到集合中 } @OnClose public void onClose() { // 关闭链接 System.out.println("disconnexted!"); if(this.user != null){ users.remove(this.user.getId()); } } @OnMessage public void onMessage(String message, Session session) { // 从Client接收消息 System.out.println("receive message!"); } @OnError public void onError(Session session, Throwable error) { error.printStackTrace(); } public void sendMessage(String message){ //由于是异步的,加上同步锁(只有一个线程能执行该块) synchronized (this.session){ try{ //后端向当前链接发送信息 this.session.getBasicRemote().sendText(message); }catch(IOException e){ e.printStackTrace(); } } } }- 1
- 2
- 3
- 4
- 5
- 6
- 7
- 8
- 9
- 10
- 11
- 12
- 13
- 14
- 15
- 16
- 17
- 18
- 19
- 20
- 21
- 22
- 23
- 24
- 25
- 26
- 27
- 28
- 29
- 30
- 31
- 32
- 33
- 34
- 35
- 36
- 37
- 38
- 39
- 40
- 41
- 42
- 43
- 44
- 45
- 46
- 47
- 48
- 49
- 50
- 51
- 52
- 53
- 54
- 55
- 56
- 57
- 58
- 59
- 60
- 61
- 62
- 63
- 64
- 65
- 66
- 67
- 68
- 69
- 70
- 71
- 72
- 73
- 74
- 75
- 76
PkIndexView.vue
<template> <PlayGround></PlayGround> </template> <script> import PlayGround from "@/components/PlayGround" import { onMounted, onUnmounted } from "vue" import { useStore } from 'vuex' export default { components:{ PlayGround, }, setup(){ const store = useStore(); const socketUrl = `ws://127.0.0.1:3000/websocket/${store.state.user.id}/`; let socket = null; onMounted(()=>{ socket = new WebSocket(socketUrl);//Js自带 //建立连接 socket.onopen = () =>{ console.log("connected!") } socket.onmessage = (msg) => { const data = JSON.parse(msg.data);//JSON的数据在data里面 console.log(data) } socket.onclose = () => { console.log("disconnected!") } }) onUnmounted(()=>{ socket.close(); }) } } </script> <style> </style>- 1
- 2
- 3
- 4
- 5
- 6
- 7
- 8
- 9
- 10
- 11
- 12
- 13
- 14
- 15
- 16
- 17
- 18
- 19
- 20
- 21
- 22
- 23
- 24
- 25
- 26
- 27
- 28
- 29
- 30
- 31
- 32
- 33
- 34
- 35
- 36
- 37
- 38
- 39
- 40
- 41
- 42
- 43
- 44
- 45
- 46
- 47
- 48
- 49
- 50
- 51
pk.js
export default { state: { status:"matching",//matching匹配页面 playing对战页面 socket:null, opponent_username:"", opponent_photo:"", }, getters: { }, mutations: { updateSocket(state,socket){ state.socket = socket; }, updateOpponent(state,opponent){ state.opponent_username = opponent.username; state.opponent_photo = opponent.photo; }, updateStatus(state,status){ state.status = status; } }, actions: { }, modules: { } }- 1
- 2
- 3
- 4
- 5
- 6
- 7
- 8
- 9
- 10
- 11
- 12
- 13
- 14
- 15
- 16
- 17
- 18
- 19
- 20
- 21
- 22
- 23
- 24
- 25
- 26
调试结果
前端

后端

3.2传递参数token(此处token是真实的)
consumer.utils.JwtAuthentication
功能:通过token返回用户的idpackage com.kob.backend.consumer.utils; import com.kob.backend.utils.JwtUtil; import io.jsonwebtoken.Claims; public class JwtAuthentication { //根据token返回userId public static Integer getUserId(String token)//不用实例访问 { int userid = -1; try { Claims claims = JwtUtil.parseJWT(token); userid = Integer.parseInt(claims.getSubject()); } catch (Exception e) { throw new RuntimeException(e); } return userid; } }- 1
- 2
- 3
- 4
- 5
- 6
- 7
- 8
- 9
- 10
- 11
- 12
- 13
- 14
- 15
- 16
- 17
- 18
- 19
- 20
consumer.WebSocketServer的改变

调试:后端输出

4.前端:匹配的页面实现MatchGround.vue
<template> <div class="matchground"> <div class="row"> <!-- 自己 --> <div class="col-6"> <div class="user-photo"> <img :src="$store.state.user.photo" alt=""> </div> <div class="user-username"> {{$store.state.user.username}} </div> </div> <!-- 对手 --> <div class="col-6"> <div class="user-photo"> <img :src="$store.state.pk.opponent_photo" alt=""> </div> <div class="user-username"> {{$store.state.pk.opponent_username}} </div> </div> <div class="col-12" style="text-align : center; padding-top : 12vh;"> <button type="button" class="btn btn-warning btn-lg" @click="click_match_btn">{{match_btn_info}}</button> </div> </div> </div> </template> <script> import { ref } from "vue" export default { setup(){ let match_btn_info = ref("开始匹配") const click_match_btn = ( )=>{ if(match_btn_info.value === "开始匹配"){match_btn_info.value = "取消"} else if(match_btn_info.value === "取消"){match_btn_info.value = "开始匹配"} } return { match_btn_info, click_match_btn, } } } </script> <style scoped> div.matchground { width: 60vw; height: 70vh; background-color:rgba(50 ,50 ,50 ,0.5); margin: 40px auto; } div.user-photo { text-align: center; padding-top: 10vh; } div.user-photo > img{ border-radius: 50%; width: 20vh; } div.user-username { text-align: center; font-size: 20px; font-weight: 600; color: white; margin-top: 2vh; } </style>- 1
- 2
- 3
- 4
- 5
- 6
- 7
- 8
- 9
- 10
- 11
- 12
- 13
- 14
- 15
- 16
- 17
- 18
- 19
- 20
- 21
- 22
- 23
- 24
- 25
- 26
- 27
- 28
- 29
- 30
- 31
- 32
- 33
- 34
- 35
- 36
- 37
- 38
- 39
- 40
- 41
- 42
- 43
- 44
- 45
- 46
- 47
- 48
- 49
- 50
- 51
- 52
- 53
- 54
- 55
- 56
- 57
- 58
- 59
- 60
- 61
- 62
- 63
- 64
- 65
- 66
- 67
- 68
- 69
- 70
- 71
- 72
- 73
- 74
- 75
- 76
- 77
PkIndexView.vue

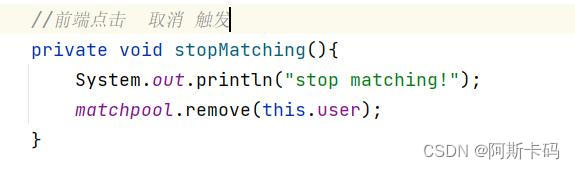
5.前后端:具体实现匹配(后端匹配成功,发送用户信息)点击开始匹配按钮–>向后端发送信息
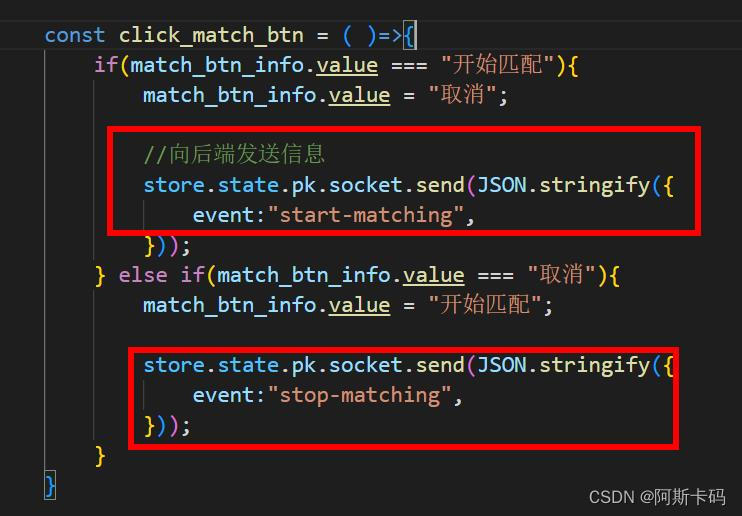
后端接收信息,调用其他函数

startMatching函数

stopMatching函数
当匹配池中的用户>=2时,每一个用户连接发送给自己信息

sendMessage函数

onOpen函数,onClose函数的修改
6.地图迁移后端consumer.utils.Game
package com.kob.backend.consumer.utils; import java.util.Random; public class Game { final private Integer rows; final private Integer cols; final private Integer inner_walls_count; final private int[][] g; final private static int[] dx = {-1, 0, 1, 0}, dy = {0, 1, 0, -1}; //构造map规模 public Game(Integer rows, Integer cols, Integer inner_walls_count) { this.rows = rows; this.cols = cols; this.inner_walls_count = inner_walls_count; this.g = new int[rows][cols]; } //货物gamemap public int[][] getG() { return g; } //地图是否连通 private boolean check_connectivity(int sx, int sy, int tx, int ty) { if (sx == tx && sy == ty) return true; g[sx][sy] = 1; for (int i = 0; i < 4; i ++ ) { int x = sx + dx[i], y = sy + dy[i]; if (x >= 0 && x < this.rows && y >= 0 && y < this.cols && g[x][y] == 0) { if (check_connectivity(x, y, tx, ty)) { g[sx][sy] = 0; return true; } } } g[sx][sy] = 0; return false; } private boolean draw() // 画地图 { for (int i = 0; i < this.rows; i ++ ) { for (int j = 0; j < this.cols; j ++ ) { g[i][j] = 0; } } //边 for (int r = 0; r < this.rows; r ++ ) { g[r][0] = g[r][this.cols - 1] = 1; } //边 for (int c = 0; c < this.cols; c ++ ) { g[0][c] = g[this.rows - 1][c] = 1; } //随机画 Random random = new Random(); for (int i = 0; i < this.inner_walls_count / 2; i ++ ) { for (int j = 0; j < 1000; j ++ ) { int r = random.nextInt(this.rows); int c = random.nextInt(this.cols); if (g[r][c] == 1 || g[this.rows - 1 - r][this.cols - 1 - c] == 1) continue; if (r == this.rows - 2 && c == 1 || r == 1 && c == this.cols - 2) continue; g[r][c] = g[this.rows - 1 - r][this.cols - 1 - c] = 1; break; } } return check_connectivity(this.rows - 2, 1, 1, this.cols - 2); } public void createMap() { for (int i = 0; i < 1000; i ++ ) { if (draw()) break; } } }- 1
- 2
- 3
- 4
- 5
- 6
- 7
- 8
- 9
- 10
- 11
- 12
- 13
- 14
- 15
- 16
- 17
- 18
- 19
- 20
- 21
- 22
- 23
- 24
- 25
- 26
- 27
- 28
- 29
- 30
- 31
- 32
- 33
- 34
- 35
- 36
- 37
- 38
- 39
- 40
- 41
- 42
- 43
- 44
- 45
- 46
- 47
- 48
- 49
- 50
- 51
- 52
- 53
- 54
- 55
- 56
- 57
- 58
- 59
- 60
- 61
- 62
- 63
- 64
- 65
- 66
- 67
- 68
- 69
- 70
- 71
- 72
- 73
- 74
- 75
- 76
- 77
- 78
- 79
- 80
- 81
- 82
- 83
- 84
- 85
- 86
- 87
- 88
- 89
- 90
- 91
- 92
- 93
- 94
- 95
- 96
- 97
- 98
- 99
-
相关阅读:
【QT】对话框dialog
记录beforeRouteEnter函数内部 this 是undefined的解决方案
程序员必知必会的TCP/IP,业内大佬给讲明白了
【无标题】
bug总结(1)--变量取错
spring+redis docker
好用的思维导图软件Xmind Pro 中文专业安装
aliyun Rest ful api V3版本身份验证构造
ElasticsearchRestTemplate 和ElasticsearchRepository 的使用
飞桨(PaddlePaddle)数据加载教程
- 原文地址:https://blog.csdn.net/qq_52384627/article/details/126387332
