-
JDBC学习篇(三)
JDBC学习篇(三)
JDBC的一种进阶版本1思路
1 内容
通过字符输入流和Properties集合对象去进行注册驱动和获取(连接)数据库的操作
你以后使用的数据库的厂商改了,只需要改配置文件的一些信息就行,不用再去大动业务逻辑了
你改动了密码也更加便捷,且使得用户更改文件时,也知道如何去改(因为文本文件基本谁都知道修改)
这个路径有可能会失效,因为在你的电脑上有这个目录,可能它这个电脑上没有,
2 核心思路
2.1 导入jar包
2.2 准备工作
/*因为调用方法的时候会抛出编译时异常,在try代码块里面定义的话 除了try代码块之外的其他地方都用不了,这样定义的话显然是不可以的 因此我们需要把在后面需要实例化的对象都在try代码块的前面进行声明 */ //声明连接对象 Connection conn=null; //声明数据库操作对象 Statement st=null; //声明结果集对象 ResultSet rs=null;- 1
- 2
- 3
- 4
- 5
- 6
- 7
- 8
- 9
- 10
2.3 创建并读取配置文件(.properties结尾的)里面的信息
2.3.1 配置文件信息里面需要含有driver、url、root、pwd信息
driver=com.mysql.jdbc.Driver url=jdbc:mysql://localhost:3306/zlz_temp?characterEncoding=utf-8&useSSL=true user=root pwd=123456- 1
- 2
- 3
- 4
2.3.2 建立一个字符输入流读取配置文件
FileReader fr=new FileReader("work01/src/dbtext.properties");- 1
2.3.3 通过Properties集合对象将字符输入流的读取内容通过键值对的方式加入到集合中
Properties pr=new Properties(); pr.load(fr);- 1
- 2
2.3.4 通过getProperties方法通过键获取我们所需要的数据(driver,url,root,pwd)
String driver=pr.getProperty("driver"); String url=pr.getProperty("url"); String user=pr.getProperty("user"); String pwd=pr.getProperty("pwd");- 1
- 2
- 3
- 4
2.4 注册驱动
Class.forname(driver); //只要用到了.class类,就会让类的代理对象去进行类的加载 //它本质还是在点这个方法的时候进行了类加载,然后执行了com.mysql.jdbc.Driver类中的静态代码块- 1
- 2
- 3
com.mysql.jdbc.Driver类中的静态代码块源码如下所示
static { try { DriverManager.registerDriver(new Driver()); } catch (SQLException var1) { throw new RuntimeException("Can't register driver!"); } }- 1
- 2
- 3
- 4
- 5
- 6
- 7
2.5 建立连接
conn=DriverManager.getConnection(url,user,pwd);- 1
2.6 创建数据库操作对象
st=conn.createStatement();- 1
2.7 执行sql语句并处理查询结果
String sql="DQL语句/DML语句"; //若sql是DQL语句,需要用ResultSet来接收,通过next()方法和getString方法获取值 ResultSet rs=st.executeQuery(sql); while(rs.next){ String 变量名=rs.getString("字段名"); //也可以通过getString("列的索引");1代表第一列.默认从1开始 //也可以根据字段对应的数据类型去进行相应类型的获取,re.getInt()也是可以的 /*通过字段名获取字段名对应的值,一般java的类的取名会和数据库的字段名保持一致 即变量名和字段名看起来是一样的内容 */ ...... } /*若sql语句是DML语句,需要用int类型接收,因为返回的是受影响的行数 如果受影响行数不为0,则DML操作成功,否则失败 */ int count=st.executeUpdate(sql);- 1
- 2
- 3
- 4
- 5
- 6
- 7
- 8
- 9
- 10
- 11
- 12
- 13
- 14
- 15
- 16
2.8.释放资源
/*释放资源的代码一般写在finally代码块中 因为无论你的程序是抛出异常还是没有异常,它都进行finally代码块去进行资源的关闭 关闭资源是调用的.close()方法,但是得要这个对象不为空才能去点方法 因为在释放资源前,需要进行非空判断 先关闭里面的资源,即st.close再去执行conn.close() 原理其实很简单,就是联系生活,外面的门和里面的门都要关,你先把外面的门关掉了,此时就没有办法去关闭里面的那条门了,因次就需要先关闭里面的资源,再去关闭外面的资源 */ if (st != null) { try { st.close(); } catch (SQLException throwables) { throwables.printStackTrace(); } finally { } } if (conn != null) { try { conn.close(); } catch (SQLException throwables) { throwables.printStackTrace(); } finally { } } /*如果是sql语句是DQL语句的话,在st.close()之前需要rs.close()*/- 1
- 2
- 3
- 4
- 5
- 6
- 7
- 8
- 9
- 10
- 11
- 12
- 13
- 14
- 15
- 16
- 17
- 18
- 19
- 20
- 21
- 22
- 23
- 24
3 实现
3.1 DQL语句
3.1.1 示例代码
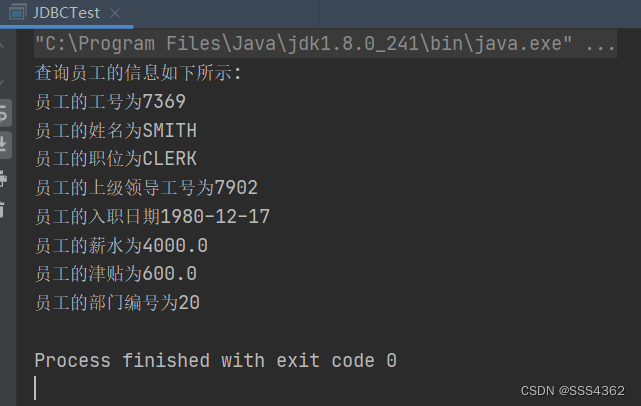
import java.io.FileNotFoundException; import java.io.FileReader; import java.io.IOException; import java.sql.*; import java.util.Properties; public class JDBCTest { public static void main(String[] args) { //1.准备工作 Connection conn=null; Statement st=null; ResultSet rs=null; try { //2.创建并读取配置文件信息到相应的变量中去 FileReader fr=new FileReader("work01/src/dbtext.properties"); Properties pr=new Properties(); pr.load(fr); String driver=pr.getProperty("driver"); String url=pr.getProperty("url"); String user=pr.getProperty("user"); String pwd=pr.getProperty("pwd"); //3.注册驱动 Class.forName(driver); //4.获取(建立连接) conn=DriverManager.getConnection(url,user,pwd); //5.获取(新建)数据库操作对象 st=conn.createStatement(); //6.执行sql语句并显示查询结果 String sql="SELECT * FROM copy_emp WHERE ename='SMITH'"; rs=st.executeQuery(sql); System.out.println("查询员工的信息如下所示:"); while (rs.next()){ System.out.println("员工的工号为"+ rs.getInt("empno")); System.out.println("员工的姓名为"+ rs.getString("ename")); System.out.println("员工的职位为"+ rs.getString("job")); System.out.println("员工的上级领导工号为"+ rs.getInt("mgr")); System.out.println("员工的入职日期"+ rs.getDate("hiredate")); System.out.println("员工的薪水为"+ rs.getDouble("sal")); System.out.println("员工的津贴为"+ rs.getDouble("comm")); System.out.println("员工的部门编号为"+ rs.getInt("deptno")); } } catch (FileNotFoundException e) { e.printStackTrace(); } catch (IOException e) { e.printStackTrace(); } catch (ClassNotFoundException e) { e.printStackTrace(); } catch (SQLException throwables) { throwables.printStackTrace(); } finally { //7.释放资源 if (rs != null) { try { rs.close(); } catch (SQLException throwables) { throwables.printStackTrace(); } } if (st != null) { try { st.close(); } catch (SQLException throwables) { throwables.printStackTrace(); } } if (conn != null) { try { conn.close(); } catch (SQLException throwables) { throwables.printStackTrace(); } } } } }- 1
- 2
- 3
- 4
- 5
- 6
- 7
- 8
- 9
- 10
- 11
- 12
- 13
- 14
- 15
- 16
- 17
- 18
- 19
- 20
- 21
- 22
- 23
- 24
- 25
- 26
- 27
- 28
- 29
- 30
- 31
- 32
- 33
- 34
- 35
- 36
- 37
- 38
- 39
- 40
- 41
- 42
- 43
- 44
- 45
- 46
- 47
- 48
- 49
- 50
- 51
- 52
- 53
- 54
- 55
- 56
- 57
- 58
- 59
- 60
- 61
- 62
- 63
- 64
- 65
- 66
- 67
- 68
- 69
- 70
- 71
- 72
- 73
- 74
- 75
- 76
- 77
3.1.2 示例代码运行截图
3.3 DML语句
3.1.1 示例代码
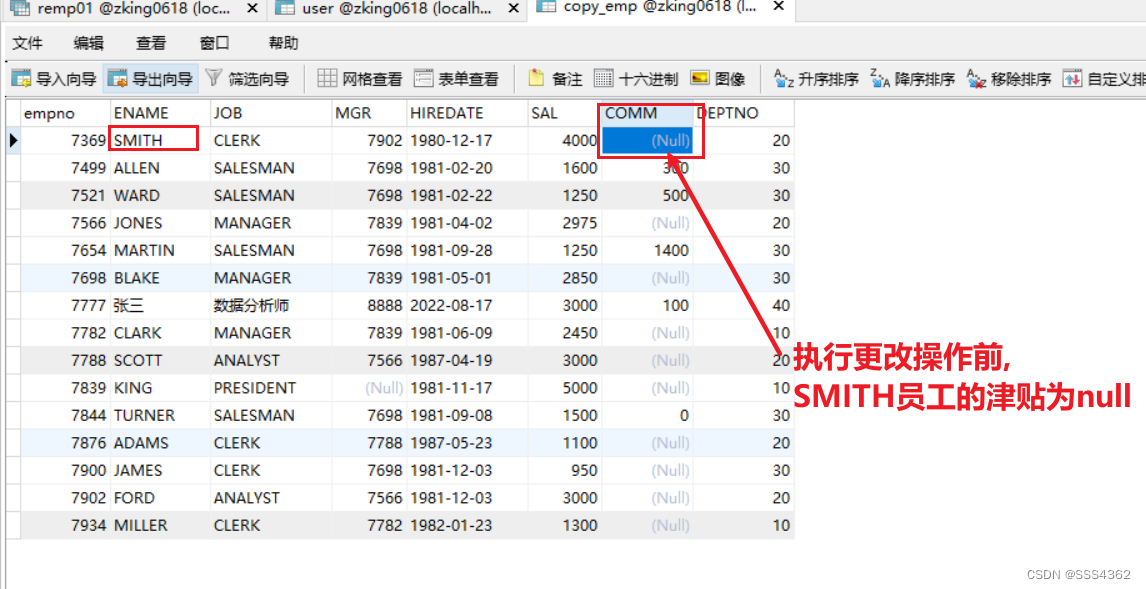
import java.io.FileNotFoundException; import java.io.FileReader; import java.io.IOException; import java.sql.*; import java.util.Properties; public class JDBCTest { public static void main(String[] args) { //1.准备工作,准备好后面需要实例化使用的对象 Connection conn=null; Statement st=null; /*2.创建并读取配置文件 配置文件需要写成user=root这种的格式 读取配置文件的步骤如下所示: 2.1使用字符文件输入流对象fr读取配置文件 2.2 通过集合Propertie对象将fr读取的内容以键值对的方式写入到集合中 2.3 调用集合对象的getString(String key)方法,通过键获取值 2.4 拿着变量去依次存储刚刚拿的的值 */ try { //3创建并读取配置文件的信息到变量中 FileReader fr=new FileReader("work01/src/dbtext.properties"); Properties pr=new Properties(); pr.load(fr); String driver=pr.getProperty("driver"); String url=pr.getProperty("url"); String user=pr.getProperty("user"); String pwd=pr.getProperty("pwd"); //4.注册驱动 Class.forName(driver); //5.获取(建立)连接 conn= DriverManager.getConnection(url,user,pwd); //6.获取数据库操作对象 st=conn.createStatement(); //7.执行SQL语句 String sql="UPDATE copy_emp SET comm=600 WHERE ename='SMITH'"; int count=st.executeUpdate(sql); //8.处理结果(增删改都是返回受影响的行数,其不为0代表增删改操作成功,否则操作失败) System.out.println(count>0?"修改成功":"修改失败"); } catch (FileNotFoundException e) { e.printStackTrace(); } catch (IOException e) { e.printStackTrace(); } catch (ClassNotFoundException e) { e.printStackTrace(); } catch (SQLException throwables) { throwables.printStackTrace(); } finally { //9.关闭流的资源,从后往前关 if (st != null) { try { st.close(); } catch (SQLException throwables) { throwables.printStackTrace(); } } if (conn != null) { try { conn.close(); } catch (SQLException throwables) { throwables.printStackTrace(); } } } } }- 1
- 2
- 3
- 4
- 5
- 6
- 7
- 8
- 9
- 10
- 11
- 12
- 13
- 14
- 15
- 16
- 17
- 18
- 19
- 20
- 21
- 22
- 23
- 24
- 25
- 26
- 27
- 28
- 29
- 30
- 31
- 32
- 33
- 34
- 35
- 36
- 37
- 38
- 39
- 40
- 41
- 42
- 43
- 44
- 45
- 46
- 47
- 48
- 49
- 50
- 51
- 52
- 53
- 54
- 55
- 56
- 57
- 58
- 59
- 60
- 61
- 62
- 63
- 64
- 65
- 66
- 67
3.1.2 示例代码运行截图

3.1.3 数据表原来的数据截图
3.1.4 数据表更新后的数据截图

-
相关阅读:
github付款收到地区限制
c++异常详解
OpenDDS 安装使用
ROS1 and ROS2一键安装
springboot+jsp+ssm手办周边商城购物网站306
knife4j 简单使用
kityformula-editor 配置字号和间距
CCF CSP认证历年题目自练Day28
wy的leetcode刷题记录_Day34
操作系统知识点总结——第一章计算机系统概述
- 原文地址:https://blog.csdn.net/SSS4362/article/details/126395555
