-
Prometheus认证访问-grafana配置-安装mysql和redis的节点监控
Prometheus 对其安全模型做了修改 , 从 https://so.csdn.net/so/search?q=Node&spm=1001.2101.3001.7020 Exporter 开始到后续其他的组件,都将支持 TLS 和 basic auth, 同时也列出了最新的安全基准(默认情况下都支持 TLS v1.2 及以上).
注意:Node Exporter v1.0.0 版本以上才支持。
htpasswd建立和更新存储用户名、密码的文本文件, 用于对HTTP用户的basic认证。
mysql_exporter是用来收集MysQL或者Mariadb数据库相关指标的,mysql_exporter需要连接到数据库并有相关权限。
Prometheus也可以用redis_exporter来监控Redis。参考
二、Prometheus TLS加密认证和基于 basic_auth 用户名密码访问
Prometheus 普罗米修斯监控https
proemtheus TSL加密认证
为 Prometheus Node Exporter 加上认证
使用基本身份验证保护 Prometheus API 和 UI 端点
htpasswd 详解
Prometheus监控实战之mysql_exporter使用
【Prometheus】mysqld_exporter安装+常用配置参数详解
prometheus+mysqld_exporter对mysql服务器多实例的监控
mysqld_exporter监控mysql信息
使用mysql_exporter监控mysql
mysql设置max_user_connections及其使用MySQL GUI Tools要注意的点
Prometheus监控Redis
prometheus监控redis操作
htpasswd生成密码
系统内置了htpasswd。
# 查看服务器的httpd-tools版本 rpm -qa |grep httpd-tools httpd-tools-2.4.6-88.el7.centos.x86_64 # basic auth 密码生成工具参数 htpasswd --help htpasswd [-cmdpsD] passwordfile username htpasswd -b[cmdpsD] passwordfile username password htpasswd -n[mdps] username htpasswd -nb[mdps] username password -c 创建passwdfile.如果passwdfile 已经存在,那么它会重新写入并删去原有内容. -n 不更新passwordfile,直接显示密码 -b 使用命令行中的密码,而不是提示输入密码。 -i 从stdin读取密码,无需验证(用于脚本使用)。 -m 使用MD5加密(默认) -2 强制密码的SHA-256 crypt()散列(安全)。 -5 强制密码的SHA-512 crypt()散列(安全)。 -B 强制bcrypt加密密码(非常安全)。 -C 设置用于bcrypt算法的计算时间 (越高越安全,但速度越慢,默认值为5,有效值为4到31)。 -r 设置用于SHA-256、SHA-512算法的轮数 (越高越安全,但速度越慢,默认值为5000)。-d 使用CRYPT加密(默认) -p 使用普通文本格式的密码 -s 使用SHA加密 -b 命令行中一并输入用户名和密码而不是根据提示输入密码,可以看见明文,不需要交互 -D 删除指定的用户 -v 验证指定用户的密码。 在Windows和NetWare以外的其他系统上,'-p'标志可能不起作用。 SHA-1算法不使用salt,并且比MD5算法更不安全。 # 升级 yum -y update httpd-tools # 使用 htpasswd 来生成 bcrypt 密码 hash # 测试密码 123456 htpasswd -nBC 12 '' New password: Re-type new password: :$2y$12$SHTOLnAJteYna.T5Cq.oZ.NcjANK.YPAb0yyQp1f1V2rx5oCgR.Du htpasswd -nBC 12 '' | tr -d ':\n' New password: Re-type new password: $2y$12$oYI1QdMJF45rbCfmJ2U0yuD6kcYMlQvphgzhQylQ7FXCmDKqozZt2- 1
- 2
- 3
- 4
- 5
- 6
- 7
- 8
- 9
- 10
- 11
- 12
- 13
- 14
- 15
- 16
- 17
- 18
- 19
- 20
- 21
- 22
- 23
- 24
- 25
- 26
- 27
- 28
- 29
- 30
- 31
- 32
- 33
- 34
- 35
- 36
- 37
- 38
- 39
- 40
- 41
- 42


openssl生成TLS证书
# 帮助 openssl --help Standard commands asn1parse ca ciphers cms crl crl2pkcs7 dgst dh dhparam dsa dsaparam ec ecparam enc engine errstr gendh gendsa genpkey genrsa nseq ocsp passwd pkcs12 pkcs7 pkcs8 pkey pkeyparam pkeyutl prime rand req rsa rsautl s_client s_server s_time sess_id smime speed spkac ts verify version x509 Message Digest commands (see the `dgst' command for more details) md2 md4 md5 rmd160 sha sha1 Cipher commands (see the `enc' command for more details) aes-128-cbc aes-128-ecb aes-192-cbc aes-192-ecb aes-256-cbc aes-256-ecb base64 bf bf-cbc bf-cfb bf-ecb bf-ofb camellia-128-cbc camellia-128-ecb camellia-192-cbc camellia-192-ecb camellia-256-cbc camellia-256-ecb cast cast-cbc cast5-cbc cast5-cfb cast5-ecb cast5-ofb des des-cbc des-cfb des-ecb des-ede des-ede-cbc des-ede-cfb des-ede-ofb des-ede3 des-ede3-cbc des-ede3-cfb des-ede3-ofb des-ofb des3 desx idea idea-cbc idea-cfb idea-ecb idea-ofb rc2 rc2-40-cbc rc2-64-cbc rc2-cbc rc2-cfb rc2-ecb rc2-ofb rc4 rc4-40 rc5 rc5-cbc rc5-cfb rc5-ecb rc5-ofb seed seed-cbc seed-cfb seed-ecb seed-ofb zlib # 生成 openssl req -new -newkey rsa:2048 -days 3650 -nodes -x509 -keyout \ prometheus_test.key -out prometheus_test.crt \ -subj "/C=CN/ST=Beijing/L=Beijing/O=companyTest.cn/CN=localhost" ll | grep test- 1
- 2
- 3
- 4
- 5
- 6
- 7
- 8
- 9
- 10
- 11
- 12
- 13
- 14
- 15
- 16
- 17
- 18
- 19
- 20
- 21
- 22
- 23
- 24
- 25
- 26
- 27
- 28
- 29
- 30
- 31
- 32
- 33
- 34
- 35
- 36
- 37
- 38
- 39
- 40

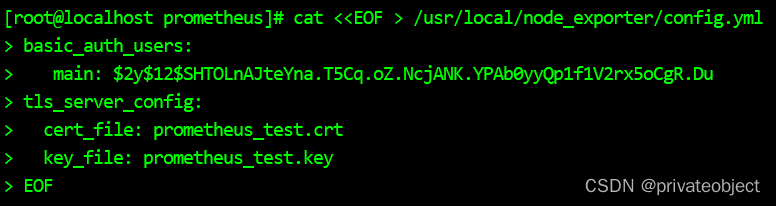
node_exporter 启用auth和TLS
cat </usr/local/node_exporter/config.yml > basic_auth_users: > main: '$2y$12$SHTOLnAJteYna.T5Cq.oZ.NcjANK.YPAb0yyQp1f1V2rx5oCgR.Du' > tls_server_config: > cert_file: prometheus_test.crt > key_file: prometheus_test.key > EOF pwd cp prometheus_test.* /usr/local/node_exporter/ chown -R prometheus.prometheus /usr/local/node_exporter/ ll /usr/local/node_exporter/ - 1
- 2
- 3
- 4
- 5
- 6
- 7
- 8
- 9
- 10
- 11


node启动service修改并重启
vim /usr/lib/systemd/system/node_exporter.service ### [Unit] Description=node_export Documentation=https://github.com/prometheus/node_exporter After=network.target [Service] Type=simple User=prometheus ExecStart=/usr/local/node_exporter/node_exporter --web.config=/usr/local/node_exporter/config.yml Restart=on-failure [Install] WantedBy=multi-user.target ### # 重加载,并重启 systemctl daemon-reload systemctl restart node_exporter.service- 1
- 2
- 3
- 4
- 5
- 6
- 7
- 8
- 9
- 10
- 11
- 12
- 13
- 14
- 15
- 16
- 17

修改prometheus的配置并热加载
cp prometheus_test.crt /usr/local/prometheus/ chown -R prometheus.prometheus /usr/local/prometheus/ ll /usr/local/prometheus/ vim /usr/local/prometheus/prometheus.yml ### # 增加监控节点 - job_name: "centos7_test" basic_auth: username: main password: 123456 scheme: https tls_config: ca_file: prometheus_test.crt insecure_skip_verify: true #static_configs: # - targets: ["127.0.0.1:9100"] file_sd_configs: - files: ['file_sd/test/node.yml'] ### curl -X POST http://localhost:9090/prometheus/-/reload- 1
- 2
- 3
- 4
- 5
- 6
- 7
- 8
- 9
- 10
- 11
- 12
- 13
- 14
- 15
- 16
- 17
- 18
- 19
- 20


访问node节点验证
地址:https://192.168.xxx.xxx:9100/


prometheus查看


prometheus 启用auth和TLS
vim /usr/local/prometheus/config.yml ### basic_auth_users: admin: '$2y$12$SHTOLnAJteYna.T5Cq.oZ.NcjANK.YPAb0yyQp1f1V2rx5oCgR.Du' #tls_server_config: # cert_file: prometheus_test.crt # key_file: prometheus_test.key ### cp prometheus_test.key /usr/local/prometheus/ chown -R prometheus.prometheus /usr/local/prometheus/prometheus_test.key chown -R prometheus.prometheus /usr/local/prometheus/config.yml vim /usr/lib/systemd/system/prometheus.service ### ExecStart=/usr/local/prometheus/prometheus --config.file=/usr/local/prometheus/prometheus.yml --storage.tsdb.path=/usr/local/prometheus/data/ --web.enable-lifecycle --storage.tsdb.retention.time=365d --web.external-url=prometheus --web.config.file=/usr/local/prometheus/config.yml ### ### scrape_configs: - job_name: "prometheus" basic_auth: username: admin password: 123456 metrics_path: "/prometheus/metrics" static_configs: - targets: ["127.0.0.1:9090"] ### # 重加载,并重启 systemctl daemon-reload systemctl restart prometheus.service # 认证的重启请求 curl -X POST -u admin http://localhost:9090/prometheus/-/reload Enter host password for user 'admin':- 1
- 2
- 3
- 4
- 5
- 6
- 7
- 8
- 9
- 10
- 11
- 12
- 13
- 14
- 15
- 16
- 17
- 18
- 19
- 20
- 21
- 22
- 23
- 24
- 25
- 26
- 27
- 28
- 29
- 30
- 31
- 32


验证


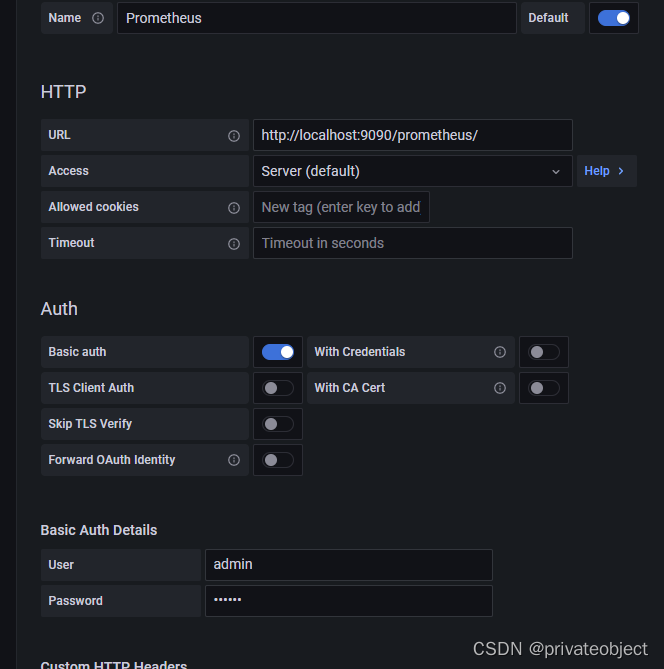
grafana配置
请求路径改为nginx转发


安装mysqld_exporter

mysql创建监控用户
# 一、创建用于监视数据库的用户exporter,需要先增加授权(在数据库所在的服务器上授权prometheus) mysql -u root -p mysql> set global validate_password.policy=LOW; # MAX_USER_CONNECTIONS参数,避免我们监控使用过多的数据库连接数,导致数据库压力过大 # 降低MySQL8 密码规则策略,或者按规则设置密码,如果是mysql8.0则需要进行设置,mariadb则不需要配置 mysql> CREATE USER 'exporter'@'%' IDENTIFIED BY 'prometheus' WITH MAX_USER_CONNECTIONS 3; # 更新最大连接数 # UPDATE mysql.user SET max_user_connections = 3 WHERE user='exporter' AND host='localhost'; FLUSH PRIVILEGES; # GRANT PROCESS, REPLICATION CLIENT, SELECT ON *.* TO 'exporter'@'localhost' IDENTIFIED BY '1qaz#EDC' WITH MAX_USER_CONNECTIONS 3; mysql> GRANT PROCESS,REPLICATION CLIENT,SELECT ON *.* TO 'exporter'@'%'; mysql> flush privileges;- 1
- 2
- 3
- 4
- 5
- 6
- 7
- 8
- 9
- 10
- 11

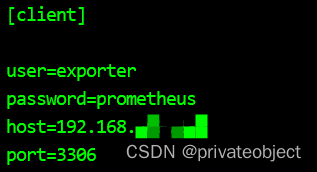
部署mysql监控节点
https://github.com/prometheus/mysqld_exporter/releases/download/v0.14.0/mysqld_exporter-0.14.0.linux-amd64.tar.gz # 下载gz包并上传到服务器 tar -zxvf mysqld_exporter-0.14.0.linux-amd64.tar.gz mv mysqld_exporter-0.14.0.linux-amd64 /usr/local/mysqld_exporter # 创建节点配置文件 vim /usr/local/mysqld_exporter/.my.cnf ### [client] user=exporter password=prometheus host=192.168.xxx.xxx port=3306 ### # 授权 chown -R prometheus.prometheus /usr/local/mysqld_exporter vim /usr/lib/systemd/system/mysqld_exporter.service ### [Unit] Description=Prometheus [Service] ExecStart=/usr/local/mysqld_exporter/mysqld_exporter --config.my-cnf=/usr/local/mysqld_exporter/.my.cnf Restart=on-failure [Install] WantedBy=multi-user.target ### # 默认端口 9104 systemctl daemon-reload systemctl start mysqld_exporter && systemctl enable mysqld_exporter systemctl status mysqld_exporter # 接入prometheus vim /usr/local/prometheus/prometheus.yml ### # 监听mysql - job_name: 'mysqld_exporter' static_configs: - targets: ['127.0.0.1:9104'] ### /usr/local/prometheus/promtool check config /usr/local/prometheus/prometheus.yml # 重新加载配置 curl -X POST -u admin http://localhost:9090/prometheus/-/reload- 1
- 2
- 3
- 4
- 5
- 6
- 7
- 8
- 9
- 10
- 11
- 12
- 13
- 14
- 15
- 16
- 17
- 18
- 19
- 20
- 21
- 22
- 23
- 24
- 25
- 26
- 27
- 28
- 29
- 30
- 31
- 32
- 33
- 34
- 35
- 36
- 37
- 38
- 39
- 40
- 41
- 42


验证
http://192.168.xxx.xxx:9104/


接入prometheus验证


grafana引入仪表盘id 7362


安装redis_exporter

https://github.com/oliver006/redis_exporter/releases https://github.com/oliver006/redis_exporter/releases/download/v1.43.1/redis_exporter-v1.43.1.linux-amd64.tar.gz # 下载gz包并上传到服务器 tar -zxvf redis_exporter-v1.43.1.linux-amd64.tar.gzmv redis_exporter-v1.43.1.linux-amd64 /usr/local/redis_exporter chown -R prometheus.prometheus /usr/local/redis_exporter vim /usr/lib/systemd/system/redis_exporter.service ### [Unit] Description=redis_exporter Documentation=https://github.com/oliver006/redis_exporter After=network.target [Service] Type=simple User=prometheus ExecStart=/usr/local/redis_exporter/redis_exporter -redis.addr 127.0.0.1:6379 -redis.password 123456 Restart=on-failure [Install] WantedBy=multi-user.target ### # 默认端口 9121 systemctl daemon-reload systemctl start redis_exporter && systemctl enable redis_exporter systemctl status redis_exporter # 接入prometheus vim /usr/local/prometheus/prometheus.yml ### # 监听redis - job_name: 'redis_exporter' static_configs: - targets: ['127.0.0.1:9121'] ### /usr/local/prometheus/promtool check config /usr/local/prometheus/prometheus.yml # 重新加载配置 curl -X POST -u admin http://localhost:9090/prometheus/-/reload- 1
- 2
- 3
- 4
- 5
- 6
- 7
- 8
- 9
- 10
- 11
- 12
- 13
- 14
- 15
- 16
- 17
- 18
- 19
- 20
- 21
- 22
- 23
- 24
- 25
- 26
- 27
- 28
- 29
- 30
- 31
- 32
- 33
- 34
- 35


访问验证
http://192.168.xxx.xxx:9121/metrics

接入prometheus并验证


grafana使用仪表盘9338

END
-
相关阅读:
chatgpt综述和报告
postgresql 表、索引的膨胀率监控
Shell脚本学习笔记
Java面试-轻松搞定Java面试集合相关题目
机器学习-预备知识
剑指offer(C++)-JZ73:翻转单词序列(数据结构-队列 & 栈)
Worthington解离酶:胶原酶及四个基本概况
SpringBoot Redis 实践指南
Java8之Function函数、BiFunction函数详解
蚂蚁核心科技产品亮相数字中国建设峰会 持续助力企业数字化转型
- 原文地址:https://blog.csdn.net/privateobject/article/details/126391808
