-
是小张的在线音乐播放系统项目详解
目录
该项目主要实现的功能如下:- 用户登录
- 上传音乐
- 删除指定音乐
- 批量删除选中的音乐
- 查询你想要的音乐(支持模糊查询)
- 添加音乐至喜欢的列表
- 移除喜欢的音乐
此项目本地访问链接:
http://192.168.126.129:8081/login.html所实现的主要页面如下:


首先应该先创建一个spring boot项目,然后在MySQL中创建数据库。
在项目下创建所需包如下所示:

一、数据库设计
1.1 创建一个数据库
-- 数据库 drop database if exists `musicserver`; create database if not exists `musicserver` character set utf8; -- 使用数据库 use `musicserver`;- 1
- 2
- 3
- 4
- 5
1.2 创建user表
DROP TABLE IF EXISTS `user`; CREATE TABLE `user` ( `id` INT PRIMARY KEY AUTO_INCREMENT, `username` varchar(20) NOT NULL, `password` varchar(255) NOT NULL );- 1
- 2
- 3
- 4
- 5
- 6
1.3 创建music表
DROP TABLE IF EXISTS `music`; CREATE TABLE `music` ( `id` int PRIMARY KEY AUTO_INCREMENT, `title` varchar(50) NOT NULL, `singer` varchar(30) NOT NULL, `time` varchar(13) NOT NULL, `url` varchar(1000) NOT NULL, `userid` int(11) NOT NULL );- 1
- 2
- 3
- 4
- 5
- 6
- 7
- 8
- 9
1.4 创建lovemusic表
DROP TABLE IF EXISTS `lovemusic`; CREATE TABLE `lovemusic` ( `id` int PRIMARY KEY AUTO_INCREMENT, `user_id` int(11) NOT NULL, `music_id` int(11) NOT NULL );- 1
- 2
- 3
- 4
- 5
- 6
二、配置数据库和xml
接下来就是在项目配置文件中对数据库进行相应的配置。
打开application.properties配置如下信息:#配置数据库 #spring.datasource.url=jdbc:mysql://127.0.0.1:3306/musicserver?characterEncoding=utf8&serverTimezone=UTC #spring.datasource.username=root #spring.datasource.password=123456 #spring.datasource.driver-class-name=com.mysql.cj.jdbc.Driver #在服务器上进行数据库配置 server.port=8081 spring.datasource.url=jdbc:mysql://127.0.0.1:3306/musicserver?characterEncoding=utf8&serverTimezone=UTC spring.datasource.username=root spring.datasource.password= spring.datasource.driver-class-name=com.mysql.cj.jdbc.Driver #配置xml mybatis.mapper-locations=classpath:mybatis/**Mapper.xml #配置springboot上传文件的大小,默认每个文件的配置最大为15Mb,单次请求的文件的总数不能大于100Mb spring.servlet.multipart.max-file-size = 15MB spring.servlet.multipart.max-request-size=100MB #音乐上传后的本地路径 #music.local.path=F:/Git_demo/java-learning-2/onlinemusic/music1 #音乐上传后服务器路径 music.local.path=/root/music # 配置springboot日志调试模式是否开启 debug=true # 设置打印日志的级别,及打印sql语句 #日志级别:trace,debug,info,warn,error #基本日志 logging.level.root=INFO logging.level.com.example.onlinemusic.mapper=debug #扫描的包:druid.sql.Statement类和frank包 logging.level.druid.sql.Statement=DEBUG logging.level.com.example=DEBUG logging.level.org.springframework.boot.autoconfigure: error- 1
- 2
- 3
- 4
- 5
- 6
- 7
- 8
- 9
- 10
- 11
- 12
- 13
- 14
- 15
- 16
- 17
- 18
- 19
- 20
- 21
- 22
- 23
- 24
- 25
- 26
- 27
- 28
- 29
- 30
- 31
- 32
- 33
- 34
- 35
- 36
- 37
三、登录模块设计
3.1创建一个
User类//在package com.example.musicserver.model包中创建User类 package com.example.onlinemusic.model; import lombok.Data; /** * Created With IntelliJ IDEA * Description: * Users: yyyyy * Date: 2022-08-04 * Time: 8:33 */ @Data public class User { private int id; private String username; private String password; }- 1
- 2
- 3
- 4
- 5
- 6
- 7
- 8
- 9
- 10
- 11
- 12
- 13
- 14
- 15
- 16
- 17
- 18
- 19
3.2 创建对应的Mapper
分别在对应的
mapper包下创建UserMapper接口:package com.example.onlinemusic.mapper; import com.example.onlinemusic.model.User; import org.apache.ibatis.annotations.Mapper; /** * Created With IntelliJ IDEA * Description: * Users: yyyyy * Date: 2022-08-04 * Time: 8:35 */ @Mapper public interface UserMapper { User login(User loginUser); }- 1
- 2
- 3
- 4
- 5
- 6
- 7
- 8
- 9
- 10
- 11
- 12
- 13
- 14
- 15
- 16
3.3 创建UserMapper.xml
在
resource目录下,新建mybatis文件夹,并在此文件夹下新建UserMapper.xml:DOCTYPE mapper PUBLIC "-//mybatis.org//DTD Mapper 3.0//EN" "http://mybatis.org/dtd/mybatis-3-mapper.dtd"> <mapper namespace="com.example.onlinemusic.mapper.UserMapper"> <select id="login" resultType="com.example.onlinemusic.model.User"> select * from user where username=#{username} and password=#{password} select> <select id="selectByName" resultType="com.example.onlinemusic.model.User"> select * from user where username=#{username}; select> mapper>- 1
- 2
- 3
- 4
- 5
- 6
- 7
- 8
- 9
- 10
- 11
- 12
- 13
- 14
- 15
3.4 登录的请求和响应设计
请求: { post, /user/login data:{username,password} } 响应: { "status": 0, "message": "登录成功", "data": { "id": xxxxx, "username": xxxxxx, "password": xxxxxxxx } } 响应体设计字段解释: { 状态码,设置为0代表成功,-1代表失败 状态描述信息,描述此次请求成功或者失败的原因 返回的数据,请求成功后,需要给前端的数据信息 }- 1
- 2
- 3
- 4
- 5
- 6
- 7
- 8
- 9
- 10
- 11
- 12
- 13
- 14
- 15
- 16
- 17
- 18
- 19
- 20
- 21
- 22
3.5 设计统一的响应体类工具类
在
tool包下创建ResponseBodyMessage类:package com.example.onlinemusic.tools; import lombok.Data; /** * Created With IntelliJ IDEA * Description: * Users: yyyyy * Date: 2022-08-07 * Time: 19:19 */ @Data public class ResponseBodyMessage <T>{ private int status;//状态码 >=0代表登录成功 <0代表登录失败 private String message;//返回的信息【出错的原因? 没错的原因?】 private T data;//返回给前端的数据 public ResponseBodyMessage(int status, String message, T data) { this.status = status; this.message = message; this.data = data; } }- 1
- 2
- 3
- 4
- 5
- 6
- 7
- 8
- 9
- 10
- 11
- 12
- 13
- 14
- 15
- 16
- 17
- 18
- 19
- 20
- 21
- 22
3.6 创建UserController类
在
controller包下创建:@RestController @RequestMapping("/user") public class UserController { @Resource private UserMapper userMapper; @Resource BCryptPasswordEncoder bCryptPasswordEncoder; @RequestMapping("/login1") public ResponseBodyMessage<User> login1(@RequestParam String username,@RequestParam String password, HttpServletRequest request){ User userlogin = new User(); userlogin.setUsername(username); userlogin.setPassword(password); User user = userMapper.login(userlogin); if(user != null){ System.out.println("登录成功!"); // request.getSession().setAttribute("USERINFO_SESSION_KEY",user); //修改session的代码为 : request.getSession().setAttribute(Constant.USERINFO_SESSION_KEY,user); return new ResponseBodyMessage<>(0,"登录成功",userlogin); }else{ System.out.println("登录失败!"); return new ResponseBodyMessage<>(-1,"登录失败",userlogin); } } }- 1
- 2
- 3
- 4
- 5
- 6
- 7
- 8
- 9
- 10
- 11
- 12
- 13
- 14
- 15
- 16
- 17
- 18
- 19
- 20
- 21
- 22
- 23
- 24
- 25
- 26
- 27
- 28
- 29
- 30
- 31
- 32
- 33
这里对注解进行说明:
@RestController:@ResponseBody + @Controller合在一起的作用。@Controller注解,表明了这个类是一个控制器类,@ResponseBody表示方法的返回值直接以指定的格式写入Http response body中。@RequestMapping: 使用@RequestMapping来映射请求,也就是通过它来指定控制器可以处理哪些URL请求。@RequestParam:将请求参数绑定到你控制器的方法参数上,如果这个参数是非必传的可以写为:RequestParam(required = false),默认是true。
上述代码中设置了
session对象,此时的key值是一个字符串,将来在其他地方获取对应的session需要通过这个字符串获取,但是存在一定的写错的情况。所以,此时建议把他定义为一个常量。在tools包中新建一个Constant类:package com.example.onlinemusic.tools; /** * Created With IntelliJ IDEA * Description: * Users: yyyyy * Date: 2022-08-07 * Time: 19:32 */ public class Constant { public static final String USERINFO_SESSION_KEY = "USERINFO_SESSION_KEY"; }- 1
- 2
- 3
- 4
- 5
- 6
- 7
- 8
- 9
- 10
- 11
- 12
登录成功验证
这里在进行验证之前要先在user表中插入用户信息:
INSERT INTO user(username,password) VALUES("zhang","123");- 1
- 2
然后使用
postman验证登录功能:

这里可以看到返回的相应数据,但是对于密码是显式显示的,为了保证用户密码安全,对密码进行相应的加密处理。BCrypt加密的原理
MD5加密
MD5是一个安全的散列算法,输入两个不同的明文不会得到相同的输出值,根据输出值,不能得到原始的明文,即其过程不可逆;但是虽然不可逆,但是不是说就是安全的。因为自从出现彩虹表后,这样的密码也"不安全"。
彩虹表:彩虹表就是一个庞大的、针对各种可能的字母组合预先计算好的哈希值的集合,不一定是针对MD5算法的,各种算法的都有,有了它可以快速的破解各类密码。越是复杂的密码,需要的彩虹表就越大,现在主流的彩虹表都是100G以上。不安全的原因:
- 暴力攻击速度很快
- 字典表很大
- 碰撞
更安全的做法是加盐或者长密码等做法,让整个加密的字符串变的更长,破解时间变慢。密码学的应用安全,是建立在破解所要付出的成本远超出能得到的利益上的。
这里我们介绍加盐的做法:盐是在每个密码中加入一些单词来变成一个新的密码,存入数据库当中。添加相应
MD5的依赖:<dependency> <groupId>commons-codecgroupId> <artifactId>commons-codecartifactId> dependency> <dependency> <groupId>org.apache.commonsgroupId> <artifactId>commons-lang3artifactId> <version>3.9version> dependency>- 1
- 2
- 3
- 4
- 5
- 6
- 7
- 8
- 9
- 10
在
tools包,新建一个MD5Util类:package com.example.onlinemusic.tools; import org.apache.commons.codec.digest.DigestUtils; /** * Created With IntelliJ IDEA * Description: * Users: yyyyy * Date: 2022-08-07 * Time: 19:48 */ public class MD5Util { //定义一个固定的盐值 private static final String salt = "1b2i3t4e"; public static String md5(String src) { return DigestUtils.md5Hex(src); } /** * 第一次加密 :模拟前端自己加密,然后传到后端 * @param inputPass * @return */ public static String inputPassToFormPass(String inputPass) { String str = ""+salt.charAt(1)+salt.charAt(3) + inputPass +salt.charAt(5) + salt.charAt(6); return md5(str); } /** * 第2次MD5加密 * @param formPass 前端加密过的密码,传给后端进行第2次加密 * @param salt 用户数据库当中(后端)的盐值 * @return */ public static String formPassToDBPass(String formPass, String salt) { String str = ""+salt.charAt(0)+salt.charAt(2) + formPass +salt.charAt(5) + salt.charAt(4); return md5(str); } /** * 上面两个函数合到一起进行调用 * @param inputPass * @param saltDB * @return */ public static String inputPassToDbPass(String inputPass, String saltDB) { String formPass = inputPassToFormPass(inputPass); String dbPass = formPassToDBPass(formPass, saltDB); return dbPass; } public static void main(String[] args) { System.out.println("对用户输入密码进行第1次加密:"+inputPassToFormPass("123456")); System.out.println("对用户输入密码进行第2次加密:"+formPassToDBPass(inputPassToFormPass("123456"), "1b2i3t4e")); System.out.println("对用户输入密码进行第2次加密:"+inputPassToDbPass("123456", "1b2i3t4e")); } }- 1
- 2
- 3
- 4
- 5
- 6
- 7
- 8
- 9
- 10
- 11
- 12
- 13
- 14
- 15
- 16
- 17
- 18
- 19
- 20
- 21
- 22
- 23
- 24
- 25
- 26
- 27
- 28
- 29
- 30
- 31
- 32
- 33
- 34
- 35
- 36
- 37
- 38
- 39
- 40
- 41
- 42
- 43
- 44
- 45
- 46
- 47
- 48
- 49
- 50
- 51
- 52
- 53
- 54
- 55
- 56

不管运行多少次,这个密码是规定的。因为这里没有用随机盐值。当密码长度很大,盐值也是随机的情况下,密码的强度也加大了。破解成本也增加了。BCrypt加密设计
Bcrypt就是一款加密工具,可以比较方便地实现数据的加密工作。你也可以简单理解为它内部自己实现了随机加盐处理 。我们使用MD5加密,每次加密后的密文其实都是一样的,这样就方便了MD5通过大数据的方式进行破解。Bcrypt生成的密文是60位的。而MD5的是32位的。Bcrypt破解难度更大。
在pom.xml中添加依赖:<dependency> <groupId>org.springframework.securitygroupId> <artifactId>spring-security-webartifactId> dependency> <dependency> <groupId>org.springframework.securitygroupId> <artifactId>spring-security-configartifactId> dependency>- 1
- 2
- 3
- 4
- 5
- 6
- 7
- 8
- 9
并在
springboot启动类添加:@SpringBootApplication(exclude = {org.springframework.boot.autoconfigure.security.servlet.SecurityAutoConfiguration.class})- 1
它是只用到了此框架下的一个类,所以没有必要将整个框架都加载进来。
启动类如下所示:
package com.example.onlinemusic; import org.springframework.boot.SpringApplication; import org.springframework.boot.autoconfigure.SpringBootApplication; @SpringBootApplication(exclude = {org.springframework.boot.autoconfigure.security.servlet.SecurityAutoConfiguration.class}) public class OnlinemusicApplication { public static void main(String[] args) { SpringApplication.run(OnlinemusicApplication.class, args); } }- 1
- 2
- 3
- 4
- 5
- 6
- 7
- 8
- 9
- 10
- 11
- 12
在
tool包下创建BCryptTest测试类:package com.example.onlinemusic.tools; import org.springframework.security.crypto.bcrypt.BCryptPasswordEncoder; /** * Created With IntelliJ IDEA * Description: * Users: yyyyy * Date: 2022-08-07 * Time: 20:01 */ public class BCryptTest { public static void main(String[] args) { //模拟从前端获得的密码 String password = "123456"; BCryptPasswordEncoder bCryptPasswordEncoder = new BCryptPasswordEncoder(); //encode方法:对用户密码进行加密 String newPassword = bCryptPasswordEncoder.encode(password); System.out.println("加密的密码为: "+newPassword); //使用matches方法进行密码的校验 //matches方法:参数一,待检验的未加密的密码 。参数二:从数据库中查询出的加密后密码 boolean same_password_result = bCryptPasswordEncoder.matches(password,newPassword); //返回true System.out.println("加密的密码和正确密码对比结果: "+same_password_result); boolean other_password_result = bCryptPasswordEncoder.matches("987654",newPassword); //返回false System.out.println("加密的密码和错误的密码对比结果: " + other_password_result); } }- 1
- 2
- 3
- 4
- 5
- 6
- 7
- 8
- 9
- 10
- 11
- 12
- 13
- 14
- 15
- 16
- 17
- 18
- 19
- 20
- 21
- 22
- 23
- 24
- 25
- 26
- 27
- 28
- 29
- 30
第一次运行结果:

第二次运行结果:

使用此方法每次运行结果不一致,但是都能匹配成功。- 密码学的应用安全,是建立在破解所要付出的成本远超出能得到的利益上的 。
- 使用
BCrypt相比于MD5加密更好的一点在于,破解的难度上加大了。 BCrypt的破解成本增加了,导致系统的运行成本也会大大的增加 。- 使用哪种加密方式取决于你的数据库中的数据价值如何?如果你是银行类型的,那么使用BCrypt是不错的,一般情况使用MD5加盐,已经够用了。
MD5与BCrypt的区别
- BCrypt加密:一种加盐的单向Hash,不可逆的加密算法,同一种明文(plaintext),每次加密后的密文都不一样,而且不可反向破解生成明文,破解难度很大。
- MD5加密:是不加盐的单向Hash,不可逆的加密算法,同一个密码经过hash的时候生成的是同一个hash值,在大多数的情况下,有些经过
md5加密的方法将会被破解。 - Bcrypt生成的密文是60位的。而MD5的是32位的。
目前,MD5和BCrypt比较流行。相对来说,BCrypt比MD5更安全,但加密更慢。
虽然BCrpyt也是输入的字符串+盐,但是与MD5+盐的主要区别是:每次加的盐不同,导致每次生成的结果也不相同。无法比对!
四、加密登录实现
向数据库中插入一条刚刚通过BCrypt加密之后的密码,同时设置一个用户名:
INSERT INTO user(username,password) VALUES("xiaozhang","$2a$10$0vMr1Vh7sx4yF5Dd9RyBmOXLj2hIY3zz5ZJCX/GnUDKabrVZgtn1W");- 1
- 2
在UserMapper类新增方法
@Mapper public interface UserMapper { User login(User loginUser); //username用户名是唯一的 User selectByName(String username); }- 1
- 2
- 3
- 4
- 5
- 6
UserMapper.xml配置
DOCTYPE mapper PUBLIC "-//mybatis.org//DTD Mapper 3.0//EN" "http://mybatis.org/dtd/mybatis-3-mapper.dtd"> <mapper namespace="com.example.onlinemusic.mapper.UserMapper"> <select id="login" resultType="com.example.onlinemusic.model.User"> select * from user where username=#{username} and password=#{password} select> <select id="selectByName" resultType="com.example.onlinemusic.model.User"> select * from user where username=#{username}; select> mapper>- 1
- 2
- 3
- 4
- 5
- 6
- 7
- 8
- 9
- 10
- 11
- 12
- 13
- 14
修改UserController类
@RestController @RequestMapping("/user") public class UserController { @Resource private UserMapper userMapper; //方式二 采用注入的方式 @Resource BCryptPasswordEncoder bCryptPasswordEncoder; //方式一 // BCryptPasswordEncoder bCryptPasswordEncoder = new BCryptPasswordEncoder(); @RequestMapping("/login") public ResponseBodyMessage<User> login(@RequestParam String username,@RequestParam String password, HttpServletRequest request){ // User userlogin = new User(); // userlogin.setUsername(username); // userlogin.setPassword(password); // // User user = userMapper.login(userlogin); User user = userMapper.selectByName(username); if(user != null){ System.out.println("登录成功!"); // request.getSession().setAttribute("USERINFO_SESSION_KEY",user); boolean flg = bCryptPasswordEncoder.matches(password,user.getPassword()); if (!flg) { return new ResponseBodyMessage<>(-1,"用户名或者密码错误",user); } request.getSession().setAttribute(Constant.USERINFO_SESSION_KEY,user); return new ResponseBodyMessage<>(0,"登录成功",user); }else{ System.out.println("登录失败!"); return new ResponseBodyMessage<>(-1,"登录失败",user); } } }- 1
- 2
- 3
- 4
- 5
- 6
- 7
- 8
- 9
- 10
- 11
- 12
- 13
- 14
- 15
- 16
- 17
- 18
- 19
- 20
- 21
- 22
- 23
- 24
- 25
- 26
- 27
- 28
- 29
- 30
- 31
- 32
- 33
- 34
- 35
- 36
- 37
- 38
- 39
- 40
- 41
- 42
- 43
对加密之后的功能进行验证:

五、上传音乐模块设计
上传音乐的接口设计
请求: { post, /music/upload {singer,MultipartFile file}, } 响应: { "status": 0, "message": "上传成功!", "data": true }- 1
- 2
- 3
- 4
- 5
- 6
- 7
- 8
- 9
- 10
- 11
- 12
- 13
新建
Music类package com.example.onlinemusic.model; import lombok.Data; /** * Created With IntelliJ IDEA * Description: * Users: yyyyy * Date: 2022-08-07 * Time: 20:39 */ @Data public class Music { private int id; private String title; private String singer; private String time; private String url; private int userid; }- 1
- 2
- 3
- 4
- 5
- 6
- 7
- 8
- 9
- 10
- 11
- 12
- 13
- 14
- 15
- 16
- 17
- 18
- 19
- 20
创建
MusicController类首先需要指定音乐的存储路径,然后检查用户是否登录成功,如果没有登录成功要先进行登录才能上传文件;
文件需要分别上传到服务器及数据库当中。
对于文件上传到服务器的操作:需要先获取到文件名(.mp3),然后将文件保存路径与文件名进行拼接得到上传到服务器的文件路径,如果存在这个文件路径则直接进行上传,如果不存在则新建这个文件路径,然后再进行上传。对于文件上传到数据库的操作:
通过上面上传到服务器的路径中获取到文件的歌曲名,上传到数据库的时候采用自定义的格式"/music/get?path="加上文件的歌曲名,这个时候要加上文件的后缀名,存进去的时候没有加后缀。然后用SimpleDateFormat获取当前音乐的上传时间;此时对音乐列表中的数据进行判断看是否增加了一条数据,如果确实是增加了一条数据,则页面跳转到音乐列表页面,如果没有增加数据,则在响应中返回数据库上传失败的相关信息。@RestController @RequestMapping("/music") public class MusicController { //获取到配置文件当中的值 音乐上传后的路径 @Value("${music.local.path}") private String SAVE_PATH/*= "F:/Git_demo/java-learning-2/onlinemusic/music1/"*/; @Resource private MusicMapper musicMapper; @Resource private LoveMusicMapper loveMusicMapper; /** * 上传歌曲 * @param singer * @param file * @param request * @param resp * @return */ @RequestMapping("/upload") public ResponseBodyMessage<Boolean> insertMusic(@RequestParam String singer, @RequestParam("filename") MultipartFile file, HttpServletRequest request, HttpServletResponse resp){ //1.检查是否登录 //没有session不创建 HttpSession session = request.getSession(false); if(session == null || session.getAttribute(Constant.USERINFO_SESSION_KEY) == null){ System.out.println("没有登录!(上传)"); return new ResponseBodyMessage<>(-1,"请登录后上传!",false); } //2.上传到服务器 String fileNameAndType = file.getOriginalFilename();//xxx.mp3 System.out.println("fileNameAndType" + fileNameAndType); String path = SAVE_PATH + "/" + fileNameAndType; File dest = new File(path); if(!dest.exists()){ dest.mkdir(); } try { //上传文件到目标 file.transferTo(dest); // return new ResponseBodyMessage<>(0,"上传成功!",true); } catch (IOException e) { e.printStackTrace(); return new ResponseBodyMessage<>(-1,"服务器上传失败!",false); } // return new ResponseBodyMessage<>(-1,"上传失败!",false); //进行数据库的上传 //1.准备数据 2.调用insert int index = fileNameAndType.lastIndexOf(".");//找到从后往前的第一个点 String title= fileNameAndType.substring(0,index); User user = (User) session.getAttribute(Constant.USERINFO_SESSION_KEY); int userid = user.getId(); //1.播放音乐->http请求 存进去的时候没有加后缀 .mp3 String url = "/music/get?path=" + title; //时间的获取 SimpleDateFormat simpleDateFormat = new SimpleDateFormat("yyyy-MM-dd"); String time = simpleDateFormat.format(new Date()); try { int ret = 0; ret = musicMapper.insert(title,singer,time,url,userid); if(ret == 1){ //这里应该跳转到音乐列表页面 resp.sendRedirect("/list.html"); return new ResponseBodyMessage<>(0,"数据库上传成功!",true); }else { return new ResponseBodyMessage<>(-1,"数据库上传失败!",false); } }catch (BindingException | IOException e){ dest.delete(); return new ResponseBodyMessage<>(-1,"数据库上传失败!",false); } //如果重复上传同一首歌曲,这里是可以上传成功的 }- 1
- 2
- 3
- 4
- 5
- 6
- 7
- 8
- 9
- 10
- 11
- 12
- 13
- 14
- 15
- 16
- 17
- 18
- 19
- 20
- 21
- 22
- 23
- 24
- 25
- 26
- 27
- 28
- 29
- 30
- 31
- 32
- 33
- 34
- 35
- 36
- 37
- 38
- 39
- 40
- 41
- 42
- 43
- 44
- 45
- 46
- 47
- 48
- 49
- 50
- 51
- 52
- 53
- 54
- 55
- 56
- 57
- 58
- 59
- 60
- 61
- 62
- 63
- 64
- 65
- 66
- 67
- 68
- 69
- 70
- 71
- 72
- 73
- 74
- 75
- 76
- 77
- 78
- 79
- 80
- 81
- 82
- 83
- 84
- 85
- 86
- 87
- 88
- 89
- 90
- 91
- 92
- 93
先进行登录,登录成功后进行上传歌曲:

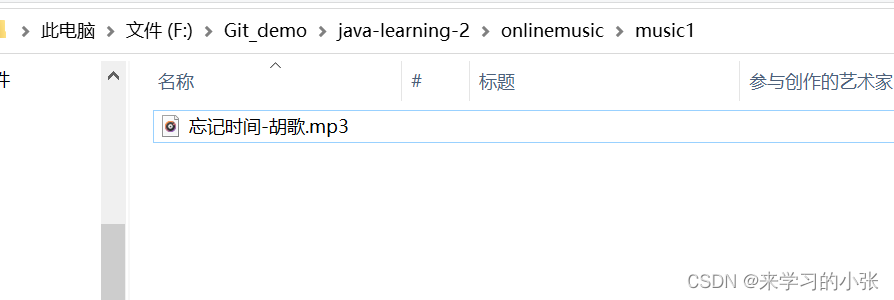
可以看到相应文件夹中成功上传歌曲:
在进行数据库上传的时候,我们需要定义MusicMapper接口及MusicMapper.xml文件:MusicMapper接口:
@Mapper public interface MusicMapper { /** * 插入音乐 * @param title 音乐名 * @param time 插入音乐时间 * @param url 音乐链接 * @param userid 用户id * @param singer 歌手 * @return */ int insert(String title, String singer,String time, String url, int userid); }- 1
- 2
- 3
- 4
- 5
- 6
- 7
- 8
- 9
- 10
- 11
- 12
- 13
MusicMapper.xml:
DOCTYPE mapper PUBLIC "-//mybatis.org//DTD Mapper 3.0//EN" "http://mybatis.org/dtd/mybatis-3-mapper.dtd"> <mapper namespace="com.example.onlinemusic.mapper.MusicMapper"> <insert id="insert"> insert into music(title,singer,time,url,userid) values(#{title},#{singer},#{time},#{url},#{userid}) insert> mapper>- 1
- 2
- 3
- 4
- 5
- 6
- 7
- 8
- 9
- 10
- 11
- 12
如何判断上传的文件是mp3
每个文件都由其构成的方式【不能通过后缀名判断】
每一个类型的文件,都有自己文件本身的格式。所以,我们可以判断自己上传
的文件的本身组成格式,以此来判断上传的是不是mp3音频文件。mp3文件格式:
MP3文件大体分为三部分:TAG_V2(ID3V2),Frame, TAG_V1(ID3V1)具体参考链接:
https://blog.csdn.net/ffjffjffjffjffj/article/details/99691239
https://www.cnblogs.com/ranson7zop/p/7655474.html
https://blog.csdn.net/sunshine1314/article/details/2514322播放音乐模块设计
首先是请求响应的设计:
请求: { get, /music/get?path=xxx.mp3 } 响应: { 音乐数据本身的字节信息 }- 1
- 2
- 3
- 4
- 5
- 6
- 7
- 8
- 9
在
MusicController类里面新增get方法:/** * 播放音乐的时候 music/get?path=xxx.mp3 它是有后缀的 * @param path * @return */ @RequestMapping("/get") public ResponseEntity<byte[]> get(String path) { File file = new File(SAVE_PATH + "/" + path); byte[] a = null; try { a = Files.readAllBytes(file.toPath()); if(a == null){ return ResponseEntity.badRequest().build(); } return ResponseEntity.ok(a); } catch (IOException e) { e.printStackTrace(); } return ResponseEntity.badRequest().build(); // return ResponseEntity.internalServerError().build();//500 // return ResponseEntity.notFound().build();//404 //return ResponseEntity.ok(a);//200 }- 1
- 2
- 3
- 4
- 5
- 6
- 7
- 8
- 9
- 10
- 11
- 12
- 13
- 14
- 15
- 16
- 17
- 18
- 19
- 20
- 21
- 22
- 23
- 24
- 25
-
Files.readAllBytes(String path): 读取文件中的所有字节,读入内存 ,参数path是文件的路径 -
ResponseEntity
ResponseEntity对象是Spring对请求响应的封装。它继承了HttpEntity对象,包含了Http的响应码(httpstatus)、响应头(header)、响应体(body)三个部分。
ResponseEntity类继承自HttpEntity类,被用于Controller层方法。ResponseEntity.ok方法有2个方法,分别是有参数和没有参数。
//这个方法若被调用的话,返回OK状态 public static ResponseEntity.BodyBuilder ok(){ return status(HttpStatus.OK); } / /这个方法若被调用的话,返回body内容和OK状态 public static <T> ResponseEntity<T> ok(T body) { ResponseEntity.BodyBuilder builder = ok(); //ResponseEntity可以通过这个builder返回任意类型的body内容 return builder.body(body); }- 1
- 2
- 3
- 4
- 5
- 6
- 7
- 8
- 9
- 10
- body类型 是 泛型T,也就是我们不确定body是什么类型,可以向ok方法传递任意类型的值
- 有参ok方法其实有调用无参ok方法
测试请求是否收到对应响应

可以明显看到有TAG标签,获取一个图片伪造的mp3文件:没有TAG标签。六、删除音乐模块设计
删除单个音乐:
请求响应的设计:
请求: { post, /music/delete, id } 响应: { "status": 0, "message": "删除成功!", "data": true }- 1
- 2
- 3
- 4
- 5
- 6
- 7
- 8
- 9
- 10
- 11
- 12
在
MusicMapper.java和MusicMapper.xml实现相应的功能:
分别是首先通过id找到要删除的音乐,然后通过id来对对应的音乐进行删除操作:
MusicMapper.java:@Mapper public interface MusicMapper { /** * 查询当前id的音乐是否存在 * @param id * @return */ Music finMusicById(int id); /** * 删除当前id的音乐 * @param musicId * @return */ int deleteMusicById(int musicId); }- 1
- 2
- 3
- 4
- 5
- 6
- 7
- 8
- 9
- 10
- 11
- 12
- 13
- 14
- 15
- 16
MusicMapper.xml:<select id="finMusicById" resultType="com.example.onlinemusic.model.Music"> select * from music where id=#{id}; select> <delete id="deleteMusicById" parameterType="java.lang.Integer"> delete from music where id=#{id}; delete>- 1
- 2
- 3
- 4
- 5
- 6
- 7
- 8
在
MusicController中实现:首先需要通过id查询当前所要删除的音乐是否存在,如果存在则进行删除操作;
通过id首先删除数据库中得数据,此时对于服务器上的数据也应进行相应的删除操作:通过url获取到歌曲名,然后通过文件保存路径+歌曲名+歌曲后缀的形式(SAVE_PATH+"/"+filename+".mp3")找到要删除文件的路径。然后对该路径下的文件进行删除操作。/** * 删除单个音乐 * @param id * @return */ @RequestMapping("/delete") public ResponseBodyMessage<Boolean> deleteMusicById(@RequestParam String id){ //1.先检查音乐是否存在 int iid = Integer.parseInt(id); // 2,如果存在要进行删除 Music music = musicMapper.finMusicById(iid); if(music == null){ System.out.println("没有这个对应id的音乐!"); return new ResponseBodyMessage<>(-1,"没有要删除的音乐",false); }else { //2.1 删除数据库的数据 int ret = musicMapper.deleteMusicById(iid); if(ret == 1){ // 2.2 删除服务器上的数据 int index = music.getUrl().lastIndexOf("="); String fileName = music.getUrl().substring(index+1);//拿到了歌曲名 File file = new File(SAVE_PATH + "/" + fileName + ".mp3"); System.out.println("当前的路径:" + file.getPath()); if(file.delete()){ //同步删除收藏表中得音乐 loveMusicMapper.deleteLoveMusicById(iid); return new ResponseBodyMessage<>(0,"服务器中的音乐删除成功!",true); }else { return new ResponseBodyMessage<>(-1,"服务器中的音乐没有删除成功!",false); } }else { return new ResponseBodyMessage<>(-1,"数据库中的音乐没有删除成功!",false); } } }- 1
- 2
- 3
- 4
- 5
- 6
- 7
- 8
- 9
- 10
- 11
- 12
- 13
- 14
- 15
- 16
- 17
- 18
- 19
- 20
- 21
- 22
- 23
- 24
- 25
- 26
- 27
- 28
- 29
- 30
- 31
- 32
- 33
- 34
- 35
- 36
- 37
- 38
数据库中原有的音乐:

使用postman对这个音乐进行删除:


批量删除音乐
请求响应设计:
请求: { post, /music/deleteSel, data:{"id":id} } 响应: { "status": 0, "message": "批量删除成功", "data": true }- 1
- 2
- 3
- 4
- 5
- 6
- 7
- 8
- 9
- 10
- 11
- 12
在
MusicController中实现deleteSelMusic方法:通过对应的id来进行删除操作,首先遍历所要删除的音乐对应的ID值,获取到id对应的音乐,如果此时音乐获取为空,则就说明没有该对应id的音乐;如果找到该id对应的音乐,则就通过URL获取到该音乐的歌曲名,然后通过保存路径+歌曲名+.mp3后缀的方式(
SAVE_PATH + "/" + fileName + ".mp3")进行其文件路径的拼接,然后对该文件进行删除操作,此时是将服务器上的歌曲进行了删除,如果喜欢的音乐列表里面也保存了此音乐,同时也应将喜欢列表里面的音乐进行删除处理,最后验证删除音乐的总条数是否与实际要删除音乐的数目相等,如果相等,则说明批量音乐删除成功,如果不相等则说明批量音乐删除失败。/** * 批量删除音乐 * @param id 是一个数组【1,3,5,7,9】先进行查询,在进行删除 * @return */ @RequestMapping("/deleteSel") public ResponseBodyMessage<Boolean> deleteSelMusic(@RequestParam("id[]") List<Integer> id){ System.out.println("所有的ID: "+ id); int sum = 0; for (int i = 0; i < id.size(); i++) { int musicId = id.get(i); Music music = musicMapper.finMusicById(musicId); if(music == null) { System.out.println("没有这个对应id的音乐!"); return new ResponseBodyMessage<>(-1, "没有要删除的音乐", false); } int ret = musicMapper.deleteMusicById(musicId); if(ret == 1){ // 2.2 删除服务器上的数据 int index = music.getUrl().lastIndexOf("="); String fileName = music.getUrl().substring(index+1);//拿到了歌曲名 File file = new File(SAVE_PATH + "/" + fileName + ".mp3"); if(file.delete()){ //同步删除收藏表中得音乐 loveMusicMapper.deleteLoveMusicById(musicId); sum += ret; // return new ResponseBodyMessage<>(0,"服务器中的音乐删除成功!",true); }else { return new ResponseBodyMessage<>(-1,"服务器中的音乐没有删除成功!",false); } }else { return new ResponseBodyMessage<>(-1,"数据库中的音乐没有删除成功!",false); } } if(sum == id.size()){ System.out.println("整体删除成功!"); return new ResponseBodyMessage<>(0,"音乐删除成功!",true); }else { System.out.println("整体删除失败!"); return new ResponseBodyMessage<>(-1,"音乐没有删除失败!",false); } }- 1
- 2
- 3
- 4
- 5
- 6
- 7
- 8
- 9
- 10
- 11
- 12
- 13
- 14
- 15
- 16
- 17
- 18
- 19
- 20
- 21
- 22
- 23
- 24
- 25
- 26
- 27
- 28
- 29
- 30
- 31
- 32
- 33
- 34
- 35
- 36
- 37
- 38
- 39
- 40
- 41
- 42
- 43
- 44
- 45
先进行登录,然后上传两个歌曲,然后对歌曲进行批量删除处理:


通过控制台也可以看到:

七、查询音乐模块
请求响应模块设计
- 支持模糊查询
- 支持传入参数为空
请求: { get, /music/findmusic, data:{musicName:musicName}, } 响应:【不给musicName传参】 { "status": 0, "message": "查询到了歌曲的信息", "data": [ { "id": 5, "title": "有形的翅膀-张韶涵", "singer": "张韶涵", "time": "2022-08-09", "url": "/music/get?path=有形的翅膀-张韶涵", "userid": 1 }, { "id": 6, "title": "Let Go", "singer": "lit", "time": "2022-08-09", "url": "/music/get?path=Let Go", "userid": 1 } ] }- 1
- 2
- 3
- 4
- 5
- 6
- 7
- 8
- 9
- 10
- 11
- 12
- 13
- 14
- 15
- 16
- 17
- 18
- 19
- 20
- 21
- 22
- 23
- 24
- 25
- 26
- 27
- 28
- 29
MusicMapper.java接口新增方法: 分别是通过歌曲名查询音乐及查询所有音乐。@Mapper public interface MusicMapper { /** * 根据歌曲名字查询音乐 * @param musicName * @return */ List<Music> findMusicByName(String musicName); /** * 查询所有的音乐 * * @return */ List<Music> findMusic(); }- 1
- 2
- 3
- 4
- 5
- 6
- 7
- 8
- 9
- 10
- 11
- 12
- 13
- 14
- 15
- 16
- 17
MusicMapper.xml新增配置:<select id="findMusicByName" resultType="com.example.onlinemusic.model.Music"> select * from music where title like concat('%',#{musicName},'%') select> <select id="findMusic" resultType="com.example.onlinemusic.model.Music"> select * from music select>- 1
- 2
- 3
- 4
- 5
- 6
- 7
- 8
- 9
MusicController类新增方法:
如果有确定的音乐名,则根据音乐名称进行查找,如果没有,就是查询列表里面所有的音乐。/** * 查询音乐 * @return */ @RequestMapping("/findmusic") public ResponseBodyMessage<List<Music>> findMusic(@RequestParam(required = false) String musicName){ List<Music> musicList = null; if (musicName != null){ musicList = musicMapper.findMusicByName(musicName); }else { musicList = musicMapper.findMusic(); } return new ResponseBodyMessage<>(0,"查询到了所有的音乐!",musicList); }- 1
- 2
- 3
- 4
- 5
- 6
- 7
- 8
- 9
- 10
- 11
- 12
- 13
- 14
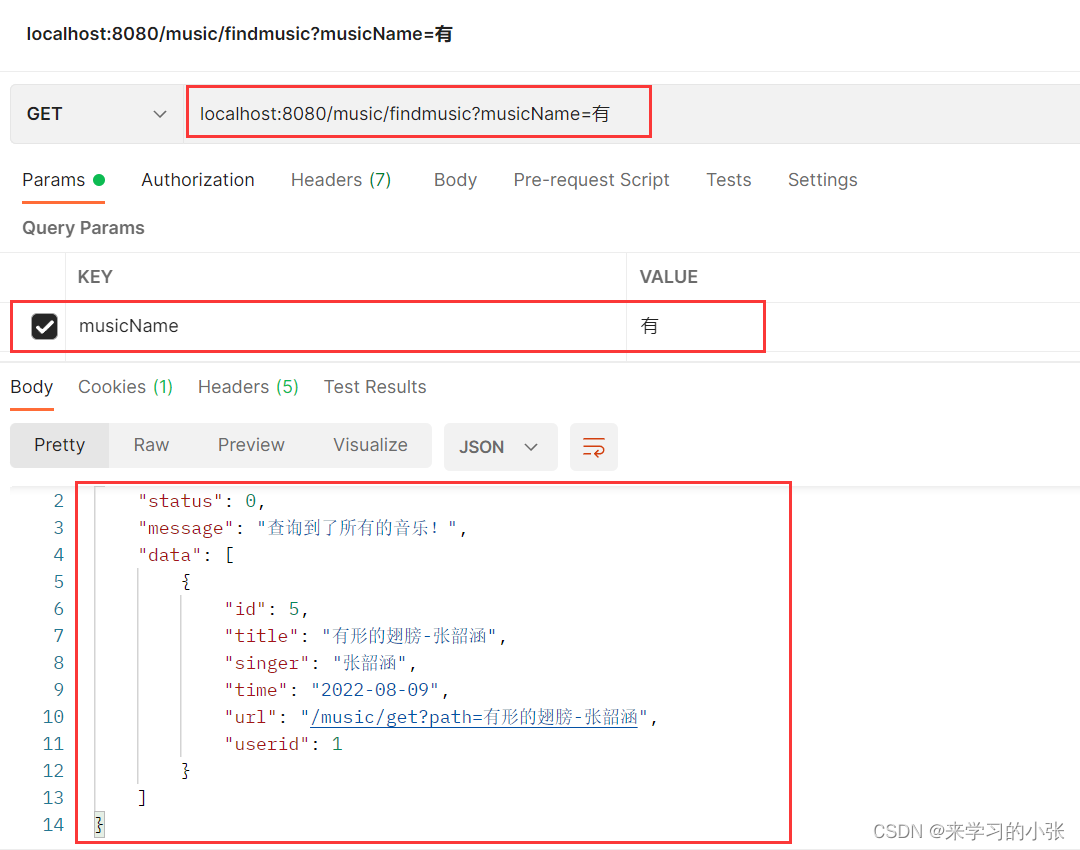
方法验证:
现在数据库里面上传两首音乐:

然后使用postman进行查询:

{ "status": 0, "message": "查询到了所有的音乐!", "data": [ { "id": 5, "title": "有形的翅膀-张韶涵", "singer": "张韶涵", "time": "2022-08-09", "url": "/music/get?path=有形的翅膀-张韶涵", "userid": 1 }, { "id": 6, "title": "Let Go", "singer": "lit", "time": "2022-08-09", "url": "/music/get?path=Let Go", "userid": 1 } ] }- 1
- 2
- 3
- 4
- 5
- 6
- 7
- 8
- 9
- 10
- 11
- 12
- 13
- 14
- 15
- 16
- 17
- 18
- 19
- 20
- 21
- 22
也支持单个音乐的查询:

也支持模糊查询:
八、喜欢/收藏音乐模块设计
添加音乐至喜欢的列表模块设计
请求响应模块设计:
请求: { post, /lovemusic/likeMusic data: id//音乐id } 响应: { "status": 0, "message": "添加喜欢的音乐(收藏)成功", "data": true }- 1
- 2
- 3
- 4
- 5
- 6
- 7
- 8
- 9
- 10
- 11
- 12
实现
LoveMusicMapper接口,收藏/喜欢音乐功能:- 需要查询此次收藏音乐是否之前收藏过,收藏过则不能添加
- 没有收藏过,插入数据库中一条记录
@Mapper public interface LoveMusicMapper { /** *检查是否已经收藏过该音乐 * @param userId * @param musicId * @return */ Music findLoveMusicByMusicIdAndUserId(int userId,int musicId); /** * 点赞/收藏音乐 * @param userId * @param musicId * @return */ boolean insertLoveMusic(int userId,int musicId); }- 1
- 2
- 3
- 4
- 5
- 6
- 7
- 8
- 9
- 10
- 11
- 12
- 13
- 14
- 15
- 16
- 17
- 18
实现
LoveMusicMapper.xml:<select id="findLoveMusicByMusicIdAndUserId" resultType="com.example.onlinemusic.model.Music"> select * from lovemusic where user_id=#{userId} and music_id=#{musicId} select> <insert id="insertLoveMusic"> insert into lovemusic(user_id,music_id)values(#{userId},#{musicId}) insert>- 1
- 2
- 3
- 4
- 5
- 6
- 7
- 8
实现
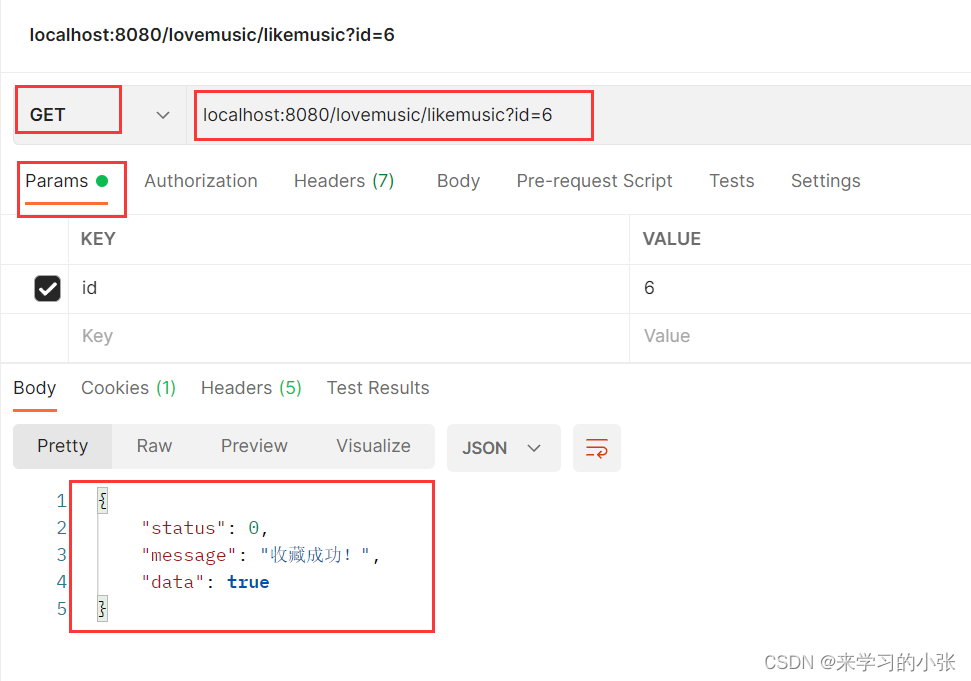
LoveMusicController类:首先应该检查用户是否登录,如果未登录,则不能进行收藏操作;如果用户登录成功,则通过session获取到用户id,通过用户id和音乐id检查用户是否已经收藏过该音乐,如果以前收藏过,则不再进行收藏,如果没有收藏过,则通过插入操作对该用户对用的音乐id进行收藏。
@RestController @RequestMapping("/lovemusic") public class LoveMusicController { @Resource private LoveMusicMapper loveMusicMapper; /** * 收藏喜欢的音乐 * @param id * @param request * @return */ @RequestMapping("/likemusic") public ResponseBodyMessage<Boolean> likeMusic(@RequestParam String id,HttpServletRequest request){ int musicId = Integer.parseInt(id);//将字符串类型转换成整形 System.out.println("musicId: " +musicId); //检查是否登录 HttpSession session = request.getSession(false); if(session == null || session.getAttribute(Constant.USERINFO_SESSION_KEY) == null){ System.out.println("没有登录(收藏喜欢)!"); return new ResponseBodyMessage<>(-1,"请登录后上传!",false); } User user = (User) session.getAttribute(Constant.USERINFO_SESSION_KEY); int userId = user.getId(); System.out.println("userId: " +userId); Music music = loveMusicMapper.findLoveMusicByMusicIdAndUserId(userId,musicId); if(music != null){ //说明之前收藏过该音乐,不能再次进行收藏了 TOOD:加一个取消收藏的功能 return new ResponseBodyMessage<>(-1,"您之前收藏过该音乐!",false); } boolean effect = loveMusicMapper.insertLoveMusic(userId,musicId); if (effect){ return new ResponseBodyMessage<>(0,"收藏成功!",true); }else { return new ResponseBodyMessage<>(-1,"收藏失败!",false); } } }- 1
- 2
- 3
- 4
- 5
- 6
- 7
- 8
- 9
- 10
- 11
- 12
- 13
- 14
- 15
- 16
- 17
- 18
- 19
- 20
- 21
- 22
- 23
- 24
- 25
- 26
- 27
- 28
- 29
- 30
- 31
- 32
- 33
- 34
- 35
- 36
- 37
- 38
- 39
- 40
- 41
- 42
- 43
- 44

这里使用post请求也可以:

查询喜欢的音乐
请求响应设计:
- 支持模糊查询
- 支持传入的参数为空
请求: { get, /lovemusic/findlovemusic, data:{musicName:musicName} } 响应:【musicName不进行传参】 { "status": 0, "message": "查询到了所有的收藏的音乐", "data": [ { "id": 6, "title": "Let Go", "singer": "lit", "time": "2022-08-09", "url": "/music/get?path=Let Go", "userid": 1 }, { "id": 5, "title": "有形的翅膀-张韶涵", "singer": "张韶涵", "time": "2022-08-09", "url": "/music/get?path=有形的翅膀-张韶涵", "userid": 1 } ] }- 1
- 2
- 3
- 4
- 5
- 6
- 7
- 8
- 9
- 10
- 11
- 12
- 13
- 14
- 15
- 16
- 17
- 18
- 19
- 20
- 21
- 22
- 23
- 24
- 25
- 26
- 27
- 28
- 29
实现
LoveMusicMapper新增方法:/** * 如果没有传入具体的歌曲名,显示当前用户收藏的所有音乐 * @param userId * @return */ List<Music> findLoveMusicByUserId(int userId); /** * 查询当前用户,指定为musicName的音乐,支持模糊查询 * 根据某个用户的ID和歌曲名称查询,某个用户收藏的音乐 * @param musicName * @param userId * @return */ List<Music> findLoveMusicBykeyAndUID(String musicName, int userId);- 1
- 2
- 3
- 4
- 5
- 6
- 7
- 8
- 9
- 10
- 11
- 12
- 13
- 14
- 15
实现
LoveMusicMapper.xml:<resultMap id="BaseMap1" type="com.example.onlinemusic.model.Music"> <id column="id" property="id"/> <id column="title" property="title" /> <id column="singer" property="singer" /> <id column="time" property="time" /> <id column="url" property="url" /> <id column="userid" property="userid" /> resultMap> <select id="findLoveMusicByUserId" resultMap="BaseMap1"> select m.* from lovemusic lm,music m where m.id = lm.music_id and lm.user_id=#{userId} select> <resultMap id="BaseMap2" type="com.example.onlinemusic.model.Music"> <id column="id" property="id" /> <id column="title" property="title" /> <id column="singer" property="singer" /> <id column="time" property="time" /> <id column="url" property="url" /> <id column="userid" property="userid" /> resultMap> <select id="findLoveMusicBykeyAndUID" resultMap="BaseMap2"> select m.* from lovemusic lm,music m where m.id = lm.music_id and lm.user_id=#{userId} and title like concat('%',#{musicName},'%') select>- 1
- 2
- 3
- 4
- 5
- 6
- 7
- 8
- 9
- 10
- 11
- 12
- 13
- 14
- 15
- 16
- 17
- 18
- 19
- 20
- 21
- 22
- 23
- 24
- 25
- 26
- 27
- 28
实现
LoveMusicController新增方法:首先判断用户是否登录,如果没有登录则提示登录后再进行查询操作,
然后通过session获得用户id,如果所传入的音乐名为空,则将喜欢列表里面的所有音乐通过id进行展示,如果传入了音乐名称,则通过音乐名称进行查询操作。/** * 查询喜欢的音乐 * @param musicName * @param request * @return */ @RequestMapping("/findlovemusic") public ResponseBodyMessage<List<Music>> findLoveMusic(@RequestParam(required = false) String musicName,HttpServletRequest request){ //检查是否登录 HttpSession session = request.getSession(false); if(session == null || session.getAttribute(Constant.USERINFO_SESSION_KEY) == null){ System.out.println("没有登录(查询喜欢)!"); return new ResponseBodyMessage<>(-1,"请登录后进行查找!",null); } User user = (User) session.getAttribute(Constant.USERINFO_SESSION_KEY); int userId = user.getId(); System.out.println("userId: " +userId); List<Music> musicList = new ArrayList<>(); if (musicName == null){ musicList = loveMusicMapper.findLoveMusicByUserId(userId); }else { musicList = loveMusicMapper.findLoveMusicBykeyAndUID(musicName,userId); } return new ResponseBodyMessage<>(0,"查询到了所有的歌曲信息!",musicList); }- 1
- 2
- 3
- 4
- 5
- 6
- 7
- 8
- 9
- 10
- 11
- 12
- 13
- 14
- 15
- 16
- 17
- 18
- 19
- 20
- 21
- 22
- 23
- 24
- 25
- 26
- 27
- 28
结果验证:

通过postman进行验证:

{ "status": 0, "message": "查询到了所有的歌曲信息!", "data": [ { "id": 6, "title": "Let Go", "singer": "lit", "time": "2022-08-09", "url": "/music/get?path=Let Go", "userid": 1 }, { "id": 5, "title": "有形的翅膀-张韶涵", "singer": "张韶涵", "time": "2022-08-09", "url": "/music/get?path=有形的翅膀-张韶涵", "userid": 1 } ] }- 1
- 2
- 3
- 4
- 5
- 6
- 7
- 8
- 9
- 10
- 11
- 12
- 13
- 14
- 15
- 16
- 17
- 18
- 19
- 20
- 21
- 22
同时支持模糊查询:

移除喜欢的音乐
请求响应设计:
请求: { post, /lovemusic/deletelovemusic, data:{id:id} } 响应: { "status": 0, "message": "取消收藏成功!", "data": true }- 1
- 2
- 3
- 4
- 5
- 6
- 7
- 8
- 9
- 10
- 11
- 12
LoveMusicMapper接口:
/** * 移除自己收藏的音乐,但是不是删除音乐本身,只是从数据库中删除了记录而已 * @param userId 用户的ID * @param musicId 音乐的ID * @return 受影响的行数 */ int deleteLoveMusic(int userId,int musicId);- 1
- 2
- 3
- 4
- 5
- 6
- 7
- 8
LoveMusicMapper.xml新增方法:<delete id="deleteLoveMusic" parameterType="java.lang.Integer"> delete from lovemusic where user_id=#{userId} and music_id=#{musicId} delete>- 1
- 2
- 3
- 4
实现
LoveMusicController新增方法:首先检查用户是否登录,如果没有登录,提示用户 登录后才能进行移除操作,然后通过用户id及音乐id进行移除操作。
/** * 移除喜欢的音乐 * @param id * @param request * @return */ @RequestMapping("/deletelovemusic") public ResponseBodyMessage<Boolean> deleteLoveMusic(@RequestParam String id,HttpServletRequest request){ int musicId = Integer.parseInt(id); HttpSession session = request.getSession(false); if(session == null || session.getAttribute(Constant.USERINFO_SESSION_KEY) == null){ System.out.println("没有登录(移除喜欢)!"); return new ResponseBodyMessage<>(-1,"请登录后进行移除!",null); } User user = (User) session.getAttribute(Constant.USERINFO_SESSION_KEY); int userId = user.getId(); System.out.println("userId: " +userId); int ret = loveMusicMapper.deleteLoveMusic(userId,musicId); if (ret == 1){ // 当删除数据库中得音乐的时候,同步删除lovemusic表中的这个音乐 return new ResponseBodyMessage<>(0,"取消收藏成功!",true); }else { return new ResponseBodyMessage<>(-1,"取消收藏失败!",false); } }- 1
- 2
- 3
- 4
- 5
- 6
- 7
- 8
- 9
- 10
- 11
- 12
- 13
- 14
- 15
- 16
- 17
- 18
- 19
- 20
- 21
- 22
- 23
- 24
- 25
- 26
- 27
先进行登录,然后进行移除操作:

移除前后数据库中的喜欢的音乐对比:

上述的删除音乐,不会删除lovemusic表中的数据,此时我们需要同步删除
LoveMusicMapper接口新增方法:/** * 当删除数据库中得音乐的时候,同步删除lovemusic表中的这个音乐 * @param musicId 音乐的ID * @return */ int deleteLoveMusicById(int musicId);- 1
- 2
- 3
- 4
- 5
- 6
LoveMusicMapper.xml新增方法:<delete id="deleteLoveMusicById" parameterType="java.lang.Integer"> delete from lovemusic where music_id=#{musicId} delete>- 1
- 2
- 3
- 4
- 5
重写MusicController.java文件中的deleteMusicById和deleteSelMusic两个方法:
这里在删除数据库中音乐的时候,收藏表里面的音乐也应当同时删除:


九、前端页面实现-登录界面
登录功能核心代码实现
login.html:$(function(){ $("#submit").click(function(){ var username = $("#user").val(); var password = $("#password").val(); if (username.trim() == "" || password.trim() == ""){ alert("用户名或者密码不能为空!"); return; } $.ajax({ url: "/user/login",//指定路径 data: {"username":username,"password":password}, type: "POST", dataType: "json",//服务器返回的数据格式 success: function (data) { console.log(data); if (data.status == 0){ // alert("登录成功!"); //跳转到指定页面 window.location.href="list.html"; }else { alert("登录失败,用户名或者密码错误!"); $("#user").val(""); $("#password").val(""); } } }); }); });- 1
- 2
- 3
- 4
- 5
- 6
- 7
- 8
- 9
- 10
- 11
- 12
- 13
- 14
- 15
- 16
- 17
- 18
- 19
- 20
- 21
- 22
- 23
- 24
- 25
- 26
- 27
- 28
- 29
- 30

jQuery是一个 JavaScript 库,jQuery极大地简化了JavaScript编程。一些常用的操作:
$(function(){ });用于存放操作DOM对象的代码,执行其中代码时DOM对象已存在$("#submit").click(function () {});当按钮点击事件被触发时会调用一个函数。$.ajax({});参考:https://www.w3school.com.cn/jquery/ajax_ajax.aspurl:发送请求的地址data:发送到服务器的数据。将自动转换为请求字符串格式type:默认值: “GET”)。请求方式 (“POST” 或 “GET”), 默认为 “GET”。注意:其它 HTTP 请求方法,如 PUT和 DELETE 也可以使用,但仅部分浏览器支持。dataType:预期服务器返回的数据类型success:请求成功后的回调函数。参数为:由服务器返回,并根据dataType参数进行处理后的数据;描述状态的字符串
上传音乐核心代码
upload.html :
<form method="POST" enctype="multipart/form-data" action="/music/upload"> 文件上传:<input type="file" name="filename"/> 歌手名: <label> <input type="text" name="singer" placeholder="请输入歌手名"/> </label> <input type="submit" value="上传"/> </form>- 1
- 2
- 3
- 4
- 5
- 6
- 7
音乐列表页面的操作
list.html核心代码部分,展示所有音乐:<!-- 核心代码实现 --> $(function () { load(); }); //musicName可以传参,也可以不传参数 function load(musicName) { $.ajax({ url: "/music/findmusic",//指定路径 data: {"musicName":musicName}, type: "GET", dataType: "json",//服务器返回的数据格式 success:function (obj) { console.log(obj); var data = obj.data;//数组 var s = ''; //data[i].id data[i].singer data[i].title for (var i = 0;i < data.length;i++){ var musicUrl = data[i].url + ".mp3"; s += ''; s += '<th><input id="'+data[i].id+'"type="checkbox"> </th>'; s += ' '; } $("#info").html(s);//把拼接好的页面添加到info的id下 } }); }' + data[i].title + ' '; s += '' + data[i].singer + ' '; s+='<td > <button class="btn btn-primary" onclick="playerSong(\''+musicUrl+'\')" >播放歌曲</button>' + '</td>'; s+='<td > <button class="btn btn-primary" onclick="deleteInfo('+ data[i].id + ')" >删除</button>' + '<button class="btn btn-primary" onclick="loveInfo('+ data[i].id + ')" > 喜欢</button>'+ '</td>'; s += '- 1
- 2
- 3
- 4
- 5
- 6
- 7
- 8
- 9
- 10
- 11
- 12
- 13
- 14
- 15
- 16
- 17
- 18
- 19
- 20
- 21
- 22
- 23
- 24
- 25
- 26
- 27
- 28
- 29
- 30
- 31
- 32
- 33
- 34
- 35
- 36
- 37
这里播放歌曲的控件,采用的是开源的控件:码云地址
在list.html中插入播放器:
<div style="width: 180px; height: 140px; position:absolute; bottom:10px; right:10px"> <script type="text/javascript" src="player/sewise.player.min.js"></script> <script type="text/javascript"> SewisePlayer.setup({ server: "vod",//点播 type: "mp3",// //这里是默认的一个网址 videourl:"http://jackzhang1204.github.io/materials/where_did_time_go.mp3", skin: "vodWhite",//皮肤 //这里需要设置false autostart:"false",//是否自动播放 }); </script>- 1
- 2
- 3
- 4
- 5
- 6
- 7
- 8
- 9
- 10
- 11
- 12
- 13
实现播放:
//实现播放歌曲里面的playerSong()函数 function playerSong(obj) { var name = obj.substring(obj.lastIndexOf("=") + 1); //obj:播放的音乐的地址 name:播放音乐的名称 0:播放的开始时间 false:代表不自动播放 SewisePlayer.toPlay(obj,name,0,true); }- 1
- 2
- 3
- 4
- 5
- 6
删除音乐
//删除音乐 function deleteInfo(obj) { console.log(obj); $.ajax({ url: "/music/delete", type: "POST", data: {"id":obj}, dataType: "json", success: function (val) { console.log(val); if(val.data == true){ alert("删除成功,重新加载当前页面!"); window.location.href="list.html"; }else { alert("删除失败!"); } } }); }- 1
- 2
- 3
- 4
- 5
- 6
- 7
- 8
- 9
- 10
- 11
- 12
- 13
- 14
- 15
- 16
- 17
- 18
- 19
- 20
收藏音乐
//收藏音乐 function loveInfo(obj) { console.log(obj); $.ajax({ url: "/lovemusic/likemusic", type: "POST", data: {"id": obj}, dataType: "json", success: function (val) { if (val.data == true) { alert("收藏成功!"); window.location.href = "list.html"; } else { alert("已收藏过该音乐!"); } } }); }- 1
- 2
- 3
- 4
- 5
- 6
- 7
- 8
- 9
- 10
- 11
- 12
- 13
- 14
- 15
- 16
- 17
- 18
- 19
查询+删除选中音乐
//查询歌曲 $(function () { $("#submit1").click(function () { var name = $("#exampleInputName2").val(); load(name); }); //当load这个函数执行成功,则执行done当中的回调函数 //删除选中 $.when(load).done(function () { $("#delete").click(function () { var id = new Array();//数组 var i = 0;//数组的下标 //遍历checkbox $("input:checkbox").each(function () { //如果被选中,this代表发生事件的dom元素, if ($(this).is(":checked")){ //获取id的值,存储到id数组当中 id[i] = $(this).attr("id"); i++; } }); console.log(id); $.ajax({ url: "/music/deleteSel", data: {"id":id}, dataType: "json", type: "POST", success: function (data) { if (data.data == true){ alert("删除成功!"); window.location.href="list.html"; }else { alert("删除失败!"); } } }); }); }); });- 1
- 2
- 3
- 4
- 5
- 6
- 7
- 8
- 9
- 10
- 11
- 12
- 13
- 14
- 15
- 16
- 17
- 18
- 19
- 20
- 21
- 22
- 23
- 24
- 25
- 26
- 27
- 28
- 29
- 30
- 31
- 32
- 33
- 34
- 35
- 36
- 37
- 38
- 39
- 40
- 41
- 42
- 43
$(“input:checkbox”).each();遍历checkbox,获取input标签的checkbox类型
$(this).is(‘:checked’) 判断复选框是否被选中,冒号是固定写法
$(this).attr(key); 获取节点属性名为key的值实现收藏音乐页面
同样该页面除了实现删除功能外,也包含播放音乐,删除喜欢的音乐和查询的功能。
$(function () { load(); }); //musicName可以传参,也可以不传参书 function load(musicName) { $.ajax({ url: "/lovemusic/findlovemusic",//指定路径 data: {"musicName":musicName}, type: "GET", dataType: "json",//服务器返回的数据格式 success:function (obj) { console.log(obj); var data = obj.data;//数组 var s = ''; //data[i].id data[i].singer data[i].title for (var i = 0;i < data.length;i++){ var musicUrl = data[i].url + ".mp3"; console.log(musicUrl); s += ''; s += ' '; } $("#info").html(s);//把拼接好的页面添加到info的id下 } }); } //实现播放歌曲里面的playerSong()函数 function playerSong(obj) { var name = obj.substring(obj.lastIndexOf("=") + 1); //obj:播放的音乐的地址 name:播放音乐的名称 0:播放的开始时间 false:代表不自动播放 SewisePlayer.toPlay(obj,name,0,true); } //删除喜欢的音乐 function deleteInfo(obj) { console.log(obj); $.ajax({ url: "/lovemusic/deletelovemusic", type: "POST", data: {"id":obj}, dataType: "json", success: function (val) { console.log(val); if(val.data == true){ alert("删除成功,重新加载当前页面!"); window.location.href="list.html"; }else { alert("删除失败!"); } } }); } //查询 $(function () { $("#submit1").click(function () { var name = $("#exampleInputName2").val(); load(name); }); });' + data[i].title + ' '; s += '' + data[i].singer + ' '; s+='<td > <button class="btn btn-primary" onclick="playerSong(\''+musicUrl+'\')" >播放歌曲</button>' + '</td>'; s+='<td > <button class="btn btn-primary" onclick="deleteInfo('+ data[i].id + ')" >移除</button>' + '</td>'; s += '- 1
- 2
- 3
- 4
- 5
- 6
- 7
- 8
- 9
- 10
- 11
- 12
- 13
- 14
- 15
- 16
- 17
- 18
- 19
- 20
- 21
- 22
- 23
- 24
- 25
- 26
- 27
- 28
- 29
- 30
- 31
- 32
- 33
- 34
- 35
- 36
- 37
- 38
- 39
- 40
- 41
- 42
- 43
- 44
- 45
- 46
- 47
- 48
- 49
- 50
- 51
- 52
- 53
- 54
- 55
- 56
- 57
- 58
- 59
- 60
- 61
- 62
- 63
- 64
- 65
- 66
- 67
- 68
十、配置拦截器
在config包下实现
LoginInterceptor类,继承HandlerInterceptor并重写preHandle方法:package com.example.onlinemusic.config; import com.example.onlinemusic.tools.Constant; import com.example.onlinemusic.tools.ResponseBodyMessage; import org.springframework.web.servlet.HandlerInterceptor; import javax.servlet.http.HttpServletRequest; import javax.servlet.http.HttpServletResponse; import javax.servlet.http.HttpSession; /** * Created With IntelliJ IDEA * Description:配置拦截器 * Users: yyyyy * Date: 2022-08-10 * Time: 21:50 */ public class LoginInterceptor implements HandlerInterceptor{ @Override public boolean preHandle(HttpServletRequest request, HttpServletResponse response, Object handler) throws Exception { //1.检查是否登录 HttpSession session = request.getSession(false); if(session != null && session.getAttribute(Constant.USERINFO_SESSION_KEY) != null){ // System.out.println("登录成功!"); return true; } return false; } }- 1
- 2
- 3
- 4
- 5
- 6
- 7
- 8
- 9
- 10
- 11
- 12
- 13
- 14
- 15
- 16
- 17
- 18
- 19
- 20
- 21
- 22
- 23
- 24
- 25
- 26
- 27
- 28
- 29
将自定义拦截器添加到系统配置文件中,在
config包下创建AppConfig类:
配置拦截规则,在用户登录之前除了登录界面可以访问,其他界面均不可进行访问。package com.example.onlinemusic.config; import org.springframework.context.annotation.Bean; import org.springframework.context.annotation.Configuration; import org.springframework.security.crypto.bcrypt.BCryptPasswordEncoder; import org.springframework.web.servlet.config.annotation.InterceptorRegistry; import org.springframework.web.servlet.config.annotation.WebMvcConfigurer; /** * Created With IntelliJ IDEA * Description: * Users: yyyyy * Date: 2022-08-07 * Time: 20:19 */ @Configuration public class AppConfig implements WebMvcConfigurer { @Bean public BCryptPasswordEncoder getBCryptPasswordEncoder(){ return new BCryptPasswordEncoder(); } /** * 将自定义拦截器添加到系统配置文件中 * @param registry */ @Override public void addInterceptors(InterceptorRegistry registry) { //配置拦截规则 LoginInterceptor loginInterceptor = new LoginInterceptor(); registry.addInterceptor(loginInterceptor). addPathPatterns("/**"). //排除所有的js excludePathPatterns("/js/**.js"). //排除images下的所有元素 excludePathPatterns("/images/**"). excludePathPatterns("/css/**.css"). excludePathPatterns("fronts/**"). excludePathPatterns("/player/**"). excludePathPatterns("/login.html"). //排除登录接口 excludePathPatterns("/user/login"). excludePathPatterns(); } }- 1
- 2
- 3
- 4
- 5
- 6
- 7
- 8
- 9
- 10
- 11
- 12
- 13
- 14
- 15
- 16
- 17
- 18
- 19
- 20
- 21
- 22
- 23
- 24
- 25
- 26
- 27
- 28
- 29
- 30
- 31
- 32
- 33
- 34
- 35
- 36
- 37
- 38
- 39
- 40
- 41
- 42
- 43
- 44
- 45
addPathPatterns:表示需要拦截的 URL,“
**”表示拦截任意方法(也就是所有方法)。
excludePathPatterns:表示需要排除的 URL十一、项目部署
- 将数据库在服务器上重新进行建表等操作
- 修改项目中的路径,数据库密码等,匹配服务器即可
- 使用
java -jar xxxx.jar启动项目【前台运行的方式】 - http://192.168.126.129:8081/login.html
- 后台运行
springboot项目:nohup java -jar xxx.jar >> log.log & - 进行功能的检查
- springboot项目更新
先查询当前的springboot项目的进程,然后kill掉
ps -ef | grep java
kill 【进程ID】ps : Linux 当中查看进程的命令
-e 代表显示所有的进程
-f 代表全格式【显示全部的信息】
grep : 全局正则表达式
重新上传jar包
重新进行后台的启动 -
相关阅读:
python | 自动化exe程序
flutter pod install, Error installing FMDB
Python的快捷键
2011-2019年全国30省绿色经济发展指数和子指数数据
C++模板与STL(一):模板基础与STL仿真复现
XCTF1-web Robots
【C++】函数重载 ③ ( 为函数指针赋值重载函数 )
从普通进阶成优秀的测试/开发程序员,一路过关斩将
隆云通二氧化硫传感器
十分钟带你了解软件测试中的白盒测试(收藏向)
- 原文地址:https://blog.csdn.net/dddddrrrzz/article/details/126215907


