-
#日常问题记--Selenium Chrome截取整个页面的图片的办法
1、问题描述
众所周知,我们可以使用以下两种方法截图整个浏览器的窗口的图像:
browser.save_screenshot('D:\\test.png') browser.get_screenshot_as_file('D:\\test.png')- 1
- 2
但这两种方法截图的图片是当前窗口所展示的界面,无法截图完整的页面,如下图所示:

2、Chrome CDP协议
首先我们先了解一下什么是Chrome的CDP协议,CDP(Chrome DevTools Protocol) 允许我们检测,调试Chromium, Chrome 和其他基于 Blink的 浏览器. 这个协议被广泛使用. 其中最著名的是 Chrome DevTools,协议的api也由这个团队维护(摘自百度百科)。
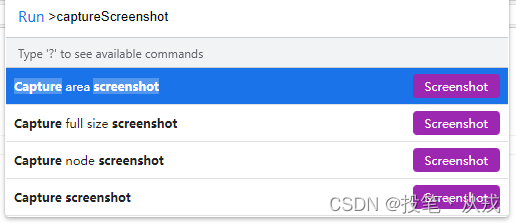
我们用f12打开devtools,然后点击右上角的三个点,就可以直接执行CDP命令了。

点击后,在弹出的框中搜索captureScreenshot,即可找到相关功能,我们点击其中的capture full size screenshot,就能截图整个界面了。
3、解决办法
根据这个思路,我们是否能在Selenium中直接调用该CDP命令呢?
很可惜,答案没那么简单,我们可以进入CDP官方文档中进行查阅,发现没有 capture full size screenshot命令,但我们能找到以下命令:{ "name": "captureScreenshot", "description": "Capture page screenshot.", "parameters": [ { "name": "format", "description": "Image compression format (defaults to png).", "optional": true, "type": "string", "enum": [ "jpeg", "png", "webp" ] }, { "name": "quality", "description": "Compression quality from range [0..100] (jpeg only).", "optional": true, "type": "integer" }, { "name": "clip", "description": "Capture the screenshot of a given region only.", "optional": true, "$ref": "Viewport" }, { "name": "fromSurface", "description": "Capture the screenshot from the surface, rather than the view. Defaults to true.", "experimental": true, "optional": true, "type": "boolean" }, { "name": "captureBeyondViewport", "description": "Capture the screenshot beyond the viewport. Defaults to false.", "experimental": true, "optional": true, "type": "boolean" } ], "returns": [ { "name": "data", "description": "Base64-encoded image data. (Encoded as a base64 string when passed over JSON)", "type": "string" } ] }- 1
- 2
- 3
- 4
- 5
- 6
- 7
- 8
- 9
- 10
- 11
- 12
- 13
- 14
- 15
- 16
- 17
- 18
- 19
- 20
- 21
- 22
- 23
- 24
- 25
- 26
- 27
- 28
- 29
- 30
- 31
- 32
- 33
- 34
- 35
- 36
- 37
- 38
- 39
- 40
- 41
- 42
- 43
- 44
- 45
- 46
- 47
- 48
- 49
- 50
我们可以使用该命令达到同样的效果,具体代码如下所示:
import base64 from undetected_chromedriver import Chrome browser = Chrome() browser.get('https://blog.csdn.net/qq_43519779/article/details/126201632') page_rect = browser.execute_cdp_cmd('Page.getLayoutMetrics', {}) screenshot_config = {'quality': 50, 'format': 'jpeg', 'captureBeyondViewport': True, 'clip': { 'width': page_rect['contentSize']['width'], 'height': page_rect['contentSize']['height'], 'x': 0, 'y': 0, 'scale': 1 }} result = browser.execute_cdp_cmd('Page.captureScreenshot', screenshot_config) with open('D:\\test.jpeg', 'wb') as f: f.write(base64.b64decode(result['data']))- 1
- 2
- 3
- 4
- 5
- 6
- 7
- 8
- 9
- 10
- 11
- 12
- 13
- 14
- 15
- 16
- 17
-
相关阅读:
.NET高性能开发-位图索引(一)
C++ 如何把string转为int,如何把int转为string(字符串转为数字,数字转为字符串)
【无标题】
【论文阅读】自动驾驶光流任务 DeFlow: Decoder of Scene Flow Network in Autonomous Driving
安装yolov3(Anaconda)
基于FPGA开发板使用Verilog设计PWM呼吸灯实验
Since Maven 3.8.1 http repositories are blocked
Elasticsearch:使用 Point 和 Shape 字段类型
《大数据:互联网大规模数据挖掘与分布式处理》(第2版)习题6.1.1-6.1.3解析
Java多线程/spring boot多线程
- 原文地址:https://blog.csdn.net/qq_43519779/article/details/126366595