-
Android学习笔记 71. activity和intent
Android学习笔记
Android 开发者基础知识 (Java) —— Google Developers 培训团队
第1单元 入门
第2课 activity和intent
71. activity和intent
你会做什么
- 创建一个新的 Android 应用程序,其中包含一个 main
Activity和一个第二个Activity. - 使用 将一些数据(字符串)从主要
Activity传递到第二个Intent,并在第二个中显示该数据Activity。 - 也
Activity使用Intent.
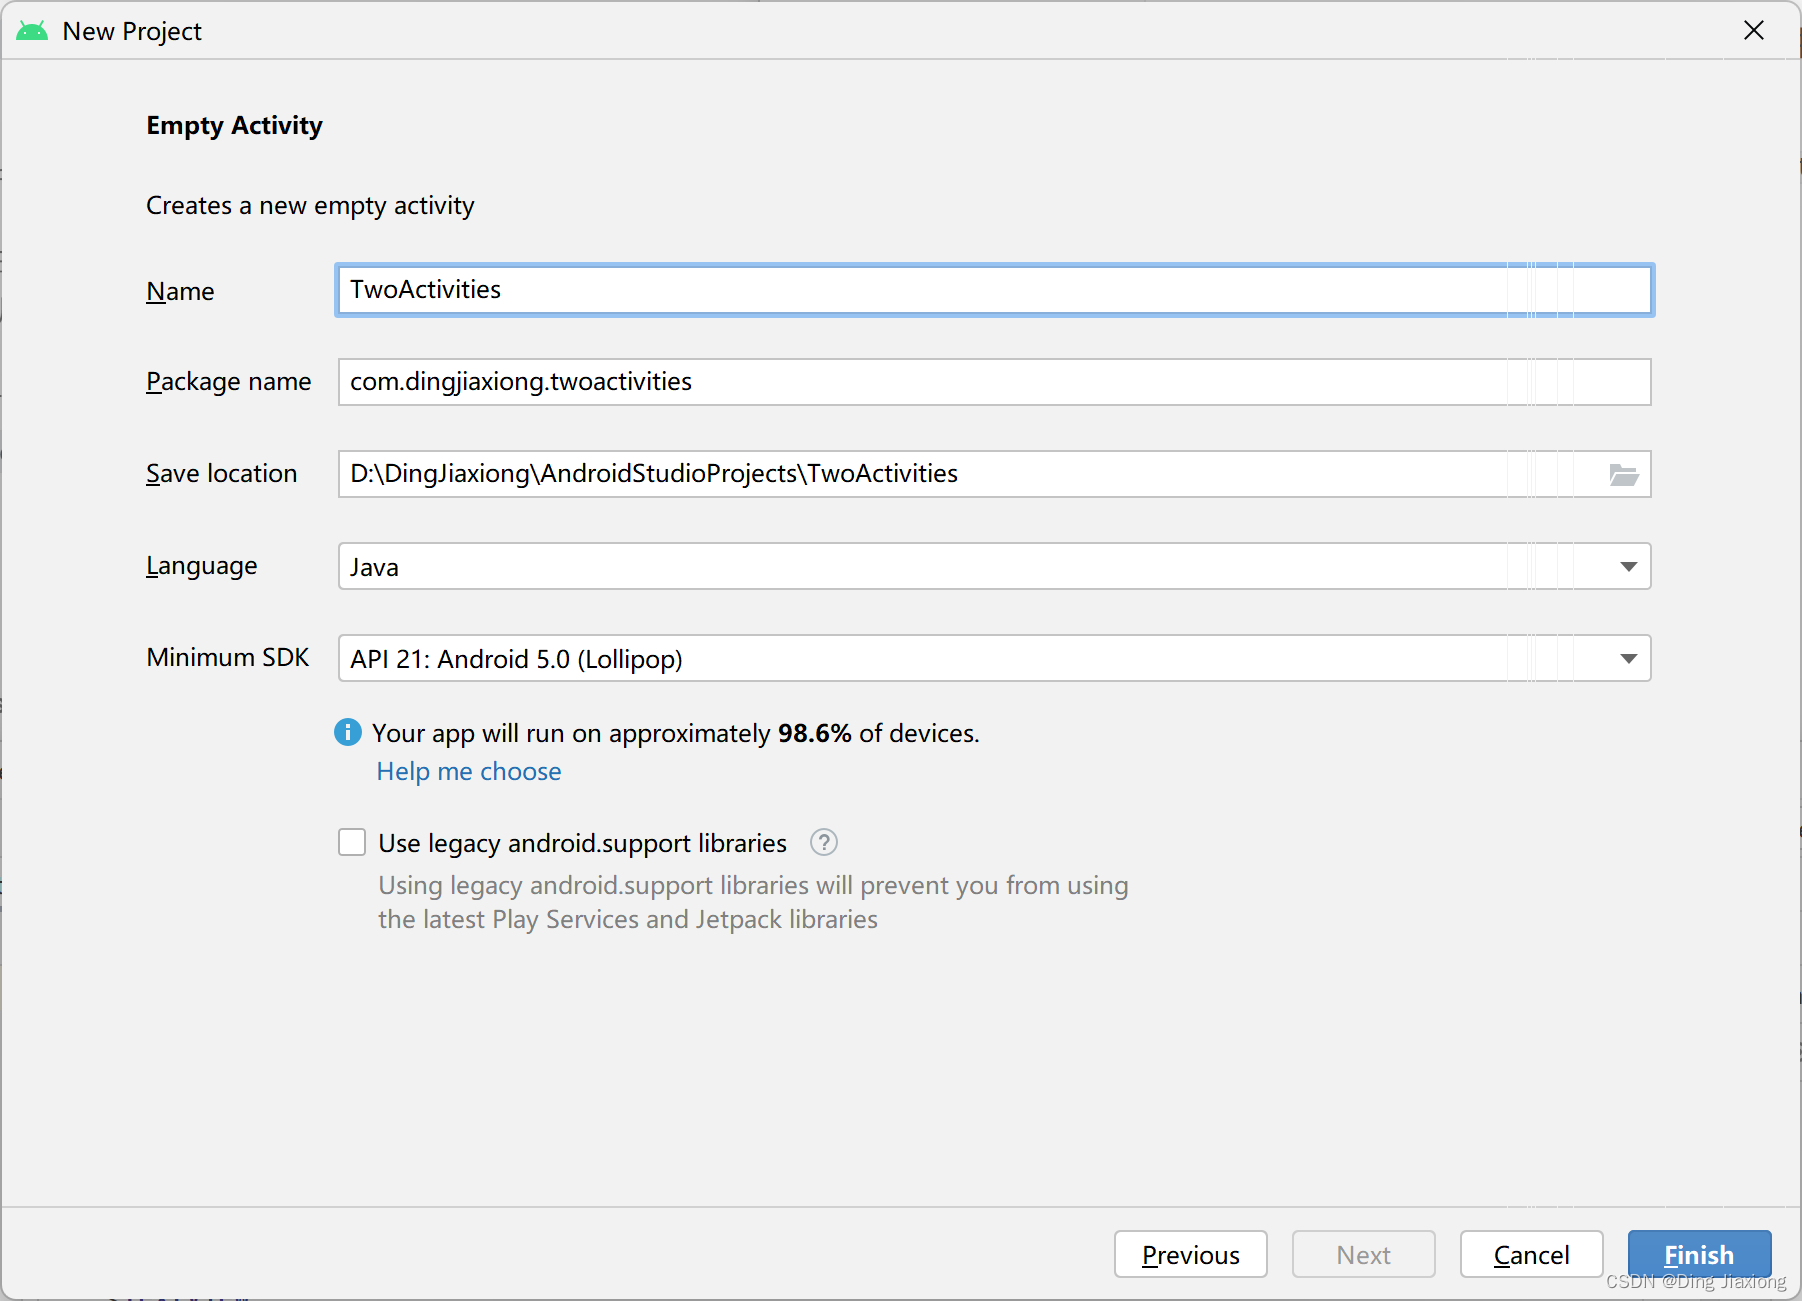
71.1 创建TwoActivity项目
-
创建项目
-
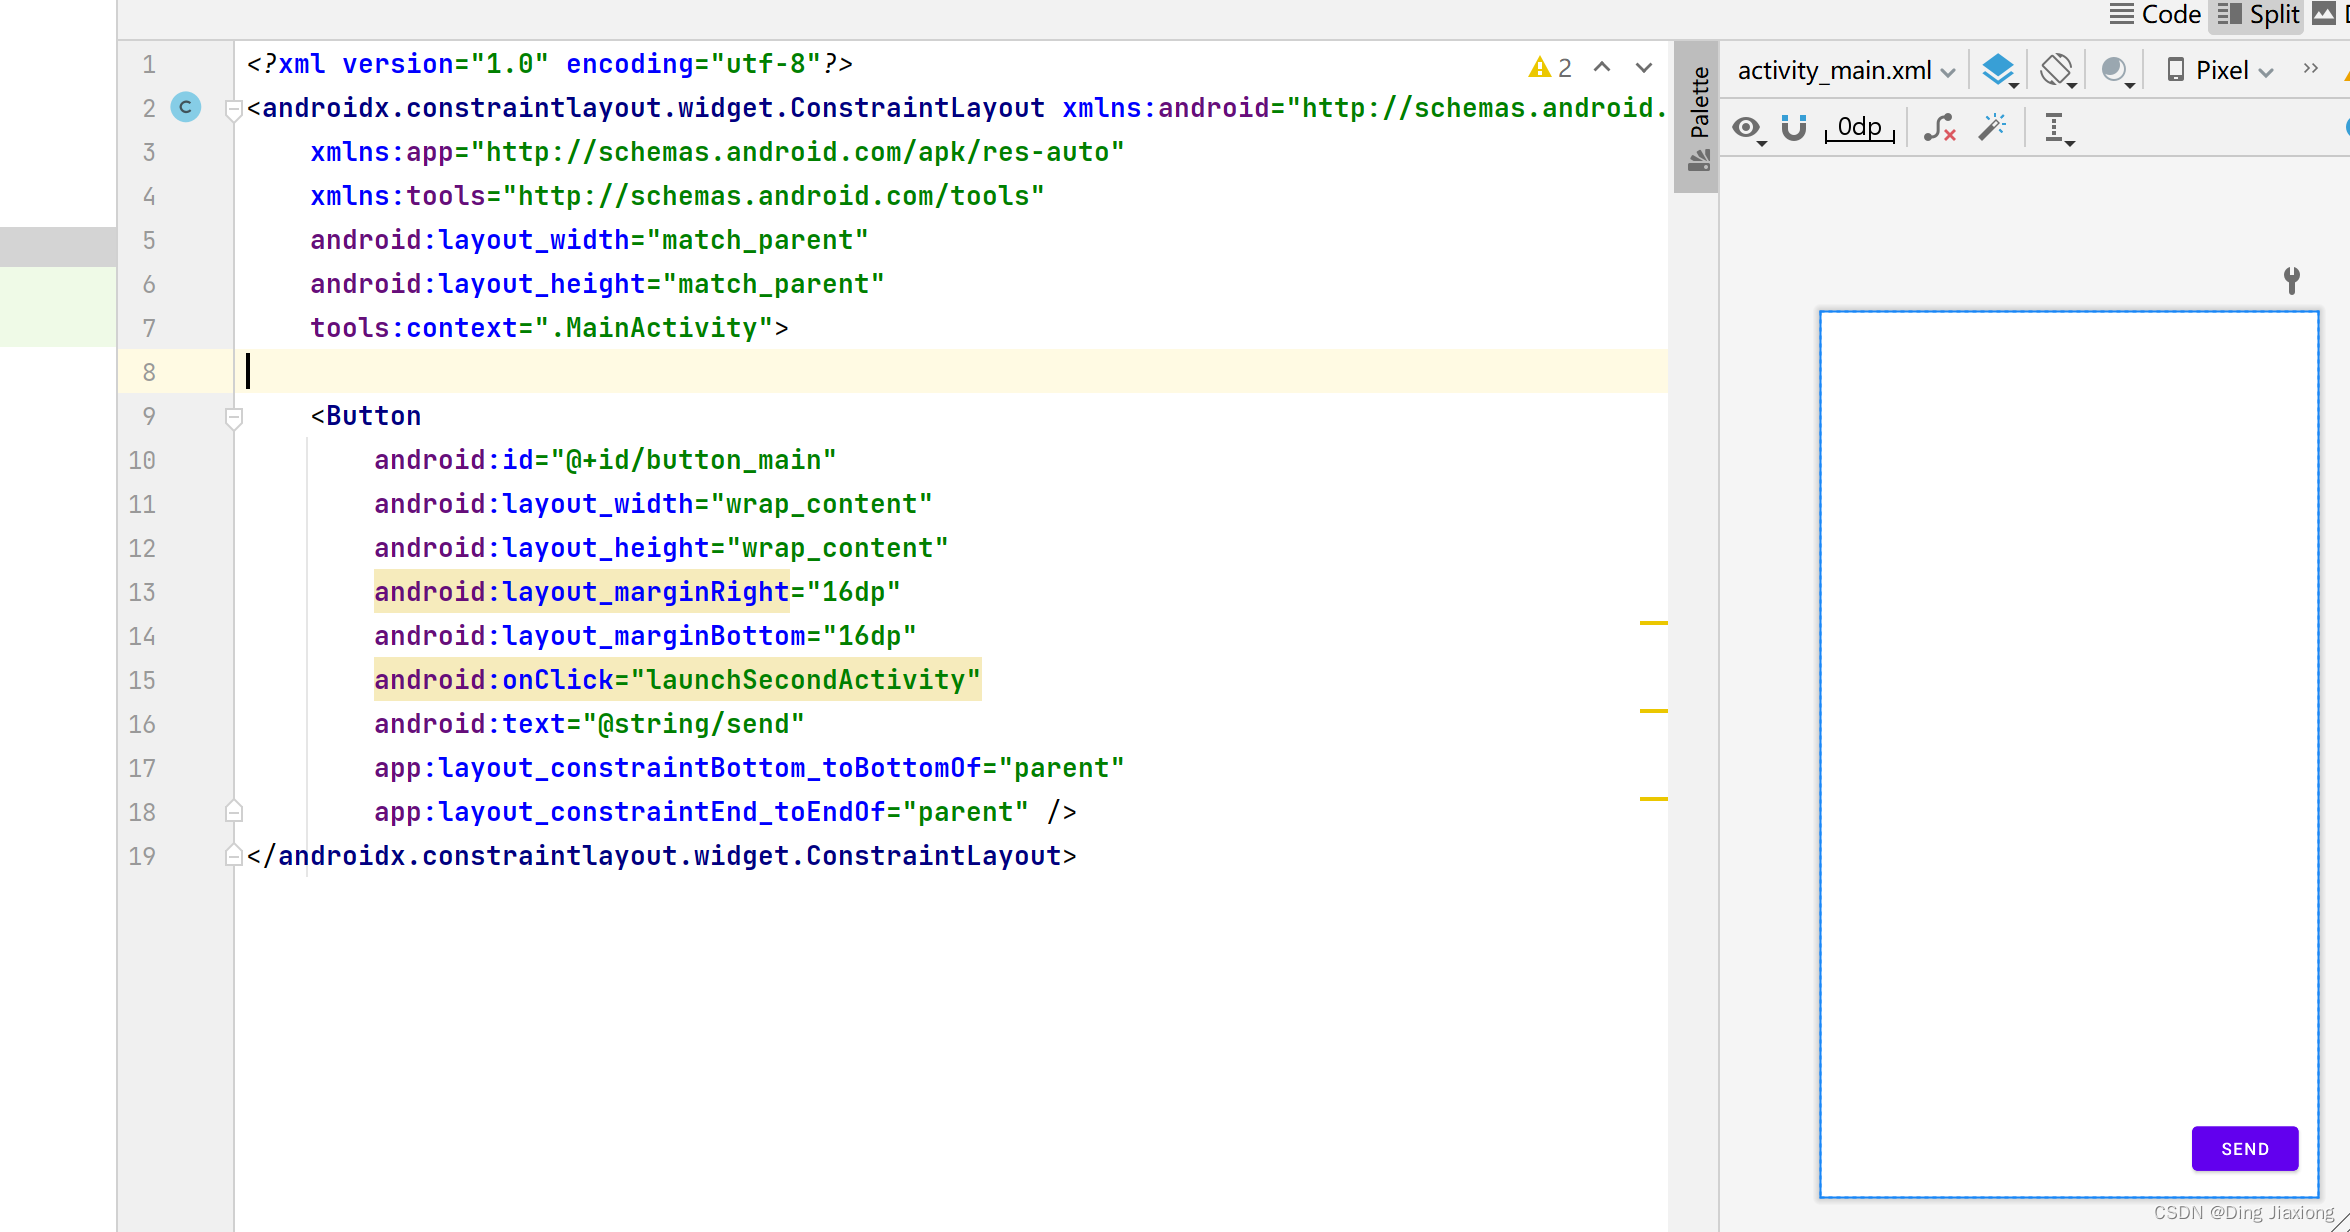
定义主Activity布局
-
设置按钮监听事件

-
运行

71.2 创建并启动第二个Activity
-
创建第二个Activity


-
查看清单文件

将其替换为

label属性将标题添加Activity到应用栏。android:exported 是Android中的四大组件 Activity,Service,Provider,Receiver 四大组件中都会有的一个属性。
主要作用是:是否支持其它应用调用。parentActivityName属性,您可以指示主要活动是第二个活动的父活动。这种关系用于您的应用程序中的向上导航:第二个活动的应用程序栏将有一个向左的箭头,以便用户可以“向上”导航到主要活动。该
android:parentActivityName——它们定义了向上导航的两个活动之间的关系。旧版本的 Android 需要这些元数据属性,因为该android:parentActivityName属性仅适用于 API 级别 16 及更高级别。 -
定义第二个Activity的布局
<androidx.constraintlayout.widget.ConstraintLayout xmlns:android="http://schemas.android.com/apk/res/android" xmlns:app="http://schemas.android.com/apk/res-auto" xmlns:tools="http://schemas.android.com/tools" android:layout_width="match_parent" android:layout_height="match_parent" tools:context=".SecondActivity"> <TextView android:layout_width="wrap_content" android:layout_height="wrap_content" android:id="@+id/text_header" android:layout_marginStart="8dp" android:layout_marginTop="16dp" android:layout_marginLeft="8dp" android:text="Message Received" android:textAppearance="@style/TextAppearance.AppCompat.Medium" android:textStyle="bold" app:layout_constraintStart_toStartOf="parent" app:layout_constraintTop_toTopOf="parent" /> androidx.constraintlayout.widget.ConstraintLayout>- 1
- 2
- 3
- 4
- 5
- 6
- 7
- 8
- 9
- 10
- 11
- 12
- 13
- 14
- 15
- 16
- 17
- 18
- 19
- 20
- 21
- 22
- 23

-
在主Activity中添加一个Intent
显式添加
Intent到 mainActivity. 这Intent用于在单击“发送”按钮Activity时激活第二个。
-
运行程序

71.3 将数据从主Activity发送到第二个Activity
-
在MainActivity布局中添加一个EditText,设置布局
<androidx.constraintlayout.widget.ConstraintLayout xmlns:android="http://schemas.android.com/apk/res/android" xmlns:app="http://schemas.android.com/apk/res-auto" xmlns:tools="http://schemas.android.com/tools" android:layout_width="match_parent" android:layout_height="match_parent" tools:context=".MainActivity"> <Button android:id="@+id/button_main" android:layout_width="wrap_content" android:layout_height="wrap_content" android:layout_marginRight="16dp" android:layout_marginBottom="16dp" android:onClick="launchSecondActivity" android:text="@string/send" app:layout_constraintBottom_toBottomOf="parent" app:layout_constraintEnd_toEndOf="parent" /> <EditText android:id="@+id/editText_main" android:layout_width="0dp" android:layout_height="wrap_content" android:layout_marginStart="8dp" android:layout_marginEnd="8dp" android:layout_marginBottom="16dp" android:ems="10" android:hint="Enter Your Message Here" android:inputType="textLongMessage" app:layout_constraintBottom_toBottomOf="parent" app:layout_constraintEnd_toStartOf="@id/button_main" app:layout_constraintStart_toStartOf="parent" /> androidx.constraintlayout.widget.ConstraintLayout>- 1
- 2
- 3
- 4
- 5
- 6
- 7
- 8
- 9
- 10
- 11
- 12
- 13
- 14
- 15
- 16
- 17
- 18
- 19
- 20
- 21
- 22
- 23
- 24
- 25
- 26
- 27
- 28
- 29
- 30
- 31
- 32
- 33
- 34
- 35

-
向intent extras添加一个字符串
Intentextras是 A中的键/值对Bundle。Bundle是数据的集合,存储为键/值对。要将信息从一个传递Activity到另一个,您将键和值从发送中放入Intent额外的内容中,然后在接收中再次将它们取回。Bundle``Activity``Activitypackage com.dingjiaxiong.twoactivities; import androidx.appcompat.app.AppCompatActivity; import android.content.Intent; import android.os.Bundle; import android.util.Log; import android.view.View; import android.widget.EditText; public class MainActivity extends AppCompatActivity { public static final String EXTRA_MESSAGE = "com.example.android.twoactivities.extra.MESSAGE"; private EditText mMessageEditText; @Override protected void onCreate(Bundle savedInstanceState) { super.onCreate(savedInstanceState); setContentView(R.layout.activity_main); mMessageEditText = findViewById(R.id.editText_main); } public void launchSecondActivity(View view) { String message = mMessageEditText.getText().toString(); Log.d("dingjiaxiong", "Button clicked!"); Intent intent = new Intent(this, SecondActivity.class); intent.putExtra(EXTRA_MESSAGE, message); startActivity(intent); } }- 1
- 2
- 3
- 4
- 5
- 6
- 7
- 8
- 9
- 10
- 11
- 12
- 13
- 14
- 15
- 16
- 17
- 18
- 19
- 20
- 21
- 22
- 23
- 24
- 25
- 26
- 27
- 28
- 29
- 30
- 31
- 32
- 33
- 34
- 35
- 36
- 37
- 38
- 39
-
为消息添加一个TextView到第二个Activity

-
修改SecondActivity以获取额外内容并显示消息
package com.dingjiaxiong.twoactivities; import androidx.appcompat.app.AppCompatActivity; import android.content.Intent; import android.os.Bundle; import android.widget.TextView; public class SecondActivity extends AppCompatActivity { @Override protected void onCreate(Bundle savedInstanceState) { super.onCreate(savedInstanceState); setContentView(R.layout.activity_second); Intent intent = getIntent(); String message = intent.getStringExtra(MainActivity.EXTRA_MESSAGE); TextView textView = findViewById(R.id.text_message); textView.setText(message); } }- 1
- 2
- 3
- 4
- 5
- 6
- 7
- 8
- 9
- 10
- 11
- 12
- 13
- 14
- 15
- 16
- 17
- 18
- 19
- 20
- 21
- 22
- 23
- 24
- 25
- 26

-
运行程序

71.4 将数据返回给主Activity
-
在 SecondActivity 布局中添加一个 EditText 和一个 Button
设置资源
<string name="button_second">Replystring> <string name="editText_second">Enter Your Reply Herestring>- 1
- 2
布局代码
<androidx.constraintlayout.widget.ConstraintLayout xmlns:android="http://schemas.android.com/apk/res/android" xmlns:app="http://schemas.android.com/apk/res-auto" xmlns:tools="http://schemas.android.com/tools" android:layout_width="match_parent" android:layout_height="match_parent" tools:context=".SecondActivity"> <TextView android:id="@+id/text_header" android:layout_width="wrap_content" android:layout_height="wrap_content" android:layout_marginStart="8dp" android:layout_marginLeft="8dp" android:layout_marginTop="16dp" android:text="Message Received" android:textAppearance="@style/TextAppearance.AppCompat.Medium" android:textStyle="bold" app:layout_constraintStart_toStartOf="parent" app:layout_constraintTop_toTopOf="parent" /> <TextView android:id="@+id/text_message" android:layout_width="wrap_content" android:layout_height="wrap_content" android:layout_marginStart="8dp" android:layout_marginLeft="8dp" android:layout_marginTop="8dp" app:layout_constraintStart_toStartOf="parent" app:layout_constraintTop_toBottomOf="@+id/text_header" /> <Button android:id="@+id/button_second" android:layout_width="wrap_content" android:layout_height="wrap_content" android:layout_marginBottom="16dp" android:layout_marginRight="16dp" android:text="@string/button_second" android:onClick="returnReply" app:layout_constraintBottom_toBottomOf="parent" app:layout_constraintRight_toRightOf="parent" /> <EditText android:id="@+id/editText_second" android:layout_width="0dp" android:layout_height="wrap_content" android:layout_marginBottom="16dp" android:layout_marginEnd="8dp" android:layout_marginStart="8dp" android:ems="10" android:hint="@string/editText_second" android:inputType="textLongMessage" app:layout_constraintBottom_toBottomOf="parent" app:layout_constraintEnd_toStartOf="@+id/button_second" app:layout_constraintStart_toStartOf="parent" /> androidx.constraintlayout.widget.ConstraintLayout>- 1
- 2
- 3
- 4
- 5
- 6
- 7
- 8
- 9
- 10
- 11
- 12
- 13
- 14
- 15
- 16
- 17
- 18
- 19
- 20
- 21
- 22
- 23
- 24
- 25
- 26
- 27
- 28
- 29
- 30
- 31
- 32
- 33
- 34
- 35
- 36
- 37
- 38
- 39
- 40
- 41
- 42
- 43
- 44
- 45
- 46
- 47
- 48
- 49
- 50
- 51
- 52
- 53
- 54
- 55
- 56
- 57
- 58
- 59

-
在第二个Activity中创建一个响应Intent
package com.dingjiaxiong.twoactivities; import androidx.appcompat.app.AppCompatActivity; import android.content.Intent; import android.os.Bundle; import android.view.View; import android.widget.EditText; import android.widget.MediaController; import android.widget.TextView; public class SecondActivity extends AppCompatActivity { public static final String EXTRA_REPLY = "com.example.android.twoactivities.extra.REPLY"; private EditText mReply; @Override protected void onCreate(Bundle savedInstanceState) { super.onCreate(savedInstanceState); setContentView(R.layout.activity_second); mReply = findViewById(R.id.editText_second); Intent intent = getIntent(); String message = intent.getStringExtra(MainActivity.EXTRA_MESSAGE); TextView textView = findViewById(R.id.text_message); textView.setText(message); } public void returnReply(View view) { String reply = mReply.getText().toString(); Intent replyIntent = new Intent(); replyIntent.putExtra(EXTRA_REPLY, reply); setResult(RESULT_OK, replyIntent); finish(); } }- 1
- 2
- 3
- 4
- 5
- 6
- 7
- 8
- 9
- 10
- 11
- 12
- 13
- 14
- 15
- 16
- 17
- 18
- 19
- 20
- 21
- 22
- 23
- 24
- 25
- 26
- 27
- 28
- 29
- 30
- 31
- 32
- 33
- 34
- 35
- 36
- 37
- 38
- 39
- 40
- 41
- 42
- 43
- 44
- 45
- 46
- 47
- 48
-
添加TextView元素以显示回复
设置资源
<string name="text_header_reply">Reply Receivedstring>- 1
主Activity布局
<androidx.constraintlayout.widget.ConstraintLayout xmlns:android="http://schemas.android.com/apk/res/android" xmlns:app="http://schemas.android.com/apk/res-auto" xmlns:tools="http://schemas.android.com/tools" android:layout_width="match_parent" android:layout_height="match_parent" tools:context=".MainActivity"> <TextView android:id="@+id/text_header_reply" android:layout_width="wrap_content" android:layout_height="wrap_content" android:layout_marginStart="8dp" android:layout_marginLeft="8dp" android:layout_marginTop="16dp" android:text="@string/text_header_reply" android:textAppearance="@style/TextAppearance.AppCompat.Medium" android:textStyle="bold" android:visibility="invisible" app:layout_constraintStart_toStartOf="parent" app:layout_constraintTop_toTopOf="parent" /> <TextView android:id="@+id/text_message_reply" android:layout_width="wrap_content" android:layout_height="wrap_content" android:layout_marginStart="8dp" android:layout_marginLeft="8dp" android:layout_marginTop="8dp" android:visibility="invisible" app:layout_constraintStart_toStartOf="parent" app:layout_constraintTop_toBottomOf="@+id/text_header_reply" /> <Button android:id="@+id/button2" android:layout_width="wrap_content" android:layout_height="wrap_content" android:layout_marginRight="16dp" android:layout_marginBottom="16dp" android:onClick="launchSecondActivity" android:text="@string/button_main" app:layout_constraintBottom_toBottomOf="parent" app:layout_constraintRight_toRightOf="parent" /> <EditText android:id="@+id/editText_main" android:layout_width="0dp" android:layout_height="wrap_content" android:layout_marginStart="8dp" android:layout_marginEnd="8dp" android:layout_marginBottom="16dp" android:ems="10" android:hint="@string/editText_main" android:inputType="textLongMessage" app:layout_constraintBottom_toBottomOf="parent" app:layout_constraintEnd_toStartOf="@+id/button2" app:layout_constraintStart_toStartOf="parent" /> androidx.constraintlayout.widget.ConstraintLayout>- 1
- 2
- 3
- 4
- 5
- 6
- 7
- 8
- 9
- 10
- 11
- 12
- 13
- 14
- 15
- 16
- 17
- 18
- 19
- 20
- 21
- 22
- 23
- 24
- 25
- 26
- 27
- 28
- 29
- 30
- 31
- 32
- 33
- 34
- 35
- 36
- 37
- 38
- 39
- 40
- 41
- 42
- 43
- 44
- 45
- 46
- 47
- 48
- 49
- 50
- 51
- 52
- 53
- 54
- 55
- 56
- 57
- 58
- 59
- 60
-
从 Intent extra 中获取回复并显示
package com.dingjiaxiong.twoactivities; import androidx.annotation.Nullable; import androidx.appcompat.app.AppCompatActivity; import android.content.Intent; import android.os.Bundle; import android.util.Log; import android.view.View; import android.widget.EditText; import android.widget.TextView; public class MainActivity extends AppCompatActivity { // Class name for Log tag private static final String LOG_TAG = MainActivity.class.getSimpleName(); // Unique tag required for the intent extra public static final String EXTRA_MESSAGE = "com.example.android.twoactivities.extra.MESSAGE"; // Unique tag for the intent reply public static final int TEXT_REQUEST = 1; // EditText view for the message private EditText mMessageEditText; // TextView for the reply header private TextView mReplyHeadTextView; // TextView for the reply body private TextView mReplyTextView; /** * Initializes the activity. * * @param savedInstanceState The current state data. */ @Override protected void onCreate(Bundle savedInstanceState) { super.onCreate(savedInstanceState); setContentView(R.layout.activity_main); // Initialize all the view variables. mMessageEditText = findViewById(R.id.editText_main); mReplyHeadTextView = findViewById(R.id.text_header_reply); mReplyTextView = findViewById(R.id.text_message_reply); } /** * Handles the onClick for the "Send" button. Gets the value of the main EditText, * creates an intent, and launches the second activity with that intent. * * The return intent from the second activity is onActivityResult(). * * @param view The view (Button) that was clicked. */ public void launchSecondActivity(View view) { Log.d(LOG_TAG, "Button clicked!"); Intent intent = new Intent(this, SecondActivity.class); String message = mMessageEditText.getText().toString(); intent.putExtra(EXTRA_MESSAGE, message); startActivityForResult(intent, TEXT_REQUEST); } /** * Handles the data in the return intent from SecondActivity. * * @param requestCode Code for the SecondActivity request. * @param resultCode Code that comes back from SecondActivity. * @param data Intent data sent back from SecondActivity. */ @Override public void onActivityResult(int requestCode, int resultCode, Intent data) { super.onActivityResult(requestCode, resultCode, data); // Test for the right intent reply. if (requestCode == TEXT_REQUEST) { // Test to make sure the intent reply result was good. if (resultCode == RESULT_OK) { String reply = data.getStringExtra(SecondActivity.EXTRA_REPLY); // Make the reply head visible. mReplyHeadTextView.setVisibility(View.VISIBLE); // Set the reply and make it visible. mReplyTextView.setText(reply); mReplyTextView.setVisibility(View.VISIBLE); } } } }- 1
- 2
- 3
- 4
- 5
- 6
- 7
- 8
- 9
- 10
- 11
- 12
- 13
- 14
- 15
- 16
- 17
- 18
- 19
- 20
- 21
- 22
- 23
- 24
- 25
- 26
- 27
- 28
- 29
- 30
- 31
- 32
- 33
- 34
- 35
- 36
- 37
- 38
- 39
- 40
- 41
- 42
- 43
- 44
- 45
- 46
- 47
- 48
- 49
- 50
- 51
- 52
- 53
- 54
- 55
- 56
- 57
- 58
- 59
- 60
- 61
- 62
- 63
- 64
- 65
- 66
- 67
- 68
- 69
- 70
- 71
- 72
- 73
- 74
- 75
- 76
- 77
- 78
- 79
- 80
- 81
- 82
- 83
- 84
- 85
- 86
-
运行

71.5 小结
概述:
- An
Activity是一个应用程序组件,它提供了一个专注于单个用户任务的单个屏幕。 - 每个
Activity都有自己的用户界面布局文件。 - 您可以为您的
Activity实现分配父/子关系以在您的应用程序中启用向上导航。 - 可以使用该属性使A
View可见或不可见。android:visibility
实施一个
Activity:- 选择文件 > 新建 > 活动以从模板开始并自动执行以下步骤。
- 如果不是从模板开始,创建一个Java 类,在关联的 XML 布局文件中
Activity实现基本 UI ,并在 AndroidManifest.xml 中声明新的。Activity``Activity
Intent:- An
Intent允许您从应用程序中的另一个组件请求操作,例如,从另一个组件开始Activity。AnIntent可以是显式的或隐式的。 - 使用显式
Intent,您可以指示接收数据的特定目标组件。 - 使用隐式
Intent,您可以指定您想要的功能,而不是目标组件。 - An
Intent可以包含执行操作的数据(作为 URI)或作为Intentextras的附加信息。 IntentextrasBundle是与 .一起发送的 a 中的键/值对Intent。
- 创建一个新的 Android 应用程序,其中包含一个 main
-
相关阅读:
分享-Spss下载含spss25.spss26.spss27等版本
linux硬件和系统查询命令
mfc入门基础(六)创建模态对话框与非模态对话框
PHP require/include 区别
提升有限元分析核心能力,这三类概念思维不可或缺
用户画像系列——布隆过滤器在策略引擎中的应用
千万支持补助让人心动?成都市关于加快发展先进制造业实现工业转型升级发展若干政策的意见
Codeforces Round #815 (Div. 2)(A~D1)
java计算机毕业设计宿舍管理系统源程序+mysql+系统+lw文档+远程调试
perl语言入门学习
- 原文地址:https://blog.csdn.net/weixin_44226181/article/details/126358168
