-
Zookeeper原理解析-单机模式
Zookeeper-单机模式
一、ZK简介
zookeeper是一个分布式协调中间件。通过 Zookeeper 可以实现分布式锁(节点唯一性、顺序节点)、注册中心(临时节点、持久化节点)、配置中心、Leader选举等等。
zookeeper 采用文件目录树结构方式存储,一个目录代表一个节点(ZNode)。
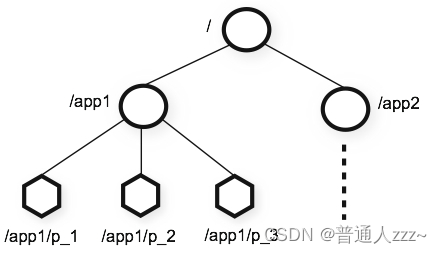 ZooKeeper 提供的命名空间与标准文件系统非常相似。名称是由斜杠 (/) 分隔的路径元素序列。ZooKeeper 命名空间中的每个节点都有一个路径标识。
与标准文件系统不同的是,节点上除了存储数据内容外,还存储了数据节点本身的一些状态信息。Zk节点数据结构:
定义 描述 czxid 即Create ZXID,表示该数据节点被创建时的事务ID。 mzxid 即Modified ZXID,表示该数据节点最后一次被更新的事务ID。 ctime 即Create time,节点创建时间。 mtime 即Modified time,节点最后一次被修改的时间。 version 版本号。 cversion 即Children version,子节点版本号。 aversion 即ACL version,节点 ACl 版本号。 ephemeralOwner 创建该临时节点的会话SessionID。如果为持久化节点,ephemeralOwner=0。 dataLength 数据内容长度。 numChildren 子节点个数。 pzxid 表示该节点的子节点列表最后一次被修改时的事务ID。注意:只有子节点列表变更才会变更pxid,子节点内容变更不会影响pzxid。 在Zookeeper中,节点存在不同类型:
- 持久化节点:节点被创建后会一直存在服务器,直到删除操作主动清除。可用于实现分布式锁。
- 持久化顺序节点:有顺序的持久节点,节点特性和持久节点是一样的,只是额外特性表现在顺序上。
- 临时节点:会被自动清理掉的节点,它的生命周期和客户端会话绑在一起,客户端会话结束,节点会被删除掉。与持久性节点不同的是,临时节点不能创建子节点。
- 临时顺序节点:有顺序的临时节点,和持久顺序节点相同,在其创建的时候会在名字后面加上数字后缀。可用于实现分布式锁。
- 容器节点:3.5.3 版本新增的,容器节点主要用来容纳子节点,如果没有给其创建子节点,容器节点表现和持久化节点一样,如果给容器节点创建了子节点,后续又把子节点清空,容器节点也会被zookeeper删除。定时任务默认60s 检查一次。
- TTL节点:默认禁用,只能通过系统配置 zookeeper.extendedTypesEnabled=true 开启,不稳定。
Zookeeper作为一个分布式微服务协调中间件,在服务启动过程中,分为了单机模式、集群模式两种类型,下面分别对两种类型的服务启动过程进行分析。
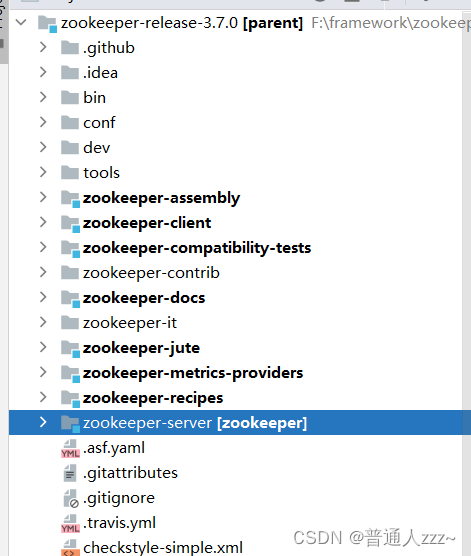
本系列的文章,所有源码摘至
zookeeper-release-3.7.0版本。
二、Zookeeper服务端启动
Zookeeper服务端启动,依据不同系统平台提供了不同的脚本,如下:
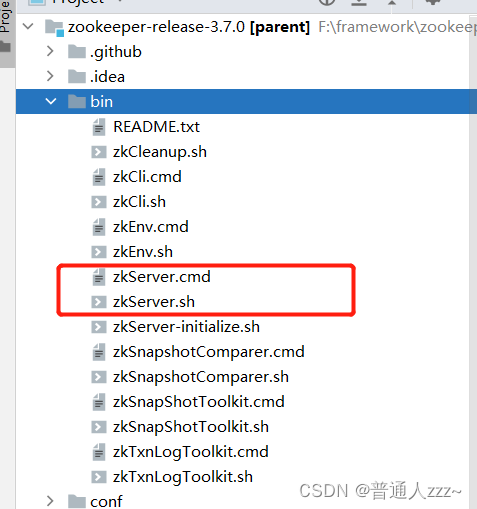
其中,zkServer.cmd 为 Windows 系统启动执行脚本,zkServer.sh 为 Linux 系统启动执行脚本。下面我们看一下 zkSever.cmd 脚本内容:@echo off setlocal call "%~dp0zkEnv.cmd" set ZOOMAIN=org.apache.zookeeper.server.quorum.QuorumPeerMain set ZOO_LOG_FILE=zookeeper-%USERNAME%-server-%COMPUTERNAME%.log echo on call %JAVA% "-Dzookeeper.log.dir=%ZOO_LOG_DIR%" "-Dzookeeper.root.logger=%ZOO_LOG4J_PROP%" "-Dzookeeper.log.file=%ZOO_LOG_FILE%" "-XX:+HeapDumpOnOutOfMemoryError" "-XX:OnOutOfMemoryError=cmd /c taskkill /pid %%%%p /t /f" -cp "%CLASSPATH%" %ZOOMAIN% "%ZOOCFG%" %* endlocal- 1
- 2
- 3
- 4
- 5
- 6
- 7
- 8
- 9
- 10
- 11
- 12
- 13
- 14
- 15
- 16
可见,Zookeeper不管在单机模式还是集群模式,都是通过运行一个
org.apache.zookeeper.server.quorum.QuorumPeerMain主函数,完成服务启动:QuorumPeerMain 源码:
@InterfaceAudience.Public public class QuorumPeerMain { private static final Logger LOG = LoggerFactory.getLogger(QuorumPeerMain.class); private static final String USAGE = "Usage: QuorumPeerMain configfile"; protected QuorumPeer quorumPeer; /** * 启动zk,需要指定zk配置文件路径 * @param args[0] 配置文件的路径 */ public static void main(String[] args) { QuorumPeerMain main = new QuorumPeerMain(); try { // initialize and run main.initializeAndRun(args); } catch (IllegalArgumentException e) { // 省略其他无关源码.... } catch (ConfigException e) { // 省略其他无关源码.... } catch (DatadirException e) { // 省略其他无关源码.... } catch (AdminServerException e) { // 省略其他无关源码.... } catch (Exception e) { // 省略其他无关源码.... } LOG.info("Exiting normally"); ServiceUtils.requestSystemExit(ExitCode.EXECUTION_FINISHED.getValue()); } protected void initializeAndRun(String[] args) throws ConfigException, IOException, AdminServerException { // 读取并解析配置文件,封装到 QuorumPeerConfig QuorumPeerConfig config = new QuorumPeerConfig(); if (args.length == 1) { config.parse(args[0]); } // Start and schedule the the purge task // 启动一个清除数据目录的定时任务 DatadirCleanupManager purgeMgr = new DatadirCleanupManager( config.getDataDir(), // 数据快照目录 config.getDataLogDir(), // 事务日志目录 config.getSnapRetainCount(), // 清除后要保留的快照数 config.getPurgeInterval()); // 清除间隔(小时) purgeMgr.start(); // config.isDistributed():判断是否为集群模式 if (args.length == 1 && config.isDistributed()) { // 集群模式 runFromConfig(config); } else { LOG.warn("Either no config or no quorum defined in config, running in standalone mode"); // 单机模式 ZooKeeperServerMain.main(args); } } // 省略其他无关源码.... }- 1
- 2
- 3
- 4
- 5
- 6
- 7
- 8
- 9
- 10
- 11
- 12
- 13
- 14
- 15
- 16
- 17
- 18
- 19
- 20
- 21
- 22
- 23
- 24
- 25
- 26
- 27
- 28
- 29
- 30
- 31
- 32
- 33
- 34
- 35
- 36
- 37
- 38
- 39
- 40
- 41
- 42
- 43
- 44
- 45
- 46
- 47
- 48
- 49
- 50
- 51
- 52
- 53
- 54
- 55
- 56
- 57
- 58
- 59
- 60
- 61
- 62
Zookeeper 通过
boolean config.isDistributed()方法判断单机模式 or 集群模式,该方法逻辑如下:public class QuorumPeerConfig { // 验证者:用于集群选举 protected QuorumVerifier quorumVerifier = null, lastSeenQuorumVerifier = null; // 是否采用单机模式:true-单机模式 private static boolean standaloneEnabled = true; public boolean isDistributed() { return quorumVerifier != null && (!standaloneEnabled || quorumVerifier.getVotingMembers().size() > 1); } // 省略其他无关源码.... }- 1
- 2
- 3
- 4
- 5
- 6
- 7
- 8
- 9
- 10
- 11
- 12
- 13
2.1 Zookeeper配置文件详解
基本参数配置
参数 描述 clientPort 主要定义客户端连接zookeeper server的端口,默认情况下为2181 dataDir 主要用来配置zookeeper server数据的存放路径 dataLogDir 主要用来存储事物日志,如果该参数不配置,则事物日志存储在dataDir路下 tickTime zookeeper中使用的基本时间度量单位,单位为毫秒。zookeeper客户端与服务器之间的心跳时间就是一个tickTime单位。默认值为3000毫秒,即3秒 集群参数配置
参数 描述 initLimit Follower连接到Leader并同步数据的最大时间,如果zookeeper数据比较大,可以考虑调大这个值来避免报错 syncLimit Follower同步Leader的最大时间 leaderServes 用于配制Leader节点是否接收客户端请求,默认情况下这个值是yes ,当集群中节点数量超过3个,建议设置为false,关闭leader节点接收客户端请求 server.x 主要用来设置集群中某台server的参数,格式 [hostname]:port1:port2[:observer]
zookeeper server启动的时候,会根据dataDirxia的myid文件确定当前节点的id。
注意:
- port1:用于follower连接leader同步数据和转发请求
- port2:用于leader选举cnxTimeout 设置连接Leader接收通知的最大超时时间,该参数只在使用 electionAlg=3 时生效 electionAlg leader选举算法:
electionAlg=1:基于UDP通信的不进行权限验证算法
electionAlg=2:表示进行基于UDP通信的进行权限验证算法
electionAlg=3:表示基于TCP通信的fast leader选举2.2 单机模式
首先,我们先分析一下Zookeeper单机模式下,需要实现哪些核心功能。
- 配置文件解析
- 数据存储、持久化
- 处理客户端请求
- watch机制
下面我们基于以上功能点进行Zookeeper单机模式源码分析。
Zookeeper 单机模式通过
ZooKeeperServerMain.main(args);进行启动。// 单机模式启动类 @InterfaceAudience.Public public class ZooKeeperServerMain { private static final Logger LOG = LoggerFactory.getLogger(ZooKeeperServerMain.class); private static final String USAGE = "Usage: ZooKeeperServerMain configfile | port datadir [ticktime] [maxcnxns]"; // ZooKeeper server supports two kinds of connection: unencrypted and encrypted. // ZooKeeper 服务器支持两种连接:未加密和加密。 private ServerCnxnFactory cnxnFactory; // 未加密 private ServerCnxnFactory secureCnxnFactory; // 加密 // 容器节点管理器:用于管理处理容器节点 private ContainerManager containerManager; // 收集 Metrics(指标) 并将当前值发布到外部设施。 private MetricsProvider metricsProvider; // zookeeper server启动服务类 private AdminServer adminServer; public static void main(String[] args) { ZooKeeperServerMain main = new ZooKeeperServerMain(); try { // init and run main.initializeAndRun(args); } catch (IllegalArgumentException e) { // 省略无关代码... } catch (ConfigException e) { // 省略无关代码... } catch (DatadirException e) { // 省略无关代码... } catch (AdminServerException e) { // 省略无关代码... } catch (Exception e) { // 省略无关代码... } LOG.info("Exiting normally"); ServiceUtils.requestSystemExit(ExitCode.EXECUTION_FINISHED.getValue()); } // init and run protected void initializeAndRun(String[] args) throws ConfigException, IOException, AdminServerException { try { ManagedUtil.registerLog4jMBeans(); } catch (JMException e) { LOG.warn("Unable to register log4j JMX control", e); } // step1:读取并解析配置文件,封装为ServerConfig ServerConfig config = new ServerConfig(); if (args.length == 1) { // 走这里,args[0] 为配置文件路径 config.parse(args[0]); } else { config.parse(args); } // run runFromConfig(config); } public void runFromConfig(ServerConfig config) throws IOException, AdminServerException { LOG.info("Starting server"); FileTxnSnapLog txnLog = null; try { try { // step2:创建一个MetricsProvider,用于收集 Metrics(指标) 并将当前值发布到外部设施。 // 可配置为 PrometheusMetricsProvider,向Prometheus 发送指标监控 metricsProvider = MetricsProviderBootstrap.startMetricsProvider( config.getMetricsProviderClassName(), config.getMetricsProviderConfiguration()); } catch (MetricsProviderLifeCycleException error) { throw new IOException("Cannot boot MetricsProvider " + config.getMetricsProviderClassName(), error); } ServerMetrics.metricsProviderInitialized(metricsProvider); // step3:初始化 ProviderRegistry,用于注册各种身份验证 ProviderRegistry.initialize(); // step4:创建FileTxnSnapLog(FileTxnLog(config.dataLogDir)、FileSnap(config.dataDir)) txnLog = new FileTxnSnapLog(config.dataLogDir, config.dataDir); // step5:Jvm监控 JvmPauseMonitor jvmPauseMonitor = null; if (config.jvmPauseMonitorToRun) { jvmPauseMonitor = new JvmPauseMonitor(config); } // step6:创建一个zkServer,注意,还未启动 final ZooKeeperServer zkServer = new ZooKeeperServer( jvmPauseMonitor, txnLog, // FileTxnSnapLog config.tickTime, // tickTime,默认3000(毫秒) config.minSessionTimeout, // 最小 Session 超时时间,minSessionTimeout = min == -1 ? tickTime * 2 : min config.maxSessionTimeout, // 最大 Session 超时时间,maxSessionTimeout = max == -1 ? tickTime * 20 : max; config.listenBacklog, null, // zk数据存储DB config.initialConfig // 配置路径 ); txnLog.setServerStats(zkServer.serverStats()); // step7:注册服务端Shutdown处理器 final CountDownLatch shutdownLatch = new CountDownLatch(1); zkServer.registerServerShutdownHandler(new ZooKeeperServerShutdownHandler(shutdownLatch)); // Start Admin server // step8:启动管理服务器 adminServer = AdminServerFactory.createAdminServer(); adminServer.setZooKeeperServer(zkServer); adminServer.start(); boolean needStartZKServer = true; if (config.getClientPortAddress() != null) { // step9:启动客户端连接(普通) cnxnFactory = ServerCnxnFactory.createFactory(); cnxnFactory.configure(config.getClientPortAddress(), config.getMaxClientCnxns(), config.getClientPortListenBacklog(), false); cnxnFactory.startup(zkServer); // zkServer has been started. So we don't need to start it again in secureCnxnFactory. needStartZKServer = false; } if (config.getSecureClientPortAddress() != null) { // step9:启动客户端连接(安全) secureCnxnFactory = ServerCnxnFactory.createFactory(); secureCnxnFactory.configure(config.getSecureClientPortAddress(), config.getMaxClientCnxns(), config.getClientPortListenBacklog(), true); secureCnxnFactory.startup(zkServer, needStartZKServer); } // step10:创建一个容器节点管理器 containerManager = new ContainerManager( zkServer.getZKDatabase(), // zk数据存储DB zkServer.firstProcessor, // zk请求处理器 Integer.getInteger("znode.container.checkIntervalMs", (int) TimeUnit.MINUTES.toMillis(1)), // 检查时间间隔 Integer.getInteger("znode.container.maxPerMinute", 10000), // 每秒要删除的最大容器数 - 避免容器删除的聚集 Long.getLong("znode.container.maxNeverUsedIntervalMs", 0) // 保留从未有任何子节点的容器节点最大时间(毫秒) ); containerManager.start(); ZKAuditProvider.addZKStartStopAuditLog(); // 监听服务器运行状态,如果未运行或遇到内部错误,执行关闭逻辑,释放资源 shutdownLatch.await(); // 关闭,释放资源 shutdown(); if (cnxnFactory != null) { cnxnFactory.join(); } if (secureCnxnFactory != null) { secureCnxnFactory.join(); } if (zkServer.canShutdown()) { zkServer.shutdown(true); } } catch (InterruptedException e) { // warn, but generally this is ok LOG.warn("Server interrupted", e); } finally { // 释放资源 if (txnLog != null) { txnLog.close(); } if (metricsProvider != null) { try { metricsProvider.stop(); } catch (Throwable error) { LOG.warn("Error while stopping metrics", error); } } } } // 省略其他无关代码....... }- 1
- 2
- 3
- 4
- 5
- 6
- 7
- 8
- 9
- 10
- 11
- 12
- 13
- 14
- 15
- 16
- 17
- 18
- 19
- 20
- 21
- 22
- 23
- 24
- 25
- 26
- 27
- 28
- 29
- 30
- 31
- 32
- 33
- 34
- 35
- 36
- 37
- 38
- 39
- 40
- 41
- 42
- 43
- 44
- 45
- 46
- 47
- 48
- 49
- 50
- 51
- 52
- 53
- 54
- 55
- 56
- 57
- 58
- 59
- 60
- 61
- 62
- 63
- 64
- 65
- 66
- 67
- 68
- 69
- 70
- 71
- 72
- 73
- 74
- 75
- 76
- 77
- 78
- 79
- 80
- 81
- 82
- 83
- 84
- 85
- 86
- 87
- 88
- 89
- 90
- 91
- 92
- 93
- 94
- 95
- 96
- 97
- 98
- 99
- 100
- 101
- 102
- 103
- 104
- 105
- 106
- 107
- 108
- 109
- 110
- 111
- 112
- 113
- 114
- 115
- 116
- 117
- 118
- 119
- 120
- 121
- 122
- 123
- 124
- 125
- 126
- 127
- 128
- 129
- 130
- 131
- 132
- 133
- 134
- 135
- 136
- 137
- 138
- 139
- 140
- 141
- 142
- 143
- 144
- 145
- 146
- 147
- 148
- 149
- 150
- 151
- 152
- 153
- 154
- 155
- 156
- 157
- 158
- 159
- 160
- 161
- 162
- 163
- 164
- 165
- 166
- 167
- 168
- 169
- 170
- 171
- 172
通过对
org.apache.zookeeper.server.ZooKeeperServerMain#initializeAndRun以及org.apache.zookeeper.server.ZooKeeperServerMain#runFromConfig方法的源码分析,可以得出zookeeper单机模式下,主要做了一下几个事情:- step1:读取并解析配置文件,封装为 ServerConfig
- step2:创建一个MetricsProvider,用于收集 Metrics(指标) 并将当前值发布到外部设施(可配置为 PrometheusMetricsProvider,向Prometheus 发送指标监控)。
- step3:初始化 ProviderRegistry,用于注册各种身份验证
- step4:创建FileTxnSnapLog,用于事务日志、快照日志的操作与处理
- step5:Jvm监控
- step6:创建一个zkServer,注意,还未启动
- step7:注册服务端Shutdown处理器
- step8:启动管理服务器
- step9:启动客户端连接(安全、普通)
- step10:创建一个容器节点管理器
下面分析其中比较核心的几个步骤:
2.2.1 step4 创建FileTxnSnapLog
在
org.apache.zookeeper.server.ZooKeeperServerMain#runFromConfig方法中,通过txnLog = new FileTxnSnapLog(config.dataLogDir, config.dataDir);创建一个FileTxnSnapLog,用于事务日志、快照的操作与处理。核心代码:
public class FileTxnSnapLog { // 包含事务日志的目录 final File dataDir; // 包含快照目录的目录 final File snapDir; TxnLog txnLog; SnapShot snapLog; // 是否自动创建DB:系统参数,默认true private final boolean autoCreateDB; // 是否信任空快照:系统参数,默认false private final boolean trustEmptySnapshot; public static final int VERSION = 2; public static final String version = "version-"; public FileTxnSnapLog(File dataDir, File snapDir) throws IOException { LOG.debug("Opening datadir:{} snapDir:{}", dataDir, snapDir); this.dataDir = new File(dataDir, version + VERSION); this.snapDir = new File(snapDir, version + VERSION); // 省略非核心代码 if (!this.dataDir.getPath().equals(this.snapDir.getPath())) { checkLogDir(); checkSnapDir(); } // 创建一个事务日志处理器 txnLog = new FileTxnLog(this.dataDir); // 创建一个快照处理器 snapLog = new FileSnap(this.snapDir); // 省略非核心代码 }- 1
- 2
- 3
- 4
- 5
- 6
- 7
- 8
- 9
- 10
- 11
- 12
- 13
- 14
- 15
- 16
- 17
- 18
- 19
- 20
- 21
- 22
- 23
- 24
- 25
- 26
- 27
- 28
- 29
- 30
- 31
- 32
- 33
- 34
可见在
FileTxnSnapLog构造方法中,主要创建了一个FileTxnLog和FileSnap,分别用于处理事务日志、快照。2.2.2 step6:创建一个zkServer
在
org.apache.zookeeper.server.ZooKeeperServerMain#runFromConfig方法中,通过以下代码创建了一个ZooKeeperServerfinal ZooKeeperServer zkServer = new ZooKeeperServer( jvmPauseMonitor, txnLog, // FileTxnSnapLog config.tickTime, // tickTime,默认3000(毫秒) config.minSessionTimeout, // 最小 Session 超时时间,minSessionTimeout = min == -1 ? tickTime * 2 : min config.maxSessionTimeout, // 最大 Session 超时时间,maxSessionTimeout = max == -1 ? tickTime * 20 : max; config.listenBacklog, null, // zk数据存储DB config.initialConfig // 配置路径 );- 1
- 2
- 3
- 4
- 5
- 6
- 7
- 8
- 9
- 10
下面我们看看
ZooKeeperServer构造函数做了什么。public class ZooKeeperServer implements SessionExpirer, ServerStats.Provider { public ZooKeeperServer(JvmPauseMonitor jvmPauseMonitor, FileTxnSnapLog txnLogFactory, int tickTime, int minSessionTimeout, int maxSessionTimeout, int clientPortListenBacklog, ZKDatabase zkDb, String initialConfig) { this(txnLogFactory, tickTime, minSessionTimeout, maxSessionTimeout, clientPortListenBacklog, zkDb, initialConfig, QuorumPeerConfig.isReconfigEnabled()); this.jvmPauseMonitor = jvmPauseMonitor; if (jvmPauseMonitor != null) { LOG.info("Added JvmPauseMonitor to server"); } } public ZooKeeperServer(FileTxnSnapLog txnLogFactory, int tickTime, int minSessionTimeout, int maxSessionTimeout, int clientPortListenBacklog, ZKDatabase zkDb, String initialConfig, boolean reconfigEnabled) { serverStats = new ServerStats(this); this.txnLogFactory = txnLogFactory; this.txnLogFactory.setServerStats(this.serverStats); this.zkDb = zkDb; this.tickTime = tickTime; setMinSessionTimeout(minSessionTimeout); setMaxSessionTimeout(maxSessionTimeout); this.listenBacklog = clientPortListenBacklog; this.reconfigEnabled = reconfigEnabled; // 监听器 listener = new ZooKeeperServerListenerImpl(this); // 读取响应缓存 readResponseCache = new ResponseCache(Integer.getInteger( GET_DATA_RESPONSE_CACHE_SIZE, // 缓存大小,默认400 ResponseCache.DEFAULT_RESPONSE_CACHE_SIZE), "getData"); // 获取子节点响应缓存 getChildrenResponseCache = new ResponseCache(Integer.getInteger( GET_CHILDREN_RESPONSE_CACHE_SIZE, // 缓存大小,默认400 ResponseCache.DEFAULT_RESPONSE_CACHE_SIZE), "getChildren"); // 配置文件路径 this.initialConfig = initialConfig; // 创建一个 请求路径指标收集器 this.requestPathMetricsCollector = new RequestPathMetricsCollector(); // 初始化大请求限制设置 this.initLargeRequestThrottlingSettings(); // 创建一个 身份验证器 this.authHelper = new AuthenticationHelper(); } private void initLargeRequestThrottlingSettings() { // 设置大请求最大字节,默认 100 * 1024 * 1024 setLargeRequestMaxBytes(Integer.getInteger("zookeeper.largeRequestMaxBytes", largeRequestMaxBytes)); // 设置大请求阈值,默认-1,表示不允许 setLargeRequestThreshold(Integer.getInteger("zookeeper.largeRequestThreshold", -1)); } }- 1
- 2
- 3
- 4
- 5
- 6
- 7
- 8
- 9
- 10
- 11
- 12
- 13
- 14
- 15
- 16
- 17
- 18
- 19
- 20
- 21
- 22
- 23
- 24
- 25
- 26
- 27
- 28
- 29
- 30
- 31
- 32
- 33
- 34
- 35
- 36
- 37
- 38
- 39
- 40
- 41
- 42
- 43
- 44
- 45
- 46
- 47
- 48
- 49
- 50
- 51
- 52
- 53
- 54
可以看到,在
ZooKeeperServer构造函数中,并没有做什么实质性多种,只是初始化了一些参数、缓存、身份证验证器等。2.2.3 step8:启动管理服务器
zookeeper AdminServer 主要用于管理员通过cmd命令操作zk。
启动管理器服务主要包含两个动作:
- 创建AdminServer
- 启动AdminServer
在
org.apache.zookeeper.server.ZooKeeperServerMain#runFromConfig方法中,通过以下代码创建并启动一个管理服务器// 创建 adminServer = AdminServerFactory.createAdminServer(); adminServer.setZooKeeperServer(zkServer); // 启动 adminServer.start();- 1
- 2
- 3
- 4
- 5
下面分别对这两个动作进行详解。
创建AdminServer
public class AdminServerFactory { private static final Logger LOG = LoggerFactory.getLogger(AdminServerFactory.class); // 封装了使用 JettyAdminServer(即启用 AdminServer)还是 DummyAdminServer(即禁用 AdminServer)的逻辑 // 可通过 zookeeper.admin.enableServer = false 关闭 // 默认开启 public static AdminServer createAdminServer() { if (!"false".equals(System.getProperty("zookeeper.admin.enableServer"))) { try { // 默认开启 Class<?> jettyAdminServerC = Class.forName("org.apache.zookeeper.server.admin.JettyAdminServer"); Object adminServer = jettyAdminServerC.getConstructor().newInstance(); return (AdminServer) adminServer; } catch (ClassNotFoundException e) { LOG.warn("Unable to start JettyAdminServer", e); } catch (InstantiationException e) { LOG.warn("Unable to start JettyAdminServer", e); } catch (IllegalAccessException e) { LOG.warn("Unable to start JettyAdminServer", e); } catch (InvocationTargetException e) { LOG.warn("Unable to start JettyAdminServer", e); } catch (NoSuchMethodException e) { LOG.warn("Unable to start JettyAdminServer", e); } catch (NoClassDefFoundError e) { LOG.warn("Unable to load jetty, not starting JettyAdminServer", e); } } // 禁用 AdminServer return new DummyAdminServer(); } }- 1
- 2
- 3
- 4
- 5
- 6
- 7
- 8
- 9
- 10
- 11
- 12
- 13
- 14
- 15
- 16
- 17
- 18
- 19
- 20
- 21
- 22
- 23
- 24
- 25
- 26
- 27
- 28
- 29
- 30
- 31
上面代码通过反射调用
JettyAdminServer无参构造函数,创建了JettyAdminServer。JettyAdminServer:用于运行命令的 Jetty 服务器
Jetty:同Tomcat一样,Jetty也是一个Servlet引擎public class JettyAdminServer implements AdminServer { // 反射调用无参构造函数 public JettyAdminServer() throws AdminServerException, IOException, GeneralSecurityException { // 从环境变量中获取参数 this( System.getProperty("zookeeper.admin.serverAddress", DEFAULT_ADDRESS), Integer.getInteger("zookeeper.admin.serverPort", DEFAULT_PORT), Integer.getInteger("zookeeper.admin.idleTimeout", DEFAULT_IDLE_TIMEOUT), System.getProperty("zookeeper.admin.commandURL", DEFAULT_COMMAND_URL), Integer.getInteger("zookeeper.admin.httpVersion", DEFAULT_HTTP_VERSION), Boolean.getBoolean("zookeeper.admin.portUnification")); } public JettyAdminServer( String address, // 服务器地址,默认0.0.0.0 int port, // 端口,默认8080 int timeout, // 超时时间,默认30000毫秒(30s) String commandUrl, // command 地址,默认/commands int httpVersion, // http版本,默认11 boolean portUnification // 允许客户端-服务器通信可以采用 SSL 和明文连接 ) throws IOException, GeneralSecurityException { this.port = port; this.idleTimeout = timeout; this.commandUrl = commandUrl; this.address = address; // 创建一个 Jetty Server server = new Server(); ServerConnector connector = null; // 创建一个 Jetty Server Connector if (!portUnification) { // 判断是否允许客户端-服务器通信可以采用 SSL 和明文连接 // 否 connector = new ServerConnector(server); } else { // 允许客户端-服务器通信可以采用 SSL 和明文连接 SecureRequestCustomizer customizer = new SecureRequestCustomizer(); customizer.setStsMaxAge(DEFAULT_STS_MAX_AGE); customizer.setStsIncludeSubDomains(true); HttpConfiguration config = new HttpConfiguration(); config.setSecureScheme("https"); config.addCustomizer(customizer); try (QuorumX509Util x509Util = new QuorumX509Util()) { String privateKeyType = System.getProperty(x509Util.getSslKeystoreTypeProperty(), ""); String privateKeyPath = System.getProperty(x509Util.getSslKeystoreLocationProperty(), ""); String privateKeyPassword = System.getProperty(x509Util.getSslKeystorePasswdProperty(), ""); String certAuthType = System.getProperty(x509Util.getSslTruststoreTypeProperty(), ""); String certAuthPath = System.getProperty(x509Util.getSslTruststoreLocationProperty(), ""); String certAuthPassword = System.getProperty(x509Util.getSslTruststorePasswdProperty(), ""); KeyStore keyStore = null, trustStore = null; try { keyStore = X509Util.loadKeyStore(privateKeyPath, privateKeyPassword, privateKeyType); trustStore = X509Util.loadTrustStore(certAuthPath, certAuthPassword, certAuthType); LOG.info("Successfully loaded private key from {}", privateKeyPath); LOG.info("Successfully loaded certificate authority from {}", certAuthPath); } catch (Exception e) { LOG.error("Failed to load authentication certificates for admin server.", e); throw e; } SslContextFactory sslContextFactory = new SslContextFactory.Server(); sslContextFactory.setKeyStore(keyStore); sslContextFactory.setKeyStorePassword(privateKeyPassword); sslContextFactory.setTrustStore(trustStore); sslContextFactory.setTrustStorePassword(certAuthPassword); connector = new ServerConnector( server, new UnifiedConnectionFactory(sslContextFactory, HttpVersion.fromVersion(httpVersion).asString()), new HttpConnectionFactory(config)); } } connector.setHost(address); connector.setPort(port); connector.setIdleTimeout(idleTimeout); server.addConnector(connector); ServletContextHandler context = new ServletContextHandler(ServletContextHandler.SESSIONS); context.setContextPath("/*"); constrainTraceMethod(context); server.setHandler(context); // 添加一个 CommandServlet,用于处理 /commands 请求 // CommandServlet 执行 cmd 命令 context.addServlet(new ServletHolder(new CommandServlet()), commandUrl + "/*"); } }- 1
- 2
- 3
- 4
- 5
- 6
- 7
- 8
- 9
- 10
- 11
- 12
- 13
- 14
- 15
- 16
- 17
- 18
- 19
- 20
- 21
- 22
- 23
- 24
- 25
- 26
- 27
- 28
- 29
- 30
- 31
- 32
- 33
- 34
- 35
- 36
- 37
- 38
- 39
- 40
- 41
- 42
- 43
- 44
- 45
- 46
- 47
- 48
- 49
- 50
- 51
- 52
- 53
- 54
- 55
- 56
- 57
- 58
- 59
- 60
- 61
- 62
- 63
- 64
- 65
- 66
- 67
- 68
- 69
- 70
- 71
- 72
- 73
- 74
- 75
- 76
- 77
- 78
- 79
- 80
- 81
- 82
- 83
- 84
- 85
- 86
- 87
- 88
- 89
- 90
- 91
- 92
- 93
启动AdminServer
public class JettyAdminServer implements AdminServer { @Override public void start() throws AdminServerException { try { // 启动 Jetty Server server.start(); } catch (Exception e) { // Server.start() only throws Exception, so let's at least wrap it // in an identifiable subclass String message = String.format( "Problem starting AdminServer on address %s, port %d and command URL %s", address, port, commandUrl); throw new AdminServerException(message, e); } LOG.info("Started AdminServer on address {}, port {} and command URL {}", address, port, commandUrl); } }- 1
- 2
- 3
- 4
- 5
- 6
- 7
- 8
- 9
- 10
- 11
- 12
- 13
- 14
- 15
- 16
- 17
- 18
- 19
由上面的分析可知,zookeeper AdminServer 通过启动一个内置的Jetty Servlet 引擎,处理 /commands 路径的请求,执行cmd命令。执行逻辑详情请看
org.apache.zookeeper.server.admin.JettyAdminServer.CommandServlet源码中deGet()方法。2.2.4 step9:启动客户端连接(安全、普通)
其中客户端连接普通模式 和 安全模式唯一区别就是安全模式需要进行授权校验,下面我们以安全模式为例。
在
org.apache.zookeeper.server.ZooKeeperServerMain#runFromConfig方法中,通过以下代码创建并启动一个安全的客户端连接。secureCnxnFactory = ServerCnxnFactory.createFactory(); secureCnxnFactory.configure(config.getSecureClientPortAddress(), config.getMaxClientCnxns(), config.getClientPortListenBacklog(), true); secureCnxnFactory.startup(zkServer, needStartZKServer);- 1
- 2
- 3
启动客户端连接分为三个步骤:
- 创建一个连接通信Factory
- 设置连接参数
- 启动客户端连接
1. 创建一个连接通信Factory
secureCnxnFactory = ServerCnxnFactory.createFactory();- 1
public abstract class ServerCnxnFactory { public static final String ZOOKEEPER_SERVER_CNXN_FACTORY = "zookeeper.serverCnxnFactory"; private static final String ZOOKEEPER_MAX_CONNECTION = "zookeeper.maxCnxns"; public static ServerCnxnFactory createFactory() throws IOException { // 获取系统参数zookeeper.serverCnxnFactory,可指定采用NIO 还是 Netty进行通信 String serverCnxnFactoryName = System.getProperty(ZOOKEEPER_SERVER_CNXN_FACTORY); if (serverCnxnFactoryName == null) { // NIO serverCnxnFactoryName = NIOServerCnxnFactory.class.getName(); } try { // 反射创建 ServerCnxnFactory serverCnxnFactory = (ServerCnxnFactory) Class.forName(serverCnxnFactoryName) .getDeclaredConstructor() .newInstance(); LOG.info("Using {} as server connection factory", serverCnxnFactoryName); return serverCnxnFactory; } catch (Exception e) { IOException ioe = new IOException("Couldn't instantiate " + serverCnxnFactoryName, e); throw ioe; } } }- 1
- 2
- 3
- 4
- 5
- 6
- 7
- 8
- 9
- 10
- 11
- 12
- 13
- 14
- 15
- 16
- 17
- 18
- 19
- 20
- 21
- 22
- 23
- 24
- 25
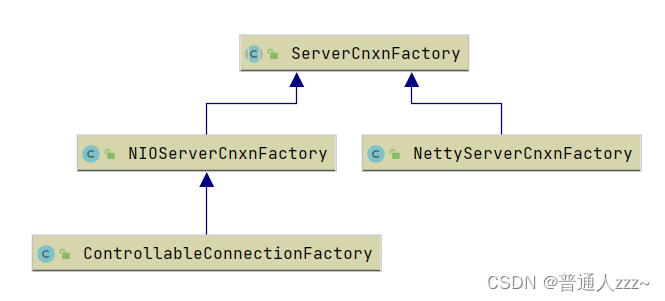
由上面分析可知,服务端与客户端通知方式主要存在三种模式:
- NIO:NIOServerCnxnFactory、ControllableConnectionFactory
- Netty:NettyServerCnxnFactory
下面我们以 NettyServerCnxnFactory 为基准,NettyServerCnxnFactory 构造函数如下。public class NettyServerCnxnFactory extends ServerCnxnFactory { public static final String PORT_UNIFICATION_KEY = "zookeeper.client.portUnification"; public static final String NETTY_ADVANCED_FLOW_CONTROL = "zookeeper.netty.advancedFlowControl.enabled"; NettyServerCnxnFactory() { x509Util = new ClientX509Util(); // 获取系统参数 zookeeper.client.portUnification:是否允许客户端-服务器通信可以采用 SSL 和明文连接 boolean usePortUnification = Boolean.getBoolean(PORT_UNIFICATION_KEY); LOG.info("{}={}", PORT_UNIFICATION_KEY, usePortUnification); if (usePortUnification) { try { // 配置 SSL 身份验证 QuorumPeerConfig.configureSSLAuth(); } catch (QuorumPeerConfig.ConfigException e) { LOG.error("unable to set up SslAuthProvider, turning off client port unification", e); usePortUnification = false; } } this.shouldUsePortUnification = usePortUnification; this.advancedFlowControlEnabled = Boolean.getBoolean(NETTY_ADVANCED_FLOW_CONTROL); LOG.info("{} = {}", NETTY_ADVANCED_FLOW_CONTROL, this.advancedFlowControlEnabled); setOutstandingHandshakeLimit(Integer.getInteger(OUTSTANDING_HANDSHAKE_LIMIT, -1)); /*************Netty***************/ EventLoopGroup bossGroup = NettyUtils.newNioOrEpollEventLoopGroup(NettyUtils.getClientReachableLocalInetAddressCount()); EventLoopGroup workerGroup = NettyUtils.newNioOrEpollEventLoopGroup(); ServerBootstrap bootstrap = new ServerBootstrap().group(bossGroup, workerGroup) .channel(NettyUtils.nioOrEpollServerSocketChannel()) // parent channel options .option(ChannelOption.SO_REUSEADDR, true) // child channels options .childOption(ChannelOption.TCP_NODELAY, true) .childOption(ChannelOption.SO_LINGER, -1) .childHandler(new ChannelInitializer<SocketChannel>() { @Override protected void initChannel(SocketChannel ch) throws Exception { ChannelPipeline pipeline = ch.pipeline(); if (advancedFlowControlEnabled) { pipeline.addLast(readIssuedTrackingHandler); } if (secure) { initSSL(pipeline, false); } else if (shouldUsePortUnification) { initSSL(pipeline, true); } pipeline.addLast("servercnxnfactory", channelHandler); } }); this.bootstrap = configureBootstrapAllocator(bootstrap); this.bootstrap.validate(); } }- 1
- 2
- 3
- 4
- 5
- 6
- 7
- 8
- 9
- 10
- 11
- 12
- 13
- 14
- 15
- 16
- 17
- 18
- 19
- 20
- 21
- 22
- 23
- 24
- 25
- 26
- 27
- 28
- 29
- 30
- 31
- 32
- 33
- 34
- 35
- 36
- 37
- 38
- 39
- 40
- 41
- 42
- 43
- 44
- 45
- 46
- 47
- 48
- 49
- 50
- 51
- 52
- 53
- 54
- 55
- 56
2. 设置连接参数
public class NettyServerCnxnFactory extends ServerCnxnFactory { @Override public void configure(InetSocketAddress addr, int maxClientCnxns, int backlog, boolean secure) throws IOException { configureSaslLogin(); // init最大连接数 initMaxCnxns(); localAddress = addr; this.maxClientCnxns = maxClientCnxns; this.secure = secure; this.listenBacklog = backlog; LOG.info("configure {} secure: {} on addr {}", this, secure, addr); } }- 1
- 2
- 3
- 4
- 5
- 6
- 7
- 8
- 9
- 10
- 11
- 12
- 13
3. 启动客户端连接
public class NettyServerCnxnFactory extends ServerCnxnFactory { @Override public void startup(ZooKeeperServer zks, boolean startServer) throws IOException, InterruptedException { // 启动客户端连接 start(); setZooKeeperServer(zks); if (startServer) { // 初始化DB zks.startdata(); // 启动zk server zks.startup(); } } @Override public void start() { if (listenBacklog != -1) { bootstrap.option(ChannelOption.SO_BACKLOG, listenBacklog); } LOG.info("binding to port {}", localAddress); // 绑定监听 parentChannel = bootstrap.bind(localAddress).syncUninterruptibly().channel(); // Port changes after bind() if the original port was 0, update // localAddress to get the real port. localAddress = (InetSocketAddress) parentChannel.localAddress(); LOG.info("bound to port {}", getLocalPort()); } }- 1
- 2
- 3
- 4
- 5
- 6
- 7
- 8
- 9
- 10
- 11
- 12
- 13
- 14
- 15
- 16
- 17
- 18
- 19
- 20
- 21
- 22
- 23
- 24
- 25
- 26
- 27
- 28
- 29
// 初始化DB zks.startdata(); // 启动zk server zks.startup();- 1
- 2
- 3
- 4
public class ZooKeeperServer implements SessionExpirer, ServerStats.Provider { public void startdata() throws IOException, InterruptedException { // check to see if zkDb is not null if (zkDb == null) { // 创建一个ZK 数据库 zkDb = new ZKDatabase(this.txnLogFactory); } // 是否初始化 if (!zkDb.isInitialized()) { // 加载数据到内存 loadData(); } } public synchronized void startup() { startupWithServerState(State.RUNNING); } private void startupWithServerState(State state) { if (sessionTracker == null) { createSessionTracker(); } // 启动会话跟踪器 startSessionTracker(); // 设置并启动请求处理器 setupRequestProcessors(); // 启动请求流量控制器 startRequestThrottler(); // 注册JMX registerJMX(); // 启动 Jvm 暂停监视器 startJvmPauseMonitor(); // 注册Metrics registerMetrics(); // 设置状态 setState(state); // 启动 RequestPathMetricsCollector requestPathMetricsCollector.start(); localSessionEnabled = sessionTracker.isLocalSessionsEnabled(); notifyAll(); } }- 1
- 2
- 3
- 4
- 5
- 6
- 7
- 8
- 9
- 10
- 11
- 12
- 13
- 14
- 15
- 16
- 17
- 18
- 19
- 20
- 21
- 22
- 23
- 24
- 25
- 26
- 27
- 28
- 29
- 30
- 31
- 32
- 33
- 34
- 35
- 36
- 37
- 38
- 39
- 40
- 41
- 42
- 43
- 44
- 45
- 46
- 47
- 48
- 49
- 50
2.2.5 step10:创建一个容器节点管理器
在
org.apache.zookeeper.server.ZooKeeperServerMain#runFromConfig方法中,通过以下代码创建并启动一个容器节点管理器。containerManager = new ContainerManager( zkServer.getZKDatabase(), // zk数据存储DB zkServer.firstProcessor, // zk请求处理器 Integer.getInteger("znode.container.checkIntervalMs", (int) TimeUnit.MINUTES.toMillis(1)), // 检查时间间隔 Integer.getInteger("znode.container.maxPerMinute", 10000), // 每秒要删除的最大容器数 - 避免容器删除的聚集 Long.getLong("znode.container.maxNeverUsedIntervalMs", 0) // 保留从未有任何子节点的容器节点最大时间(毫秒) ); containerManager.start();- 1
- 2
- 3
- 4
- 5
- 6
- 7
- 8
containerManager 用于容器节点的管理,当容器节点下没有子节点时,执行清理动作
public class ContainerManager { public ContainerManager(ZKDatabase zkDb, RequestProcessor requestProcessor, int checkIntervalMs, int maxPerMinute, long maxNeverUsedIntervalMs) { this.zkDb = zkDb; // zk db this.requestProcessor = requestProcessor; // 请求处理器 this.checkIntervalMs = checkIntervalMs; // 检查时间间隔(毫秒) this.maxPerMinute = maxPerMinute; // 每秒要删除的最大容器数 - 避免容器删除的聚集 this.maxNeverUsedIntervalMs = maxNeverUsedIntervalMs; // 保留从未有任何子节点的容器节点最大时间(毫秒) // 创建一个 timer timer = new Timer("ContainerManagerTask", true); LOG.info("Using checkIntervalMs={} maxPerMinute={} maxNeverUsedIntervalMs={}", checkIntervalMs, maxPerMinute, maxNeverUsedIntervalMs); } private final AtomicReference<TimerTask> task = new AtomicReference<TimerTask>(null); public void start() { if (task.get() == null) { TimerTask timerTask = new TimerTask() { @Override public void run() { try { // 检查 checkContainers(); } catch (InterruptedException e) { Thread.currentThread().interrupt(); LOG.info("interrupted"); cancel(); } catch (Throwable e) { LOG.error("Error checking containers", e); } } }; // CAS 设值 if (task.compareAndSet(null, timerTask)) { // 运行timer timer.scheduleAtFixedRate(timerTask, checkIntervalMs, checkIntervalMs); } } } public void checkContainers() throws InterruptedException { long minIntervalMs = getMinIntervalMs(); // 获取所有需要删除的容器节点 for (String containerPath : getCandidates()) { long startMs = Time.currentElapsedTime(); ByteBuffer path = ByteBuffer.wrap(containerPath.getBytes(UTF_8)); Request request = new Request(null, 0, 0, ZooDefs.OpCode.deleteContainer, path, null); try { LOG.info("Attempting to delete candidate container: {}", containerPath); // 发送删除request postDeleteRequest(request); } catch (Exception e) { LOG.error("Could not delete container: {}", containerPath, e); } long elapsedMs = Time.currentElapsedTime() - startMs; long waitMs = minIntervalMs - elapsedMs; if (waitMs > 0) { Thread.sleep(waitMs); } } }- 1
- 2
- 3
- 4
- 5
- 6
- 7
- 8
- 9
- 10
- 11
- 12
- 13
- 14
- 15
- 16
- 17
- 18
- 19
- 20
- 21
- 22
- 23
- 24
- 25
- 26
- 27
- 28
- 29
- 30
- 31
- 32
- 33
- 34
- 35
- 36
- 37
- 38
- 39
- 40
- 41
- 42
- 43
- 44
- 45
- 46
- 47
- 48
- 49
- 50
- 51
- 52
- 53
- 54
- 55
- 56
- 57
- 58
- 59
- 60
- 61
- 62
- 63
2.3 集群模式(Zab协议)
参考文献
-
相关阅读:
参加2024年CSDN博客_付费内容优质创作者_颁奖仪式的收获
Linux 下玩《原神》等游戏怎样查看实时帧率等信息
线性代数学习笔记8-2:对称矩阵和Hermitian矩阵、共轭转置、正定矩阵
K8s之pod的设计模式
班级校园网页设计作业 静态HTML我的班级网页 DW班级网站模板下载 大学生简单班级网页作品代码 我的大学网页制作 学生班级网页设计作业
expressDemo不能使用import
433遥控收发模块使用介绍
Chain-Of-Note:解决噪声数据、不相关文档和域外场景来改进RAG的表现
金仓数据库KingbaseES ksql工具用户指南及参考--3. Ksql入门
antd级联选择器(a-cascader)动态加载和动态回显效果实现
- 原文地址:https://blog.csdn.net/qq_33375499/article/details/126324660
