-
SpringCloud gateway+zookeeper实现网关路由
准备工作
需要两个项目去实现路由
demo1为springboot项目用于接入网关,测试网关连通性
gateway为网关路由项目

网关搭建
1.电脑安装好zookeeper,并且正常运行服务
Zookeeper官网

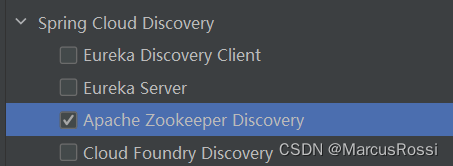
2.创建一个spring cloud gateway项目,并引入zookeeper功能

pom文件配置<dependencies> <dependency> <groupId>org.springframework.cloudgroupId> <artifactId>spring-cloud-starter-gatewayartifactId> dependency> <dependency> <groupId>org.springframework.bootgroupId> <artifactId>spring-boot-starter-testartifactId> <scope>testscope> dependency> <dependency> <groupId>org.springframework.cloudgroupId> <artifactId>spring-cloud-starter-zookeeper-discoveryartifactId> <exclusions> <exclusion> <groupId>org.apache.zookeepergroupId> <artifactId>zookeeperartifactId> exclusion> exclusions> dependency> <dependency> <groupId>org.apache.zookeepergroupId> <artifactId>zookeeperartifactId> <version>3.8.0version> dependency> dependencies> <dependencyManagement> <dependencies> <dependency> <groupId>org.springframework.cloudgroupId> <artifactId>spring-cloud-dependenciesartifactId> <version>${spring-cloud.version}version> <type>pomtype> <scope>importscope> dependency> dependencies>- 1
- 2
- 3
- 4
- 5
- 6
- 7
- 8
- 9
- 10
- 11
- 12
- 13
- 14
- 15
- 16
- 17
- 18
- 19
- 20
- 21
- 22
- 23
- 24
- 25
- 26
- 27
- 28
- 29
- 30
- 31
- 32
- 33
- 34
- 35
- 36
- 37
创建好项目后,启动类要启用服务发现功能
@EnableDiscoveryClient@SpringBootApplication @EnableDiscoveryClient public class GatewayApplication { public static void main(String[] args) { SpringApplication.run(GatewayApplication.class, args); } }- 1
- 2
- 3
- 4
- 5
- 6
- 7
- 8
- 9
- 10
为了方便配置,将application.properties改成yml
以下是第一部分配置,8080端口会与zookeeper服务冲突,二选一调整端口server: port: 8090 spring: application: name: rmx-gateway cloud: zookeeper: connect-string: 127.0.0.1:2181- 1
- 2
- 3
- 4
- 5
- 6
- 7
- 8
配置完以后,先启动zookeeper服务,再启动gateway项目,一定要有先后顺序(顺序反了,会导致项目无法启动)
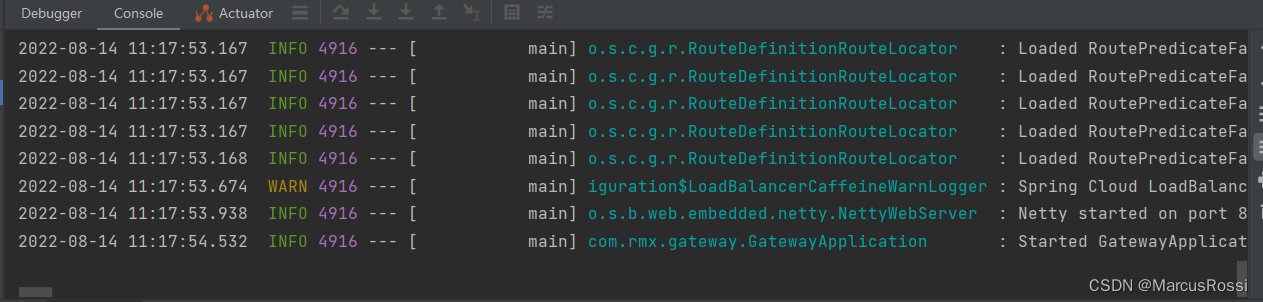
当gateway项目启动完成以后,去zookeeper服务里面去查询是否成功接入该项目服务
以下是一种查看服务是否接入的方法
启动zkCli.cmd,这个是client端

启动后,在控制台输入ls /services,查看到自己的gateway项目名字后,即可确定已经接入了

测试网关功能
这一步我们需要创建个springboot项目,并引入zookeeper服务发现

pom.xml文件<dependencies> <dependency> <groupId>org.springframework.bootgroupId> <artifactId>spring-boot-starter-webartifactId> dependency> <dependency> <groupId>org.springframework.cloudgroupId> <artifactId>spring-cloud-starter-zookeeper-discoveryartifactId> <version>3.1.2version> dependency> <dependency> <groupId>org.springframework.bootgroupId> <artifactId>spring-boot-starter-testartifactId> <scope>testscope> dependency> dependencies>- 1
- 2
- 3
- 4
- 5
- 6
- 7
- 8
- 9
- 10
- 11
- 12
- 13
- 14
- 15
- 16
- 17
先配置测试项目的application
server.port=8091 spring.application.name=rmx-demo spring.cloud.zookeeper.connect-string=127.0.0.1:2181- 1
- 2
- 3
- 4
- 5
- 6
配置完以后,试着启动一下,启动完以后顺带进入zookeeper查看服务是否被接入

这时候zookeeper已经可以接入网关和测试项目了,但是网关和测试项目的路由还没有实现,我们需要停掉网关项目,把测试项目配置进入网关回到网关的application.yml,并在里面加入路由配置
srping.cloud.gateway.routes就是路由的配置,这里使用路径配置,方便测试,Path后面输入对应的controller入口
yml的完整内容server: port: 8090 spring: application: name: rmx-gateway cloud: zookeeper: connect-string: 127.0.0.1:2181 gateway: routes: - id: demo1 uri: http://localhost:8091 predicates: - Path=/test- 1
- 2
- 3
- 4
- 5
- 6
- 7
- 8
- 9
- 10
- 11
- 12
- 13
- 14
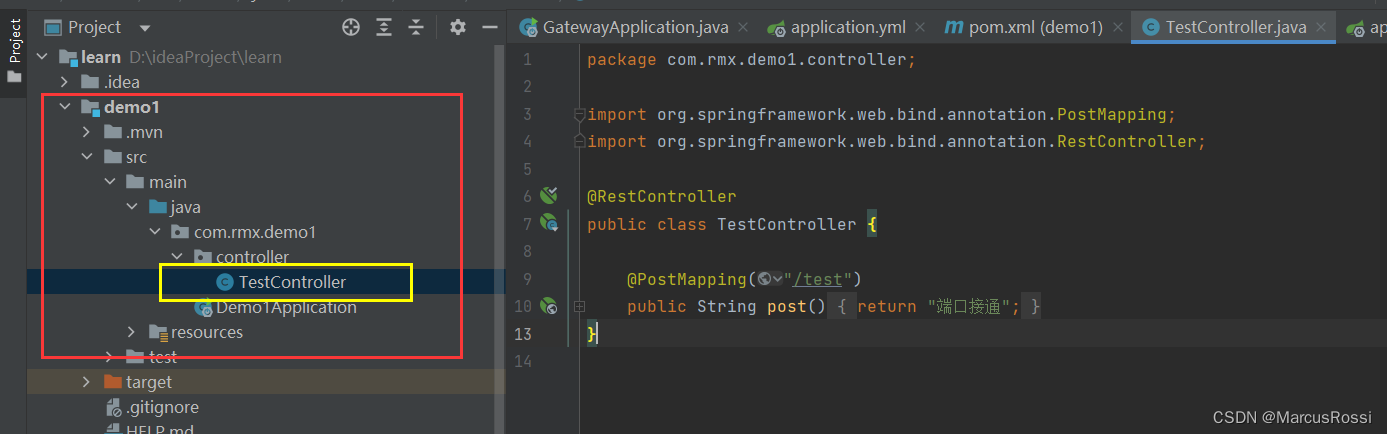
在测试项目中写一个测试controller,路径与配置的名称保持一致
@RestController public class TestController { @PostMapping("/test") public String post(){ return "端口接通"; } }- 1
- 2
- 3
- 4
- 5
- 6
- 7
- 8
- 9
两者都弄好后,再将这两个项目启动,然后测试路由是否成功
先测试直接用8091测试项目的端口去调用接口
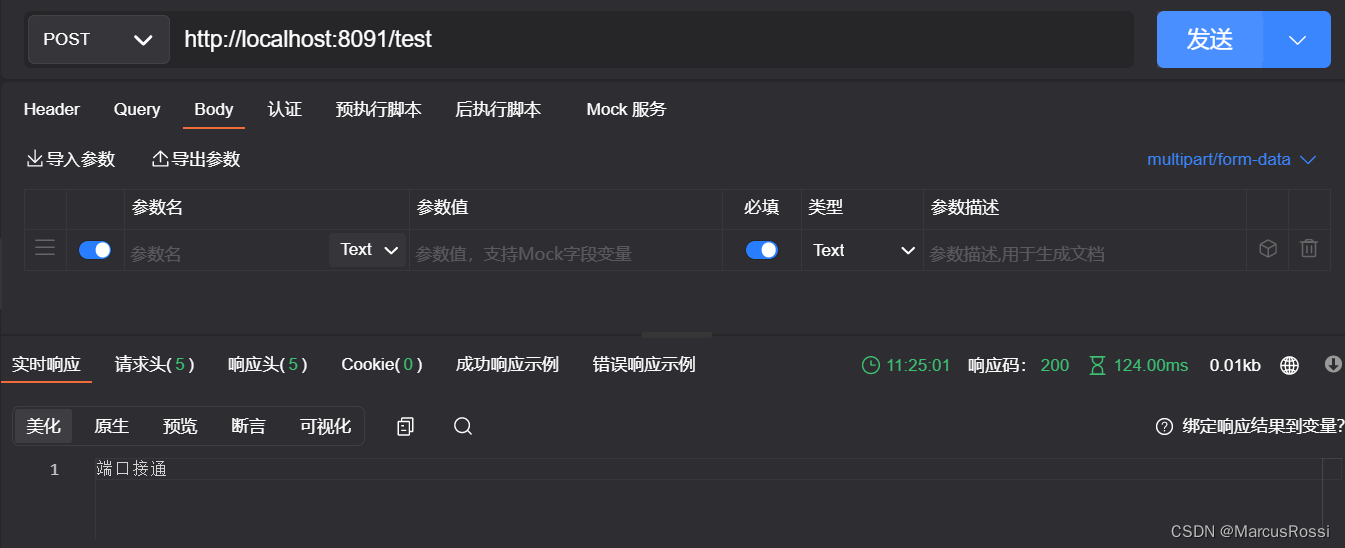
再测试用路由端口8090调用接口,看是否接通
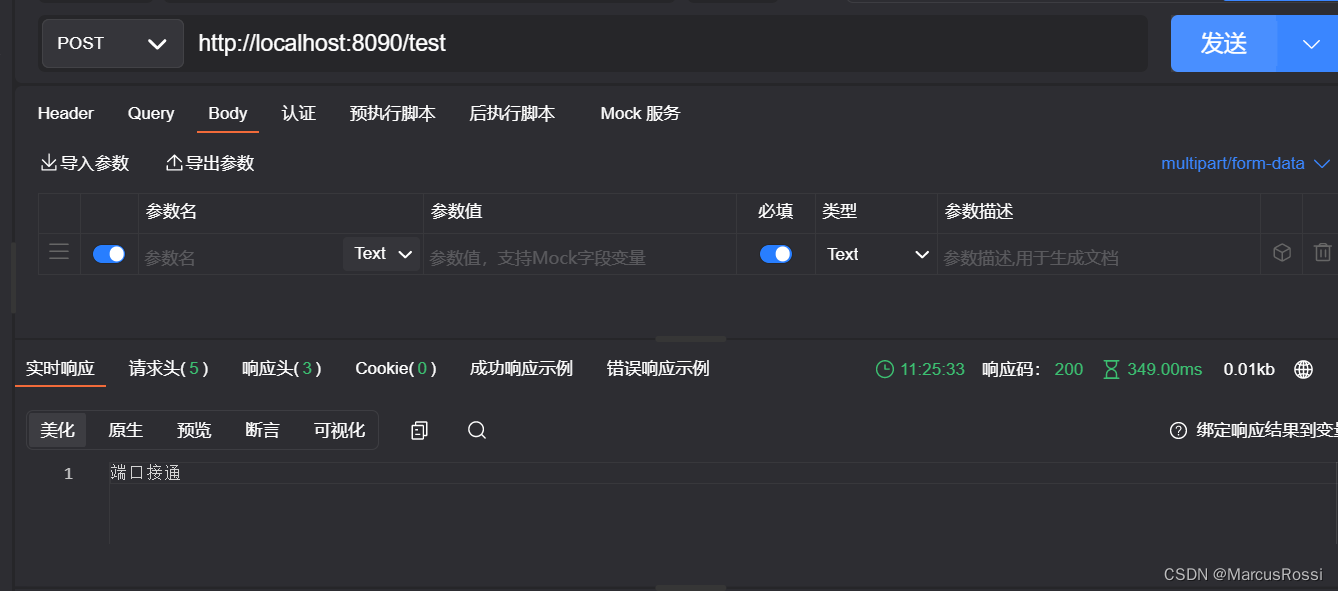
如果都调用成功,则路由实现完成 -
相关阅读:
微信小程序 - 2023年最新版手机号快捷登录详细教程
APScheduler如何设置任务不并发(即第一个任务执行完再执行下一个)?
var、let、const关键字的特性,以及let、const暂时性死区的作用
第17章 其他数据库日志【4.日志与备份篇】【MySQL高级】
入门神经网络——识别图片是否为猫
C嘎嘎 - 内存分区
2022 退役记
kubeadm init 报错 ”unknown service runtime.v1alpha2.RuntimeService”
进制的转换 如六进制
JAVA文件和多个参数前后台交互
- 原文地址:https://blog.csdn.net/qq_42451456/article/details/126329483
