-
Python Web3.0应用开发【2022】
在本文中,我们将讨论如何使用 Python 编写 Web 3 dapp。我们使用web3.py库,它支持使用 Python 与以太坊区块链进行交互。

用熟悉的语言学习 Web3.0开发 :Java | Php | Python | .Net / C# | Golang | Node.JS | Flutter / Dart
使用 javascript 开发web dapp 时,可以方便地将应用程序与 MetaMask 集成,MetaMask 包含用户在以太坊区块链上拥有的各种帐户。当需要执行交易时,dapp 将依赖 MetaMask 对交易进行签名。在幕后,MetaMask 连接到一个名为Infura的节点。Infura 是一个连接到以太坊区块链的完整节点。它为应用程序连接到以太坊区块链提供了一种简单的方法,而无需开发人员设置自己的节点,这可能非常昂贵并且需要大量的努力。下图展示了 dapp、MetaMask、Infura 和以太坊区块链之间的流程:

Web3.py 受到 web3.js 的启发,因此可以找到许多类似web3.js中看到的功能。要安装web3.py,请在 Jupyter Notebook 中键入以下命令:
!pip install web3- 1
如果你正在开发 Python dapp,则无法连接到 MetaMask 来访问你的帐户并使用它来签署的交易。相反,你需要在自己的帐户中导入,签署自己的交易,然后自己将其连接到 Infura,如下图所示:

1、注册 Infura
现在我们已经了解了Python dapp 将如何工作,让我们首先在https://infura.io. 注册一个免费帐户:
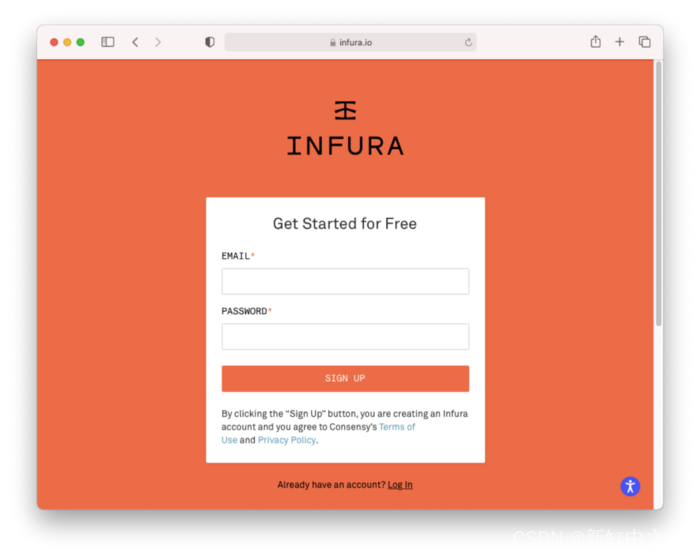
验证电子邮件后,你将能够登录Infura。创建第一个项目(确保在 PRODUCT 下选择Ethereum)并为项目命名:

现在,你将获得项目 ID、项目密码以及应用程序要连接的端点。对于本文,选择ROPSTEN作为端点:
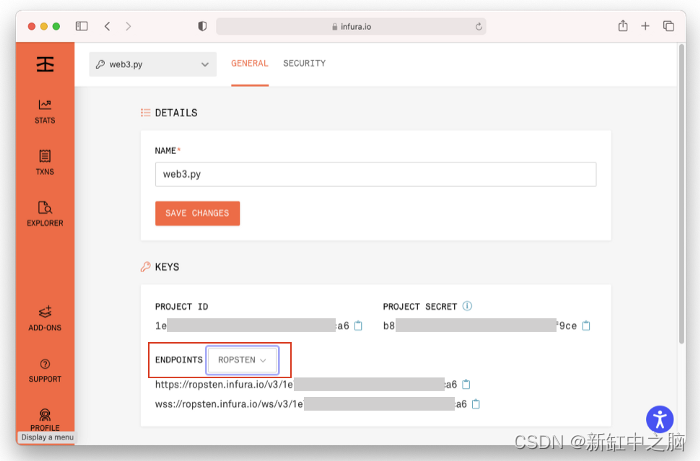
特别注意的是,复制端点 URL:
https://ropsten.infura.io/v3/- 1
2、连接到 Web3 提供程序 (Infura)
获得 Infura 端点 URL 后,让我们尝试看看是否能够使用web3.py库连接它:
from web3 import Web3 w3 = Web3(Web3.HTTPProvider( 'https://ropsten.infura.io/v3/')) w3.isConnected() - 1
- 2
- 3
- 4
请务必将Project_ID替换为自己的。
如果看到True输出,则表明已成功连接到Infura。
如果收到有关bitarray版本的错误,请执行以下安装:
!pip install bitarray==1.2.1- 1
3、获取以太坊区块
让我们尝试从 Ropsten 测试网络中获取特定的块:
w3.eth.get_block(12345)- 1
你将看到以下内容:
AttributeDict({'difficulty': 39828207, 'extraData': HexBytes('0xd883010502846765746887676f312e372e338664617277696e'), 'gasLimit': 4712388, 'gasUsed': 0, 'hash': HexBytes('0x8856ffd33791223a229e69910b1157cda0029da204fd2eddbc7f4293ff2ec3c6'), 'logsBloom': HexBytes('0x00000000000000000000000000000000000000000000000000000000000000000000000000000000000000000000000000000000000000000000000000000000000000000000000000000000000000000000000000000000000000000000000000000000000000000000000000000000000000000000000000000000000000000000000000000000000000000000000000000000000000000000000000000000000000000000000000000000000000000000000000000000000000000000000000000000000000000000000000000000000000000000000000000000000000000000000000000000000000000000000000000000000000000000000000000000'), 'miner': '0x0E032D12cBcf5F078b855ea4B4Cd44D357A6B96C', 'mixHash': HexBytes('0x716db118261307e8ae4e77b70fbb0e9e3f8f39e59eee59996689aad7fdbe469a'), 'nonce': HexBytes('0x4026c896934436f6'), 'number': 12345, 'parentHash': HexBytes('0x77d612c3b20ff8fd7ad919103ab3341e3b959c935f70857e37203af1a0fd8ea5'), 'receiptsRoot': HexBytes('0x56e81f171bcc55a6ff8345e692c0f86e5b48e01b996cadc001622fb5e363b421'), 'sha3Uncles': HexBytes('0x1dcc4de8dec75d7aab85b567b6ccd41ad312451b948a7413f0a142fd40d49347'), 'size': 539, 'stateRoot': HexBytes('0x90032c7b5bb5611c55065a040561930d33d7be74513558cc78f1962278678b54'), 'timestamp': 1479743393, 'totalDifficulty': 121127119632, 'transactions': [], 'transactionsRoot': HexBytes('0x56e81f171bcc55a6ff8345e692c0f86e5b48e01b996cadc001622fb5e363b421'), 'uncles': []})- 1
- 2
- 3
- 4
- 5
- 6
- 7
- 8
- 9
- 10
- 11
- 12
- 13
- 14
- 15
- 16
- 17
- 18
- 19
- 20
如果要查看最新块的内容,请使用:
w3.eth.get_block('latest')- 1
4、设置以太坊帐户
现在让我们设置我们的以太坊账户。我将使用之前在 MetaMask 中创建的两个帐户。由于需要在 Python 程序中加载私钥,因此建议将私钥存储在环境文件中,这样就不会在 Python 代码中公开它们。为此,我将安装
python-dotenv模块:!pip install python-dotenv- 1
安装python-dotenv模块后,创建一个名为
.env的文件并将其保存在与 Jupyter 笔记本相同的目录中。使用以下内容填充它:account1_private_key = '' - 1
要获取账户 1 的私钥,请转到 MetaMask 并按照下图中列出的步骤进行操作:

获得私钥后,可以将其粘贴到.env文件中。
接下来,使用以下代码段设置帐户 1 和 2 的详细信息:
from dotenv import load_dotenv load_dotenv() import os # Account 1 account1_address = '0xB35b89eE8AAc5C3ea6cd5C9080E8c66Cb17ca2CC' account1_private_key = os.environ.get('account1_private_key') # Account 2 account2_address = '0x1cc025d9A1741b51FD5dE6003884dc264F149AdC'- 1
- 2
- 3
- 4
- 5
- 6
- 7
- 8
由于我稍后只使用账户 1 签署我的交易,因此只需要加载账户 1 的私钥。
请务必将
0xB35b89eE8AAc5C3ea6cd5C9080E8c66Cb17ca2CC和0x1cc025d9A1741b51FD5dE6003884dc264F149AdC
分别替换为你的Account 1和Account 2的地址。我还将假设你的账户 1 和账户 2 在 Ropsten 测试网络中已经有一些以太币。如果没有,请使用 MetaMask 从Faucet 获取一些测试币。
5、获取账户余额
现在让我们检查账户 1 的余额:
w3.eth.get_balance(account1_address)- 1
目前我有 6.2468 ETH,所以我得到如下输出(以 Wei 为单位):
6246772509923908581- 1
6、在账户之间转移以太币
现在让我们将 1 ETH 从账户 1 转移到账户 2。这是我们学习如何使用 web3.py 执行交易的好机会。
为此:
- 首先使用
eth.get_transaction_count()函数获取从指定账户发送的交易数量。这将用作交易的随机数。 - 然后,创建一个包含交易详情的字典:
nonce = w3.eth.get_transaction_count(account1_address) tx = { 'nonce': nonce, # transaction count 'to': account2_address, # who to send the ETH to 'value': w3.toWei(1, 'ether'), # the amount to transfer 'gasPrice': w3.eth.gas_price, # get the price of gas }- 1
- 2
- 3
- 4
- 5
- 6
- 7
在上面,我将 1 ETH 从账户 1 转移到账户 2。我使用
eth.gas_price属性来获取当前的 gas 价格。接下来,使用
eth.estimate_gas()函数估计此交易需要多少gas,然后将金额插入交易字典:gas = w3.eth.estimate_gas(tx) tx['gas'] = gas print(tx)- 1
- 2
- 3
你应该看到如下交易:
{ 'nonce':371, 'to':'0x1cc025d9A1741b51FD5dE6003884dc264F149AdC', 'value':1000000000000000000, 'gasPrice':2159166649, 'gas':21000 }- 1
- 2
- 3
- 4
- 5
- 6
- 7
现在可以使用以下
eth.account.sign_transaction()函数签署交易:signed_tx = w3.eth.account.sign_transaction(tx,account1_private_key)- 1
要将交易发送到 Infura,请使用以下
eth.send_raw_transaction()函数:tx_hash = w3.eth.send_raw_transaction(signed_tx.rawTransaction) print(w3.toHex(tx_hash))- 1
- 2
该函数将返回一个哈希值,如下所示:
0x369e102bfa26006e6035db942b6d8bc7b361624e9b323ccce4b16f78f58ecfc0- 1
交易需要一些时间来确认。如果要等待事务完成,请使用
eth.wait_for_transaction_receipt()函数(这是一个阻塞调用):receipt = w3.eth.wait_for_transaction_receipt(tx_hash)- 1
最后,为了验证转账确实正确执行,检查账户 1 和 2 的余额:
print(w3.eth.get_balance(account1_address)) print(w3.eth.get_balance(account2_address))- 1
- 2
将 1 ETH 从账户 1 转移到账户 2 的整个代码片段如下所示:
nonce = w3.eth.get_transaction_count(account1_address) tx = { 'nonce': nonce, 'to': account2_address, 'value': w3.toWei(1, 'ether'), 'gasPrice': w3.eth.gas_price, } gas = w3.eth.estimate_gas(tx) tx['gas'] = gas signed_tx = w3.eth.account.sign_transaction(tx,account1_private_key) tx_hash = w3.eth.send_raw_transaction(signed_tx.rawTransaction) print(w3.toHex(tx_hash)) receipt = w3.eth.wait_for_transaction_receipt(tx_hash)- 1
- 2
- 3
- 4
- 5
- 6
- 7
- 8
- 9
- 10
- 11
- 12
- 13
7、与智能合约交互
我们想要对 web3.py 库做的更重要的事情是与智能合约进行交互。为此,我将参考在上一篇文章中已经部署到 Ropsten 测试网上的两个智能合约。为了方便起见,我将在这里复制两个智能合约。
7.1 第一个合约
这是第一个智能合约的代码:
// SPDX-License-Identifier: MIT pragma solidity ^0.8;contract ProofOfExistence { //---store the hash of the strings--- mapping (bytes32 => bool) private proofs; //-------------------------------------------------- // Store a proof of existence in the contract state //-------------------------------------------------- function storeProof(bytes32 proof) private { // use the hash as the key proofs[proof] = true; } //---------------------------------------------- // Calculate and store the proof for a document //---------------------------------------------- function notarize(string memory document) public { // call storeProof() with the hash of the string storeProof(proofFor(document)); } //-------------------------------------------- // Helper function to get a document's sha256 //-------------------------------------------- // Takes in a string and returns the hash of the string function proofFor(string memory document) private pure returns (bytes32) { // converts the string into bytes array and then hash it return sha256(bytes(document)); } //---------------------------------------- // Check if a document has been notarized //---------------------------------------- function checkDocument(string memory document) public view returns (bool){ // use the hash of the string and check the proofs mapping // object return proofs[proofFor(document)]; } }- 1
- 2
- 3
- 4
- 5
- 6
- 7
- 8
- 9
- 10
- 11
- 12
- 13
- 14
- 15
- 16
- 17
- 18
- 19
- 20
- 21
- 22
- 23
- 24
- 25
- 26
- 27
- 28
- 29
- 30
- 31
- 32
- 33
- 34
- 35
- 36
- 37
- 38
- 39
- 40
这个合约:
- 允许你使用
notarize()函数对字符串进行公证 - 允许你检查字符串之前是否使用
checkDocument()函数进行了公证。
由于合约已经部署,让我们通过将合约的地址和 ABI 传递给
eth.contract()函数来创建对它的引用:address = '0x5AE4fCa41f2DCA381E6a5211e368d0181A465acf' abi = '[ { "inputs": [ { "internalType": "string", "name": "document", "type": "string" } ], "name": "checkDocument", "outputs": [ { "internalType": "bool", "name": "", "type": "bool" } ], "stateMutability": "view", "type": "function" }, { "inputs": [ { "internalType": "string", "name": "document", "type": "string" } ], "name": "notarize", "outputs": [], "stateMutability": "nonpayable", "type": "function" } ]' notarizer = w3.eth.contract(address = address, abi = abi)- 1
- 2
- 3
现在
notarizer包含对合约的引用。要对字符串进行公证,请执行以下操作:
string_to_notarise = "Ofenbach — You Don't Know Me" nonce = w3.eth.get_transaction_count(account1_address) # estimate the gas fee estimated_gas = \ notarizer.functions.notarize(string_to_notarise).estimateGas() # build the transaction transaction = \ notarizer.functions.notarize(string_to_notarise).buildTransaction( { 'gas': estimated_gas, 'gasPrice': w3.eth.gas_price, 'from': account1_address, 'nonce': nonce }) # sign the transaction signed_txn = w3.eth.account.sign_transaction(transaction, private_key = account1_private_key) # send the transaction tx_hash = w3.eth.send_raw_transaction(signed_txn.rawTransaction) print(w3.toHex(tx_hash)) # wait for the transaction to confirm receipt = w3.eth.wait_for_transaction_receipt(tx_hash)- 1
- 2
- 3
- 4
- 5
- 6
- 7
- 8
- 9
- 10
- 11
- 12
- 13
- 14
- 15
- 16
- 17
- 18
- 19
- 20
- 21
- 22
在上面代码中:
- 要从合约中调用
notarize()函数,请使用notarizer.functions.notarize() - 使用
estimateGas()函数来估计调用notarize()合约函数所需的gas - 使用
buildTransaction()函数来构建交易以对字符串进行公证。 - 使用
eth.sign_transaction()函数签署交易 - 使用
eth.send_raw_transaction()函数发送交易 - 使用
eth.wait_for_transaction_receipt()函数等待交易确认
确认交易后,可以像这样调用
checkDocument()函数:# check if string is notarized correctly notarizer.functions.checkDocument(string_to_notarise).call()- 1
- 2
它应该返回一个True值。
7.2 第二个合约
第二个合约稍微复杂一些:
- 只有合约的所有者才能对字符串进行公证
- 调用
checkDocument()函数时,调用者必须支付 100 wei 除了 gas 费。 checkDocument()函数的结果通过一个名为Document的事件返回。
完整的合约如下图:
// SPDX-License-Identifier: MIT pragma solidity ^0.8;contract ProofOfExistence { address owner = msg.sender; //---define an event--- event Document(address from, string text, bool valid); //---store the hash of the strings--- mapping (bytes32 => bool) private proofs; //-------------------------------------------------- // Store a proof of existence in the contract state //-------------------------------------------------- function storeProof(bytes32 proof) private { // use the hash as the key proofs[proof] = true; } //---------------------------------------------- // Calculate and store the proof for a document //---------------------------------------------- function notarize(string memory document) public { require(msg.sender == owner, 'Only the owner of this contract can notarize a string'); // call storeProof() with the hash of the string storeProof(proofFor(document)); } //-------------------------------------------- // Helper function to get a document's sha256 //-------------------------------------------- // Takes in a string and returns the hash of the string function proofFor(string memory document) private pure returns (bytes32) { // converts the string into bytes array and then hash it return sha256(bytes(document)); } //---------------------------------------- // Check if a document has been notarized //---------------------------------------- function checkDocument(string memory document) public payable { require(msg.value == 100 wei, 'This service requires a fee of 100 wei'); // transfer the money received to the owner payable(owner).transfer(msg.value); // fire the Document event to return the result emit Document(msg.sender, document, proofs[proofFor(document)]); }}- 1
- 2
- 3
- 4
- 5
- 6
- 7
- 8
- 9
- 10
- 11
- 12
- 13
- 14
- 15
- 16
- 17
- 18
- 19
- 20
- 21
- 22
- 23
- 24
- 25
- 26
- 27
- 28
- 29
- 30
- 31
- 32
- 33
- 34
- 35
- 36
- 37
- 38
- 39
- 40
- 41
- 42
- 43
- 44
- 45
- 46
7.3 加载合约
让我们使用其地址和 ABI 加载合约:
address = '0xF620e7eFb991498d72b95a3e66D912f91B4D6Ba7' abi = '[ { "anonymous": false, "inputs": [ { "indexed": false, "internalType": "address", "name": "from", "type": "address" }, { "indexed": false, "internalType": "string", "name": "text", "type": "string" }, { "indexed": false, "internalType": "bool", "name": "valid", "type": "bool" } ], "name": "Document", "type": "event" }, { "inputs": [ { "internalType": "string", "name": "document", "type": "string" } ], "name": "checkDocument", "outputs": [], "stateMutability": "payable", "type": "function" }, { "inputs": [ { "internalType": "string", "name": "document", "type": "string" } ], "name": "notarize", "outputs": [], "stateMutability": "nonpayable", "type": "function" } ]' notarizer = w3.eth.contract(address=address, abi=abi)- 1
- 2
- 3
7.4 公正字符串
使用第二个合约对字符串进行公证与第一个合约类似。唯一需要记住的是,只有合约的所有者才能调用
notarize()函数。在第二个合约中调用
checkDocument()函数更有趣。要对字符串进行公证,需要执行以下其他操作:
- 估计调用
checkDocument()函数需要多少gas费用,加上100wei的值(函数需要这个数量) - 在交易中包含要发送到
checkDocument()函数的金额(100 wei) - 创建
Document事件的实例 - 要监听
Document事件,需要实现自己的循环机制。在这里,我首先使用w3.eth.filter()函数来监听合约中的特定事件。 然后,我使用了一个无限循环,使用事件过滤器的get_new_entries()函数继续监听事件。当接收到一个事件时,可以通过它的transactionHash属性 获取事件的详细信息。使用此事务哈希,可以调用事件的processReceipt()函数来获取事件的详细信息。就我而言,一旦获取Document事件,我将停止 监听未来的事件。
string_to_check = "Ofenbach — You Don't Know Me" nonce = w3.eth.getTransactionCount(account1_address) # estimate the gas fee estimated_gas = notarizer.functions.checkDocument( string_to_check).estimateGas( {'value':100}) # 100 is the wei to send # build the transaction transaction = notarizer.functions.checkDocument( string_to_check).buildTransaction( { 'gas': estimated_gas, 'gasPrice': w3.eth.gas_price, 'from': account1_address, 'nonce': nonce, 'value': w3.toWei(100, 'wei'), # amount to send to the }) # function # sign the transaction signed_txn = w3.eth.account.sign_transaction(transaction, private_key = account1_private_key) # send the transaction tx_hash = w3.eth.send_raw_transaction(signed_txn.rawTransaction) print(w3.toHex(tx_hash)) import time # create an instance of the event document_event = notarizer.events.Document() def handle_event(event): receipt = \ w3.eth.wait_for_transaction_receipt(event['transactionHash']) result = document_event.processReceipt(receipt) # print the content of the Document event print(result[0]['args']) if result[0]['args']['from'] == account1_address: return True return False def log_loop(event_filter, poll_interval): while True: for event in event_filter.get_new_entries(): result = handle_event(event) if result == True: return time.sleep(poll_interval) block_filter = w3.eth.filter( { 'fromBlock':'latest', 'address':address # address of contract }) log_loop(block_filter, 2)- 1
- 2
- 3
- 4
- 5
- 6
- 7
- 8
- 9
- 10
- 11
- 12
- 13
- 14
- 15
- 16
- 17
- 18
- 19
- 20
- 21
- 22
- 23
- 24
- 25
- 26
- 27
- 28
- 29
- 30
- 31
- 32
- 33
- 34
- 35
- 36
- 37
- 38
- 39
- 40
- 41
- 42
- 43
- 44
- 45
- 46
- 47
当运行上述代码时,将在
Document事件触发时看到如下输出:AttributeDict({'from': '0xB35b89eE8AAc5C3ea6cd5C9080E8c66Cb17ca2CC', 'text': "Ofenbach — You Don't Know Me", 'valid': True})- 1
8、结束语
总的来说,使用 Python 和 web3.py 构建一个 web 3 dapp 类似于使用 web3.js 构建一个。关键区别在于,对于 Python dapp,需要自己熟悉交易—— 签署交易、估算所需的 gas 费用、设置 gas 价格,然后等待交易确认并处理触发的事件。
-
相关阅读:
LeetCode 18 四数之和
Python3《机器学习实战》学习笔记(四):朴素贝叶斯实战篇之新浪新闻分类
【IPython的使用技巧】
使用R和curl库编写一段爬虫代码
OpenXR手部追踪实现详解
phy调试2
【Electron】vue+electron快捷键设置
Redis-03持久化
分布式事务-TCC异常-空回滚
pytorch优化器设置
- 原文地址:https://blog.csdn.net/shebao3333/article/details/126328509


