-
k8s 基于kubeadm搭建高可用集群
1.安装配置负载均衡工具
1.1 配置 haproxy (主节点都需要配置)
1.1.1 下载 haproxyyum -y install haproxy- 1
1.1.2 修改 haproxy配置文件
#--------------------------------------------------------------------- # Example configuration for a possible web application. See the # full configuration options online. # # http://haproxy.1wt.eu/download/1.4/doc/configuration.txt # #--------------------------------------------------------------------- #--------------------------------------------------------------------- # Global settings #--------------------------------------------------------------------- global # to have these messages end up in /var/log/haproxy.log you will # need to: # # 1) configure syslog to accept network log events. This is done # by adding the '-r' option to the SYSLOGD_OPTIONS in # /etc/sysconfig/syslog # # 2) configure local2 events to go to the /var/log/haproxy.log # file. A line like the following can be added to # /etc/sysconfig/syslog # # local2.* /var/log/haproxy.log # log 127.0.0.1 local2 chroot /var/lib/haproxy pidfile /var/run/haproxy.pid maxconn 4000 user haproxy group haproxy daemon # turn on stats unix socket stats socket /var/lib/haproxy/stats #--------------------------------------------------------------------- # common defaults that all the 'listen' and 'backend' sections will # use if not designated in their block #--------------------------------------------------------------------- defaults mode http log global option httplog option dontlognull option http-server-close option forwardfor except 127.0.0.0/8 option redispatch retries 3 timeout http-request 10s timeout queue 1m timeout connect 10s timeout client 1m timeout server 1m timeout http-keep-alive 10s timeout check 10s maxconn 3000 #--------------------------------------------------------------------- # main frontend which proxys to the backends #--------------------------------------------------------------------- frontend k8s-apiserver ## 配置master的监听 mode tcp bind *:9443 ## 监听9443端口(这个端口用于kubeadm 初始化需要) acl url_static path_beg -i /static /images /javascript /stylesheets acl url_static path_end -i .jpg .gif .png .css .js use_backend static if url_static default_backend k8s-apiserver ## backend k8s-apiserver #--------------------------------------------------------------------- # static backend for serving up images, stylesheets and such #--------------------------------------------------------------------- backend static ##这个对于我们配置 k8s 无关 balance roundrobin server static 127.0.0.1:4331 check #--------------------------------------------------------------------- # round robin balancing between the various backends #--------------------------------------------------------------------- backend k8s-apiserver mode tcp # 模式tcp balance roundrobin # 采用轮询的负载算法 server k8s-master1 192.168.34.7:6443 check ##k8s管理节点的aipserver server k8s-master2 192.168.34.9:6443 check ##k8s管理节点的aipserver- 1
- 2
- 3
- 4
- 5
- 6
- 7
- 8
- 9
- 10
- 11
- 12
- 13
- 14
- 15
- 16
- 17
- 18
- 19
- 20
- 21
- 22
- 23
- 24
- 25
- 26
- 27
- 28
- 29
- 30
- 31
- 32
- 33
- 34
- 35
- 36
- 37
- 38
- 39
- 40
- 41
- 42
- 43
- 44
- 45
- 46
- 47
- 48
- 49
- 50
- 51
- 52
- 53
- 54
- 55
- 56
- 57
- 58
- 59
- 60
- 61
- 62
- 63
- 64
- 65
- 66
- 67
- 68
- 69
- 70
- 71
- 72
- 73
- 74
- 75
- 76
- 77
- 78
- 79
- 80
- 81
- 82
- 83
- 84
- 85
- 86
1.1.3 重启 haproxy
systemctl restart haproxy systemctl enable haproxy- 1
- 2
1.2 配置 keepalived(主节点都需要配置)
1.2.1 下载 keepalivedyum -y install keepalived- 1
1.2.2 修改 keepalived配置文件
监听haproxy脚本#!/bin/bash A=`ps -C haproxy --no-header |wc -l` if [ $A -eq 0 ];then systemctl start haproxy sleep 3 if [ `ps -C haproxy --no-header |wc -l` -eq 0 ];then systemctl stop keepalived.service fi fi- 1
- 2
- 3
- 4
- 5
- 6
- 7
- 8
- 9
- 10
! Configuration File for keepalived vrrp_script chk_http_prot { script "/etc/keepalived/check_haproxy.sh" fall 2 rise 10 interval 2 # 每2秒执行一次检测 weight 2 # 权重 } global_defs { router_id k8s-master2 ##当前设备的hostname } vrrp_instance VI_1 { state MASTER ##表示主节点 interface ens192 ##对应本机的网卡 virtual_router_id 1 ## id设为相同,表示是同一个虚拟路由组(所有的master节点这个要一样) priority 80 ##权重 advert_int 1 authentication { auth_type PASS auth_pass 1111 } virtual_ipaddress { 192.168.34.100 ##虚拟ip(vip) } track_script { chk_http_prot } }- 1
- 2
- 3
- 4
- 5
- 6
- 7
- 8
- 9
- 10
- 11
- 12
- 13
- 14
- 15
- 16
- 17
- 18
- 19
- 20
- 21
- 22
- 23
- 24
- 25
- 26
- 27
- 28
- 29
- 30
- 31
- 32
1.2.3 重启 keepalived
systemctl restart keepalived systemctl enable keepalived- 1
- 2
2. 安装kubernetes(k8s)
2.1 k8s安装配置
所有节点都需要安装 kubeadm 、kubelet、kubectl(kubectl 的安装防止后期从节点转主节点)
2.2 kubeadm 启动加入集群## kubeadm init --control-plane-endpoint (keepalived的虚拟ip【vip】):(haproxy的监听端口) --upload-certs --v=6 --image-repository registry.aliyuncs.com/google_containers --pod-network-cidr=10.244.0.0/16 --kubernetes-version 1.23.5 kubeadm init --control-plane-endpoint 192.168.34.100:9443 --upload-certs --v=6 --image-repository registry.aliyuncs.com/google_containers --pod-network-cidr=10.244.0.0/16 --kubernetes-version 1.23.5- 1
- 2
执行后得到下边图片
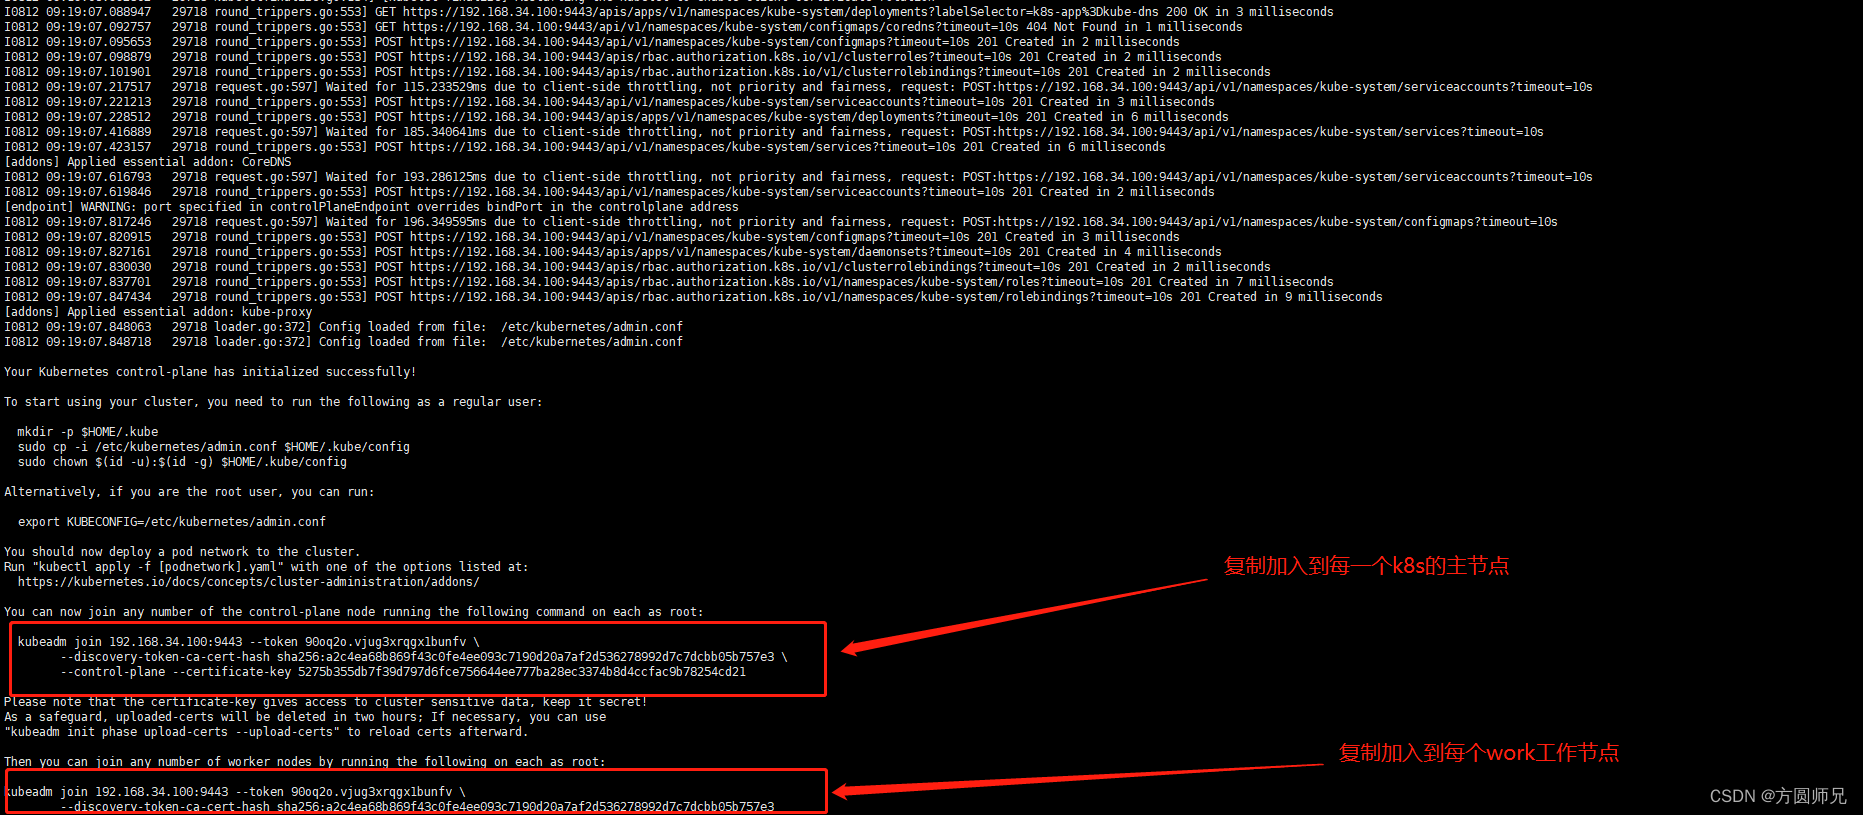
2.2.1 根据 2.2 生成的命令后得到这个命令,然后这个命令加入其他主节点kubeadm join 192.168.34.100:9443 --token 90oq2o.vjug3xrqgx1bunfv \ --discovery-token-ca-cert-hash sha256:a2c4ea68b869f43c0fe4ee093c7190d20a7af2d536278992d7c7dcbb05b757e3 \ --control-plane --certificate-key 5275b355db7f39d797d6fce756644ee777ba28ec3374b8d4ccfac9b78254cd21- 1
- 2
- 3
2.2.2 根据 2.2 生成的命令后得到这个命令,然后这个命令加入其他工作节点
kubeadm join 192.168.34.100:9443 --token 90oq2o.vjug3xrqgx1bunfv \ --discovery-token-ca-cert-hash sha256:a2c4ea68b869f43c0fe4ee093c7190d20a7af2d536278992d7c7dcbb05b757e3- 1
- 2
2.3 查看 k8s 集群
kubectl get nodes- 1

2.3.1 可以看到我们的节点显示 NotReady ,这种情况是因为我们没有配置网络
kube-flannel.yml 插件安装


-
相关阅读:
第十三届蓝桥杯 C++ B 组省赛 G 题———积木画(AC)
分享一个MSSA插值的GRACE level数据集
SpringMVC概述及入门案例
时间模块之datatime模块、os模块、sys模块、json模块、json模块实操
SystemVerilog Assertions应用指南 Chapter1.30 使用“ intersect”控制序列的长度
对图像中边、线、点的检测(支持平面/鱼眼/球面相机)附源码
Flink用户自定义连接器(Table API Connectors)学习总结
vmware安装openEuler20.03
互联网轻量级框架整合之MyBatis动态SQL
ISP--Black Level Correction(黑电平矫正)
- 原文地址:https://blog.csdn.net/weixin_47752736/article/details/126297440
