-
react使用脚手架搭建
一.创建项目并启动
1.1全局安装
npm install -g create-react-app- 1
1.2 创建项目
create-react-app 这里写你的项目名- 1
1.3进入项目文件夹
cd 步骤二写的项目名- 1
1.4启动项目
npm start- 1
二.脚手架文件介绍

三、实战
3.1一个简单的hello
- 创建一个
components文件夹,专门用于放组件,文件夹下再创建不同组件名的文件夹,组件一多就不会乱 - 把写好的组件引入App.js中,这是最大的父组件


3.2样式的模块化
- 为避免样式名冲突可以写,但不常用


3.3react插件的安装
- 以后就不用手敲模板的
rcc就可以出现类式组件模板,rfc就出现函数组件


3.4todoList案例
- 功能:组件化实现增删改查
- 对props类型限制 :
npm install prop-types --save
APP.js
import './App.css'; import Header from './components/Header' import List from './components/List' import Footer from './components/Footer' import { Component } from 'react'; export default class App extends Component { state = { todoList: [ { id: '001', name: '吃饭', check: true }, { id: '002', name: '睡觉', check: false }, { id: '003', name: '玩游戏', check: true }, ] } // 添加todo addTodo = (todoObj) => { const { todoList } = this.state this.setState({ todoList: [todoObj, ...todoList] }) } // 改变todo状态 updateTodo = (id, check) => { const { todoList } = this.state const newTodoList = todoList.map(todoObj => { if (id === todoObj.id) return { ...todoObj, check } else return todoObj }) this.setState({ todoList: newTodoList }) } //删除todo deleteToto = (id) => { const { todoList } = this.state if (window.confirm('确定删除吗?')) this.setState({ todoList: todoList.filter(todo => todo.id !== id) }) } // 切换全选反选 handleAllTodo = (check) => { const { todoList } = this.state this.setState({ todoList: todoList.map(todo => { return { ...todo, check } }) }) } //清除所有已选 handleAllClear = () => { const { todoList } = this.state this.setState({ todoList: todoList.filter(todo => { return !todo.check }) }) } render() { const { todoList } = this.state return ( <div> <div className="todo-container"> <div className="todo-wrap"> <Header addTodo={this.addTodo} /> <List todoList={todoList} updateTodo={this.updateTodo} deleteToto={this.deleteToto} /> <Footer todoList={todoList} handleAllTodo={this.handleAllTodo} handleAllClear={this.handleAllClear} /> </div> </div> </div> ) } }- 1
- 2
- 3
- 4
- 5
- 6
- 7
- 8
- 9
- 10
- 11
- 12
- 13
- 14
- 15
- 16
- 17
- 18
- 19
- 20
- 21
- 22
- 23
- 24
- 25
- 26
- 27
- 28
- 29
- 30
- 31
- 32
- 33
- 34
- 35
- 36
- 37
- 38
- 39
- 40
- 41
- 42
- 43
- 44
- 45
- 46
- 47
- 48
- 49
- 50
- 51
- 52
- 53
- 54
- 55
- 56
- 57
- 58
- 59
- 60
- 61
- 62
- 63
- 64
- 65
- 66
- 67
- 68
- 69
- 70
- 71
- 72
- 73
- 74
src\components\Header\index.jsx
import { Component } from 'react' import PropTypes from 'prop-types' import './index.css' export default class Hrader extends Component { // 对传入的props进行类型与必要性校验 static propTypes = { addTodo: PropTypes.func.isRequired } handleKeyUp = (event) => { const { target, keyCode } = event //回车键才触发 if (keyCode !== 13 || target.value.trim() === '') return // 组装好对象 const obj = { id: new Date().getTime(), name: target.value, check: false } // 调用父方法并传值 this.props.addTodo(obj) // 清空 target.value = '' } render() { return ( <div className="todo-header"> <input onKeyUp={this.handleKeyUp} type="text" placeholder="请输入你的任务名称,按回车键确认" /> </div> ) } }- 1
- 2
- 3
- 4
- 5
- 6
- 7
- 8
- 9
- 10
- 11
- 12
- 13
- 14
- 15
- 16
- 17
- 18
- 19
- 20
- 21
- 22
- 23
- 24
- 25
- 26
- 27
- 28
- 29
- 30
- 31
src\components\Header\index.css
/*header*/ .todo-header input { width: 560px; height: 28px; font-size: 14px; border: 1px solid #ccc; border-radius: 4px; padding: 4px 7px; } .todo-header input:focus { outline: none; border-color: rgba(82, 168, 236, 0.8); box-shadow: inset 0 1px 1px rgba(0, 0, 0, 0.075), 0 0 8px rgba(82, 168, 236, 0.6); }- 1
- 2
- 3
- 4
- 5
- 6
- 7
- 8
- 9
- 10
- 11
- 12
- 13
- 14
- 15
- 16
src\components\List\index.jsx
import { Component } from 'react'; import PropTypes from 'prop-types' import './index.css' import Item from '../Item' export default class List extends Component { // 对传入的props类型与必要性校验 static propTypes = { todoList: PropTypes.array.isRequired, updateTodo: PropTypes.func.isRequired, deleteToto: PropTypes.func.isRequired } render() { const { todoList, updateTodo, deleteToto } = this.props; return ( <ul className="todo-main"> { todoList.map(todo => <Item {...todo} key={todo.id} updateTodo={updateTodo} deleteToto={deleteToto} />) } </ul> ) } }- 1
- 2
- 3
- 4
- 5
- 6
- 7
- 8
- 9
- 10
- 11
- 12
- 13
- 14
- 15
- 16
- 17
- 18
- 19
- 20
- 21
- 22
- 23
- 24
- 25
- 26
src\components\List\index.css
/*main*/ .todo-main { margin-left: 0px; border: 1px solid #ddd; border-radius: 2px; padding: 0px; } .todo-empty { height: 40px; line-height: 40px; border: 1px solid #ddd; border-radius: 2px; padding-left: 5px; margin-top: 10px; }- 1
- 2
- 3
- 4
- 5
- 6
- 7
- 8
- 9
- 10
- 11
- 12
- 13
- 14
- 15
- 16
- 17
src\components\Item\index.jsx
import { Component } from 'react' import PropTypes from 'prop-types' import './index.css' export default class Item extends Component { // 对传入的props类型与必要性进行校验 static propTypes = { updateTodo: PropTypes.func.isRequired } state = { mouse: false } handleMouse = (flag) => { // 必须要返回函数 return () => { this.setState({ mouse: flag }) } } // 修改选中的状态 handleCheck = (id) => { return (event) => { this.props.updateTodo(id, event.target.checked) } } // 删除选项 handleDelete = (id) => { this.props.deleteToto(id) } render() { const { id, name, check } = this.props const { mouse } = this.state return ( <li style={{ backgroundColor: mouse ? '#ddd' : '#fff' }} onMouseEnter={this.handleMouse(true)} onMouseLeave={this.handleMouse(false)}> <label> <input type="checkbox" checked={check} onChange={this.handleCheck(id)} /> <span>{name}</span> </label> <button onClick={() => this.handleDelete(id)} className="btn btn-danger" style={{ display: mouse ? "block" : "none" }}>删除</button> </li> ) } }- 1
- 2
- 3
- 4
- 5
- 6
- 7
- 8
- 9
- 10
- 11
- 12
- 13
- 14
- 15
- 16
- 17
- 18
- 19
- 20
- 21
- 22
- 23
- 24
- 25
- 26
- 27
- 28
- 29
- 30
- 31
- 32
- 33
- 34
- 35
- 36
- 37
- 38
- 39
- 40
- 41
- 42
- 43
- 44
- 45
src\components\Item\index.css
/*item*/ li { list-style: none; height: 36px; line-height: 36px; padding: 0 5px; border-bottom: 1px solid #ddd; } li label { float: left; cursor: pointer; } li label li input { vertical-align: middle; margin-right: 6px; position: relative; top: -1px; } li button { float: right; display: none; margin-top: 3px; } li:before { content: initial; } li:last-child { border-bottom: none; }- 1
- 2
- 3
- 4
- 5
- 6
- 7
- 8
- 9
- 10
- 11
- 12
- 13
- 14
- 15
- 16
- 17
- 18
- 19
- 20
- 21
- 22
- 23
- 24
- 25
- 26
- 27
- 28
- 29
- 30
- 31
- 32
- 33
- 34
src\components\Footer\index.jsx
import { Component } from 'react' import './index.css' export default class Footer extends Component { // 切换全选反选 checkAlltodo = (event) => { this.props.handleAllTodo(event.target.checked) } //清除已完成任务 clearAllCheck = () => { this.props.handleAllClear() } render() { const { todoList } = this.props //已完成的个数 const doneCount = todoList.reduce((pre, todo) => pre + (todo.check ? 1 : 0), 0) return ( <div className="todo-footer"> <label> <input type="checkbox" onChange={this.checkAlltodo} checked={doneCount === todoList.length && todoList.length !== 0} /> </label> <span> <span>已完成{doneCount}</span> / 全部{todoList.length} </span> <button onClick={this.clearAllCheck} className="btn btn-danger">清除已完成任务</button> </div> ) } }- 1
- 2
- 3
- 4
- 5
- 6
- 7
- 8
- 9
- 10
- 11
- 12
- 13
- 14
- 15
- 16
- 17
- 18
- 19
- 20
- 21
- 22
- 23
- 24
- 25
- 26
- 27
- 28
- 29
- 30
- 31
src\components\Footer\index.css
/*footer*/ .todo-footer { height: 40px; line-height: 40px; padding-left: 6px; margin-top: 5px; } .todo-footer label { display: inline-block; margin-right: 20px; cursor: pointer; } .todo-footer label input { position: relative; top: -1px; vertical-align: middle; margin-right: 5px; } .todo-footer button { float: right; margin-top: 5px; }- 1
- 2
- 3
- 4
- 5
- 6
- 7
- 8
- 9
- 10
- 11
- 12
- 13
- 14
- 15
- 16
- 17
- 18
- 19
- 20
- 21
- 22
- 23
- 24
- 25
- 26
- 27
效果

3.5脚手架配置代理
安装
npm install axios- 1
3.5.1前置说明
- react本身只关注界面,并不包含发送ajax请求
- 前端应用需要通过ajax请求 与后端进行数据交互
- react应用中需要集成第三方库或自己封装
- 常用的第三方库为axios:
- 封装XmlHttpRequest对象的ajax
- promise风格
- 可以在浏览器与node服务器端使用
但是直接请求会被同源策略拦截,需要一个代理,这个代理相当于中介,它负责转发请求与相应,也正是因为它只是转发,而没有触发ajax引擎,所以不会被拦截下来.
这里启动了node服务器做测试
建立setupProxy文件,文件名不能改const proxy = require('http-proxy-middleware')//引入http-proxy-middleware,react脚手架已经安装 module.exports = function (app) { app.use( proxy.createProxyMiddleware('/api1', { //遇见/api1前缀的请求,就会触发该代理配置 target: 'http://localhost:5000', //请求转发给谁 changeOrigin: true,//控制服务器收到的请求头中Host的值 pathRewrite: { '^/api1': '' } //重写请求路径,下面有示例解释 }), proxy.createProxyMiddleware('/api2', { target: 'http://localhost:5001', changeOrigin: true, pathRewrite: { '^/api2': '' } }), ) }- 1
- 2
- 3
- 4
- 5
- 6
- 7
- 8
- 9
- 10
- 11
- 12
- 13
- 14
- 15
- 16
- 17
APP.js
import axios from 'axios'; import { Component } from 'react'; import './App.css'; export default class App extends Component { getStudent = () => { axios.get("http://localhost:3000/api1/students").then(res => { console.log(res) }) } getCar = () => { axios.get("http://localhost:3000/api2/cars").then(res => { console.log(res) }) } render() { return ( <div> <button onClick={this.getStudent}>点我获取学生数据</button> <button onClick={this.getCar}>点我获取汽车数据</button> </div> ) } }- 1
- 2
- 3
- 4
- 5
- 6
- 7
- 8
- 9
- 10
- 11
- 12
- 13
- 14
- 15
- 16
- 17
- 18
- 19
- 20
- 21
- 22
- 23
- 24
- 25
- 26
- 27
- 28
- 29
效果

3.5.2GitHub搜索案例
消息订阅发布模式
npm install pubsub-js- 1
src\App.js
import React, { Component } from 'react' import Search from './components/Search' import List from './components/list' import './App.css' export default class App extends Component { render() { return ( <div className="container"> <Search /> <List /> </div> ) } }- 1
- 2
- 3
- 4
- 5
- 6
- 7
- 8
- 9
- 10
- 11
- 12
- 13
- 14
- 15
- 16
代理:src\setupProxy.js
const proxy = require('http-proxy-middleware')//引入http-proxy-middleware,react脚手架已经安装 module.exports = function (app) { app.use( proxy.createProxyMiddleware('/api1', { //遇见/api1前缀的请求,就会触发该代理配置 target: 'http://localhost:5000', //请求转发给谁 changeOrigin: true,//控制服务器收到的请求头中Host的值 pathRewrite: { '^/api1': '' } //重写请求路径,下面有示例解释 }) ) }- 1
- 2
- 3
- 4
- 5
- 6
- 7
- 8
- 9
- 10
- 11
- 12
src\components\Search\index.js
import React, { Component } from 'react' import PubSub from 'pubsub-js' import axios from 'axios' export default class Search extends Component { searchList = () => { PubSub.publish('updateAppState', { isFirst: false, isLoading: true }); const { value: keywork } = this.keyWorkEl axios.get(`/api1/search/users?q=${keywork}`).then((res) => { PubSub.publish('updateAppState', { isLoading: false, users: res.data.items }); }).catch((err) => { PubSub.publish('updateAppState', { isLoading: false, err: err.message }); }) } render() { return ( <section className="jumbotron"> <h3 className="jumbotron-heading">搜索用户</h3> <div> <input ref={c => this.keyWorkEl = c} type="text" placeholder="输入关键词" /> <button onClick={this.searchList}>搜索</button> </div> </section> ) } }- 1
- 2
- 3
- 4
- 5
- 6
- 7
- 8
- 9
- 10
- 11
- 12
- 13
- 14
- 15
- 16
- 17
- 18
- 19
- 20
- 21
- 22
- 23
- 24
- 25
- 26
src\components\list\index.js
import React, { Component } from 'react' import PubSub from 'pubsub-js' export default class List extends Component { state = ({ users: [], isFirst: true, isLoading: false, err: '' }) componentDidMount() { // 订阅 this.token = PubSub.subscribe('updateAppState', (msg, dataObj) => { this.setState(dataObj) }); } componentWillUnmount() { //取消订阅 PubSub.unsubscribe(this.token) } render() { const { users, isFirst, isLoading, err } = this.state return ( <div className="row"> { isFirst ? <h2>欢迎使用,请输入关键字,随后搜索</h2> : isLoading ? <h2>请稍后</h2> : err ? <h2>err</h2> : users.map(user => { return ( <div className="card" key={user.id}> <a href={user.html_url} target="_blank"> <img src={user.avatar_url} style={{ width: '100px' }} /> </a> <p className="card-text">{user.login}</p> </div> ) })} </div> ) } }- 1
- 2
- 3
- 4
- 5
- 6
- 7
- 8
- 9
- 10
- 11
- 12
- 13
- 14
- 15
- 16
- 17
- 18
- 19
- 20
- 21
- 22
- 23
- 24
- 25
- 26
- 27
- 28
- 29
- 30
- 31
- 32
- 33
- 34
- 35
- 36
- 37
- 38
- 39
- 40
- 41
- 42
- 43
效果
会有默认显示,查询时有loading,点击可跳转打开用户界面

3.5.3fetch发送请求
- 非第三方库不用下载,直接window自带,主要提倡关注分离,不是xhr
- 兼容性不高,有一些老版本浏览器不支持
根据3.5的代码改造
searchList = async () => { PubSub.publish('updateAppState', { isFirst: false, isLoading: true }); const { value: keywork } = this.keyWorkEl // axios.get(`/api1/search/users?q=${keywork}`).then((res) => { // PubSub.publish('updateAppState', { isLoading: false, users: res.data.items }); // }).catch((err) => { // PubSub.publish('updateAppState', { isLoading: false, err: err.message }); // }) try { const res = await fetch(`/api1/search/users?q=${keywork}`) const data = await res.json() PubSub.publish('updateAppState', { isLoading: false, users: data.items }); } catch (err) { PubSub.publish('updateAppState', { isLoading: false, err: err.message }); } }- 1
- 2
- 3
- 4
- 5
- 6
- 7
- 8
- 9
- 10
- 11
- 12
- 13
- 14
- 15
- 16
3.6路由的使用
- 点击导航链接引起路径改变,被路由器监听到进行匹配组件从而展示
- 因为需要在同一个路由里面跳转,所以BrowserRouter直接包裹在最外层就好
- 路由组件是通过路由匹配成功展示的组件,一般组件就是不受路由影响的组件
- 路由组件props默认会有路由数据,一般组件没有
npm install react-router-dom- 1
src\index.js
import React from 'react'; import ReactDOM from 'react-dom/client'; import './index.css'; import App from './App'; import reportWebVitals from './reportWebVitals'; import { BrowserRouter } from 'react-router-dom' const root = ReactDOM.createRoot(document.getElementById('root')); root.render( <BrowserRouter> <React.StrictMode> <App /> </React.StrictMode> </BrowserRouter> ); // If you want to start measuring performance in your app, pass a function // to log results (for example: reportWebVitals(console.log)) // or send to an analytics endpoint. Learn more: https://bit.ly/CRA-vitals reportWebVitals();- 1
- 2
- 3
- 4
- 5
- 6
- 7
- 8
- 9
- 10
- 11
- 12
- 13
- 14
- 15
- 16
- 17
- 18
- 19
- 20
- 21
src\App.js
import React, { Component } from 'react' import { Link, Route } from 'react-router-dom' import About from './components/About' import Home from './components/Home' import './App.css' export default class App extends Component { render() { return ( <div> <div className="row"> <div className="col-xs-offset-2 col-xs-8"> <div className="page-header"><h2>React Router Demo</h2></div> </div> </div> <div className="row"> <div className="col-xs-2 col-xs-offset-2"> <div className="list-group"> <Link className="list-group-item active" to="/about" >About</Link> <Link className="list-group-item" to="/home" >Home</Link> </div> </div> <div className="col-xs-6"> <div className="panel"> <div className="panel-body"> <Route path='/about' component={About} /> <Route path='/home' component={Home} /> </div> </div> </div> </div> </div> ) } }- 1
- 2
- 3
- 4
- 5
- 6
- 7
- 8
- 9
- 10
- 11
- 12
- 13
- 14
- 15
- 16
- 17
- 18
- 19
- 20
- 21
- 22
- 23
- 24
- 25
- 26
- 27
- 28
- 29
- 30
- 31
- 32
- 33
- 34
- 35
- 36
两个子组件

效果

3.6.1NavLink
- 选中状态默认添加了active类名,使用activeClassName指定样式类名,v6改用className使用用函数返回

3.6.2封装NavLink组件
- 组件之间写的是特殊属性叫标签体,传递给子组件的时候会默认叫children的key

src\components\MyNavLink.jsx
import React, { Component } from 'react' import { NavLink } from 'react-router-dom' export default class MyNavLink extends Component { render() { console.log(this.props) return ( <NavLink activeClassName='red' className="list-group-item" {...this.props} /> ) } }- 1
- 2
- 3
- 4
- 5
- 6
- 7
- 8
- 9
- 10
- 11
- 12

3.6.3Switch组件(v6移除)
- 如果路径相同但含有多个组件的情况,会将多个组件同时展示,如果不想这么做,就在外面包裹一层,那么匹配上第一个以后就不会往下走

3.6.4路由的模糊匹配与严格匹配(v6版没这概念)
- 路由的匹配规则是如图,会将/about/a/b提取成about a b,然后依次匹配,并且是有顺序地匹配,模糊匹配情况下,只要前面字段匹配上了就会展示,如果添加严格匹配则需要about a b完全一样才展示

- 添加严格模式,exact

3.6.5嵌套路由
- 如下面代码所示,News和Message组件都是嵌套在Home组件下面的,路由有个匹配规则,像Home组件About组件这两个都是先注册的路由,先注册先匹配,如果匹配不到就不进行下一步.所以假设News的路由只写/news,那么在模糊匹配的时候发现没有news开头的,就不会继续进行.
- 所以子路由需要在前面加上上一级路由的path值
src\App.js
import React, { Component } from 'react' import { Route, Switch } from 'react-router-dom' import About from './pages/About' import Home from './pages/Home' import MyNavLink from './components/MyNavLink' import './App.css' export default class App extends Component { render() { return ( <div> <div className="row"> <div className="col-xs-offset-2 col-xs-8"> <div className="page-header"><h2>React Router Demo</h2></div> </div> </div> <div className="row"> <div className="col-xs-2 col-xs-offset-2"> <div className="list-group"> <MyNavLink to="/about/a/b" a={1} b={2}>About</MyNavLink> <MyNavLink to="/home" >Home</MyNavLink> </div> </div> <div className="col-xs-6"> <div className="panel"> <div className="panel-body"> <Switch> <Route path='/about' component={About} /> <Route path='/home' component={Home} /> </Switch> </div> </div> </div> </div> </div> ) } }- 1
- 2
- 3
- 4
- 5
- 6
- 7
- 8
- 9
- 10
- 11
- 12
- 13
- 14
- 15
- 16
- 17
- 18
- 19
- 20
- 21
- 22
- 23
- 24
- 25
- 26
- 27
- 28
- 29
- 30
- 31
- 32
- 33
- 34
- 35
- 36
- 37
- 38
- 39
src\pages\Home\index.jsx
import React, { Component } from 'react' import News from './News' import Message from './Message' import MyNavLink from '../../components/MyNavLink' import { Route } from 'react-router-dom' export default class Home extends Component { render() { return ( <div> <div>我是home</div> <div> <ul className="nav nav-tabs"> <li> <MyNavLink to="/home/news">News</MyNavLink> </li> <li> <MyNavLink to="/home/message">Message</MyNavLink> </li> </ul> <div> <Route path='/home/news' component={News} /> <Route path='/home/message' component={Message} /> </div> </div> </div> ) } }- 1
- 2
- 3
- 4
- 5
- 6
- 7
- 8
- 9
- 10
- 11
- 12
- 13
- 14
- 15
- 16
- 17
- 18
- 19
- 20
- 21
- 22
- 23
- 24
- 25
- 26
- 27
- 28
- 29
- 30
效果

3.6.6向路由传递params参数
- 子组件可以通过this.props接收

3.6.7向路由组件传递state参数
- 这种传参不会在地址栏暴露,使用的时候因为是在操作history,所以刷新也没问题,但是复制链接给别人再打开就有问题了
- 从this.props取值

3.6.8replace
- 关掉当前页,打开新页面
<MyNavLink replace to="/home/news">News</MyNavLink>- 1
3.6.9编程式路由导航

3.6.10withRouter的使用(v6已移除)
- 能够将一般组件身上加上路由组件所特有的api,也就是本来一般组件没有this.props.history,但是引入withRouter后就有了
- withRouter的返回值是一个新组件

3.6.11 BrowserRouter与HashRouter的区别
- 1.底层原理不一样
BrowserRouter使用的是H5的historyAPI,不兼容IE9及以下版本
HashRouter使用的是URL的哈希值 - 2.url变现形式不一样
BrowserRouter的路径中没有#
HashRouter的路径包含# - 3.刷新后对路由state参数的影响
BrowserRouter没有任何影响,因为state保存在history对象中
HashRouter刷新后会导致路由state参数的丢失
3.7 路由V6版本
- React Router以三个不同的包发布到npm,它们分别为:
1.react-router:路由的核心库,提供了很多的组件、钩子
2.react-router-dom:包含react-router所有的内容,并添加一些专门用于DOM的组件,例如
3.react-router-native:包含react-router所有内容,并添加一些专门用于ReactNative的API,例如: - 与React Router5x版本相比,改变了什么?
1.内置组件的变化:移除
2.语法的变化:component={About}变为element={
3.新增多个hook:useParams、useNavigate、useMatch等
4.没有withRouter
5.官方明确推荐函数式组件
3.7.1一级组件
- Routes改为必写,且有switch匹配成功就不往下走的功能,语法的变化:
component={About}变为element={
import React from 'react' import { NavLink, Routes, Route } from 'react-router-dom' import Home from './pages/Home/index.jsx' import About from './pages/About/index.jsx' export default function App() { return ( <div> <div className="row"> <div className="col-xs-2 col-xs-offset-2"> <div className="list-group"> <NavLink className="list-group-item" to='/about'>About</NavLink> <NavLink className="list-group-item" to='/home'>Home</NavLink> </div> </div> <div className="col-xs-6"> <div className="panel"> <div className="panel-body"> <div> <Routes> <Route path='/about' element={<About />}></Route> <Route path='/home' element={<Home />}></Route> </Routes> </div> </div> </div> </div> </div></div> ) }- 1
- 2
- 3
- 4
- 5
- 6
- 7
- 8
- 9
- 10
- 11
- 12
- 13
- 14
- 15
- 16
- 17
- 18
- 19
- 20
- 21
- 22
- 23
- 24
- 25
- 26
- 27
- 28
- 29
- 30
- 31

3.7.2重定向
- navigate只要被渲染就会修改路径,引起页面切换
- replace属性用于控制跳转模式,true就删掉当前页,跳转新页面
src\App.js
import React from 'react' import { NavLink, Routes, Route, Navigate } from 'react-router-dom' import Home from './pages/Home/index.jsx' import About from './pages/About/index.jsx' export default function App() { return ( <div> <div className="row"> <div className="col-xs-2 col-xs-offset-2"> <div className="list-group"> <NavLink className="list-group-item" to='/about'>About</NavLink> <NavLink className="list-group-item" to='/home'>Home</NavLink> </div> </div> <div className="col-xs-6"> <div className="panel"> <div className="panel-body"> <div> <Routes> <Route path='/about' element={<About />}></Route> <Route path='/home' element={<Home />}></Route> <Route path='/' element={<Navigate to="/about" />}></Route> </Routes> </div> </div> </div> </div> </div></div> ) }- 1
- 2
- 3
- 4
- 5
- 6
- 7
- 8
- 9
- 10
- 11
- 12
- 13
- 14
- 15
- 16
- 17
- 18
- 19
- 20
- 21
- 22
- 23
- 24
- 25
- 26
- 27
- 28
- 29
- 30
- 31
- 32
src\pages\Home\index.jsx
import React, { useState } from 'react' import { Navigate } from 'react-router-dom' export default function Home() { const [sum, setSum] = useState(1) return ( <div> {sum === 2 ? <Navigate to="/about" replace={false} /> : <h4>当前sum的值是:{sum}</h4>} <h2>Home组件内容</h2> <button onClick={() => setSum(2)}>点我sum变2</button> </div> ) }- 1
- 2
- 3
- 4
- 5
- 6
- 7
- 8
- 9
- 10
- 11
- 12
- 13
- 14

3.7.3NavRoute选中状态
- v5是使用activeClassName,而v6是使用className函数返回值
import React from 'react' import { NavLink, Route, Routes, Navigate } from 'react-router-dom' import About from './pages/About' import Home from './pages/Home' import './App.css' export default function App() { function computedClassName({isActive}){ return isActive ? "list-group-item active" : "list-group-item" } return ( <div> <div> <div className="row"> <div className="col-xs-offset-2 col-xs-8"> <div className="page-header"><h2>React Router Demo</h2></div> </div> </div> <div className="row"> <div className="col-xs-2 col-xs-offset-2"> <div className="list-group"> <NavLink className={computedClassName} to="/about" >About</NavLink> <NavLink className={computedClassName} to="/home" >Home</NavLink> </div> </div> <div className="col-xs-6"> <div className="panel"> <div className="panel-body"> <Routes> <Route path='/about' element={<About />} /> <Route path='/home' element={<Home />} /> <Route path='/' element={<Navigate to='/about' />} /> </Routes> </div> </div> </div> </div> </div></div> ) }- 1
- 2
- 3
- 4
- 5
- 6
- 7
- 8
- 9
- 10
- 11
- 12
- 13
- 14
- 15
- 16
- 17
- 18
- 19
- 20
- 21
- 22
- 23
- 24
- 25
- 26
- 27
- 28
- 29
- 30
- 31
- 32
- 33
- 34
- 35
- 36
- 37
- 38
- 39
- 40
- 41

3.7.4useRoutes路由表
- 跟vue很像,就是根据path跟element生成route结构
src\App.js
import React from 'react' import { NavLink, useRoutes } from 'react-router-dom' import './App.css' import router from './router' export default function App() { // 新增 const element = useRoutes(router) function computedClassName({ isActive }) { return isActive ? "list-group-item active" : "list-group-item" } return ( <div> <div> <div className="row"> <div className="col-xs-offset-2 col-xs-8"> <div className="page-header"><h2>React Router Demo</h2></div> </div> </div> <div className="row"> <div className="col-xs-2 col-xs-offset-2"> <div className="list-group"> <NavLink className={computedClassName} to="/about" >About</NavLink> <NavLink className={computedClassName} to="/home" >Home</NavLink> </div> </div> <div className="col-xs-6"> <div className="panel"> <div className="panel-body"> {/*} /> } /> } /> - 1
- 2
- 3
- 4
- 5
- 6
- 7
- 8
- 9
- 10
- 11
- 12
- 13
- 14
- 15
- 16
- 17
- 18
- 19
- 20
- 21
- 22
- 23
- 24
- 25
- 26
- 27
- 28
- 29
- 30
- 31
- 32
- 33
- 34
- 35
- 36
- 37
- 38
- 39
- 40
- 41
- 42
- 43
- 44
src\router\index.js
import About from '../pages/About' import Home from '../pages/Home' import { Navigate } from 'react-router-dom' export default [ { path: '/about', element: <About /> }, { path: '/home', element: <Home /> }, { path: '/', element: <Navigate to="/about" /> } ]- 1
- 2
- 3
- 4
- 5
- 6
- 7
- 8
- 9
- 10

3.7.5嵌套路由
- Outlet类似vue的router-view,子路由用children,如果想子组件选项高亮,而父组件不需要高亮,那就在父组件NavLink中加end
src\router\index.js
import About from '../pages/About' import Home from '../pages/Home' import News from '../pages/Home/News' import Message from '../pages/Home/Message' import { Navigate } from 'react-router-dom' export default [ { path: '/about', element: <About /> }, { path: '/home', element: <Home />, children: [ { path: 'news', element: <News /> }, { path: 'message', element: <Message /> } ] }, { path: '/', element: <Navigate to="/about" /> } ]- 1
- 2
- 3
- 4
- 5
- 6
- 7
- 8
- 9
- 10
- 11
- 12
- 13
- 14
- 15
- 16
- 17
- 18
- 19
src\pages\Home\index.jsx
import React from 'react' import '../../App.css' import { Outlet, NavLink } from 'react-router-dom' export default function Home() { function computedClassName({ isActive }) { return isActive ? "list-group-item active" : "list-group-item" } return ( <div> <div className="list-group"> <NavLink className={computedClassName} to="News" >News</NavLink> <NavLink className={computedClassName} to="Message" >Message</NavLink> </div> <Outlet /> </div> ) }- 1
- 2
- 3
- 4
- 5
- 6
- 7
- 8
- 9
- 10
- 11
- 12
- 13
- 14
- 15
- 16
- 17
- 18
- 19

3.7.6路由传参parmas
- 传参


- 接收参数

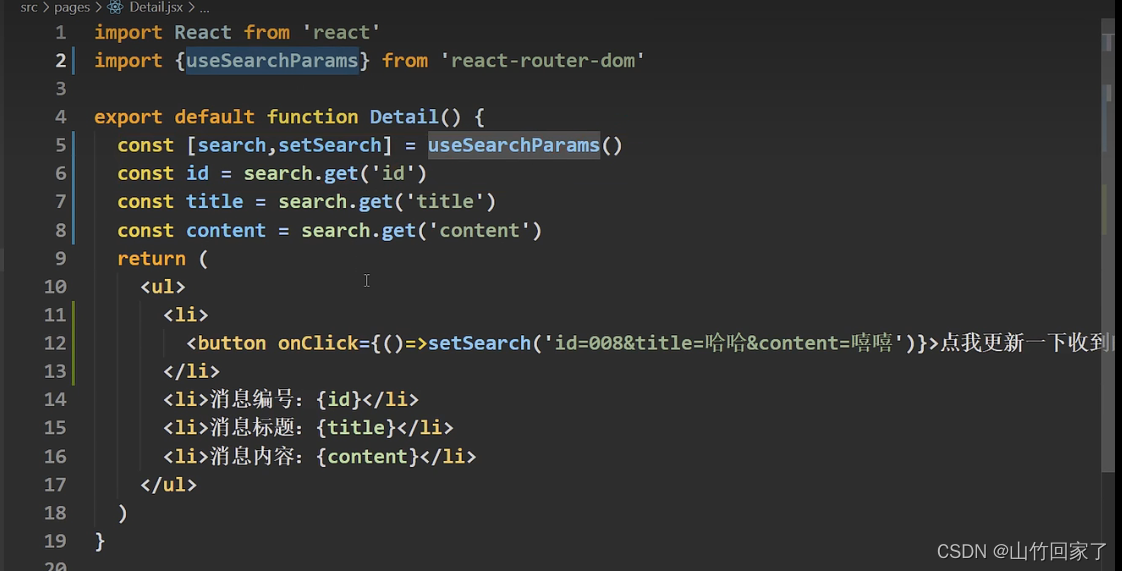
3.7.7路由传参search
- 传参

- 拿参
3.7.8路由传参state
- 传参

- 取参

3.7.9编程式路由导航useNavigate
import React from 'react' import { useNavigate } from 'react-router-dom' export default function Home() { const navigate = useNavigate() function goAbout() { // useNavigate是一个函数,参数1为路径,search跟parmas的可以直接拼在参数1的路径后面 // state就在参数2中定义 navigate('/about', { replace: false, state: { id: 99 } }) // 前进 // navigate(1) // 后退 // navigate(-1) } return ( <div> <h2>Home组件内容</h2> <button onClick={goAbout}>去about</button> </div> ) }- 1
- 2
- 3
- 4
- 5
- 6
- 7
- 8
- 9
- 10
- 11
- 12
- 13
- 14
- 15
- 16
- 17
- 18
- 19
- 20
- 21
- 22
- 23
- 24
- 25
- 26
3.7.10 useInRouterContent
- 作用:如果组件在
- 我的理解就是有没有被BrowserRouter包裹住
- 使用:useInRouterContext()就行
3.8redux(下面还有官方的react-redux,这里用于方便理解)

- Action Creators是函数,接收一个对象,type是类型是字符串,data是动作,包装好以后扔给store.action分同步和异步,同步action为Object,异步action为function。
- store分发任务给reducers,并且带上之前的数据
- reducers有初始化跟加工数据的作用,第一次接收时previousState是undefined,下次就是之前的数据了,加工好以后传回给store
- 类型客人(React Components)点菜, 服务员(Action Creators)将客人的需求生成函数,例如type:点菜data番茄炒蛋然后发给老板(store),老板将这个客人之前的点菜记录跟现在的传给厨房(Redues),厨房炒好以后端给老板,客人要拿的时候去老板那里拿
下载
npm install redux- 1
下载这个中间件是用于处理action异步,让store辨别是函数并调用
npm install redux-thunk- 1
- store.getState()获取仓库中的数据
- store.dispatch用于改变数据
- 最后store.subscribe(),需要监听数据改变,手动渲染数据,因为redux不帮渲染
src\App.js
import React from 'react' import Count from './components/Count' export default function App() { return ( <div> <Count /> </div> ) }- 1
- 2
- 3
- 4
- 5
- 6
- 7
- 8
- 9
- 10
- 11
src\components\Count.jsx
import React, { useRef, useState } from 'react' import state from '../redux/state' import { createIncrementAction, createDecrementAction, createIncrementAsyncAction } from '../redux/count_action' export default function Count() { const selectNumber = useRef(null); const [count, setCount] = useState(0) function increment() { const { current: { value } } = selectNumber state.dispatch(createIncrementAction(Number(value))) setCount()//手动渲染,将就写,不用跟着 } function decrement() { const { current: { value } } = selectNumber state.dispatch(createDecrementAction(Number(value))) setCount()//手动渲染,将就写,不用跟着 } function incrementIfOdd() { const { current: { value } } = selectNumber if (state.getState() % 2 !== 0) { state.dispatch(createIncrementAction(Number(value))) setCount()//手动渲染,将就写,不用跟着 } } function incrementAsync() { const { current: { value } } = selectNumber state.dispatch(createIncrementAsyncAction(Number(value), 500)) setCount()//手动渲染,将就写,不用跟着 } return ( <div> <h2>当前求和为:{state.getState()}</h2> <select ref={selectNumber}> <option value="1">1</option> <option value="2">2</option> <option value="3">3</option> </select> <button onClick={increment}>+</button> <button onClick={decrement}>-</button> <button onClick={incrementIfOdd}>当前求和为奇数再加</button> <button onClick={incrementAsync}>异步加</button> </div> ) }- 1
- 2
- 3
- 4
- 5
- 6
- 7
- 8
- 9
- 10
- 11
- 12
- 13
- 14
- 15
- 16
- 17
- 18
- 19
- 20
- 21
- 22
- 23
- 24
- 25
- 26
- 27
- 28
- 29
- 30
- 31
- 32
- 33
- 34
- 35
- 36
- 37
- 38
- 39
- 40
- 41
- 42
- 43
- 44
- 45
src\redux\state.js
/** * 该文件专门用于暴露一个store对象,整个应用只有一个store对象 */ // 引入createStore,专门用于创建redux中最为核心的store对象 import { createStore, applyMiddleware } from 'redux' // 引入为count组件服务的reducer import countReducer from './count_reducer' // 引入redux-thunk,用于支持异步action import thunk from 'redux-thunk' // 暴露store export default createStore(countReducer, applyMiddleware(thunk))- 1
- 2
- 3
- 4
- 5
- 6
- 7
- 8
- 9
- 10
- 11
- 12
src\redux\constant.js
/** * 该模块是用于定义action对象中type类型的常量值 */ export const INCREMENT = 'increment' export const DECREMENT = 'decrement'- 1
- 2
- 3
- 4
- 5
src\redux\count_action.js
/** * 该文件专门为count组件生成action对象 */ // 同步action,就是指action的值为Object类型的一般对象 import { INCREMENT, DECREMENT } from './constant' export const createIncrementAction = data => ({ type: INCREMENT, data }) export const createDecrementAction = data => ({ type: DECREMENT, data }) // 异步action,就是指action的值为函数 export const createIncrementAsyncAction = (data, time) => { return (dispatch) => { setTimeout(() => { dispatch(createIncrementAction(data)) }, time) } }- 1
- 2
- 3
- 4
- 5
- 6
- 7
- 8
- 9
- 10
- 11
- 12
- 13
- 14
- 15
- 16
src\redux\count_reducer.js
/** * 1.该文件用于创建一个为Count组件服务的reducer,reducer的本质就是一个函数 * 2.reducer函数会接到两个参数,分别为:之前的状态(preState),动作对象(action) */ import { INCREMENT, DECREMENT } from './constant' export default function countReducer(preState = 0, action) { // 从action对象中获取type,data const { type, data } = action // 根据type决定如何加工数据 switch (type) { case INCREMENT://如果是加 return preState + data case DECREMENT://如果是减 return preState - data default: return preState } }- 1
- 2
- 3
- 4
- 5
- 6
- 7
- 8
- 9
- 10
- 11
- 12
- 13
- 14
- 15
- 16
- 17
- 18
- 19

3.9react-redux
下载
npm install react-redex- 1

3.9.1 链接容器组件与UI组件(接着3.8的代码继续改造)

src\App.js
import React from 'react' //引入包裹着UI组件库的容器组件 import Count from './containers/Count' import store from './redux/state' export default function App() { return ( <div> {/* redux与容器组件的连接靠props */} <Count store={store} /> </div> ) }- 1
- 2
- 3
- 4
- 5
- 6
- 7
- 8
- 9
- 10
- 11
- 12
- 13
- 14
src\containers\Count\index.jsx
// 引入Count的UI组件 import CountUI from '../../components/Count' // 引入connect连接UI组件库 import { connect } from 'react-redux' // 使用connect()()创建并暴露一个count的容器组件 export default connect()(CountUI)- 1
- 2
- 3
- 4
- 5
- 6
- 7
3.9.2基本使用
- 1.明确两个概念:
UI组件:不能使用任何redux的api,只负责页面的呈现、交互等
容器组件:负责和redux通信,将结果交给UI组件 - 2.如何创建一个容器组件-----靠react-redux的connect函数
connect(mapStateToProps,mapDisptchToProps)(UIzujan)
mapStateToProps映射状态,返回值是一个对象
mapDispatchToProps:映射操作状态的方法,返回值是一个对象
容器组件有检测 状态改变并渲染的能力 -
- 备注:容器组件中的store是靠props传进去的,而不是在容器组件中直接引入

src\index.jsimport React from 'react'; import ReactDOM from 'react-dom/client'; import './index.css'; import App from './App'; import reportWebVitals from './reportWebVitals'; import { BrowserRouter } from 'react-router-dom'; import store from './redux/state' import { Provider } from 'react-redux'; const root = ReactDOM.createRoot(document.getElementById('root')); root.render( // 此处需要用Provider包裹App,目的是让App所有的后代容器组件都能接收到store <Provider store={store}> <BrowserRouter> <React.StrictMode> <App /> </React.StrictMode> </BrowserRouter> </Provider> ); reportWebVitals();- 1
- 2
- 3
- 4
- 5
- 6
- 7
- 8
- 9
- 10
- 11
- 12
- 13
- 14
- 15
- 16
- 17
- 18
- 19
- 20
- 21
- 22
src\App.js
import React from 'react' //引入包裹着UI组件库的容器组件 import Count from './containers/Count' import Person from './containers/Person' export default function App() { return ( <div> <Count /> <hr /> <Person /> </div > ) }- 1
- 2
- 3
- 4
- 5
- 6
- 7
- 8
- 9
- 10
- 11
- 12
- 13
- 14
- 15
3.9.2.1state
src\redux\state.js
/** * 该文件专门用于暴露一个store对象,整个应用只有一个store对象 */ // 引入createStore,专门用于创建redux中最为核心的store对象 import { createStore, applyMiddleware } from 'redux' // 引入所有reducer import allReducer from './reducer' // 引入redux-thunk,用于支持异步action import thunk from 'redux-thunk' // 暴露store export default createStore(allReducer, applyMiddleware(thunk))- 1
- 2
- 3
- 4
- 5
- 6
- 7
- 8
- 9
- 10
- 11
- 12
src\redux\constant.js—非必须
/** * 该模块是用于定义action对象中type类型的常量值 */ export const INCREMENT = 'increment' export const DECREMENT = 'decrement' export const ADD_PERSON = 'add_person'- 1
- 2
- 3
- 4
- 5
- 6
3.9.2.2action
src\redux\action\count.js
/** * 该文件专门为count组件生成action对象 */ // 同步action,就是指action的值为Object类型的一般对象 import { INCREMENT, DECREMENT } from '../constant' export const increment = data => ({ type: INCREMENT, data }) export const decrement = data => ({ type: DECREMENT, data }) // 异步action,就是指action的值为函数 export const incrementAsync = (data, time) => { return (dispatch) => { setTimeout(() => { dispatch(increment(data)) }, time) } }- 1
- 2
- 3
- 4
- 5
- 6
- 7
- 8
- 9
- 10
- 11
- 12
- 13
- 14
- 15
- 16
src\redux\action\person.js
import { ADD_PERSON } from '../constant' export const addPerson = data => ({ type: ADD_PERSON, data })- 1
- 2
3.9.2.3reducer
src\redux\reducer\index.js
import { combineReducers } from 'redux' // 引入为count组件服务的reducer import count from './count' // person import person from './person' // 集合reducer,合并后总状态是一个对象 const allReducer = combineReducers({ count, person }) export default allReducer- 1
- 2
- 3
- 4
- 5
- 6
- 7
- 8
- 9
- 10
- 11
- 12
- 13
src\redux\reducer\count.js
/** * 1.该文件用于创建一个为Count组件服务的reducer,reducer的本质就是一个函数 * 2.reducer函数会接到两个参数,分别为:之前的状态(preState),动作对象(action) */ import { INCREMENT, DECREMENT } from '../constant' export default function count(preState = 0, action) { // 从action对象中获取type,data const { type, data } = action // 根据type决定如何加工数据 switch (type) { case INCREMENT://如果是加 return preState + data case DECREMENT://如果是减 return preState - data default: return preState } }- 1
- 2
- 3
- 4
- 5
- 6
- 7
- 8
- 9
- 10
- 11
- 12
- 13
- 14
- 15
- 16
- 17
- 18
- 19
src\redux\reducer\person.js
import { ADD_PERSON } from '../constant' const initPerson = [{ id: '001', name: '杀生丸', age: '18' }] export default function person(preState = initPerson, action) { const { type, data } = action switch (type) { case ADD_PERSON: // 错误示范: // 是因为redux做了浅比较,发现地址值一样的,就不更新了 // return preState.unshift(data) // 正确: // 返回新数组 // 并且redux是要一个纯函数,纯函数:只要是同样的输入(实参),必定得到同样的输出(返回) // 必须遵守以下一些约束: // 1.不得改写参数数据 // 2.不会产生任何副作用,例如网络请求,输入和输出设备 // 3.不能调用Date.now()或randow等不纯的方法 return [data, ...preState] default: return preState } }- 1
- 2
- 3
- 4
- 5
- 6
- 7
- 8
- 9
- 10
- 11
- 12
- 13
- 14
- 15
- 16
- 17
- 18
- 19
- 20
- 21

3.10项目打包运行
npm run build- 1
3.11扩展
3.11.1setState()
- setState()是同步的,但是state之后的操作是异步的
- setState更新状态的2种写法
(1)setState(stateChange,[callback])------对象式的setState
stateChange为状态改变对象(该对象可以体现出状态的改变)
callBack是可选的回调函数,它在状态更新完毕,界面也更新后(render调用后)才被调用
(2)setState(updater,[callback])—函数式的setState
updater为返回stateChange对象的函数
updater可以 接收到state和props
callback是可选的回调函数,它在状态更新、界面也更新后(render调用后)才被调用 - 总结:
1.对象式的setState是函数式的setState的简写方式(语法糖)
2.使用原则:
如果状态不依赖于原状态?使用对象方式:函数式
如果需要在setState()执行后获取最新的状态数据,要在第二个callback函数中读取
对象式
import React, { Component } from 'react' export default class App extends Component { state = { count: 0 } add = () => { const { count } = this.state this.setState({ count: count + 1 }, () => { console.log(this.state.count, '执行完渲染后回调') }) console.log(this.state.count, '直接调用') } render() { return ( <div> <h1>和:{this.state.count}</h1> <button onClick={this.add}>加</button> </div > ) } }- 1
- 2
- 3
- 4
- 5
- 6
- 7
- 8
- 9
- 10
- 11
- 12
- 13
- 14
- 15
- 16
- 17
- 18
- 19
- 20
- 21

3.11.2函数式
import React, { Component } from 'react' export default class App extends Component { state = { count: 0 } add = () => { this.setState((state, props) => { return { count: state.count + 1 } }, () => { console.log(this.state.count, '执行完渲染后回调') }) console.log(this.state.count, '直接调用') } render() { return ( <div> <h1>和:{this.state.count}</h1> <button onClick={this.add}>加</button> </div > ) } }- 1
- 2
- 3
- 4
- 5
- 6
- 7
- 8
- 9
- 10
- 11
- 12
- 13
- 14
- 15
- 16
- 17
- 18
- 19
- 20
- 21
- 22
- 23
- 24
3.11.3lazyLoad路由懒加载

3.11.4PureComponent()
- 重写了shouldComponentUpdate(),只有state或props数据变化才返回true
- 注意:只进行state和props数据的浅比较,如果只是数据对象内部数据变了,返回false
3.11.4 插槽
import React, { useState } from 'react' export default function App() { return ( <div> App <A render={(num) => <B num={num} />} /> </div> ) } function A(props) { const [num, setNum] = useState(9) return ( <div> A {props.render(num)} </div> ) } function B(props) { return ( <div>B{props.num}</div> ) }- 1
- 2
- 3
- 4
- 5
- 6
- 7
- 8
- 9
- 10
- 11
- 12
- 13
- 14
- 15
- 16
- 17
- 18
- 19
- 20
- 21
- 22
- 23
- 24
- 25
- 26
- 27

3.12hook
- Hook是react16.8版本增加的新特性/新语法
- 可以在函数组件中使用state以及其他的React特性
3.1.2.1State Hook
- State Hook让函数组件也可以有state状态,并进行状态数据的读写操作
- 语法:const [xxx,setXxx]=React.useState(init)
- useState()说明:
参数:第一次初始化指定的值在内部缓存
返回值:包含2个元素的数组,第1个为内部当前状态值,第2个为更新状态值的函数 - setXxx()2种写法:
setXxx(newValue):参数为非函数值,直接指定新的状态值,内部用其覆盖原来的状态值
setXxx(value=>newValue):参数为函数,接收原本的状态值,返回新的状态值,内部用其覆盖原来的状态值
import React, { useState } from 'react' export default function App() { // 本质上渲染时1+NaN(初始值,每次渲染都要调用),但是以下部门react做了缓存,不会重置 const [count, setCount] = useState(99) function addCount() { // 方法一 // setCount(count + 1) // 方法二 setCount(oldCount => oldCount + 1) } return ( <div> <h2>总数为{count}</h2> <button onClick={addCount}>点我</button> </div> ) }- 1
- 2
- 3
- 4
- 5
- 6
- 7
- 8
- 9
- 10
- 11
- 12
- 13
- 14
- 15
- 16
- 17
- 18
- 19

3.1.2.2Effect Hook
- 可以在函数组件中执行副作用操作(用于模拟类组件中的生命周期钩子)
- 语法和说明:看代码
import React, { useState, useEffect } from 'react' export default function App() { const [count, setCount] = useState(99) const [suibain, setSuibian] = useState(99) function addCount() { setCount(count + 1) } // 如果不传第二个参数,则监听所有数据,一旦有数据变更都会改变 // useEffect(() => { // console.log('你点一下按钮') // }) // 如果传空数组则什么都不监视 // useEffect(() => { // console.log('你点一下按钮') // }, []) // 数组传入值后除了初始外,只有该值变化才会触发 // useEffect(() => { // console.log('你点一下按钮') // }, [suibain]) useEffect(() => { // 这里相当于componentDidMount和componentDidUpdate console.log('开启定时器') const timer = setInterval(() => { console.log('进入定时器') setCount(count => count + 1) }, 1000) return () => { // 这里相当于componentWillUnmount console.log('清除定时器') clearInterval(timer) } }, []) return ( <div> <h2>总数为{count}</h2> <button onClick={addCount}>点我</button> </div> ) }- 1
- 2
- 3
- 4
- 5
- 6
- 7
- 8
- 9
- 10
- 11
- 12
- 13
- 14
- 15
- 16
- 17
- 18
- 19
- 20
- 21
- 22
- 23
- 24
- 25
- 26
- 27
- 28
- 29
- 30
- 31
- 32
- 33
- 34
- 35
- 36
- 37
- 38
- 39
- 40
- 41
- 42
- 43
- 44
- 45

3.1.2.3 ref
import React, { useRef } from 'react' export default function App() { const num = useRef() function show() { console.log(num.current.value) } return ( <div> <input ref={num}></input> <button onClick={show}>点我</button> </div> ) }- 1
- 2
- 3
- 4
- 5
- 6
- 7
- 8
- 9
- 10
- 11
- 12
- 13
- 14
- 15
- 16

3.1.2.4useContext跨组件传值
- 官网例子
import React, { useRef, useContext } from 'react' const themes = { light: { foreground: "#000000", background: "#eeeeee" }, dark: { foreground: "#ffffff", background: "#222222" } }; const ThemeContext = React.createContext(themes.dark); export default function App() { return ( <ThemeContext.Provider value={themes.dark}> <Toolbar /> </ThemeContext.Provider> ); } function Toolbar(props) { return ( <div> <ThemedButton /> </div> ); } function ThemedButton() { const theme = useContext(ThemeContext); console.log(theme, 99) return ( <button style={{ background: theme.background, color: theme.foreground }}> I am styled by theme context! </button> ); }- 1
- 2
- 3
- 4
- 5
- 6
- 7
- 8
- 9
- 10
- 11
- 12
- 13
- 14
- 15
- 16
- 17
- 18
- 19
- 20
- 21
- 22
- 23
- 24
- 25
- 26
- 27
- 28
- 29
- 30
- 31
- 32
- 33
- 34
- 35
- 36
- 37
- 38
- 39
- 40

3.13 组件通信方式总结
组件间的关系:
- 父子组件
- 兄弟组件(非嵌套组件)
- 祖孙组件(跨级组件)
几种通信方式:
1.props:
children props
render props
2.消息订阅-发布
pubs-sub
3.集中式管理:
redux
4.context:
生产者-消费者模式比较好的搭配方式:
- 父子组件:props
- 兄弟组件:消息订阅-发布、集中式管理
- 祖孙组件(跨级组件):消息订阅-发布、集中式管理、context(开发用的少,封装插件用的多)
-
相关阅读:
【011】Wireshark主窗口新增、删除显示的列数
模拟实现C语言--strcat函数
vue手写卡片切换,并且点击获取到卡片信息
威纶通MT8102iE系列触摸屏如何校准屏幕?
【ESD专题】静电防护物品、静电测试工具及防静电符号
C++/QT + Mysql + Tcp 企业协作管理系统
Abnova丨抗GBA单克隆抗体解决方案
JuiceFS 在多云存储架构中的应用 | 深势科技分享
find命令
论文复现《SplaTAM: Splat, Track & Map 3D Gaussians for Dense RGB-D SLAM》
- 原文地址:https://blog.csdn.net/weixin_47886687/article/details/124977070
