-
CAPL函数Test Node中,关闭总线,关闭节点,停发报文应该怎么做?
- 🍅 我是蚂蚁小兵,专注于车载诊断领域,尤其擅长于对CANoe工具的使用
- 🍅 寻找组织 ,答疑解惑,摸鱼聊天,博客源码,点击加入👉【相亲相爱一家人】
- 🍅 玩转CANoe,博客目录大全,点击跳转👉
📘前言
-
🍅 在测试过程中,我们可能有需要关闭总线,关闭节点,停发报文的应用场景
-
🍅 在CAN Interaction Layer (谈谈我对交互层的理解)文中,已经写了在
Simulation Node节点中,CAPL脚本可以通过交互层(IL层)函数来实现关闭节点和停发报文等;今天就再来总结下Test Node中哪些CAPL函数可以实现这些功能 -
🍅 演示软硬件环境
Windows11 x64;CANoe 11 SP2 x64


📙 节点问题
🍅 关闭/激活Node节点
1️⃣ 创建个
CAPL TEST MODULE
2️⃣ 一段行代码,关闭Engine节点
/*@!Encoding:936*/ testcase ContrloNode(char node[]) { testSetEcuOffline(node); } void MainTest () { ContrloNode("Engine"); }- 1
- 2
- 3
- 4
- 5
- 6
- 7
- 8
- 9
- 10
- 11
- 12
- 13
3️⃣ 运行结果,Engine节点的报文都停发了

🍅 检测节点是否已经被关闭
1️⃣ 在自动化测试过程中,不存在人去看是否真的被关闭,CAPL有相应的函数来实现我们的需求
ChkStart_NodeBabbling函数: 检测指定节点是否处于Inactive状态

2️⃣ 简化代码如下,项目应用可以再丰富:
testcase ContrloNode(char node[]) { dword chkId; dword stmId; testSetEcuOffline(node); // 启动用 testSetEcuOnline // checks that after 300 ms no transmission are available chkId = ChkStart_NodeBabbling (node,100); TestAddCondition(chkId); // sequence of different actions and waiting conditions TestWaitForTimeout(1000); TestRemoveCondition(chkId); } void MainTest () { ContrloNode("Engine"); }- 1
- 2
- 3
- 4
- 5
- 6
- 7
- 8
- 9
- 10
- 11
- 12
- 13
- 14
- 15
- 16
- 17
- 18
3️⃣ 运行结果,Engine节点的报文都停发了,报告也很清晰

🍅 激活节点 和 检测节点是否已经被激活
1️⃣ 在关闭节点后,我们还需要再次激活节点,使用
testSetEcuOnline函数ChkStart_NodeDead函数: 检测节点在 某个时间内是否收到了来自于该节点的任何一帧报文,用于检测节点是否被激活

2️⃣ 激活和检测代码如下testcase EnableNode(char node[]) { dword chkId; dword stmId; testSetEcuOnline(node); // 启动用 testSetEcuOnline // checks that at least one message of the node is sent in each 100 ms chkId = ChkStart_NodeDead (node,100); TestAddCondition(chkId); // sequence of different actions and waiting conditions TestWaitForTimeout(1000); TestRemoveCondition(chkId); } void MainTest () { DisableNode("Engine"); testWaitForTimeout(2000); EnableNode("Engine"); }- 1
- 2
- 3
- 4
- 5
- 6
- 7
- 8
- 9
- 10
- 11
- 12
- 13
- 14
- 15
- 16
- 17
- 18
- 19
- 20
3️⃣ 测试结果显示,在100ms内收到了节点Engine的报文,且1000ms内收到了30帧

📙报文问题
🍅 停发某一帧报文
1️⃣ TestDisableMsg 函数
- TestDisableMsg :参数可以是dbMessage 类型,也可以是报文ID,测试代码选择ID

2️⃣ 多路总线情况下需要setBusContext,来指定操作的总线
testcase DisableMessage(dword can_ID,char Bus[]) { dword BusFlag; BusFlag = getBusNameContext(Bus);///多路总线需要设置 setBusContext(BusFlag); TestDisableMsg(can_ID); TestWaitForTimeout(2000); } void MainTest () { // DisableNode("Engine"); // testWaitForTimeout(2000); // EnableNode("Engine"); DisableMessage(0x123,"CAN"); }- 1
- 2
- 3
- 4
- 5
- 6
- 7
- 8
- 9
- 10
- 11
- 12
- 13
- 14
- 15
- 16
- 17
- 18
3️⃣ 测试结果看到0x123报文停发了

🍅 检测报文停发
- 1️⃣ 这个方法就有很多了,下面就用 TestWaitForMessage 函数

2️⃣ 等待一段时间收不到这条报文,就表明停发成功
testcase DisableMessage(dword can_ID,char Bus[]) { dword BusFlag; long ret; BusFlag = getBusNameContext(Bus);///多路总线需要设置 setBusContext(BusFlag); TestDisableMsg(can_ID); TestWaitForTimeout(1000); ret = TestWaitForMessage (can_ID ,3000); if (ret == 0) testStepPass("", "xxxx passed"); else TestStepFail("", "xxxx failed"); } void MainTest () { // DisableNode("Engine"); // testWaitForTimeout(2000); // EnableNode("Engine"); DisableMessage(0x123,"CAN"); }- 1
- 2
- 3
- 4
- 5
- 6
- 7
- 8
- 9
- 10
- 11
- 12
- 13
- 14
- 15
- 16
- 17
- 18
- 19
- 20
- 21
- 22
- 23
- 24
- 25
- 26
🍅 启动报文和检测报文
- 1️⃣ TestEnableMsg 函数:使能报文

2️⃣ 代码如下
testcase EnbleMessage(dword can_ID,char Bus[]) { dword BusFlag; long ret; long maxWaitTime = 2000; BusFlag = getBusNameContext(Bus);///多路总线需要设置 setBusContext(BusFlag); TestEnableMsg(can_ID); ret = testWaitForMessage(can_ID,2000); if (ret == 1) testStepPass("", "xxxx passed"); else TestStepFail("", "xxxx failed,Not received xx message in xx ms"); } void MainTest () { // DisableNode("Engine"); // testWaitForTimeout(2000); // EnableNode("Engine"); DisableMessage(0x123,"CAN"); testWaitForTimeout(2000); EnbleMessage(0x123,"CAN"); }- 1
- 2
- 3
- 4
- 5
- 6
- 7
- 8
- 9
- 10
- 11
- 12
- 13
- 14
- 15
- 16
- 17
- 18
- 19
- 20
- 21
- 22
- 23
- 24
- 25
- 26
📙CAN Bus总线问题
🍅 关闭CAN Bus总线(TX)
- 1️⃣ canSetChannelOutput 函数:可以关闭和开启CAN总线

2️⃣ 代码如下
testcase controlChannel(long channel, long silent) { canSetChannelOutput(channel,silent); Write("silent set to %d",silent); } void MainTest () { // DisableNode("Engine"); // testWaitForTimeout(2000); // EnableNode("Engine"); // DisableMessage(0x123,"CAN"); // testWaitForTimeout(2000); // EnbleMessage(0x123,"CAN"); controlChannel(1,0); //关闭 }- 1
- 2
- 3
- 4
- 5
- 6
- 7
- 8
- 9
- 10
- 11
- 12
- 13
- 14
- 15
- 16
- 17
- 18
- 19
3️⃣ 测试结果,看到所有TX报文都被停发,不影响RX(这里是simulation bus ,没有RX)
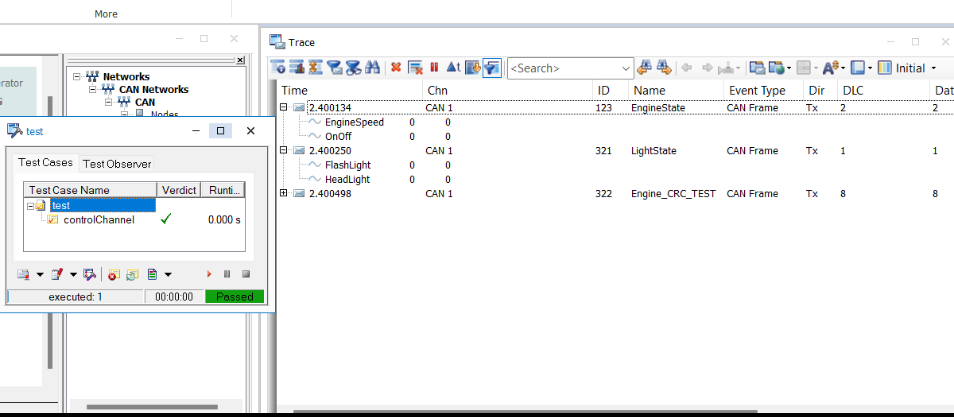
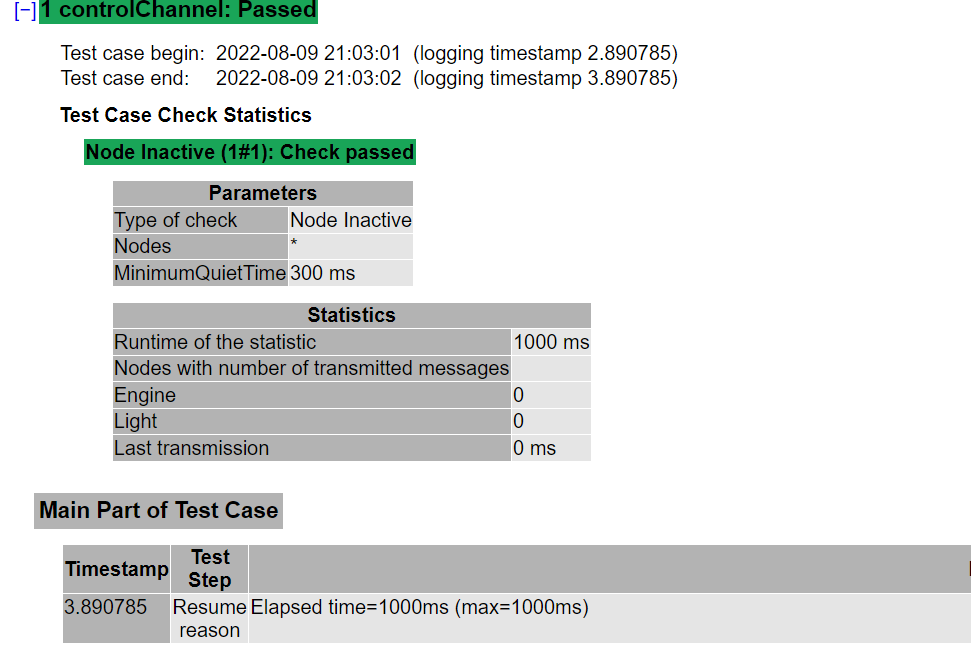
🍅 检测CAN Bus总线是否被关闭
- 1️⃣ canSetChannelOutput 函数:检测所有节点在指定时间内,都没发送报文

2️⃣ 代码如下
testcase controlChannel(long channel, long silent,char Bus[]) { dword chkId; dword BusFlag; BusFlag = getBusNameContext(Bus);///多路总线需要设置 setBusContext(BusFlag); canSetChannelOutput(channel,silent); Write("silent set to %d",silent); // checks that after 300 ms no transmission are available chkId = ChkStart_AllNodesBabbling(300); TestAddCondition(chkId); // sequence of different actions and waiting conditions TestWaitForTimeout(1000); TestRemoveCondition(chkId); } void MainTest () { // DisableNode("Engine"); // testWaitForTimeout(2000); // EnableNode("Engine"); // DisableMessage(0x123,"CAN"); // testWaitForTimeout(2000); // EnbleMessage(0x123,"CAN"); controlChannel(1,0,"CAN"); }- 1
- 2
- 3
- 4
- 5
- 6
- 7
- 8
- 9
- 10
- 11
- 12
- 13
- 14
- 15
- 16
- 17
- 18
- 19
- 20
- 21
- 22
- 23
- 24
- 25
- 26
- 27
- 28
- 29
- 30
- 31
- 32
3️⃣ 测试结果,看到所有TX报文都被停发
🍅 检测CAN Bus总线是否被关闭
- 这里使能总线之后,检测总线用testWaitForMessage函数就可以,不用传任何参数,收到任何报文都OK
testcase EnbleChannel(long channel, long silent,char Bus[]) { dword chkId; dword BusFlag; long ret; BusFlag = getBusNameContext(Bus);///多路总线需要设置 setBusContext(BusFlag); canSetChannelOutput(channel,silent); ret = testWaitForMessage(1000); if (ret == 1) testStepPass("", "xxxx passed"); else TestStepFail("", "xxxx failed,Not received xx message in xx ms"); } void MainTest () { // DisableNode("Engine"); // testWaitForTimeout(2000); // EnableNode("Engine"); // DisableMessage(0x123,"CAN"); // testWaitForTimeout(2000); // EnbleMessage(0x123,"CAN"); DisableChannel(1,0,"CAN"); testWaitForTimeout(2000); EnbleChannel(1,1,"CAN"); }- 1
- 2
- 3
- 4
- 5
- 6
- 7
- 8
- 9
- 10
- 11
- 12
- 13
- 14
- 15
- 16
- 17
- 18
- 19
- 20
- 21
- 22
- 23
- 24
- 25
- 26
- 27
- 28
- 29
- 30
- 31
- 32

🌎总结


- 🚩要有最朴素的生活,最遥远的梦想,即使明天天寒地冻,路遥马亡!
- 🚩如果这篇博客对你有帮助,请 “点赞” “评论”“收藏”一键三连 哦!码字不易,大家的支持就是我坚持下去的动力。

- 🍅 我是蚂蚁小兵,专注于车载诊断领域,尤其擅长于对CANoe工具的使用
-
相关阅读:
git的基础操作
在Jetson Nano上安装MNN深度学习框架
mybatis学习:一、Mybatis简介、Mybatis 入门程序
ENVI_IDL: 批量制作专题地图
使用三丰云免费主机搭建zerotier网络
pytorch 多GPU训练
C++ string 类相关知识
什么是零日攻击?
网络唤醒(Wake-on-LAN, WOL)
反射效率为什么低?
- 原文地址:https://blog.csdn.net/qq_34414530/article/details/126293016