-
ES——Fluent-bit——kibana组建日志收集系统---docker方式部署
ES——Fluent-bit——kibana组建日志收集系统—docker方式部署
一、准备环境
1.部署docker环境
略
2.准备es集群
本文章采用的是华为云的CSS云搜索服务的多节点集群(es集群),并且该集群时开启安全模式,未开启https访问
二、fluent-bit部署及配置
1.编写docker-compose.yaml
# vim docker-compose.yaml version: "3" services: fluent-bit: image: cr.fluentbit.io/fluent/fluent-bit:1.9.3 container_name: fluent-bit restart: always volumes: - ./:/fluent-bit/etc/ - /apps/:/apps/ #此路径为服务的日志路径 ports: - "2020:2020" deploy: resources: limits: cpus: '1' memory: 2G reservations: cpus: '0.01' memory: 2M- 1
- 2
- 3
- 4
- 5
- 6
- 7
- 8
- 9
- 10
- 11
- 12
- 13
- 14
- 15
- 16
- 17
- 18
- 19
- 20
- 21
- 22
- 23
2.编写fluent-bit.conf
# vim fluent-bit.conf [SERVICE] Flush 5 Log_Level info Daemon off Parsers_File parsers.conf HTTP_Server On HTTP_Listen 0.0.0.0 HTTP_Port 2020 # parsers_file parsers_multiline.conf [INPUT] Name tail Tag fram-admin Parser docker Path /apps/farm-admin/logs/fram-admin/*.log #需收集的日志文件 # multiline.parser multiline-regex Multiline On Parser_Firstline docker #多行合并,引用规则 [FILTER] Name parser Match ** Parser docker #引用规则 Key_Name log [OUTPUT] Name stdout Match * [OUTPUT] Name es Match fram-admin #对应input的tag Host 192.168.101.51 #css的ip地址 Port 9200 #css的端口 HTTP_User admin #css的账户 HTTP_Passwd admin #css的密码 Logstash_Format On #是否启用索引 Logstash_Prefix prod_fram-admin #索引前缀名 Logstash_DateFormat %Y-%W #索引后缀,以年-周为时间结尾 Replace_Dots On Trace_Error On Retry_Limit False- 1
- 2
- 3
- 4
- 5
- 6
- 7
- 8
- 9
- 10
- 11
- 12
- 13
- 14
- 15
- 16
- 17
- 18
- 19
- 20
- 21
- 22
- 23
- 24
- 25
- 26
- 27
- 28
- 29
- 30
- 31
- 32
- 33
- 34
- 35
- 36
- 37
- 38
- 39
- 40
- 41
- 42
- 43
- 44
- 45
3.编写parsers.conf
# vim parsers.conf [PARSER] Name apache Format regex Regex ^(?\S+)(? : +(?\S+)(? : +(?\S+)(? : +(?.*)$ Time_Key time Time_Format %b %d %H:%M:%S- 1
- 2
- 3
- 4
- 5
- 6
- 7
- 8
- 9
- 10
- 11
- 12
- 13
- 14
- 15
- 16
- 17
- 18
- 19
- 20
- 21
- 22
- 23
- 24
- 25
- 26
- 27
- 28
- 29
- 30
- 31
- 32
- 33
- 34
- 35
- 36
- 37
- 38
- 39
- 40
- 41
- 42
- 43
- 44
- 45
- 46
- 47
- 48
- 49
4.启动fluent-bit
# docker-compose create # docker-compose start- 1
- 2
三、kibana的部署及配置
部署kibana # docker pull amazon/opendistro-for-elasticsearch-kibana:1.11.0 # docker run -it -d --restart=always --name kibana -p 80:5601 amazon/opendistro-for-elasticsearch-kibana:1.11.0 # docker exec -it kibana /bin/bash # vi config/kibana.yml #server.name: kibana #server.host: "0" #elasticsearch.hosts: https://192.168.101.106:9200 #elasticsearch.ssl.certificateAuthorities: "/usr/share/kibana/config/CloudSearchService.cer" #elasticsearch.ssl.verificationMode: none #elasticsearch.username: kibanaserver #elasticsearch.password: kibanaserver #elasticsearch.requestHeadersWhitelist: ["securitytenant","Authorization"] elasticsearch.username: "admin" elasticsearch.password: "admin" elasticsearch.ssl.verificationMode: none server.ssl.enabled: false server.rewriteBasePath: false server.port: 5601 server.host: "0" elasticsearch.hosts: ["http://192.168.101.51:9200"] elasticsearch.requestHeadersWhitelist: ["securitytenant","Authorization"] opendistro_security.multitenancy.enabled: true opendistro_security.multitenancy.tenants.enable_global: true opendistro_security.multitenancy.tenants.enable_private: true opendistro_security.multitenancy.tenants.preferred: ["Private", "Global"] opendistro_security.multitenancy.enable_filter: false #opendistro_security.multitenancy.enabled: true #opendistro_security.multitenancy.tenants.preferred: ["Private", "Global"] opendistro_security.readonly_mode.roles: ["kibana_read_only"] # Use this setting if you are running kibana without https #opendistro_security.cookie.secure: false #exit #退出容器 # docker restart kibana 浏览器访问http://ip:5601- 1
- 2
- 3
- 4
- 5
- 6
- 7
- 8
- 9
- 10
- 11
- 12
- 13
- 14
- 15
- 16
- 17
- 18
- 19
- 20
- 21
- 22
- 23
- 24
- 25
- 26
- 27
- 28
- 29
- 30
- 31
- 32
- 33
- 34
- 35
- 36
- 37
- 38
- 39
- 40
- 41
四、索引生命周期配置
此配置在kibana的界面上

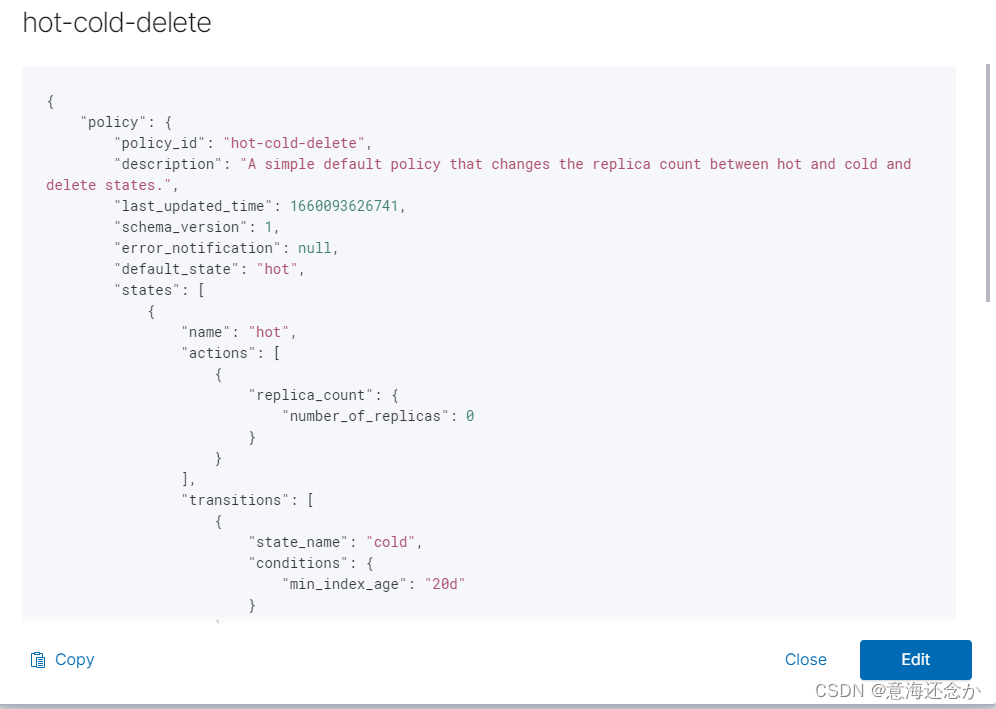
{ "policy": { "policy_id": "hot-cold-delete", "description": "A simple default policy that changes the replica count between hot and cold and delete states.", "last_updated_time": 1625996294336, "schema_version": 1, "error_notification": null, "default_state": "hot", "states": [ { "name": "hot", "actions": [ { "replica_count": { "number_of_replicas": 0 } } ], "transitions": [ { "state_name": "cold", "conditions": { "min_index_age": "25d" } } ] }, { "name": "cold", "actions": [ { "replica_count": { "number_of_replicas": 0 } } ], "transitions": [ { "state_name": "delete", "conditions": { "min_index_age": "30d" } } ] }, { "name": "delete", "actions": [ { "delete": {} } ], "transitions": [] } ] } }- 1
- 2
- 3
- 4
- 5
- 6
- 7
- 8
- 9
- 10
- 11
- 12
- 13
- 14
- 15
- 16
- 17
- 18
- 19
- 20
- 21
- 22
- 23
- 24
- 25
- 26
- 27
- 28
- 29
- 30
- 31
- 32
- 33
- 34
- 35
- 36
- 37
- 38
- 39
- 40
- 41
- 42
- 43
- 44
- 45
- 46
- 47
- 48
- 49
- 50
- 51
- 52
- 53
- 54
- 55
- 56
- 57
五、创建索引模板并引用生命周期
登陆华为云的css的Cerebor界面

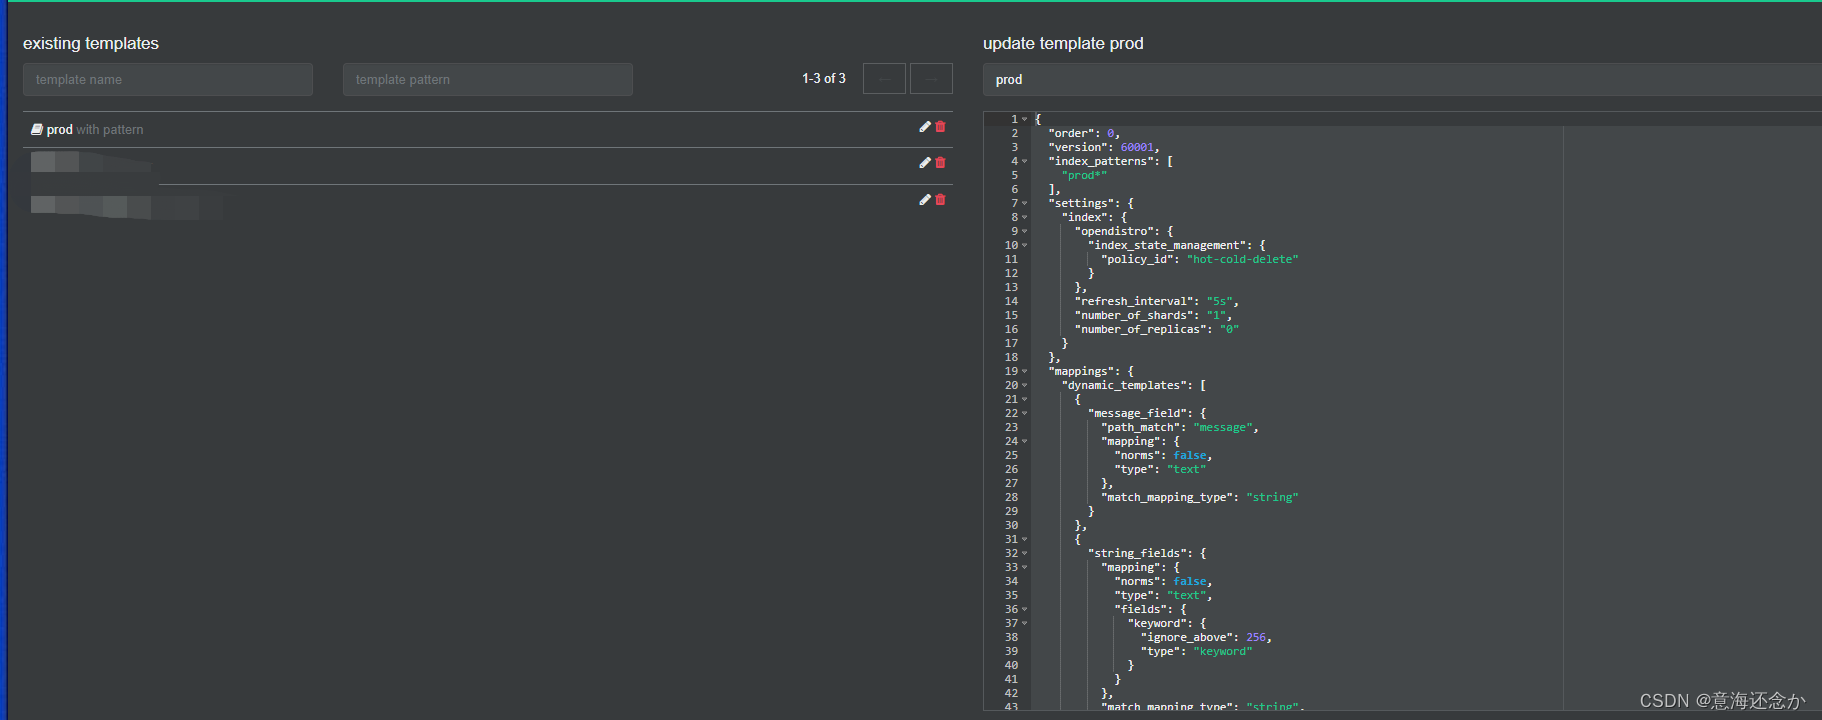
{ "order": 0, "version": 60001, "index_patterns": [ "prod*" ], "settings": { "index": { "opendistro": { "index_state_management": { "policy_id": "hot-cold-delete" } }, "refresh_interval": "5s", "number_of_shards": "1", "number_of_replicas": "0" } }, "mappings": { "dynamic_templates": [ { "message_field": { "path_match": "message", "mapping": { "norms": false, "type": "text" }, "match_mapping_type": "string" } }, { "string_fields": { "mapping": { "norms": false, "type": "text", "fields": { "keyword": { "ignore_above": 256, "type": "keyword" } } }, "match_mapping_type": "string", "match": "*" } } ], "properties": { "@timestamp": { "type": "date" }, "geoip": { "dynamic": true, "properties": { "ip": { "type": "ip" }, "latitude": { "type": "half_float" }, "location": { "type": "geo_point" }, "longitude": { "type": "half_float" } } }, "@version": { "type": "keyword" } } }, "aliases": {} }- 1
- 2
- 3
- 4
- 5
- 6
- 7
- 8
- 9
- 10
- 11
- 12
- 13
- 14
- 15
- 16
- 17
- 18
- 19
- 20
- 21
- 22
- 23
- 24
- 25
- 26
- 27
- 28
- 29
- 30
- 31
- 32
- 33
- 34
- 35
- 36
- 37
- 38
- 39
- 40
- 41
- 42
- 43
- 44
- 45
- 46
- 47
- 48
- 49
- 50
- 51
- 52
- 53
- 54
- 55
- 56
- 57
- 58
- 59
- 60
- 61
- 62
- 63
- 64
- 65
- 66
- 67
- 68
- 69
- 70
- 71
- 72
- 73
- 74
- 75
- 76
- 77
至此日志收集系统完毕,后续更新自建es集群,以及错误日志告警等,敬请各位看官持续关注…
-
相关阅读:
Python中lambda函数&eval()函数&递归的详细用法
win10禁用USB恢复USB
头部品牌集体扑街!2023年9月京东平板电视TOP10品牌排行榜出炉
七、shell脚本语言文本处理三剑客awk
如果有些字段不想进行序列化怎么办?
STM32连接WIFI-ESP8266实战—AP模式运用
Optisystem应用:光电检测器灵敏度建模
7、python中的异常处理
Node.js中基于node-schedule实现定时任务之详解
Linux下安装两个版本python
- 原文地址:https://blog.csdn.net/weixin_43273856/article/details/126284659
