-
mybatis入门
目录
一、mabatis
简介:是一款orm框架,即对象映射关系框架;是一款关于数据库层面的框架
官网:MyBatis中文网
ORM:Object reference Mapping
二、Mybatis环境搭建
1)导入pom依赖
①、先建立一个maven项目,然后导入pom依赖

将以上图中蓝色部分的代码块替换为以下这个
- <properties>
- <maven.compiler.source>1.8maven.compiler.source>
- <maven.compiler.target>1.8maven.compiler.target>
- properties>
- <dependencies>
- <dependency>
- <groupId>junitgroupId>
- <artifactId>junitartifactId>
- <version>4.12version>
- <scope>testscope>
- dependency>
- <dependency>
- <groupId>javax.servletgroupId>
- <artifactId>javax.servlet-apiartifactId>
- <version>4.0.0version>
- <scope>providedscope>
- dependency>
- <dependency>
- <groupId>org.mybatisgroupId>
- <artifactId>mybatisartifactId>
- <version>3.4.5version>
- dependency>
- <dependency>
- <groupId>mysqlgroupId>
- <artifactId>mysql-connector-javaartifactId>
- <version>5.1.44version>
- dependency>
- <dependency>
- <groupId>org.apache.logging.log4jgroupId>
- <artifactId>log4j-coreartifactId>
- <version>2.9.1version>
- dependency>
- <dependency>
- <groupId>org.apache.logging.log4jgroupId>
- <artifactId>log4j-apiartifactId>
- <version>2.9.1version>
- dependency>
- <dependency>
- <groupId>org.apache.logging.log4jgroupId>
- <artifactId>log4j-webartifactId>
- <version>2.9.1version>
- dependency>
- dependencies>
然后导入改变 。
②、将以下代码块加入finalName标签下面
- <resources>
- <resource>
- <directory>src/main/javadirectory>
- <includes>
- <include>**/*.xmlinclude>
- includes>
- resource>
- <resource>
- <directory>src/main/resourcesdirectory>
- <includes>
- <include>jdbc.propertiesinclude>
- <include>*.xmlinclude>
- includes>
- resource>
- resources>
 然后导入改变 。
③、将以下代码块加入到
标签下面 - <plugin>
- <groupId>org.mybatis.generatorgroupId>
- <artifactId>mybatis-generator-maven-pluginartifactId>
- <version>1.3.2version>
- <dependencies>
- <dependency>
- <groupId>mysqlgroupId>
- <artifactId>mysql-connector-javaartifactId>
- <version>5.1.44version>
- dependency>
- dependencies>
- <configuration>
- <overwrite>trueoverwrite>
- configuration>
- plugin>
 然后导入改变 。
2)导入框架的配置文件
①先建立一个jdbc.properties文件,然后将以下代码加入其中
- jdbc.driver=com.mysql.jdbc.Driver
- jdbc.url=jdbc:mysql://localhost:3306/mybatis_ssm?useUnicode=true&characterEncoding=UTF-8
- jdbc.username=root
- jdbc.password=123456
鼠标选中resources右键


②、安装插件
Free mybatis plugin、Mybatis generator、mybatis tools、maven helper


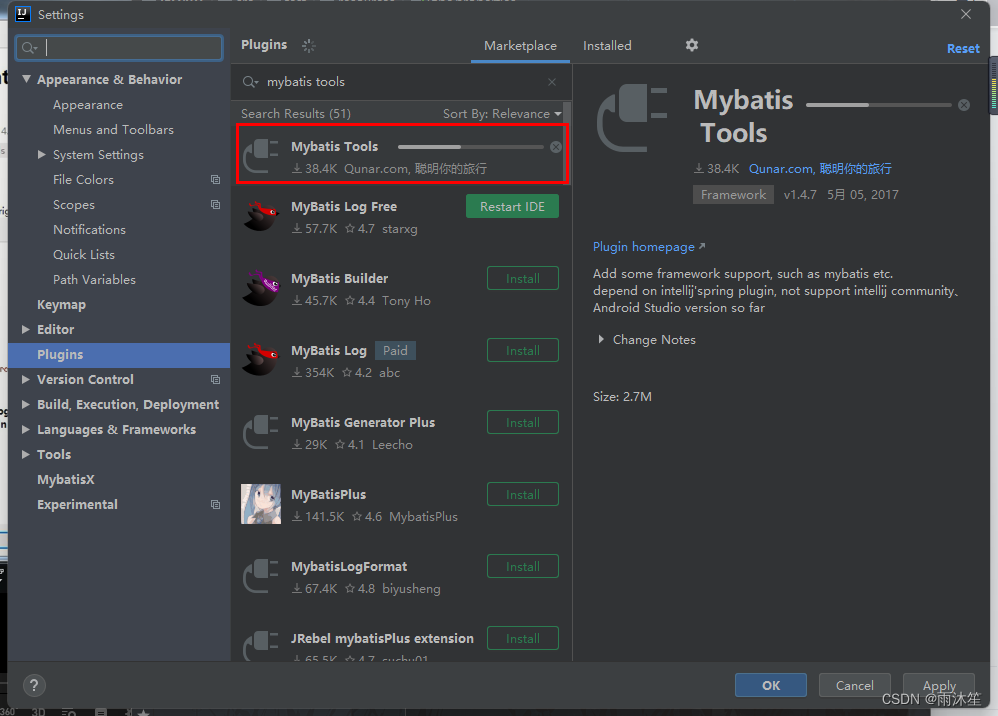

详情介绍:Intellij Idea Mybatis 插件(plugin和tools插件)_yangshijin1988的博客-CSDN博客_idea mapper 插件
③修改web.xml
- <web-app xmlns="http://xmlns.jcp.org/xml/ns/javaee"
- xmlns:xsi="http://www.w3.org/2001/XMLSchema-instance"
- xsi:schemaLocation="http://xmlns.jcp.org/xml/ns/javaee http://xmlns.jcp.org/xml/ns/javaee/web-app_3_1.xsd"
- version="3.1">web-app>

④、建立一个mybatis.cfg.xml文件
- configuration PUBLIC "-//mybatis.org//DTD Config 3.0//EN" "http://mybatis.org/dtd/mybatis-3-config.dtd">
- <configuration>
- <properties resource="jdbc.properties"/>
- <settings>
- <setting name="logImpl" value="LOG4J2"/>
- settings>
- <typeAliases>
- typeAliases>
- <environments default="development">
- <environment id="development">
- <transactionManager type="jdbc"/>
- <dataSource type="POOLED">
- <property name="driver"
- value="${jdbc.driver}"/>
- <property name="url"
- value="${jdbc.url}"/>
- <property name="username" value="${jdbc.username}"/>
- <property name="password" value="${jdbc.password}"/>
- dataSource>
- environment>
- environments>
- <mappers>
- <mapper resource="com/javaxl/mapper/BookMapper.xml"/>
- mappers>
- configuration>
 现在环境就已经搭建好了
三、Mybatis generator插件的使用
①安装Mybatis generator插件
第一步已经在上面就完成了
②配置generatorConfig.xml
先创建generatorConfig.xml文件
- generatorConfiguration PUBLIC "-//mybatis.org//DTD MyBatis Generator Configuration 1.0//EN"
- "http://mybatis.org/dtd/mybatis-generator-config_1_0.dtd" >
- <generatorConfiguration>
- <properties resource="jdbc.properties"/>
- <classPathEntry location="E:\\Maven\\mvn_baoc\\mysql\\mysql-connector-java\\5.1.44\\mysql-connector-java-5.1.44.jar"/>
- <context id="infoGuardian">
- <commentGenerator>
- <property name="suppressAllComments" value="true"/>
- <property name="suppressDate" value="true"/>
- commentGenerator>
- <jdbcConnection driverClass="${jdbc.driver}"
- connectionURL="${jdbc.url}" userId="${jdbc.username}" password="${jdbc.password}"/>
- <javaTypeResolver>
- <property name="forceBigDecimals" value="false"/>
- javaTypeResolver>
- <javaModelGenerator targetPackage="com.mgy.model"
- targetProject="src/main/java">
- <property name="enableSubPackages" value="false"/>
- <property name="constructorBased" value="true"/>
- <property name="trimStrings" value="false"/>
- <property name="immutable" value="false"/>
- javaModelGenerator>
- <sqlMapGenerator targetPackage="com.mgy.mapper"
- targetProject="src/main/java">
- <property name="enableSubPackages" value="false"/>
- sqlMapGenerator>
- <javaClientGenerator targetPackage="com.mgy.mapper"
- targetProject="src/main/java" type="XMLMAPPER">
- <property name="enableSubPackages" value="false"/>
- javaClientGenerator>
- <table schema="" tableName="t_mvc_Book" domainObjectName="Book"
- enableCountByExample="false" enableDeleteByExample="false"
- enableSelectByExample="false" enableUpdateByExample="false">
- table>
- <table schema="" tableName="t_oa_permission" domainObjectName="Permission"
- enableCountByExample="false" enableDeleteByExample="false"
- enableSelectByExample="false" enableUpdateByExample="false">
- table>
- context>
- generatorConfiguration>
要修改五处:
1)、 修改jar包的路径

2)、修改你要保存的位置

3)、修改你要生成的表

③配置maven运行generator命令
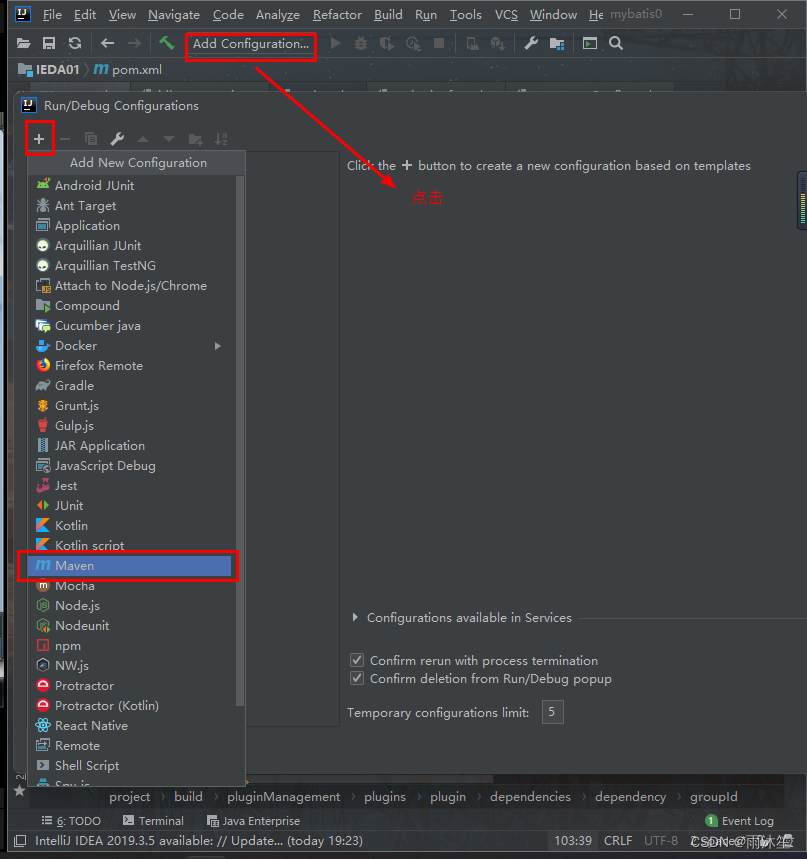

 运行完后效果和下图一样
④、在pom中处理generatorConfig.xml不能编译问题
步骤总结:
1.添加配置文件
1.1.修改5.1.44的jar的路径
1.2.修改实体类生成地址
1.3.修改SQL对应的配置文件的生成地址
1.4.修改Dao层代码生成地址
1.5.指定需要生成增删改查的表
2.配置maven的Mybatis 逆向生成代码的命令
commond line
3.在pom文件中使用配置好的命令
四、Mybatis增删改查测试
sqlSession的作用:
1.sqlsession可以拿到Mapper对象
2.作为缓存使用,一级缓存,默认会开启的缓存
3.处于性能的考虑,会采用二级缓存,二级缓存需要手动开启
SessionUtil类:
- package com.mgy.util;
- import org.apache.ibatis.session.SqlSession;
- import org.apache.ibatis.session.SqlSessionFactory;
- import org.apache.ibatis.session.SqlSessionFactoryBuilder;
- /**
- * @author 云鹤衫
- * @site www.yunheshan.com
- * @company xxx公司
- * @create 2022-08-10 21:48
- */
- public class SessionUtil {
- private static SqlSessionFactory sessionFactory;
- private static ThreadLocal
threadLocal = new ThreadLocal (); - static {
- sessionFactory = new SqlSessionFactoryBuilder().build(SessionUtil.class.getResourceAsStream("/mybatis.cfg.xml"));
- }
- public static SqlSession openSession() {
- SqlSession session = threadLocal.get();
- if (null == session) {
- session = sessionFactory.openSession();
- threadLocal.set(session);
- }
- return session;
- }
- public static void main(String[] args) {
- SqlSession session = openSession();
- System.out.println(session.getConnection());
- session.close();
- // System.out.println(session.getConnection());
- }
- }
测试逆向生成的代码是否正确
分析:
有事务:增删改
无事务:查询
结论:
测试:查询、删除没问题代码就没问题
BookBiz接口:
- package com.mgy.biz;
- import com.mgy.model.Book;
- /**
- * @author 云鹤衫
- * @site www.yunheshan.com
- * @company xxx公司
- * @create 2022-08-10 21:59
- */
- public interface BookBiz {
- int deleteByPrimaryKey(Integer bid);
- Book selectByPrimaryKey(Integer bid);
- }
BookBiz实现类:
- package com.mgy.biz.impl;
- import com.mgy.biz.BookBiz;
- import com.mgy.mapper.BookMapper;
- import com.mgy.model.Book;
- /**
- * @author 云鹤衫
- * @site www.yunheshan.com
- * @company xxx公司
- * @create 2022-08-10 22:03
- */
- public class BookBizImpl implements BookBiz {
- private BookMapper bookMapper;
- // alt+insert 快速提供set/get/tostring/构造方法
- // alt+enter 快速构建实现类,填充代码的前半部分 ctrl+1
- public BookMapper getBookMapper() {
- return bookMapper;
- }
- public void setBookMapper(BookMapper bookMapper) {
- this.bookMapper = bookMapper;
- }
- @Override
- public int deleteByPrimaryKey(Integer bid) {
- return bookMapper.deleteByPrimaryKey(bid);
- }
- @Override
- public Book selectByPrimaryKey(Integer bid) {
- return bookMapper.selectByPrimaryKey(bid);
- }
- }
实现类的测试类:
- package com.mgy.biz.impl;
- import com.mgy.biz.BookBiz;
- import com.mgy.mapper.BookMapper;
- import com.mgy.util.SessionUtil;
- import org.apache.ibatis.session.SqlSession;
- import org.junit.After;
- import org.junit.Before;
- import org.junit.Test;
- import org.junit.runner.RunWith;
- import static org.junit.Assert.*;
- /**
- * @author 云鹤衫
- * @site www.yunheshan.com
- * @company xxx公司
- * @create 2022-08-10 22:09
- */
- public class BookBizImplTest {
- private BookBizImpl bookBiz;
- private SqlSession sqlSession;
- @Before
- public void setUp() throws Exception {
- System.out.println("初始化方法...");
- BookBizImpl bookBiz=new BookBizImpl();
- // 工具类中获取session对象
- sqlSession=SessionUtil.openSession();
- // 从session对象获取mapper对象
- BookMapper mapper=sqlSession.getMapper(BookMapper.class);
- bookBiz.setBookMapper(mapper);
- this.bookBiz=bookBiz;
- }
- @After
- public void tearDown() throws Exception {
- System.out.println("方法测试结束...");
- sqlSession.commit();
- sqlSession.close();
- }
- @Test
- public void deleteByPrimaryKey() {
- bookBiz.deleteByPrimaryKey(44);
- }
- @Test
- public void selectByPrimaryKey() {
- System.out.println("测试的业务方法...");
- // System.out.println(bookBiz.getBookMapper());
- System.out.println(bookBiz.selectByPrimaryKey(44));
- }
- }
效果:

项目开发中,一般会集成日志框架,日志框架的作用是帮助程序员在开发的过程中快速排除问题,定位问题;

-
相关阅读:
Blender生成COLMAP数据集
不懂 Kubernetes 实现云原生是什么体验?
【强化学习论文合集】IJCAI-2022 强化学习论文 | 2022年合集(五)
Oracle创建表空间及用户
Java之I/O
【C++】lock_guard用法
Python基础语法
短视频如何展现效果更佳?不用类型的短视频有不同的侧重点
【Vue】 Vue3 安装说明,适合小白新手
SPDK/NVMe存储技术分析之初识UIO(二)
- 原文地址:https://blog.csdn.net/m0_62604616/article/details/126272909
