-
jQuery框架入门?有这篇就够了好吧
jQuery框架之15分钟上手jquery框架
前文
全文总计7100字阅读约15分钟,推荐跟着文章来实践,理解透彻大约需要60分钟,加油!
jQuery:
通过JS的封装技巧把DOM封装起来简化操作,避免繁琐的代码书写,目前行业内占有率最高的框架,在2015年之前jquery是WEB地体大框架,由于历史原因JQuery已经在之前20多年事件中在大量的项目中被使用,除了做外包之外,可能大部分都是jquery了吧jquery官网:官网
https://jquery.com/- 1
原生与jQuery
jquery和原生DOM的对比
*用原生DOM找到box下面的的div让他们的文字变红如下
<body> <div id="box"> <div>1div> <div>2div> <div>3div> <div>4div> <div>5div> <div>6div> div> <script> document.querySelectorAll('#box>div').forEach(value => { value.style.color="red" }); script> body>- 1
- 2
- 3
- 4
- 5
- 6
- 7
- 8
- 9
- 10
- 11
- 12
- 13
- 14
- 15
- 16
简化为构造函数
<script> class color { constructor(x) { // list:自定义属性名,保存查询结果 this.list = document.querySelectorAll(x); } } var $color = new color("#box>div"); console.log($color); script>- 1
- 2
- 3
- 4
- 5
- 6
- 7
- 8
- 9
- 10
模仿jQuery封装
<script> //创建构造函数 class color { constructor(x) { // list:自定义属性名,保存查询结果 this.list = document.querySelectorAll(x); // console.log(x); } } // 封装方法 function $css(x, name, to_color) { console.log(name); var colors = new color(x); colors.list.forEach((element) => { element.style[name] = to_color; }); } // 参数1:类 // 参数2:style属性 // 参数三:更改为 $css("#box>div", "color", "red"); script>- 1
- 2
- 3
- 4
- 5
- 6
- 7
- 8
- 9
- 10
- 11
- 12
- 13
- 14
- 15
- 16
- 17
- 18
- 19
- 20
- 21
- 22
- 23
模仿封装的dome使用效果

jQuery框架的版本区别
min版本和普通版的区别
普通版本:有换行 有注释适合阅读但是体积大
产品版/压缩版:取消多余多余的空格和换行,只留代码,适合产品上线使用文件结构

jqery的使用方式
本地文件引入jqery

网络CDN分发引入jqery
引入如下
<script src="https://apps.bdimg.com/libs/jquery/2.1.4/jquery.min.js"> script>- 1
- 2
jquery本体详细
jquery会在全局里面添加方法
所以我们想要查看的话就可以输入
console.log($) // 更加详细可使用 console.dir($)- 1
- 2
- 3

jquery的底层就是querySelectorAll用CSS选择器来选择元素尝试使用jquery选择器
jquery设置样式
接下来我们来试一下
首先先创建一些基本的架构<button>111button> <button>222button> <p>333p> <p>444p> <div id="box">555div> <div class="abc">666div>- 1
- 2
- 3
- 4
- 5
- 6
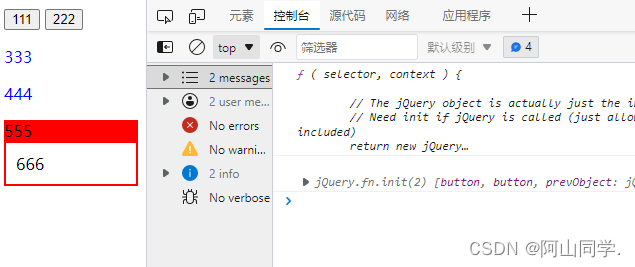
如下图:
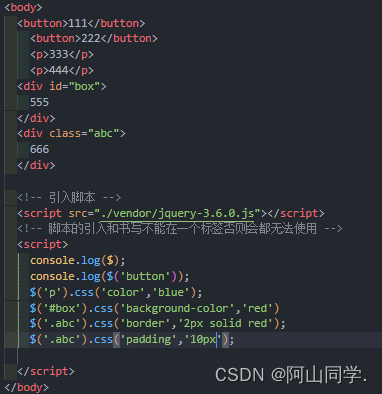
效果:
但是我们要给同一个元素添加多个CSS样式,作者采用函数重载技巧:如果制作多功能函数- 如果CSS方法接受两个实参:就会设置单一属性
- 如果接收到一个实参,类型是对象,则设置多样性
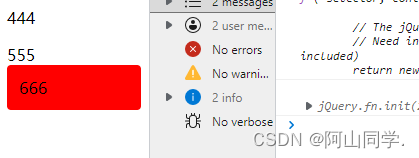
选择器多样式设置
$('.abc').css({ 'border': '2px solid red', 'padding': '10px', 'background-color': 'red', 'border-radius': '4px' })- 1
- 2
- 3
- 4
- 5
- 6
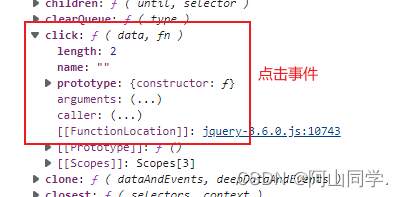
click点击事件
在创建元素且添加jquery事件后打印一下元素

可以看到元素的点击事件的原型
我们使用原生一般都是习惯使用this所以我们尝试一下打印this

点击之后打印出来发现是原生DOM的元素

由于我们使用的是框架的方法,那我们可以实现点击之后标签变色嘛
-
this是原生DOM的对象,只能用原生的DOM方法

-
要想用JQuery对象的方法,就要把this梵高JQery的对象里面

看到这里我们会发现为什么$括号这么强大
其实作者巧妙地运用了函数重载,所以$()是一个多功能函数如果参数是字符串就作为选择器去查元素,参数如果是对象就直接引入过去
jquert操作操作class
使用jQuery制作单选框
首先我们来写出主体框架
DOCTYPE html> <html lang="en"> <head> <meta charset="UTF-8"> <meta http-equiv="X-UA-Compatible" content="IE=edge"> <meta name="viewport" content="width=device-width, initial-scale=1.0"> <title>Documenttitle> <style> #box{ user-select: none; /* background-color: brown; */ display: flex; } #box>span{ padding: 12px 30px; background-color: rgb(181, 181, 154); margin: 4px; border-radius: 5px; transition: 1s; font-size: 20px; } #box>span.active{ background-color: rgb(40, 109, 128); color: aliceblue; } style> head> <body> <h2>晚上该干点什么呢?h2> <div id="box"> <span>睡觉span> <span>写项目span> <span>打游戏span> <span>出去逛逛span> <span>陪女朋友span> div> body> html>- 1
- 2
- 3
- 4
- 5
- 6
- 7
- 8
- 9
- 10
- 11
- 12
- 13
- 14
- 15
- 16
- 17
- 18
- 19
- 20
- 21
- 22
- 23
- 24
- 25
- 26
- 27
- 28
- 29
- 30
- 31
- 32
- 33
- 34
- 35
- 36
- 37
- 38
我们需要实现的效果图如下

我们如果要实现下面的效果应该怎么做呢?我们都知道原生js可以通过点击事件来触发,所以我们使用jQuery也可以实现添加样式
操作class的常见参数
add添加
$(this).addClass('active');- 1
toggle:切换
$(this).toggle('active');- 1
remove:移除
$(this).remove('active');- 1
siblings:兄弟姐妹
$('#box>span').click(function(){ $(this).addClass('active').siblings().removeClass('active') // 当前项.添加样式.找到兄弟元素们.移除他们的样式 })- 1
- 2
- 3
- 4
全代码:
DOCTYPE html> <html lang="en"> <head> <meta charset="UTF-8" /> <meta http-equiv="X-UA-Compatible" content="IE=edge" /> <meta name="viewport" content="width=device-width, initial-scale=1.0" /> <title>Documenttitle> <style> #box { user-select: none; /* background-color: brown; */ display: flex; } #box > span { padding: 12px 25px; background-color: rgb(181, 181, 154); margin: 4px; border-radius: 5px; transition: 1s; font-size: 15px; } #box > span.active { padding: 12px 25px; background-color: rgb(40, 109, 128); color: aliceblue; margin: 4px; border-radius: 5px; transition: 1s; font-size: 15px; } style> head> <body> <h2>晚上该干点什么呢?h2> <div id="box"> <span>睡觉span> <span>写项目span> <span>打游戏span> <span>出去逛逛span> <span>陪女朋友span> div> <script src="./vendor/jquery-3.6.0.js">script> <script> // 当点击时 $("#box>span").click(function () { $(this).addClass("active").siblings().removeClass("active"); // 当前项.添加样式.找到兄弟元素们.移除他们的样式 }); script> body> html>- 1
- 2
- 3
- 4
- 5
- 6
- 7
- 8
- 9
- 10
- 11
- 12
- 13
- 14
- 15
- 16
- 17
- 18
- 19
- 20
- 21
- 22
- 23
- 24
- 25
- 26
- 27
- 28
- 29
- 30
- 31
- 32
- 33
- 34
- 35
- 36
- 37
- 38
- 39
- 40
- 41
- 42
- 43
- 44
- 45
- 46
- 47
- 48
- 49
- 50
- 51
- 52
jQuery导航栏
接下来我们再做一个导航栏来练手
参考:

HTML主体架构
DOCTYPE html> <html lang="en"> <head> <meta charset="UTF-8"> <meta http-equiv="X-UA-Compatible" content="IE=edge"> <meta name="viewport" content="width=device-width, initial-scale=1.0"> <title>Documenttitle> <style> body{ background-color: aquamarine; } #box{ width: 510px; background-color: rgb(0, 43, 105); display: flex; border-radius: 5px; } #box>span{ width: 200px; height: 50px; display: flex; justify-content: center; align-items: center; font-size: 18px; border-radius: 5px; /* background-color: azure; */ color: aliceblue; } #box>span.active{ font-size: 18px; background-color: rgb(243, 151, 0); } style> head> <body> <div id="box"> <span class="active">主页span> <span>关于我span> <span>开发的项目span> <span>联系我span> <span>我的博客span> div> body> html>- 1
- 2
- 3
- 4
- 5
- 6
- 7
- 8
- 9
- 10
- 11
- 12
- 13
- 14
- 15
- 16
- 17
- 18
- 19
- 20
- 21
- 22
- 23
- 24
- 25
- 26
- 27
- 28
- 29
- 30
- 31
- 32
- 33
- 34
- 35
- 36
- 37
- 38
- 39
- 40
- 41
- 42
- 43
- 44
- 45
jquery导航栏制作解析
首先我们需要找到标签
$('#box>span')- 1
然后添加点击事件
$('#box>span').click(function(){})- 1
点击之后我们要找到元素,由于jquery已经遍历好了所以我们不需要去遍历找参数所以我们使用它自带的this(
原生DOM的this与jquery的this不能混用)- 给元素添加class
$(this).addClass('active')- 1
- 由于点击之后就相当于选择了这个元素了我们要把其他元素的高亮给去掉,首先我们要找到她的兄弟
$(this).siblings()- 1
- 然后我们需要移除掉他们的样式
$(this).removeClass(active)- 1
- 最后可以简化写法一下
$('#box>span').click(function(){ $(this).addClass('active').siblings().removeClass('active'); })- 1
- 2
- 3
代码如下所示

jQuery的显示与隐藏
如果需要隐藏项目的话我们可以直接写为
$('元素类').hide()- 1
使用了之后我们可以发现被使用了此属性的元素的样式会以
display:none;的方式隐藏起来,如下图所示

如果父元素下面有很多的类的话,关键是如果全部写写上标签的话就显得有些不切合实际了如果写first-child或者first-child的方式的话就显得有些麻烦了所以jquery就提供了一个全新的选择方式:.eq()的方式所以可以写为:假如我要选择#box下面的第二个盒子的话

我们就可以写为:$("#box>div").eq(1).hide();- 1
当然有由于可能盒子太多不可能写特别大的话我们可以写负数
$("#box>div").eq(-1).hide();- 1
jQuery简单的动画
上面说完了一些常用的属性之后现在我们来讲一些简单的动画
show():显示toggle():切换slide():滑动slideUp():滑动收起- 第一个参数为过渡时间
- 第二个参数为执行完毕之后的回调函数
slideup():滑动收起- 第一个参数为过渡时间
- 第二个参数为执行完毕之后的回调函数
举例1----模仿某网站的小广告
DOCTYPE html> <html lang="en"> <head> <meta charset="UTF-8" /> <meta http-equiv="X-UA-Compatible" content="IE=edge" /> <meta name="viewport" content="width=device-width, initial-scale=1.0" /> <title>Documenttitle> <style> #ad { width: 150px; height: 200px; position: fixed; bottom: 0; right: 0; border: 1px solid rgb(152, 150, 150); padding: 1px; } style> head> <body> <div id="ad"> <button>关闭button> <p>欢迎来到传奇世界,我是xin88,是兄弟就来剁我 装备全靠打秒回收p> div> <script src="./vendor/jquery-3.6.0.js">script> <script> $("#ad").hide(); function toad() { setTimeout(() => { // slideDown滑动展开 $("#ad").slideDown(1000); }, 5000); } toad() $("#ad>button").click(function () { // 第一个方法 // $('#ad').hide(2000) // 父元素:parent // slideUp:收起 // 参数2,完成后的回调函数 $(this).parent().slideUp(1000, toad()); }); $("#ad").click(function () { // location.replace('http://xin88.top') }); script> body> html>- 1
- 2
- 3
- 4
- 5
- 6
- 7
- 8
- 9
- 10
- 11
- 12
- 13
- 14
- 15
- 16
- 17
- 18
- 19
- 20
- 21
- 22
- 23
- 24
- 25
- 26
- 27
- 28
- 29
- 30
- 31
- 32
- 33
- 34
- 35
- 36
- 37
- 38
- 39
- 40
- 41
- 42
- 43
- 44
- 45
- 46
- 47
- 48
- 49
示例2----某些折叠菜单
DOCTYPE html> <html lang="en"> <head> <meta charset="UTF-8" /> <meta http-equiv="X-UA-Compatible" content="IE=edge" /> <meta name="viewport" content="width=device-width, initial-scale=1.0" /> <title>Documenttitle> <style> #box { width: 300px; border: 1px solid #ccc; } #box > div:first-child { background-color: #aaa; padding: 10px; } #box > div:last-child { background-color: #eee; padding: 10px; } style> head> <body> <div id="box"> <div>晚上吃点啥呢?div> <div> <div>猪脚饭div> <div>红烧茄子div> <div>黄焖鸡div> <div>小炒肉div> <div>5555div> <div>6666div> div> div> <script src="./vendor/jquery-3.6.0.js">script> <script> // 首先隐藏项目 // $('#box>div:last-child').hide() // jQuery提供了eq选择器来找到选项 // 负数代表倒数来选择 // $('#box>div:eq(-1)').hide() $("#box>div").eq(1).hide(); // 点击是显示 $("#box>div") .eq(0) .click(function () { // 原生DOM的下一个元素nextElementSibling // 在jquery就简化为了next() // show:显示 // toggle:切换 // 滑动过渡动画 // slide:滑动 // 参数1:动画时长,默认单位毫秒 $(this).next().slideToggle(10000); }); $("#box>div:first-child").click(function () { $(this).css("display:none"); }); script> body> html>- 1
- 2
- 3
- 4
- 5
- 6
- 7
- 8
- 9
- 10
- 11
- 12
- 13
- 14
- 15
- 16
- 17
- 18
- 19
- 20
- 21
- 22
- 23
- 24
- 25
- 26
- 27
- 28
- 29
- 30
- 31
- 32
- 33
- 34
- 35
- 36
- 37
- 38
- 39
- 40
- 41
- 42
- 43
- 44
- 45
- 46
- 47
- 48
- 49
- 50
- 51
- 52
- 53
- 54
- 55
- 56
- 57
- 58
- 59
- 60
- 61
- 62
-
相关阅读:
浅谈拓展欧几里得算法
DL之GRU:基于2022年6月最新上证指数数据集利用GRU算法预测最新股票上证指数实现回归预测
Kafka-Java二:Spring配置kafka消息发送端的缓冲区
python使用apscheduler每隔一段时间自动化运行程序
电脑重装系统后内存占用高怎么解决?
PMP 通关之45天备考五重点
【Eclipse Maven Tycho】如何通过maven执行eclipse application
专访阿里云:AI 时代服务器操作系统洗牌在即,生态合作重构未来
sklearn快速入门教程:标准化
SPDK vhost-user结合SPDK NVMe-oF RDMA性能调优
- 原文地址:https://blog.csdn.net/weixin_50112395/article/details/126266078
