-
VIT 源码详解
1.项目配置说明
参数说明:
数据集:
--name cifar10-100_500
--dataset cifar10
哪个版本的模型:
--model_type ViT-B_16
预训练权重:
--pretrained_dir checkpoint/ViT-B_16.npz
2.patch embeding与position_embedding
对于图像编码,以VIT - B/16为例,首先用卷积核大小为16*16、步长为16的卷积,对图像进行变换,此时图像维度变成16 * 768 * 14 * 14,再变换维度为[16, 196, 768],然后将维度为16*1*768的0patch相连。
对于位置编码,构建一个1 * 197 * 768的向量
最后,将图像编码与位置编码相加就完成了本次编码。
代码如下:
- class Embeddings(nn.Module):
- """Construct the embeddings from patch, position embeddings.
- """
- def __init__(self, config, img_size, in_channels=3):
- super(Embeddings, self).__init__()
- self.hybrid = None
- img_size = _pair(img_size)
- # patch_size 大小 与 patch数量 n_patches
- if config.patches.get("grid") is not None:
- grid_size = config.patches["grid"]
- patch_size = (img_size[0] // 16 // grid_size[0], img_size[1] // 16 // grid_size[1])
- n_patches = (img_size[0] // 16) * (img_size[1] // 16)
- self.hybrid = True
- else:
- patch_size = _pair(config.patches["size"])
- n_patches = (img_size[0] // patch_size[0]) * (img_size[1] // patch_size[1])
- self.hybrid = False
- # 使用混合模型
- if self.hybrid:
- self.hybrid_model = ResNetV2(block_units=config.resnet.num_layers,
- width_factor=config.resnet.width_factor)
- in_channels = self.hybrid_model.width * 16
- # patch_embeding 16 * 768 * 14 * 14
- self.patch_embeddings = Conv2d(in_channels=in_channels,
- out_channels=config.hidden_size,
- kernel_size=patch_size,
- stride=patch_size)
- # 初始化 position_embeddings: 1 * 197 * 768
- self.position_embeddings = nn.Parameter(torch.zeros(1, n_patches+1, config.hidden_size))
- # 初始化第 0 个patch,表示分类特征 1*1*768
- self.cls_token = nn.Parameter(torch.zeros(1, 1, config.hidden_size))
- # dropout层
- self.dropout = Dropout(config.transformer["dropout_rate"])
- def forward(self, x):
- print(x.shape)
- B = x.shape[0]
- # 拓展cls_tokens的维度:16 *1*768
- cls_tokens = self.cls_token.expand(B, -1, -1)
- print(cls_tokens.shape)
- # 混合模型
- if self.hybrid:
- x = self.hybrid_model(x)
- # 编码:16 * 768 * 14 * 14
- x = self.patch_embeddings(x)
- print(x.shape)
- # 变换维度:16 * 768 * 14 * 14-->[16, 768, 196]
- x = x.flatten(2)
- print(x.shape)
- # [16, 768, 196] --> [16, 196, 768]
- x = x.transpose(-1, -2)
- print(x.shape)
- # 加入分类特征patch
- x = torch.cat((cls_tokens, x), dim=1)
- print(x.shape)
- # 加入位置编码
- embeddings = x + self.position_embeddings
- print(embeddings.shape)
- # dropout层
- embeddings = self.dropout(embeddings)
- print(embeddings.shape)
- return embeddings
3.ecoder
多头注意力模块:
首先构建q,k,v三个辅助向量,因为我们采用多头注意力机制(12个),首先,我们需要将q,k,v维度从16, 197, 768转换成16, 12, 197, 64,然后获得q,k的相似性qk,因为获得的是两两之间的关系,所以维度为16, 12, 197, 197,消除量纲,经过softmax后,得到提取到的特征向量qkv,维度为16, 12, 197, 64,再将维度还原成16, 197, 768
- class Attention(nn.Module):
- def __init__(self, config, vis):
- super(Attention, self).__init__()
- self.vis = vis
- # heads数量
- self.num_attention_heads = config.transformer["num_heads"]
- # 每个head的向量维度
- self.attention_head_size = int(config.hidden_size / self.num_attention_heads)
- # 总head_size
- self.all_head_size = self.num_attention_heads * self.attention_head_size
- # query向量
- self.query = Linear(config.hidden_size, self.all_head_size)
- # key向量
- self.key = Linear(config.hidden_size, self.all_head_size)
- # value向量
- self.value = Linear(config.hidden_size, self.all_head_size)
- # 全连接层
- self.out = Linear(config.hidden_size, config.hidden_size)
- # dropout层
- self.attn_dropout = Dropout(config.transformer["attention_dropout_rate"])
- self.proj_dropout = Dropout(config.transformer["attention_dropout_rate"])
- self.softmax = Softmax(dim=-1)
- def transpose_for_scores(self, x):
- # 维度:16, 197, 768-->16,197,12,64
- new_x_shape = x.size()[:-1] + (self.num_attention_heads, self.attention_head_size)
- # print(new_x_shape)
- x = x.view(*new_x_shape)
- # print(x.shape)
- # print(x.permute(0, 2, 1, 3).shape)
- # 16,197,12,64 --> 16, 12, 197, 64
- return x.permute(0, 2, 1, 3)
- def forward(self, hidden_states):
- # print(hidden_states.shape)
- # q,k,v:16, 197, 768
- mixed_query_layer = self.query(hidden_states)
- # print(mixed_query_layer.shape)
- mixed_key_layer = self.key(hidden_states)
- # print(mixed_key_layer.shape)
- mixed_value_layer = self.value(hidden_states)
- # print(mixed_value_layer.shape)
- # q,k,v:16, 197, 768-->16, 12, 197, 64
- query_layer = self.transpose_for_scores(mixed_query_layer)
- # print(query_layer.shape)
- key_layer = self.transpose_for_scores(mixed_key_layer)
- # print(key_layer.shape)
- value_layer = self.transpose_for_scores(mixed_value_layer)
- # print(value_layer.shape)
- # q,k的相似性:16, 12, 197, 197
- attention_scores = torch.matmul(query_layer, key_layer.transpose(-1, -2))
- # print(attention_scores.shape)
- # 消除量纲
- attention_scores = attention_scores / math.sqrt(self.attention_head_size)
- # print(attention_scores.shape)
- attention_probs = self.softmax(attention_scores)
- # print(attention_probs.shape)
- weights = attention_probs if self.vis else None
- attention_probs = self.attn_dropout(attention_probs)
- # print(attention_probs.shape)
- # print(value_layer.shape)
- # 特征向量:qkv:16, 12, 197, 64
- context_layer = torch.matmul(attention_probs, value_layer)
- # print(context_layer.shape)
- # 16, 12, 197, 64-->16, 12, 197, 64
- context_layer = context_layer.permute(0, 2, 1, 3).contiguous()
- # print(context_layer.shape)
- # 16, 12, 197, 64-->16, 197, 768
- new_context_layer_shape = context_layer.size()[:-2] + (self.all_head_size,)
- context_layer = context_layer.view(*new_context_layer_shape)
- # print(context_layer.shape)
- # 全连接层:16, 197, 768
- attention_output = self.out(context_layer)
- # print(attention_output.shape)
- # dropout层
- attention_output = self.proj_dropout(attention_output)
- # print(attention_output.shape)
- return attention_output, weights
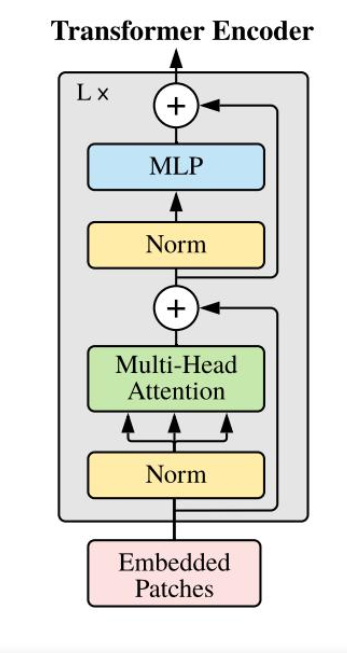
transformer encoder
对于输入的x,首先经过层归一化后,输入多头注意力机制,对结果进行残差连接,再经过层归一化,经过两层全连接,残差连接后,得到一个模块结果,堆叠L层,输出最终结果
- class Block(nn.Module):
- def __init__(self, config, vis):
- super(Block, self).__init__()
- # 序列的大小:768
- self.hidden_size = config.hidden_size
- # 层归一化
- self.attention_norm = LayerNorm(config.hidden_size, eps=1e-6)
- self.ffn_norm = LayerNorm(config.hidden_size, eps=1e-6)
- # MLP层
- self.ffn = Mlp(config)
- # 多头注意力机制
- self.attn = Attention(config, vis)
- def forward(self, x):
- # print(x.shape)
- # 16, 197, 768
- h = x
- # 层归一化
- x = self.attention_norm(x)
- # print(x.shape)
- # 多头注意力机制
- x, weights = self.attn(x)
- # 残差连接
- x = x + h
- # print(x.shape)
- h = x
- # 层归一化
- x = self.ffn_norm(x)
- # print(x.shape)
- # MLP层
- x = self.ffn(x)
- # print(x.shape)
- # 残差连接
- x = x + h
- # print(x.shape)
- return x, weights
整体架构
对于输入x,进行patch embeding和position embeding后,此时维度为16*197*768,输入encoder中,经过L层的编码模块,取出第0个patch的编码结果(表示分类特征),输入分类层,得到预测结果。
- class VisionTransformer(nn.Module):
- def __init__(self, config, img_size=224, num_classes=21843, zero_head=False, vis=False):
- super(VisionTransformer, self).__init__()
- self.num_classes = num_classes
- self.zero_head = zero_head
- self.classifier = config.classifier
- self.transformer = Transformer(config, img_size, vis)
- self.head = Linear(config.hidden_size, num_classes)
- def forward(self, x, labels=None):
- x, attn_weights = self.transformer(x)
- print(x.shape)
- # X.shape:16, 197, 768 logits.shape:16, 10
- logits = self.head(x[:, 0])
- print(logits.shape)
- # 交叉熵
- if labels is not None:
- loss_fct = CrossEntropyLoss()
- loss = loss_fct(logits.view(-1, self.num_classes), labels.view(-1))
- return loss
- else:
- return logits, attn_weights
-
相关阅读:
本地数据库IndexedDB - 学员管理系统之条件筛选(四)
网络编程TCP/UDP通信
终于辞职了,全职ue了
Unity3D 与 安卓交互
OceanBase 安全审计之透明加密
地图瓦片下载地址汇总(leaflet 百度地图等)
ctfshow MengXIn misc1
ovalbumin/OVA-Nitrophenyl Carbonates 鸡卵白蛋白-硝基苯碳酸盐
大豆耐涝的秘密
带你手撕一颗红黑树
- 原文地址:https://blog.csdn.net/qq_52053775/article/details/126261070