-
springcloudalibaba架构(13):Spring Cloud Gateway服务网关和入门案例
前言
在微服务架构中,一个系统被拆成很多个小服务。作为客户端要如何去调用这么多的微服务呢?如果没有网关的存在,我们只能在客户端去记录每个微服务的地址,然后去分别调用。

这样的架构,会存在很多的问题- 客户端多次请求不同的微服务,增加了客户端代码和配置编写的复杂性
- 认证复杂,每个服务都需要独立认证鉴权
- 存在跨域请求,在一定的场景下处理相对复杂。
添加API网关之后,系统的架构图变成了如下所示:
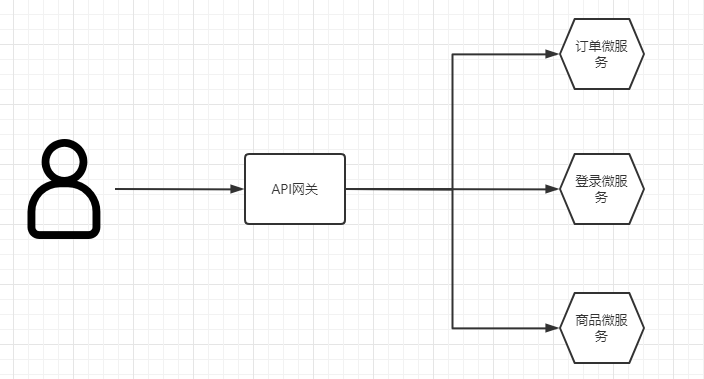
上面的这些问题可以借用API网关来解决。
所谓的API网关,就是指系统的统一入口,它封装了应用程序的内部结构,为客户端提供统一服务,一些与业务本身无关的公共逻辑也可以在这里实现,比如认证、鉴权、监控、路由转发等。在业界比较流行的网关中,有 Nginx+lua,Kong , Zuul 和Spring Cloud Gateway。
注意: SpringCloud alibaba技术栈中并没有提供给自己的网关,我们可以采用Spring Cloud Gateway来做网关。第一节 Gateway简介
Spring Cloud Gateway 是 Spring基于Spring5.0,Spring Boot 2.0和Project Reactor等技术开发的网关,它旨在为微服务架构提供一种简单有效的统一的API路由管理方式。它的目标是替代Netflix Zuul,其不仅提供统一的路由方式,并且基于Filter链的方式提供了网关基本的功能,例如: 安全,监控,限流。
优点:- 性能强:是第一代Zuul的1.6倍
- 功能强大:内置了很多使用的功能,例如: 转发、监控、限流
- 设置优雅,容易扩展
缺点: - 其实现依赖Netty与WebFlux,不是传统的Servlet变成模型,学习成本高
- 不能将其部署在Tomcat,Jetty等Servlet容器里,只能打成Jar包运行
- 需要Spring Boot 2.0以及以上的版本,才支持。
第二节 Gateway简单入门案例
本章代码已分享至Gitee: https://gitee.com/lengcz/springcloudalibaba01.git
-
创建api-gateway模块(springboot模块)
-
引入依赖gateway依赖(不需要webstarter依赖)
<dependency> <groupId>org.springframework.cloudgroupId> <artifactId>spring-cloud-starter-gatewayartifactId> dependency>- 1
- 2
- 3
- 4

- 配置yml文件
server: port: 7000 spring: application: name: api-gateway cloud: gateway: routes: #路由数组,满足什么条件,转发到什么微服务 - id: product_route #当前路由发的标识,需要唯一,默认是UUID uri: http://localhost:8081 #请求最终转发的地址 order: 1 #路由优先级 数值越小优先级越高 predicates: #断言 - Path=/product-serv/** #当请求路径满足Path指定的规则时,此路由信息才会正常转发 filters: #过滤器,在请求传递过程中,对请求做一些手脚 - StripPrefix=1 #在请求转发之前去掉一层路径,例如 localhost:7000/product-serv/product/1-->localhost:8081/product/1- 1
- 2
- 3
- 4
- 5
- 6
- 7
- 8
- 9
- 10
- 11
- 12
- 13
- 14
- 15
- 启动网关和product微服务,请求地址:http://localhost:7000/product-serv/product/1,通过网关请求,可以获取到product服务提供的接口信息。

第三节 Gateway从nacos中获取服务信息
在第二节中,我们在yml文件中配置了微服务的信息,写死了product微服务的ip和端口,那么当我们开启了多个product微服务做负载均衡怎么办?微服务的ip和端口变更怎么办?显然微服务的ip和端口不应该写死,从nacos服务注册中心获取微服务的地址和端口,就可以解决上述问题。如何操作呢?
显然我们需要在api-gateway模块进行改造- 导入依赖
<dependency> <groupId>com.alibaba.cloudgroupId> <artifactId>spring-cloud-starter-alibaba-nacos-discoveryartifactId> dependency>- 1
- 2
- 3
- 4
- 5
- 主类开启服务发现
@SpringBootApplication @EnableDiscoveryClient //开启服务发现 public class ApiGatewayApplication { public static void main(String[] args) { SpringApplication.run(ApiGatewayApplication.class,args); } }- 1
- 2
- 3
- 4
- 5
- 6
- 7
- 8
- 修改配置文件
server: port: 7000 spring: application: name: api-gateway cloud: nacos: discovery: server-addr: localhost:8848 #将gateway注册到nacos gateway: discovery: locator: enabled: true # 让gateway从nacos获取服务信息 routes: #路由数组,满足什么条件,转发到什么微服务 - id: product_route #当前路由发的标识,需要唯一,默认是UUID # uri: http://localhost:8081 #请求最终转发的地址 uri: lb://server-product #lb 指的是负载均衡,后面跟的是具体微服务的名称 order: 1 #路由优先级 数值越小优先级越高 predicates: #断言 - Path=/product-serv/** #当请求路径满足Path指定的规则时,此路由信息才会正常转发 filters: #过滤器,在请求传递过程中,对请求做一些手脚 - StripPrefix=1 #在请求转发之前去掉一层路径,例如 localhost:7000/product-serv/product/1-->localhost:8081/product/1- 1
- 2
- 3
- 4
- 5
- 6
- 7
- 8
- 9
- 10
- 11
- 12
- 13
- 14
- 15
- 16
- 17
- 18
- 19
- 20
- 21
- 22
- 启动网关测试,并启动两个product微服务(方便负载均衡测试),多次请求测试,可以看到product微服务的两个实例都被负载均衡调用了。


第四节 默认路由
在前面的章节,我们需要自定义路由规则,但是gateway是有默认路由的。修改配置文件去掉路由规则,测试
1. 怎么配置默认路由
- 去掉路由规则后,配置文件变成下面这样
server: port: 7000 spring: application: name: api-gateway cloud: nacos: discovery: server-addr: localhost:8848 #将gateway注册到nacos gateway: discovery: locator: enabled: true # 让gateway从nacos获取服务信息- 1
- 2
- 3
- 4
- 5
- 6
- 7
- 8
- 9
- 10
- 11
- 12
- 13
- 重启网关,请求测试 http://localhost:7000/server-product/product/3

2. 默认路由说明
格式解释,其实默认规则也就相当于将Path中的前缀改成微服务的标识


-
相关阅读:
【Linux】网络编程二:socket简介、字节序、socket地址及地址转换API
系统设计题面试八股文背诵版
VLAN实现二层流量隔离(mux-vlan)应用基础配置
【试题029】C语言Switch case语句小例题
微信文件如何直接打印及打印功能在哪里设置?
计算机考研 | 2016年 | 计算机组成原理真题
微信小程序2022年发展方向曝光
pwnable_hacknote
简单介绍Spring中的事物
科技成果鉴定之鉴定测试报告
- 原文地址:https://blog.csdn.net/u011628753/article/details/126253281
