-
SpringBoot整合Swagger3和Knife4j及使用
前言
开发api提供对应的接口规范进行联调或并行开发,api文档管理必不可少。常用的Knife4j基于swagger(依赖已经compile),可以进行管理。
Swagger3引入
如果你在启动项目的时候抛出:Failed to start bean ‘documentationPluginsBootstrapper’; nested exception is java.lang.NullPointerException。引入下面pom。
Pom
采用3.0:
<dependency> <groupId>io.springfoxgroupId> <artifactId>springfox-boot-starterartifactId> <version>3.0.0version> dependency> <dependency> <groupId>org.projectlombokgroupId> <artifactId>lombokartifactId> dependency>- 1
- 2
- 3
- 4
- 5
- 6
- 7
- 8
- 9
- 10
yml
配置application.yml文件
spring: mvc: pathmatch: # Springfox使用的路径匹配是基于AntPathMatcher的,而Spring Boot 2.6.X使用的是PathPatternMatcher,所以需要配置此参数 matching-strategy: ANT_PATH_MATCHER- 1
- 2
- 3
- 4
- 5
配置类
配置类中可以判断开发还是生产环境配置文件来进行配置,也可以指定扫描类型等:
@Configuration @EnableOpenApi public class SwaggerConfig { /** * 创建API应用 * apiInfo() 增加API相关信息 * 通过select()函数返回一个ApiSelectorBuilder实例,用来控制哪些接口暴露给Swagger来展现, * 本例采用指定扫描的包路径来定义指定要建立API的目录。 * * @return * 可创建两个Bean一个配置测试,一个配置生产的环境不同的配置 */ @Bean public Docket restApi(Environment environment) { // 设置要显示swagger的环境 Profiles of = Profiles.of("dev", "test"); // 判断当前是否处于该环境,通过 enable() 接收此参数判断是否要显示 boolean isShow = true;//= environment.acceptsProfiles(of); return new Docket(DocumentationType.SWAGGER_2) // 配置分组 .groupName("标准接口") //是否开启 (true 开启 false隐藏。生产环境建议隐藏) .enable(isShow) .apiInfo(apiInfo("Spring Boot中使用Swagger3构建RESTful APIs", "1.0")) .useDefaultResponseMessages(true) .forCodeGeneration(false) //通过.select()方法,去配置扫描接口 .select() //扫描的路径包,设置basePackage会将包下的所有被@Api标记类的所有方法作为api . 配合@EnableOpenApi 找到API位置,不需要再在启动类上配置 .apis(RequestHandlerSelectors.basePackage("com.cbry.swagger.controller")) //指定路径处理,PathSelectors.any()代表所有的路径 .paths(PathSelectors.any()) .build(); } /** * 创建该API的基本信息(这些基本信息会展现在文档页面中) * 访问地址:http://ip:port/swagger-ui.html * * @return */ private ApiInfo apiInfo(String title, String version) { return new ApiInfoBuilder() .title(title) .description("更多请关注: https://blog.csdn.net/qq_37334150") .termsOfServiceUrl("https://blog.csdn.net/qq_37334150") .contact(new Contact("cbry", "https://blog.csdn.net/qq_37334150", "xxxx@163.com")) .version(version) .build(); } }- 1
- 2
- 3
- 4
- 5
- 6
- 7
- 8
- 9
- 10
- 11
- 12
- 13
- 14
- 15
- 16
- 17
- 18
- 19
- 20
- 21
- 22
- 23
- 24
- 25
- 26
- 27
- 28
- 29
- 30
- 31
- 32
- 33
- 34
- 35
- 36
- 37
- 38
- 39
- 40
- 41
- 42
- 43
- 44
- 45
- 46
- 47
- 48
- 49
- 50
- 51
- 52
- 53
实体类
@Data @AllArgsConstructor @NoArgsConstructor @ApiModel(value = "用户试实体", description = "用户试实体") public class User { @ApiModelProperty(value = "名字", required = true,example = "属性举例",notes = "备注") String name; @ApiModelProperty(value = "年龄") int age; @ApiModelProperty(value = "性别") String sex; @ApiModelProperty(value = "描述") String desc; }- 1
- 2
- 3
- 4
- 5
- 6
- 7
- 8
- 9
- 10
- 11
- 12
- 13
- 14
- 15
Controller
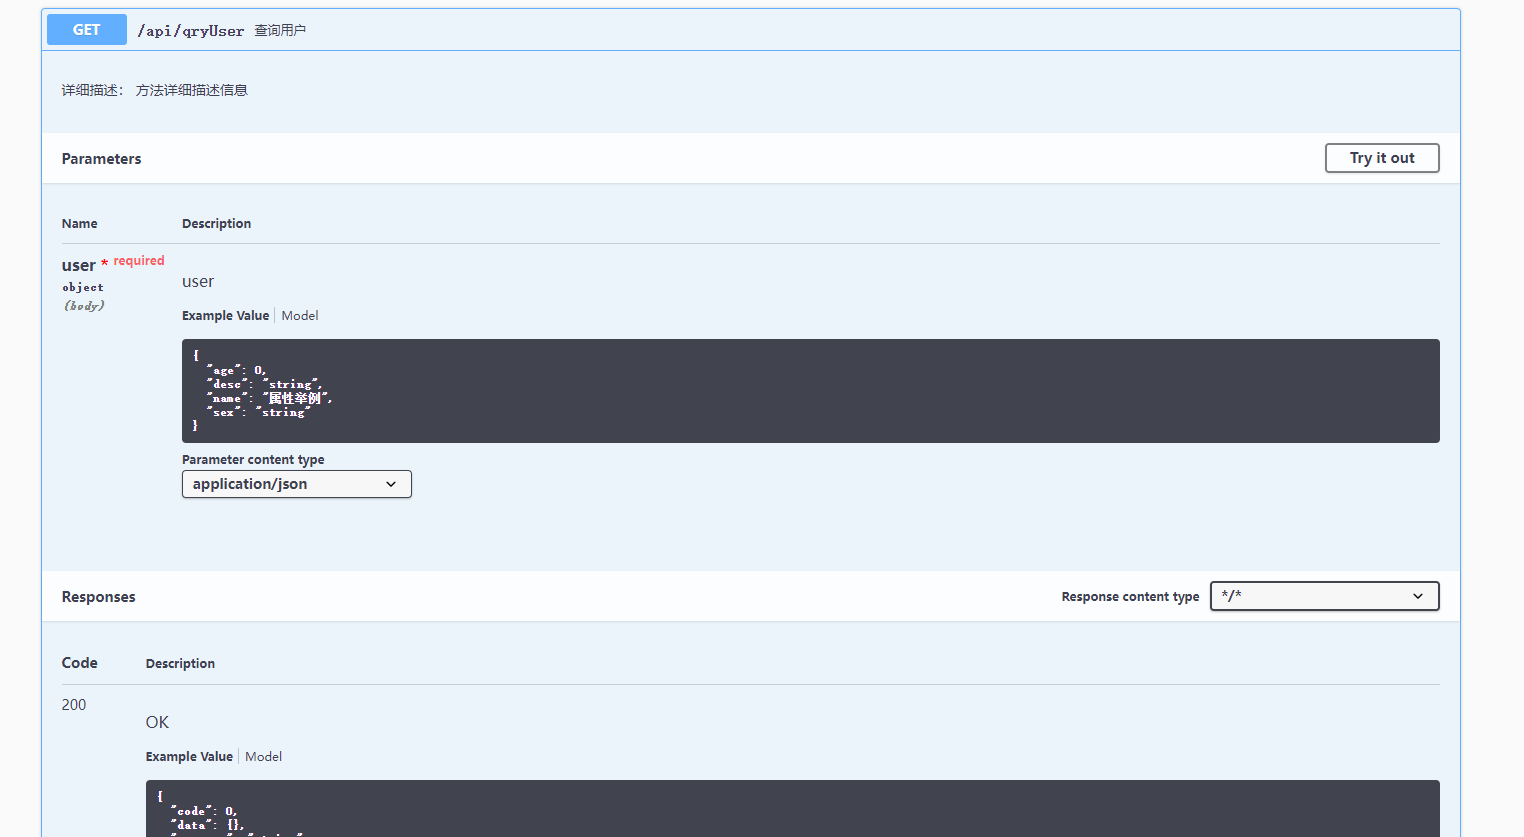
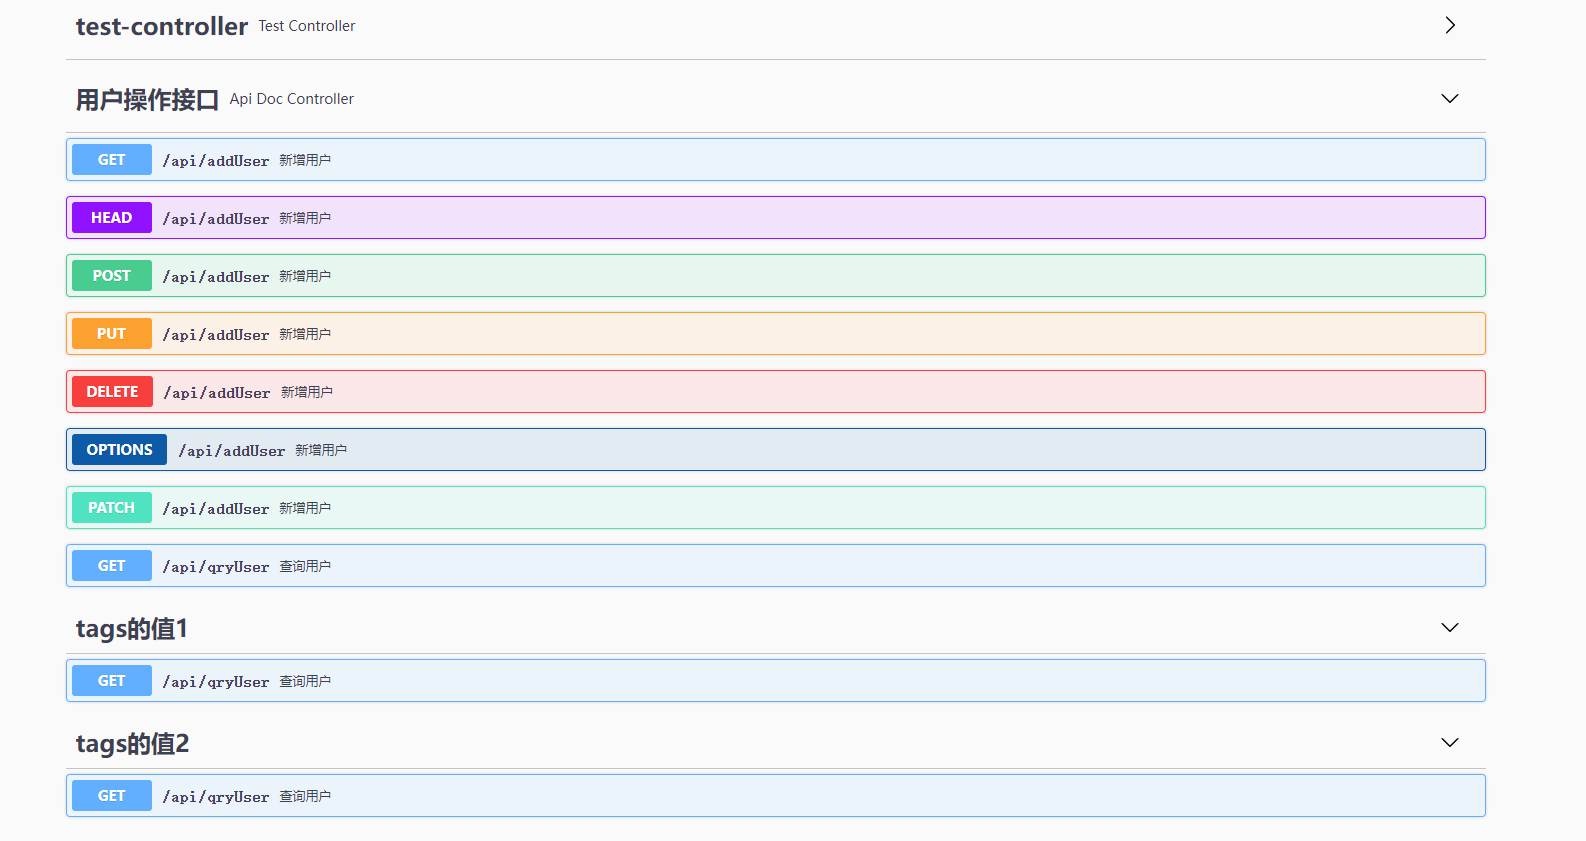
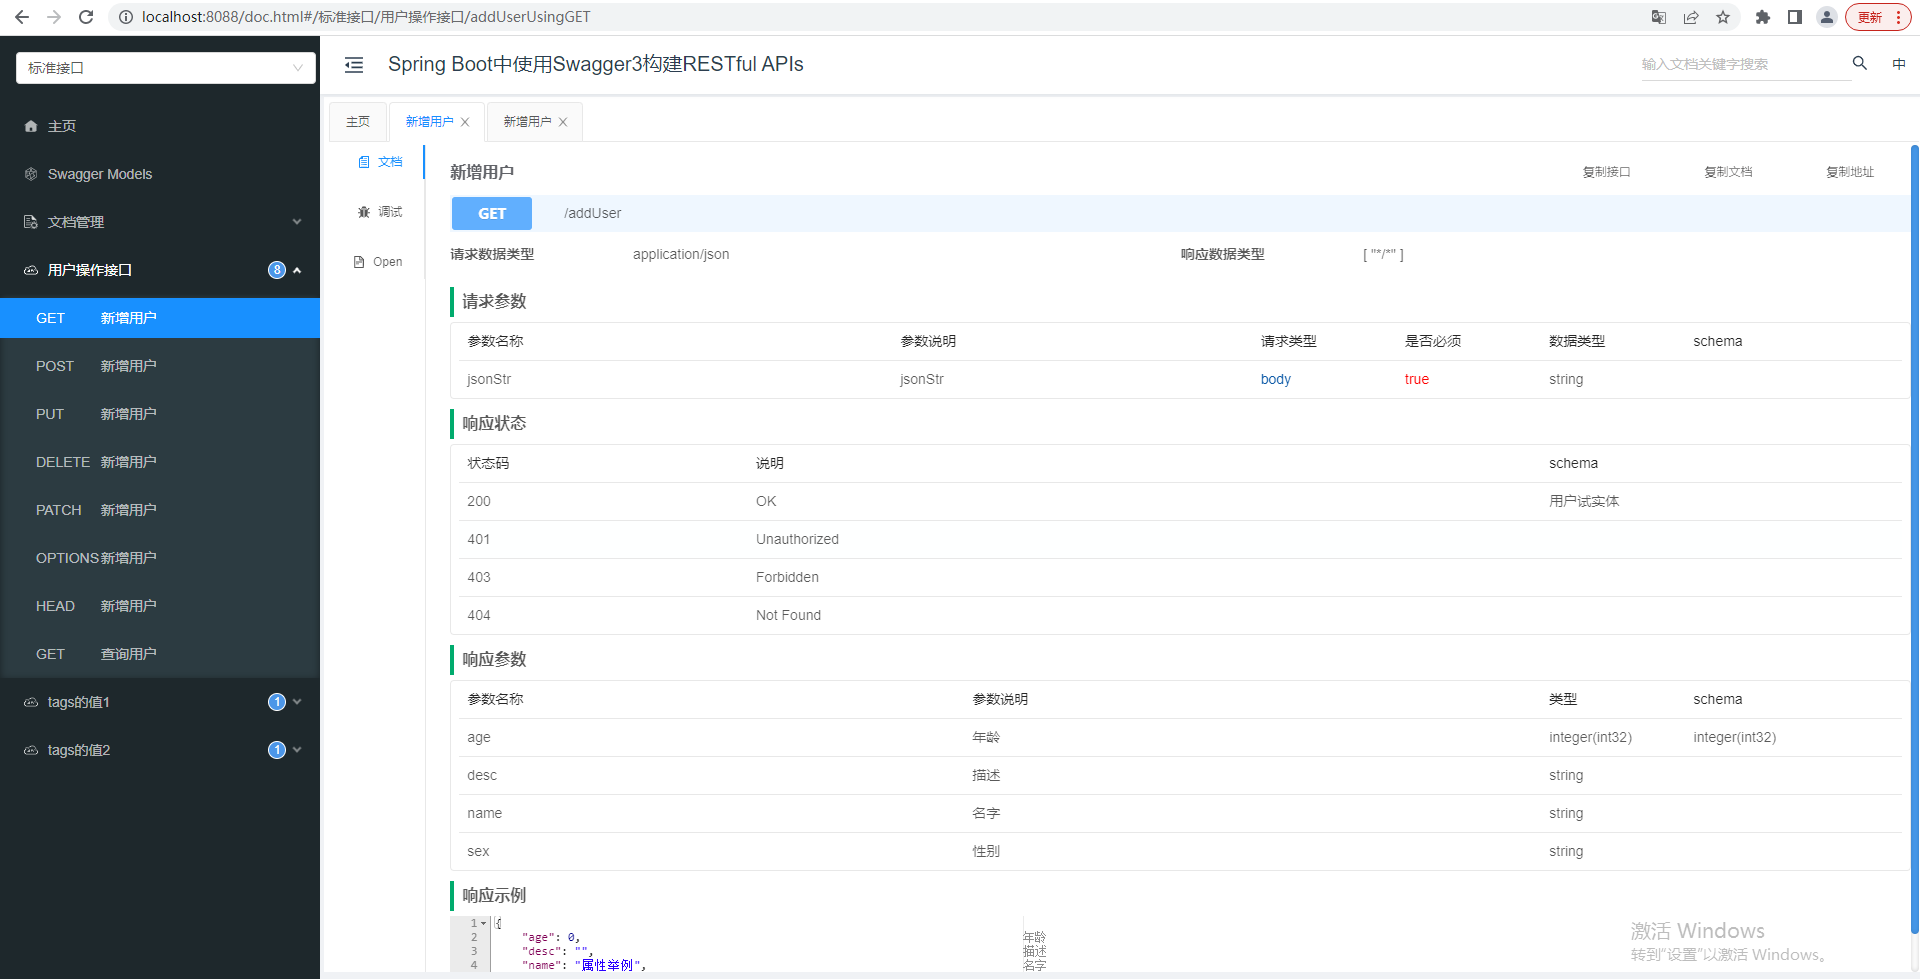
@Api(value="用户controller",tags={"用户操作接口"}) @Slf4j public class ApiDocController { @ApiOperation(value = "新增用户") //@ApiResponses({ @ApiResponse(code = 200, message = "OK", response = User.class) }) @RequestMapping("/addUser") @ResponseBody public User addUser(@RequestBody String jsonStr){ return new User("fengfeng",24,"a girl" , "23333"); } @ApiOperation(value = "查询用户",notes = "详细描述: 方法详细描述信息",tags={"tags的值1","tags" + "的值2"},produces = "application/json",consumes = "application/json",protocols="http",httpMethod = "GET") @RequestMapping("/qryUser") @ResponseBody public RespEntity qryUser(@RequestBody User user){ return new RespEntity(200,"创建User成功", user); } }- 1
- 2
- 3
- 4
- 5
- 6
- 7
- 8
- 9
- 10
- 11
- 12
- 13
- 14
- 15
- 16
- 17
- 18
- 19
具体注解的属性值
一个个描述太过繁杂,可以点进注解源码查看,比如说@ApiOperation举例:

主要属性:
属性 描述 value url的路径值后面的描述 notes 详细描述 tags 分组 position 如果配置多个Api 想改变显示的顺序位置 produces For example, “application/json, application/xml” consumes For example, “application/json, application/xml” protocols 协议类型: http, https, ws, wss. authorizations 高级特性认证时配置 hidden 配置为true 将在文档中隐藏 response 返回的对象 responseContainer 这些对象是有效的 “List”, “Set” or “Map”.,其他无效 httpMethod “GET”, “HEAD”, “POST”, “PUT”, “DELETE”, “OPTIONS” and “PATCH” code http的状态码 默认 200 extensions 扩展属性 效果
访问地址:http://127.0.0.1:8088/swagger-ui/index.html
Knife4j优化包
pom
相关依赖如下其内含了上面swagger3的依赖:
<dependency> <groupId>com.github.xiaoymingroupId> <artifactId>knife4j-spring-boot-starterartifactId> <version>3.0.3version> dependency>- 1
- 2
- 3
- 4
- 5
- 6

application.yml
knife4j: enable: true #true则是生产环境不允许访问knife4j production: false- 1
- 2
- 3
- 4
访问
文档管理页面:http://localhost:8088/doc.html
2022.8.10补充
忽略不生成的文档注解:@ApiIgnore , 可接口可controller。
入参JSON数据
入参JSON数据若生成文档,采用model入参自动转换的形式即可,@RequestBody将传入jsonStr自动转换对应model:
@RequestBody RecAssetIncParams params- 1
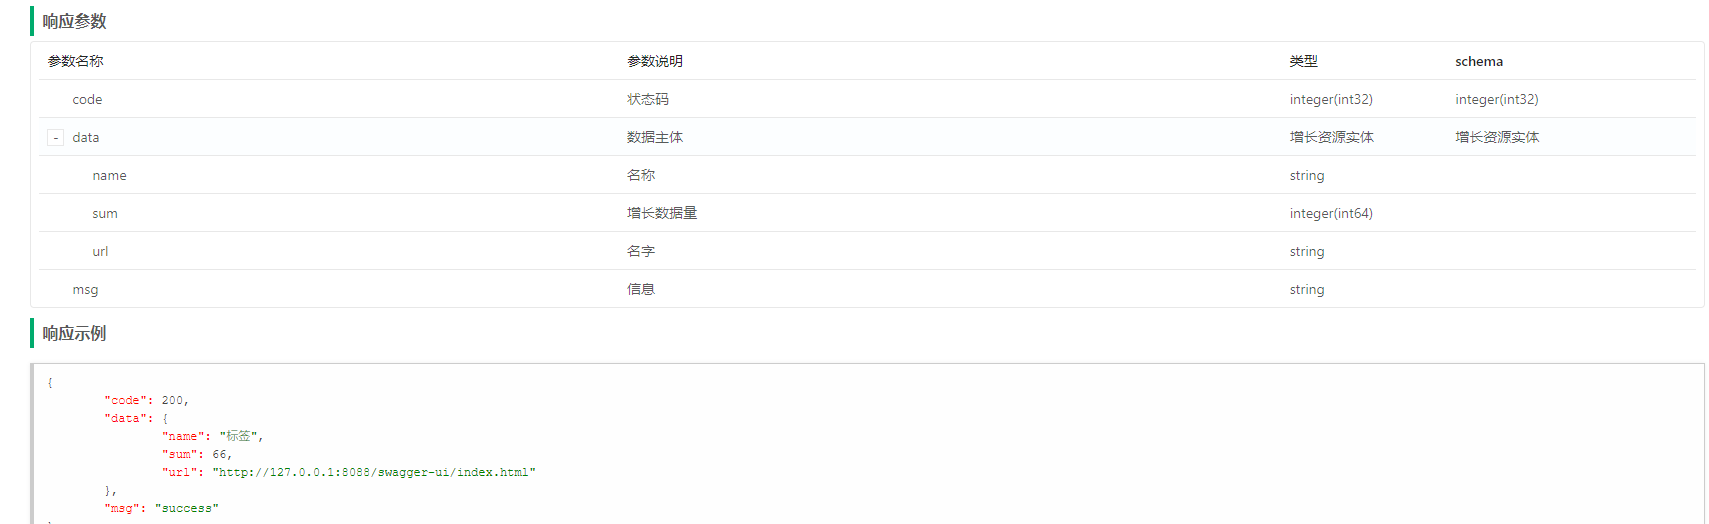
统一返回体问题
如果返回的统一返回对象中数据对象作为属性,则无法识别:
@ApiModelProperty(value = "数据主体",example = "object") Object data;- 1
- 2
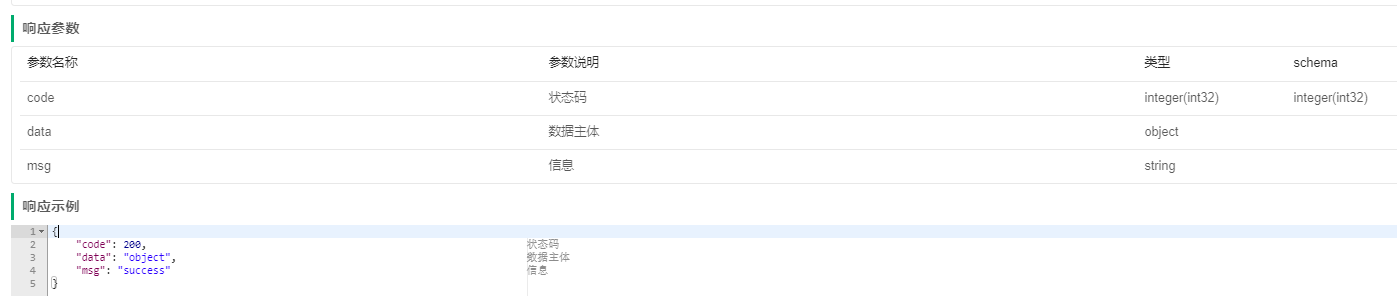
修改泛型:
@Data @AllArgsConstructor @NoArgsConstructor @ApiModel(value = "统一返回体") public class RespEntity<T> { @ApiModelProperty(value = "状态码",example = "200") int code; @ApiModelProperty(value = "信息",example = "success") String msg; @ApiModelProperty(value = "数据主体",example = "object") T data; }- 1
- 2
- 3
- 4
- 5
- 6
- 7
- 8
- 9
- 10
- 11
- 12
controller,返回类型指定数据类型:
@ApiOperation(value = "获取最近资源新增统计" , produces = "application/json" , consumes = "application/json") @GetMapping(value = "/getRecAssetInc") @ResponseBody public RespEntity<RecAssetInc> getRecAssetStats(@RequestBody RecAssetIncParams params){ return new RespEntity(200,"success",new RecAssetInc()); }- 1
- 2
- 3
- 4
- 5
- 6
-
相关阅读:
结对编程大法好
使用ant-design-vue实现换肤功能
超前进位加法器
K8s部署
百度上线“文心一言”付费版本,AI聊天机器人市场竞争加剧
proxy代理服务
树莓派简单驱动编写以及代码测试
后仿真 不收敛
酷玩Go命令行工具—Cobra
2022-09-07 mysql/stonedb-查询优化器逻辑记录及优化器魔改
- 原文地址:https://blog.csdn.net/qq_37334150/article/details/126253985