-
十六、【VUE-CLI】Vuex(store)
十六、Vuex
1、全局事件总线弊端
全局事件总线,组件少的时候用着还可,组件一多就会乱,那有没有一种把数据抽出来,单独存放在一个对象上,这个对象再对外提供各种API操作这个数据呢?这样就不存在绑定泛滥、命名冲突、传输混乱的问题了!
Vuex 应运而生!
2、上才艺!计数器案例(纯Vue写法)
1、效果图

2、项目结构

3、CODE
1、App.vue
- 1
- 2
- 3
- 4
- 5
- 6
- 7
- 8
- 9
- 10
- 11
- 12
- 13
- 14
2、Count.vue
当前求和为:{{sum}}
- 1
- 2
- 3
- 4
- 5
- 6
- 7
- 8
- 9
- 10
- 11
- 12
- 13
- 14
- 15
- 16
- 17
- 18
- 19
- 20
- 21
- 22
- 23
- 24
- 25
- 26
- 27
- 28
- 29
- 30
- 31
- 32
- 33
- 34
- 35
- 36
- 37
- 38
- 39
- 40
- 41
- 42
- 43
- 44
- 45
- 46
- 47
- 48
3、上菜!Vuex原理图
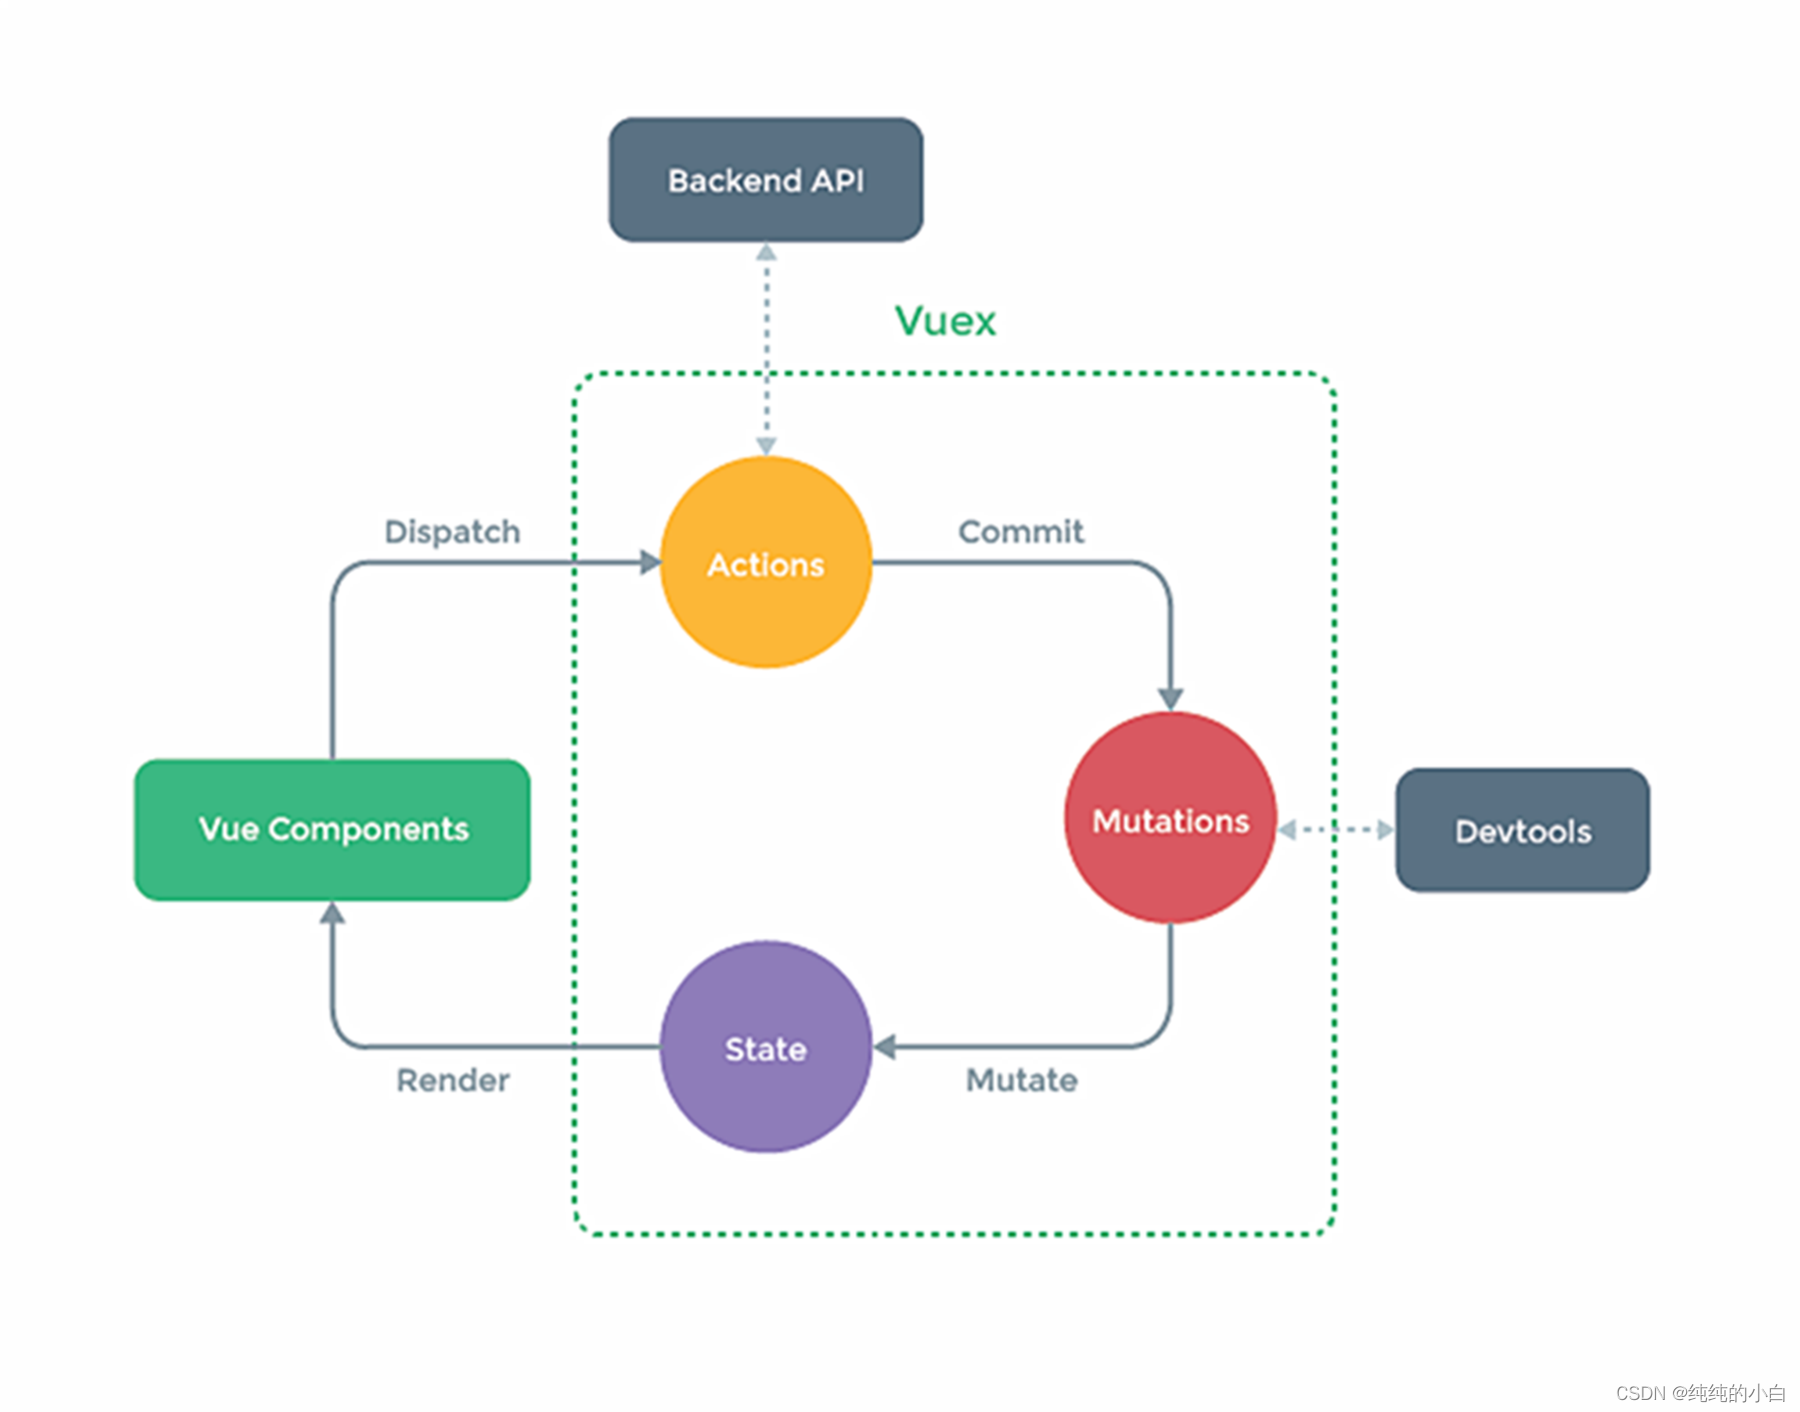
4、冷静分析

5、安装上牌!
1、安装
需要注意的是:
Vue2只能安装 Vuex.3 版本: npm i vuex@3
Vue3只能安装 Vuex.4 版本: npm i vuex
2、创建Vuex文件结构

3、CODE
1、index.js
// 该文件用于创建VueX中最为核心的store // 引入Vuex import Vuex from 'vuex' // 准备Actions:用于响应组件中的动作 const actions = {} // 准备Mutations:用于操作数据(state) const mutations = {} // 准备state:用于存储数据 const state = {} // 创建并暴露store export default new Vuex.Store({ actions, mutations, state })- 1
- 2
- 3
- 4
- 5
- 6
- 7
- 8
- 9
- 10
- 11
- 12
- 13
- 14
- 15
- 16
- 17
- 18
- 19
- 20
2、上牌(main.js)
//引入Vue import Vue from 'vue' //引入App import App from './App.vue' // 引入Vuex import Vuex from 'vuex' //引入store import store from './store' //关闭Vue的生产提示 Vue.config.productionTip = false // 使用Vuex插件 Vue.use(Vuex) //创建vm new Vue({ el:'#app', render: h => h(App), store, beforeCreate() { Vue.prototype.$bus = this } })- 1
- 2
- 3
- 4
- 5
- 6
- 7
- 8
- 9
- 10
- 11
- 12
- 13
- 14
- 15
- 16
- 17
- 18
- 19
- 20
- 21
- 22
- 23
- 24
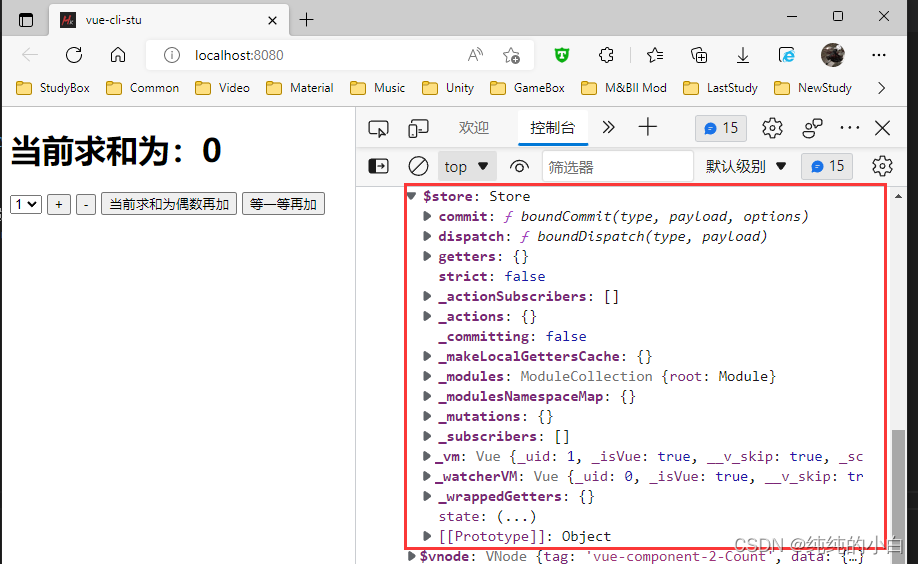
4、Result

5、分析一波
很简单,就是在创建 store 前调用 Vue.use(Vuex) 呗!
值得一提的是扫描文件的时候所有 import会向上提升,运行的时候会先把 import 跑完
So,单纯的把 Vue.use(Vuex) 放到 import store from ‘./store’ 上面解决不了问题!
6、CorrectCODE
1、index.js
// 该文件用于创建 Vuex 中最为核心的 store //引入Vue import Vue from 'vue' // 引入Vuex import Vuex from 'vuex' // 使用Vuex插件 Vue.use(Vuex) // 准备Actions:用于响应组件中的动作 const actions = {} // 准备Mutations:用于操作数据(state) const mutations = {} // 准备state:用于存储数据 const state = {} // 创建并暴露store export default new Vuex.Store({ actions, mutations, state })- 1
- 2
- 3
- 4
- 5
- 6
- 7
- 8
- 9
- 10
- 11
- 12
- 13
- 14
- 15
- 16
- 17
- 18
- 19
- 20
- 21
- 22
- 23
- 24
- 25
2、上牌(main.js)
//引入Vue import Vue from 'vue' //引入App import App from './App.vue' //引入store import store from './store' //关闭Vue的生产提示 Vue.config.productionTip = false //创建vm new Vue({ el:'#app', render: h => h(App), store, beforeCreate() { Vue.prototype.$bus = this } })- 1
- 2
- 3
- 4
- 5
- 6
- 7
- 8
- 9
- 10
- 11
- 12
- 13
- 14
- 15
- 16
- 17
- 18
- 19
7、NewResult
6、安排!计数器升级Vuex版本
1、Count.vue
当前求和为:{{$store.state.sum}}
- 1
- 2
- 3
- 4
- 5
- 6
- 7
- 8
- 9
- 10
- 11
- 12
- 13
- 14
- 15
- 16
- 17
- 18
- 19
- 20
- 21
- 22
- 23
- 24
- 25
- 26
- 27
- 28
- 29
- 30
- 31
- 32
- 33
- 34
- 35
- 36
- 37
- 38
- 39
- 40
- 41
- 42
- 43
- 44
- 45
- 46
2、index.js
// 该文件用于创建VueX中最为核心的store // 引入Vue import Vue from 'vue' // 引入Vuex import Vuex from 'vuex' // 使用Vuex插件 Vue.use(Vuex) // 准备Actions:用于响应组件中的动作 const actions = { add(context, value){ console.log('Actions.add 被调用了!\n上下文参数为:', context, '\n值参数为:', value) context.commit('ADD', value) }, less(context, value){ console.log('Actions.less 被调用了!\n上下文参数为:', context, '\n值参数为:', value) context.commit('LESS', value) } } // 准备Mutations:用于操作数据(state) const mutations = { ADD(state, value){ console.log('Mutations.ADD 被调用了!\n状态参数为:', state, '\n值参数为:', value) state.sum += value }, LESS(state, value){ console.log('Mutations.LESS 被调用了!\n状态参数为:', state, '\n值参数为:', value) state.sum -= value } } // 准备state:用于存储数据 const state = { sum: 0 } // 创建并暴露store export default new Vuex.Store({ actions, mutations, state })- 1
- 2
- 3
- 4
- 5
- 6
- 7
- 8
- 9
- 10
- 11
- 12
- 13
- 14
- 15
- 16
- 17
- 18
- 19
- 20
- 21
- 22
- 23
- 24
- 25
- 26
- 27
- 28
- 29
- 30
- 31
- 32
- 33
- 34
- 35
- 36
- 37
- 38
- 39
- 40
- 41
- 42
- 43
- 44
- 45
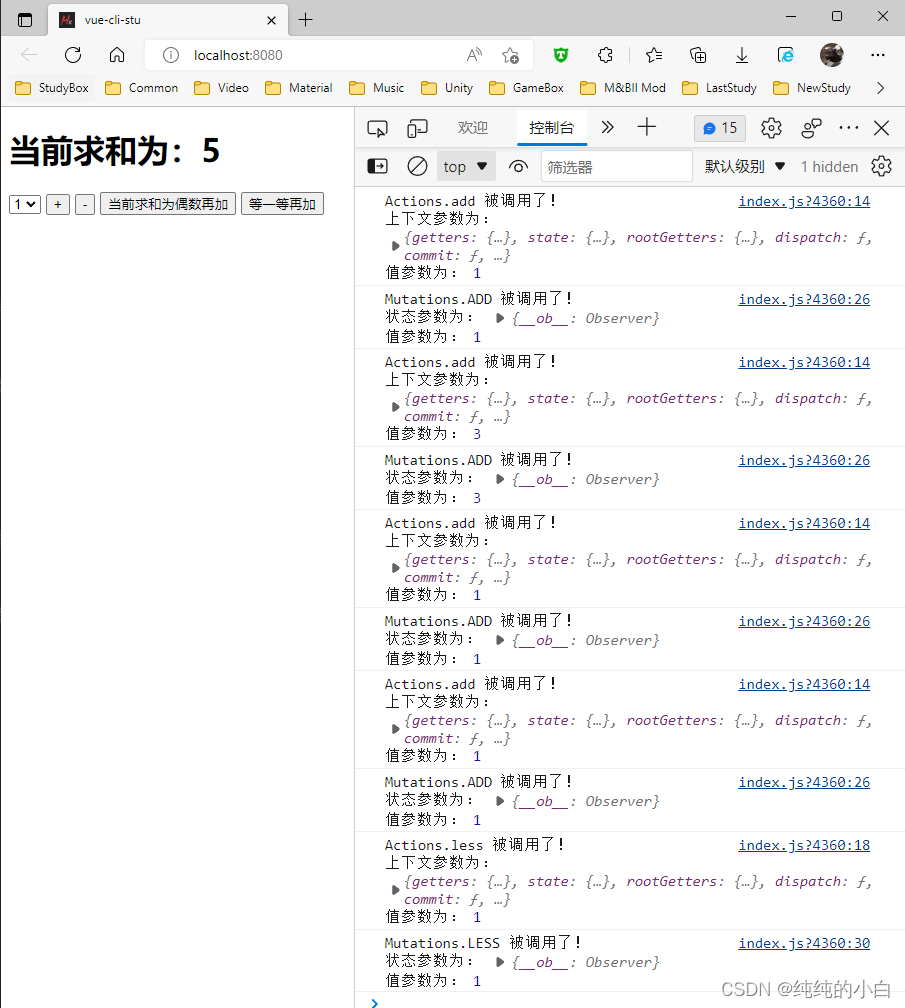
3、Result
7、升级!getters
需求:展示一个求和放大100倍的数据
我想对 store的某个属性进行一系列运算获得一个结果展示到页面上,并且多个组件都要用到,这样既不方便直接在组件里写方法也不方便写计算属性,就只能挂 Vuex 身上,嗯,没错就是 getters 了!
1、index.js
// 准备getters:用于对state中的数据进行加工 const getters = { bigSum(state){ return state.sum * 100 } } // 创建并暴露store export default new Vuex.Store({ // ... getters })- 1
- 2
- 3
- 4
- 5
- 6
- 7
- 8
- 9
- 10
- 11
- 12
2、Count.vue
和放大100倍:{{$store.getters.bigSum}}
- 1
3、Result

8、新需求!mapState 和 mapGetters
增加一些属性!
但是获取很多的时候写法就很繁琐,有没有一种方法可以直接获取
而不用每次都写 $store.state.xxx 和 $store.getters.xxx
当然有了! mapState 和 mapGetters
1、index.js
// 准备state:用于存储数据 const state = { sum: 0, name: 'Mr.Wang', age: 24 }- 1
- 2
- 3
- 4
- 5
- 6
2、Count.vue
		当前求和为:{{$store.state.sum}}
		和放大100倍:{{$store.getters.bigSum}}
		我是迷人的{{$store.state.name}},今年{{$store.state.age}}岁
- 1
- 2
- 3
- 4
- 5
- 6
- 7
- 8
3、Result

4、优化!计算属性
Count.vue
当前求和为:{{he}}
和放大100倍:{{daHe}}
我是迷人的{{myName}},今年{{myAge}}岁
- 1
- 2
- 3
- 4
- 5
- 6
- 7
- 8
- 9
- 10
- 11
- 12
- 13
- 14
- 15
- 16
- 17
- 18
- 19
- 20
- 21
- 22
- 23
- 24
- 25
- 26
- 27
- 28
5、优化!mapState
1、CODE:Count.vue
- 1
- 2
- 3
- 4
- 5
- 6
- 7
- 8
- 9
- 10
- 11
- 12
- 13
- 14
- 15
- 16
- 17
- 18
- 19
- 20
- 21
- 22
- 23
- 24
- 25
- 26
- 27
- 28
- 29
- 30
2、Result

3、mapState生成的计算属性放到computed里
computed:{ // 手写 state 属性时代过去啦!!! /* he(){ return this.$store.state.sum }, myName(){ return this.$store.state.name }, myAge(){ return this.$store.state.age }, */ // 借助mapState生成计算属性,从state中读取数据(对象写法) ...mapState({ he: 'sum', myName: 'name', myAge: 'age' }), // 借助mapState生成计算属性,从state中读取数据(数组写法) // 数组写法写法必须满足 mapState({ sum: 'sum', name: 'name', age: 'age' }) //...mapState([ 'sum', 'name', 'age' ]), daHe(){ return this.$store.getters.bigSum } }- 1
- 2
- 3
- 4
- 5
- 6
- 7
- 8
- 9
- 10
- 11
- 12
- 13
- 14
- 15
- 16
- 17
- 18
- 19
- 20
- 21
- 22
4、mapGetters生成的计算属性放到computed里
- 1
- 2
- 3
- 4
- 5
- 6
- 7
- 8
- 9
- 10
- 11
- 12
- 13
- 14
- 15
9、同理升级Actions和Mutations!mapActions 和 mapMutations
1、代码变更
1、Count.vue
methods: { increment(){ this.$store.commit('ADD', this.n) }, decrement(){ this.$store.commit('LESS', this.n) }, incrementEven(){ this.$store.dispatch('evenAdd', this.n) }, incrementWait(){ this.$store.dispatch('waitAdd', this.n) }, }- 1
- 2
- 3
- 4
- 5
- 6
- 7
- 8
- 9
- 10
- 11
- 12
- 13
- 14
2、index.js
// 准备Actions:用于响应组件中的动作 const actions = { add(context, value){ context.commit('ADD', value) }, less(context, value){ context.commit('LESS', value) }, // 新+2 evenAdd(context, value){ if(context.state.sum && context.state.sum % 2 == 0){ context.dispatch('add', value) } }, waitAdd(context, value){ setTimeout(()=>{ context.dispatch('add', value) },500) } }- 1
- 2
- 3
- 4
- 5
- 6
- 7
- 8
- 9
- 10
- 11
- 12
- 13
- 14
- 15
- 16
- 17
- 18
- 19
- 20
2、mapActions 和 mapMutations
1、CODE:Count.vue
- 1
- 2
- 3
- 4
- 5
- 6
- 7
- 8
- 9
- 10
- 11
- 12
- 13
- 14
- 15
- 16
- 17
- 18
- 19
- 20
- 21
- 22
- 23
- 24
- 25
- 26
- 27
- 28
- 29
- 30
- 31
- 32
- 33
- 34
- 35
- 36
- 37
- 38
- 39
- 40
- 41
2、Result

3、CorrectCODE:Count.vue
- 1
- 2
- 3
- 4
- 5
- 6
- 7
- 8
- 9
- 10
- 11
- 12
- 13
- 14
- 15
- 16
- 17
- 18
- 19
- 20
- 21
- 22
- 23
4、CorrectResult

10、高级开发!Vuex模块化编码
核心理念就是 A 干 A 的活, B 干 B的活,你俩别勾搭在一起瞎干活
1、store/index.js
// 该文件用于创建VueX中最为核心的store // 引入Vue import Vue from 'vue' // 引入VueX import Vuex from 'vuex' // 使用Vuex插件 Vue.use(Vuex) // A的活 const a = { actions: {...}, mutations: {...}, getters: {...}, state: {...} } // B的活 const b = { actions: {...}, mutations: {...}, getters: {...}, state: {...} } // 创建并暴露store export default new Vuex.Store({ modules: { // 别问!就这么写,甲鱼的臀部,规定! a, // 此处对象简写了,你正常写也没人拦着你啊 b } })- 1
- 2
- 3
- 4
- 5
- 6
- 7
- 8
- 9
- 10
- 11
- 12
- 13
- 14
- 15
- 16
- 17
- 18
- 19
- 20
- 21
- 22
- 23
- 24
- 25
- 26
- 27
- 28
- 29
- 30
- 31
- 32
- 33
2、vc里如何获取属性和自动生成
1、先看看state变成啥样了
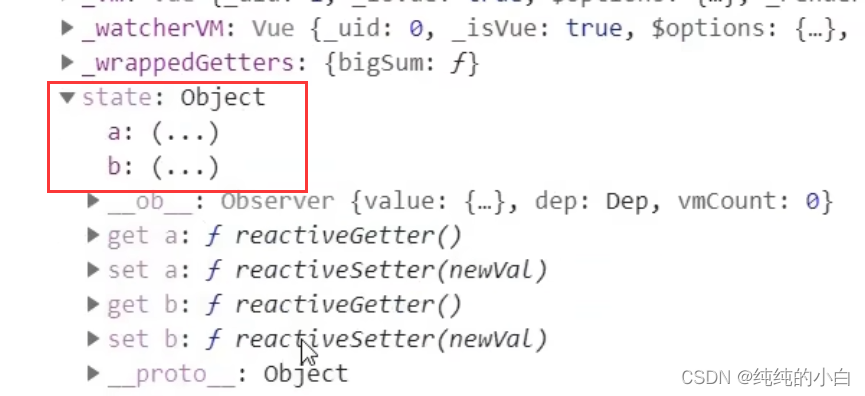
很明显原来 $store.state.sum 得写成 $store.state.a.sum 了
2、mapState第一种取法
当前求和为:{{$store.state.a.sum}}
我是迷人的{{a.name}},今年{{a.age}}岁
- 1
- 2
- 3
- 4
- 5
- 6
- 7
- 8
- 9
- 10
- 11
- 12
- 13
- 14
- 15
- 16
- 17
- 18
- 19
- 20
- 21
- 22
- 23
- 24
- 25
- 26
- 27
- 28
- 29
3、mapState第二种取法
1、首先index.js得改造,加一个 命名空间 namespaced 属性
// A的活 const a = { namespaced: true, // 选用,要使用第二种写法就必须开启此属性 actions: {...}, mutations: {...}, getters: {...}, state: {...} }- 1
- 2
- 3
- 4
- 5
- 6
- 7
- 8
如果不写就会报如下错误:

2、mapState第二种取法
当前求和为:{{sum}}
和放大100倍:{{bigSum}}
我是迷人的{{name}},今年{{age}}岁
- 1
- 2
- 3
- 4
- 5
- 6
- 7
- 8
- 9
- 10
- 11
- 12
- 13
- 14
- 15
- 16
- 17
- 18
- 19
- 20
- 21
4、mapGetters
// 直接取写法 <p>调用全局的getter:{{this.$store.getters.theirname}}</p> <p>调用模块的A的getter:{{this.$store.getters['a/bigSum']}}</p> // 自动生成时对象写法也和mapState略有不同 ...mapGetters({bigSum: 'a/bigSum'}), // 自动生成时数组写法和mapState相同 ...mapGetters('a', ['bigSum']), // namespaced: true- 1
- 2
- 3
- 4
- 5
- 6
- 7
- 8
- 9
这里肯定就有小伙伴要问了,为什么不同呀?用脚指头想都知道肯定是 key给的不一样了呗!

看到这里机智的小伙伴就又要问了,为什么不像 state 一样写呢?难道是因为爱情吗?当然不是!肯定是不推荐你直接调用呗!
5、mapMutations 和 mapActions
// 直接调用 this.$store.dispatch('a/add', data) this.$store.commit('a/ADD', data) // mapMutations(对象写法) // ...mapMutations({increment: 'ADD', decrement: 'LESS'}), // 原单写法 ...mapMutations('a', {increment: 'ADD', decrement: 'LESS'}), // namespaced: true // mapMutations数组写法(同理,但是基本不会有人用) // ...mapMutations(['ADD', 'LESS']), // 原单写法 // ...mapMutations('a', ['ADD', 'LESS']), // mapActions(对象写法) // ...mapActions({incrementEven: 'evenAdd', incrementWait: 'waitAdd'}) ...mapActions('a', {incrementEven: 'evenAdd', incrementWait: 'waitAdd'}), // namespaced: true // mapActions数组写法(同理,但是基本不会有人用) // ...mapActions(['evenAdd', 'waitAdd']), // 原单写法 // ...mapActions('a', ['evenAdd', 'waitAdd']),- 1
- 2
- 3
- 4
- 5
- 6
- 7
- 8
- 9
- 10
- 11
- 12
- 13
- 14
- 15
- 16
- 17
3、模块化的好处
可以分门别类,每个人的活单独写到一个 js 文件里,要么给你一个 store 文件夹是干嘛的,就是让你分门别类的!
11、Vuex总结
1.概念
在Vue中实现集中式状态(数据)管理的一个Vue插件,对vue应用中多个组件的共享状态进行集中式的管理(读/写),也是一种组件间通信的方式,且适用于任意组件间通信
2.何时使用?
多个组件需要共享数据时
3.搭建vuex环境
-
创建文件:
src/store/index.js//引入Vue核心库 import Vue from 'vue' //引入Vuex import Vuex from 'vuex' //应用Vuex插件 Vue.use(Vuex) //准备actions对象——响应组件中用户的动作 const actions = {} //准备mutations对象——修改state中的数据 const mutations = {} //准备state对象——保存具体的数据 const state = {} //创建并暴露store export default new Vuex.Store({ actions, mutations, state })- 1
- 2
- 3
- 4
- 5
- 6
- 7
- 8
- 9
- 10
- 11
- 12
- 13
- 14
- 15
- 16
- 17
- 18
- 19
- 20
-
在
main.js中创建vm时传入store配置项...... //引入store import store from './store' ...... //创建vm new Vue({ el:'#app', render: h => h(App), store })- 1
- 2
- 3
- 4
- 5
- 6
- 7
- 8
- 9
- 10
- 11
4.基本使用
-
初始化数据、配置
actions、配置mutations,操作文件store.js//引入Vue核心库 import Vue from 'vue' //引入Vuex import Vuex from 'vuex' //引用Vuex Vue.use(Vuex) const actions = { //响应组件中加的动作 jia(context,value){ // console.log('actions中的jia被调用了',miniStore,value) context.commit('JIA',value) }, } const mutations = { //执行加 JIA(state,value){ // console.log('mutations中的JIA被调用了',state,value) state.sum += value } } //初始化数据 const state = { sum:0 } //创建并暴露store export default new Vuex.Store({ actions, mutations, state, })- 1
- 2
- 3
- 4
- 5
- 6
- 7
- 8
- 9
- 10
- 11
- 12
- 13
- 14
- 15
- 16
- 17
- 18
- 19
- 20
- 21
- 22
- 23
- 24
- 25
- 26
- 27
- 28
- 29
- 30
- 31
- 32
- 33
- 34
-
组件中读取vuex中的数据:
$store.state.sum -
组件中修改vuex中的数据:
$store.dispatch('action中的方法名',数据)或$store.commit('mutations中的方法名',数据)备注:若没有网络请求或其他业务逻辑,组件中也可以越过actions,即不写
dispatch,直接编写commit
5.getters的使用
-
概念:当state中的数据需要经过加工后再使用时,可以使用getters加工。
-
在
store.js中追加getters配置...... const getters = { bigSum(state){ return state.sum * 10 } } //创建并暴露store export default new Vuex.Store({ ...... getters })- 1
- 2
- 3
- 4
- 5
- 6
- 7
- 8
- 9
- 10
- 11
- 12
- 13
-
组件中读取数据:
$store.getters.bigSum
6.四个map方法的使用
-
mapState方法:用于帮助我们映射
state中的数据为计算属性computed: { //借助mapState生成计算属性:sum、school、subject(对象写法) ...mapState({sum:'sum',school:'school',subject:'subject'}), //借助mapState生成计算属性:sum、school、subject(数组写法) ...mapState(['sum','school','subject']), },- 1
- 2
- 3
- 4
- 5
- 6
- 7
-
mapGetters方法:用于帮助我们映射
getters中的数据为计算属性computed: { //借助mapGetters生成计算属性:bigSum(对象写法) ...mapGetters({bigSum:'bigSum'}), //借助mapGetters生成计算属性:bigSum(数组写法) ...mapGetters(['bigSum']) },- 1
- 2
- 3
- 4
- 5
- 6
- 7
-
mapActions方法:用于帮助我们生成与
actions对话的方法,即:包含$store.dispatch(xxx)的函数methods:{ //靠mapActions生成:incrementOdd、incrementWait(对象形式) ...mapActions({incrementOdd:'jiaOdd',incrementWait:'jiaWait'}) //靠mapActions生成:incrementOdd、incrementWait(数组形式) ...mapActions(['jiaOdd','jiaWait']) }- 1
- 2
- 3
- 4
- 5
- 6
- 7
-
mapMutations方法:用于帮助我们生成与
mutations对话的方法,即:包含$store.commit(xxx)的函数methods:{ //靠mapActions生成:increment、decrement(对象形式) ...mapMutations({increment:'JIA',decrement:'JIAN'}), //靠mapMutations生成:JIA、JIAN(对象形式) ...mapMutations(['JIA','JIAN']), }- 1
- 2
- 3
- 4
- 5
- 6
- 7
备注:mapActions与mapMutations使用时,若需要传递参数需要:在模板中绑定事件时传递好参数,否则参数是事件对象
7.模块化+命名空间
-
目的:让代码更好维护,让多种数据分类更加明确
-
修改
store.jsconst countAbout = { namespaced:true,//开启命名空间 state:{x:1}, mutations: { ... }, actions: { ... }, getters: { bigSum(state){ return state.sum * 10 } } } const personAbout = { namespaced:true,//开启命名空间 state:{ ... }, mutations: { ... }, actions: { ... } } const store = new Vuex.Store({ modules: { countAbout, personAbout } })- 1
- 2
- 3
- 4
- 5
- 6
- 7
- 8
- 9
- 10
- 11
- 12
- 13
- 14
- 15
- 16
- 17
- 18
- 19
- 20
- 21
- 22
- 23
- 24
- 25
-
开启命名空间后,组件中读取state数据:
//方式一:自己直接读取 this.$store.state.personAbout.list //方式二:借助mapState读取: ...mapState('countAbout',['sum','school','subject']),- 1
- 2
- 3
- 4
-
开启命名空间后,组件中读取getters数据:
//方式一:自己直接读取 this.$store.getters['personAbout/firstPersonName'] //方式二:借助mapGetters读取: ...mapGetters('countAbout',['bigSum'])- 1
- 2
- 3
- 4
-
开启命名空间后,组件中调用dispatch
//方式一:自己直接dispatch this.$store.dispatch('personAbout/addPersonWang',person) //方式二:借助mapActions: ...mapActions('countAbout',{incrementOdd:'jiaOdd',incrementWait:'jiaWait'})- 1
- 2
- 3
- 4
-
开启命名空间后,组件中调用commit
//方式一:自己直接commit this.$store.commit('personAbout/ADD_PERSON',person) //方式二:借助mapMutations: ...mapMutations('countAbout',{increment:'JIA',decrement:'JIAN'}),- 1
- 2
- 3
- 4
- 相关阅读:
基于JavaSwing开发电子琴程序(简约版)(小作业) 课程设计 大作业源码
NineData:从 Kafka 到 ClickHouse 的数据同步解决方案
firewalld服务讲解
多旋翼无人机组合导航系统-多源信息融合算法(Matlab代码实现)
1.Linux环境
【无标题】
华为云如何购买并登录Windows弹性云服务器?
java计算机毕业设计Vue框架电商后台管理系统源码+mysql数据库+系统+lw文档+部署
uniapp 事件委托失败 获取不到dataset
计算机毕业设计 基于SSM的支教志愿者招聘系统的设计与实现 Java实战项目 附源码+文档+视频讲解
- 原文地址:https://blog.csdn.net/qq_30769437/article/details/126202906


