-
pytorch入门1
参考来自PyTorch从入门到放弃(目录) - 二十三岁的有德 - 博客园 (cnblogs.com)
torch.cat(inputs, dimension=0) → Tensor
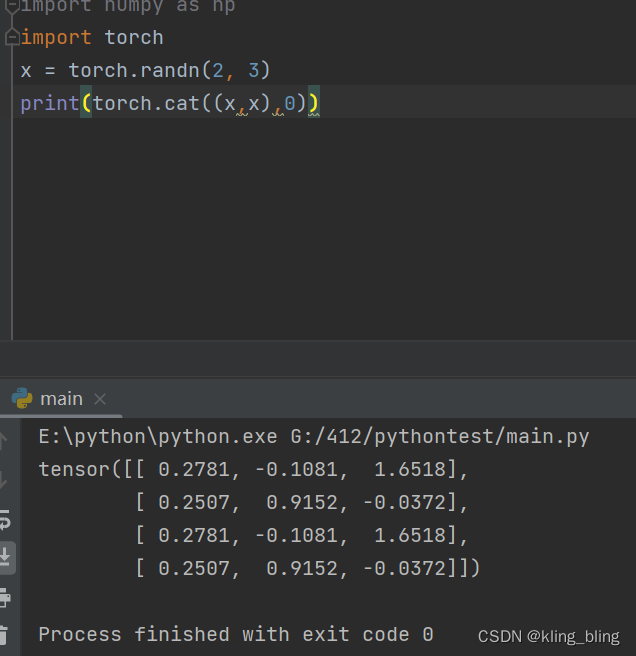
链接(dim=0是列链接,1是航链接)

torch.chunk(tensor, chunks, dim=0)
切割,cat的反向操作

torch.gather(input, dim, index, out=None) → Tensor
沿着不同维度取出tensor的值:
 ’
’torch.index_select(input, dim, index, out=None) → Tensor
切片,针对不同维度

torch.nonzero(input, out=None) → LongTensor
返回不是0的下标

利用torch解决线性回归问题:
- import numpy as np
- import torch
- import torch.nn as nn
- x=np.arange(1,12,dtype=np.float32).reshape(-1,1)
- y=2*x+3
- class LinearRegressionModel(nn.Module):
- def __init__(self,input_dim,output_dim):
- super().__init__()
- self.linear=nn.Linear(input_dim,output_dim)
- def forward(self,inp):
- out=self.linear(inp)
- return out
- regression_model=LinearRegressionModel(1,1)
- device=torch.device("cuda:0" if torch.cuda.is_available() else "cpu")
- regression_model.to(device)
- epochs=20
- learning_rate=0.01
- optimizer=torch.optim.SGD(regression_model.parameters(),learning_rate)
- criterion=nn.MSELoss()
- for epoch in range(epochs):
- inputs=torch.from_numpy(x).to(device)
- labels=torch.from_numpy(y).to(device)
- optimizer.zero_grad()
- outputs=regression_model(inputs)
- loss=criterion(outputs,labels)
- loss.backward()
- optimizer.step()
- if epoch%10==0:
- print("epoch:",epoch,"loss:",loss.item())
- predict=regression_model(torch.from_numpy(x).requires_grad()).data.numpy()
- torch.save(regression_model.state_dict(),"model.pk1")
- result=regression_model.load_state_dict(torch.load("model.pk1"))
用nn手写网络lenet网络
- import torch as t
- import torch.nn as nn
- import torch.nn.functional as F
- from torch.autograd import Variable as V
- from matplotlib import pyplot as plt
- from IPython import display
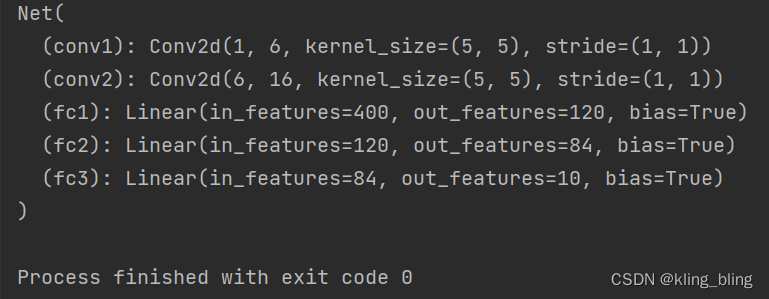
- class Net(nn.Module):
- def __init__(self):
- super(Net,self).__init__()
- self.conv1=nn.Conv2d(1,6,5)
- self.conv2=nn.Conv2d(6,16,5)
- self.fc1=nn.Linear(16*5*5,120)
- self.fc2=nn.Linear(120,84)
- self.fc3=nn.Linear(84,10)
- def forward(self,x):
- x=self.conv1(x)
- x=F.relu(x)
- x=F.max_pool2d(x,(2,2))
- x=self.conv2(x)
- x=F.relu(x)
- x=F.max_pool2d(x,2)
- x=x.view(x.size()[0],-1)
- x=F.relu(self.fc1(x))
- x=F.relu(self.fc2(x))
- x=self.fc3(x)
- return x
- net=Net()
- print(net)

练习:
- input=V(t.randn(1,1,32,32))
- out=net(input)
- output=net(input)
- target=V(t.arange(0,10)).view(1,10).float()
- criterion=nn.MSELoss()
- loss=criterion(output,target)
- optimizer=optim.SGD(net.parameters(),lr=0.01)
- optimizer.zero_grad()
- output=net(input)
- loss=criterion(output,target)
- loss.backward()
- optimizer.step()
nn.Module
全连接层
- import torch as t
- import torch.nn as nn
- import torch.nn.functional as F
- from torch.autograd import Variable as V
- from matplotlib import pyplot as plt
- from IPython import display
- import torch.optim as optim
- class Linear(nn.Module):
- def __init__(self,in_features,out_features):
- super(Linear,self).__init__()
- self.w=nn.Parameter(t.randn(in_features,out_features))
- self.b=nn.Parameter(t.randn(out_features))
- def forward(self,x):
- x=x.mm(self.w)
- return x+self.b.expand_as(x)
- layer=Linear(4,3)
- input=V(t.randn(2,4))
- output=layer(input)
- print(output)

构建多层全连接网络:
- import torch as t
- import torch.nn as nn
- import torch.nn.functional as F
- from torch.autograd import Variable as V
- from matplotlib import pyplot as plt
- from IPython import display
- import torch.optim as optim
- class Linear(nn.Module):
- def __init__(self, in_features, out_features): # 输入的数据维度,输出的数据维度
- super(Linear,
- self).__init__() # 等价于 nn.Module.__init__(self),继承父类的init构造函数
- self.w = nn.Parameter(t.randn(in_features, out_features))
- self.b = nn.Parameter(t.randn(out_features))
- def forward(self, x):
- x = x.mm(self.w)
- return x + self.b.expand_as(x)
- class Perceptron(nn.Module):
- def __init__(self,in_features,hidden_features,out_features):
- super(Perceptron,self).__init__()
- self.layer1=Linear(in_features,hidden_features)
- self.layer2=Linear(hidden_features,out_features)
- def forward(self,x):
- x=self.layer1(x)
- x=t.sigimoid(x)
- x=self.layer2(x)
- return x
- perceptron=Perceptron(3,4,1)
- for name,param in perceptron.named_parameters():
- print(name,param.size())

常用的神经网络层:
1.显示图片(温客行yyds)
- import torch as t
- import torch.nn as nn
- import torch.nn.functional as F
- from torch.autograd import Variable as V
- from matplotlib import pyplot as plt
- from IPython import display
- import torch.optim as optim
- from PIL import Image
- from torchvision.transforms import ToTensor,ToPILImage
- to_tensor=ToTensor()
- to_pil=ToPILImage()
- nick=Image.open('G:/3.bmp')
- nick.show()

加锐化卷积
- import torch as t
- import torch.nn as nn
- import torch.nn.functional as F
- from torch.autograd import Variable as V
- from matplotlib import pyplot as plt
- from IPython import display
- import torch.optim as optim
- from PIL import Image
- from torchvision.transforms import ToTensor,ToPILImage
- to_tensor=ToTensor()
- to_pil=ToPILImage()
- yeye=Image.open('G:/3.bmp')
- inp=to_tensor(yeye).unsqueeze(0)
- kernel=t.ones(3,3,3)/-9
- kernel[:,1,1]=1
- conv=nn.Conv2d(
- in_channels=3 , #彩色图
- out_channels=1,
- kernel_size=3,
- stride=1,
- bias=False
- )
- conv.weight.data=kernel.view(1,3,3,3)
- #输出通道数和卷积核数一样,1代表卷积核数,3代表输入数,后两个为卷积核尺寸
- out=conv(V(inp))
- y=to_pil(out.data.squeeze(0))
- y.show()

加普通卷积
- import torch as t
- import torch.nn as nn
- import torch.nn.functional as F
- from torch.autograd import Variable as V
- from matplotlib import pyplot as plt
- from IPython import display
- import torch.optim as optim
- from PIL import Image
- from torchvision.transforms import ToTensor,ToPILImage
- to_tensor=ToTensor()
- to_pil=ToPILImage()
- yeye=Image.open('G:/3.bmp')
- inp=to_tensor(yeye).unsqueeze(0)
- conv=nn.Conv2d(
- in_channels=3,
- out_channels=1,
- kernel_size=3,
- stride=1,
- bias=False
- )
- out=conv(V(inp))
- y=to_pil(out.data.squeeze(0))
- y.show()

通过Sequential 构建前馈传播网络
三种:
- net1=nn.Sequential()
- net1.add_module('conv',nn.Conv2d(3,3,3))
- net1.add_module('batchnorm',nn.BatchNorm2d(3))
- net1.add_module('activation_layer',nn.ReLU())
- net2=nn.Sequential(nn.Conv2d(3,3,3),nn.BatchNorm2d(3),nn.ReLU())
- from collections import OrderedDict
- net3=nn.Sequential(
- OrderedDict([('conv1',nn.Conv2d(3,3,3)),
- ('bn1',nn.BatchNorm2d(3)),
- ('relu',nn.ReLU())])
- )
通过 ModuleList 构建前馈传播网络
- modellist=nn.ModuleList([nn.Linear(3,4),nn.ReLU(),nn.Linear(4,2)])
- inp=V(t.rand(1,3))
- for model in modellist:
- inp=model(inp)
- class MyModule(nn.Module):
- def __init__(self):
- super(MyModule,self).__init__()
- self.list=[nn.Linear(3,4),nn.ReLU()]
- self.module_list=nn.ModuleList([nn.Conv2d(3,3,3),nn.ReLU()])
- def forward(self):
- pass
- model=MyModule()
- print(model)
循环神经网络层
- t.manual_seed(1000)
- inp=V(t.randn(2,3,4))#长度为2,batchsize为3,每个元素占4维
- lstm=nn.LSTM(4,3,1)#4维,3个隐藏元,1层
- h0=V(t.randn(1,3,3))
- c0=V(t.randn(1,3,3))
- out,hn=lstm(inp,(h0,c0))
- print(out)

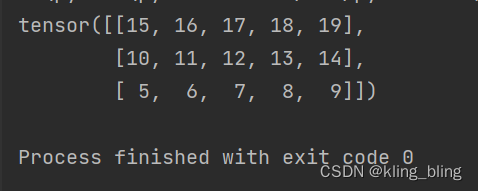
词向量在自然语言中应用十分广泛,torch 同样也提供了 Embedding 层
- embedding=nn.Embedding(4,5)
- embedding.weight.data=t.arange(0,20).view(4,5)
- with t.no_grad():
- inp=V(t.arange(3,0,-1)).long()
- output=embedding(inp)
- print(output)
损失函数
- score=V(t.randn(3,2))
- label=V(t.Tensor([1,0,1])).long()
- criterion=nn.CrossEntropyLoss()
- loss=criterion(score,label)
- print(loss)

优化器:
- class Net(nn.Module):
- def __init__(self):
- super(Net,self).__init__()
- self.features=nn.Sequential(nn.Conv2d(3,6,2),
- nn.ReLU(),
- nn.MaxPool2d(2,2),
- nn.Conv2d(6,16,5),
- nn.ReLU(),
- nn.MaxPool2d(2,2))
- self.classifier=nn.Sequential(nn.Linear(16*5*5,120),
- nn.ReLU(),
- nn.Linear(120,84),
- nn.ReLU(),
- nn.Linear(84,10))
- def forward(self,x):
- x=self.features(x)
- x=x.view(-1,16*5*5)
- x=self.classifier(x)
- return x
- net=Net()
- optimizer=optim.SGD(params=net.parameters(),lr=0.01)
- optimizer.zero_grad()
- inp=V(t.randn(1,3,32,32))
- output=net(inp)
- output.backward(output)
- optimizer.step()
- #针对不同的网络设置不同学习率
- ptimizer=optim.SGD(
- [
- {
- 'params':net.features.parameters()
- },
- {
- 'params':net.classifier.parameters(),
- 'lr':1e-2
- },
- ],
- lr=1e-5
- )
nn.functional 和 nn.Module 的区别
- inp=V(t.randn(2,3))
- model=nn.Linear(3,4)
- output1=model(inp)
- output2=nn.functional.linear(inp,model.weight,model.bias)
- class MyLinear(nn.Module):
- def __init__(self):
- super(MyLinear,self).__init__()
- self.weight=nn.Parameter(t.randn(3,4))
- self.bias=nn.Parameter(t.zeros(3))
- def forward(self):
- return F.linear(input,self.weight,self.bias)
搭建ResNet网络(torch实现)
- class ResidualBlock(nn.Module):
- def __init__(self,inchannel,outchannel,stride=1,shortcut=None):
- super(ResidualBlock,self).__init__()
- self.left=nn.Sequential(
- nn.Conv2d(inchannel,outchannel,3,stride,1,bias=False),
- nn.BatchNorm2d(outchannel),
- nn.ReLU(inplace=True),
- nn.Conv2d(outchannel,outchannel,3,1,1,bias=False),
- nn.BatchNorm(outchannel)
- )
- self.right=shortcut
- def forward(self,x):
- out=self.left(x)
- residual=x if self.right is None else self.right(x)
- out=out+residual
- out=F.relu(out)
- return out
- class ResNet(nn.Module):
- def __init__(self,num_classes=1000):
- super(ResNet,self).__init__()
- self.pre=nn.Sequential(
- nn.conv2d(3,64,7,2,3,bias=False),
- nn.BatchNorm2d(64),
- nn.ReLU(inplace=True),
- nn.MaxPool2d(3,2,1),
- )
- self.layer1=self._make_layer(64,128,3)
- self.layer2=self._make_layer(128,256,4,stride=2)
- self.layer3=self._make_layer(256,512,6,stride=2)
- self.layer4=self._make_layer(512,512,3,stride=2)
- self.fc=nn.Linear(512,num_classes)
- def _make_layer(self,inchannel,outchannel,block_num,stride=1):
- shortcut=nn.Sequential(
- nn.Conv2d(inchannel,outchannel,1,stride,bias=False),
- nn.BatchNorm2d(outchannel)
- )
- layers=[]
- layers.append(ResidualBlock(inchannel,outchannel,stride,shortcut))
- for i in range(1,block_num):
- layers.append(ResidualBlock(outchannel,outchannel))
- return nn.Sequential(*layers)
- def forward(self,x):
- x=self.pre(x)
- x=self.layer1(x)
- x=self.layer2(x)
- x=self.layer3(x)
- x=self.layer4(x)
- x=F.avg_pool2d(x,7)
- x=x.view(x.size(0),-1)
- res_net=ResNet()
- inp=t.autograd.Variable(t.randn(1,3,224,224))
- output=res_net(inp)
torchvision 中的 resnet34网络调用
- from torchvision import models
- res_net=models.resnet34()
- inp=t.autograd.Variable(t.randn(1,3,224,224))
- output=res_net(inp)
- output.size()
深度网络模型持久化
tensor对象保存
- import torch as t
- a=t.Tensor(3,4)
- if t.cuda.is_available():
- a=a.cuda(1)
- t.save(a,'a.pth')
- b=t.load('a.pth')
- c=t.load('a.pth',map_location=lambda storage,loc:storage)
- d=t.load('a.pth',map_location={'cuda:1','cuda:0'})
Module 对象的保存和加载
- import torch as t
- t.set_default_tensor_type('torch.FloatTensor')
- from torchvision.models import AlexNet
- model=AlexNet()
- model.state_dict().keys()
- t.save(model.state_dict(),'alexnet.pth')
- model.load_state_dict(t.load('alexnet.pth'))
Optimizer 对象的保存和加载
- optimizer=t.optim.Adam(model.parameters(),lr=0.1)
- t.save(optimizer.state_dict(),'optimizer.pth')
- optimizer.load_state_dict(t.load('optimizer.pth'))
深度学习程序架构设计
模型定义
数据处理和加载
训练模型(Train & Validate)
训练过程可视化
测试(Test/Inference)- checkpoints/
- data/
- __init__.py
- dataset.py
- get_data.sh
- models/
- __init__.py
- AlexNet.py
- BasicModule.py
- ResNet34.py
- utils/
- __init__.py
- visualize.py
- config.py
- main.py
- requirement.txt
- README.md
比较复杂的可视化工具tensorboard和visdom
使用的时候可以使用colab或者科学上网方法,不然链接会断
数据集可以百度云盘获得
编程实战_猫和狗二分类_深度学习项目架构
1.数据加载
- class DogCat(data.Dataset):
- def __init__(self,root,transforms=None,train=True,test=False):
- self.test=test
- imgs=[os.path.join(root,img)
- for img in os.listdir(root)]
- if self.test:
- imgs=sorted(
- imgs,
- key=lambda x:int(x.split('.')[-2].split('/')[-1])
- )
- else:
- imgs=sorted(imgs,
- key=lambda x:int(x.split('.')[-2]))
- imgs_num=len(imgs)
- if self.test:
- self.imgs=imgs
- elif train:
- self.imgs=imgs[:int(0.7*imgs_num)]
- else:
- self.imgs=imgs[int(0.7*imgs_num):]
- if transforms is None:
- normalize=T.Normalize(mean=[0.485,0.456,0.406],
- std=[0.229,0.224,0.225])
- if self.test or not train:#测试集和验证集
- self.transforms=T.Compose([
- T.Scale(224),
- T.CenterCrop(224),
- T.ToTensor(),
- normalize
- ])
- else:#训练集
- self.transforms=T.Compose([
- T.Scale(256),
- T.RandomResizedCrop(224),
- T.RandomHorizontalFlip(),
- T.ToTensor(),
- normalize
- ])
- def __getitm__(self,index):
- #返回一张图片
- img_path=self.imgs[index]
- if self.text:
- label=self.imgs[index].split('.')[-2]
- label=int(label.split('/')[-1])
- else :
- label=1 if 'dog' in img_path.split('/')[-1] else 0
- data=Image.open(img_path)
- data=self.transforms(data)
- return data,label
- def __len__(self):
- return len(self.imgs)
2.定义模型
- import time
- import torch as t
- class BasicModule(t.nn.Module):#封装save和load
- def __init__(self):
- super(BasicModule,self).__init__()
- self.model_name=str(type(self))
- def load(self,path):
- self.load_state_dict(t.load(path))
- def save(self,name=None):
- #模型名字+时间
- if name is None:
- prefix='checkpoints/'+self.model_name+'.'
- name=time.strftime(prefix+'%m%d_%H:%M:%S.pth')
- t.save(self.state_dict(),name)
- return name
封装save和load
配置文件
- class DefaultConfig(object):
- env='default'
- model='AlexNet'
- train_data_root=' ./data/train/'
- test_data_root='./data/test/'
- load_model_path='checkpoints/model.pth'
- batch_size=128
- use_gpu=False
- num_workers=4
- print_freq=20
- result_file='result.csv'
- max_epoch=10
- lr=0.1
- lr_decay=0.95
- weight_decay=1e-4
main.py的代码组织结构
在我们这个项目的 main.py 中主要包括以下四个函数,其中三个需要命令行执行,main.py 的代码组织结构如下所示:
train:
- def train(**kwargs):
- opt.parse(kwargs)
- vis=Visualizer(opt.env)
- #模型
- model=opt.model()
- if opt.load_model_path:
- model.load(opt.laod_model_path)
- if opt,use_gpu:model.cuda()
- #数据
- train_data=DogCat(opt.train_data_root,train=True)
- val_data=DogCat(opt.train_data_root,train=False)
- train_dataloader=Dataloader(train_data,
- opt.batch_size,
- shuffle=True,
- num_workers=opt.num_workers)
- val_dataloader = Dataloader(train_data,
- opt.batch_size,
- shuffle=False,
- num_workers=opt.num_workers)
- #函数和优化器
- criterion=torch.nn.CrossEntropyLoss()
- lr=opt.lr
- optimizer=t.optim.Adam(model.parameters(),
- lr=lr,
- weight_decay=opt.weight.decay)
- #指标
- loss_meter = meter.AverageValueMeter() # 平均损失
- confusion_matrix = meter.ConfusionMeter(2) # 混淆矩阵
- previous_loss = 1e100
- #训练
- for epoch in range(opt.max_epoch):
- loss_meter.reset()
- confusion_matrix.reset()
- for ii,(data,label) in enumerate(train_dataloader):
- inp=Variable(data)
- target=Variable(label)
- if opt.use_gpu:
- inp=inp.cuda()
- target=target.cuda()
- optimizer.zero_grad()
- score=model(inp)
- loss=criterion(score,target)
- loss.backward()
- optimizer.step()
- loss_meter.add(loss.data[0])
- confusion_matrix.add(score.data, target.data)
- if ii % opt.print_freq == opt.print_freq - 1:
- vis.plot('loss', loss_meter.value()[0])
- # 如果需要的话,进入 debug 模式
- if os.path.exists(opt.debug_file):
- ipdb.set_trace()
- model.save()
- if loss_meter.value()[0] > previous_loss:
- lr = lr * opt.lr_decay
- for param_group in optimizer.param_groups:
- param_group['lr'] = lr
- previous_loss = loss_meter.value()[0]
val
- def val(model,dataloader):
- model.eval()
- confusion_matrix = meter.ConfusionMeter(2)
- for ii, data in enumerate(dataloader):
- inp, label = data
- val_inp = Variable(inp, volatile=True)
- val_label = Variable(label.long(), volatile=True)
- if opt.use_gpu:
- val_inp = val_inp.cuda()
- val_label = val_label.cuda()
- score = model(val_inp)
- confusion_matrix.add(score.data.squeeze(), label.long())
- # 把模型恢复为训练模式
- model.train()
- cm_value = confusion_matrix.value()
- accuracy = 100. * (cm_value[0][0] + cm_value[1][1]) / (cm_value.sum())
- return confusion_matrix, accuracy
测试
- def test(**kwargs):
- opt.parse(kwargs)
- model=getattr(models,opt.model)().eval()
- if opt.load_model_path:
- model.load(opt.load_model_path)
- if opt.use_gpu: model.cuda()
- train_data=DogCat(opt.test_data_root,test=True)
- test_dataloader=DataLoader(train_data,
- batch_sampler=opt.batch_size,
- shuffle=False,
- num_workers=opt.num_workers
- )
- result=[]
- for ii, (data, path) in enumerate(test_dataloader):
- inp = Variable(data, volatile=True)
- if opt.use_gpu: inp = inp.cuda()
- score = model(inp)
- probability = probability = functional.softmax(score, dim=1)[:, 0].detach().tolist()
- batch_results = [(path_, probability_) for path_, probability_ in zip(path, probability)]
- results += batch_results
- write_csv(results, opt.result_file)
- return results
-
相关阅读:
Linux网络配置
【LeetCode】Day169-子数组的最小值之和
【JavaScript复习三】循环结构for和while
集成elastic-job分布式调度定时任务
cesium 图形标注圆形、正方形、多边形、椭圆等
Flink 重启策略和故障恢复策略
王道数据结构2(线性表)
上周热点回顾(7.24-7.30)
【C语言刷LeetCode】717. 1 比特与 2 比特字符(E)
Netty编码和解码
- 原文地址:https://blog.csdn.net/kling_bling/article/details/125942303