-
J2EE基础:Spring及ioc
目录
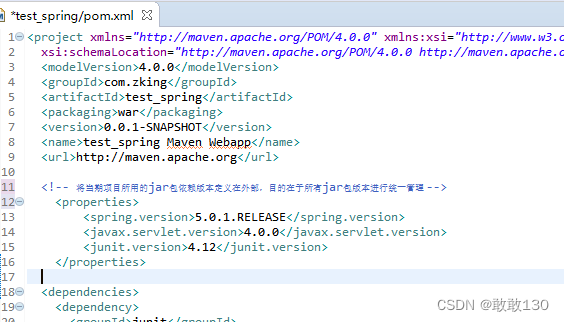
1. 统一的路口,一处改变,多处改变,版本抽离出来的一个原因
3.3.建模后期望在每一个Servlet都能够拿到Spring的上下文对象ClassPathXmlApplicationContext
一、Spring的简介
Spring是一个开源框架,它由Rod Johnson创建。它是为了解决企业应用开发的复杂性而创建的。
Spring使用基本的JavaBean来完成以前只可能由EJB完成的事情。
然而,Spring的用途不仅限于服务器端的开发。从简单性、可测试性和松耦合的角度而言,任何Java应用都可以从Spring中受益。


目的:解决企业应用开发的复杂性
功能:使用基本的JavaBean代替EJB,并提供了更多的企业应用功能
范围:任何Java应用
简单来说,Spring是一个轻量级的控制反转(IoC)和面向切面(AOP)的容器框架。

1.1 中间层框架、万能胶
struts2
spring
hibernate
1.2 容器框架
JavaBean 项目中的一个个类
IOC和AOP
二、Spring中ioc的特点
我们先新建一个maven项目
1. 统一的路口,一处改变,多处改变,版本抽离出来的一个原因
2.具体的jar包依赖
 如果这个文件报红了,下面就不用写了,如果说当前目录解决不了,就切换一个目录,在解决不了,那么就把仓库清空
3.导入jdk的插件

4.目录放出来,接着把我们的web2.3改为3.1
web.xml
- <web-app xmlns="http://xmlns.jcp.org/xml/ns/javaee"
- xmlns:xsi="http://www.w3.org/2001/XMLSchema-instance"
- xsi:schemaLocation="http://xmlns.jcp.org/xml/ns/javaee http://xmlns.jcp.org/xml/ns/javaee/web-app_3_1.xsd"
- version="3.1">
- <display-name>Archetype Created Web Applicationdisplay-name>
- web-app>
5.把这个maven项目搭建起来


6.更新

二、Spring中ioc的特点


通过上面这些我们目前就只需要修改UserBizImp12即可,项目越大修改的就越多,目前我们只是有两个

总结:
最原始:频繁修改业务层biz层代码 反复去修改原有的代码,本来没有bag就会修改成bug
多实现:凡是涉及到用户业务层 调用的地址,都需要修改代码 修改的就是这个接口的实现类spring-context .xml
- <beans xmlns="http://www.springframework.org/schema/beans"
- xmlns:xsi="http://www.w3.org/2001/XMLSchema-instance"
- xmlns:aop="http://www.springframework.org/schema/aop"
- xmlns:context="http://www.springframework.org/schema/context"
- xsi:schemaLocation="http://www.springframework.org/schema/beans http://www.springframework.org/schema/beans/spring-beans.xsd
- http://www.springframework.org/schema/aop http://www.springframework.org/schema/aop/spring-aop-4.3.xsd
- http://www.springframework.org/schema/context http://www.springframework.org/schema/context/spring-context-4.3.xsd">
- beans>
把这个复制到如图所示:


我们新建一个Demo1测试一下:

我们现在运行的UserBizImpl2-----》运行结果如图所:

运行的UserBizImpl2-----》运行结果如图所:

三、依赖注入的3中方式
目前我只是把OrderAction的set和get方法注释了如图所示

我们在运行一下就会报错

建模就报错了,就是说没有set方法了,也就是说我们注入对象方法的话它是跟set方法是有关系的
1.set 注入


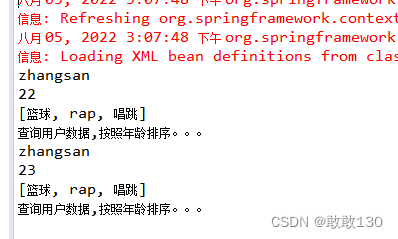
打印然后我们在去Demo1里面运行一下看看有没有如图所示:

userBiz.java
- package com.jwj.biz;
- /**
- * 用户业务类
- * @author 蒋文娟
- *
- * @date 2022年8月6日 下午4:22:40
- */
- public interface UserBiz {
- void list();
- }
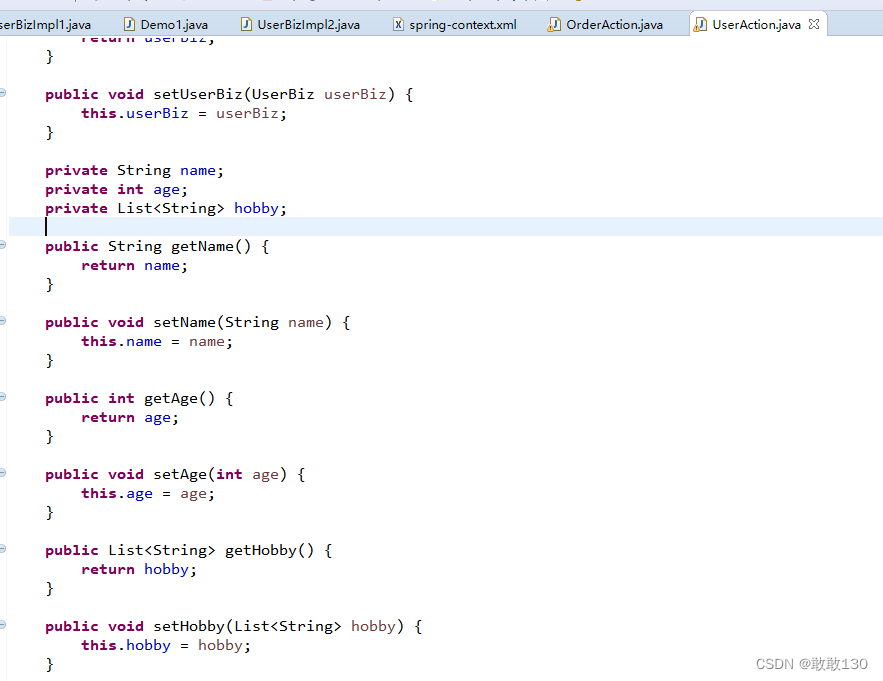
代码块:UserAction.java
- package com.jwj.biz.web;
- import java.util.List;
- import com.jwj.biz.UserBiz;
- import com.jwj.biz.impl.UserBizImpl1;
- public class UserAction {
- // private UserBiz userBiz=new UserBizImpl1();
- private UserBiz userBiz;
- public UserBiz getUserBiz() {
- return userBiz;
- }
- public void setUserBiz(UserBiz userBiz) {
- this.userBiz = userBiz;
- }
- private String name;
- private int age;
- private List<String> hobby;
- public String getName() {
- return name;
- }
- public void setName(String name) {
- this.name = name;
- }
- public int getAge() {
- return age;
- }
- public void setAge(int age) {
- this.age = age;
- }
- public List<String> getHobby() {
- return hobby;
- }
- public void setHobby(List<String> hobby) {
- this.hobby = hobby;
- }
- public void list() {
- System.out.println(name);
- System.out.println(age);
- System.out.println(hobby);
- // 调用业务处理类
- userBiz.list();
- }
- }
spring-context.xml
- <beans xmlns="http://www.springframework.org/schema/beans"
- xmlns:xsi="http://www.w3.org/2001/XMLSchema-instance"
- xmlns:aop="http://www.springframework.org/schema/aop"
- xmlns:context="http://www.springframework.org/schema/context"
- xsi:schemaLocation="http://www.springframework.org/schema/beans http://www.springframework.org/schema/beans/spring-beans.xsd
- http://www.springframework.org/schema/aop http://www.springframework.org/schema/aop/spring-aop-4.3.xsd
- http://www.springframework.org/schema/context http://www.springframework.org/schema/context/spring-context-4.3.xsd">
- <bean class="com.jwj.biz.impl.UserBizImpl1" id="userBiz">bean>
- <bean class="com.jwj.biz.web.UserAction" id="userAction">
- <property name="userBiz" ref="userBiz">property>
- <property name="name" value="zhangsan">property>
- <property name="age" value="22">property>
- <property name="hobby">
- <list>
- <value>篮球value>
- <value>rapvalue>
- <value>唱跳value>
- list>
- property>
- bean>
- <bean class="com.jwj.biz.web.OrderAction" id="orderAction">
- <property name="userBiz" ref="userBiz">property>
- bean>
- beans>
2.构造 注入
通过构造器 ,我们在OrderAction里面设置如图所示:


我们在去运行一下如图所示:
OrderAction.java代码块:
- package com.jwj.biz.web;
- import java.util.List;
- import com.jwj.biz.UserBiz;
- import com.jwj.biz.impl.UserBizImpl1;
- public class OrderAction {
- //private UserBiz userBiz=new UserBizImpl1();
- private UserBiz userBiz;
- public UserBiz getUserBiz() {
- return userBiz;
- }
- public void setUserBiz(UserBiz userBiz) {
- this.userBiz = userBiz;
- }
- private String name;
- private int age;
- private List<String> hobby;
- public OrderAction(String name, int age, List<String> hobby) {
- super();
- this.name = name;
- this.age = age;
- this.hobby = hobby;
- }
- public OrderAction() {
- // TODO Auto-generated constructor stub
- }
- public void list() {
- System.out.println(name);
- System.out.println(age);
- System.out.println(hobby);
- // 调用业务处理类
- userBiz.list();
- }
- }
spring-context.xml
- <beans xmlns="http://www.springframework.org/schema/beans"
- xmlns:xsi="http://www.w3.org/2001/XMLSchema-instance"
- xmlns:aop="http://www.springframework.org/schema/aop"
- xmlns:context="http://www.springframework.org/schema/context"
- xsi:schemaLocation="http://www.springframework.org/schema/beans http://www.springframework.org/schema/beans/spring-beans.xsd
- http://www.springframework.org/schema/aop http://www.springframework.org/schema/aop/spring-aop-4.3.xsd
- http://www.springframework.org/schema/context http://www.springframework.org/schema/context/spring-context-4.3.xsd">
- <bean class="com.jwj.biz.impl.UserBizImpl1" id="userBiz">bean>
- <bean class="com.jwj.biz.web.UserAction" id="userAction">
- <property name="userBiz" ref="userBiz">property>
- <property name="name" value="zhangsan">property>
- <property name="age" value="22">property>
- <property name="hobby">
- <list>
- <value>篮球value>
- <value>rapvalue>
- <value>唱跳value>
- list>
- property>
- bean>
- <bean class="com.jwj.biz.web.OrderAction" id="orderAction">
- <property name="userBiz" ref="userBiz">property>
- <constructor-arg name="name" value="zhangsan">constructor-arg>
- <constructor-arg name="age" value="23">constructor-arg>
- <constructor-arg name="hobby">
- <list>
- <value>篮球value>
- <value>rapvalue>
- <value>唱跳value>
- list>
- constructor-arg>
- bean>
- beans>
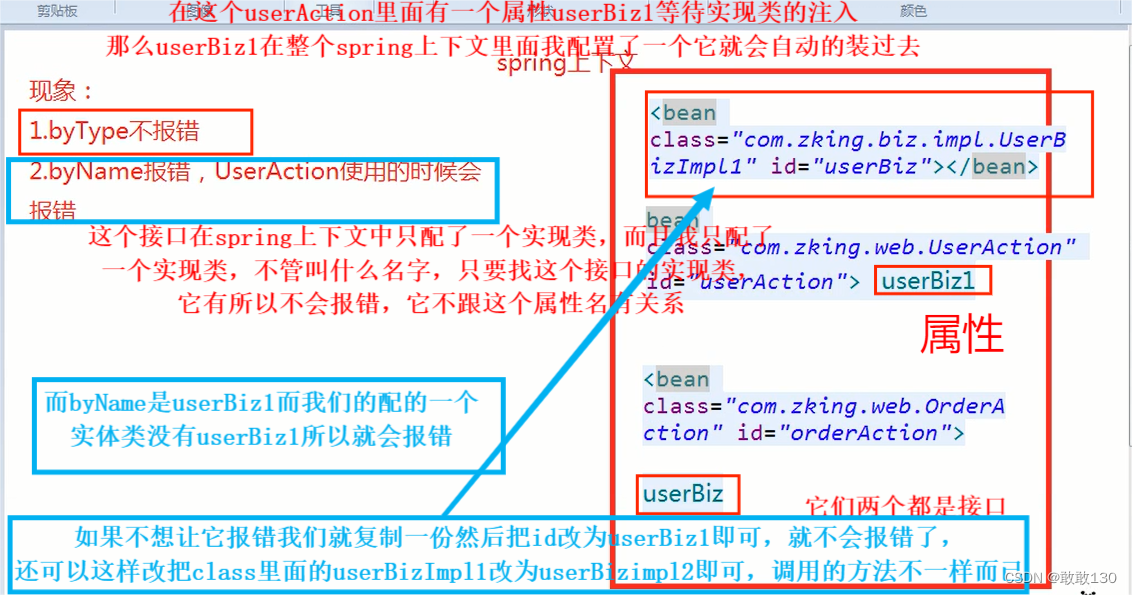
3.自动装配


报空指针错误,因为没有输入所以才会报错
byName

改为这样如图所示:

我们在去运行一下: 就没有报错了

我们把UserAction里面的userBiz改为userBiz1,全部改好了之后我们在去运行一下:就会报错如图所示:

报的错就是我们刚刚改动的地址
byType
当我们在换成byType的时候如图所示:

我们在去运行一下就不会报错了如图所示:

4.总结
我们在换回来byName

当我们有改为byType的时候,它就会报错了如图所示:

default-autowire="byType"
byName: 是Spring管理的bean对象的ID进行查找 ,如果找不到则注入失败,反之成功。
byType: 是Spring管理的bean对象接口实现类进行查找,如果没有或2个以上,则注入失败,反之成功
四、Spring与web容器的整合
它是为了解决问题的,最终我们的开发肯定是开发web应用的web网页程序,最终就是要运行起来,要拿到整个工程里的任何一个bin对象的,那么我们当前是通过建模的方式去拿的,那么我们不可能把建模的那段代码放到每一个servlet里面去做
1.why:建模的过程是十分耗时的

项目启动两三分钟少之又少,如果每一次请求都要加这个文件,给客户的响应速度是极其慢的
如果要走上面那个建模就相当于睡觉了,也就相当于Thread.sleep(10000);
2.解决问题
建模是耗时间的, 怎么才能让建模执行一次,并且同时能让每一个Servlet拿到context对象?
1.建模必不可少
2.建模要保障只执行一次
3.3.建模后期望在每一个Servlet都能够拿到Spring的上下文对象ClassPathXmlApplicationContext
3.how
1.监听器的初始化方法
Tomcat一启动监听器就打印,那么它会保障一定不会给你建模,并且它还保证执行一次

2.Spring的上下文要存放在Tomcat上下文中
SpringLoadListener.java代码块:
- package com.jwj.biz.ioc.listener;
- import javax.servlet.ServletContext;
- import javax.servlet.ServletContextEvent;
- import javax.servlet.ServletContextListener;
- import org.springframework.context.support.ClassPathXmlApplicationContext;
- import com.jwj.biz.web.UserAction;
- public class SpringLoadListener implements ServletContextListener{
- @Override
- public void contextInitialized(ServletContextEvent sce) {
- // 拿到Spring的上下文中
- // 建模
- ClassPathXmlApplicationContext context = new ClassPathXmlApplicationContext("spring-context.xml");
- // 将Spring的上下文保存到Tomcat上下文
- ServletContext servletContext = sce.getServletContext();
- servletContext.setAttribute("springContext", context);
- }
- }
DemoServlet.java代码块:
- package com.jwj.biz.ioc.demo;
- import java.io.IOException;
- import javax.servlet.ServletException;
- import javax.servlet.http.HttpServlet;
- import javax.servlet.http.HttpServletRequest;
- import javax.servlet.http.HttpServletResponse;
- import org.springframework.context.support.ClassPathXmlApplicationContext;
- import com.jwj.biz.web.UserAction;
- /**
- * Spring于web容器的整合原理
- * why:建模的过程是十分耗时的
- * 解决问题:
- * 1.建模必不可少
- * 2.建模要保障只执行一次
- * 3.建模后期望在每一个Servlet都能够拿到Spring的上下文对象ClassPathXmlApplicationContext
- * how:
- * 1.监听器的初始化方法
- * 2.Spring的上下文要存放在Tomcat上下文中
- *
- * @author 蒋文娟
- *
- * @date 2022年8月5日 下午4:34:22
- */
- @WebServlet("/springDemo")
- public class DemoServlet extends HttpServlet{
- @Override
- protected void service(HttpServletRequest req, HttpServletResponse resp) throws ServletException, IOException {
- // Thread.sleep(1000);
- // 建模
- // ClassPathXmlApplicationContext context = new ClassPathXmlApplicationContext("spring-context.xml");
- ClassPathXmlApplicationContext context = (ClassPathXmlApplicationContext) req.getServletContext().getAttribute("springContext");
- UserAction userAction = (UserAction) context.getBean("userAction");
- userAction.list();
- }
- }
我们在我们在上面的测试改动一下
把我们之前注册的那两个行代码还原,然后我们有多写了一个UserBiz1那个给注释掉,把id改为原来的UserBiz
spring-context.xml代码块:
- <beans xmlns="http://www.springframework.org/schema/beans"
- xmlns:xsi="http://www.w3.org/2001/XMLSchema-instance"
- xmlns:aop="http://www.springframework.org/schema/aop"
- xmlns:context="http://www.springframework.org/schema/context"
- xsi:schemaLocation="http://www.springframework.org/schema/beans http://www.springframework.org/schema/beans/spring-beans.xsd
- http://www.springframework.org/schema/aop http://www.springframework.org/schema/aop/spring-aop-4.3.xsd
- http://www.springframework.org/schema/context http://www.springframework.org/schema/context/spring-context-4.3.xsd">
- <bean class="com.jwj.biz.impl.UserBizImpl1" id="userBiz">bean>
- <bean class="com.jwj.biz.web.UserAction" id="userAction">
- <property name="userBiz" ref="userBiz">property>
- <property name="name" value="zhangsan">property>
- <property name="age" value="22">property>
- <property name="hobby">
- <list>
- <value>篮球value>
- <value>rapvalue>
- <value>唱跳value>
- list>
- property>
- bean>
- <bean class="com.jwj.biz.web.OrderAction" id="orderAction">
- <property name="userBiz" ref="userBiz">property>
- <constructor-arg name="name" value="zhangsan">constructor-arg>
- <constructor-arg name="age" value="23">constructor-arg>
- <constructor-arg name="hobby">
- <list>
- <value>篮球value>
- <value>rapvalue>
- <value>唱跳value>
- list>
- constructor-arg>
- bean>
- beans>
UserAction.java代码块 把里面的UserBiz1改为UserBIz
- package com.jwj.biz.web;
- import java.util.List;
- import com.jwj.biz.UserBiz;
- import com.jwj.biz.impl.UserBizImpl1;
- /**
- * 依赖注入的3中方式
- * 1.set 注入
- * 2.构造 注入
- * 3.自动装配
- * byName
- * byType
- *
- * @author 蒋文娟
- *
- * @date 2022年8月5日 下午3:00:32
- */
- public class UserAction {
- // private UserBiz userBiz=new UserBizImpl1();
- private UserBiz userBiz;
- public UserBiz getUserBiz() {
- return userBiz;
- }
- public void setUserBiz(UserBiz userBiz) {
- this.userBiz = userBiz;
- }
- private String name;
- private int age;
- private List<String> hobby;
- public String getName() {
- return name;
- }
- public void setName(String name) {
- this.name = name;
- }
- public int getAge() {
- return age;
- }
- public void setAge(int age) {
- this.age = age;
- }
- public List<String> getHobby() {
- return hobby;
- }
- public void setHobby(List<String> hobby) {
- this.hobby = hobby;
- }
- public void list() {
- System.out.println(name);
- System.out.println(age);
- System.out.println(hobby);
- // 调用业务处理类
- userBiz.list();
- }
- }
我们要记得去web.xml配置,没有配置的话会报500的错误
web.xml代码块:
- <web-app xmlns="http://xmlns.jcp.org/xml/ns/javaee"
- xmlns:xsi="http://www.w3.org/2001/XMLSchema-instance"
- xsi:schemaLocation="http://xmlns.jcp.org/xml/ns/javaee http://xmlns.jcp.org/xml/ns/javaee/web-app_3_1.xsd"
- version="3.1">
- <display-name>Archetype Created Web Applicationdisplay-name>
- <listener>
- <listener-class>com.jwj.biz.ioc.listener.SpringLoadListenerlistener-class>
- listener>
- web-app>
然后我们在运行一下:在DemoServlet记得加上注解@WebServlet("/springDemo") 注意要用debug启动

3.还需优化
在我们的SpringLoadListener框架里面一定叫ServletContextEvent不一定,我们的框架一定要支持可以更改框架名字的,如果一个项目要用十几个框架的就会重命名,所以一定要支持可配置
我们就要在web.xml里面去配置一下
- <web-app xmlns="http://xmlns.jcp.org/xml/ns/javaee"
- xmlns:xsi="http://www.w3.org/2001/XMLSchema-instance"
- xsi:schemaLocation="http://xmlns.jcp.org/xml/ns/javaee http://xmlns.jcp.org/xml/ns/javaee/web-app_3_1.xsd"
- version="3.1">
- <display-name>Archetype Created Web Applicationdisplay-name>
- <context-param>
- <param-name>springconfiglocationparam-name>
- <param-value>/applicationContext.xmlparam-value>
- context-param>
- <listener>
- <listener-class>com.jwj.biz.ioc.listener.SpringLoadListenerlistener-class>
- listener>
- web-app>
SpringLoadListener.java
在我们的上下文中拿到这个值
- package com.jwj.biz.ioc.listener;
- import javax.servlet.ServletContext;
- import javax.servlet.ServletContextEvent;
- import javax.servlet.ServletContextListener;
- import org.springframework.context.support.ClassPathXmlApplicationContext;
- import com.jwj.biz.web.UserAction;
- public class SpringLoadListener implements ServletContextListener{
- @Override
- public void contextInitialized(ServletContextEvent sce) {
- System.out.println("初始化...");
- ServletContext servletContext = sce.getServletContext();
- // 拿到我们刚刚配置好的
- String springconfiglocation = servletContext.getInitParameter("springconfiglocation");
- // 拿到我们的值
- System.out.println(springconfiglocation+".....");
- // 拿到Spring的上下文中
- // 建模
- ClassPathXmlApplicationContext context = new ClassPathXmlApplicationContext("spring-context.xml");
- // 将Spring的上下文保存到Tomcat上下文
- servletContext.setAttribute("springContext", context);
- }
- }
我们在运行一下看看拿到了没有如图所示:拿到了

五、总结
前四个都是面试题
1.Spring的理解及作用
容器框架 中间层框架 用来整合其他的第三方框架
有两大核心组件 第一个是ioc 第二个是aop
2.IOC的作用
特点:依赖注入、控制反转
控制反转:经创建对象的权利,有程序员手动new对象的权利转交给Spring容器完成
优点:便于维护,拥抱变化
3.依赖注入的方式
set注入
构造注入
自动装配
4.自动装配
byName:根据bean 的 id在Spring的上下文中进行寻找,匹配上了会自动注入给属性
byType:根据属性接口在Spring上下文中找对应的接口实现类,如果找到一个,就会自动注入;如果0或者2个以上就会报错
5.Spring如何与web容器集成
1.在监听器中初始化Spring上下文--建模
2.拿到tomcat上下文,将Spring上下文存储到tomcat中
3.在web.xml中配置监听器
4.在测试的servlet中进行测试,在servlet看能否拿到Spring上下文
-
相关阅读:
Union和union导致的数据不一致
BUUCTF reverse wp 56 - 60
mybatis、mybatisPlus
【动态规划】139. 单词拆分、多重背包
【c++】跟webrtc学容器:有序
阿里云对象存储OSS的使用笔记
[NCTF 2018]flask真香
org.junit.runners.model.InvalidTestClassError:
【RocketMQ】消息的拉取
Java设计模式-抽象工厂模式
- 原文地址:https://blog.csdn.net/weixin_67465673/article/details/126167436