-
Elasticsearch7.17.3+分布式搜索引擎
一. 前言
Elastic的底层是开源库 Lucene。但是,你没法直接用Lucene,必须自己写代码去调用它的接口。Elastic是 Lucene的封装,提供了 REST API的操作接口,开箱即用。REST API:天然的跨平台。
博主尝试了es8.X.X版本坑太多…
官网地址
二.基本概念
在6.0版本以上,官方已舍弃类型的概念
三. ES-docker安装
以下安装方式
es7.x以上版本不适用# 安装es镜像 docker pull elasticsearch:7.17.3 mkdir -p /mydata/elasticsearch/config mkdir -p /mydata/elasticsearch/data echo "http.host: 0.0.0.0" >> /mydata/elasticsearch/config/elasticsearch.yml chmod -R 777 /mydata/elasticsearch/ docker run --name elasticsearch -p 9200:9200 -p 9300:9300 \ -e "discovery.type=single-node" \ -e ES_JAVA_OPTS="-Xms512m -Xmx512m" \ --restart=always --privileged=true \ -v /mydata/elasticsearch/config/elasticsearch.yml:/usr/share/elasticsearch/config/elasticsearch.yml \ -v /mydata/elasticsearch/data:/usr/share/elasticsearch/data \ -v /mydata/elasticsearch/plugins:/usr/share/elasticsearch/plugins \ -d elasticsearch:7.17.3 # 安装es可视化工具kibana docker pull kibana:7.17.3 # ELASTICSEARCH_HOSTS=http://本机ip:9200 docker run --name kibana -e ELASTICSEARCH_HOSTS=http://192.168.56.101:9200 -p 5601:5601 \ --restart=always --privileged=true -d kibana:7.17.3- 1
- 2
- 3
- 4
- 5
- 6
- 7
- 8
- 9
- 10
- 11
- 12
- 13
- 14
- 15
- 16
- 17
- 18
- 19
- 20
- 21
访问 http://ip:9200
四.基本请求
测试数据
4.1 _cat
示例:http://192.168.56.101:9200/_cat/health

GET /_cat/nodes: 查看所有节点 GET /_cat/health: 查看es健康状况 GET/_cat/master: 查看主节点 GET /_cat/indices:查看所有索引 show databases;- 1
- 2
- 3
- 4
4.2 索引一个文档(保存)
type被移除后:
索引操作:PUT {index}/{type}/{id}需要修改成PUT {index}/_doc/{id}
Mapping 操作:PUT {index}/{type}/_mapping则变成PUT {index}/_mapping
所有增删改查搜索操作返回结果里面的关键字 _type 都将被移除
父子关系使用 join 字段来构建POST 新增.如果不指定id,会自动生成id.指定id就会修改这个数据,并新增版本号
PUT可以新增可以修改.PUT必须指定 id;由于PUT需要指定id,我们一般都用来做修改操作,不指定id会报错。
示例:
发送post或put请求


4.3 查询文档
GET请求


并发控制修改请求 PUT http://192.168.56.101:9200/customer/_doc/1?if_seq_no=1&if_primary_term=1 响应解析 { "_index": "customer", // 在哪个索引 "_type": "_doc", // 多余字段 "_id": "1", // 记录id "_version": 2, // 版本号 "result": "updated", // "_shards": { "total": 2, "successful": 1, "failed": 0 }, "_seq_no": 2, // 并发控制字段,每次更新就会+1,做乐观锁 "_primary_term": 1 // 同上,主分片重新分配,如重启,就会变化 }- 1
- 2
- 3
- 4
- 5
- 6
- 7
- 8
- 9
- 10
- 11
- 12
- 13
- 14
- 15
- 16
- 17
- 18
4.4 更新文档
POST 新增.如果不指定id,会自动生成id.指定id就会修改这个数据,并新增版本号
PUT可以新增可以修改.PUT必须指定 id;由于PUT需要指定id,我们一般都用来做修改操作,不指定id会报错。POST http://192.168.56.101:9200/customer/_doc/1/
_update
带_update会对比原来数据,数据一致则不做操作
put和post(不带_update)都会直接更新数据4.5 删除文档
DELETE http://192.168.56.101:9200/customer/external/1

4.6 bulk批量API
POST
示例:
{ {"index": {"_id": "1"}} {"name": "john Doe"} {"index": {"_id": "2"}} {"name": "john Doe"} }- 1
- 2
- 3
- 4
- 5
- 6

4.7 高级索引
4.7.1.searchAPI
ES支持两种基本方式检索∶
一个是通过使用 REST request URI 发送搜索参数(uri+检索参数)// GET {bank}/_search?{q=*&sort=account_number:asc} // 查询结果分页返回 GET bank/_search?q=*&sort=account_number:asc- 1
- 2
- 3
另一个是通过使用 REST request body来发送它们(uri:请求体)
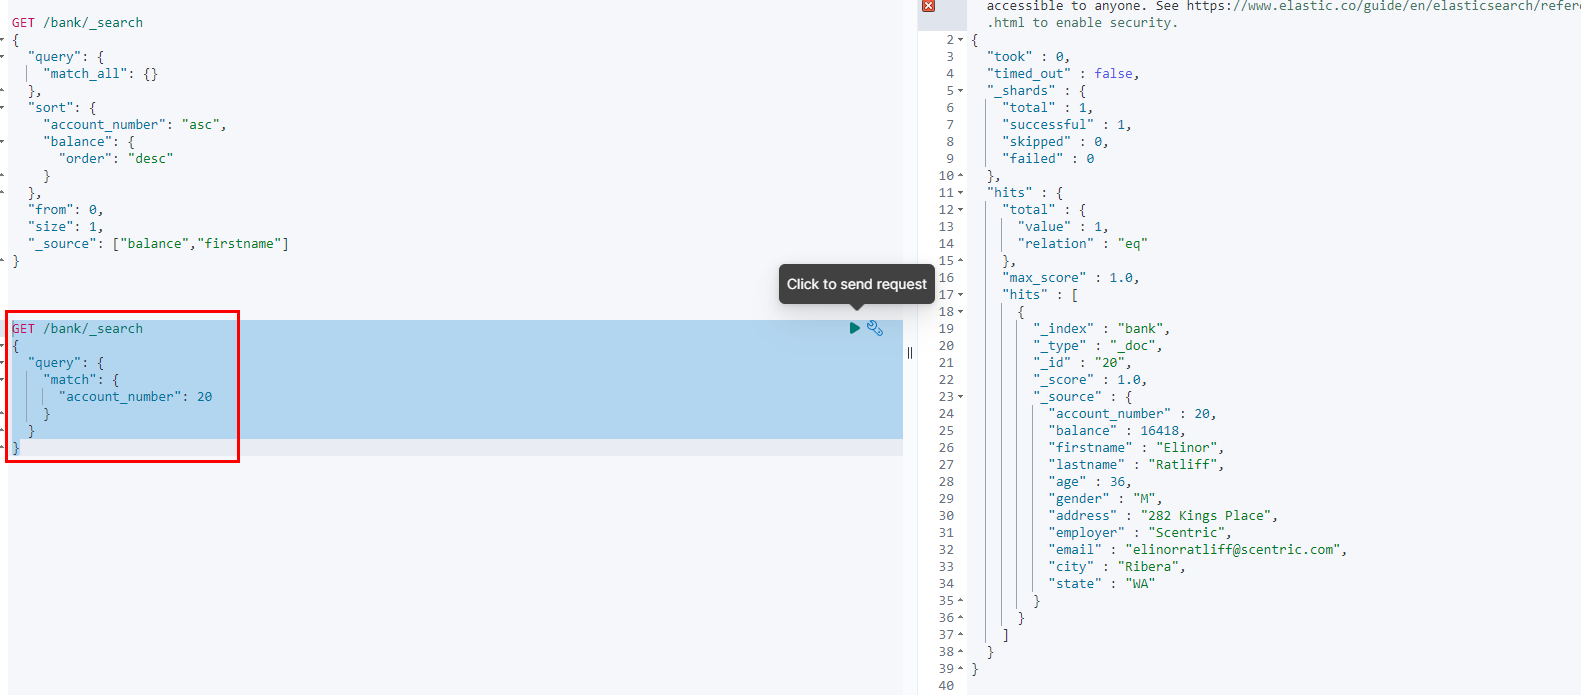
其中请求体被称为query DSL 领域对象语言// GET /{bank}/_search GET /bank/_search { "query": { "match_all": {} //全查询 }, "sort": { "account_number": "asc", // 以该字段升序排序 "balance": { "order": "desc" } }, "from": 0, // 起始页 "size": 3, // 想返回的数据个数 "_source": ["balance","firstname"] // 数据只返回规定的字段 }- 1
- 2
- 3
- 4
- 5
- 6
- 7
- 8
- 9
- 10
- 11
- 12
- 13
- 14
- 15
- 16

4.7.2.精确查询和模糊查询
// 匹配非字符串字段即为精确查询,反之为模糊查询(倒排索引维护,按评分排序) GET /bank/_search { "query": { "match": { "account_number": 20 } } } GET /bank/_search { "query": { "match": { "address": "kings" } } }- 1
- 2
- 3
- 4
- 5
- 6
- 7
- 8
- 9
- 10
- 11
- 12
- 13
- 14
- 15
- 16
- 17
- 18

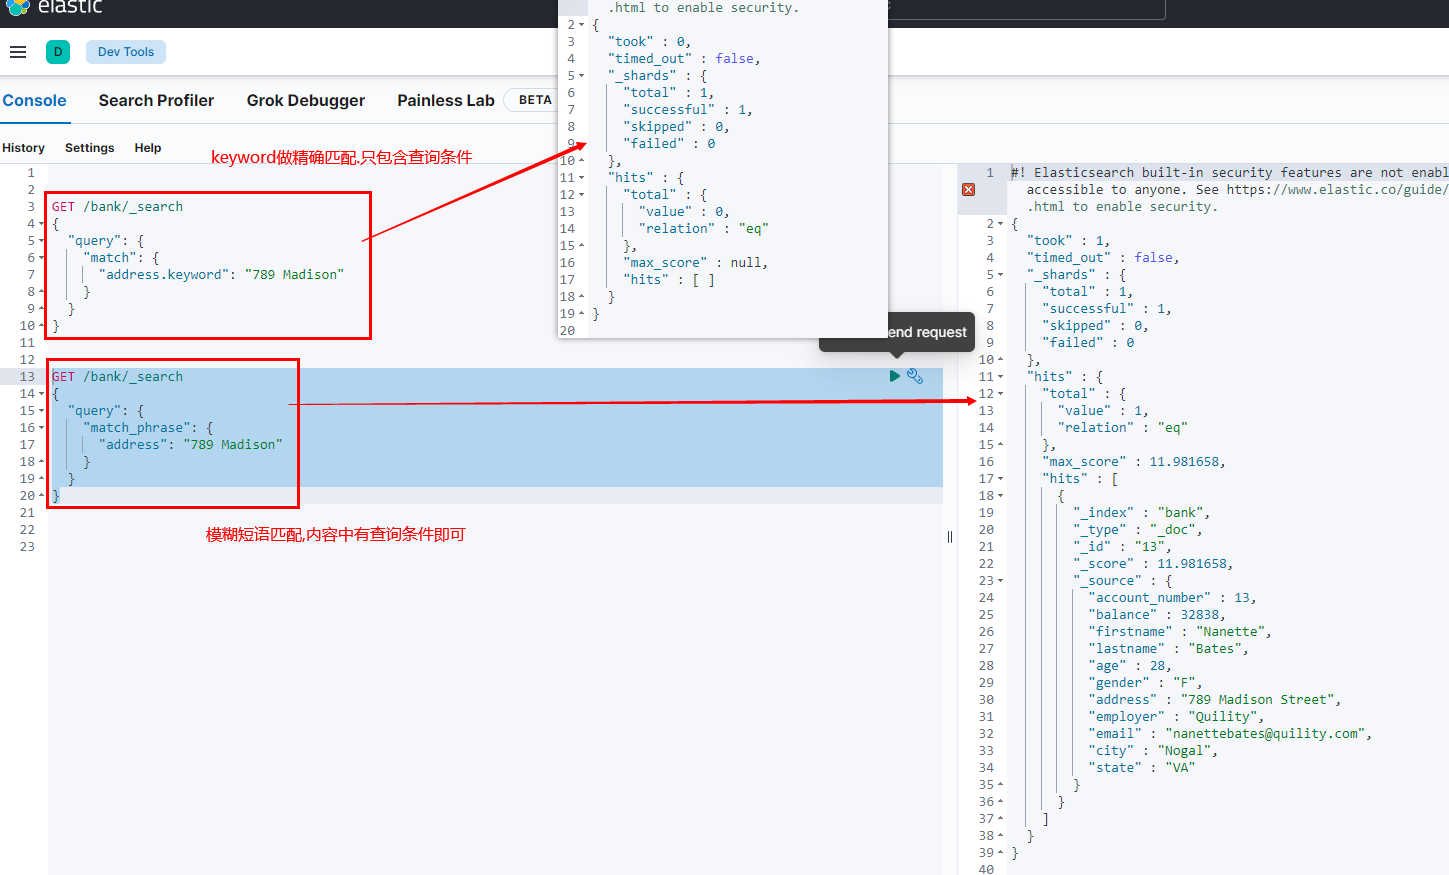
4.7.3.短语匹配
如下
match_phrase规定了 mill lane必须连续出现GET /bank/_search { "query": { "match_phrase": { "address": "mill lane" } } }- 1
- 2
- 3
- 4
- 5
- 6
- 7
- 8


4.7.4 多字段匹配
GET /bank/_search { "query": { "multi_match": { "fields": ["address","city"], // 指定查询的字段 "query": "mill" // 至少有一个字段包含mill } } }- 1
- 2
- 3
- 4
- 5
- 6
- 7
- 8
- 9
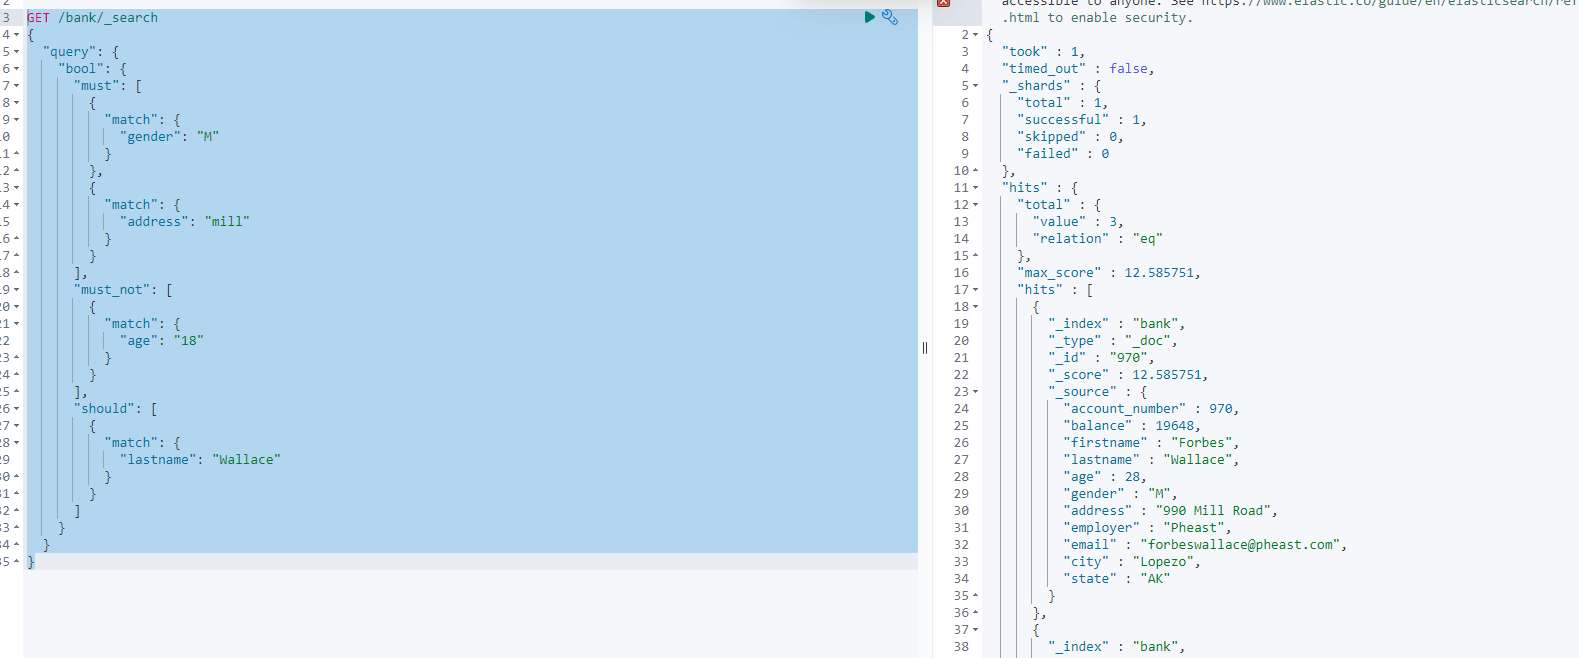
4.7.5 bool多条件查询
bool合并多条match条件
GET /bank/_search { "query": { "bool": { "must": [ // 必须满足的条件 { "match": { "gender": "M" } }, { "match": { "address": "mill" } } ], "must_not": [ // 必须不满足 { "match": { "age": "18" } } ], "should": [ // 加分项,可以满足可以不满足.影响评分 { "match": { "lastname": "Wallace" } } ] } } }- 1
- 2
- 3
- 4
- 5
- 6
- 7
- 8
- 9
- 10
- 11
- 12
- 13
- 14
- 15
- 16
- 17
- 18
- 19
- 20
- 21
- 22
- 23
- 24
- 25
- 26
- 27
- 28
- 29
- 30
- 31
- 32
- 33
must和should 都会贡献相关性得分, 而must_not相当于filter没有相关性得分
4.7.6 filter过滤
GET /bank/_search { "query": { "bool": { "must": [ { "range": { "age": { "gte": 18, "lte": 30 } } } ] } } } GET /bank/_search { "query": { "bool": { "filter": [ { "range": { "age": { "gte": 18, "lte": 30 } } } ] } } }- 1
- 2
- 3
- 4
- 5
- 6
- 7
- 8
- 9
- 10
- 11
- 12
- 13
- 14
- 15
- 16
- 17
- 18
- 19
- 20
- 21
- 22
- 23
- 24
- 25
- 26
- 27
- 28
- 29
- 30
- 31
- 32
- 33
- 34
- 35
- 36
- 37
- 38
- 39

4.7.7 term查询
文本字段应当避免使用term,term使用在非文本精确匹配字段,全文检索用match4.7.8 keyword
每一个字段都可以keyword. 有无keyword区别如下:
五 sql操作ES模式&aggregations执行聚合
aggregations提供了从数据中分组和提取的能力.但一般的我们用sql好了
sql模式可替换上述所有写法,需要注意的是查询条件在linux下字段和值区分大小写#搜索address中包含mill的所有人的年龄分布以及平均年龄 GET _sql?format=txt { "query": "SELECT count(*),age FROM bank WHERE address LIKE '%Mill%' GROUP BY age LIMIT 10" }- 1
- 2
- 3
- 4
- 5
- 6

5.1 mapping
相当给字段规定类型. 不写就会根据第一次json数据自动猜测数据类型.
类型详见官方文档5.1.1初始定义
GET /my_index/_mapping #查看映射
PUT /my_index { "mappings": { "properties": { "age": {"type": "integer" }, "email": {"type": "keyword"}, "name": {"type": "text"} } } }- 1
- 2
- 3
- 4
- 5
- 6
- 7
- 8
- 9
- 10
5.1.2 添加新字段映射
PUT /my_index/_mapping { "properties": { "firstname": { "type": "text" } } }- 1
- 2
- 3
- 4
- 5
- 6
- 7
- 8
5.1.3 更新字段映射
已经存在的映射无法修改,可进行数据迁移- 原索引
PUT /my_index { "mappings": { "properties": { "age": {"type": "integer" }, } } }- 1
- 2
- 3
- 4
- 5
- 6
- 7
- 8
- 创建新索引
PUT my_index2 { "mappings": { "properties": { "age": { "type": "text" } } } }- 1
- 2
- 3
- 4
- 5
- 6
- 7
- 8
- 9
- 10
- 克隆同步数据
POST _reindex { "source": { "index": "my_index" }, "dest": { "index": "my_index2" } }- 1
- 2
- 3
- 4
- 5
- 6
- 7
- 8
- 9
六.分词
A tokenizer receives a stream of characters, breaks it up into individual tokens (usually individual words), and outputs a stream of tokens. For instance, a whitespace tokenizer breaks text into tokens whenever it sees any whitespace. It would convert the text into the terms .“Quick brown fox!”[Quick, brown, fox!]
The tokenizer is also responsible for recording the following:
-Order or position of each term (used for phrase and word proximity queries)
-Start and end character offsets of the original word which the term represents (used for highlighting search snippets).
-Token type, a classification of each term produced, such as , , or . Simpler analyzers only produce the token type. word
Elasticsearch has a number of built in tokenizers which can be used to build custom analyzers.分词中文的推荐ik分词器ik分词器github地址6.1 docker安装ik分词器
# 将官网下载的ik.zip包解压放在es的plugins文件下或容器内部的plugins下 # 如使用虚拟机连不上网的可以通过ssh工具传输 =======在es的plugins外部的映射文件下执行======= wget https://github.com/medcl/elasticsearch-analysis-ik/releases/download/v7.17.3/elasticsearch-analysis-ik-7.17.3.zip unzip elasticsearch-analysis-ik-7.17.3.zip # 如在容器外的映射文件plugins修改安装的ik文件权限 chmod -R 777 elasticsearch-analysis-ik-7.17.3/ # 进入es容器的/bin目录下 查看是否安装成功 elasticsearch-plugin list- 1
- 2
- 3
- 4
- 5
- 6
- 7
- 8
- 9
- 10

最后
重启es容器6.2 使用ik分析器
POST _analyze { "analyzer": "ik_smart", "text": ["台湾回归,我是中国人"] } POST _analyze { "analyzer": "ik_max_word", "text": ["台湾回归,我是中国人"] }- 1
- 2
- 3
- 4
- 5
- 6
- 7
- 8
- 9
- 10
- 11

6.3 ik自定义分词器
- 1.安装nginx
通过ik访问nginx代理,获得最新词库信息.因此先安装nginx
docker pull nginx:1.20 #1.随便启动一个nginx实例,只是为了复制出配置 docker run -p 80:80 --name nginx -d nginx:1.20 #2.将容器内的配置文件拷贝到当前目录: docker container cp nginx/conf:/etc/nginx . #3.删除容器 docker stop nginx && docker rm nginx #4.创建容器数据卷 docker run -p 80:80 --name nginx \ --privileged=true --restart=always \ -v /mydata/nginx/html:/usr/share/nginx/html \ -v /mydata/nginx/logs:/var/log/nginx \ -v /mydata/nginx/conf:/etc/nginx \ -d nginx:1.20- 1
- 2
- 3
- 4
- 5
- 6
- 7
- 8
- 9
- 10
- 11
- 12
- 13
- 14
- 15
- 16
- 17
数据卷如下

2.创建es资源库
/mydata/nginx/html/下创建mkdir es资源目录
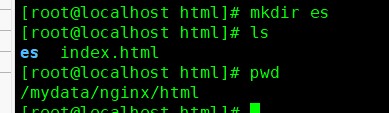
3.在es目录下创建分词文本库

vi fenci.txt写入组词

4.访问 nginx端口下es文件的fenci.txt(乱码是由于linux系统为utf8编码,而在window上显示的系统编码为gbk)

5.配置ik分词器远程词库地址

之前已经将es和nginx的数据卷都挂在/mydata目录下.进入ik分词器数据卷的config文件中


vi IKAnalyzer.cfg.xml如图修改为

6.测试
重启es容器
docker restart elasticsearch


七.es整合springboot
Elasticsearch-java-Client:官方封装了ES 操作,API层次分明,上手简单- 1.xml配置
<dependency> <groupId>co.elastic.clientsgroupId> <artifactId>elasticsearch-javaartifactId> <version>7.17.3version> dependency> <dependency> <groupId>com.fasterxml.jackson.coregroupId> <artifactId>jackson-databindartifactId> <version>2.12.3version> dependency> <dependency> <groupId>jakarta.jsongroupId> <artifactId>jakarta.json-apiartifactId> <version>2.0.1version> dependency>- 1
- 2
- 3
- 4
- 5
- 6
- 7
- 8
- 9
- 10
- 11
- 12
- 13
- 14
- 15
- 16
- 17
- 2.配置es访问客户端
@SpringBootConfiguration public class MallElasticSearchConfig { public static final RequestOptions COMMON_OPTIONS; static { RequestOptions.Builder builder = RequestOptions.DEFAULT.toBuilder(); // builder.addHeader("Authorization", "Bearer " + TOKEN); // builder.setHttpAsyncResponseConsumerFactory( // new HttpAsyncResponseConsumerFactory // .HeapBufferedResponseConsumerFactory(30 * 1024 * 1024 * 1024)); COMMON_OPTIONS = builder.build(); } // 同步客户端 @Bean public ElasticsearchClient esClient() { // Create the low-level client RestClient restClient = RestClient.builder(new HttpHost("192.168.56.101", 9200,"http")).build(); // Create the transport with a Jackson mapper ElasticsearchTransport transport = new RestClientTransport( restClient, new JacksonJsonpMapper()); // And create the API client return new ElasticsearchClient(transport); } }- 1
- 2
- 3
- 4
- 5
- 6
- 7
- 8
- 9
- 10
- 11
- 12
- 13
- 14
- 15
- 16
- 17
- 18
- 19
- 20
- 21
- 22
- 23
- 24
- 25
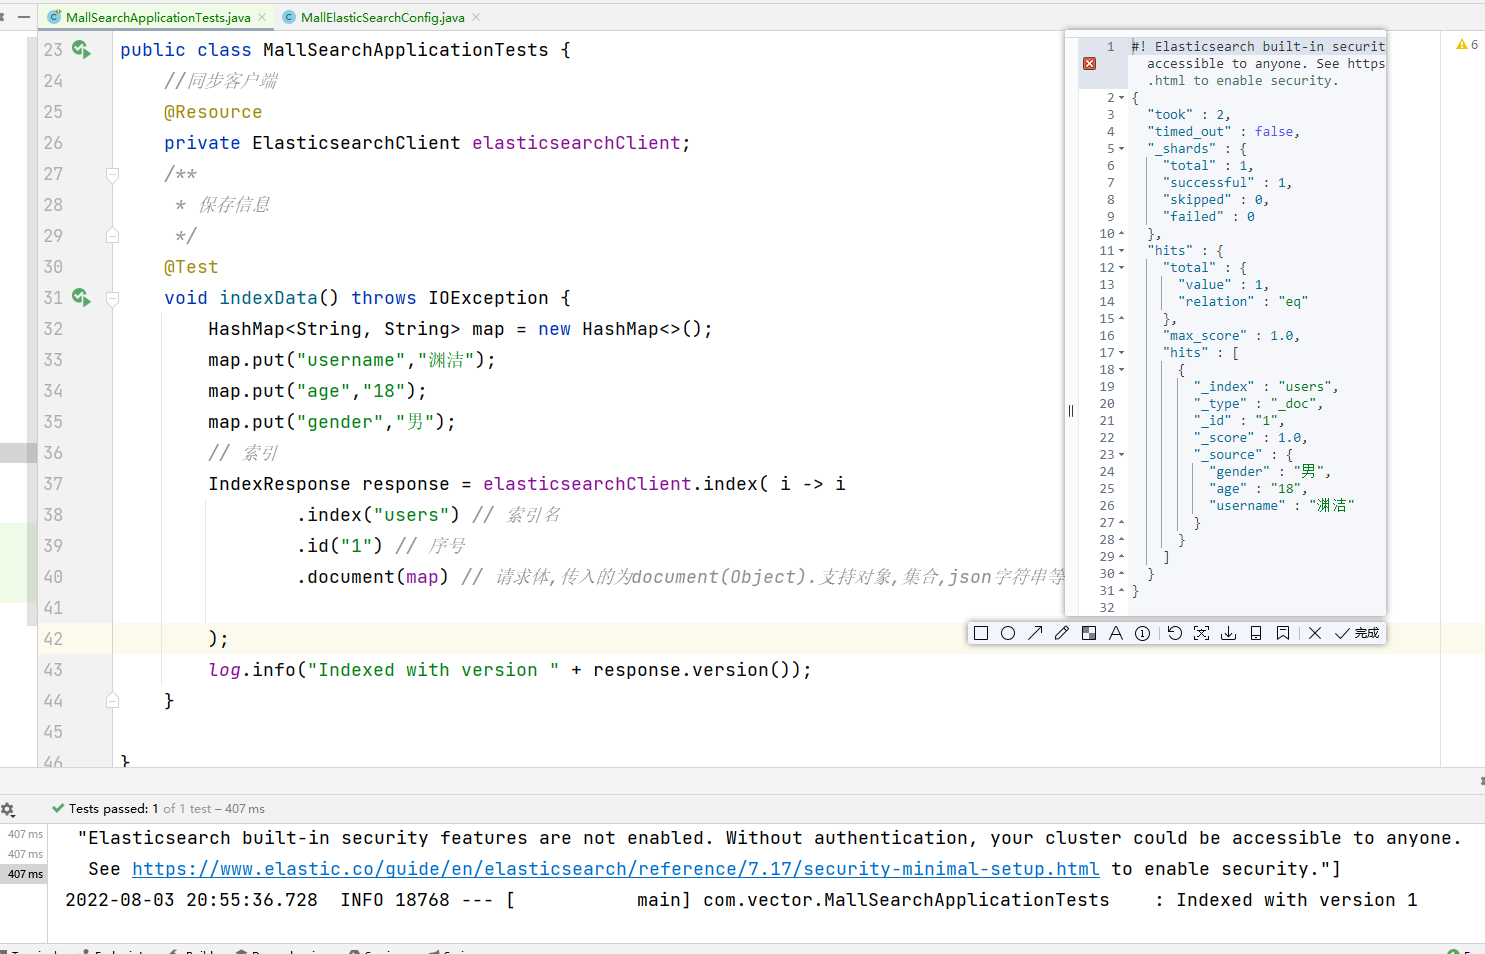
- 3.测试结果
package com.vector; import co.elastic.clients.elasticsearch.ElasticsearchClient; import co.elastic.clients.elasticsearch._types.aggregations.*; import co.elastic.clients.elasticsearch._types.query_dsl.MatchQuery; import co.elastic.clients.elasticsearch._types.query_dsl.Query; import co.elastic.clients.elasticsearch.core.IndexResponse; import co.elastic.clients.elasticsearch.core.SearchResponse; import co.elastic.clients.elasticsearch.core.search.Hit; import lombok.Data; import lombok.ToString; import lombok.extern.slf4j.Slf4j; import org.junit.jupiter.api.Test; import org.skyscreamer.jsonassert.JSONParser; import org.springframework.boot.test.context.SpringBootTest; import javax.annotation.Resource; import java.io.IOException; import java.util.HashMap; import java.util.List; import java.util.Map; /** * @ClassName MallSearchApplication * @Description TODO * @Author YuanJie * @Date 2022/8/3 12:11 */ @SpringBootTest @Slf4j public class MallSearchApplicationTests { //同步客户端 @Resource private ElasticsearchClient elasticsearchClient; @Data @ToString static class Account { private int account_number; private int balance; private String firstname; private String lastname; private int age; private String gender; private String address; private String employer; private String email; private String city; private String state; } /** * 保存信息 */ @Test void indexData() throws IOException { HashMap<String, String> map = new HashMap<>(); map.put("username", "渊洁"); map.put("age", "18"); map.put("gender", "男"); // 索引 IndexResponse response = elasticsearchClient.index(i -> i .index("users") // 索引名 .id("1") // 序号 .document(map) // 请求体,传入的为document(Object).支持对象,集合,json字符串等 详见javadoc ); log.info("Indexed with version " + response.version()); } /** * 搜索文档 */ @Test public void searchData() throws IOException { Query query = MatchQuery.of(q -> q .field("address") .query("mill") )._toQuery(); // 1.创建检索请求 SearchResponse<Account> response = elasticsearchClient.search(s -> s .index("bank") .query(query) // 按照年龄值分布聚合 .aggregations("ageAgg", a -> a .terms(h -> h .field("age") .size(10) )) // 计算平均薪资 .aggregations("balanceAvg", b -> b .avg(h -> h .field("balance"))), Account.class ); log.info("max score " + response.hits().maxScore()); log.info("response.aggregations" + response.aggregations()); List<Hit<Account>> hits = response.hits().hits(); for (Hit<Account> hit : hits) { log.info("Found source " + hit.source() + ", score " + hit.score() + ", index " + hit.index() + ", id " + hit.id()); } List<LongTermsBucket> ageAgg = response.aggregations().get("ageAgg").lterms().buckets().array(); for (LongTermsBucket longTermsBucket : ageAgg) { log.info(" ageAgg " + longTermsBucket.docCount() + " bikes under " + longTermsBucket.key()); } AvgAggregate balanceAvg = response.aggregations().get("balanceAvg").avg(); log.info(" name " + balanceAvg._aggregateKind() + "balanceAvg " + balanceAvg.value()); } }- 1
- 2
- 3
- 4
- 5
- 6
- 7
- 8
- 9
- 10
- 11
- 12
- 13
- 14
- 15
- 16
- 17
- 18
- 19
- 20
- 21
- 22
- 23
- 24
- 25
- 26
- 27
- 28
- 29
- 30
- 31
- 32
- 33
- 34
- 35
- 36
- 37
- 38
- 39
- 40
- 41
- 42
- 43
- 44
- 45
- 46
- 47
- 48
- 49
- 50
- 51
- 52
- 53
- 54
- 55
- 56
- 57
- 58
- 59
- 60
- 61
- 62
- 63
- 64
- 65
- 66
- 67
- 68
- 69
- 70
- 71
- 72
- 73
- 74
- 75
- 76
- 77
- 78
- 79
- 80
- 81
- 82
- 83
- 84
- 85
- 86
- 87
- 88
- 89
- 90
- 91
- 92
- 93
- 94
- 95
- 96
- 97
- 98
- 99
- 100
- 101
- 102
- 103
- 104
- 105
- 106
- 107
- 108
- 109
- 110
- 111
- 112
- 113
- 114
- 115
- 116
- 117
- 118
- 119
- 120
- 121
- 122

-
相关阅读:
网络基础入门
哪些问题会让企业申报不了高新技术企业?
什么是 GPT-4 Vision
【Harmony OS】【ArkUI】ets开发 基础页面布局与数据连接
Node.js | 详解 JWT 登录验证 的工作原理
Vivado与Notepad++关联步骤
Laravel 模型的关联写入&多对多的关联写入 ⑩③
【Linux】部署Jenkins(简介及详细教程【war包部署】)
Android在app中实现蓝牙服务Service的案例
Verilog参数定义与仿真模块中的参数修改
- 原文地址:https://blog.csdn.net/m0_50913327/article/details/125874329

