-
【ShardingSphere-proxy +PostgreSQL实现读写分离(静态策略)】
在业务对数据库是读多写少,且单台服务器或者单个数据库的性能已经不能满足当前业务对数据库大量读取请求的时候,我们可能需要对数据库做读写分离。
常见的可以做读写分离的工具有mycat、ShardingSphere等。本文使用ShardingSphere-proxy实现了PostgreSQL的读写分离场景,如果对于PostgreSQL数据库除读写分离外还需要连接池等需求,还可以了解一下PostgreSQL的pgpool-II。
一、本文相关ip地址
角色 版本 IP地址 主库 PostgreSQL 13.4 172.20.10.9 从库 PostgreSQL 13.4 172.20.10.10 ShardingSphere-proxy 5.1.2 172.20.10.3 用于测试连接ShardingSphere-Proxy(有psql客户端) psql版本 12.9 172.20.10.6 本次安装部署是在CentOS Linux release 7.4上完成,开始已经部署好了PostgreSQL的主从流复制环境。在此不做赘述。
- [postgres@primary ~]$ psql -c "select * from pg_stat_replication;"
- pid | usesysid | usename | application_name | client_addr | client_hostname | client_port | backend_start | backend_xmin | state | sent_lsn | write_lsn | flush_lsn | replay_lsn |
- write_lag | flush_lag | replay_lag | sync_priority | sync_state | reply_time
- -------+----------+---------+------------------+--------------+-----------------+-------------+-------------------------------+--------------+-----------+------------+------------+------------+------------+---
- --------------+-----------+------------+---------------+------------+------------------------------
- 56107 | 16385 | replica | walreceiver | 172.20.10.10 | | 46262 | 2022-08-02 12:02:49.504343+08 | | streaming | 0/FB841B40 | 0/FB841B40 | 0/FB841B40 | 0/FB841B40 | 00
- :00:00.037914 | | | 0 | async | 2022-08-02 12:02:49.65561+08
- (1 row)
二、数据库配置
1.postgresql.conf里配置
listen_addresses = '*'2.pg_hba.conf白名单配置(这里是我测试为了方便,如果实际使用,最好用范围最小的实际ip段来约束)
host all all 0.0.0.0/0 md5重启数据库
3.数据库里创建供测试ShardingSphere-proxy读写分离的用户和数据库(权限在使用时候也要进行约束,可以给数据库的owner,或根据需求调整)
- create user ssp_user_test password 'Enmo@123' superuser;
- create database ssp_db_test;
三、安装部署ShardingSphere-proxy
在172.20.10.3节点安装proxy
需要安装jdk(must have Java JRE 8 or higher),我本地的jdk版本为
- [root@primary conf]# java -version
- openjdk version "1.8.0_342"
- OpenJDK Runtime Environment (build 1.8.0_342-b07)
- OpenJDK 64-Bit Server VM (build 25.342-b07, mixed mode)
1.获取软件包并安装ShardingSphere-proxy
- --下载地址
- https://shardingsphere.apache.org/document/current/en/downloads/
- --解压
- tar -xvf apache-shardingsphere-5.1.2-shardingsphere-proxy-bin.tar.gz
- --做软链
- ln -s /root/apache-shardingsphere-5.1.2-shardingsphere-proxy-bin /opt/ssp
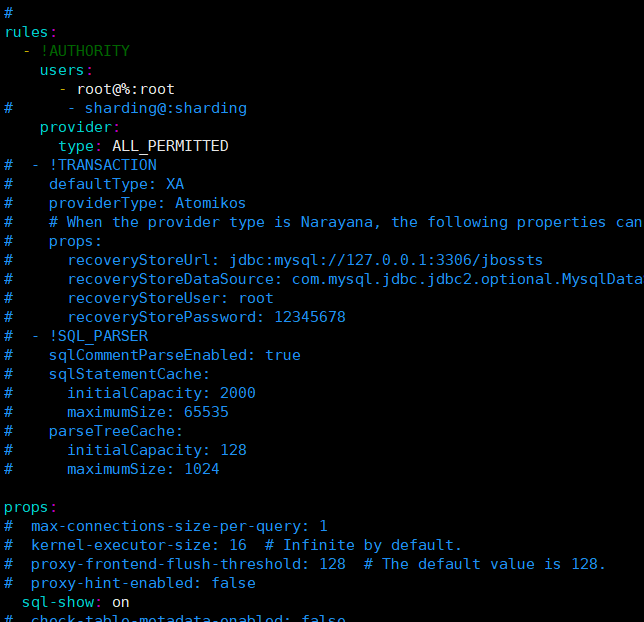
2.修改server.yaml,配置虚拟帐号密码
配置虚拟帐号密码,使用默认的root用户及密码root,且允许外网连接,同时权限指定为“所有权限无限制”,sql-show是用于在日志中记录下每条sql及执行的节点,其它为默认值
- rules:
- - !AUTHORITY
- users:
- - root@%:root
- # - sharding@:sharding
- provider:
- type: type: ALL_PERMITTED
- props:
- # max-connections-size-per-query: 1
- # kernel-executor-size: 16 # Infinite by default.
- # proxy-frontend-flush-threshold: 128 # The default value is 128.
- # proxy-hint-enabled: false
- sql-show: on
如图所示
3.编辑读写分离文件 config-readwrite-splitting.yaml
databaseName是我映射的数据库名字,primary_ds和replica_ds_0分别为主库/写库的相关配置和从库/读库的相关被配置。
- databaseName: xmaster_db
- #
- dataSources:
- primary_ds:
- url: jdbc:postgresql://172.20.10.9:5432/ssp_db_test
- username: ssp_user_test
- password: Enmo@123
- # connectiontimeoutMilliseconds: 30000
- # idletimeoutmilliseconds: 60000
- # maxlifetimemilliseconds: 1800000
- # maxpoolsize: 50
- # minpoolsize: 1
- replica_ds_0:
- url: jdbc:postgresql://172.20.10.10:5432/ssp_db_test
- username: ssp_user_test
- password: Enmo@123
- rules:
- - !READWRITE_SPLITTING
- dataSources:
- readwrite_ds:
- type: Static
- props:
- write-data-source-name: primary_ds
- read-data-source-names: replica_ds_0

四、启动ShardingSphere-proxy并验证
- [root@localhost bin]# pwd
- /root/apache-shardingsphere-5.1.2-shardingsphere-proxy-bin/bin
- [root@localhost bin]# sh start.sh
- we find java version: java8, full_version=1.8.0_342
- Starting the ShardingSphere-Proxy ...
- The classpath is /root/apache-shardingsphere-5.1.2-shardingsphere-proxy-bin/conf:.:/root/apache-shardingsphere-5.1.2-shardingsphere-proxy-bin/lib/*:/root/apache-shardingsphere-5.1.2-shardingsphere-proxy-bin/ext-lib/*
- Please check the STDOUT file: /root/apache-shardingsphere-5.1.2-shardingsphere-proxy-bin/logs/stdout.log

查看ShardingSphere-proxy输出的日志内容- [root@localhost bin]# cat /root/apache-shardingsphere-5.1.2-shardingsphere-proxy-bin/logs/stdout.log
- Thanks for using Atomikos! This installation is not registered yet.
- REGISTER FOR FREE at http://www.atomikos.com/Main/RegisterYourDownload and receive:
- - tips & advice
- - working demos
- - access to the full documentation
- - special exclusive bonus offers not available to others
- - everything you need to get the most out of using Atomikos!
- [INFO ] 2022-07-07 20:18:07.629 [main] o.a.s.p.v.ShardingSphereProxyVersion - Database name is `PostgreSQL`, version is `13.4`, database name is `xmaster_db`
- [INFO ] 2022-07-07 20:18:07.889 [main] o.a.s.p.frontend.ShardingSphereProxy - ShardingSphere-Proxy Memory mode started successfully
- Thanks for using Atomikos! This installation is not registered yet.
- REGISTER FOR FREE at http://www.atomikos.com/Main/RegisterYourDownload and receive:
- - tips & advice
- - working demos
- - access to the full documentation
- - special exclusive bonus offers not available to others
- - everything you need to get the most out of using Atomikos!
- [INFO ] 2022-07-07 20:19:27.088 [main] o.a.s.p.v.ShardingSphereProxyVersion - Database name is `PostgreSQL`, version is `13.4`, database name is `xmaster_db`
- [INFO ] 2022-07-07 20:19:27.349 [main] o.a.s.p.frontend.ShardingSphereProxy - ShardingSphere-Proxy Memory mode started successfully

ShardingSphere-Proxy已经启动起来了。ShardingSphere-Proxy的默认端口3307也已经起来了
- [root@localhost bin]# ss -tnl
- State Recv-Q Send-Q Local Address:Port Peer Address:Port
- LISTEN 0 128 *:6000 *:*
- LISTEN 0 128 *:22 *:*
- LISTEN 0 128 :::3307 :::*
- LISTEN 0 128 :::6000 :::*
- LISTEN 0 128 :::22 :::*
这时候我们通过另外的终端,进行连接验证,即我们的第四台服务器172.20.10.6,通过server.yaml里的虚拟账号密码,可以连接进来
- [postgres@localhost ~]$ ip a | grep ens33 | grep global
- inet 172.20.10.6/28 brd 172.20.10.15 scope global ens33
- [postgres@localhost ~]$ psql -h 172.20.10.3 -U root xmaster_db -p 3307
- Password for user root:
- psql (12.9, server 13.4-ShardingSphere-Proxy 5.1.2)
- WARNING: psql major version 12, server major version 13.
- Some psql features might not work.
- Type "help" for help.
- xmaster_db=> create table t1(id int);
- CREATE TABLE
- xmaster_db=> insert into t1 values(1);
- INSERT 0 1
- xmaster_db=> select * from t1;
- id
- ----
- 1
- (1 row)
插入数据期间可以去数据库的主库查看数据情况
- ssp_db_test=# \dt
- List of relations
- Schema | Name | Type | Owner
- --------+------+-------+---------------
- public | t1 | table | ssp_user_test
- (1 row)
- ssp_db_test=# select * from t1;
- id
- ----
- 1
- (1 row)
- ssp_db_test=# select * from t1;
- ERROR: relation "t1" does not exist
- LINE 1: select * from t1;
- ^
- ssp_db_test=# \dt
- Did not find any relations.
去查看ShardingSphere-proxy的输出日志,发现create、insert、drop的操作都是在主节点进行的,而select在备机节点执行。
- [root@localhost logs]# ll /root/apache-shardingsphere-5.1.2-shardingsphere-proxy-bin/logs/stdout.log
- -rw-r--r-- 1 root root 4926 Aug 2 14:46 /root/apache-shardingsphere-5.1.2-shardingsphere-proxy-bin/logs/stdout.log
- [INFO ] 2022-08-02 14:45:26.965 [Connection-2-ThreadExecutor] ShardingSphere-SQL - Logic SQL: create table t1(id int);
- [INFO ] 2022-08-02 14:45:26.965 [Connection-2-ThreadExecutor] ShardingSphere-SQL - SQLStatement: PostgreSQLCreateTableStatement(containsNotExistClause=false)
- [INFO ] 2022-08-02 14:45:26.965 [Connection-2-ThreadExecutor] ShardingSphere-SQL - Actual SQL: primary_ds ::: create table t1(id int);
- [INFO ] 2022-08-02 14:45:29.655 [Connection-2-ThreadExecutor] ShardingSphere-SQL - Logic SQL: insert into t1 values(1);
- [INFO ] 2022-08-02 14:45:29.655 [Connection-2-ThreadExecutor] ShardingSphere-SQL - SQLStatement: PostgreSQLInsertStatement(withSegment=Optional.empty)
- [INFO ] 2022-08-02 14:45:29.655 [Connection-2-ThreadExecutor] ShardingSphere-SQL - Actual SQL: primary_ds ::: insert into t1 values(1);
- [INFO ] 2022-08-02 14:45:31.953 [Connection-2-ThreadExecutor] ShardingSphere-SQL - Logic SQL: select * from t1;
- [INFO ] 2022-08-02 14:45:31.953 [Connection-2-ThreadExecutor] ShardingSphere-SQL - SQLStatement: PostgreSQLSelectStatement(limit=Optional.empty, lock=Optional.empty, window=Optional.empty)
- [INFO ] 2022-08-02 14:45:31.953 [Connection-2-ThreadExecutor] ShardingSphere-SQL - Actual SQL: replica_ds_0 ::: select * from t1;
- [INFO ] 2022-08-02 14:46:00.073 [Connection-2-ThreadExecutor] ShardingSphere-SQL - Logic SQL: drop table t1;
- [INFO ] 2022-08-02 14:46:00.073 [Connection-2-ThreadExecutor] ShardingSphere-SQL - SQLStatement: PostgreSQLDropTableStatement(containsExistClause=false)
- [INFO ] 2022-08-02 14:46:00.073 [Connection-2-ThreadExecutor] ShardingSphere-SQL - Actual SQL: primary_ds ::: drop table t1;

-
相关阅读:
Redis——Lettuce连接redis集群
谁懂万方检索的高级检索嘛
优思学院《质量工程师入门攻略2024》
【AICFD案例教程】电子机箱风冷散热分析
如何实现智能场景的搭建与升级?看看这家企业是怎么做的
Pycharm安装配置Pyside6
13.keepalived实现高可用
CSDN编程竞赛第四期 及部分解题思路及参赛经历分享
独立企业签名和共享企业签名的区别
WebSocket小案例(spring-boot-starter-websocket)
- 原文地址:https://blog.csdn.net/weixin_47308871/article/details/126134314
