-
yolov5训练步骤及安全帽检测
环境部署问题、训练后无法识别问题都有介绍注意事项
一、说明
- 系统uname -ar:ubuntu18.0.4(Linux ubuntu 5.4.0-122-generic) 64bit
- 显卡lspci:GeForce GT 1030
- nvidia版本:NVIDIA-Linux-x86_64-470.129.06.run (该网址搜索下载:https://www.nvidia.cn/geforce/drivers)
- cuda版本: cuda_10.2.89_440.33.01_linux.run (历史版本:https://developer.nvidia.com/cuda-toolkit-archive)
- yolov5: 代码是tag v6.1
二、PC机nvidia显卡(没有忽略用CPU方式)
- 禁用 nouveau驱动
lsmod | grep nouveau 禁用: sudo vim /etc/modprobe.d/blacklist.conf blacklist nouveau options nouveau modeset=0 sudo update-initramfs -u- 1
- 2
- 3
- 4
- 5
- 6
- 7
- nvidia驱动安装
sudo apt install dkms build-essential linux-headers-generic sudo apt-get install -y libc6-i386 lib32stdc++6 lib32gcc1 lib32ncurses5 lib32z1 sudo ./NVIDIA-Linux-x86_64-470.129.06.run --dkms --no-opengl-files 一定操作,否则会失败 在BIOS界面,禁用secure boot(安全模式) (安装失败重装) sudo nvidia-uninstall sudo apt-get remove --purge nvidia*- 1
- 2
- 3
- 4
- 5
- 6
- 7
- 8
- 9
- 10
- 安装cuda10.2
A、sudo service lightdm stop B、如果已安装nvidia驱动,安装时把驱动取消,建议先安装驱动,并且驱动版本大于cuda后缀的440.33.01,否则cuda安装失败) wget https://developer.download.nvidia.com/compute/cuda/10.2/Prod/local_installers/cuda_10.2.89_440.33.01_linux.run sudo sh cuda_10.2.89_440.33.01_linux.run --no-opengl-libs (如果开始安装了nvidia-390.151版本驱动会有问题) C、vi ~/.bashrc export PATH="/usr/local/cuda-10.2/bin:$PATH" export LD_LIBRARY_PATH="/usr/local/cuda-10.2/lib64:$LD_LIBRARY_PATH" D、sudo service lightdm start- 1
- 2
- 3
- 4
- 5
- 6
- 7
- 8
- 9
- 10
- nvidia-smi:失败
ls /usr/src | grep nvidia #查看自己安装的nvidia版本,我的是470.129.06 sudo apt install dkms sudo dkms install -m nvidia -v 470.129.06- 1
- 2
- 3
三、python升级
- python3.6–>pyhton3.9 (系统自带3.6)
- 安装依赖
sudo apt-get install libffi-dev zlib1g-dev libbz2-dev libssl-dev liblzma-dev- 1
- 下载python3.9
wget https://www.python.org/ftp/python/3.9.0/Python-3.9.0.tgz- 1
- 编译
./configure --with-ssl --enable-optimizations (--with-ssl 参数要加上否则使用中会出错) make sudo make install- 1
- 2
- 3
- 设置软连接
sudo ln -s /usr/local/bin/python3 /usr/bin/python39 #不要修改系统python3软连接,否则一些命令无法使用 sudo ln -s /usr/local/bin/pip3 /usr/bin/pip3- 1
- 2
四、pytorch安装
- 官网
https://pytorch.org/get-started/locally/- 1
- CPU
pip install torch==1.9.0+cpu torchvision==0.10.0+cpu torchaudio==0.9.0 -f https://download.pytorch.org/whl/torch_stable.html 如果失败进入https://download.pytorch.org/whl/torch_stable.html 下载对应版本- 1
- 2
- GPU
pip install torch==1.9.0+cu102 torchvision==0.10.0+cu102 torchaudio==0.9.0 -f https://download.pytorch.org/whl/torch_stable.html pip3 install torch-1.9.0+cu102-cp39-cp39-linux_x86_64.whl pip3 install torchvision-0.10.0+cu102-cp39-cp39-linux_x86_64.whl pip3 install torchaudio-0.9.0-cp39-cp39-linux_x86_64.whl- 1
- 2
- 3
- 4
- 5
五、pip 依赖
absl-py==0.12.0 altgraph==0.17 backcall==0.2.0 backports.lzma==0.0.14 cachetools==4.2.1 certifi==2020.12.5 chardet==4.0.0 charset-normalizer==2.1.0 click==8.1.3 cycler==0.10.0 decorator==5.1.1 docker-pycreds==0.4.0 future==0.18.2 gitdb==4.0.9 GitPython==3.1.27 google-auth==1.28.1 google-auth-oauthlib==0.4.4 GPUtil==1.4.0 grpcio==1.37.0 idna==2.10 importlib-metadata==4.12.0 ipython==7.34.0 jedi==0.18.1 kiwisolver==1.3.1 lxml==4.9.1 Markdown==3.4.1 matplotlib==3.3.4 matplotlib-inline==0.1.3 numpy==1.21.6 oauthlib==3.2.0 opencv-python==4.5.1.48 pandas==1.3.5 parso==0.8.3 pathtools==0.1.2 pexpect==4.8.0 pickleshare==0.7.5 Pillow==9.2.0 promise==2.3 prompt-toolkit==3.0.30 protobuf==3.15.8 psutil==5.9.1 ptyprocess==0.7.0 pyasn1==0.4.8 pyasn1-modules==0.2.8 Pygments==2.12.0 pyparsing==3.0.9 PyQt5==5.15.4 pyqt5-plugins==5.15.4.2.2 PyQt5-Qt5==5.15.2 PyQt5-sip==12.11.0 pyqt5-tools==5.15.4.3.2 PyQtChart==5.15.4 PyQtChart-Qt5==5.15.2 python-dateutil==2.8.2 python-dotenv==0.20.0 pytz==2022.1 PyYAML==6.0 qt5-applications==5.15.2.2.2 qt5-tools==5.15.2.1.2 requests==2.25.1 requests-oauthlib==1.3.1 rsa==4.9 scipy==1.6.1 seaborn==0.11.2 sentry-sdk==1.8.0 setproctitle==1.2.3 shortuuid==1.0.9 six==1.16.0 smmap==5.0.0 tensorboard==2.4.1 tensorboard-plugin-wit==1.8.1 tornado==6.1 tqdm==4.64.0 traitlets==5.3.0 typing-extensions==4.3.0 urllib3==1.26.5 wandb==0.12.21 wcwidth==0.2.5 Werkzeug==1.0.1 wincertstore==0.2 zipp==3.8.1- 1
- 2
- 3
- 4
- 5
- 6
- 7
- 8
- 9
- 10
- 11
- 12
- 13
- 14
- 15
- 16
- 17
- 18
- 19
- 20
- 21
- 22
- 23
- 24
- 25
- 26
- 27
- 28
- 29
- 30
- 31
- 32
- 33
- 34
- 35
- 36
- 37
- 38
- 39
- 40
- 41
- 42
- 43
- 44
- 45
- 46
- 47
- 48
- 49
- 50
- 51
- 52
- 53
- 54
- 55
- 56
- 57
- 58
- 59
- 60
- 61
- 62
- 63
- 64
- 65
- 66
- 67
- 68
- 69
- 70
- 71
- 72
- 73
- 74
- 75
- 76
- 77
- 78
- 79
- 80
- 81
- 82
六、准备数据集
- YOLOv5代码
git clone https://github.com/ultralytics/yolov5- 1
- 图片资源,用飞桨安全帽资源,已经标注好了
HelmetDetection包括images(原始图片)和annotations(标注信息xml) 下载地址:https://aistudio.baidu.com/aistudio/datasetdetail/50329- 1
- 2
- yolov5中创建目录(资源转成VOC格式)
helmet_source Annotations #标注信息xml dataSet_path # images #原始图片 ImageSets #数据集分类txt文件(自写make_voc_txt.py脚本生成) labels #voc格式的标签文件(自写make_voc_label.py脚本生成)- 1
- 2
- 3
- 4
- 5
- 6
- 注意
1. 按照上述目录结构训练结果可以检测出图片 2. 在data中创建的目录训练cls一直是0,检测图片也不识别 3. 尝试换环境版本,调参数都不行 4. 最后觉的可能哪里路径有问题- 1
- 2
- 3
- 4
七、训练
- 将coco.yaml复制一份helmet.yaml修改如下:
train: helmet_source/dataSet_path/train.txt # train images (relative to 'path') 118287 images val: helmet_source/dataSet_path/val.txt # val images (relative to 'path') 5000 images # test: helmet_source/dataSet_path/test.txt # 20288 of 40670 images, submit to https://competitions.codalab.org/competitions/20794 # Classes nc: 2 # number of classes names: ['helmet', 'head'] # class names- 1
- 2
- 3
- 4
- 5
- 6
- 7
- 将models/yolov5s.yaml修改
nc: 2 # number of classes 改为自己的类别个数- 1
- 训练指令(我的测试资源和脚本以及官网权重在文中后面有写)
python39 train.py --img 416 --batch 4 --epochs 100 --data data/helmet.yaml --cfg models/yolov5s.yaml --weights weights/yolov5s.pt --device 0 #--device cpu- 1
- 说明
输出:runs/train/exp/weights/best.pt 和 last.pt 说明:训练100次,效果不太好,500次会好点,当然越多越好 YOLOv5 训练 ( train.py )、验证 ( val.py )、推理 ( detect.py ) 和导出 ( export.py ) 的正确操作- 1
- 2
- 3
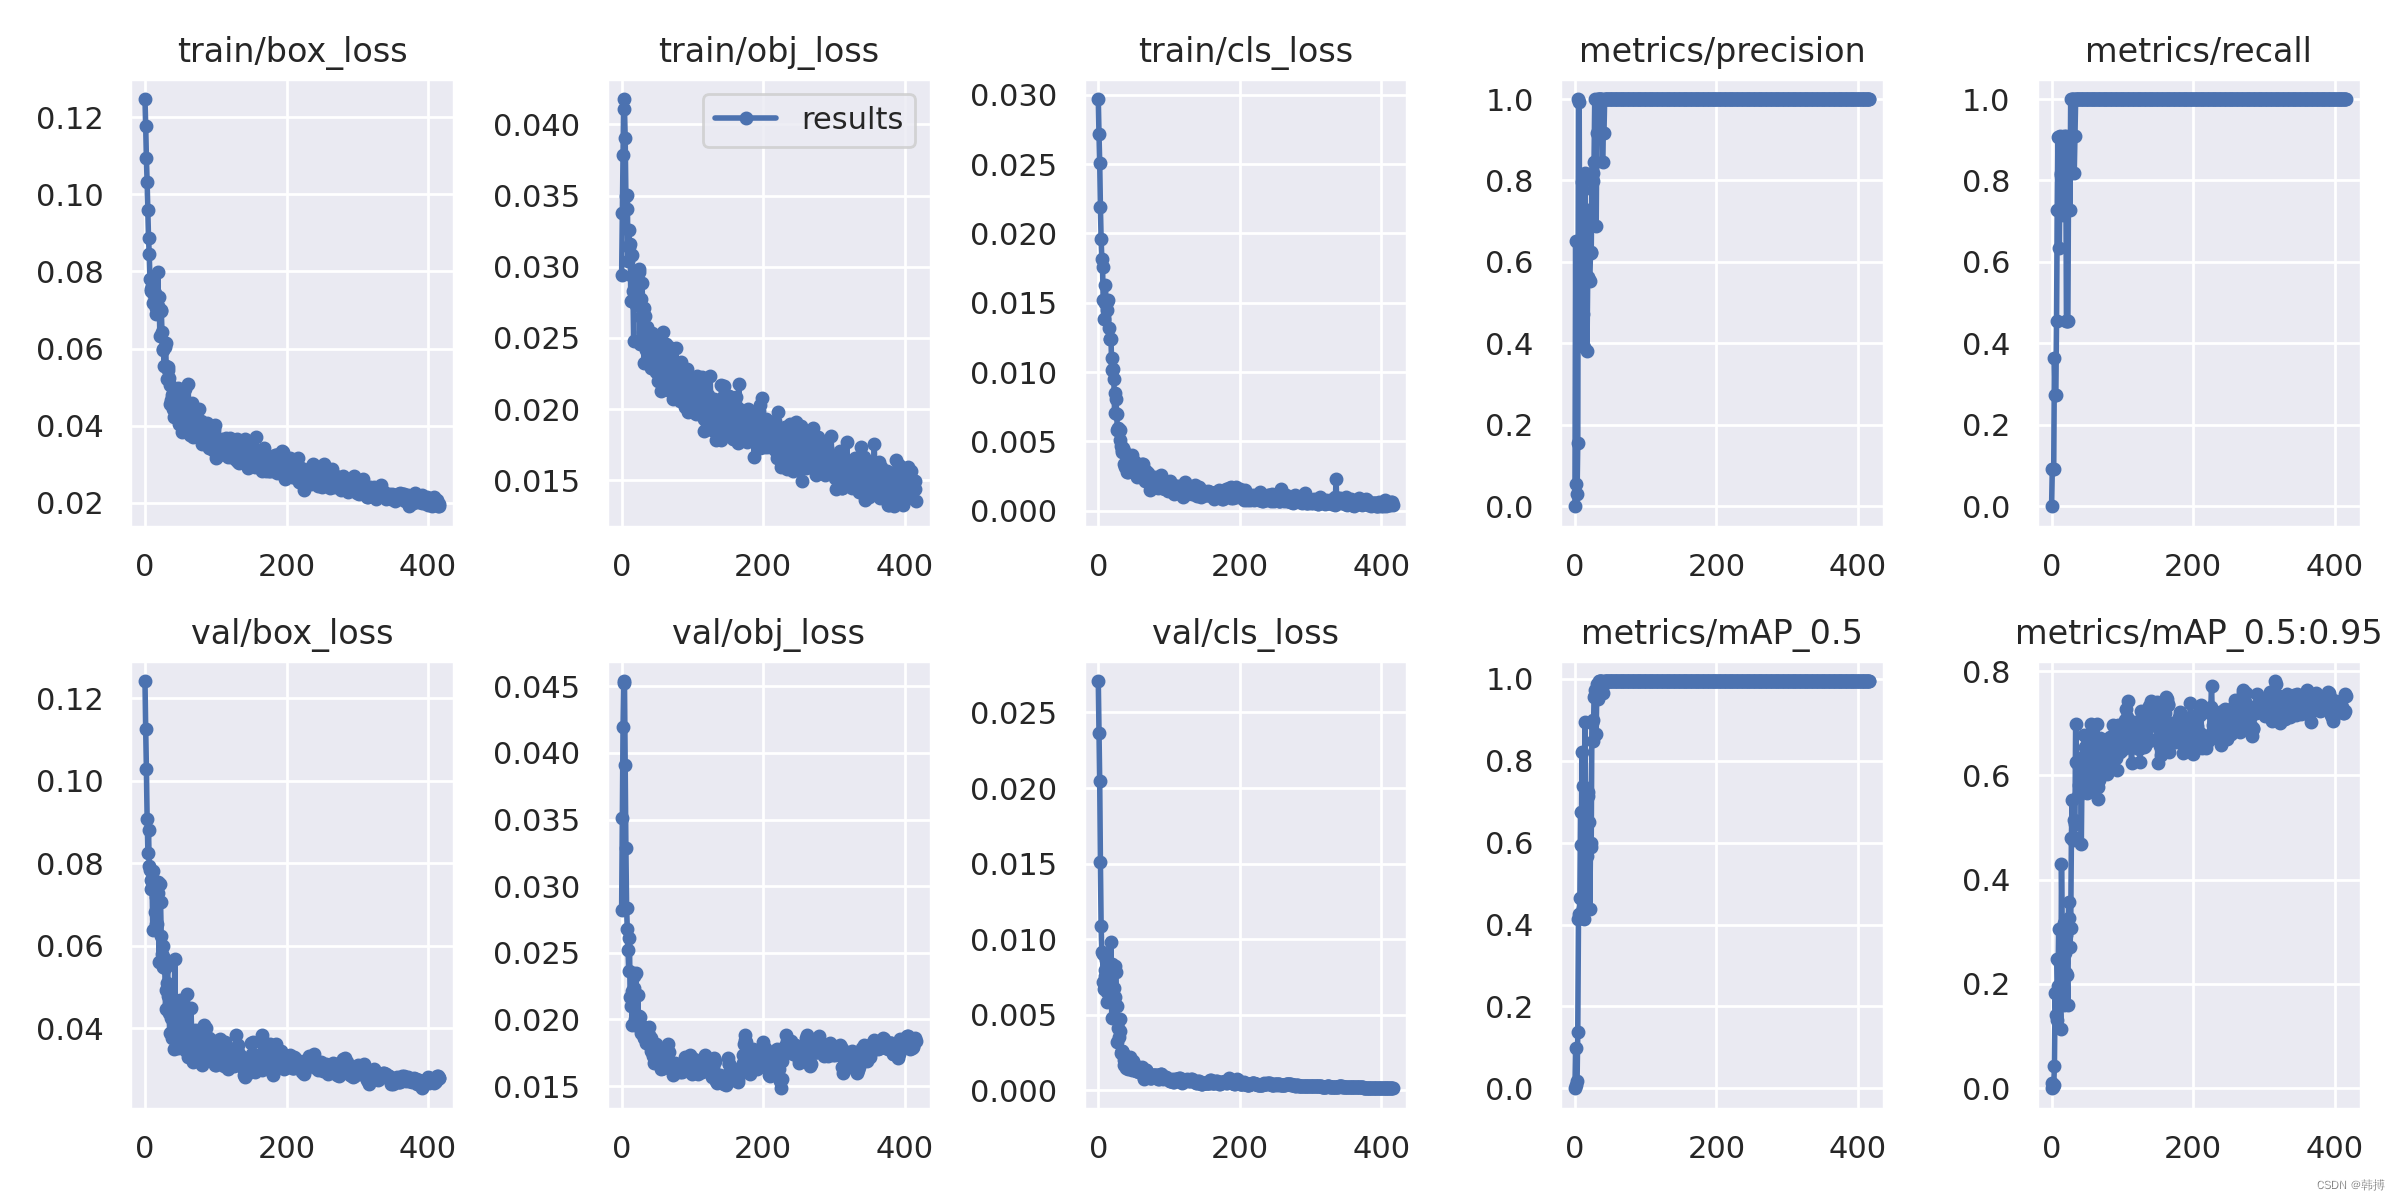
5.训练结果图


八、测试
- 检测指令
python39 detect.py --data data/helmet.yaml --weights runs/train/exp/weights/best.pt --source helmet_test.png #--conf-thres 0.1 --iou-thres 0.9- 1
- 原始图片和结果


九、资源及脚本
-
测试资源下载点击这里下载
-
分类脚本 make_voc_txt.py
import os import random trainval_percent = 0.1 train_percent = 0.9 root_path = 'helmet_source' xmlfilepath = '%s/Annotations' % root_path txtsavepath = '%s/ImageSets' % root_path total_xml = os.listdir(xmlfilepath) num = len(total_xml) list = range(num) tv = int(num * trainval_percent) tr = int(tv * train_percent) trainval = random.sample(list, tv) train = random.sample(trainval, tr) ftrainval = open('%s/trainval.txt' % txtsavepath, 'w') ftest = open('%s/test.txt' % txtsavepath, 'w') ftrain = open('%s/train.txt' % txtsavepath, 'w') fval = open('%s/val.txt' % txtsavepath, 'w') for i in list: name = total_xml[i][:-4] + '\n' if i in trainval: ftrainval.write(name) if i in train: ftest.write(name) else: fval.write(name) else: ftrain.write(name) ftrainval.close() ftrain.close() fval.close() ftest.close()- 1
- 2
- 3
- 4
- 5
- 6
- 7
- 8
- 9
- 10
- 11
- 12
- 13
- 14
- 15
- 16
- 17
- 18
- 19
- 20
- 21
- 22
- 23
- 24
- 25
- 26
- 27
- 28
- 29
- 30
- 31
- 32
- 33
-
生产yolo需要的标注数据格式make_voc_label.py(同时可以产生标注图片)
import xml.etree.ElementTree as ET import pickle import os, cv2 from os import listdir, getcwd from os.path import join from tqdm import tqdm sets = ['train', 'test','val'] classes = ['helmet', 'head'] colors = {'helmet': (60, 60, 250), 'head': (250, 60, 60)} root_path = "helmet_source" dataSet_path = "%s/dataSet_path" % root_path image_path = "%s/images" % root_path Annotations_path = "%s/Annotations" % root_path ImageSets_path = "%s/ImageSets" % root_path labels_path = "%s/labels" % root_path def convert(size, box): dw = 1. / size[0] dh = 1. / size[1] x = (box[0] + box[1]) / 2.0 - 1 y = (box[2] + box[3]) / 2.0 - 1 w = box[1] - box[0] h = box[3] - box[2] x = x * dw w = w * dw y = y * dh h = h * dh # x_center = (box[0]+box[1])/2.0 # y_center = (box[2]+box[3])/2.0 # x = x_center / size[0] # y = y_center / size[1] # w = (box[1] - box[0]) / size[0] # h = (box[3] - box[2]) / size[1] return (x, y, w, h) def convert_annotation(image_id): in_file = open('%s/%s.xml' % (Annotations_path, image_id)) out_file = open('%s/%s.txt' % (labels_path, image_id), 'w') im = cv2.imread('%s/%s.png' % (image_path, image_id)) print('%s/%s.png' % (image_path, image_id)) tree = ET.parse(in_file) root = tree.getroot() size = root.find('size') w = int(size.find('width').text) h = int(size.find('height').text) for obj in root.iter('object'): difficult = obj.find('difficult').text cls = obj.find('name').text if cls not in classes or int(difficult) == 1: continue cls_id = classes.index(cls) xmlbox = obj.find('bndbox') xmin = xmlbox.find('xmin').text xmax = xmlbox.find('xmax').text ymin = xmlbox.find('ymin').text ymax = xmlbox.find('ymax').text b = (float(xmin), float(xmax), float(ymin), float(ymax)) b1, b2, b3, b4 = b # 标注越界修正 if b2 > w: b2 = w if b4 > h: b4 = h b = (b1, b2, b3, b4) bb = convert((w, h), b) out_file.write(str(cls_id) + " " + " ".join([str(a) for a in bb]) + '\n') print(cls, colors[cls], xmin, xmax, ymin, ymax) cv2.rectangle(im, (int(xmin), int(ymin)), (int(xmax), int(ymax)), colors[cls]) cv2.putText(im, cls, (int(xmin), int(ymin) - 3), cv2.FONT_HERSHEY_SIMPLEX, 0.5, colors[cls]) # cv2.imshow('result', im) # cv2.waitKey(0) cv2.imwrite('%s/%s_tag.png' % (image_path, image_id), im) wd = getcwd() print(wd) for image_set in sets: if not os.path.exists(labels_path): os.makedirs(labels_path) image_ids = open('%s/%s.txt' % (ImageSets_path, image_set)).read().strip().split() list_file = open('%s/%s.txt' % (dataSet_path, image_set), 'w') for image_id in image_ids: # print(image_id) list_file.write('%s/%s.png\n' % (image_path, image_id)) convert_annotation(image_id) list_file.close()- 1
- 2
- 3
- 4
- 5
- 6
- 7
- 8
- 9
- 10
- 11
- 12
- 13
- 14
- 15
- 16
- 17
- 18
- 19
- 20
- 21
- 22
- 23
- 24
- 25
- 26
- 27
- 28
- 29
- 30
- 31
- 32
- 33
- 34
- 35
- 36
- 37
- 38
- 39
- 40
- 41
- 42
- 43
- 44
- 45
- 46
- 47
- 48
- 49
- 50
- 51
- 52
- 53
- 54
- 55
- 56
- 57
- 58
- 59
- 60
- 61
- 62
- 63
- 64
- 65
- 66
- 67
- 68
- 69
- 70
- 71
- 72
- 73
- 74
- 75
- 76
- 77
- 78
- 79
- 80
- 81
- 82
- 83
- 84
- 85
- 86
- 87
- 88
- 89
-
文件重命名分序make_voc_file.py
import os path = "./image" filelist = os.listdir(path) #该文件夹下所有的文件(包括文件夹) count=0 #从零开始 for file in filelist: print(file) for file in filelist: #遍历所有文件 Olddir=os.path.join(path,file) #原来的文件路径 if os.path.isdir(Olddir): #如果是文件夹则跳过 continue filename=os.path.splitext(file)[0] #文件名 filetype=os.path.splitext(file)[1] #文件扩展名 Newdir=os.path.join(path,str(count).zfill(6)+filetype) #用字符串函数zfill 以0补全所需位数 os.rename(Olddir,Newdir)#重命名 count+=1- 1
- 2
- 3
- 4
- 5
- 6
- 7
- 8
- 9
- 10
- 11
- 12
- 13
- 14
- 15
5.下载官方权重(里面有download_weights.sh脚本)
from utils.downloads import attempt_download models = ['n', 's', 'm', 'l', 'x'] models.extend([x + '6' for x in models]) # add P6 models for x in models: attempt_download(f'yolov5{x}.pt')- 1
- 2
- 3
- 4
- 5
- 6
- 7
附:
1、pip3 install backports.lzma (3.9忽略) sudo vi /usr/local/lib/python3.7/lzma.py from _lzma import * from _lzma import _encode_filter_properties, _decode_filter_properties 修改: try: from _lzma import * from _lzma import _encode_filter_properties, _decode_filter_properties except ImportError: from backports.lzma import * from backports.lzma import _encode_filter_properties, _decode_filter_properties 2、labelImg使用 git clone https://github.com/tzutalin/labelImg pip3 install lxml pyrcc5 -o resources.py resources.qrc , 将Qt文件格式(.qrc)转为Python(.py)格式,将生成的resources.py拷贝到同级的libs目录下 sudo apt-get install libxcb-xinerama0 (解决 qt.qpa.plugin: Could not load the Qt platform plugin "xcb" in "" even though it was found) 3、pip3 运行出错:subprocess.CalledProcessError: Command '('lsb_release', '-a')' returned non-zero exit status 1 sudo cp /usr/lib/python3/dist-packages/lsb_release.py /usr/local/lib/python3.7 (3.9忽略)- 1
- 2
- 3
- 4
- 5
- 6
- 7
- 8
- 9
- 10
- 11
- 12
- 13
- 14
- 15
- 16
- 17
- 18
- 19
- 20
-
相关阅读:
从零开始搭建一个组件库(一)
2020年第 45 届国际大学生程序设计竞赛(ICPC)亚洲区域赛(上海)
ROC和AUC
mysql5.7.35安装配置教程【超级详细安装教程】
76~90(正则表达式)
最高薪15k!“转行软件测试后,我想要的生活,就应该是这样!”
r86s编译lede x86 OpenWrt
亚马逊、ozon、美客多等平台的测评技术核心:提升跨境电商业绩的关键要素
Spring事务管理 | 数据库连接池流程原理分析
Python程序的5种图像处理特效
- 原文地址:https://blog.csdn.net/hanbo622/article/details/126126323