-
Spring Boot 2 基础篇学习笔记
文章目录
- 01-开发环境
- 02-内容介绍
- 03-SpringBoot入门案例(Idea联网版)
- 04-SpringBoot入门案例(官网创建版)
- 05-SpringBoot入门案例(阿里云版)
- 06-SpringBoot入门案例(手工制作版)
- 07-教你一招:隐藏文件或文件夹
- 08-入门案例解析:parent
- 09-入门案例解析:starter
- 10-入门案例解析:引导类
- 11-入门案例:辅助功能
- [补]知识加油站-01-REST风格简介
- [补]知识加油站-02-RESTful入门案例
- [补]知识加油站-03-RESTful快速开发
- 12-教你一招:复制模块
- 13-属性配置方式
- 14-基础配置
- 15-3种配置文件类型
- 16-配置文件加载优先级
- 17-教你一招:属性提示消失解决方案
- 18-yaml数据格式
- 19-读取yaml单一属性数据
- 20-yaml文件中的变量引用
- 21-读取yaml全部属性数据
- 22-读取yaml引用类型属性数据
- 23-SpringBoot整合JUnit
- 24-整合JUnit——classes属性
- 25-SpringBoot整合MyBatis
- 26-SpringBoot整合MyBatis常见问题处理
- 27-SpringBoot整合MyBatisPlus
- 28-SpringBoot整合Druid
- 29-SSMP整合案例制作分析
- 30-模块创建
- 31-实体类快速开发(lombok)
- 32-数据层标准开发(基础CRUD)
- 33-开启MP运行日志
- 34-分页
- 35-数据层标准开发(条件查询)
- 36-业务层标准开发(基础CRUD)
- 37-业务层快速开发(基于MyBatisPlus构建)
- 38-表现层标准开发
- 39-表现层数据一致性处理(R对象)
- 40-前后端调用(axios发送异步请求)
- 41-列表功能
- 42-添加功能
- 43-删除功能
- 44修改功能(加载数据)
- 45-修改功能
- 46-异常消息处理
- 47-分页
- 48-分页功能维护(删除BUG)
- 49-条件查询
- 50-基础篇完结
01-开发环境
学习要求
- 熟悉Spring基础
- 熟悉Maven使用
环境要求
- Java8及以上
- Maven 3.5及以上:https://docs.spring.io/spring-boot/docs/current/reference/html/getting-started.html#getting-started-system-requirements
学习资料
- Spring Boot官网:https://spring.io/projects/spring-boot
- Spring Boot 官方文档:https://docs.spring.io/spring-boot/docs/current/reference/html/
- Spring Boot 中文文档:http://felord.cn/_doc/_springboot/2.1.5.RELEASE/_book/
- 视频地址:https://www.bilibili.com/video/BV15b4y1a7yGp=24&share_source=copy_web
- 源码地址:GitHub Gitee
02-内容介绍
-
基础篇
Java基础语法
Spring与SpringMVC
知道Spring是用来管理bean,能够基于Restful实现页面请求交互功能
Mybatis与Mybatis-Plus
基于Mybatis和MybatisPlus能够开发出包含基础CRUD功能的标准Dao模块
数据库MySQL
能够读懂基础CRUD功能的SQL语句
服务器
知道服务器与web工程的关系,熟悉web服务器的基础配置
maven
知道maven的依赖关系,知道什么是依赖范围,依赖传递,排除依赖,可选依赖,继承
web技术(含vue,ElementUI)
知道vue如何发送ajax请求,如何获取响应数据,如何进行数据模型双向绑定
03-SpringBoot入门案例(Idea联网版)
- SpringBoot是由Pivotal团队提供的全新框架,其设计目的是用来简化Spring应用的初始搭建以及开发过程
①:创建新模块,选择Spring Initializr,并配置模块相关基础信息

②:选择当前模块需要使用的技术集

③:开发控制器类
//Rest 模式 @RestController @RequestMapping("/books") public class BookController { @GetMapping public String getById() { System.out.println("springboot is running..."); return "springboot is running..."; } }- 1
- 2
- 3
- 4
- 5
- 6
- 7
- 8
- 9
- 10
④:运行自动生成的Application类

⑤:打开浏览器访问url地址为:http://localhost:8080/books
-
最简SpringBoot程序所包含的基础文件 (pom.xml文件 和 Application类 )
- pom.xml文件
4.0.0
org.springframework.boot
spring-boot-starter-parent
2.5.6
com.example
springboot-01-quickstart
0.0.1-SNAPSHOT
org.springframework.boot
spring-boot-starter-web
org.springframework.boot
spring-boot-starter-test
test
-
Application类
@SpringBootApplication
public class Springboot0101QuickstartApplication {public static void main(String[] args) { SpringApplication.run(Springboot0101QuickstartApplication.class, args); }- 1
- 2
- 3
}
-
Spring程序与SpringBoot程序对比

注意: 基于idea开发SpringBoot程序需要确保联网且能够加载到程序框架结构
小结:
- 开发SpringBoot程序可以根据向导进行联网快速制作
- SpringBoot程序需要基于JDK8进行制作
- SpringBoot程序中需要使用何种功能通过勾选选择技术
- 运行SpringBoot程序通过运行Application程序入口进行
04-SpringBoot入门案例(官网创建版)
- 基于SpringBoot官网创建项目,地址:https://start.spring.io/

小结:
- 打开SpringBoot官网,选择Quickstart Your Project
- 创建工程,并保存项目
- 解压项目,通过IDE导入项目
05-SpringBoot入门案例(阿里云版)
- 基于阿里云创建项目,地址:https://start.aliyun.com

注意事项:
- 阿里云提供的坐标版本较低,如果需要使用高版本,进入工程后手工切换SpringBoot版本
- 阿里云提供的工程模板与Spring官网提供的工程模板略有不同
小结:
- 选择start来源为自定义URL
- 输入阿里云start地址
- 创建项目
06-SpringBoot入门案例(手工制作版)
-
手工创建项目(手工导入坐标)

4.0.0org.springframework.boot spring-boot-starter-parent 2.5.6 com.example springboot_01_04_quickstart 1.0-SNAPSHOT org.springframework.boot spring-boot-starter-web - 1
- 2
- 3
- 4
- 5
- 6
- 7
- 8
- 9
- 10
- 11
- 12
- 13
- 14
- 15
- 16
-
手工创建项目(手工制作引导类)
@SpringBootApplication
public class Application {public static void main(String[] args) { SpringApplication.run(Application.class, args); }- 1
- 2
- 3
}
小结:
- 创建普通Maven工程
- 继承spring-boot-starter-parent
- 添加依赖spring-boot-starter-web
- 制作引导类Application
总结:
- 创建SpringBoot工程的四种方式
基于Idea创建SpringBoot工程
基于官网创建SpringBoot工程
基于阿里云创建SpringBoot工程
手工创建Maven工程修改为SpringBoot工程
07-教你一招:隐藏文件或文件夹
- .mvn;.gitignore;HELP.md;mvnw;mvnw.cmd;*.iml;

2018版的做法:

较新版本的做法 :

小结:- Idea中隐藏指定文件或指定类型文件
Setting → File Types → Ignored Files and Folders
输入要隐藏的文件名,支持*号通配符
回车确认添加
08-入门案例解析:parent

-
parent
4.0.0
org.springframework.boot
spring-boot-starter-parent
2.5.6
com.example
springboot-01-quickstart
0.0.1-SNAPSHOT
org.springframework.boot
spring-boot-starter-web
org.springframework.boot
spring-boot-starter-test
test
按住Ctrl点击pom.xml中的spring-boot-starter-parent,跳转到了spring-boot-starter-parent的pom.xml,xml配置如下(只摘抄了部分重点配置):
org.springframework.boot spring-boot-dependencies 2.5.6 - 1
- 2
- 3
- 4
- 5
按住Ctrl点击pom.xml中的spring-boot-starter-dependencies,跳转到了spring-boot-starter-dependencies的pom.xml,xml配置如下(只摘抄了部分重点配置):
5.15.3 2.7.7 1.9.63 2.4.0 1.8.13 3.9.1 4.0.6 2.1.4 3.0.0 1.7.11 ... ... ...org.springframework.boot spring-boot 2.0.1.RELEASE org.springframework.boot spring-boot-test 2.0.1.RELEASE org.jetbrains.kotlin kotlin-maven-plugin ${kotlin.version} org.jooq jooq-codegen-maven ${jooq.version} org.springframework.boot spring-boot-maven-plugin 2.0.1.RELEASE - 1
- 2
- 3
- 4
- 5
- 6
- 7
- 8
- 9
- 10
- 11
- 12
- 13
- 14
- 15
- 16
- 17
- 18
- 19
- 20
- 21
- 22
- 23
- 24
- 25
- 26
- 27
- 28
- 29
- 30
- 31
- 32
- 33
- 34
- 35
- 36
- 37
- 38
- 39
- 40
- 41
- 42
- 43
- 44
- 45
- 46
- 47
- 48
- 49
- 50
从上面的spring-boot-starter-dependencies的pom.xml中我们可以发现,一部分坐标的版本、依赖管理、插件管理已经定义好,所以我们的SpringBoot工程继承spring-boot-starter-parent后已经具备版本锁定等配置了。所以起步依赖的作用就是进行依赖的传递。
小结:
- 开发SpringBoot程序要继承spring-boot-starter-parent
- spring-boot-starter-parent中定义了若干个依赖管理
- 继承parent模块可以避免多个依赖使用相同技术时出现依赖版本冲突
- 继承parent的形式也可以采用引入依赖的形式实现效果
09-入门案例解析:starter
-
spring-boot-starter-web.pom
按住Ctrl点击pom.xml中的spring-boot-starter-web,跳转到了spring-boot-starter-web的pom.xml,xml配置如下(只摘抄了部分重点配置):
4.0.0
org.springframework.boot
spring-boot-starters
2.0.1.RELEASE
org.springframework.boot
spring-boot-starter-web
2.0.1.RELEASE
Spring Boot Web Starterorg.springframework.boot spring-boot-starter 2.0.1.RELEASE compile org.springframework.boot spring-boot-starter-json 2.0.1.RELEASE compile org.springframework.boot spring-boot-starter-tomcat 2.0.1.RELEASE compile org.hibernate.validator hibernate-validator 6.0.9.Final compile org.springframework spring-web 5.0.5.RELEASE compile org.springframework spring-webmvc 5.0.5.RELEASE compile - 1
- 2
- 3
- 4
- 5
- 6
- 7
- 8
- 9
- 10
- 11
- 12
- 13
- 14
- 15
- 16
- 17
- 18
- 19
- 20
- 21
- 22
- 23
- 24
- 25
- 26
- 27
- 28
- 29
- 30
- 31
- 32
- 33
- 34
- 35
- 36
- 37
- 38
从上面的spring-boot-starter-web的pom.xml中我们可以发现,spring-boot-starter-web就是将web开发要使用的spring-web、spring-webmvc等坐标进行了“打包”,这样我们的工程只要引入spring-boot-starter-web起步依赖的坐标就可以进行web开发了,同样体现了依赖传递的作用。

- starter
SpringBoot中常见项目名称,定义了当前项目使用的所有依赖坐标,以达到减少依赖配置的目的 - parent
所有SpringBoot项目要继承的项目,定义了若干个坐标版本号(依赖管理,而非依赖),以达到减少依赖冲突的目的
spring-boot-starter-parent各版本间存在着诸多坐标版本不同 - 实际开发
使用任意坐标时,仅书写GAV(groupId, artifactId, version)中的G和A,V由SpringBoot提供,除非SpringBoot未提供对应版本V
如发生坐标错误,再指定Version(要小心版本冲突)
小结:
- 开发SpringBoot程序需要导入坐标时通常导入对应的starter
- 每个不同的starter根据功能不同,通常包含多个依赖坐标
- 使用starter可以实现快速配置的效果,达到简化配置的目的
10-入门案例解析:引导类
-
启动方式
@SpringBootApplication
public class Springboot0101QuickstartApplication {public static void main(String[] args) { ConfigurableApplicationContext ctx = SpringApplication.run(Springboot0101QuickstartApplication.class, args); //获取bean对象 BookController bean = ctx.getBean(BookController.class); System.out.println("bean======>" + bean); }- 1
- 2
- 3
- 4
- 5
- 6
}
-
SpringBoot的引导类是Boot工程的执行入口,运行main方法就可以启动项目
-
SpringBoot工程运行后初始化Spring容器,扫描引导类所在包加载bean
小结:
- SpringBoot工程提供引导类用来启动程序
- SpringBoot工程启动后创建并初始化Spring容器
11-入门案例:辅助功能
-
辅助功能 内嵌tomcat

-
使用maven依赖管理变更起步依赖项
org.springframework.boot spring-boot-starter-web org.springframework.boot spring-boot-starter-tomcat org.springframework.boot spring-boot-starter-jetty org.springframework.boot spring-boot-starter-test test - 1
- 2
- 3
- 4
- 5
- 6
- 7
- 8
- 9
- 10
- 11
- 12
- 13
- 14
- 15
- 16
- 17
- 18
- 19
- 20
- 21
- 22
- 23
-
Jetty比Tomcat更轻量级,可扩展性更强(相较于Tomcat),谷歌应用引擎(GAE)已经全面切换为Jetty
-
内置服务器
tomcat(默认) apache出品,粉丝多,应用面广,负载了若干较重的组件
jetty 更轻量级,负载性能远不及tomcat
undertow undertow,负载性能勉强跑赢tomcat
小结:
- 内嵌Tomcat服务器是SpringBoot辅助功能之一
- 内嵌Tomcat工作原理是将Tomcat服务器作为对象运行,并将该对象交给Spring容器管理
- 变更内嵌服务器思想是去除现有服务器,添加全新的服务器
总结:
- 入门案例(4种方式)
- SpringBoot概述
parent
starter
引导类
辅助功能(内嵌tomcat)
[补]知识加油站-01-REST风格简介
-
什么是 rest :
-
REST(Representational State Transfer)表现形式状态转换
-
传统风格资源描述形式
http://localhost/user/getByIdid=1 (得到id为1的用户)
http://localhost/user/saveUser (保存用户) -
REST风格描述形式
http://localhost/user/1 (得到id为1的用户)
http://localhost/user (保存用户)
-
-
优点:
- 隐藏资源的访问行为, 无法通过地址得知对资源是何种操作
- 书写简化
-
按照REST风格访问资源时使用行为动作区分对资源进行了何种操作
GET 用来获取资源,POST 用来新建资源,PUT 用来更新资源,DELETE 用来删除资源
- http://localhost/users 查询全部用户信息 GET (查询)
- http://localhost/users/1 查询指定用户信息 GET (查询)
- http://localhost/users 添加用户信息 POST (新增/保存)
- http://localhost/users 修改用户信息 PUT (修改/更新)
- http://localhost/users/1 删除用户信息 DELETE (删除)
注意:
上述行为是约定方式,约定不是规范,可以打破,所以称REST风格,而不是REST规范
描述模块的名称通常使用复数,也就是加s的格式描述,表示此类资源,而非单个资源,例如: users、 books、 accounts… -
根据REST风格对资源进行访问称为RESTful
-
小结:
- REST
- 动作4个
- RESTful
[补]知识加油站-02-RESTful入门案例
步骤:
①:设定http请求动作(动词)
使用
@RequestMapping注解的 method 属性声明请求的方式使用
@RequestBody注解 获取请求体内容。直接使用得到是 key=value&key=value…结构的数据。get 请求方式不适用。使用
@ResponseBody注解实现将 controller 方法返回对象转换为 json 响应给客户端。@RequestMapping(value="/users",method=RequestMethod.POST)
②:设定请求参数(路径变量)
使用
@PathVariable用于绑定 url 中的占位符。例如:请求 url 中 /delete/{id},这个{id}就是 url 占位符。
- @RequestMapping

- @PathVariable

- @RequestBody @RequestParam @PathVariable

[补]知识加油站-03-RESTful快速开发
- 使用
@RestController注解开发 RESTful 风格

- 使用 @GetMapping @PostMapping @PutMapping @DeleteMapping 简化
@RequestMapping注解开发

12-教你一招:复制模块
- 原则
保留工程基础结构
抹掉原始工程痕迹


在IDEA 中点击模块管理添加模块


小结:
- 在工作空间中复制对应工程,并修改工程名称
- 删除与Idea相关配置文件,仅保留src目录与pom.xml文件
- 修改pom.xml文件中的artifactId与新工程/模块名相同
- 删除name标签(可选)
- 保留备份工程供后期使用
13-属性配置方式
-
修改服务器端口

-
SpringBoot默认配置文件application.properties,通过键值对配置对应属性
-
修改配置
修改服务器端口# 服务器端口配制 server.port=80- 1
- 2
小结:
- SpringBoot默认配置文件application.properties
14-基础配置
-
修改配置
修改服务器端口
server.port=80
关闭运行日志图标(banner)
spring.main.banner-mode=off
设置日志相关
logging.level.root=debug服务器端口配置
server.port=80
修改banner
spring.main.banner-mode=off
spring.banner.image.location=logo.png
日志
logging.level.root=info
-
SpringBoot内置属性查询
https://docs.spring.io/spring-boot/docs/current/reference/html/application-properties.html#application-properties
官方文档中参考文档第一项:Application Propertie
小结:
- SpringBoot中导入对应starter后,提供对应配置属性
- 书写SpringBoot配置采用关键字+提示形式书写
15-3种配置文件类型
- 配置文件格式

- SpringBoot提供了多种属性配置方式
-
application.properties
server.port=80
-
application.yml
server:
port: 81 -
application.yaml
server:
port: 82

小结:
- SpringBoot提供了3种配置文件的格式
properties(传统格式/默认格式)
yml(主流格式)
yaml
16-配置文件加载优先级
- SpringBoot配置文件加载顺序
application.properties > application.yml > application.yaml - 常用配置文件种类
application.yml
小结:
- 配置文件间的加载优先级
properties(最高)
yml
yaml(最低) - 不同配置文件中相同配置按照加载优先级相互覆盖 (高优先级配置内容会覆盖低优先级配置内容),不同配置文件中不同配置全部保留
17-教你一招:属性提示消失解决方案


小结:- 指定SpringBoot配置文件
Setting → Project Structure → Facets
选中对应项目/工程
Customize Spring Boot
选择配置文件
18-yaml数据格式
yaml
- YAML(YAML Ain’t Markup Language),一种数据序列化格式
-
优点:
- 容易阅读
- 容易与脚本语言交互
- 以数据为核心,重数据轻格式
-
YAML文件扩展名
- .yml(主流)
- .yaml
yaml语法规则
基本语法
-
key: value-> value 前面一定要有空格 -
大小写敏感
-
属性层级关系使用多行描述,每行结尾使用冒号结束
-
使用缩进表示层级关系,同层级左侧对齐,只允许使用空格(不允许使用Tab键)
-
属性值前面添加空格(属性名与属性值之间使用冒号+空格作为分隔)
-
#表示注释 -
核心规则:数据前面要加空格与冒号隔开
server:
servlet:
context-path: /hello
port: 82
数据类型
-
字面值表示方式

字面值表示方式
boolean: TRUE #TRUE,true,True,FALSE,false , False 均可
float: 3.14 #6.8523015e+5 # 支持科学计数法
int: 123 #0b1010_0111_0100_1010_1110 # 支持二进制、八进制、十六进制null: ~ # 使用 ~ 表示 null
string: HelloWorld # 字符串可以直接书写
string2: “Hello World” # 可以使用双引号包裹特殊字符
date: 2018-02-17 # 日期必须使用 yyyy-MM-dd 格式
datetime: 2018-02-17T15:02:31+08:00 # 时间和日期之间使用 T 连接,最后使用 + 代表时区 -
数组表示方式:在属性名书写位置的下方使用减号作为数据开始符号,每行书写一个数据,减号与数据间空格分隔

subject:
- Java
- 前端
- 大数据
enterprise:
name: zhangsan
age: 16subject2:
- Java
- 前端
- 大数据
likes: [王者荣耀,刺激战场] # 数组书写缩略格式
users: # 对象数组格式
-
name: Tom
age: 4 -
name: Jerry
age: 5
users2: # 对象数组格式二 -
name: Tom
age: 4 -
name: Jerry
age: 5
对象数组缩略格式
users3: [ { name:Tom , age:4 } , { name:Jerry , age:5 } ]
小结:
1. yaml语法规则 大小写敏感 属性层级关系使用多行描述,每行结尾使用冒号结束 使用缩进表示层级关系,同层级左侧对齐,只允许使用空格(不允许使用Tab键) 属性值前面添加空格(属性名与属性值之间使用冒号+空格作为分隔) # 表示注释 2. 注意属性名冒号后面与数据之间有一个空格 3. 字面值、对象数据格式、数组数据格式(略)- 1
- 2
- 3
- 4
- 5
- 6
- 7
- 8
19-读取yaml单一属性数据
-
使用@Value读取单个数据,属性名引用方式:${一级属性名.二级属性名……}

@Value("${country}") private String country1; @Value("${user.age}") private String age1; @Value("${likes[1]}") private String likes1; @Value("${users[1].name}") private String name1; @GetMapping public String getById() { System.out.println("springboot is running2..."); System.out.println("country1=>" + country1); System.out.println("age1=>" + age1); System.out.println("likes1=>" + likes1); System.out.println("name1=>" + name1); return "springboot is running2..."; }- 1
- 2
- 3
- 4
- 5
- 6
- 7
- 8
- 9
- 10
- 11
- 12
- 13
- 14
- 15
- 16
- 17
- 18
- 19
- 20
- 21
- 22
小结:
- 使用@Value配合SpEL读取单个数据
- 如果数据存在多层级,依次书写层级名称即可
20-yaml文件中的变量引用
-
在配置文件中可以使用属性名引用方式引用属性


-
属性值中如果出现转移字符,需要使用双引号包裹

小结:
- 在配置文件中可以使用${属性名}方式引用属性值
- 如果属性中出现特殊字符,可以使用双引号包裹起来作为字符解析
21-读取yaml全部属性数据
- 封装全部数据到Environment对象
- 注意 要导这个 包
- import org.springframework.core.env.Environment;


小结:
- 使用Environment对象封装全部配置信息
- 使用@Autowired自动装配数据到Environment对象中
22-读取yaml引用类型属性数据
-
自定义对象封装指定数据
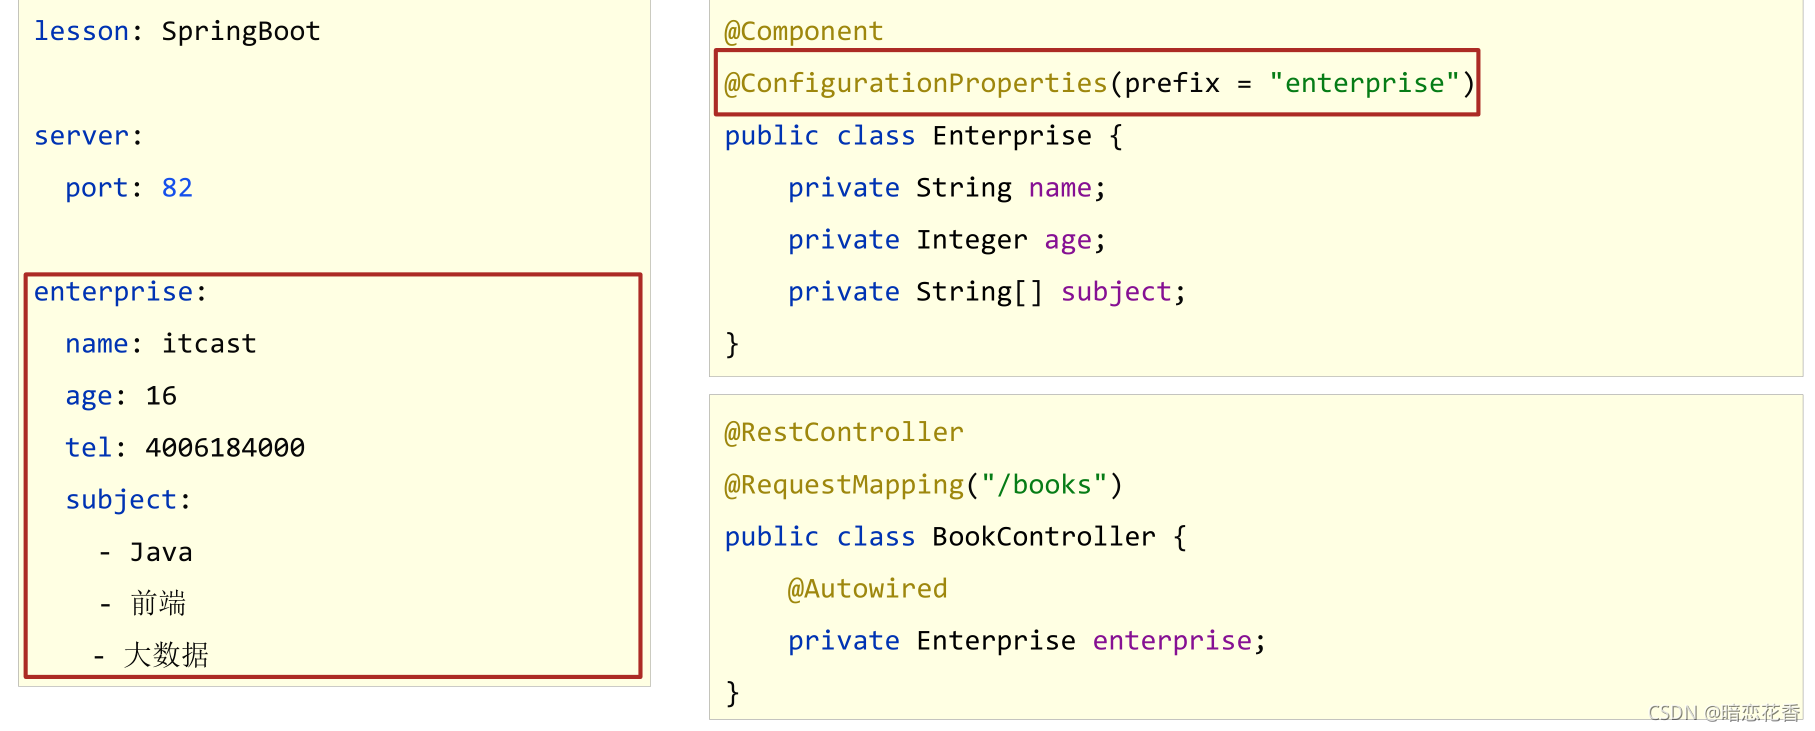
-
自定义对象封装指定数据的作用
创建类,用于封装下面的数据
由spring帮我们去加载数据到对象中,一定要告诉spring加载这组信息
使用时候从spring中直接获取信息使用
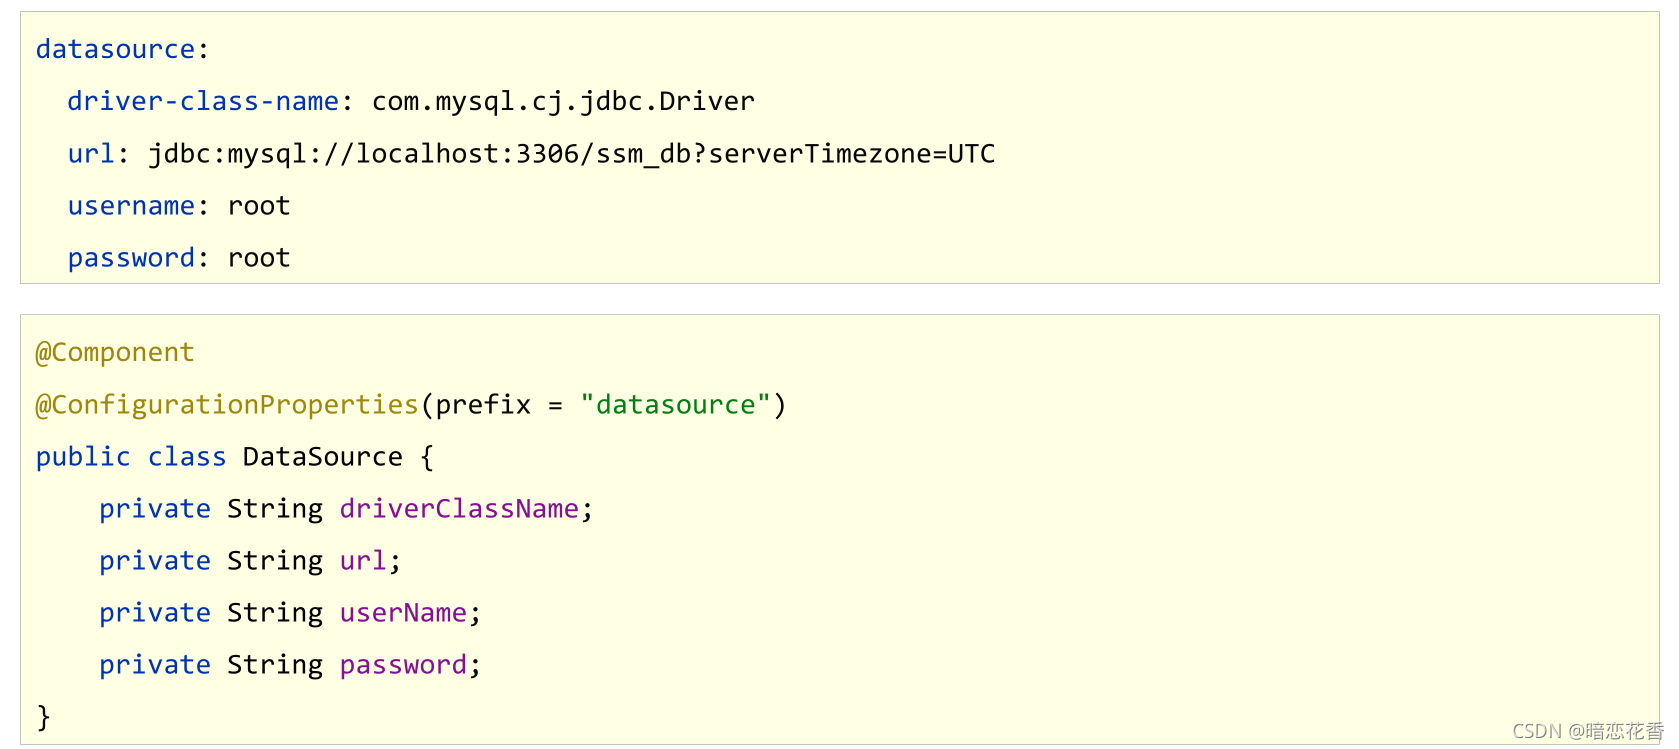
datasource:
driver: com.mysql.jdbc.Driver
url: jdbc:mysql://localhost/springboot_db
username: root
password: root666123//1.定义数据模型封装yaml文件中对应的数据
//2.定义为spring管控的bean
@Component
//3.指定加载的数据
@ConfigurationProperties(prefix = “datasource”)
public class MyDataSource {private String driver; private String url; private String username; private String password; //省略get/set/tostring 方法- 1
- 2
- 3
- 4
- 5
- 6
}
使用自动装配封装指定数据
@Autowired private MyDataSource myDataSource;- 1
- 2
输出查看
System.out.println(myDataSource);- 1
小结:
- 使用@ConfigurationProperties注解绑定配置信息到封装类中
- 封装类需要定义为Spring管理的bean,否则无法进行属性注入
23-SpringBoot整合JUnit
-
添加Junit的起步依赖 Spring Initializr 创建时自带
org.springframework.boot spring-boot-starter-test test -
SpringBoot整合JUnit
@SpringBootTest
class Springboot07JunitApplicationTests {
@Autowired
private BookService bookService;
@Test
public void testSave(){
bookService.save();
}
} -
@SpringBootTest
名称:@SpringBootTest
类型:测试类注解
位置:测试类定义上方
作用:设置JUnit加载的SpringBoot启动类
范例:@SpringBootTest
class Springboot05JUnitApplicationTests {}
小结:
- 导入测试对应的starter
- 测试类使用@SpringBootTest修饰
- 使用自动装配的形式添加要测试的对象
24-整合JUnit——classes属性

@SpringBootTest(classes = Springboot04JunitApplication.class) //@ContextConfiguration(classes = Springboot04JunitApplication.class) class Springboot04JunitApplicationTests { //1.注入你要测试的对象 @Autowired private BookDao bookDao; @Test void contextLoads() { //2.执行要测试的对象对应的方法 bookDao.save(); System.out.println("two..."); } }- 1
- 2
- 3
- 4
- 5
- 6
- 7
- 8
- 9
- 10
- 11
- 12
- 13
- 14
- 15
注意:
- 如果测试类在SpringBoot启动类的包或子包中,可以省略启动类的设置,也就是省略classes的设定
小结:
- 测试类如果存在于引导类所在包或子包中无需指定引导类
- 测试类如果不存在于引导类所在的包或子包中需要通过 classes 属性指定引导类
25-SpringBoot整合MyBatis
①:创建新模块,选择Spring初始化,并配置模块相关基础信息

②:选择当前模块需要使用的技术集(MyBatis、MySQL)

③:设置数据源参数#DB Configuration: spring: datasource: driver-class-name: com.mysql.cj.jdbc.Driver url: jdbc:mysql://localhost:3306/springboot_db username: root password: 123456- 1
- 2
- 3
- 4
- 5
- 6
- 7
④:创建user表
在 springboot_db 数据库中创建 user 表-- ---------------------------- -- Table structure for `user` -- ---------------------------- DROP TABLE IF EXISTS `user`; CREATE TABLE `user` ( `id` int(11) NOT NULL AUTO_INCREMENT, `username` varchar(50) DEFAULT NULL, `password` varchar(50) DEFAULT NULL, `name` varchar(50) DEFAULT NULL, PRIMARY KEY (`id`) ) ENGINE=InnoDB AUTO_INCREMENT=10 DEFAULT CHARSET=utf8; -- ---------------------------- -- Records of user -- ---------------------------- INSERT INTO `user` VALUES ('1', 'zhangsan', '123', '张三'); INSERT INTO `user` VALUES ('2', 'lisi', '123', '李四');- 1
- 2
- 3
- 4
- 5
- 6
- 7
- 8
- 9
- 10
- 11
- 12
- 13
- 14
- 15
- 16
- 17
⑤:创建实体Bean
public class User { // 主键 private Long id; // 用户名 private String username; // 密码 private String password; // 姓名 private String name; //此处省略getter,setter,toString方法 .. .. }- 1
- 2
- 3
- 4
- 5
- 6
- 7
- 8
- 9
- 10
- 11
- 12
- 13
⑥: 定义数据层接口与映射配置
@Mapper public interface UserDao { @Select("select * from user") public ListgetAll(); } - 1
- 2
- 3
- 4
- 5
- 6
⑦:测试类中注入dao接口,测试功能
@SpringBootTest class Springboot05MybatisApplicationTests { @Autowired private UserDao userDao; @Test void contextLoads() { ListuserList = userDao.getAll(); System.out.println(userList); } } - 1
- 2
- 3
- 4
- 5
- 6
- 7
- 8
- 9
- 10
- 11
- 12
- 13
⑧:运行如下
[User{id=1, username='zhangsan', password='123', name='张三'}, User{id=2, username='lisi', password='123', name='李四'}]- 1
总结:
- 勾选MyBatis技术,也就是导入MyBatis对应的starter
- 数据库连接相关信息转换成配置
- 数据库SQL映射需要添加@Mapper被容器识别到
26-SpringBoot整合MyBatis常见问题处理
SpringBoot版本低于2.4.3(不含),Mysql驱动版本大于8.0时,需要在url连接串中配置时区
jdbc:mysql://localhost:3306/springboot_db?serverTimezone=UTC- 1
或在MySQL数据库端配置时区解决此问题
1.MySQL 8.X驱动强制要求设置时区
- 修改url,添加serverTimezone设定
- 修改MySQL数据库配置(略)
2.驱动类过时,提醒更换为com.mysql.cj.jdbc.Driver
27-SpringBoot整合MyBatisPlus
①:手动添加SpringBoot整合MyBatis-Plus的坐标,可以通过mvnrepository获取com.baomidou mybatis-plus-boot-starter 3.4.3 - 1
- 2
- 3
- 4
- 5
注意事项: 由于SpringBoot中未收录MyBatis-Plus的坐标版本,需要指定对应的Version
②:定义数据层接口与映射配置,继承BaseMapper
@Mapper public interface UserDao extends BaseMapper{ } - 1
- 2
- 3
- 4
③:其他同SpringBoot整合MyBatis
(略)④:测试类中注入dao接口,测试功能
@SpringBootTest class Springboot06MybatisPlusApplicationTests { @Autowired private UserDao userDao; @Test void contextLoads() { Listusers = userDao.selectList(null); System.out.println(users); } } - 1
- 2
- 3
- 4
- 5
- 6
- 7
- 8
- 9
- 10
- 11
- 12
- 13
⑤: 运行如下:
[User{id=1, username='zhangsan', password='123', name='张三'}, User{id=2, username='lisi', password='123', name='李四'}]- 1
注意: 如果你的数据库表有前缀要在 application.yml 添加如下配制
#设置Mp相关的配置 mybatis-plus: global-config: db-config: table-prefix: tbl_- 1
- 2
- 3
- 4
- 5
小结:
1.手工添加MyBatis-Plus对应的starter
2.数据层接口使用BaseMapper简化开发
3.需要使用的第三方技术无法通过勾选确定时,需要手工添加坐标28-SpringBoot整合Druid

①: 导入Druid对应的startercom.alibaba druid-spring-boot-starter 1.2.6 - 1
- 2
- 3
- 4
- 5
②: 指定数据源类型 (这种方式只需导入一个 Druid 的坐标)
#DB Configuration: spring: datasource: driver-class-name: com.mysql.cj.jdbc.Driver url: jdbc:mysql://localhost:3306/springboot_db?serverTimezone=UTC username: root password: 123456 type: com.alibaba.druid.pool.DruidDataSource- 1
- 2
- 3
- 4
- 5
- 6
- 7
- 8
或者 变更Druid的配置方式(推荐) 这种方式需要导入 Druid对应的starter
spring: datasource: druid: driver-class-name: com.mysql.cj.jdbc.Driver url: jdbc:mysql://localhost:3306/springboot_db?serverTimezone=UTC username: root password: 123456- 1
- 2
- 3
- 4
- 5
- 6
- 7
小结:
1.整合Druid需要导入Druid对应的starter
2.根据Druid提供的配置方式进行配置
3.整合第三方技术通用方式- 导入对应的starter
- 根据提供的配置格式,配置非默认值对应的配置项
29-SSMP整合案例制作分析
案例效果演示:

案例实现方案分析与流程解析
1. 案例实现方案分析 实体类开发————使用Lombok快速制作实体类 Dao开发————整合MyBatisPlus,制作数据层测试类 Service开发————基于MyBatisPlus进行增量开发,制作业务层测试类 Controller开发————基于Restful开发,使用PostMan测试接口功能 Controller开发————前后端开发协议制作 页面开发————基于VUE+ElementUI制作,前后端联调,页面数据处理,页面消息处理 列表、新增、修改、删除、分页、查询 项目异常处理 按条件查询————页面功能调整、Controller修正功能、Service修正功能 2. SSMP案例制作流程解析 先开发基础CRUD功能,做一层测一层 调通页面,确认异步提交成功后,制作所有功能 添加分页功能与查询功能- 1
- 2
- 3
- 4
- 5
- 6
- 7
- 8
- 9
- 10
- 11
- 12
- 13
- 14
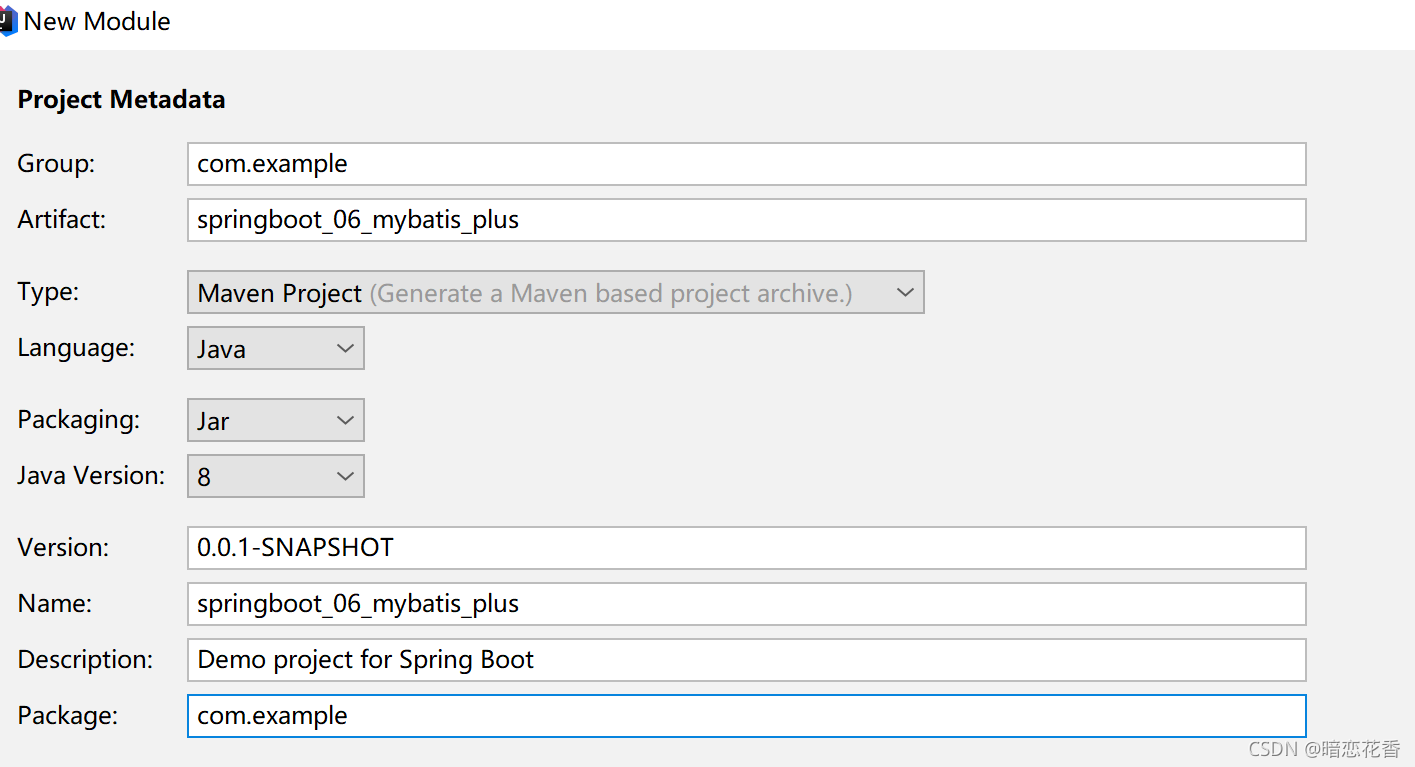
30-模块创建


pom.xml
org.springframework.boot spring-boot-starter-web mysql mysql-connector-java runtime com.baomidou mybatis-plus-boot-starter 3.4.3 com.alibaba druid-spring-boot-starter 1.2.6 org.springframework.boot spring-boot-starter-test test - 1
- 2
- 3
- 4
- 5
- 6
- 7
- 8
- 9
- 10
- 11
- 12
- 13
- 14
- 15
- 16
- 17
- 18
- 19
- 20
- 21
- 22
- 23
- 24
- 25
- 26
- 27
- 28
- 29
- 30
- 31
tbl_book.sql
DROP TABLE IF EXISTS `tbl_book`; CREATE TABLE `tbl_book` ( `id` int(11) NOT NULL AUTO_INCREMENT, `type` varchar(20) DEFAULT NULL, `name` varchar(50) DEFAULT NULL, `description` varchar(255) DEFAULT NULL, PRIMARY KEY (`id`) ) ENGINE=InnoDB AUTO_INCREMENT=13 DEFAULT CHARSET=utf8; -- ---------------------------- -- Records of tbl_book -- ---------------------------- INSERT INTO `tbl_book` VALUES ('1', '计算机理论', 'Spring实战第5版', 'Spring入门经典教程,深入理解Spring原理技术内幕'); INSERT INTO `tbl_book` VALUES ('2', '计算机理论', 'Spring 5核心原理与30个类手写实战', '十年沉淀之作,写Spring精华思想'); INSERT INTO `tbl_book` VALUES ('3', '计算机理论', 'Spring 5设计模式', '深入Spring源码剖析Spring源码中蕴含的10大设计模式'); INSERT INTO `tbl_book` VALUES ('4', '计算机理论', 'Spring MVC+ MyBatis开发从入门到项目实战', '全方位解析面向Web应用的轻量级框架,带你成为Spring MVC开发高手'); INSERT INTO `tbl_book` VALUES ('5', '计算机理论', '轻量级Java Web企业应用实战', '源码级剖析Spring框架,适合已掌握Java基础的读者'); INSERT INTO `tbl_book` VALUES ('6', '计算机理论', 'Java核心技术卷|基础知识(原书第11版)', 'Core Java第11版,Jolt大奖获奖作品,针对Java SE9、10、 11全面更新'); INSERT INTO `tbl_book` VALUES ('7', '计算机理论', '深入理解Java虚拟机', '5个维度全面剖析JVM,面试知识点全覆盖'); INSERT INTO `tbl_book` VALUES ('8', '计算机理论', 'Java编程思想(第4版)', 'Java学习必读经典殿堂级著作!赢得了全球程序员的广泛赞誉'); INSERT INTO `tbl_book` VALUES ('9', '计算机理论', '零基础学Java (全彩版)', '零基础自学编程的入门]图书,由浅入深,详解Java语言的编程思想和核心技术'); INSERT INTO `tbl_book` VALUES ('10', '市场营销', '直播就该这么做:主播高效沟通实战指南', '李子柒、李佳琦、薇娅成长为网红的秘密都在书中'); INSERT INTO `tbl_book` VALUES ('11', '市场营销', '直播销讲实战一本通', '和秋叶一起学系列网络营销书籍'); INSERT INTO `tbl_book` VALUES ('12', '市场营销', '直播带货:淘宝、天猫直播从新手到高手', '一本教你如何玩转直播的书, 10堂课轻松实现带货月入3W+');- 1
- 2
- 3
- 4
- 5
- 6
- 7
- 8
- 9
- 10
- 11
- 12
- 13
- 14
- 15
- 16
- 17
- 18
- 19
- 20
- 21
- 22
- 23
- 24
小结:
-
勾选SpringMVC与MySQL坐标
-
修改配置文件为yml格式
-
设置端口为80方便访问
server: port: 80- 1
- 2
31-实体类快速开发(lombok)
-
Lombok,一个Java类库,提供了一组注解,简化POJO实体类开发
org.projectlombok lombok - 1
- 2
- 3
- 4
- 5
-
lombok版本由SpringBoot提供,无需指定版本
-
常用注解:@Data
@Data
public class Book {
private Integer id;
private String type;
private String name;
private String description;
} -
为当前实体类在编译期设置对应的get/set方法,toString方法,hashCode方法,equals方法等
小结:
1. 实体类制作 2. 使用lombok简化开发 导入lombok无需指定版本,由SpringBoot提供版本 @Data注解- 1
- 2
- 3
- 4
32-数据层标准开发(基础CRUD)
-
导入MyBatisPlus与Druid对应的starter
com.baomidou mybatis-plus-boot-starter 3.4.3 com.alibaba druid-spring-boot-starter 1.2.6 - 1
- 2
- 3
- 4
- 5
- 6
- 7
- 8
- 9
- 10
- 11
-
配置数据源与MyBatisPlus对应的基础配置(id生成策略使用数据库自增策略)
druid 数据源配制
spring:
  datasource:
    druid:
      driver-class-name: com.mysql.cj.jdbc.Driver
      url: jdbc:mysql://localhost:3306/springboot_db?serverTimezone=UTC
      username: root
password: 123456mybatis-plus
mybatis-plus:
global-config:
db-config:
table-prefix: tbl_
id-type: auto # 主键策略 -
继承BaseMapper并指定泛型
@Mapper
public interface BookDao extends BaseMapper {/** * 查询一个 * 这是 Mybatis 开发 * @param id * @return */ @Select("select * from tbl_book where id = #{id}") Book getById(Integer id);- 1
- 2
- 3
- 4
- 5
- 6
- 7
- 8
}
-
制作测试类测试结果
@SpringBootTest
public class BookDaoTestCase {@Autowired private BookDao bookDao; @Test void testGetById() { System.out.println(bookDao.getById(1)); System.out.println(bookDao.selectById(1)); } @Test void testSave() { Book book = new Book(); book.setType("测试数据123"); book.setName("测试数据123"); book.setDescription("测试数据123"); bookDao.insert(book); } @Test void testUpdate() { Book book = new Book(); book.setId(13); book.setType("测试数据asfd"); book.setName("测试数据123"); book.setDescription("测试数据123"); bookDao.updateById(book); } @Test void testDelete() { bookDao.deleteById(13); } @Test void testGetAll() { System.out.println(bookDao.selectList(null)); } @Test void testGetPage() { } @Test void testGetBy() { }- 1
- 2
- 3
- 4
- 5
- 6
- 7
- 8
- 9
- 10
- 11
- 12
- 13
- 14
- 15
- 16
- 17
- 18
- 19
- 20
- 21
- 22
- 23
- 24
- 25
- 26
- 27
- 28
- 29
- 30
- 31
- 32
- 33
- 34
- 35
- 36
- 37
- 38
- 39
- 40
- 41
- 42
- 43
- 44
- 45
}
小结:
- 手工导入starter坐标(2个)
- 配置数据源与MyBatisPlus对应的配置
- 开发Dao接口(继承BaseMapper)
- 制作测试类测试Dao功能是否有效
33-开启MP运行日志
-
为方便调试可以开启MyBatisPlus的日志
mybatis-plus
mybatis-plus:
global-config:
db-config:
table-prefix: tbl_
id-type: auto # 主键策略
configuration:
# 开启MyBatisPlus的日志
log-impl: org.apache.ibatis.logging.stdout.StdOutImpl
小结:
- 使用配置方式开启日志,设置日志输出方式为标准输出

34-分页
-
分页操作需要设定分页对象IPage
@Test void testGetPage() { IPage page = new Page(1, 5); bookDao.selectPage(page, null); }- 1
- 2
- 3
- 4
- 5
-
IPage对象中封装了分页操作中的所有数据
数据
当前页码值
每页数据总量
最大页码值
数据总量 -
分页操作是在MyBatisPlus的常规操作基础上增强得到,内部是动态的拼写SQL语句,因此需要增强对应的功能,
使用MyBatisPlus拦截器实现@Configuration
public class MybatisPlusConfig {@Bean public MybatisPlusInterceptor mybatisPlusInterceptor() { //1. 定义 Mp 拦截器 MybatisPlusInterceptor interceptor = new MybatisPlusInterceptor(); //2. 添加具体的拦截器 分页拦截器 interceptor.addInnerInterceptor(new PaginationInnerInterceptor()); return interceptor; }- 1
- 2
- 3
- 4
- 5
- 6
- 7
- 8
}
-
测试
@Test void testGetPage() { IPage page = new Page(1, 5); bookDao.selectPage(page, null); System.out.println(page.getCurrent()); System.out.println(page.getSize()); System.out.println(page.getPages()); System.out.println(page.getTotal()); System.out.println(page.getRecords()); }- 1
- 2
- 3
- 4
- 5
- 6
- 7
- 8
- 9
- 10

小结:- 使用IPage封装分页数据
- 分页操作依赖MyBatisPlus分页拦截器实现功能
- 借助MyBatisPlus日志查阅执行SQL语句
35-数据层标准开发(条件查询)
-
使用QueryWrapper对象封装查询条件,推荐使用LambdaQueryWrapper对象,所有查询操作封装成方法调用
@Test void testGetBy2() { LambdaQueryWrapperlambdaQueryWrapper = new LambdaQueryWrapper<>(); lambdaQueryWrapper.like(Book::getName, "Spring"); bookDao.selectList(lambdaQueryWrapper); } @Test void testGetBy() { QueryWrapper queryWrapper = new QueryWrapper<>(); queryWrapper.like("name", "Spring"); bookDao.selectList(queryWrapper); } - 1
- 2
- 3
- 4
- 5
- 6
- 7
- 8
- 9
- 10
- 11
- 12
- 13
- 14
-
支持动态拼写查询条件
@Test void testGetBy2() { String name = "1"; LambdaQueryWrapperlambdaQueryWrapper = new LambdaQueryWrapper<>(); //if (name != null) lambdaQueryWrapper.like(Book::getName,name); lambdaQueryWrapper.like(Strings.isNotEmpty(name), Book::getName, name); bookDao.selectList(lambdaQueryWrapper); } - 1
- 2
- 3
- 4
- 5
- 6
- 7
- 8

小结:
- 使用QueryWrapper对象封装查询条件
- 推荐使用LambdaQueryWrapper对象
- 所有查询操作封装成方法调用
- 查询条件支持动态条件拼装
36-业务层标准开发(基础CRUD)
-
Service层接口定义与数据层接口定义具有较大区别,不要混用
selectByUserNameAndPassword(String username,String password); 数据层接口
login(String username,String password); Service层接口 -
接口定义
public interface BookService {
Boolean save(Book book); Boolean update(Book book); Boolean delete(Integer id); Book getById(Integer id); ListgetAll(); IPage getPage(int currentPage,int pageSize); - 1
- 2
- 3
- 4
- 5
- 6
- 7
- 8
- 9
- 10
- 11
}
-
实现类定义
@Service
public class BookServiceImpl implements BookService {@Autowired private BookDao bookDao; @Override public Boolean save(Book book) { return bookDao.insert(book) > 0; } @Override public Boolean update(Book book) { return bookDao.updateById(book) > 0; } @Override public Boolean delete(Integer id) { return bookDao.deleteById(id) > 0; } @Override public Book getById(Integer id) { return bookDao.selectById(id); } @Override public ListgetAll() { return bookDao.selectList(null); } @Override public IPage getPage(int currentPage, int pageSize) { IPage page = new Page(currentPage, pageSize); bookDao.selectPage(page, null); return page; } - 1
- 2
- 3
- 4
- 5
- 6
- 7
- 8
- 9
- 10
- 11
- 12
- 13
- 14
- 15
- 16
- 17
- 18
- 19
- 20
- 21
- 22
- 23
- 24
- 25
- 26
- 27
- 28
- 29
- 30
- 31
- 32
- 33
- 34
}
-
测试类定义
@SpringBootTest
public class BookServiceTestCase {@Autowired private BookService bookService; @Test void testGetById() { System.out.println(bookService.getById(4)); } @Test void testSave() { Book book = new Book(); book.setType("测试数据123"); book.setName("测试数据123"); book.setDescription("测试数据123"); bookService.save(book); } @Test void testUpdate() { Book book = new Book(); book.setId(14); book.setType("测试数据asfd"); book.setName("测试数据123"); book.setDescription("测试数据123"); bookService.update(book); } @Test void testDelete() { bookService.delete(14); } @Test void testGetAll() { System.out.println(bookService.getAll()); } @Test void testGetPage() { IPagepage = bookService.getPage(2, 5); System.out.println(page.getCurrent()); System.out.println(page.getSize()); System.out.println(page.getPages()); System.out.println(page.getTotal()); System.out.println(page.getRecords()); } - 1
- 2
- 3
- 4
- 5
- 6
- 7
- 8
- 9
- 10
- 11
- 12
- 13
- 14
- 15
- 16
- 17
- 18
- 19
- 20
- 21
- 22
- 23
- 24
- 25
- 26
- 27
- 28
- 29
- 30
- 31
- 32
- 33
- 34
- 35
- 36
- 37
- 38
- 39
- 40
- 41
- 42
- 43
- 44
- 45
- 46
}
小结:
- Service接口名称定义成业务名称,并与Dao接口名称进行区分
- 制作测试类测试Service功能是否有效
37-业务层快速开发(基于MyBatisPlus构建)
-
快速开发方案
使用MyBatisPlus提供有业务层通用接口(ISerivce)与业务层通用实现类(ServiceImpl
在通用类基础上做功能重载或功能追加
注意重载时不要覆盖原始操作,避免原始提供的功能丢失

-
接口定义
public interface IBookService extends IService {
} -
接口追加功能
public interface IBookService extends IService {
// 追加的操作与原始操作通过名称区分,功能类似 Boolean delete(Integer id); Boolean insert(Book book); Boolean modify(Book book); Book get(Integer id);- 1
- 2
- 3
- 4
- 5
- 6
- 7
- 8
}

-
实现类定义
@Service
public class BookServiceImpl extends ServiceImpl
} -
实现类追加功能
@Service
public class BookServiceImpl extends ServiceImpl@Autowired private BookDao bookDao; public Boolean insert(Book book) { return bookDao.insert(book) > 0; } public Boolean modify(Book book) { return bookDao.updateById(book) > 0; } public Boolean delete(Integer id) { return bookDao.deleteById(id) > 0; } public Book get(Integer id) { return bookDao.selectById(id); }- 1
- 2
- 3
- 4
- 5
- 6
- 7
- 8
- 9
- 10
- 11
- 12
- 13
- 14
- 15
- 16
- 17
- 18
}
-
测试类定义
@SpringBootTest
public class BookServiceTest {@Autowired private IBookService bookService; @Test void testGetById() { System.out.println(bookService.getById(4)); } @Test void testSave() { Book book = new Book(); book.setType("测试数据123"); book.setName("测试数据123"); book.setDescription("测试数据123"); bookService.save(book); } @Test void testUpdate() { Book book = new Book(); book.setId(14); book.setType("==========="); book.setName("测试数据123"); book.setDescription("测试数据123"); bookService.updateById(book); } @Test void testDelete() { bookService.removeById(14); } @Test void testGetAll() { System.out.println(bookService.list()); } @Test void testGetPage() { IPagepage = new Page<>(2, 5); bookService.page(page); System.out.println(page.getCurrent()); System.out.println(page.getSize()); System.out.println(page.getPages()); System.out.println(page.getTotal()); System.out.println(page.getRecords()); } - 1
- 2
- 3
- 4
- 5
- 6
- 7
- 8
- 9
- 10
- 11
- 12
- 13
- 14
- 15
- 16
- 17
- 18
- 19
- 20
- 21
- 22
- 23
- 24
- 25
- 26
- 27
- 28
- 29
- 30
- 31
- 32
- 33
- 34
- 35
- 36
- 37
- 38
- 39
- 40
- 41
- 42
- 43
- 44
- 45
- 46
- 47
}
小结:
- 使用通用接口(ISerivce)快速开发Service
- 使用通用实现类(ServiceImpl
- 可以在通用接口基础上做功能重载或功能追加
- 注意重载时不要覆盖原始操作,避免原始提供的功能丢失
38-表现层标准开发
- 基于Restful进行表现层接口开发
- 使用Postman测试表现层接口功能
表现层开发
@RestController @RequestMapping("/books") public class BookController { @Autowired private IBookService bookService; @GetMapping public ListgetAll() { return bookService.list(); } @PostMapping public Boolean save(@RequestBody Book book) { return bookService.save(book); } @PutMapping public Boolean update(@RequestBody Book book) { return bookService.modify(book); } @DeleteMapping("{id}") public Boolean delete(@PathVariable Integer id) { return bookService.delete(id); } @GetMapping("{id}") public Book getById(@PathVariable Integer id) { return bookService.getById(id); } @GetMapping("{currentPage}/{pageSize}") public IPage getPage(@PathVariable Integer currentPage, @PathVariable int pageSize) { return bookService.getPage(currentPage, pageSize); } } - 1
- 2
- 3
- 4
- 5
- 6
- 7
- 8
- 9
- 10
- 11
- 12
- 13
- 14
- 15
- 16
- 17
- 18
- 19
- 20
- 21
- 22
- 23
- 24
- 25
- 26
- 27
- 28
- 29
- 30
- 31
- 32
- 33
- 34
- 35
- 36
- 37
- 38
添加 分页的业务层方法
IBookService
IPagegetPage(int currentPage,int pageSize); - 1
BookServiceImpl
@Override public IPagegetPage(int currentPage, int pageSize) { IPage page = new Page(currentPage, pageSize); bookDao.selectPage(page, null); return page; } - 1
- 2
- 3
- 4
- 5
- 6
- 7
- 8
功能测试


小结:- 基于Restful制作表现层接口
新增:POST
删除:DELETE
修改:PUT
查询:GET - 接收参数
实体数据:@RequestBody
路径变量:@PathVariable
39-表现层数据一致性处理(R对象)
-
之前的格式
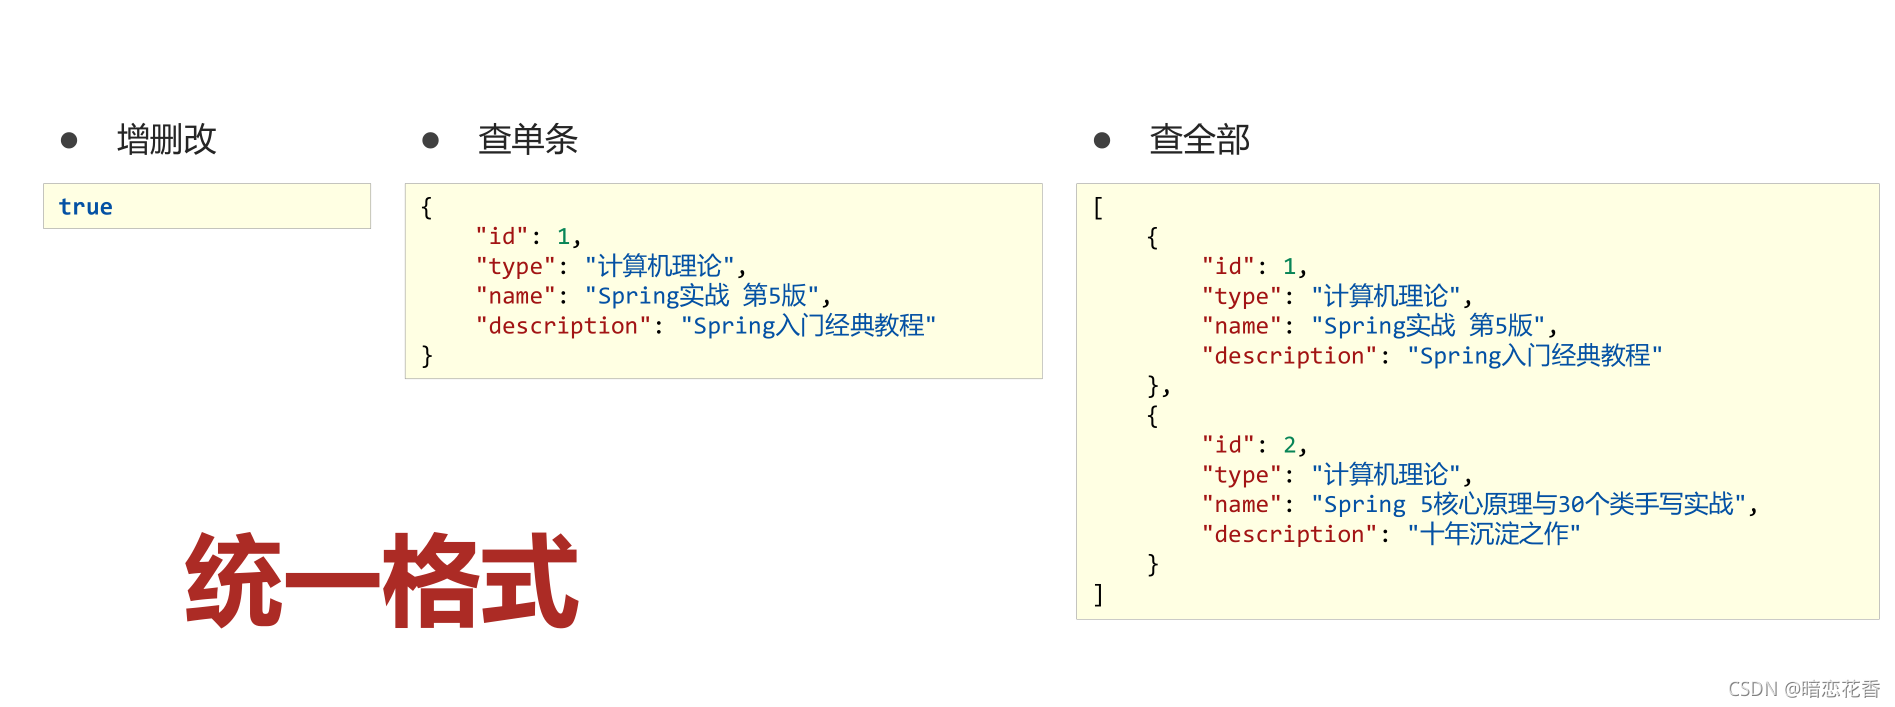
-
增加一个 data 属性,把数据全部封装到 data 里

当数据为 null 可能出现的问题- 查询id不存在的数据,返回 null
- 查询过程中抛出异常,catch 中返回 null
-
增加 一个状态属性

-
设计表现层返回结果的模型类,用于后端与前端进行数据格式统一,也称为前后端数据协议
@Data
public class R {
private Boolean flag;
private Object data;public R() { } /** * 不返回数据的构造方法 * * @param flag */ public R(Boolean flag) { this.flag = flag; } /** * 返回数据的构造方法 * * @param flag * @param data */ public R(Boolean flag, Object data) { this.flag = flag; this.data = data; }- 1
- 2
- 3
- 4
- 5
- 6
- 7
- 8
- 9
- 10
- 11
- 12
- 13
- 14
- 15
- 16
- 17
- 18
- 19
- 20
- 21
- 22
}
-
表现层接口统一返回值类型结果
@RestController
@RequestMapping(“/books”)
public class BookController {@Autowired private IBookService bookService; @GetMapping public R getAll() { return new R(true, bookService.list()); } @PostMapping public R save(@RequestBody Book book) { return new R(bookService.save(book)); } @PutMapping public R update(@RequestBody Book book) { return new R(bookService.modify(book)); } @DeleteMapping("{id}") public R delete(@PathVariable Integer id) { return new R(bookService.delete(id)); } @GetMapping("{id}") public R getById(@PathVariable Integer id) { return new R(true, bookService.getById(id)); } @GetMapping("{currentPage}/{pageSize}") public R getPage(@PathVariable Integer currentPage, @PathVariable int pageSize) { return new R(true, bookService.getPage(currentPage, pageSize)); }- 1
- 2
- 3
- 4
- 5
- 6
- 7
- 8
- 9
- 10
- 11
- 12
- 13
- 14
- 15
- 16
- 17
- 18
- 19
- 20
- 21
- 22
- 23
- 24
- 25
- 26
- 27
- 28
- 29
- 30
- 31
- 32
- 33
}

小结:
- 设计统一的返回值结果类型便于前端开发读取数据
- 返回值结果类型可以根据需求自行设定,没有固定格式
- 返回值结果模型类用于后端与前端进行数据格式统一,也称为前
后端数据协议
40-前后端调用(axios发送异步请求)
使用VUE的方法时提示报错:
Method definition shorthands are not supported by current JavaScript version
表示:该方法定义的缺陷是不支持当前的JavaScript版本,虽然可以程序可以正常运行,但是这个方法会出现红色的波浪线,很不爽
解决:
打开 File -> Settings -> Languages & Frameworks -> Javascript
把JavaScript版本为ECMAScript 6就可以了-
前后端分离结构设计中页面归属前端服务器
-
单体工程中页面放置在resources目录下的static目录中(建议执行clean)
-
前端发送异步请求,调用后端接口
//钩子函数,VUE对象初始化完成后自动执行 created() { //调用查询全部数据的操作 this.getAll(); }, //列表 getAll() { //发送异步请求 axios.get("/books").then((res)=>{ console.log(res.data); }) },- 1
- 2
- 3
- 4
- 5
- 6
- 7
- 8
- 9
- 10
- 11
- 12
- 13
- 14

小结:- 单体项目中页面放置在resources/static目录下
- created钩子函数用于初始化页面时发起调用
- 页面使用axios发送异步请求获取数据后确认前后端是否联通
41-列表功能
-
列表页
//列表 getAll() { //发送异步请求 axios.get("/books").then((res) => { //console.log(res.data); this.dataList = res.data.data; }) },- 1
- 2
- 3
- 4
- 5
- 6
- 7
- 8

小结:
- 将查询数据返回到页面,利用前端数据双向绑定进行数据展示
42-添加功能
-
弹出添加窗口
// 弹出添加窗口
handleCreate() {
this.dialogFormVisible = true;
}, -
清除数据
//重置表单
resetForm() {
this.formData = {};
}, -
在弹出添加窗口时 清除数据
//弹出添加窗口
handleCreate() {
this.dialogFormVisible = true;
this.resetForm();
}, -
发送添加请求
//添加
handleAdd() {
axios.post(“/books”, this.formData).then((res) => {
//判断当前操作是否成功
if (res.data.flag) {
//1.关闭弹层
this.dialogFormVisible = false;
this.KaTeX parse error: Expected 'EOF', got '}' at position 37: …"); }̲ else { …message.error(“添加失败”);
}
}).finally(() => {
//2.重新加载数据
this.getAll();
})
}, -
取消添加
//取消
cancel() {
//1.关闭弹层
this.dialogFormVisible = false;
//2.提示用户
this.$message.info(“当前操作取消”);
},
小结:
- 请求方式使用POST调用后台对应操作
- 添加操作结束后动态刷新页面加载数据
- 根据操作结果不同,显示对应的提示信息
- 弹出添加Div时清除表单数据
43-删除功能
-
删除
// 删除
handleDelete(row) {
axios.delete(“/books/” + row.id).then((res) => {
if (res.data.flag) {
this.KaTeX parse error: Expected 'EOF', got '}' at position 36: …功"); }̲ else { …message.error(“删除失败”);
}
}).finally(() => {
this.getAll();
});
} -
加入确认删除对话框
// 删除
handleDelete(row) {
//1. 弹出提示框
this.KaTeX parse error: Expected '}', got 'EOF' at end of input: … this.message.success(“删除成功”);
} else {
this.KaTeX parse error: Expected 'EOF', got '}' at position 39: … }̲ }).…message.info(“取消操作”);
});},
小结:
- 请求方式使用Delete调用后台对应操作
- 删除操作需要传递当前行数据对应的id值到后台
- 删除操作结束后动态刷新页面加载数据
- 根据操作结果不同,显示对应的提示信息
- 删除操作前弹出提示框避免误操作
44修改功能(加载数据)
-
弹出修改窗口
//弹出编辑窗口
handleUpdate(row) {
axios.get(“/books/” + row.id).then((res) => {
if (res.data.flag && res.data.data != null) {
// 展示弹层,加载数据
this.dialogFormVisible4Edit = true;
this.formData = res.data.data;
} else {
this.$message.error(“数据同步失败,自动刷新”);
}
}).finally(() => {
//重新加载数据
this.getAll();
});
}, -
删除消息维护
// 删除
handleDelete(row) {
//1. 弹出提示框
this.KaTeX parse error: Expected '}', got 'EOF' at end of input: … this.message.success(“删除成功”);
} else {
this.KaTeX parse error: Expected 'EOF', got '}' at position 46: … }̲ }).…message.info(“取消操作”);
});},
小结:
- 加载要修改数据通过传递当前行数据对应的id值到后台查询数据
- 利用前端数据双向绑定将查询到的数据进行回显
45-修改功能
-
修改
//修改
handleEdit() {
axios.put(“/books”, this.formData).then((res) => {
//判断当前操作是否成功
if (res.data.flag) {
//1.关闭弹层
this.dialogFormVisible4Edit = false;
this.KaTeX parse error: Expected 'EOF', got '}' at position 36: …功"); }̲ else { …message.error(“修改失败”);
}
}).finally(() => {
//2.重新加载数据
this.getAll();
});
}, -
取消添加和修改
//取消
cancel() {
//1.关闭弹层
this.dialogFormVisible = false;
this.dialogFormVisible4Edit = false;
//2.提示用户
this.$message.info(“当前操作取消”);
},
小结:
- 请求方式使用PUT调用后台对应操作
- 修改操作结束后动态刷新页面加载数据(同新增)
- 根据操作结果不同,显示对应的提示信息(同新增)
46-异常消息处理
-
业务操作成功或失败返回数据格式
{
“flag”: true,
“data”: null
}{
“flag”: false,
“data”: null
} -
后台代码BUG导致数据格式不统一性
{
“timestamp”: “2021-11-07T12:44:29.343+00:00”,
“status”: 500,
“error”: “Internal Server Error”,
“path”: “/books”
} -
对异常进行统一处理,出现异常后,返回指定信息
@RestControllerAdvice
public class ProjectExceptionAdvice {//拦截所有的异常信息 @ExceptionHandler(Exception.class) public R doException(Exception ex) { // 记录日志 // 发送消息给运维 // 发送邮件给开发人员 ,ex 对象发送给开发人员 ex.printStackTrace(); return new R(false, null, "系统错误,请稍后再试!"); }- 1
- 2
- 3
- 4
- 5
- 6
- 7
- 8
- 9
}
-
修改表现层返回结果的模型类,封装出现异常后对应的信息
flag:false
Data: null
消息(msg): 要显示信息@Data
public class R{
private Boolean flag;
private Object data;
private String msg;
public R(Boolean flag,Object data,String msg){
this.flag = flag;
this.data = data;
this.msg = msg;
}
} -
页面消息处理,没有传递消息加载默认消息,传递消息后加载指定消息
//添加
handleAdd() {
axios.post(“/books”, this.formData).then((res) => {
//判断当前操作是否成功
if (res.data.flag) {
//1.关闭弹层
this.dialogFormVisible = false;
this.KaTeX parse error: Expected 'EOF', got '}' at position 36: …功"); }̲ else { …message.error(res.data.msg);
}
}).finally(() => {
//2.重新加载数据
this.getAll();
})
}, -
可以在表现层Controller中进行消息统一处理
@PostMapping public R save(@RequestBody Book book) throws IOException { //if (book.getName().equals("123")) throw new IOException(); boolean flag = bookService.save(book); return new R(flag, flag ? "添加成功^_^" : "添加失败-_-!"); }- 1
- 2
- 3
- 4
- 5
- 6
-
页面消息处理
//添加
handleAdd() {
axios.post(“/books”, this.formData).then((res) => {
//判断当前操作是否成功
if (res.data.flag) {
//1.关闭弹层
this.dialogFormVisible = false;
this.KaTeX parse error: Expected 'EOF', got '}' at position 42: …sg); }̲ else { …message.error(res.data.msg);
}
}).finally(() => {
//2.重新加载数据
this.getAll();
})
},
小结:
- 使用注解@RestControllerAdvice定义SpringMVC异常处理器用来处理异常的
- 异常处理器必须被扫描加载,否则无法生效
- 表现层返回结果的模型类中添加消息属性用来传递消息到页面
47-分页
-
页面使用 el 分页组件添加分页功能
- 1
- 2
- 3
- 4
- 5
- 6
- 7
- 8
- 9
- 10
- 11
- 12
- 13
- 14
-
定义分页组件需要使用的数据并将数据绑定到分页组件
data: {
pagination: { // 分页相关模型数据
currentPage: 1, // 当前页码
pageSize: 10, // 每页显示的记录数
total: 0, // 总记录数
}
}, -
替换查询全部功能为分页功能
getAll() {
axios.get(“/books/” + this.pagination.currentPage + “/” + this.pagination.pageSize).then((res) => {});
}, -
分页查询
使用路径参数传递分页数据或封装对象传递数据@GetMapping("{currentPage}/{pageSize}") public R getPage(@PathVariable Integer currentPage, @PathVariable int pageSize) { return new R(true, bookService.getPage(currentPage, pageSize)); }- 1
- 2
- 3
- 4
-
加载分页数据
//分页查询 getAll() { //发送异步请求 axios.get("/books/" + this.pagination.currentPage + "/" + this.pagination.pageSize).then((res) => { //console.log(res.data); this.pagination.currentPage = res.data.data.current; this.pagination.pageSize = res.data.data.size; this.pagination.total = res.data.data.total; this.dataList = res.data.data.records; }) },- 1
- 2
- 3
- 4
- 5
- 6
- 7
- 8
- 9
- 10
- 11
- 12
-
分页页码值切换
//切换页码
handleCurrentChange(currentPage) {
//修改页码值为当前选中的页码值
this.pagination.currentPage = currentPage;
//执行查询
this.getAll();
},
小结:
- 使用el分页组件
- 定义分页组件绑定的数据模型
- 异步调用获取分页数据
- 分页数据页面回显
48-分页功能维护(删除BUG)
-
对查询结果进行校验,如果当前页码值大于最大页码值,使用最大页码值作为当前页码值重新查询
@GetMapping("{currentPage}/{pageSize}") public R getPage(@PathVariable Integer currentPage, @PathVariable int pageSize) { IPagepage = bookService.getPage(currentPage, pageSize); // 如果当前页码值大于了总页码值,那么重新执行查询操作,使用最大页码值作为当前页码值 if (currentPage > page.getPages()) { page = bookService.getPage((int) page.getPages(), pageSize); } return new R(true, page); } - 1
- 2
- 3
- 4
- 5
- 6
- 7
- 8
- 9
小结:
- 基于业务需求维护删除功能
49-条件查询
-
查询条件数据封装
单独封装
与分页操作混合封装pagination: {//分页相关模型数据
currentPage: 1,//当前页码
pageSize: 10,//每页显示的记录数
total: 0,//总记录数
type: “”,
name: “”,
description: “”
} -
页面数据模型绑定
小结:
- 定义查询条件数据模型(当前封装到分页数据模型中)
- 异步调用分页功能并通过请求参数传递数据到后台
50-基础篇完结
基于SpringBoot的SSMP整合案例
- pom.xml
配置起步依赖 - application.yml
设置数据源、端口、框架技术相关配置等 - dao
继承BaseMapper、设置@Mapper - dao测试类
- service
调用数据层接口或MyBatis-Plus提供的接口快速开发 - service测试类
- controller
基于Restful开发,使用Postman测试跑通功能 - 页面
放置在resources目录下的static目录中
总结:
- 整合JUint
- 整合MyBatis
- 整合MyBatis-Plus
- 整合Druid
- 基于SpringBoot的SSMP整合案例
后续学习
- 基础篇
- 能够创建SpringBoot工程
- 基于SpringBoot实现ssm/ssmp整合
- 实用篇
- 运维实用篇 Spring Boot 2 运维实用篇学习笔记
- 能够掌握SpringBoot程序多环境开发
- 能够基于Linux系统发布SpringBoot工程
- 能够解决线上灵活配置SpringBoot工程的需求
- 开发实用篇 实用篇
- 能够基于SpringBoot整合任意第三方技术
- 运维实用篇 Spring Boot 2 运维实用篇学习笔记
- 原理篇
先自我介绍一下,小编13年上师交大毕业,曾经在小公司待过,去过华为OPPO等大厂,18年进入阿里,直到现在。深知大多数初中级java工程师,想要升技能,往往是需要自己摸索成长或是报班学习,但对于培训机构动则近万元的学费,着实压力不小。自己不成体系的自学效率很低又漫长,而且容易碰到天花板技术停止不前。因此我收集了一份《java开发全套学习资料》送给大家,初衷也很简单,就是希望帮助到想自学又不知道该从何学起的朋友,同时减轻大家的负担。添加下方名片,即可获取全套学习资料哦
-
相关阅读:
千古第一文人苏轼的众CP
Java流式编程的使用
掌动智能:UI自动化测试工具产品功能和优势
几个不错的开源项目
机器学习----模型及算法01
《C++进阶--11.文件操作》
Django — 介绍和搭建
linux防火墙查看状态firewall、iptable
MySQL学习(四)——事务与存储引擎
[极致用户体验] 为什么建议2022年不用“等比设计稿“+rem,而用“灵活设计稿“+px
- 原文地址:https://blog.csdn.net/m0_54850467/article/details/126114071
