-
SpringBoot教程(十六) SpringBoot集成swagger(全网最全)
一. 接口文档概述
swagger是当下比较流行的实时接口文文档生成工具。接口文档是当前前后端分离项目中必不可少的工具,在前后端开发之前,后端要先出接口文档,前端根据接口文档来进行项目的开发,双方开发结束后在进行联调测试。
所以接口文档其实就是开发之前双方之间的一种约定。通常接口文档分为离线的和实时的。离线的接口文档工具有: word(相当于没说), YAPI, 小幺鸡等,这种文档需要程序员在上面编写,也一般具备接口测试功能。通常是由开发人员先在离线接口文档上编写信息,然后交给前端人员参照开发。最大的弊端是当我们的接口程序发生变动时,需要回过头来维护上面的内容,很麻烦,是真的麻烦。
实时接口文档就是可以根据我们的代码来自动生成相应的接口文档,优点就是我们的代码发生变化时,生成的接口文档也会自动更新,无需我们关注修改,主需要按时发布即可。但是由于是根据代码自动生成的,所以最大的弊端就是代码侵入性强,需要我们在项目代码中集成生成接口文档的相关代码。实时接口文档现在的方案有很多,但是swagger还是其中比较有影响力的一个。
二. SpringBoot集成swagger2
官网地址: swagger.io 当然,官网都是英文的,看起来还是比较麻烦的。建议大家直接按照我的步骤来,还是很简单的。
同时在说一点: swagger分为swagger2 和swagger3两个常用版本。二者区别不是很大,主要对于依赖和注解进行了优化。swagger2需要引入2个jar包,swagger3只需要一个,用起来没有什么大的区别。下面以swagger2为例。
2.1 引入依赖
io.springfox springfox-swagger2 2.9.2 io.springfox springfox-swagger-ui 2.9.2 - 1
- 2
- 3
- 4
- 5
- 6
- 7
- 8
- 9
- 10
2.2 引入配置
首先需要添加一个注解 : @EnableSwagger2。 这个注解我们可以添加到SpringBoot的启动类上,也可以自定义一个配置类,放到上面。添加了这个注解以后,就代表我们已经在项目中开启了Swagger的功能。
我们采用第二种方式,自己定义一个配置类,正好还可以添加一个Docket配置。 所谓Docket配置,就是一组(一个项目或一个版本)接口文档的配置,比如设置名称, 联系人等等。
我们在config文件夹下,添加一个SwaggerConfig类。
@Configuration @EnableSwagger2 public class SwaggerConfig { /** * 设置多个: * * @Bean * public Docket appApi() { * * Listpars = new ArrayList<>(); * ParameterBuilder token = new ParameterBuilder(); * token.name("token").description("用户令牌").modelRef(new ModelRef("string")).parameterType("header").required(false) * .build(); * pars.add(token.build()); * * return new Docket(DocumentationType.SWAGGER_2).select().paths(regex("/app/.*")).build() * .globalOperationParameters(pars).apiInfo(pdaApiInfo()).useDefaultResponseMessages(false) * .enable(enableSwagger) * .groupName("appApi"); * * } * * @Bean * public Docket adminApi() { * * List pars = new ArrayList<>(); * ParameterBuilder token = new ParameterBuilder(); * token.name("token").description("用户令牌").modelRef(new ModelRef("string")).parameterType("header").required(false) * .build(); * pars.add(token.build()); * return new Docket(DocumentationType.SWAGGER_2).select().paths(regex("/admin/.*")).build() * .globalOperationParameters(pars).apiInfo(pdaApiInfo()).useDefaultResponseMessages(false) * .enable(enableSwagger) * .groupName("adminApi"); * * } * * * @return */ @Bean public Docket createRestApi() { return new Docket(DocumentationType.SWAGGER_2).apiInfo(apiInfo()).select() .apis(RequestHandlerSelectors.basePackage("com.lsqingfeng.action.swagger.controller")).paths(PathSelectors.any()) .build().globalOperationParameters(setHeaderToken()); } private ApiInfo apiInfo() { return new ApiInfoBuilder().title("action-swagger").description("swagger实战").termsOfServiceUrl("") .version("1.0").build(); } /** * @Description: 设置swagger文档中全局参数 * @param * @Date: 2020/9/11 10:15 * @return: java.util.List */ private List setHeaderToken() { List pars = new ArrayList<>(); ParameterBuilder userId = new ParameterBuilder(); userId.name("token").description("用户TOKEN").modelRef(new ModelRef("string")).parameterType("header") .required(true).build(); pars.add(userId.build()); return pars; } } 复制代码 - 1
- 2
- 3
- 4
- 5
- 6
- 7
- 8
- 9
- 10
- 11
- 12
- 13
- 14
- 15
- 16
- 17
- 18
- 19
- 20
- 21
- 22
- 23
- 24
- 25
- 26
- 27
- 28
- 29
- 30
- 31
- 32
- 33
- 34
- 35
- 36
- 37
- 38
- 39
- 40
- 41
- 42
- 43
- 44
- 45
- 46
- 47
- 48
- 49
- 50
- 51
- 52
- 53
- 54
- 55
- 56
- 57
- 58
- 59
- 60
- 61
- 62
- 63
- 64
- 65
- 66
- 67
- 68
- 69
- 70
- 71
- 72
- 73
上面就是一个配置案例, 还设置了一个setToken方法,代表生成文档的所有接口中,都要包含一个header类型的token参数。
2.3 给Controller 添加注解
我们接口文档的直接描述主要就是在Controller这一层,比如这个接口的功能,参数的名称,返回值的名称等。这些值我们都需要在Controller上通过给方法上,请求参数和返回参数上添加对应的注解,swagger才能帮我们生成相应的接口文档。这也就是我前面提到的对现有代码的侵入性。
我们来写一个案例。
首先先创建一个vo的包,里边写我们的请求和相应参数,使用JavaBean定义出请求和响应的数据结构。注意这里要添加相应的注解:
请求类:
package com.lsqingfeng.springboot.vo; import io.swagger.annotations.ApiModel; import io.swagger.annotations.ApiModelProperty; import lombok.Data; /** * @className: SwaggerReqVO * @description: * @author: sh.Liu * @date: 2022-03-22 19:19 */ @Data @ApiModel("创建Swagger请求参数") public class SwaggerReqVO { @ApiModelProperty("id") private Integer id; @ApiModelProperty("姓名") private String name; @ApiModelProperty("性别") private Integer gender; }- 1
- 2
- 3
- 4
- 5
- 6
- 7
- 8
- 9
- 10
- 11
- 12
- 13
- 14
- 15
- 16
- 17
- 18
- 19
- 20
- 21
- 22
- 23
- 24
- 25
响应类:
package com.lsqingfeng.springboot.vo; import io.swagger.annotations.ApiModel; import io.swagger.annotations.ApiModelProperty; import lombok.Data; /** * @className: SwaggerResVO * @description: * @author: sh.Liu * @date: 2022-03-22 19:20 */ @Data @ApiModel("创建Swagger响应结果") public class SwaggerResVO { @ApiModelProperty("id") private Integer id; @ApiModelProperty("姓名") private String name; @ApiModelProperty("性别") private Integer gender; @ApiModelProperty("啥啥") private String what; }- 1
- 2
- 3
- 4
- 5
- 6
- 7
- 8
- 9
- 10
- 11
- 12
- 13
- 14
- 15
- 16
- 17
- 18
- 19
- 20
- 21
- 22
- 23
- 24
- 25
- 26
- 27
- 28
这里分别使用了 @ApiModel注解和 @@ApiModelProperty 注解定义了实体的名称和字段的名称,方便生成接口文档时展示。
再来看Controller:
package com.lsqingfeng.springboot.controller; import com.lsqingfeng.springboot.vo.SwaggerReqVO; import com.lsqingfeng.springboot.vo.SwaggerResVO; import io.swagger.annotations.Api; import io.swagger.annotations.ApiOperation; import org.springframework.web.bind.annotation.*; /** * @className: SwaggerController * @description: swagger 接口测试 * @author: sh.Liu * @date: 2022-03-22 19:18 */ @RestController @RequestMapping("/swagger") @Api(value = "用户接口", tags = {"用户接口"}) public class SwaggerController { @ApiOperation("新增用户") @PostMapping("save") public String save(@RequestBody SwaggerReqVO req) { return "success"; } @GetMapping("getById") @ApiOperation("根据条件查询用户") public SwaggerResVO getById(@RequestBody SwaggerResVO req) { return new SwaggerResVO(); } }- 1
- 2
- 3
- 4
- 5
- 6
- 7
- 8
- 9
- 10
- 11
- 12
- 13
- 14
- 15
- 16
- 17
- 18
- 19
- 20
- 21
- 22
- 23
- 24
- 25
- 26
- 27
- 28
- 29
- 30
- 31
这里使用了@Api注解和 @ApiOperation注解分别标注了接口组名和接口的名称。现在我们启动项目。

发现报了这个错误。
上网查询原因说是SpringBoot2.6版本和Swagger2.9.2不兼容导致的。 也有人说是由于guava这个包的版本过低导致的。
我都分别试了一下,替换了guava的高版本依赖问题还是存在。
这个问题的主要原因确实是SpringBoot版本过高导致。如果你用的是SpringBoot2.5.x及之前版本是没有问题的。
Spring Boot 2.6.X使用PathPatternMatcher匹配路径,Swagger引用的Springfox使用的路径匹配是基于AntPathMatcher的。
所以要想解决,添加配置,将springBoot MVC的路劲匹配模式修改一下即可。
在springBoot配置文件中添加配置:
spring.mvc.pathmatch.matching-strategy=ANT_PATH_MATCHER- 1
如果是yml格式的配置文件:

再次启动问题解决。
访问地址: ip:端口号/swagger-ui.html
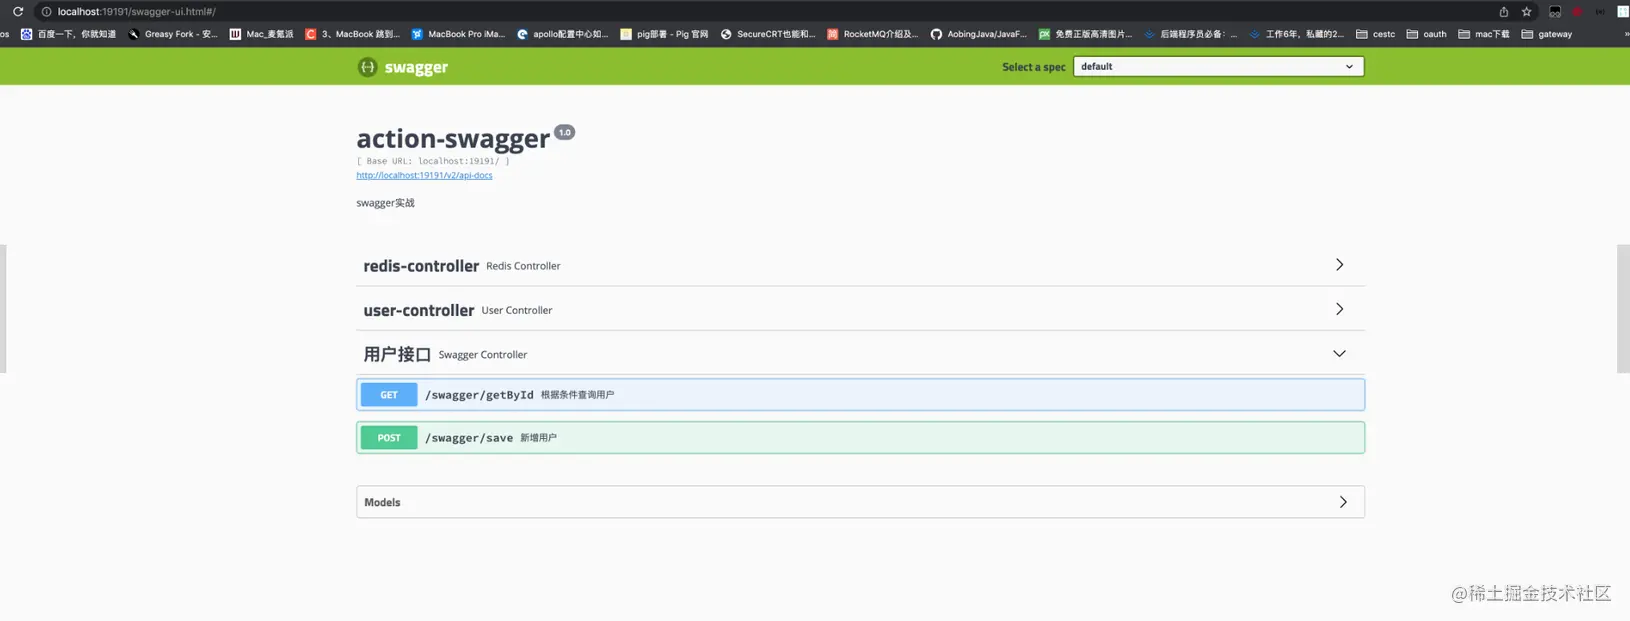
正常情况就可以看到我们的界面了。一会再说非正常情况。由于我们只给用户接口添加了注解,所有用户接口是可以直接观察中文文档的。而剩下的两个接口,由于没添加注解,所以都是以默认的形式展示的。
点开接口,我们可以看到接口中的想详细信息

点击model,可以看到字段的中文描述。点击 Try it out,就可以直接调试接口。同时注意接口中都让填一个token,这就是我们之前的设置成效了。

截止到目前其实swagger的集成就已经完毕了,主要就是根据我们的注解生成文档,并且可以在线调用调试。开发的时候,我们只需要把Controller这一层的请求和响应,以及方法描述等内容先开发完毕,就可以提供给前端让他们参照开发了。
2.4 [404]问题解决
正常情况我们按照上面的步骤就可以出现页面,但是有些时候可能是由于springBoot的版本过高导致的,我们输入之前的地址,出现404的情况,这个主要是由于项目中无法读取到swagger依赖包下的页面导致的。如果出现了这个问题,我们可以添加一个配置类,让他实现WebMvcConfigurer 接口,在添加一个方法:
@Override public void addResourceHandlers(ResourceHandlerRegistry registry) { registry.addResourceHandler("/**").addResourceLocations("classpath:/static/"); registry.addResourceHandler("swagger-ui.html") .addResourceLocations("classpath:/META-INF/resources/"); registry.addResourceHandler("/webjars/**") .addResourceLocations("classpath:/META-INF/resources/webjars/"); }- 1
- 2
- 3
- 4
- 5
- 6
- 7
- 8
完整代码如下:
package com.lsqingfeng.springboot.config; import com.lsqingfeng.springboot.interceptor.TokenInterceptor; import org.springframework.context.annotation.Bean; import org.springframework.context.annotation.Configuration; import org.springframework.web.servlet.config.annotation.InterceptorRegistry; import org.springframework.web.servlet.config.annotation.ResourceHandlerRegistry; import org.springframework.web.servlet.config.annotation.WebMvcConfigurer; /** * @className: WebMvcConfig * @description:webMvc配置 * @author: sh.Liu * @date: 2022-01-13 09:51 */ @Configuration public class WebMvcConfig implements WebMvcConfigurer { @Override public void addResourceHandlers(ResourceHandlerRegistry registry) { registry.addResourceHandler("/**").addResourceLocations("classpath:/static/"); registry.addResourceHandler("swagger-ui.html") .addResourceLocations("classpath:/META-INF/resources/"); registry.addResourceHandler("/webjars/**") .addResourceLocations("classpath:/META-INF/resources/webjars/"); } }- 1
- 2
- 3
- 4
- 5
- 6
- 7
- 8
- 9
- 10
- 11
- 12
- 13
- 14
- 15
- 16
- 17
- 18
- 19
- 20
- 21
- 22
- 23
- 24
- 25
- 26
- 27
- 28
这个时候在启动就可以了!
2.5 替换UI
上面的整个过程已经完成了,但是生成的接口文档的页面,其实很多人不太喜欢,觉得不太符合国人的使用习惯,所有又有一些大神,提供了其他的UI测试页面。这个页面的使用还是比较广泛的。
修改方式:只需引入一个依赖包:
com.github.xiaoymin swagger-bootstrap-ui 1.9.6 - 1
- 2
- 3
- 4
- 5
然后把刚才实现的那个的那个方法再添加一条:
registry.addResourceHandler("doc.html") .addResourceLocations("classpath:/META-INF/resources/");- 1
- 2
完成代码:
package com.lsqingfeng.springboot.config; import com.lsqingfeng.springboot.interceptor.TokenInterceptor; import org.springframework.context.annotation.Bean; import org.springframework.context.annotation.Configuration; import org.springframework.web.servlet.config.annotation.InterceptorRegistry; import org.springframework.web.servlet.config.annotation.ResourceHandlerRegistry; import org.springframework.web.servlet.config.annotation.WebMvcConfigurer; /** * @className: WebMvcConfig * @description:webMvc配置 * @author: sh.Liu * @date: 2022-01-13 09:51 */ @Configuration public class WebMvcConfig implements WebMvcConfigurer { // @Override // public void addInterceptors(InterceptorRegistry registry) { // //拦截 // registry.addInterceptor(new TokenInterceptor()) // .addPathPatterns("/**") // .excludePathPatterns("/login"); // } @Override public void addResourceHandlers(ResourceHandlerRegistry registry) { registry.addResourceHandler("/**").addResourceLocations("classpath:/static/"); registry.addResourceHandler("swagger-ui.html") .addResourceLocations("classpath:/META-INF/resources/"); registry.addResourceHandler("/webjars/**") .addResourceLocations("classpath:/META-INF/resources/webjars/"); registry.addResourceHandler("doc.html") .addResourceLocations("classpath:/META-INF/resources/"); } }- 1
- 2
- 3
- 4
- 5
- 6
- 7
- 8
- 9
- 10
- 11
- 12
- 13
- 14
- 15
- 16
- 17
- 18
- 19
- 20
- 21
- 22
- 23
- 24
- 25
- 26
- 27
- 28
- 29
- 30
- 31
- 32
- 33
- 34
- 35
- 36
- 37
重新启动项目: 访问路径发生了变化:** ip:端口号/doc.html**

页面出现了。我们在看看我们的用户接口:

这个风格确实更加的直观,同时也是可以直接进行调试的。大部分的swagger都用的这个风格的文档。
三. SpringBoot集成swagger3
上面已经很详细的讲解了swagger2的集成方式,而swagger3的集成方式更加的简洁一些。
首先引入依赖:
io.springfox springfox-boot-starter 3.0.0 - 1
- 2
- 3
- 4
- 5
然后是替换注解: swagger2使用的开启注解是: @EnableSwagger2
而在swagger3中,这个注解要换成: @EnableOpenApi
配置类:
import org.springframework.context.annotation.Bean; import org.springframework.context.annotation.Configuration; import springfox.documentation.builders.RequestHandlerSelectors; import springfox.documentation.oas.annotations.EnableOpenApi; import springfox.documentation.spi.DocumentationType; import springfox.documentation.spring.web.plugins.Docket; @Configuration public class SwaggerConfig { @Bean public Docket createRestApi() { return new Docket(DocumentationType.OAS_30) // v2 不同 .select() .apis(RequestHandlerSelectors.basePackage("com.example.swaggerv3.controller")) // 设置扫描路径 .build(); } }- 1
- 2
- 3
- 4
- 5
- 6
- 7
- 8
- 9
- 10
- 11
- 12
- 13
- 14
- 15
- 16
- 17
要注意,里边的版本类型换成了 OAS_30, 就是swagger3的意思。
OAS 是 OpenAPI Specification 的简称,翻译成中文就是 OpenAPI 说明书。
同时访问地址:原始地址,也就是没换UI的地址: localhost:8080/swagger-ui/index.html这个要和swagger2区分开。
swagger3的原始UI风格也发生了一些变化:

同时swagger3也是可以更换UI的。方法和swagger2一样。
四. swaggerUI 拦截器和跨域冲突处理
如果我们的项目中有关于跨域的处理,同时还有拦截器,然后还要使用swagger,这种情况大家要注意了,有可能我们的拦截器会将swagger中的页面路径拦截掉导致swagger页面出不来,当我们在拦截器中把swagger的页面排除掉的时候,也有可能会导致跨域配置的失效。
详细的解决方案可以看我之前写过的一篇博客: lsqingfeng.blog.csdn.net/article/det…
具体解决方案简单提一下:
拦截器:
/** * 拦截器配置 * * @author liuShuai */ @Configuration public class InterceptorConfig implements WebMvcConfigurer { @Bean public TokenInterceptor tokenInterceptor() { return new TokenInterceptor(); } @Override public void addInterceptors(InterceptorRegistry registry) { registry .addInterceptor(tokenInterceptor()) .addPathPatterns("/**") .excludePathPatterns("/user/login") .excludePathPatterns("/user/downloadExcel") .excludePathPatterns("/swagger-resources/**", "/webjars/**", "/v2/**", "/swagger-ui.html/**"); } @Override public void addResourceHandlers(ResourceHandlerRegistry registry) { registry.addResourceHandler("swagger-ui.html") .addResourceLocations("classpath:/META-INF/resources/"); registry.addResourceHandler("/webjars/**") .addResourceLocations("classpath:/META-INF/resources/webjars/"); } }- 1
- 2
- 3
- 4
- 5
- 6
- 7
- 8
- 9
- 10
- 11
- 12
- 13
- 14
- 15
- 16
- 17
- 18
- 19
- 20
- 21
- 22
- 23
- 24
- 25
- 26
- 27
- 28
- 29
- 30
- 31
- 32
跨域配置:
import org.springframework.context.annotation.Bean; import org.springframework.context.annotation.Configuration; import org.springframework.web.cors.CorsConfiguration; import org.springframework.web.cors.UrlBasedCorsConfigurationSource; import org.springframework.web.filter.CorsFilter; /** * @className: CorsConfig * @description: * @author: sh.Liu * @date: 2020-12-02 10:16 */ @Configuration public class CorsConfig { @Bean public CorsFilter corsFilter() { CorsConfiguration config = new CorsConfiguration(); config.addAllowedOrigin("*"); config.setAllowCredentials(true); config.addAllowedMethod("*"); config.addAllowedHeader("*"); UrlBasedCorsConfigurationSource configSource = new UrlBasedCorsConfigurationSource(); configSource.registerCorsConfiguration("/**", config); return new CorsFilter(configSource); } }- 1
- 2
- 3
- 4
- 5
- 6
- 7
- 8
- 9
- 10
- 11
- 12
- 13
- 14
- 15
- 16
- 17
- 18
- 19
- 20
- 21
- 22
- 23
- 24
- 25
- 26
- 27
用这两种方式去配置,就可以让他们和平共处了。
另: 配套项目代码已托管中gitCode: gitcode.net/lsqingfeng/…
分支: feautre/MybatisPlus
所有文章也会在微信公众号首发更新,欢迎关注:
五. 写在最后
截止到本篇文章,关于SpringBoot的系列学习笔记已经更新了十六篇,也基本上要和大家说再见了。感谢大家的一路支持。这十六篇文章主要面向SpringBoot的实战性学习上,基本很少会介绍一些原理性的概念。也已经集成目前大部分主流的框架和中间件。如果大家对于Spring中一些生命周期,初始化过程,类加载原理和常用注解不太了解(因为这一个部分很少介绍),建议大家结合我之前写的Spring5系列教程一起学习,里边介绍了Spring IOC和AOP的核心概念。
这个系列的教程就更新到这里了,后面可能就不会在继续更新这个系列了。下个目标,我可能准备写一个SpringCloud的系列教程,主要针对alibaba版本中的一些组件用法。但是由于最近公司比较忙,可能更新的会比较慢。希望大家多多支持。
心怀感恩,不说再见,咱们下个系列见!
先自我介绍一下,小编13年上师交大毕业,曾经在小公司待过,去过华为OPPO等大厂,18年进入阿里,直到现在。深知大多数初中级java工程师,想要升技能,往往是需要自己摸索成长或是报班学习,但对于培训机构动则近万元的学费,着实压力不小。自己不成体系的自学效率很低又漫长,而且容易碰到天花板技术停止不前。因此我收集了一份《java开发全套学习资料》送给大家,初衷也很简单,就是希望帮助到想自学又不知道该从何学起的朋友,同时减轻大家的负担。添加下方名片,即可获取全套学习资料哦
-
相关阅读:
Codeforces 348B 思维
免费开源的积分商城系统_积分商城的功能逻辑_OctShop
Bootstrap的导航栏设计相关知识
【Bluetooth|蓝牙开发】一、开篇词 | 打造全网最详细的Bluetooth开发教程
Pytorch学习之路 - CNN
598. 范围求和 II (脑筋急转弯)
java版直播商城平台规划及常见的营销模式有哪些?
AI数字人软件系统开发框架
帮帮我,我不知道问题出现在哪里了
Labs‘Codes review(AVR)(3)
- 原文地址:https://blog.csdn.net/m0_67402013/article/details/126114745
