-
SocketIO介绍+SpringBoot整合SocketIO完成实时通信
Socket.IO笔记
即时通信是基于TCP长连接,建立连接之后,客户段/服务器可以无限次随时向对端发送数据,实现服务器数据发送的即时性
HTTP
HTTP是短链接,设计的目的是减少服务器的压力
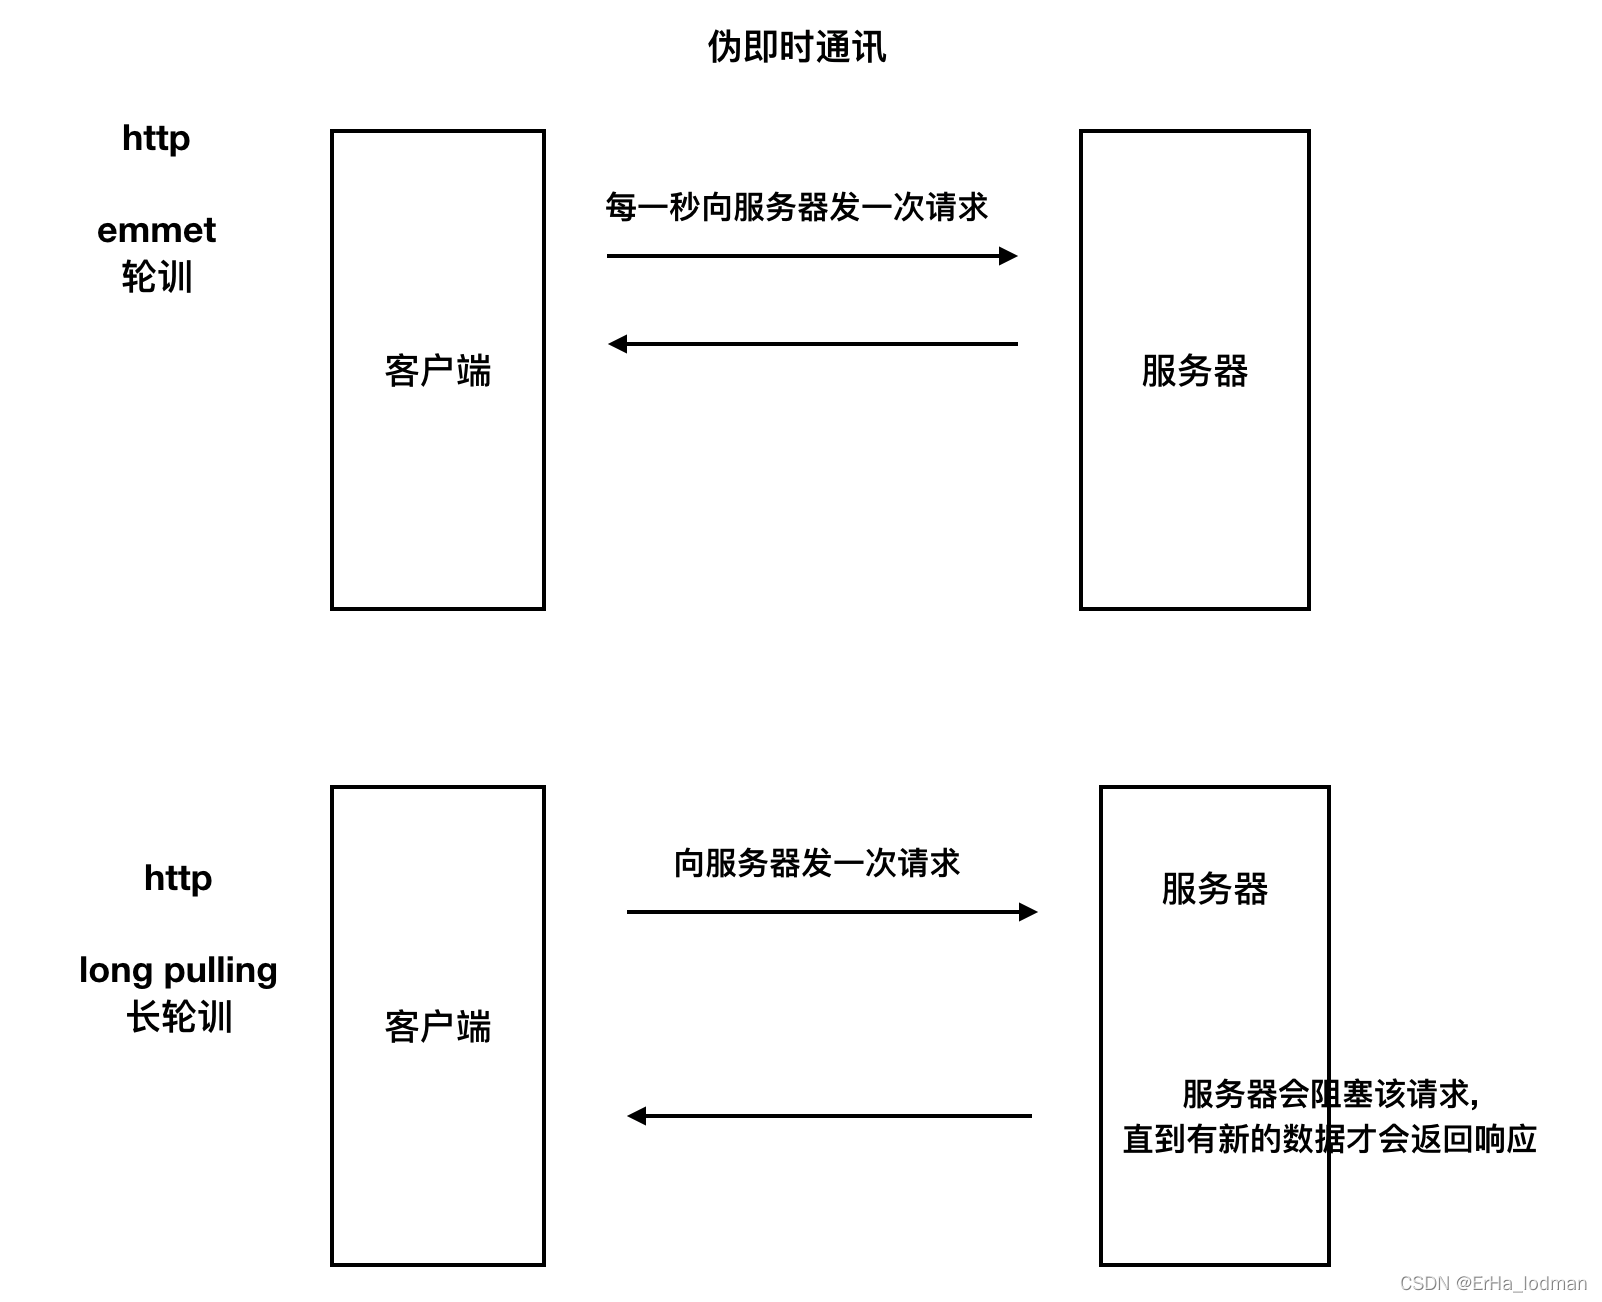
HTTP伪即时通讯
- 轮询 emmet
- 长轮询 long pulling
应用场景
- 聊天功能
- 在线即时推送 如下单后立即推送给商户
实现即时通讯
- 自己搭建服务器
- 选择支持的协议 websocket xmpp
- 使用一些比较成熟的框架 socketio xmppframework
- 自己封装socket
- 使用成熟的第三方方案
- 融云 环信
Websocket
websocket和http都是基于Tcp,不同在于HTTP建立的是短链接,而websocket建立的是长连接
缺点是websocket仅能支持部分平台

Socket.IO
Socket.io是基于WebSocket协议的一套成熟的解决方案,可以在浏览器和服务器之间实现实时,双向和基于事件的通信,SocketIO将WebSocket、AJAX和其它的通信方式全部封装成了统一的通信接口,也就是说,我们在使用SocketIO时,不用担心兼容问题,底层会自动选用最佳的通信方式。
优点
- 易用性
- 跨平台
- 自适应
缺点
- 传输的数据并不完全遵循webSocket协议,这就要求客户端和服务器端都必须使用socket.io解决方案
SpringBoot整合SocketIO实现实时推送
目录结构如下

1. pom.xml
com.corundumstudio.socketio netty-socketio 1.7.11 - 1
- 2
- 3
- 4
- 5
2.application.properties
server.port=8080 server.servlet.context-path=/ spring.mvc.view.prefix=/templates spring.mvc.view.suffix=.html #============================================================================ # netty socket io setting #============================================================================ # host在本地测试可以设置为localhost或者本机IP,在Linux服务器跑可换成服务器IP socketio.host=localhost socketio.port=9092 # 设置最大每帧处理数据的长度,防止他人利用大数据来攻击服务器 socketio.maxFramePayloadLength=1048576 # 设置http交互最大内容长度 socketio.maxHttpContentLength=1048576 # socket连接数大小(如只监听一个端口boss线程组为1即可) socketio.bossCount=1 socketio.workCount=100 socketio.allowCustomRequests=true # 协议升级超时时间(毫秒),默认10秒。HTTP握手升级为ws协议超时时间 socketio.upgradeTimeout=1000000 # Ping消息超时时间(毫秒),默认60秒,这个时间间隔内没有接收到心跳消息就会发送超时事件 socketio.pingTimeout=6000000 # Ping消息间隔(毫秒),默认25秒。客户端向服务器发送一条心跳消息间隔 socketio.pingInterval=25000- 1
- 2
- 3
- 4
- 5
- 6
- 7
- 8
- 9
- 10
- 11
- 12
- 13
- 14
- 15
- 16
- 17
- 18
- 19
- 20
- 21
- 22
- 23
- 24
- 25
3.创建辅助类
3.1创建通道连接缓存类

package com.erha.socketio.cache; import com.corundumstudio.socketio.SocketIOClient; import org.springframework.context.annotation.ComponentScan; import org.springframework.stereotype.Component; import java.util.HashMap; import java.util.Map; import java.util.UUID; import java.util.concurrent.ConcurrentHashMap; /** * @ClassNameClientCache * @Description TODO 缓存用户 - 页面sessionId - 通道连接 * @Author DELL * @Date 2022/1/2113:55 * @Version 1.0 **/ @Component public class ClientCache { /** * @Author 二哈老头子 * @Description //TODO 用户信息缓存 * @Date 14:00 2022/1/21 * @Param * @return **/ private static Map- 1
- 2
- 3
- 4
- 5
- 6
- 7
- 8
- 9
- 10
- 11
- 12
- 13
- 14
- 15
- 16
- 17
- 18
- 19
- 20
- 21
- 22
- 23
- 24
- 25
- 26
- 27
- 28
- 29
- 30
- 31
- 32
- 33
- 34
- 35
- 36
- 37
- 38
- 39
- 40
- 41
- 42
- 43
- 44
- 45
- 46
- 47
- 48
- 49
- 50
- 51
- 52
- 53
- 54
- 55
- 56
- 57
- 58
- 59
- 60
- 61
- 62
- 63
- 64
- 65
- 66
- 67
- 68
- 69
- 70
- 71
- 72
- 73
- 74
- 75
- 76
- 77
- 78
3.2创建消息类
package com.erha.socketio.pojo; import org.springframework.stereotype.Component; /** * @ClassNameMessageInfo * @Description TODO * @Author DELL * @Date 2022/1/2114:36 * @Version 1.0 **/ @Component public class MessageInfo { private String userID; private String userName; private String message; public MessageInfo() { } public MessageInfo(String userID, String userName, String message) { this.userID = userID; this.userName = userName; this.message = message; } public MessageInfo(String userName, String message) { this.userName = userName; this.message = message; } @Override public String toString() { return "MessageInfo{" + "userID='" + userID + ''' + ", userName='" + userName + ''' + ", message='" + message + ''' + '}'; } public String getUserID() { return userID; } public void setUserID(String userID) { this.userID = userID; } public String getUserName() { return userName; } public void setUserName(String userName) { this.userName = userName; } public String getMessage() { return message; } public void setMessage(String message) { this.message = message; } }- 1
- 2
- 3
- 4
- 5
- 6
- 7
- 8
- 9
- 10
- 11
- 12
- 13
- 14
- 15
- 16
- 17
- 18
- 19
- 20
- 21
- 22
- 23
- 24
- 25
- 26
- 27
- 28
- 29
- 30
- 31
- 32
- 33
- 34
- 35
- 36
- 37
- 38
- 39
- 40
- 41
- 42
- 43
- 44
- 45
- 46
- 47
- 48
- 49
- 50
- 51
- 52
- 53
- 54
- 55
- 56
- 57
- 58
- 59
- 60
- 61
- 62
- 63
- 64
4.创建SocketIO配置类
package com.erha.socketio.config; import com.corundumstudio.socketio.SocketConfig; import com.corundumstudio.socketio.SocketIOServer; import com.erha.socketio.handler.SocketIOHandler; import org.springframework.beans.factory.InitializingBean; import org.springframework.beans.factory.annotation.Value; import org.springframework.context.annotation.Configuration; import javax.annotation.Resource; /** * @ClassNameSocketIOConfig * @Description TODO * @Author DELL * @Date 2022/1/2114:19 * @Version 1.0 **/ @Configuration public class SocketIOConfig implements InitializingBean { @Resource private SocketIOHandler socketIOHandler; @Value("${socketio.host}") private String host; @Value("${socketio.port}") private Integer port; @Value("${socketio.bossCount}") private int bossCount; @Value("${socketio.workCount}") private int workCount; @Value("${socketio.allowCustomRequests}") private boolean allowCustomRequests; @Value("${socketio.upgradeTimeout}") private int upgradeTimeout; @Value("${socketio.pingTimeout}") private int pingTimeout; @Value("${socketio.pingInterval}") private int pingInterval; @Override public void afterPropertiesSet() throws Exception { SocketConfig socketConfig = new SocketConfig(); socketConfig.setReuseAddress(true); socketConfig.setTcpNoDelay(true); socketConfig.setSoLinger(0); com.corundumstudio.socketio.Configuration configuration = new com.corundumstudio.socketio.Configuration(); configuration.setSocketConfig(socketConfig); // host在本地测试可以设置为localhost或者本机IP,在Linux服务器跑可换成服务器IP configuration.setHostname(host); configuration.setPort(port); // socket连接数大小(如只监听一个端口boss线程组为1即可) configuration.setBossThreads(bossCount); configuration.setWorkerThreads(workCount); configuration.setAllowCustomRequests(allowCustomRequests); // 协议升级超时时间(毫秒),默认10秒。HTTP握手升级为ws协议超时时间 configuration.setUpgradeTimeout(upgradeTimeout); // Ping消息超时时间(毫秒),默认60秒,这个时间间隔内没有接收到心跳消息就会发送超时事件 configuration.setPingTimeout(pingTimeout); // Ping消息间隔(毫秒),默认25秒。客户端向服务器发送一条心跳消息间隔 configuration.setPingInterval(pingInterval); SocketIOServer socketIOServer = new SocketIOServer(configuration); //添加事件监听器 socketIOServer.addListeners(socketIOHandler); //启动SocketIOServer socketIOServer.start(); System.out.println("SocketIO启动完毕"); } }- 1
- 2
- 3
- 4
- 5
- 6
- 7
- 8
- 9
- 10
- 11
- 12
- 13
- 14
- 15
- 16
- 17
- 18
- 19
- 20
- 21
- 22
- 23
- 24
- 25
- 26
- 27
- 28
- 29
- 30
- 31
- 32
- 33
- 34
- 35
- 36
- 37
- 38
- 39
- 40
- 41
- 42
- 43
- 44
- 45
- 46
- 47
- 48
- 49
- 50
- 51
- 52
- 53
- 54
- 55
- 56
- 57
- 58
- 59
- 60
- 61
- 62
- 63
- 64
- 65
- 66
- 67
- 68
- 69
- 70
- 71
- 72
- 73
- 74
- 75
- 76
- 77
- 78
- 79
- 80
5.SocketIO事件响应类
package com.erha.socketio.handler; import com.corundumstudio.socketio.AckRequest; import com.corundumstudio.socketio.SocketIOClient; import com.corundumstudio.socketio.annotation.OnConnect; import com.corundumstudio.socketio.annotation.OnDisconnect; import com.corundumstudio.socketio.annotation.OnEvent; import com.erha.socketio.cache.ClientCache; import com.erha.socketio.pojo.MessageInfo; import org.springframework.stereotype.Component; import javax.annotation.Resource; import java.util.HashMap; import java.util.Iterator; import java.util.Map; import java.util.UUID; /** * @ClassNameSocketIOHandler * @Description TODO * @Author DELL * @Date 2022/1/2114:29 * @Version 1.0 **/ @Component public class SocketIOHandler { @Resource private ClientCache clientCache; /** * @Author 二哈老头子 * @Description //TODO 客户端连接的时候触发,前端js触发:socket = io.connect("http://localhost:9092"); * @Date 12:12 2022/1/20 * @Param [client] * @return void **/ @OnConnect public void onConnect(SocketIOClient client){ String userId = client.getHandshakeData().getSingleUrlParam("userId"); UUID sessionId = client.getSessionId(); clientCache.saveClient(userId,sessionId, client); System.out.println("userId: "+userId+"连接建立成功 - "+sessionId); } /** * @Author 二哈老头子 * @Description //TODO 客户端关闭连接时触发:前端js触发:socket.disconnect(); * @Date 12:14 2022/1/20 * @Param [client] * @return void **/ @OnDisconnect public void onDisconnect(SocketIOClient client){ String userId = client.getHandshakeData().getSingleUrlParam("userId"); UUID sessionId = client.getSessionId(); clientCache.deleteSessionClientByUserId(userId,sessionId); System.out.println("userId: "+userId+"连接关闭成功 - "+sessionId); } /** * @Author 二哈老头子 * @Description * //TODO 自定义消息事件,客户端js触发:socket.emit('messageevent', {msgContent: msg});时触发该方法 * //TODO 前端js的 socket.emit("事件名","参数数据")方法,是触发后端自定义消息事件的时候使用的 * //TODO 前端js的 socket.on("事件名",匿名函数(服务器向客户端发送的数据))为监听服务器端的事件 * @Date 13:51 2022/1/20 * @Param [client, request, data] * @return void **/ @OnEvent("chatevent") public void chatEvent(SocketIOClient client, AckRequest ackRequest, MessageInfo message){ HashMap- 1
- 2
- 3
- 4
- 5
- 6
- 7
- 8
- 9
- 10
- 11
- 12
- 13
- 14
- 15
- 16
- 17
- 18
- 19
- 20
- 21
- 22
- 23
- 24
- 25
- 26
- 27
- 28
- 29
- 30
- 31
- 32
- 33
- 34
- 35
- 36
- 37
- 38
- 39
- 40
- 41
- 42
- 43
- 44
- 45
- 46
- 47
- 48
- 49
- 50
- 51
- 52
- 53
- 54
- 55
- 56
- 57
- 58
- 59
- 60
- 61
- 62
- 63
- 64
- 65
- 66
- 67
- 68
- 69
- 70
- 71
- 72
- 73
- 74
- 75
- 76
- 77
- 78
- 79
- 80
6.控制层类Controller
6.1页面跳转基础类
@Controller public class baseController { @RequestMapping(value = "/") public String index(){ return "index"; } }- 1
- 2
- 3
- 4
- 5
- 6
- 7
6.2页面根据通道连接发送信息测试类
@RestController @RequestMapping("/push") public class PushController { @Resource private ClientCache clientCache; @GetMapping("/user/{userId}") public String pushTuUser(@PathVariable("userId") String userId){ HashMap- 1
- 2
- 3
- 4
- 5
- 6
- 7
- 8
- 9
- 10
- 11
- 12
- 13
- 14
- 15
- 16
7.前端页面
前端页面需要引入socket.io.js 的js包
Demo Chat Netty-socketio Demo Chat
- 1
- 2
- 3
- 4
- 5
- 6
- 7
- 8
- 9
- 10
- 11
- 12
- 13
- 14
- 15
- 16
- 17
- 18
- 19
- 20
- 21
- 22
- 23
- 24
- 25
- 26
- 27
- 28
- 29
- 30
- 31
- 32
- 33
- 34
- 35
- 36
- 37
- 38
- 39
- 40
- 41
- 42
- 43
- 44
- 45
- 46
- 47
- 48
- 49
- 50
- 51
- 52
- 53
- 54
- 55
- 56
- 57
- 58
- 59
- 60
- 61
- 62
- 63
- 64
- 65
- 66
- 67
- 68
- 69
- 70
- 71
- 72
- 73
- 74
- 75
- 76
- 77
- 78
- 79
- 80
- 81
- 82
- 83
- 84
核心代码
创建连接,该语句的执行对应会调用服务端的SocketIO事件相应类中@OnConnect注解的方法
//创建通道连接 var socket = io.connect('http://localhost:9092?userId=79'); // --@OnConnect注解的方法- 1
- 2
监听代码
//事件监听服务器端监听器的@OnConnect注解方法 socket.on('connect', function() { output('Client has connected to the server!'); }); //事件监听服务器端监听器的@OnDisconnect注解的方法 socket.on('disconnect', function() { output('The client has disconnected!'); }); //自定义页面监听事件监听后端发送来的信息 后端页面对应代码 socketIOClient.sendEvent("chatevent",message); socket.on('chatevent', function(message) { output('' + message.userName + ': ' + message.message); }); //自定义事件格式 socket.on("自定义事件名称",function(message){.....})- 1
- 2
- 3
- 4
- 5
- 6
- 7
- 8
- 9
- 10
- 11
- 12
- 13
- 14
- 15
- 16
功能代码
//关闭通道连接 可被@OnDisconnect注解的方法监听 socket.disconnect(); //发往服务器端 @OnEvent("chatevent")注解的方法 socket.emit('chatevent', message);- 1
- 2
- 3
- 4
- 5
效果展示
输入集成链接 http://localhost:8080/ 进入聊天页面
![[外链图片转存中...(img-6QZ8Q8Hr-1642756854466)]](https://1000bd.com/contentImg/2022/08/04/074851735.png)
后台提示:
![[外链图片转存中...(img-zLUD8WwJ-1642756854467)]](https://1000bd.com/contentImg/2022/08/04/074851829.png)
输入 http://localhost:8080/push/user/79 先从服务端发送消息
![[外链图片转存中...(img-dMxKdyMj-1642756854468)]](https://1000bd.com/contentImg/2022/08/04/074851926.png)
页面信息发送
![[外链图片转存中...(img-67DkYwU1-1642756854468)]](https://1000bd.com/contentImg/2022/08/04/074852035.png)
关闭链接
![[外链图片转存中...(img-upT1ohTY-1642756854469)]](https://1000bd.com/contentImg/2022/08/04/074852128.png)
![[外链图片转存中...(img-2Hia5s0V-1642756854469)]](https://1000bd.com/contentImg/2022/08/04/074852215.png)
先自我介绍一下,小编13年上师交大毕业,曾经在小公司待过,去过华为OPPO等大厂,18年进入阿里,直到现在。深知大多数初中级java工程师,想要升技能,往往是需要自己摸索成长或是报班学习,但对于培训机构动则近万元的学费,着实压力不小。自己不成体系的自学效率很低又漫长,而且容易碰到天花板技术停止不前。因此我收集了一份《java开发全套学习资料》送给大家,初衷也很简单,就是希望帮助到想自学又不知道该从何学起的朋友,同时减轻大家的负担。添加下方名片,即可获取全套学习资料哦
-
相关阅读:
Python:多线程【GIL/全局解释器锁】【Python为解决多线程之间数据完整性和状态同步的问题,在任意时刻只能由一个线程在解释器中运行】【Python的多线程是表面上的多线程,不是真正的多线程】
C++对象与对象的关系
字符函数、字符串函数和内存函数
解决ubuntu删除文件没释放空间
app小程序手机端Python爬虫实战06UiSelector文本、className定位方式
windows内核编程-文件操作
使用StrictMode-StrictMode原理(1)
11┃音视频直播系统之 WebRTC 进行文本聊天并实时传输文件
Zotero在word中插入带超链接的参考文献/交叉引用/跳转参考文献
两天写一个电影资讯速览微信小程序(附源码)
- 原文地址:https://blog.csdn.net/m0_54864585/article/details/126114062
