-
尚硅谷_Spring5
Spring5
中文文档:https://cntofu.com/book/95/index.html
课程内容介绍:
Spring框架概述,IOC容器,AOP,JDBCTemplate,事务管理,Spring5新特性。
1. Spring框架概述
详细的信息直接看百度百科即可:https://baike.baidu.com/item/spring/85061?fr=aladdin
- Spring 是轻量级(体积小,jar包少)的开源的 JavaEE 框架;
- Spring 可以解决企业应用开发的复杂性;
- Spring 有两个核心部分:IOC 和 Aop:
- IOC,控制反转,即把创建对象的过程交给Spring进行管理;
- AOP,面向切面,即在不修改源代码进行功能增强;
- Spring特点:
- 方便解耦(IOC),简化开发;
- AOP编程支持,可以理解为程序的扩展;
- 方便程序测试(Junit);
- 方便和其他框架进行整合(如,mybatis);
- 方便进行事务操作;
- 降低 API 开发难度;
- 在课程中,选取 Spring 版本 5.x
2. Spring5入门案例
2.1 下载Spring5

注:GA表示长期支持,SNAPSHOT表示快照。
下载地址:https://repo.spring.io/ui/native/release/org/springframework/spring/ ,这里下载5.2.6版本进行学习。

2.2 打开IDEA新建一个空工程,然后在里面添加module

2.3 导入相关的依赖包
那么我们需要导入那些jar包呢?

从上面的图中可以看出,其中Core Container中所需要的jar包是一定要导入的,所以在这里我们先暂时导入Beans、Core、Context、Expression这些jar包。此外,还需要导入一个日志的jar包,否则会报错!

在module中添加类路径:

2.4 创建普通类,在这个类创建普通方法
package com.atguigu.spring; public class User { // 创建普通方法 public void add(){ System.out.println("add..."); } }- 1
- 2
- 3
- 4
- 5
- 6
- 7
- 8
2.5 创建 Spring 配置文件,在配置文件配置创建的对象
-
Spring配置文件是xml格式,在src类资源目录下新建一个bean1.xml文件,文件内容如下:
<beans xmlns="http://www.springframework.org/schema/beans" xmlns:xsi="http://www.w3.org/2001/XMLSchema-instance" xsi:schemaLocation="http://www.springframework.org/schema/beans http://www.springframework.org/schema/beans/spring-beans.xsd"> <bean id="user" class="com.atguigu.spring.User">bean> beans>- 1
- 2
- 3
- 4
- 5
- 6
- 7
- 8
3. IOC
3.1 什么是IOC
- 控制反转:把对象创建和对象之间的调用过程交给Spring进行管理;
- 使用IOC的目的:为了降低耦合度;
- 做入门案例就是IOC实现;
原始service调用dao层,耦合度太高:

使用工厂模式实现,工厂模式可以降低程序的耦合度:

3.2 IOC底层原理
xml文件解析、工厂模式、反射。
3.3 画图讲解IOC底层原理

3.4 IOC接口
-
IOC 思想是基于 IOC 容器完成,IOC 容器底层就是对象工厂;
-
Spring 提供 IOC 容器实现两种方式:(两个接口)
-
BeanFactory:由IOC 容器基础实现,是 Spring 内部的使用接口,不提供给开发人员进行使用,BeanFactory加载配置文件时候不会创建对象,只有在获取(使用)对象才去创建对象;
// 加载配置文件,使用BeanFactory时在这里不会创建对象 BeanFactory context = new ClassPathXmlApplicationContext("bean1.xml"); // BeanFactory只有在获取或者使用对象的时候才会创建对象 User user = context.getBean("user", User.class);- 1
- 2
- 3
- 4
- 5
-
ApplicationContext:推荐使用,它是BeanFactory 接口的子接口,提供更多更强大的功能,一般由开发人员进行使用, 加载配置文件(只要在xml文件中配置了bean)时候就会把在配置文件对象进行创建;
-
在IDEA中使用ctrl+H即可看见当前类的实现接口:

4. IOC 操作 Bean 管理
什么是bean管理?
Bean 管理指的是两个操作:Spring 创建对象、Spring 注入属性;
Bean 管理操作有两种方式:
-
基于 xml 配置文件方式实现;
-
基于注解方式实现;
4.1 基于xml方式实现bean管理
4.1.1 基于xml方式创建对象;
<bean id="user" class="com.atguigu.spring.User">bean>- 1
- 2
- 3
- 4
- 5
- 6
- 7
- 8
- 9
- 10
4.1.2 基于 xml 方式注入属性
DI:依赖注入,就是注入属性,注意:注入属性要在创建对象的基础之上来完成。
4.1.3 属性注入的几种方式:
使用set()方法进行注入:
-
第一步,创建类,定义属性和对应的 set 方法
package com.atguigu.spring; /** * 演示使用set()方法进行属性的注入。 */ public class Book { // 定义属性 private String bname; private String bauthor; // 为属性创建对象的set()方法 public void setBname(String bname) { this.bname = bname; } public void setBauthor(String bauthor) { this.bauthor = bauthor; } public static void main(String[] args) { // 创建对象 Book book = new Book(); // 通过set()方法为属性赋值 book.setBname("abc"); } public void testDemo(){ System.out.println("book name:" + bname + ", book author:" + bauthor); } }- 1
- 2
- 3
- 4
- 5
- 6
- 7
- 8
- 9
- 10
- 11
- 12
- 13
- 14
- 15
- 16
- 17
- 18
- 19
- 20
- 21
- 22
- 23
- 24
- 25
- 26
- 27
- 28
- 29
- 30
- 31
-
第二步,在 spring 配置文件配置并创建对象,配置属性注入;
<bean id="book" class="com.atguigu.spring.Book"> <property name="bname" value="易筋经"/> <property name="bauthor" value="达摩老祖"/> bean>- 1
- 2
- 3
- 4
- 5
- 6
- 7
- 8
- 9
- 10
- 11
-
第三步,测试
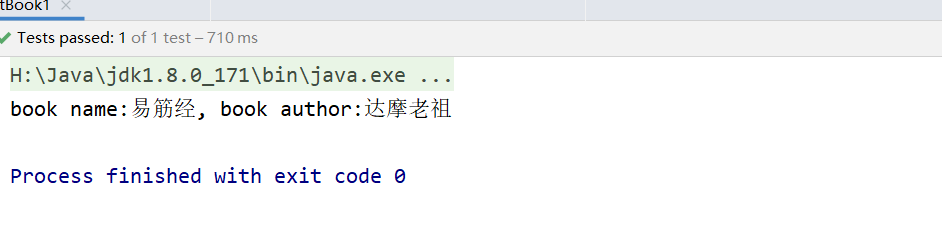
@Test public void testBook1(){ // 1. 加载配置文件 BeanFactory beanFactory = new ClassPathXmlApplicationContext("bean1.xml"); // 2. 获取配置并创建对象 Book book = beanFactory.getBean("book", Book.class); book.testDemo(); }- 1
- 2
- 3
- 4
- 5
- 6
- 7
- 8
使用有参数构造进行注入:
-
创建类,定义属性,创建属性对应有参数构造方法;
package com.atguigu.spring; public class Order { // 属性 private String oname; private String address; // 在有参数构造构造方法时,不需要提供无参构造也能创建对象(使用有参构造创建) public Order(String oname, String address) { this.oname = oname; this.address = address; } public void testOrder(){ System.out.println("oname: " + oname + ", address: " + address); } }- 1
- 2
- 3
- 4
- 5
- 6
- 7
- 8
- 9
- 10
- 11
- 12
- 13
- 14
- 15
- 16
- 17
-
配置xml文件
<bean id="order" class="com.atguigu.spring.Order"> <constructor-arg name="oname" value="computer"/> <constructor-arg name="address" value="China" /> bean>- 1
- 2
- 3
- 4
- 5
- 6
- 7
- 8
- 9
- 10
- 11
-
测试
@Test public void testOrder(){ // 1. 加载配置文件 ApplicationContext applicationContext = new ClassPathXmlApplicationContext("bean1.xml"); // 2. 获取配置并创建对象 Order order = applicationContext.getBean("order", Order.class); order.testOrder(); }- 1
- 2
- 3
- 4
- 5
- 6
- 7
- 8

p 名称空间注入:(了解)
使用 p 名称空间注入,可以简化基于 xml 配置方式,实现步骤如下:
-
第一步,添加 p 名称空间在配置文件中:

-
第二步,进行属性注入,在 bean 标签里面进行操作:
<bean id="book2" class="com.atguigu.spring.Book" p:bname="Java核心卷二" p:bauthor="动力节点"/>- 1
- 2

5.4 xml 注入其他类型属性
字面量: 类似常量。
-
null注入
<property name="address"> <null /> property>- 1
- 2
- 3
- 4
-
属性值包含特殊符号
<property name="address"> <value> >]]> value> property>- 1
- 2
- 3
- 4
- 5
- 6
- 7
- 8
- 9
- 10
4.1.4 注入外部bean
UserDao:
package com.atguigu.spring.dao; public interface UserDao { void update(); }- 1
- 2
- 3
- 4
- 5
UserDaoImpl:
package com.atguigu.spring.dao; public class UserDaoImpl implements UserDao{ @Override public void update() { System.out.println("userDao update..."); } }- 1
- 2
- 3
- 4
- 5
- 6
- 7
- 8
UserService:
package com.atguigu.spring.service; import com.atguigu.spring.dao.UserDao; public class UserService { // UserDao类型的属性 private UserDao userDao; public void setUserDao(UserDao userDao) { this.userDao = userDao; } public void add(){ System.out.println("userService add..."); // 调用userDao中的update()方法 userDao.update(); } }- 1
- 2
- 3
- 4
- 5
- 6
- 7
- 8
- 9
- 10
- 11
- 12
- 13
- 14
- 15
- 16
- 17
- 18
xml配置文件:
<bean id="userService" class="com.atguigu.spring.service.UserService"> <property name="userDao" ref="userDao"/> bean> <bean id="userDao" class="com.atguigu.spring.dao.UserDaoImpl"/>- 1
- 2
- 3
- 4
- 5
- 6
- 7
- 8
- 9
- 10
- 11
测试:
package com.atguigu.spring.test; import com.atguigu.spring.service.UserService; import org.junit.Test; import org.springframework.context.ApplicationContext; import org.springframework.context.support.ClassPathXmlApplicationContext; public class Test02 { // 测试ref属性 @Test public void t1(){ ApplicationContext applicationContext = new ClassPathXmlApplicationContext("bean2_ref属性.xml"); // 获取bean UserService userService = applicationContext.getBean("userService", UserService.class); userService.add(); } }- 1
- 2
- 3
- 4
- 5
- 6
- 7
- 8
- 9
- 10
- 11
- 12
- 13
- 14
- 15
- 16
- 17

4.1.5 注入内部bean
-
一对多的关系,如部门和员工之间的关系就是一个部门有多个员工;
-
在实体类之间表示一对多关系,为了表示员工所属的部门,使用对象类型属性进行表示;
package com.atguigu.spring.bean; /** * 部门类 */ public class Dept { private String dname; public void setDname(String dname) { this.dname = dname; } @Override public String toString() { return "Dept{" + "dname='" + dname + '\'' + '}'; } }- 1
- 2
- 3
- 4
- 5
- 6
- 7
- 8
- 9
- 10
- 11
- 12
- 13
- 14
- 15
- 16
- 17
- 18
- 19
package com.atguigu.spring.bean; /** * 员工类 */ public class Emp { private String ename; private String gender; // 员工属于部门(一对多的关系),这里使用对象的形式进行表示 private Dept dept; public void setEname(String ename) { this.ename = ename; } public void setGender(String gender) { this.gender = gender; } public void setDept(Dept dept) { this.dept = dept; } // 用于测试是否注入成功 public void add(){ System.out.println("ename: " + ename + ", gender: " + gender + ", dept: " + dept); } }- 1
- 2
- 3
- 4
- 5
- 6
- 7
- 8
- 9
- 10
- 11
- 12
- 13
- 14
- 15
- 16
- 17
- 18
- 19
- 20
- 21
- 22
- 23
- 24
- 25
- 26
- 27
- 28
- 29
-
在Spring中进行配置
<bean id="emp" class="com.atguigu.spring.bean.Emp"> <property name="ename" value="zhangsan"/> <property name="gender" value="man"/> <property name="dept"> <bean id="dept" class="com.atguigu.spring.bean.Dept"> <property name="dname" value="销售部"/> bean> property> bean>- 1
- 2
- 3
- 4
- 5
- 6
- 7
- 8
- 9
- 10
- 11
- 12
4.1.6 注入属性-级联赋值
-
第一种写法:
<bean id="emp" class="com.atguigu.spring.bean.Emp"> <property name="ename" value="曹操"/> <property name="gender" value="男"/> <property name="dept" ref="dept"/> bean> <bean id="dept" class="com.atguigu.spring.bean.Dept"> <property name="dname" value="武装部"/> bean>- 1
- 2
- 3
- 4
- 5
- 6
- 7
- 8
- 9
- 10
- 11
- 12
-
第二种写法:需要为在Emp中给dept对象设置getDept()方法:
<bean id="emp" class="com.atguigu.spring.bean.Emp"> <property name="ename" value="曹操"/> <property name="gender" value="男"/> <property name="dept.dname" value="军事部"/> bean>- 1
- 2
- 3
- 4
- 5
- 6
- 7
- 8
4.1.7 xml注入集合属性
包括:数组、list、map、set属性。
-
第一步,创建类
package com.xuan.bean; import java.util.Arrays; import java.util.List; import java.util.Map; import java.util.Set; public class Stu { // 1. 数组类型属性 private String[] courses; // 2. list集合类型属性 private List<String> list; // map集合类型属性 private Map<String, String> map; // 4. set集合类型属性 private Set<String> set; public void setCourses(String[] courses) { this.courses = courses; } public void setList(List<String> list) { this.list = list; } public void setMap(Map<String, String> map) { this.map = map; } public void setSet(Set<String> set) { this.set = set; } // 打印信息 public void printInfo(){ System.out.println("courses: " + Arrays.toString(courses)); System.out.println("list: " + list); System.out.println("map: " + map); System.out.println("set: " + set); } }- 1
- 2
- 3
- 4
- 5
- 6
- 7
- 8
- 9
- 10
- 11
- 12
- 13
- 14
- 15
- 16
- 17
- 18
- 19
- 20
- 21
- 22
- 23
- 24
- 25
- 26
- 27
- 28
- 29
- 30
- 31
- 32
- 33
- 34
- 35
- 36
- 37
- 38
- 39
- 40
- 41
-
第二步,在Spring配置文件中进行配置。
<bean id="stu" class="com.xuan.bean.Stu"> <property name="courses"> <array> <value>JavaSEvalue> <value>JavaWebvalue> array> property> <property name="list"> <list> <value>张三value> <value>小张value> list> property> <property name="map"> <map> <entry key="课程名称" value="mysql"/> <entry key="课时" value="20"/> map> property> <property name="set"> <set> <value>Springvalue> <value>SpringMVCvalue> set> property> bean>- 1
- 2
- 3
- 4
- 5
- 6
- 7
- 8
- 9
- 10
- 11
- 12
- 13
- 14
- 15
- 16
- 17
- 18
- 19
- 20
- 21
- 22
- 23
- 24
- 25
- 26
- 27
- 28
- 29
- 30
-
测试
@Test public void t1(){ // 读取配置文件 ApplicationContext context = new ClassPathXmlApplicationContext("bean1.xml"); // 获取对象 Stu stu = context.getBean("stu", Stu.class); stu.printInfo(); }- 1
- 2
- 3
- 4
- 5
- 6
- 7
- 8

[补充] 在集合里面设置对象类型的值:
<bean id="stu" class="com.xuan.bean.Stu"> <property name="phones"> <list> <ref bean="p1"/> <ref bean="p2"/> list> property> bean> <bean id="p1" class="com.xuan.bean.Phone"> <property name="markCode" value="huawei23323"/> bean> <bean id="p2" class="com.xuan.bean.Phone"> <property name="markCode" value="huaweiAL2000"/> bean>- 1
- 2
- 3
- 4
- 5
- 6
- 7
- 8
- 9
- 10
- 11
- 12
- 13
- 14
- 15
- 16
[补充] 把集合注入部分提取出来:
第一步,在 spring 配置文件中引入名称空间 util
<beans xmlns="http://www.springframework.org/schema/beans" xmlns:xsi="http://www.w3.org/2001/XMLSchema-instance" xmlns:p="http://www.springframework.org/schema/p" xmlns:util="http://www.springframework.org/schema/util" xsi:schemaLocation="http://www.springframework.org/schema/beans http://www.springframework.org/schema/beans/spring-beans.xsd http://www.springframework.org/schema/util http://www.springframework.org/schema/util/spring-util.xsd"> beans>- 1
- 2
- 3
- 4
- 5
- 6
- 7
- 8
第二步,使用 util 标签完成 list 集合注入提取出来
<util:list id="bookList"> <value>第一章value> <value>第二章value> <value>第三章value> util:list> <bean id="book" class="com.xuan.bean.Book"> <property name="chapter" ref="bookList"/> bean>- 1
- 2
- 3
- 4
- 5
- 6
- 7
- 8
- 9
- 10
4.1.8 FactoryBean
在Spring 有两种类型 bean,一种普通 bean,另外一种工厂 bean(FactoryBean);
普通 bean:在配置文件中定义 bean 类型就是返回类型,以下这种就是普通的bean;
<bean id="p1" class="com.xuan.bean.Phone"> <property name="markCode" value="huawei23323"/> bean>- 1
- 2
- 3
工厂 bean:在配置文件定义 bean的 类型可以和返回的类型不一样;
工厂bean的实现步骤如下:
-
第一步,创建类,如果这个类作为工厂 bean,则必须要实现接口 FactoryBean,实现接口里面的方法,在实现的方法中定义返回的 bean 类型;
package com.xuan.factoryBean; import com.xuan.bean.Phone; import org.springframework.beans.factory.FactoryBean; /** * 定义一个工厂类。 */ public class FactoryBeanTest implements FactoryBean { // 定义工厂bean的返回对象类型 @Override public Phone getObject() throws Exception { Phone phone = new Phone(); phone.setMarkCode("huawei p30 pro"); return phone; } @Override public Class<?> getObjectType() { return null; } @Override public boolean isSingleton() { return false; } }- 1
- 2
- 3
- 4
- 5
- 6
- 7
- 8
- 9
- 10
- 11
- 12
- 13
- 14
- 15
- 16
- 17
- 18
- 19
- 20
- 21
- 22
- 23
- 24
- 25
- 26
- 27
-
第二步,配置xml配置文件
<bean id="factoryBeanTest" class="com.xuan.factoryBean.FactoryBeanTest" />- 1
-
第三步,测试:
// 测试工厂bean @Test public void t3(){ ApplicationContext context = new ClassPathXmlApplicationContext("factoryBean.xml"); // 由于FactoryBeanTest实现了FactoryBean接口,在其中定义了返回类型为:Phone Phone phone = context.getBean("factoryBeanTest", Phone.class); System.out.println(phone); // Phone{markCode='huawei p30 pro'} }- 1
- 2
- 3
- 4
- 5
- 6
- 7
- 8

4.1.9 bean的作用域
在 Spring 里面,设置创建 bean 实例是单实例还是多实例。单实例,即对象只创建一次,多个程序之间共用一个对象;多实例,每次需要的时候都创建一个单独对象;在 Spring 里面,默认情况下,bean是单实例对象。
<bean id="book" class="com.xuan.bean.Book"> <property name="chapter" ref="bookList"/> bean>- 1
- 2
- 3
@Test public void t2(){ // 读取配置文件 ApplicationContext context = new ClassPathXmlApplicationContext("bean2.xml"); // 获取对象 Book book1 = context.getBean("book", Book.class); Book book2 = context.getBean("book", Book.class); System.out.println(book1); System.out.println(book2); }- 1
- 2
- 3
- 4
- 5
- 6
- 7
- 8
- 9
- 10

在Spring中如何设置多实例:
在 spring 配置文件 bean 标签里面有属性(scope)用于设置单实例还是多实例,scope 属性值如下:
- singleton,表示是单实例对象,是默认值;
- prototype,表示是多实例对象;
<bean id="book" class="com.xuan.bean.Book" scope="prototype"> <property name="chapter" ref="bookList"/> bean>- 1
- 2
- 3

singleton 和 prototype 区别:
- singleton 单实例,prototype 多实例;
- 设置 scope 的值是 singleton 时候, spring在加载xml配置文件时候就会创建单实例对象;当设置为prototype 时候,spring加载xml配置文件时候并不会创建对象,而是在调用getBean()方法的时候创建多实例对象;
补充,scope的值并不只是singleton与prototype,还有两个使用较少的request与session;
4.1.10 bean的生命周期
什么是bean的生命周期?即bean对象从创建到销毁的过程。
bean的有以下的生命周期:
- 通过构造器创建 bean 实例(无参数构造);
- 为 bean 的属性设置值或对其他 bean 引用(调用 对应的set 方法);
- 调用 bean 的初始化的方法(需要进行配置初始化的方法);
- 使用bean对象 (对象获取到了);
- 当容器关闭时候,调用 bean 对象的销毁方法(需要进行配置销毁的方法);
具体实现如下:
第一步,定义类:
package com.xuan.bean; public class Orders { // 订单名称 private String oname; public Orders() { System.out.println("bean生命周期:"); System.out.println("第一步,执行无参构造创建bean实例!"); } public void setOname(String oname) { this.oname = oname; System.out.println("第二步,调用set方法设置属性的值!"); } // 创建初始化方法,该方法名随意,这里必须要在xml文件的bean标签中使用initMethod参数进行指定后该方法才生效。 public void init(){ System.out.println("第三步,执行初始化的方法!"); } /* 创建销毁方法方法名随意,也需要在xml文件的bean标签中使用destroyMethod参数进行指定后生效。 但是必须要要手动配置让对象销毁该方法才会被执行。 */ public void destroy(){ System.out.println("第五部,执行销毁的方法!"); } }- 1
- 2
- 3
- 4
- 5
- 6
- 7
- 8
- 9
- 10
- 11
- 12
- 13
- 14
- 15
- 16
- 17
- 18
- 19
- 20
- 21
- 22
- 23
- 24
- 25
- 26
- 27
- 28
- 29
第二步,编写xml配置文件:
<bean id="orders" class="com.xuan.bean.Orders" init-method="init" destroy-method="destroy"> <property name="oname" value="huawei phone"/> bean>- 1
- 2
- 3
- 4
- 5
- 6
- 7
第三步,测试:
// 测试bean生命周期 @Test public void t4(){ // 获取配置文件 ApplicationContext context = new ClassPathXmlApplicationContext("bean生命周期.xml"); Orders orders = context.getBean("orders", Orders.class); System.out.println("第四步,获取bean实例对象:" + orders); /* 手动让bean实例销毁,注意这里是必须的,不然在xml配置文件中destroy-method参数指定的方法不会被执行。 注意,这里的context是ApplicationContext引用类型,其中并没有close()方法。但是在ApplicationContext的子类中扩展了close()方法。 所以这里要转为它的子类型。 */ ((ClassPathXmlApplicationContext) context).close(); }- 1
- 2
- 3
- 4
- 5
- 6
- 7
- 8
- 9
- 10
- 11
- 12
- 13
- 14
- 15

补充:bean有后置处理器,如果加上bean的后置处理,那么bean生命周期有七步:
1. 通过构造器创建 bean 实例(无参数构造); 2. 为 bean 的属性设置值或对其他 bean 引用(调用 对应的set 方法); 3. 把 bean 实例传递 bean 后置处理器的方法 postProcessBeforeInitialization; 4. 调用 bean 的初始化的方法(需要进行配置初始化的方法); 5. 把 bean 实例传递 bean 后置处理器的方法 postProcessAfterInitialization 6. 使用bean对象 (对象获取到了); 7. 当容器关闭时候,调用 bean 对象的销毁方法(需要进行配置销毁的方法);- 1
- 2
- 3
- 4
- 5
- 6
- 7
具体实现:
第一步,编写后置类:
package com.xuan.bean; import org.springframework.beans.BeansException; import org.springframework.beans.factory.config.BeanPostProcessor; /** * bean的后置处理器。 * 该后置处理器需要在配置文件中使用bean标签进行注册(与普通的bean注册没区别),之后在xml配置文件中所有的bean对象在初始化之前和之后都会调用这个后置处理器中所编写的方法。 */ public class MyBeanPostProcessor implements BeanPostProcessor { @Override public Object postProcessBeforeInitialization(Object bean, String beanName) throws BeansException { System.out.println("bean对象初始化之后调用postProcessBeforeInitialization()"); return bean; } public Object postProcessAfterInitialization(Object bean, String beanName) throws BeansException { System.out.println("bean对象初始化之前调用postProcessAfterInitialization()"); return bean; } }- 1
- 2
- 3
- 4
- 5
- 6
- 7
- 8
- 9
- 10
- 11
- 12
- 13
- 14
- 15
- 16
- 17
- 18
- 19
- 20
第二步,注册后置类:
<bean id="myBeanPostProcessor" class="com.xuan.bean.MyBeanPostProcessor"/>- 1
- 2
- 3
- 4
- 5
第三步,测试:

4.1.11 自动装配
什么是自动装配?即根据指定装配规则(属性名称或者属性类型),Spring 自动将匹配的属性值进行注入,而不需要像property标签那样进行手动的配置。
实现步骤如下:
package com.xuan.自动装配; /** * 部门类。 */ public class Dept { @Override public String toString() { return "Dept{}"; } }- 1
- 2
- 3
- 4
- 5
- 6
- 7
- 8
- 9
- 10
- 11
package com.xuan.自动装配; /** * 员工类。 */ public class Emp { // 多个员工属于一个部门 private Dept dept; public void setDept(Dept dept) { this.dept = dept; } @Override public String toString() { return "Emp{" + "dept=" + dept + '}'; } public void printInfo(){ System.out.println(dept); } }- 1
- 2
- 3
- 4
- 5
- 6
- 7
- 8
- 9
- 10
- 11
- 12
- 13
- 14
- 15
- 16
- 17
- 18
- 19
- 20
- 21
- 22
- 23
xml配置文件,根据属性名称进行注入:
<bean id="emp" class="com.xuan.自动装配.Emp" autowire="byName"> bean> <bean id="dept" class="com.xuan.自动装配.Dept"/>- 1
- 2
- 3
- 4
- 5
- 6
- 7
- 8
- 9
- 10
- 11
// 测试自动装配 @Test public void t5(){ ApplicationContext context = new ClassPathXmlApplicationContext("bean5_自动装配.xml"); Emp emp = context.getBean("emp", Emp.class); System.out.println(emp); }- 1
- 2
- 3
- 4
- 5
- 6
- 7
4.1.12 引入外部属性文件
比如连接数据库的配置信息,引入德鲁伊jar包之后,可以直接编写在xml文件中,也可以定义在外部的properties文件中进行引入。
-
直接编写在xml文件中:
<bean id="dataSource" class="com.alibaba.druid.pool.DruidDataSource"> <property name="driverClassName" value="com.mysql.jdbc.Driver"/> <property name="url" value="jdbc:mysql://localhost:3306/userDb"/> <property name="username" value="root"/> <property name="password" value="root"/> bean>- 1
- 2
- 3
- 4
- 5
- 6
- 7
-
编写在外部properties文件中(使用较多):
jdbc.propertes文件:
driverClassName=com.mysql.jdbc.Driver url=jdbc:mysql://localhost:3306/userDb username=root password=root- 1
- 2
- 3
- 4
编写xml配置文件,注需要在配置文件中引入context命名空间。

<context:property-placeholder location="jdbc.properties"/> <bean id="dataSource" class="com.alibaba.druid.pool.DruidDataSource"> <property name="driverClassName" value="${driverClassName}"/> <property name="url" value="${url}"/> <property name="username" value="${username}"/> <property name="password" value="${password}"/> bean>- 1
- 2
- 3
- 4
- 5
- 6
- 7
- 8
- 9
4.2 基于注解方式实现bean管理
什么是注解? 注解是代码中的一种特殊标记,格式如下:
权限修饰符 @interface 注解名称(属性名=属性值,属性名=属性值...){ ... }- 1
- 2
- 3
注解可以作用在类上面,方法上面,属性上面;使用注解的目的就是为了简化xml配置文件。
Spring针对Bean管理中创建对象提供了以下的注解:
- @Componect;
- @Service;
- @Controller;
- @Repository;
这四个注解的功能是一样的,都可以用来创建bean实例。只是按照习惯通常将它们放在不同的层级上面,如@Controller一般放在控制层的类上。
4.2.1 基于注解方式创建对象
第一步,引入依赖:

第二步,开启组件扫描
<context:component-scan base-package="com.xuanfeng"/>- 1
- 2
- 3
- 4
- 5
- 6
- 7
第三步,创建类,在类上面添加Spring创建对象的注解
package com.xuanfeng.service; import org.springframework.stereotype.Component; /** * 这里注解里面的value属性值可以不写,默认值是类的首字母小写。即UserService -> userService。 * @Component(value = "userService") 注意,这句话与:本质上是一样。 */ @Component(value = "userService") public class UserService { public void add(){ System.out.println("userService add..."); } } - 1
- 2
- 3
- 4
- 5
- 6
- 7
- 8
- 9
- 10
- 11
- 12
- 13
- 14
测试:
// 测试使用注解创建对象 @Test public void t1(){ // 加载配置文件 ApplicationContext context = new ClassPathXmlApplicationContext("bean1.xml"); UserService userService = context.getBean("userService", UserService.class); userService.add(); }- 1
- 2
- 3
- 4
- 5
- 6
- 7
- 8
补充,开启组件扫描细节配置
<context:component-scan base-package="com.xuanfeng" use-default-filters="false"> <context:include-filter type="annotation" expression="org.springframework.stereotype.Component"/> context:component-scan>- 1
- 2
- 3
- 4
- 5
- 6
- 7
- 8
- 9
- 10
<context:component-scan base-package="com.xuanfeng"> <context:exclude-filter type="annotation" expression="org.springframework.stereotype.Controller"/> context:component-scan>- 1
- 2
- 3
- 4
- 5
- 6
- 7
- 8
4.2.2 基于注解方式实现属性注入
Spring提供了以下的注解进行属性的注入:
- **@Autowired,**根据属性类型进行自动装配;
- **@Qualifier,**根据名称进行自动装配,需要与@Autowired属性一起使用;
- **@Resource,**即可以根据类型注入,也可以根据名称进行注入;
- **@Value,**注入普通类型的属性;
@Autowired注解的使用:
package com.xuanfeng.dao; public interface UserDao { void add(); }- 1
- 2
- 3
- 4
- 5
package com.xuanfeng.dao; import org.springframework.stereotype.Repository; @Repository public class UserDaoImpl implements UserDao { @Override public void add() { System.out.println("user dao add method..."); } }- 1
- 2
- 3
- 4
- 5
- 6
- 7
- 8
- 9
- 10
- 11
package com.xuanfeng.service; import com.xuanfeng.dao.UserDao; import org.springframework.beans.factory.annotation.Autowired; import org.springframework.stereotype.Service; @Service public class UserService { /* 注入userDao属性,注意,这里不需要为userDao属性提供set方法,因为@Autowired注解已经进行了实现。 */ @Autowired private UserDao userDao; public void add(){ System.out.println("user service add method..."); // 调用userDao中的方法 userDao.add(); } }- 1
- 2
- 3
- 4
- 5
- 6
- 7
- 8
- 9
- 10
- 11
- 12
- 13
- 14
- 15
- 16
- 17
- 18
- 19
- 20
// 测试使用注解创建对象 @Test public void t1(){ // 加载配置文件 ApplicationContext context = new ClassPathXmlApplicationContext("bean1.xml"); UserService userService = context.getBean("userService", UserService.class); userService.add(); }- 1
- 2
- 3
- 4
- 5
- 6
- 7
- 8
@Qualifiter注解的使用:
@Repository("userDao") public class UserDaoImpl implements UserDao { @Override public void add() { System.out.println("user dao add method..."); } }- 1
- 2
- 3
- 4
- 5
- 6
- 7
@Service public class UserService { /* 注入userDao属性,注意,这里不需要为userDao属性提供set方法,因为@Autowired注解已经进行了实现。 */ @Autowired // 根据属性类型进行注入 @Qualifier("userDao") // 根据属性名称进行注入 private UserDao userDao; public void add(){ System.out.println("user service add method..."); userDao.add(); } }- 1
- 2
- 3
- 4
- 5
- 6
- 7
- 8
- 9
- 10
- 11
- 12
- 13
- 14
@Resource注解的使用:
// @Resource // 根据类型进行注入 @Resource(name = "userDao") // 根据名称进行注入 private UserDao userDao;- 1
- 2
- 3
需要注意的是:@Resource注解是在javax.annotation.Resource;这个包下,而不是Spring官方提供的。
@Value注解:
// 用户名 @Value("Spring5") private String username;- 1
- 2
- 3
4.2.3 完全注解开发
第一步,创建配置类,用于替换xml配置文件
package com.xuanfeng.config; import org.springframework.context.annotation.ComponentScan; import org.springframework.context.annotation.Configuration; /** * 将该类标识为Spring的配置类,所以需要@Configuration注解进行标识。 */ @Configuration // 指定扫描的组件包 @ComponentScan({"com.xuanfeng"}) public class SpringConfig { }- 1
- 2
- 3
- 4
- 5
- 6
- 7
- 8
- 9
- 10
- 11
- 12
- 13
第二步,测试,其他的配置与xml文件的使用是一样的,这里只是加载配置信息的方式变了
// 测试完全使用注解开发 @Test public void t2(){ // 加载配置类 ApplicationContext context = new AnnotationConfigApplicationContext(SpringConfig.class); UserService userService = context.getBean("userService", UserService.class); userService.add(); }- 1
- 2
- 3
- 4
- 5
- 6
- 7
- 8
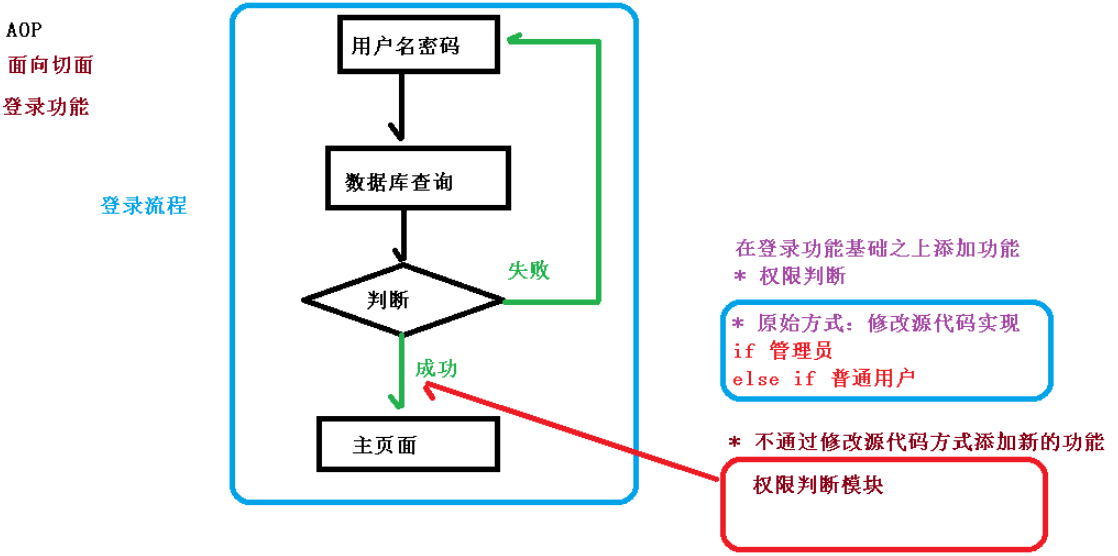
5. AOP
5.1 什么是AOP
AOP(Aspect Oriented Programming,面向切面/方面编程),利用 AOP 可以对业务逻辑的各个部分进行隔离,从而使得业务逻辑各部分之间的耦合度降低,提高程序的可重用性,同时提高了开发的效率。
通俗描述:不通过修改源代码方式,在主干功能里面添加新功能;使用登录例子说明AOP:
5.2 AOP底层原理
AOP底层使用动态代理机制来实现,分为两种情况的代理:
- 有接口时,使用JDK动态代理;
- 没有接口时,使用GCLIB动态代理;
使用JDK动态代理:
主要是“创建接口实现类代理对象”,从而增强类的方法。

使用CGLIB动态代理:
主要是“创建子类的代理对象”,从而增强类的方法。

5.3 JDK动态代理
**1. ** JDK动态代理,使用 Proxy 类里面的方法创建代理对象;

调用newProxyInstance()方法:
public static Object newProxyInstance(ClassLoader loader, Class<?>[] interfaces, InvocationHandler h) throws IllegalArgumentException- 1
- 2
- 3
- 4
参数说明:
- loader,类加载器;
- interfaces,增强方法所在的类,这个类实现的接口,支持多个接口;
- InvocationHandler,实现这个接口 InvocationHandler,创建代理对象,写增强的部分;
**2. ** 编写JDK动态代理代码
步骤一,创建接口,定义方法
package com.xuan.dao; public interface UserDao { int add(int a, int b); String update(String id); }- 1
- 2
- 3
- 4
- 5
- 6
步骤二,创建接口实现类,实现方法
package com.xuan.dao; public class UserDaoImpl implements UserDao { @Override public int add(int a, int b) { return a + b; } @Override public String update(String id) { return id; } }- 1
- 2
- 3
- 4
- 5
- 6
- 7
- 8
- 9
- 10
- 11
- 12
- 13
- 14
步骤三,使用 Proxy 类创建接口代理对象
package com.xuan.dao; import java.lang.reflect.InvocationHandler; import java.lang.reflect.Method; import java.lang.reflect.Proxy; import java.util.Arrays; /** * UserDao的接口代理类。 */ public class JDKProxy { public static void main(String[] args) { // 创建接口代理实现对象 Class[] interfaces = {UserDao.class}; UserDaoImpl userDaoImpl = new UserDaoImpl(); UserDao userDao = (UserDao) Proxy.newProxyInstance(JDKProxy.class.getClassLoader(), interfaces, new UserDaoProxy(userDaoImpl)); System.out.println(userDao.add(1, 2)); } } // 创建代理对象 class UserDaoProxy implements InvocationHandler{ /* 创建的是谁的代理对象,就把谁传递过来。 通过有参数构造方法进行传递。 */ private Object obj; public UserDaoProxy(Object obj){ this.obj = obj; } @Override public Object invoke(Object proxy, Method method, Object[] args) throws Throwable { // 方法之前 System.out.println("即将执行的方法:"+method.getName()+ "\n该方法所传递的参数:"+ Arrays.toString(args)); // 被增强的方法执行 Object result = method.invoke(obj, args); // 方法执行之后 System.out.println("方法执行之后"); return result; } }- 1
- 2
- 3
- 4
- 5
- 6
- 7
- 8
- 9
- 10
- 11
- 12
- 13
- 14
- 15
- 16
- 17
- 18
- 19
- 20
- 21
- 22
- 23
- 24
- 25
- 26
- 27
- 28
- 29
- 30
- 31
- 32
- 33
- 34
- 35
- 36
- 37
- 38
- 39
- 40
- 41
- 42
- 43
- 44
- 45
- 46
5.4 AOP术语
- 连接点
- 切入点
- 通知(也叫增强)
- 切面

5.5 AOP操作(准备工作)
Spring框架一般都是基于AspectJ实现AOP操作,AspectJ 不是 Spring 组成部分,而是独立的 AOP 框架,一般把 AspectJ 和 Spirng 框架一起使用,从而进行AOP操作。
基于AspectJ实现AOP操作,有两种方式:
- 基于xml配置文件实现;
- 基于注解的方式实现(推荐使用);
在项目中引入AOP相关依赖:

切入点表达式:
-
切入点表达式作用,知道对哪个类里面的哪个方法进行增强;
-
语法结构:
execution([权限修饰符] [返回类型] [类全路径] [方法名称]([参数列表])) 注意: 权限修饰符一般可以使用*代替,表示任意权限(通常指的是public|protect|private); 返回类型一般可以省略,直接使用空格即可; 参数列表一般使用两个..代替;- 1
- 2
- 3
- 4
- 5
- 6
举例 1:对 com.atguigu.dao.BookDao 类里面的 add方法进行增强
execution(* com.atguigu.dao.BookDao.add(..))- 1
举例 2:对 com.atguigu.dao.BookDao 类里面的所有的方法进行增强
execution(* com.atguigu.dao.BookDao.* (..))- 1
举例 3:对 com.atguigu.dao 包里面所有类,类里面所有方法进行增强
execution(* com.atguigu.dao.*.* (..))- 1
5.6 AOP操作(AspectJ注解)
第一步,创建类,在类里面定义方法;
package com.xuan.aopannotation; /** * 被增强的类。 */ public class User { public void add(){ System.out.println("add..."); } }- 1
- 2
- 3
- 4
- 5
- 6
- 7
- 8
- 9
- 10
第二步,创建增强类(编写增强逻辑)
在增强类里面,创建方法,让不同方法代表不同通知类型。
package com.xuan.aopannotation; /** * 增强类。 */ public class UserProxy { // 代表前置通知 public void before(){ System.out.println("before..."); } }- 1
- 2
- 3
- 4
- 5
- 6
- 7
- 8
- 9
- 10
- 11
第三步,进行通知的配置
-
引入命名空间;

-
使用注解创建User和UserProxy对象;
@Component public class User {}- 1
- 2
@Component public class UserProxy {}- 1
- 2
-
在增强类上面添加@Aspect注解;
@Component @Aspect // 生成代理对象 public class UserProxy { // 代表前置通知,结合切入点表达式进行使用 @Before("execution(* com.xuan.aopannotation.User.add(..))") public void before(){ System.out.println("before..."); } }- 1
- 2
- 3
- 4
- 5
- 6
- 7
- 8
- 9
-
在 spring 配置文件中开启生成代理对象;
<aop:aspectj-autoproxy/>- 1
- 2
第四步,测试

配置不同类型的通知
在增强类里面,在作为通知方法上面添加响应的通知类型的注解,再使用切入点表达式配置。
@Component @Aspect // 生成代理对象 public class UserProxy { // 代表前置通知 @Before("execution(* com.xuan.aopannotation.User.add(..))") public void before(){ System.out.println("before..."); } /* 后置通知(也叫返回通知)在返回值之后执行,当遇到异常时不会执行。 */ @AfterReturning("execution(* com.xuan.aopannotation.User.add(..))") public void afterReturning(){ System.out.println("afterReturning..."); } /* 最终通知,在被增强的方法执行之后执行,遇到异常时同样会执行。 */ @After("execution(* com.xuan.aopannotation.User.add(..))") public void after(){ System.out.println("after..."); } // 异常通知 @AfterThrowing("execution(* com.xuan.aopannotation.User.add(..))") public void afterThrowing(){ System.out.println("afterThrowing"); } // 环绕通知 @Around("execution(* com.xuan.aopannotation.User.add(..))") public void around(ProceedingJoinPoint pjp) throws Throwable { System.out.println("环绕之前..."); // 执行被增强的方法 pjp.proceed(); System.out.println("环绕之后..."); } }- 1
- 2
- 3
- 4
- 5
- 6
- 7
- 8
- 9
- 10
- 11
- 12
- 13
- 14
- 15
- 16
- 17
- 18
- 19
- 20
- 21
- 22
- 23
- 24
- 25
- 26
- 27
- 28
- 29
- 30
- 31
- 32
- 33
- 34
- 35
- 36
- 37
- 38
- 39
- 40
抽取相同切入点:
public class UserProxy { // 相同切入点抽取 @Pointcut("execution(* com.xuan.aopannotation.User.add(..))") public void pointCut(){ } // 代表前置通知 @Before("pointCut()") public void before(){ System.out.println("before..."); } }- 1
- 2
- 3
- 4
- 5
- 6
- 7
- 8
- 9
- 10
- 11
- 12
- 13
有多个增强类多同一个方法进行增强,设置增强类优先级:
在增强类上面添加 @Order(数字类型值)注解,数字类型值越小优先级越高。
@Component @Aspect @Order(1) public class PersonProxy{}- 1
- 2
- 3
- 4
完全使用注解开发:
创建配置类,不需要创建 xml 配置文件。
@Configuration @ComponentScan({"com.xuan.aopannotation"}) @EnableAspectJAutoProxy(proxyTargetClass = true) public class ConfigAop { }- 1
- 2
- 3
- 4
- 5
5.7 AOP操作(AspectJ配置文件)
-
创建两个类,即增强类和被增强类,创建方法;
package com.xuan.aopxml; /** * 被增强类。 */ public class Book { public void buy(){ System.out.println("buy..."); } }- 1
- 2
- 3
- 4
- 5
- 6
- 7
- 8
- 9
- 10
package com.xuan.aopxml; /** * 被增强类。 */ public class BookProxy { public void before(){ System.out.println("before..."); } }- 1
- 2
- 3
- 4
- 5
- 6
- 7
- 8
- 9
- 10
-
在Spring配置文件中创建两个对象;
<bean id="book" class="com.xuan.aopxml.Book"/> <bean id="bookProxy" class="com.xuan.aopxml.BookProxy"/>- 1
- 2
- 3
-
在Spring配置文件中配置切入点;
<aop:config> <aop:pointcut id="p" expression="execution(* com.xuan.aopxml.Book.buy(..))"/> <aop:aspect ref="bookProxy"> <aop:before method="before" pointcut-ref="p"/> aop:aspect> aop:config>- 1
- 2
- 3
- 4
- 5
- 6
- 7
- 8
- 9
- 10
- 11
- 12
-
测试
// 测试配置文件 @Test public void t2(){ ApplicationContext context = new ClassPathXmlApplicationContext("bean2.xml"); // 增强的是User中的方法,所以这里获取的是user Book book = context.getBean("book", Book.class); book.buy(); }- 1
- 2
- 3
- 4
- 5
- 6
- 7
- 8
6. JdbcTemplate
6.1 概念及准备工作
什么是JdbcTemplate?
Spring 框架对 JDBC 进行封装,使用 JdbcTemplate 更加方便实现对数据库操作。
准备工作:
- 相关jar包:

-
在Spring配置文件中配置数据库连接池:
<bean id="dataSource" class="com.alibaba.druid.pool.DruidDataSource" destroy-method="close"> <property name="url" value="jdbc:mysql:///user_db" /> <property name="username" value="root" /> <property name="password" value="root" /> <property name="driverClassName" value="com.mysql.jdbc.Driver" /> bean>- 1
- 2
- 3
- 4
- 5
- 6
- 7
-
配置JdbcTemplate对象,注入DataSource
<bean id="jdbcTemplate" class="org.springframework.jdbc.core.JdbcTemplate"> <property name="dataSource" ref="dataSource"/> bean>- 1
- 2
- 3
- 4
- 5
-
创建 service 类,创建 dao 类,在 dao 注入 jdbcTemplate 对象
首先在配置文件中开启组件扫描:
<context:component-scan base-package="com.xuan"/>- 1
然后创建类:
package com.xuan.dao; public interface BookDao { }- 1
- 2
- 3
- 4
package com.xuan.dao; import org.springframework.beans.factory.annotation.Autowired; import org.springframework.jdbc.core.JdbcTemplate; import org.springframework.stereotype.Repository; @Repository public class BookDaoImpl implements BookDao{ // 注入JdbcTemplate @Autowired private JdbcTemplate jdbcTemplate; }- 1
- 2
- 3
- 4
- 5
- 6
- 7
- 8
- 9
- 10
- 11
- 12
package com.xuan.service; import com.xuan.dao.BookDao; import org.springframework.beans.factory.annotation.Autowired; import org.springframework.stereotype.Service; @Service public class BookService { // 注入dao层 @Autowired private BookDao bookDao; }- 1
- 2
- 3
- 4
- 5
- 6
- 7
- 8
- 9
- 10
- 11
- 12
6.2 JdbcTemplate操作数据库
entity,Book类

6.2.1 增、删、改
编写service与dao,在dao进行数据库添加操作;调用JdbcTemplate对象里面update()方法法实现添加操作。更新、修改都差不多,这里不进行演示。
@Override public void addBook(Book book) { String sql = "insert into t_book values(?, ?, ?)"; int affectRow = jdbcTemplate.update(sql, book.getBookId(), book.getBookName(), book.getBookStatus()); System.out.println(affectRow); } @Override public void delBook(String bookId) { String sql = "delete from t_book where book_id = ?"; int update = jdbcTemplate.update(sql, bookId); System.out.println(update); } @Override public void updateBook(Book book) { String sql = "update t_book set book_name = ?, boo_status = ? where book_id = ?"; int update = jdbcTemplate.update(sql, book.getBookName(), book.getBookStatus(), book.getBookId()); System.out.println(update); }- 1
- 2
- 3
- 4
- 5
- 6
- 7
- 8
- 9
- 10
- 11
- 12
- 13
- 14
- 15
- 16
- 17
- 18
- 19
- 20
测试:
@Test public void updateBook(){ ApplicationContext context = new ClassPathXmlApplicationContext("bean.xml"); BookService bookService = context.getBean("bookService", BookService.class); // 添加数据 // bookService.addBook(new Book("tushu550", "Java核心卷1", 1)); // 修改数据 // bookService.updateBook(new Book("tushu550", "Java核心卷2", 2)); // 删除数据 bookService.delBook("tushu550"); }- 1
- 2
- 3
- 4
- 5
- 6
- 7
- 8
- 9
- 10
- 11
- 12
- 13
6.2.2 查询返回某个特定类型的值
如,select count(*) from t_book;查询图书数量;
函数,queryForObject(String sql, Class requiredType);
- sql, 表示执行的sql;
- requiredType,表示返回类型的Class,如返回整型,Integer.class;
public void NumberOfBook() { String sql = "SELECT COUNT(*) FROM t_book"; Integer integer = jdbcTemplate.queryForObject(sql, Integer.class); System.out.println(integer); }- 1
- 2
- 3
- 4
- 5
6.2.3 查询返回对象
通常用在查询图书详细信息的时候。
函数,queryForObject(String sql, RowMapper rowMapper, Object… args);
-
sql,要执行的sql语句;
-
RowMapper 是接口,针对返回不同类型数据,使用这个接口里面实现类完成
数据封装;
-
args,可变参数,通常用为sql语句中的 ? 号指定值;
public Book queryBookInfo(String bookId) { String sql = "select * from t_book where book_id = ?"; return jdbcTemplate.queryForObject(sql, new BeanPropertyRowMapper<>(Book.class), bookId); }- 1
- 2
- 3
- 4
6.2.4 查询返回集合
通常用在查询图书列表、分页的场景。
函数,query(String sql, RowMapper rowMapper, Object… args);
-
sql,要执行的sql语句;
-
RowMapper 是接口,针对返回不同类型数据,使用这个接口里面实现类完成
数据封装;
-
可变参数,通常用为sql语句中的 ? 号指定值;
public List<Book> allBookInfo() { String sql = "select * from t_book"; return jdbcTemplate.query(sql, new BeanPropertyRowMapper<>(Book.class)); }- 1
- 2
- 3
- 4
6.3 批量操作
批量操作,即操作表里面多条记录; 这里使用批量添加操作演示;
函数,batchUpdate(String sql, List
- sql,要执行的sql语句;
- batchArgs,List 集合,添加多条记录数据;
public void batchUpdate(List<Object[]> batchArgs) { String sql = "insert into t_book values(?, ?, ?)"; int[] batchUpdate = jdbcTemplate.batchUpdate(sql, batchArgs); System.out.println(Arrays.toString(batchUpdate));; }- 1
- 2
- 3
- 4
- 5
测试,
// 批量插入图书 List<Object[]> bookList = new ArrayList<>(); Object[] o1 = {"tushu5510", "Python数据可视化实战", "2"}; Object[] o2 = {"tushu5511", "Python Django开发", "2"}; Object[] o3 = {"tushu5512", "Python Flask Web开发", "2"}; bookList.add(o1); bookList.add(o2); bookList.add(o3); bookService.batchUpdate(bookList);- 1
- 2
- 3
- 4
- 5
- 6
- 7
- 8
- 9
6.4 事务控制
什么是事务?
事务是数据库操作最基本单元,逻辑上属于一组操作,要么都成功,如果有一个失败则所有操作都失败;典型的应用场景就是转账:
lucy 转账 100 元 给 mary lucy 少 100,mary 多 100- 1
- 2
事务的四大特性(ACID):
- 原子性;
- 一致性;
- 隔离性;
- 持久性;
6.4.1 环境搭建

-
在数据库中添加两条记录;
INSERT INTO t_user(username, money) VALUES('Lucy', 1000),('Mary', 1000);- 1
-
创建service,dao,完成对象的创建与注入关系;即在service中注入dao,在dao中注入JdbcTemplate,在JdbcTemplate中注入DataSource;
package com.xuan.dao; public interface UserDao { /** * 少钱的方法; */ void reduceMoney(); /** * 多钱的方法; */ void addMoney(); }- 1
- 2
- 3
- 4
- 5
- 6
- 7
- 8
- 9
- 10
- 11
- 12
- 13
- 14
package com.xuan.dao; import org.springframework.beans.factory.annotation.Autowired; import org.springframework.jdbc.core.JdbcTemplate; import org.springframework.stereotype.Repository; @Repository public class UserDaoImpl implements UserDao { // 注入JdbcTemplate @Autowired private JdbcTemplate jdbcTemplate; /* 模拟 Lucy 给 Mary 转一百块钱。 */ @Override public void reduceMoney() { String sql = "update t_user set money = money - ? where username = ?"; jdbcTemplate.update(sql, 100, "Lucy"); } @Override public void addMoney() { String sql = "update t_user set money = money + ? where username = ?"; jdbcTemplate.update(sql, 100, "Mary"); } }- 1
- 2
- 3
- 4
- 5
- 6
- 7
- 8
- 9
- 10
- 11
- 12
- 13
- 14
- 15
- 16
- 17
- 18
- 19
- 20
- 21
- 22
- 23
- 24
- 25
- 26
- 27
package com.xuan.service; import com.xuan.dao.UserDao; import org.springframework.beans.factory.annotation.Autowired; import org.springframework.stereotype.Service; @Service public class UserService { // 注入UserDao @Autowired private UserDao userDao; public void accountTest(){ // Lucy 给 Mary 转 100 userDao.reduceMoney(); // Mary 收到 Lucy 的 100 userDao.addMoney(); } }- 1
- 2
- 3
- 4
- 5
- 6
- 7
- 8
- 9
- 10
- 11
- 12
- 13
- 14
- 15
- 16
- 17
- 18
- 19
- 20
- 21
<context:component-scan base-package="com.xuan"/> <bean id="dataSource" class="com.alibaba.druid.pool.DruidDataSource" destroy-method="close"> <property name="url" value="jdbc:mysql:///guigu_bookdb" /> <property name="username" value="root" /> <property name="password" value="root" /> <property name="driverClassName" value="com.mysql.jdbc.Driver" /> bean> <bean id="jdbcTemplate" class="org.springframework.jdbc.core.JdbcTemplate"> <property name="dataSource" ref="dataSource"/> bean>- 1
- 2
- 3
- 4
- 5
- 6
- 7
- 8
- 9
- 10
- 11
- 12
- 13
- 14
- 15
- 16
-
测试
@Test public void t1(){ ApplicationContext context = new ClassPathXmlApplicationContext("bean.xml"); UserService userService = context.getBean("userService", UserService.class); userService.accountTest(); }- 1
- 2
- 3
- 4
- 5
- 6
上面代码,如果正常执行没有问题的,但是如果代码执行过程中出现异常,则会出现问题。
public void accountTest(){ // Lucy 给 Mary 转 100 userDao.reduceMoney(); // 模拟网络异常 int i = 1/0; // Mary 收到 Lucy 的 100 userDao.addMoney(); }- 1
- 2
- 3
- 4
- 5
- 6
- 7
- 8
- 9
- 10
上面的问题如何解决呢?
这里使用事务控制进行解决。

6.4.2 Spring事务管理介绍
- 在JavaEE三层结构中,事务一般是添加在Service层(业务逻辑层);
- 在Spring中进行事务管理操作,有两种方式:
- 编程式事务管理,如上面那种图,就是编程式管理的典型例子;
- 声明式事务管理(推荐使用);
声明式事务管理:
- 基于注解方法(推荐使用);
- 基于xml配置文件方式;
在Spring中进行声明式事务管理的底层使用了AOP原理。
Spring事务管理API,这个AIP提供了一个接口,代表事务管理器,这个接口针对不同的框架提供不同的实现类。

6.2.3 声明式事务管理(注解)
-
在Spring配置文件中配置事务管理器;
<bean id="transactionManager" class="org.springframework.jdbc.datasource.DataSourceTransactionManager"> <property name="dataSource" ref="dataSource"/> bean>- 1
- 2
- 3
- 4
- 5
-
在配置文件中开启事务注解;
引入名称空间:
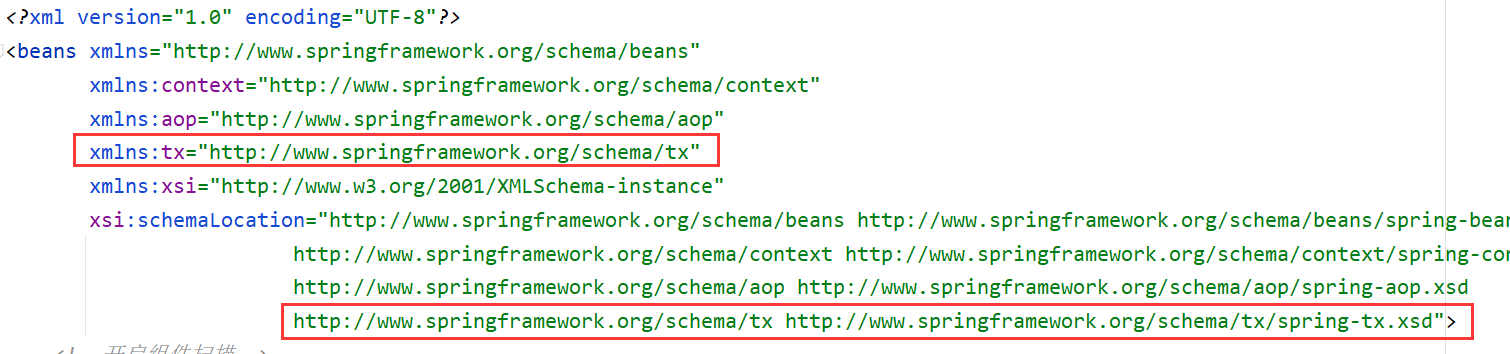
开启事务注解:
<tx:annotation-driven transaction-manager="transactionManager"/>- 1
- 2
-
在Service类上面(或者Service类里面的方法上)添加事务注解;
- @Transactional,这个注解可以添加到类上面,也可以添加到方法上面;
- 如果把这个注解添加类上面,则这个类里面所有的方法都会被添加事务;
- 如果把这个注解添加方法上面,则这个方法会被添加事务;
@Service @Transactional // 使用声明式注解 public class UserService {}- 1
- 2
- 3
补充: 这里使用事务管理后,当模拟网络的异常时,如果事务不能进行回滚,解决思路是去看一下数据库中对应表的索引。如果对应表使用的索引是MyISM,则应该换成InnoDB,详细请看:连接.
6.2.4 声明式事务管理参数配置
在Service类上面添加注解@Transactional,在这个注解里面可以配置相关的参数。

**1. propagation:**事务传播行为,当一个事务的方法被另外一个事务的方法调用时候,这个事务方法如何进行 。

REQUIRED:

REQUIRED_NEW:

SUPPORTS:

@Transactional(propagation = Propagation.REQUIRED)- 1
2. ioslation: 事务隔离级别
事务中有一个特性,这个特性交隔离级别,多事务操作之间不会产生影响。如果不考虑事务的隔离性,则会产生很多的问题。主要有三大问题:
- 脏读:一个未提交事务读取到另一个未提交事务的数据,通常都与事务的回滚有关;
- 不可重复读:一个未提交事务读取到另一提交事务修改的数据;
- 幻读;一个未提交事务读取到另一提交事务添加的数据;
通过设置事务的隔离级别可以解决以上的问题。
脏读 不可重复读 幻读 READ UNCOMMITTED(读未提交) 有 有 有 READ COMMITTED(读已提交) 无 有 有 REPEATABLE READ(可重复读) 无 无 有 SERIALIABLE(串行化) 无 无 无 @Transactional(isolation = Isolation.READ_COMMITTED)- 1
3. timeout: 超时时间
事务需要在一定的时间内进行提交,如果不提交该事务则会回滚。timeout的默认值是 -1 ,设置时间以秒单位进行计算。
5. readOnly: 是否只读
读通常对应于数据库的查询操作,写对应于数据库的添加、修改、删除操作。readOnly 默认值 false,表示可以进行CRUD操作,如果设置 readOnly 值为 true,则只能进行查询。
6. rollbackFor: 回滚
设置当程序出现哪些异常时,进行事务的回滚。
7. noRollbackFor: 不回滚
设置当程序出现哪些异常时,不进行事务的回滚。
6.2.5 XML声明式事务管理
在Spring配置文件中进行声明式事务管理配置。
- 配置事务管理器;
- 配置通知;
- 配置切入点和切面;
<bean id="transactionManager" class="org.springframework.jdbc.datasource.DataSourceTransactionManager"> <property name="dataSource" ref="dataSource"/> bean> <tx:advice id="txAdvise"> <tx:attributes> <tx:method name="accountTest" propagation="REQUIRED" timeout="20" rollback-for="java.lang.Exception"/> tx:attributes> tx:advice> <aop:config> <aop:pointcut id="p" expression="execution(* com.xuan.service.UserService.*(..))"/> <aop:advisor advice-ref="txAdvise" pointcut-ref="p"/> aop:config>- 1
- 2
- 3
- 4
- 5
- 6
- 7
- 8
- 9
- 10
- 11
- 12
- 13
- 14
- 15
- 16
- 17
- 18
- 19
- 20
- 21
- 22
- 23
- 24
- 25
6.2.6 完全注解实现声明式事务管理
package com.xuan.config; import com.alibaba.druid.pool.DruidDataSource; import org.springframework.context.annotation.Bean; import org.springframework.context.annotation.ComponentScan; import org.springframework.context.annotation.Configuration; import org.springframework.jdbc.core.JdbcTemplate; import org.springframework.jdbc.datasource.DataSourceTransactionManager; import org.springframework.transaction.annotation.EnableTransactionManagement; import javax.sql.DataSource; @Configuration // 标记为配置类 @ComponentScan("com.xuan") // 组件扫描 @EnableTransactionManagement // 开启事务 public class TxConfig { // 创建数据库连接池 @Bean // 这个注解对应于配置文件中的bean标签 public DruidDataSource getDruidDataSource(){ DruidDataSource dataSource = new DruidDataSource(); dataSource.setDriverClassName("com.mysql.jdbc.Driver"); dataSource.setUrl("jdbc:mysql:///guigu_bookdb"); dataSource.setUsername("root"); dataSource.setPassword("root"); return dataSource; } /** * 创建JdbcTemplate对象 * @param dataSource DataSource源,巧妙思想:直接让Spring到ioc容器中去寻找对应的类型。 * @return JdbcTemplate对象。 */ @Bean public JdbcTemplate getJdbcTemplate(DataSource dataSource){ // 到ioc容器中根据类型找到dataSource进行注入 JdbcTemplate jdbcTemplate = new JdbcTemplate(); // 注入dataSource jdbcTemplate.setDataSource(dataSource); return jdbcTemplate; } // 创建事务管理器 @Bean public DataSourceTransactionManager getDataSourceTransactionManager(DataSource dataSource){ DataSourceTransactionManager transactionManager = new DataSourceTransactionManager(); transactionManager.setDataSource(dataSource); return transactionManager; } }- 1
- 2
- 3
- 4
- 5
- 6
- 7
- 8
- 9
- 10
- 11
- 12
- 13
- 14
- 15
- 16
- 17
- 18
- 19
- 20
- 21
- 22
- 23
- 24
- 25
- 26
- 27
- 28
- 29
- 30
- 31
- 32
- 33
- 34
- 35
- 36
- 37
- 38
- 39
- 40
- 41
- 42
- 43
- 44
- 45
- 46
- 47
- 48
- 49
- 50
7. Spring5框架新特性
整个 Spring5 框架的代码都是基于 Java8,运行时兼容 JDK9**,**许多不建议使用的类和方法在代码库中删除。
7.1 核心特性
7.1.1 日志
Spring 5.0 框架自带了通用的日志封装:
- Spring5 已经移除 Log4jConfigListener,官方建议使用 Log4j2;
- Spring5 框架整合 Log4j2;
第一步,引入jar包

第二步 创建 log4j2.xml 配置文件
<configuration status="INFO"> <appenders> <console name="Console" target="SYSTEM_OUT"> <PatternLayout pattern="%d{yyyy-MM-dd HH:mm:ss.SSS} [%t] %-5level %logger{36} - %msg%n"/> console> appenders> <loggers> <root level="info"> <appender-ref ref="Console"/> root> loggers> configuration>- 1
- 2
- 3
- 4
- 5
- 6
- 7
- 8
- 9
- 10
- 11
- 12
- 13
- 14
- 15
- 16
- 17
- 18
- 19
- 20
7.2 核心容器
7.2.1 @Nullable注解
@Nullable 注解可以使用在方法 / 属性 / 参数上面,表示方法的返回值 / 属性值 / 参数值可以为空;
7.2.2 函数式风格
分别有这两个:GenericApplicationContext/AnnotationConfigApplicationContext,下面使用GenericApplicationContext进行演示。
/* 函数式风格,可以理解为λ表达式。 函数式风格创建的对象,可以交给 spring 进行管理。 */ @Test public void testGenericApplicationContext(){ // 1. 创建GenericApplicationContext对象 GenericApplicationContext context = new GenericApplicationContext(); // 2. 调用context的方法去注册对象 context.refresh(); context.registerBean("u1", User.class, () -> new User()); // 3. 获取在Spring中注册的u1对象 /* 第一种,如果在registerBean中没有指定beanName的值。则使用包类全名; 第二种,如果指定了beanName的值,则使用指定的值进行获取; */ User u1 = context.getBean("u1", User.class); System.out.println(u1); }- 1
- 2
- 3
- 4
- 5
- 6
- 7
- 8
- 9
- 10
- 11
- 12
- 13
- 14
- 15
- 16
- 17
- 18
- 19
- 20
7.2.3 整合JUnit5
整合Junit4:
第一步,引入Spring相关针对测试的依赖

如果是整合Junit4,则Junit4的相关依赖也要进行引入:

第二步,创建测试类,使用注解方式完成
package com.xuan.test; import com.xuan.service.UserService; import org.junit.Test; import org.junit.runner.RunWith; import org.springframework.beans.factory.annotation.Autowired; import org.springframework.test.context.ContextConfiguration; import org.springframework.test.context.junit4.SpringJUnit4ClassRunner; /** * Spring整合Junit4. */ @RunWith(SpringJUnit4ClassRunner.class) @ContextConfiguration("classpath:bean1.xml") // 相当于是加载配置文件 public class JTest4 { // 自动注入UserService类 @Autowired private UserService userService; @Test public void jT1(){ userService.accountTest(); } }- 1
- 2
- 3
- 4
- 5
- 6
- 7
- 8
- 9
- 10
- 11
- 12
- 13
- 14
- 15
- 16
- 17
- 18
- 19
- 20
- 21
- 22
- 23
- 24
整合Junit5:
第一步,引入 JUnit5 的 jar 包

第二步,创建测试类,使用注解完成
package com.xuan.test; import com.xuan.service.UserService; import org.junit.jupiter.api.Test; import org.junit.jupiter.api.extension.ExtendWith; import org.springframework.beans.factory.annotation.Autowired; import org.springframework.test.context.ContextConfiguration; import org.springframework.test.context.junit.jupiter.SpringExtension; /** * 整合Junit5. */ @ExtendWith(SpringExtension.class) @ContextConfiguration("classpath:bean1.xml") public class JTest5 { @Autowired private UserService userService; @Test public void t1(){ userService.accountTest(); } }- 1
- 2
- 3
- 4
- 5
- 6
- 7
- 8
- 9
- 10
- 11
- 12
- 13
- 14
- 15
- 16
- 17
- 18
- 19
- 20
- 21
- 22
- 23
- 24
- 25
@ExtendWith(SpringExtension.class) @ContextConfiguration("classpath:bean1.xml") // 也使用复合注解代替上面的两个注解 @SpringJUnitConfig(locations = "classpath:bean1.xml") <appender-ref ref="Console"/> </root> </loggers> </configuration>- 1
- 2
- 3
- 4
- 5
- 6
- 7
- 8
- 9
-
相关阅读:
HTTP发起请求与收到响应的大致过程
CatFly【汇编代码还原】
尚好房 12_redis缓存与AOP
Springboot毕设项目个人理财系统0l4c1(java+VUE+Mybatis+Maven+Mysql)
【LeetCode】恢复二叉搜索树 [M](Morris遍历)
Windows权限维持
Mongo基础笔记
【Data Mining】Introduction
【超简便的Python】 提取两个列表的共同元素
云原生FAQ
- 原文地址:https://blog.csdn.net/Hello_super/article/details/126111592
